Program for creating CDs. How to burn files to disk
To date, the use of CD, DVD and other disk media is still relevant for the implementation of various tasks. Gradually CD and DVD disc and will replace flash drives, since they can already be connected to a TV and to various audio / DVD players, viewing and listening to the desired content directly from flash drives!
But it is still convenient to use CD / DVD discs, for example: for burning boot programs, for burning movies in DVD format (if it is not convenient to watch on a computer, and the TV and DVD player do not support flash drives), for burning audio CDs (if again, your player does not provide for connecting flash drives), and also in some cases for simple file storage. True, the latter is hardly necessary for anyone ...
And since the use of such storage media as CDs and DVDs still makes sense and in some situations you can’t even do without them, I decided to tell you how you can record various kinds of information on them: music, DVD movies, and images of boot programs!
For example, I still use CDs and DVDs primarily for burning boot programs. Let me explain ... The boot program is the one that will be loaded on the computer even before the operating system starts. Basically, these are utility programs, for example, for partitioning hard drive partitions, virus scans, launching various tools Reserve copy and recovery, launching the Live operating system (the one through which there is a graphical full access to all your files on your computer and serves to perform some tasks of restoring, copying, repairing the current system).
When writing flash drives often arise various problems. Either the computer for some reason does not load the program from the USB flash drive, or the program itself is not written correctly to the USB flash drive, so that later it can work as a bootable one. And the disk will always work, and most importantly, that it does not have physical damage and that's it. Recorded quickly and do not suffer later with the download :)
There are many programs for burning discs. There are both paid and free ones. The use of paid programs for banal recording of discs, in general, I consider it unreasonable, since all these simple functions also available for free!
I will select 2 good programs: ImgBurn and AshampooBurningStudio FREE. The former has more customization options, but the interface is less for a beginner. And the second is extremely understandable and, perhaps, any computer user will figure it out. Here, using her example, I will now demonstrate the possibility of recording various types CD/ DVD discs…
Let's start by installing the program.
Installing Ashampoo Burning Studio FREE.
The first step is to download the program. And I strongly recommend that you always do this from the official website of the developer, otherwise you risk running into an installer containing various viruses, ransomware and other rubbish.
ashampoo.com
On this page, we go down a little to the AshampooBurningStudio FREE line and click the "Download" button on the right:
The size of the program installer is within 30-35 MB, which is quite a bit.
How will it open new page, after a few seconds, the program will start downloading to your computer, after which you can run the downloaded file and proceed with the installation:
First of all, the program prompts you to select the installation language. The default is already "Russian", so just click "OK":
In the next window, accept license agreement by clicking "I agree, continue":
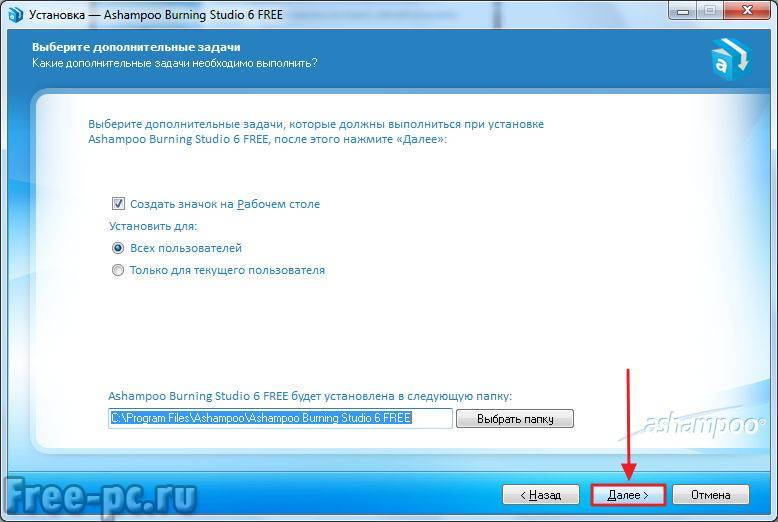
Next, you are given the opportunity to change the path for installing the program, but I recommend leaving the one that will be set by default. You can also enable/disable the creation of a shortcut on the desktop after installation and choose for which users this program will be available through the Start menu (only for you or for everyone). The last setting makes no sense as such, since the program can still be run from any user, unless, of course, the rights are configured through some other means.
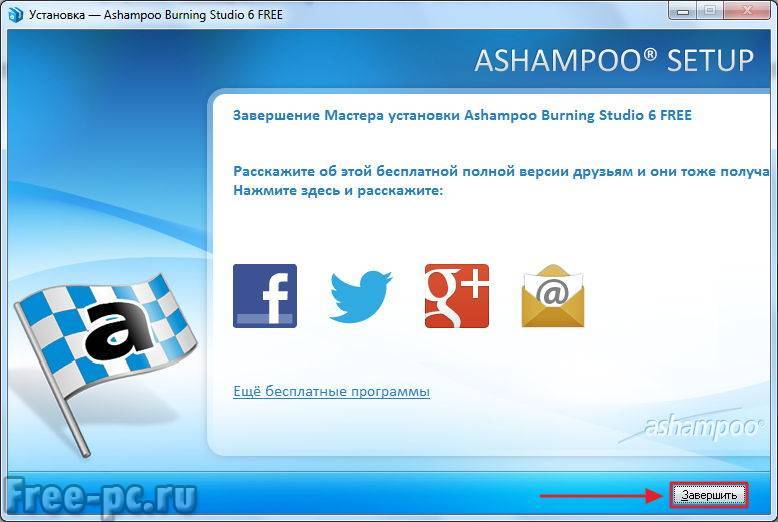
If in the last window there was a checkmark "Run AshampooBurningStudio FREE", then the program will start immediately.
Let's get started with the program!
Working with Ashampoo Burning Studio FREE!
At the time of launching the program, its official website may open, which you just need to close.
Immediately after launch, a window will appear about activating your full free license. Click the "Continue" button below:
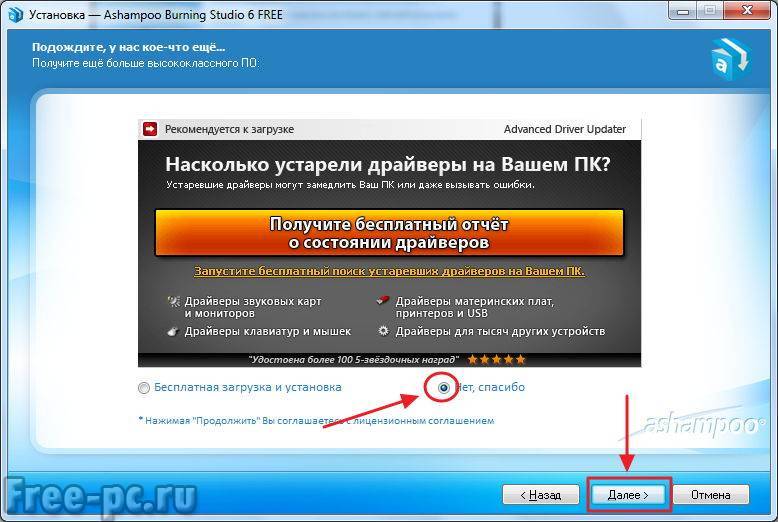
Further, another window with an advertising offer may immediately appear. Since the program is completely free, when working with it, you may occasionally see ads like the one in the image below. Just close it with the "Close" button or the "No, thanks" button:
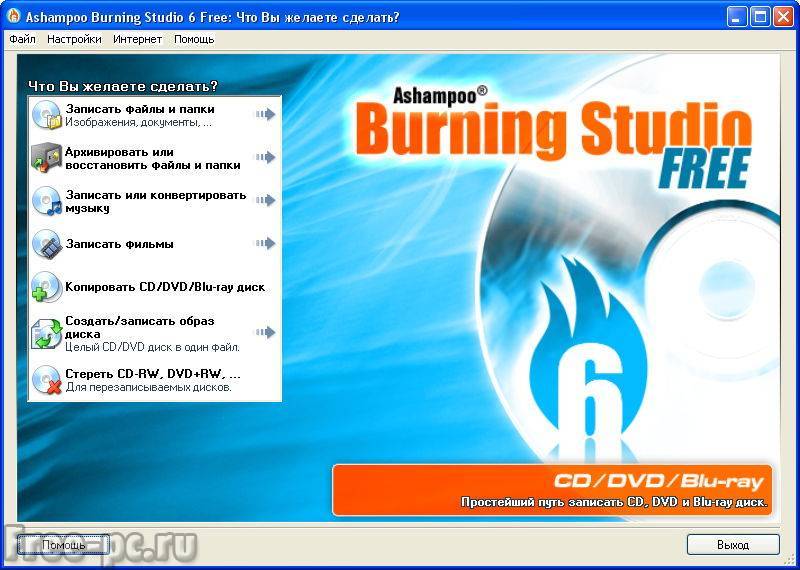
So, we see such a program interface:
There are several sections for burning various types of discs, everything is simple and clear.
To begin with, let's consider, in my opinion, the most important thing - how to burn an image with a boot program to disk.
We write the bootable version of the program to disk!
A boot program designed to be written to a disk is usually a single file, which is called an image.
The image file usually has one of the following formats: ISO, CUE, BIN. These are the main formats. There are, of course, others, but they are less common.
And, suppose you downloaded the bootable version of the antivirus in order to check your computer for various threats as thoroughly as possible, even before Windows startup, which will give greater efficiency of the check.
Here is the file to write for an example:
As you can see, it has the ISO extension and was downloaded from the official site of Kaspersky Anti-Virus.
Burning such a disc is very easy!
To do this, move the mouse cursor over the "Disk Image" section and select "Burn Image":
In the next window, click "Browse" and select through the usual explorer windows file with the image of the desired program:
The next window will check the disk. Since we have not inserted the disk yet, we will see a message that it is not in the drive:
We insert the disk and wait until the information in the window is updated.
Note. If you suddenly have several drives connected to your computer, you need to select the one into which you inserted the disc. It is selected in the "CD / DVD drive" list, as shown in the image above.
Keep in mind that you can use both CDs and DVDs for recording. The choice depends on the size of the recorded data. Any boot program (if the program is one, and not an assembly), is unlikely to have a size of more than 700 MB, which is exactly how much a simple CD can contain.
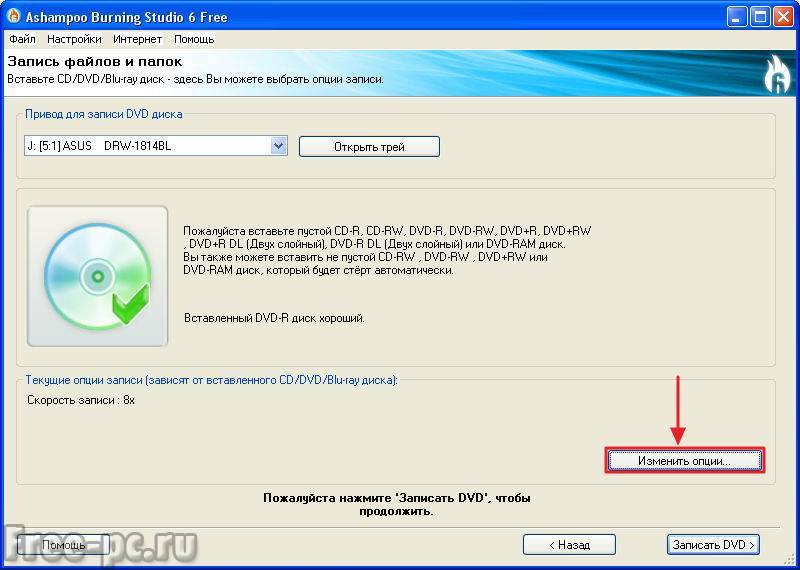
After the window receives the message "Inserted CD-R is good” (instead of “CD-R” your disc type will be displayed: CD-R, CD-RW, DVD or DVD-RW), you can move on by clicking the “Burn CD” button at the bottom right:
We do not need the "Advanced Settings" button.
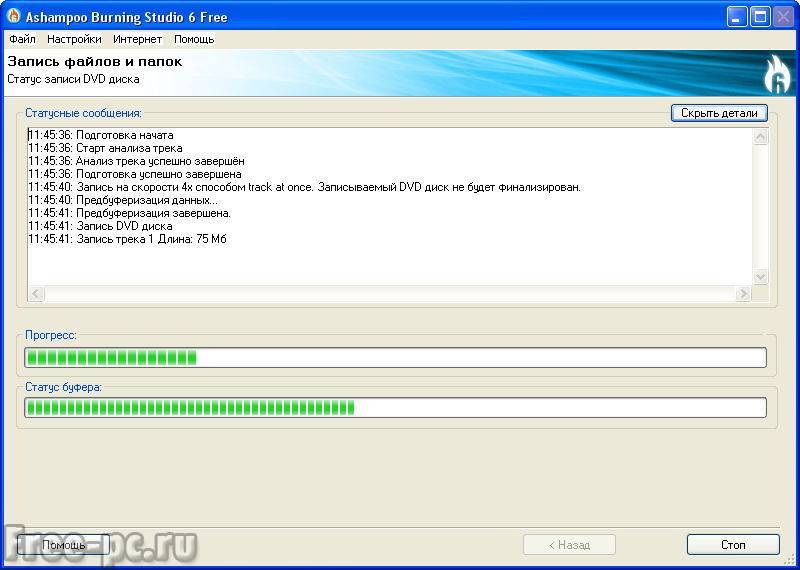
The following window will open and the file will be written to disk immediately:
ATTENTION!
Do not interrupt the recording of the disc, do not press the "Stop" button, because this may damage your disc!
After waiting for the end of the recording, you will receive a message in a small window about the successful completion of the operation, where you need to click "OK":
Options will be available below. further action. We need to return to the main menu, so we press the corresponding button:
That's all! Image boot program written to disk and now you can boot from it and use it!
I will talk about what the BIOS is and how to configure it to boot from disk in a separate article of mine a little later.
So, we recorded the boot disk with the program. Let's go ahead and look at how to burn a movie and music disc...
We burn a disc with a movie or music!
The principle of recording each of the file formats through this one is similar to each other. Now let's look at how to burn a disc with a movie. In the example, I will show the recording of a DVD video.
Burning a disc with a DVD movie.
To record this type of disc, open the corresponding section "Video" and select "VideoDVD disc from folder":
You will also see others possible options burning video to a disc, such as "VideoCD". This format makes sense if the video is very small and will fit on a CD.
Let's move on to the settings window, where first of all it is possible to specify the name of the DVD itself. You can write anything here and some DVD players will display this name on the panel. Next, through the "Browse" button, select the folder with the movie on the computer.
A DVD movie usually consists of 2 folders "AUDIO_TS" and "VIDEO_TS". There may not be an "AUDIO_TS" folder at all, so if there is only one folder, it's okay! You need to specify the path exactly to the "VIDEO_TS" folder.
Now you need to insert a blank DVD disc into the drive and wait until the information is updated. If the drive is not displayed, you may need to select a different drive (). Then click the "Burn DVD" button:
Next, the recording process will begin, after which you will receive a completion message and suggestions for further actions. More I told when I talked about the record boot disk with the program. Everything is similar here.
After 20 minutes (depending on the volume) the disc will be recorded, after which it can be viewed on any DVD player. This is in case it is not convenient on the computer (for example, a small screen), and TVs and DVD players do not support the ability to connect a flash drive with a movie.
If you can connect a flash drive with a video file to a TV or DVD player or a computer has big screen, where it will be convenient to watch a movie, then there is no point in burning a disc from a DVD video :)
There is also nothing difficult in recording a disc with music ...
Recording a disc with music.
The main music format is MP3. In this format, you can fill a hundred songs on just one CD :) Also, sometimes they still use a simple format - AudioCD. The difference is that only 80 minutes of music will fit on it (usually 10-15 tracks), but such a disc can be played perfectly on any audio player, while an MP3 disc cannot be listened to on a player that does not support MP3, respectively.
Today, most modern players also support the connection of flash drives, which eliminates the need to burn discs with music. I downloaded the necessary songs onto a USB flash drive, plugged it into the player in the car or somewhere else and listened calmly :)
But still, not everyone has the opportunity to connect flash drives and listen to music from them. In such a case, I tell you how to burn a disc with music!
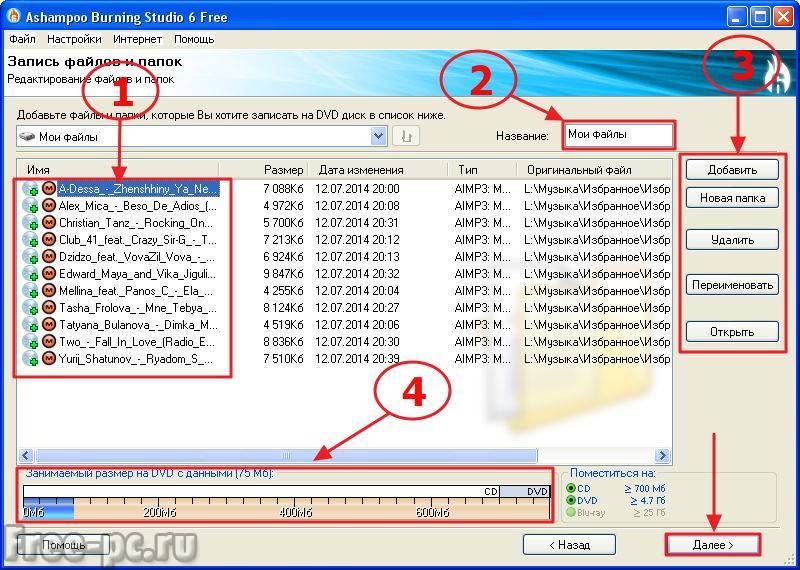
So, to record music, you need to go to the "Music" section in the program and select the desired disc format:
I circled the main ones in the image above.
In the next window, you need to use the "Add" button to select the music files from the computer that you want to burn to disk:
On the this example I chose to burn a simple audio disc, so you can see the timeline at the bottom. If you are writing such a disc (which will be perfectly readable on any player), then make sure that the number of recorded minutes does not exceed 80! After all the songs have been added, you can delete something unnecessary with the corresponding "Delete" button or continue recording.
If you are burning an MP3 disc, then instead of the minutes scale, there will be a scale with the amount of data in megabytes at the bottom, as in the example below:
Let me remind you that for a CD disc, you can record a maximum of 700 MB. If you add so many songs that the volume exceeds 700 MB, then the program will automatically switch to MP3 DVD burning mode and the scale will change its appearance to the size of a DVD disc (which will fit 4.7 GB of data):
DVDMP3 will also play successfully on MP3 players.
After selecting all the songs (regardless of the disc variant) and clicking "Next", you will be taken to the verification window for the inserted disc, from which you will proceed directly to the burning process. I have already read more about these steps and in this case there will be no differences.
So we considered the principle of recording music and video on a disk.
And now let's look at the last possibility that may come in handy for someone - burning a disk with any data.
Burn a disc with any files!
In addition to special formats such as DVD video, disc image burning, and others, you can burn a disc with mixed content. For example, you can burn a number of folders with documents, pictures and videos to disk and give them to someone for viewing.
In general, such a function today, I think, is no longer relevant at all. Almost anything and any amount of data can be transferred over the Internet. Small files are sent by mail, via social networks and chats, and large (and small documents too) can be uploaded to online disk storage and provide a link to anyone to view and download them.
What are online storages and how to use them I told in the article:
In extreme cases, the files can be copied to a flash drive, USB or external USB hard drive.
If you just need to store data, and not transfer it to someone, then it would also be very strange to use a disk for this today :) In the same way, it is easier to upload all the data to online disks and keep a copy on a second hard disk.
But still, someone else may need to burn a disc with mixed content, so I decided to touch on this point anyway ...
A simple data disc can be burned without using third party programs, right through windows explorer. To do this, insert desired disk into the drive, select it through the "My Computer" window, mark the type of information being written and click "Next". Example:
For writing data, it is best to select the USB Flash Drive type, as in the image above.
And now it remains only to drag necessary files to disk!
There is no need to press any separate button to record. Having transferred all the necessary files to the window, the disk can be removed. However, it will be extracted after a few seconds, and not immediately, because Windows will perform a special write operation on it so that it can be read on other computers.
That's the whole process.
And through the program Ashampoo Burning Recording a Studio FREE data disc is just as easy.
You need to select the "Write data" section and the "New disk" item:
A window will open where you need to add all those files and folders that you want to burn to disk. To do this, click "Add" and select files through the opened Windows Explorer:
The scale at the bottom shows the amount used and in general - how much you can write to disk. To proceed to the recording, click "Next".
And then there is a window with checking the inserted disk, after which the recording itself takes place. I have already talked about all this above. So if you have a question, follow this link and read.
But most likely there will be no questions, since everything is intuitively clear :)
On this, we have considered the options for recording the main types of discs that you may still need today, despite their gradual replacement with flash drives.
I plan to write a separate article about writing programs to flash drives. Well, about recording ordinary files and music on a USB flash drive, there is nothing to tell :) I copied everything you need and you're done! :)
I hope the article will be useful for beginners ...
Good luck to you! All the best and keep in touch ;)
Files can be recorded from any computer or laptop with which . Writing data to disk is necessary for storing and transmitting information. CD/DVD discs are external storage devices due to their reliability, durability, high capacity and low cost. Recently, Flash drives or just USB flash drives have begun to gain popularity. But CD / DVD discs do not become obsolete and I think they will not become obsolete.
We will write files using the built-in tools of windows 7.
To burn files to disk, follow these steps in order.
Step 1 . First, insert a blank CD into your CD/DVD drive. If you are right for removable media, the following window will open autostart. In the blank DVD options section, click the link. If the autorun window does not appear, then open My Computer and in the section Devices with removable media double click Disk.

Step 2. A window will appear burn disc. Here you must specify Disc name and choose one of two disk usage options:
- As a USB flash drive.
- With CD/DVD player.
Select use as USB flash drive and click Further.

Hello dear reader of my blog. In a previous article, I told you in detail how you can. Today I want to tell you how to burn data to DVD disc. After all, many Windows users encounter a problem when they need to burn some data to a DVD disc and don't know how to do it. Can burn DVD disc with built-in Windows tools, but this feature doesn't work very well. Some of you will ask, what about a flash drive (flash drive) on which you can write files? Yes, you can also write to a USB flash drive, but what if you need to transfer files to another person? Do not give him a flash drive. Or do you need to make an archive of your data, photos, music and movies, but there is sorely not enough space on your hard drive? That's right, ordinary DVD discs (popularly called "blanks") will come to the rescue here.
So how do you burn files to a DVD disc? What is the best free program to do this? What are the formats of DVD discs? We will talk about this in this article. So let's go...
- What are the formatsDVDs?
- Installationprograms
- Sign up forDVD disc
- Updating an existingDVD disc
- Deleting data onDVD
What are the formatsDVDdisks?
At the beginning of the article I will tell you, dear readers of my blog, that in addition to DVD discs, there are also CDs or CD discs (CD-R, CD-RW) with a capacity of 700 MB, but since their volume is much less than the volume of a DVD disc and they slowly start disappear from sale, we will not consider them in this article.
DVD disc - digital multi-purpose disc - information carrier, made in the form of a disc. Physically exist in two sizes: 8 cm and 12 cm.
8 cm DVD discs - the volume on such discs is usually 1.46 GB (DVD-1) on a single layer and 2.66 GB (DVD-2) on a double layer disc. Due to their small size, these discs are easy to store in your pocket.
12 cm DVD discs - the volume on such discs is usually 4.70 GB (DVD-5) on a single layer and 8.54 GB (DVD-9) on a dual-layer disc.
There are also other disc formats (DVD-3, DVD-4, DVD-6, etc.), but due to their low prevalence, we will not consider them.
The letter (R) in the name of the disc says that the disc is for single use, the letter (RW) is rewritable, for reusable use.
In addition to differences in size and volume, DVD discs also differ in the recording format.
There are DVD-R or DVD-RW and DVD+R or DVD+RW formats. They differ in the recording standard and for the average user they have no differences. That “pluses”, that “backing tracks” are perfectly readable on all modern DVD devices. There are “fans” of both “plus” and “minus” tracks. For myself, I chose the plus sign format, as a more modern recording format.
InstallationprogramsAshampoo Burning Studio 6 FREE
Data on a DVD disc is best written with a disc burning program. But which program should you choose? There are a large number of paid and free programs for DVD recording disks, and the most popular among the free ones, I think, is " Ashampoo Burning Studio 6 FREE».
So, to install the program, go to the official website of the program, in the section " Downloads», ( www.ashampoo.com/en/usd/dld/0710/Ashampoo-Burning-Studio-6/ )
(you can click on the picture to enlarge it)

We select the place where to download the program and after downloading we launch this file (double-click). A window will appear in which you need to select a language and click " OK»

Press " I agree, continue»

We ignore the installation of additional software, click " No thanks" and " Further»
Program " AshampooBurningStudio 6FREE» will start to install
Click " Complete»
Sign up forDVDdisk
Program " AshampooBurningStudio 6FREE' should start automatically. If this does not happen, click on the program icon on the desktop
Launch the main window of the program
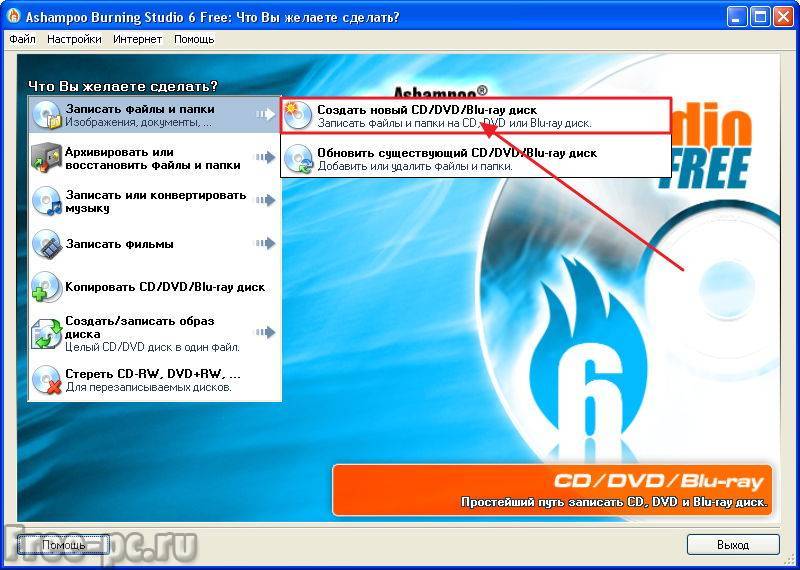
To write files and folders to blank disc DVD, click Burn files and folders", then " Create newCD/DVD/blue-ray disk»
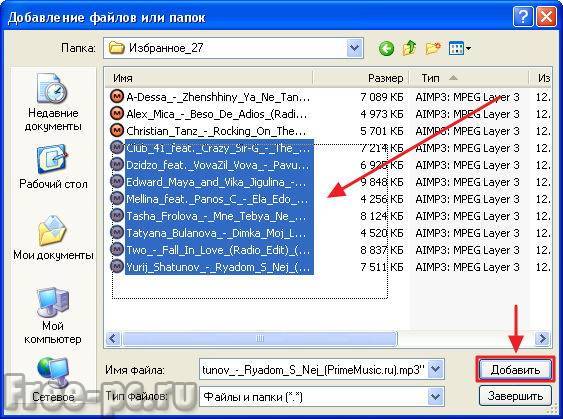
The BurningStudio program explorer will appear, click the “ Add»
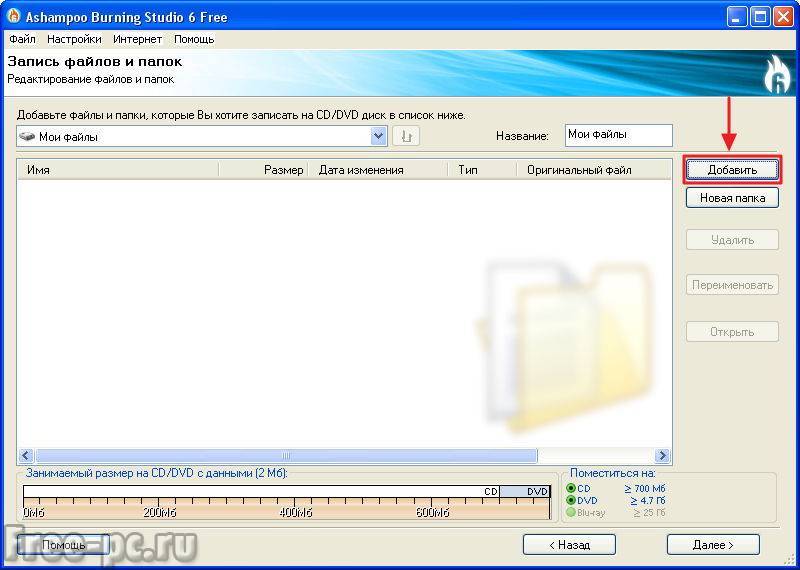
Highlight the files you want to burn to DVD and click " Add»
The selected files are added to the BurningStudio explorer, where we can perform various actions on them
- List of files prepared for burning to DVD
- Disc name
- Control buttons. Can add, delete and rename files
- DVD disc full status
Set the write speed. I usually set the minimum write speed to increase the chances of it being read on all devices. You can check the box Check recorded files and folders after recording” to check if the data is read from the DVD after it has been burned. Press " OK»

Press " burnDVD»

We see in a new window that the recording of data has begun on the DVD disc, showing the recording progress
When burning a DVD disc, it is advisable not to run any more programs on the computer, as the recording may “stumble” and you will spoil the “blank”
At the end of the recording, a message will appear indicating that the DVD has been successfully burned.

Updating an existingDVDdisk
When burning DVD-RW or DVD+RW discs, sometimes you need to add files to the DVD or delete some files. In this case, in the main window of the program, click on " Burn files and folders", then " Update existingCD/DVD/Blu-ray disk»
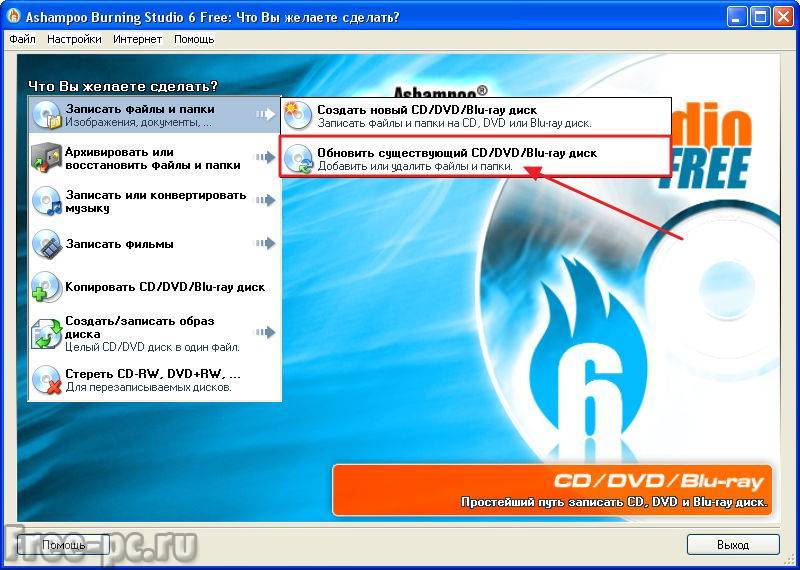
Insert the DVD disc on which you want to update the data into the DVD drive and click " Further»

The program explorer will appear with the existing files on the DVD. You can rename, delete, add new files. Then press " Further»

The rest of the steps are the same as described above.
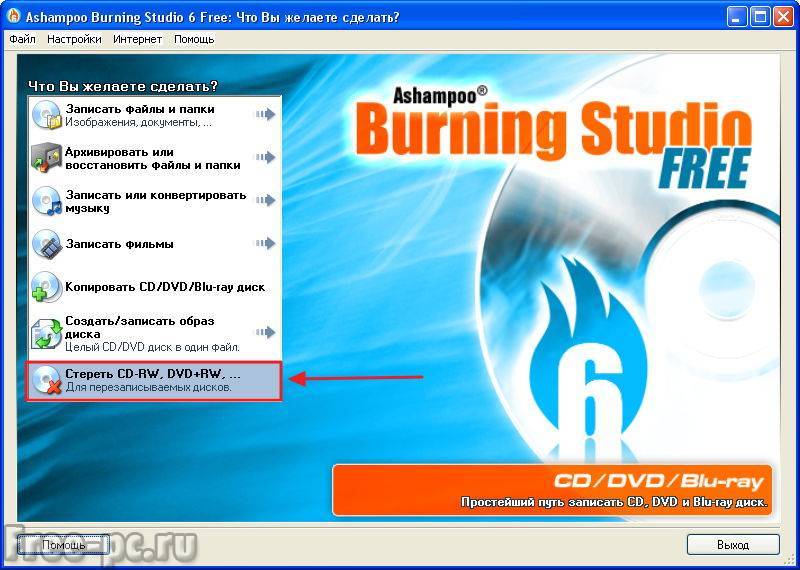
Deleting data onDVDdisk
Sometimes there are situations when a DVD+RW or DVD-RW needs to be cleared of data.
To do this, in the main window of the program, click on " EraseCD-rw,DVD+RW»
In everyday practice with a computer, sooner or later you will have to face the question: how to write files to disk. For example, I'll show you how to burn a disc on Windows 7 and Windows XP. This process is quite simple, but requires specialized knowledge in certain moments. I will try to tell you simply and clearly about the process of writing to a disk and its subtleties.
Today I will teach you how to burn various files and folders from your computer to ordinary blank CDs and DVDs. We will also talk with you about what types of discs are and how they differ from each other.
I will note right away that there is a way to write information to discs that does not involve the use of any program for recording. This method is good for its versatility. With it, you can write information to a blank disk without additional special programs and settings, in fact, on any computer.
You can also burn data to disk using the CDBurnerXP program, you can read a lesson on using it in my lesson "".
Unfortunately, this method has one very serious drawback - on computers with operating system Windows, this method can only write information to a CD. To burn DVD discs, you still need to install special program(Nero or similar). In this case, it will not work to write information to a DVD disc, given this fact, we will talk about this method in my future lessons.
What are discs
Discs (optical storage media) are divided into CDs and DVDs; these are plastic discs with a hole in the center. On them, with the help of a laser, information is written and read. Many people mistakenly believe that only cartoons and feature films can be recorded on DVDs, and everything else on CDs: text documents, photos, music. Of course, in reality this is not the case at all. CDs and DVDs differ mainly in the maximum size of the recorded information.Usually, a DVD disc contains five, and sometimes eight times more information than a conventional CD. Thus, if a CD can fit one movie that was not recorded in the high quality, then three, four (and even more) films can be recorded on an ordinary DVD disc, depending on their size and quality. Now it is very popular to sell licensed films on DVD discs. It is also possible to burn documents, music, photos and other files both on a DVD disc and on a CD disc.
There are also marks on disks: RW and R. The difference between such disks is that on a disk with R it is possible to write information only once. On a disk with RW information can be written not once, but many times. On such discs, information can be recorded, used, and then erased (if necessary) and recorded something else. Discs that can be written to many times are called multi-session discs.
Now we will take a closer look at two ways to burn to a blank CD: for Windows 7 and for Windows XP.
How to Burn Discs in Windows XP
Before I start telling you how to burn a disc on Windows 7, I'll first show you how to do it on Windows XP. First you need to insert empty disk CD into your computer's drive. Now you need to select the files and folders that you want to burn to a blank CD. To do this, copy them by clicking right click mouse over the files to be written.
After that, you need to open the disk, "My Computer" (Start -> Computer). Open the CD/DVD drive in it. You need to right-click on an empty space and click on the "Paste" item.
The folders and files that have been copied will appear on the disk. This does not mean at all that the files and folders have already been written to this empty disk. To write these folders and files to a blank disk, you need to right-click on an empty space open window, and then select "Burn files and folders to CD" from the list that appears.
The CD Burner window opens. Here you can type your chosen name for your disc in the CD Name field, although this is completely optional.
When your disc is burned (the green bar fills up and then disappears), a new window will automatically open in which you need to click the "Finish" button. After that, the recorded disc will automatically pop out of the drive. With this, the computer tells us that the recording on your disk has been successfully completed, and you can already use this disk.
How to erase a drive in XP
From the above, you understand how to burn a disc on Windows XP. But if you have recorded on RW discs, you can use it several times. I remind you that it is possible to erase information from a disk if it is reusable (multisession). Reusable discs have the inscription RW. If R is written on your disk (which means that it is disposable), then we will not be able to erase information from it for re-writing.
To do this, you must first insert your disc into the drive. Open the disk on the computer through "My Computer". Open the CD / DVD drive in it. Then right-click in an empty area of the window. Select "Erase this CD-RW" from the list. In the new window that opens, click the "Next" button. Wait for a while until all previously recorded information from the disc is erased. The moment this happens, the Done button appears. Click on it. That's all. Your disk is now clean. You can write anything to it again.
Burning a disc in Windows 7
This manual is intended for computer owners who want to understand how to burn files to disk in the Windows 7 operating system (OS).
I draw your attention to the fact that computers with operating Windows system Vista and Windows 7 can burn selected information to either DVD or CD.
Highlight the folders and files you want to burn to a blank disc. You need to copy them by clicking the right mouse button on any selected file or folder, selecting the "Copy" item from the list. Then insert a blank disc into the drive. You need to open "Computer" (Start -> Computer). Open the CD/DVD drive. You need to click on its image with the left mouse button twice. A small window will open. Now you need to select the disk type. There are 2 types of disc available - "With CD/DVD Player" and "As USB Flash Drive"( file system LFS). The first option - "With a CD / DVD player" - is considered a classic (as in Windows XP). It is quite suitable if you want to record music on your disc that you can listen to both on a computer and on a player. This option is not very convenient, but reliable - a disc recorded in this mode can be opened on any computer.
The second option is more convenient: you will have a disk that looks like a flash drive. You will be able to record folders and files by normal copying. You can erase from the disk by simple deletion.
Choose the disc type that suits you. Then click the "Next" button. If you chose the type "Like a flash drive", you will see a warning about the need to wait until the disk is prepared for burning. Now you need to click the "Yes" button. After the disk is prepared, the window will disappear, a new window will appear in which you will be prompted by the computer to open the folder in order to view the files.
If such a window does not appear, you need to open “Computer” again, then “CD / DVD drive”. An empty disk will open. Right-click on an empty space, then you need to click on the "Paste" item. After a while, all the folders and files you need will be added to the disk. The disc has been burned!
If the disc type is "With CD/DVD player", a blank disc will open.
Right-click on free space, then you need to click on the item "Insert". Now the files and folders you copied will be pasted onto the drive. This does not mean at all that the information has already been written to the disk. To burn these folders and files to an empty disk, right-click on the free space, select "Burn to Disc" from the list. In the "Burn to Disc" window that appears, you can type any name for your disc in the appropriate "Disc Name" field, although this is optional. The field "Recording speed", you need to choose at what speed the disc will be recorded, I usually record 16 x. Now click the "Next" button. We'll have to wait a bit until the disc is written. After the disc is written (the green bar fills up and disappears), a new window will open, here you need to click the "Finish" button. Before closing the CD/DVD, you must end the session that has been recorded in order to enjoy it as normal. removable media(LFS file system).
To close a disc session, you need to open your computer, right-click on the CD / DVD drive and select "End Session". After that, the session will close, and the burned disc can be used on other computers.
Once you figure out how to write files to a disc on this system, you can now use the standard procedure for erasing discs.
How to erase a drive in Windows 7
You can erase information from a disc if the disc is multi-session. I remind you that multisession discs are labeled RW. If the disk has the inscription R, it means that it is disposable.
Insert your disc into the drive, then open it on your computer by clicking Start - Computer accordingly. Right-click in an empty area of the open window. You will see a list from which you should select the item "Erase this disk". A new window will open. Click "Next". Wait a little while the information from the disk is erased. At the end of the process, the "Finish" button will appear, click on it. Your disk is clean, you can write information to it again.
How to Format (Erase) a CD/DVD
Open the computer, right-click on the drive, from context menu select Format.
The standard cluster size when formatting is 2048 bytes, click the "Start" button. After that, formatting will begin.
I hope you figured out how to write data to a disc that you can later use on another computer, laptop or in your car player.
Burn ISO image:
Recording from Windows Media in Windows 7:
 The Complete Guide to Google Forms How to Create and Use Google Forms
 Virus Petya: the battlefield - Rosneft
 Yandex Navigator not working