Installing mac os from a flash drive. Installing Mac OS X Mountain Lion from a disk or flash drive. Clean install of OS X Mavericks.
October 22, 2013 Apple immediately after the presentation, she released her new operating system for computers,. Cupertinos pleasantly surprised everyone by giving every Macintosh user the opportunity to install a new OS absolutely free... Whether Apple will stick to this position for the next operating systems is not known. However, back to the topic. If you're already signed in to Mac App Store and downloaded OS X Mavericks, then you are faced with the question of how to install the OS - by updating by running the installer or install OS X Mavericks from a USB stick.
Check everything, then click Continue. 
Use the button to select the size. Then click "Install". This is the final part of the second part. Complete all of this and click Next. 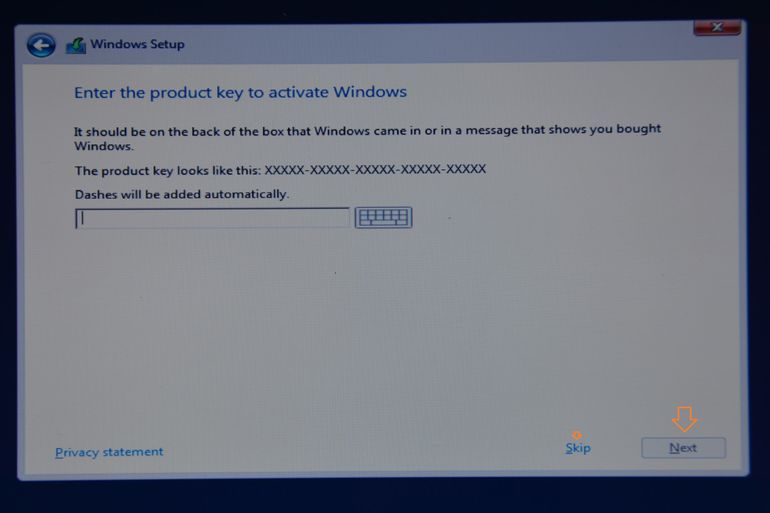
Enter your product key or click Skip to skip this step, and then click Next.
Pricing and upgrade requirements
Say you agree to the terms. 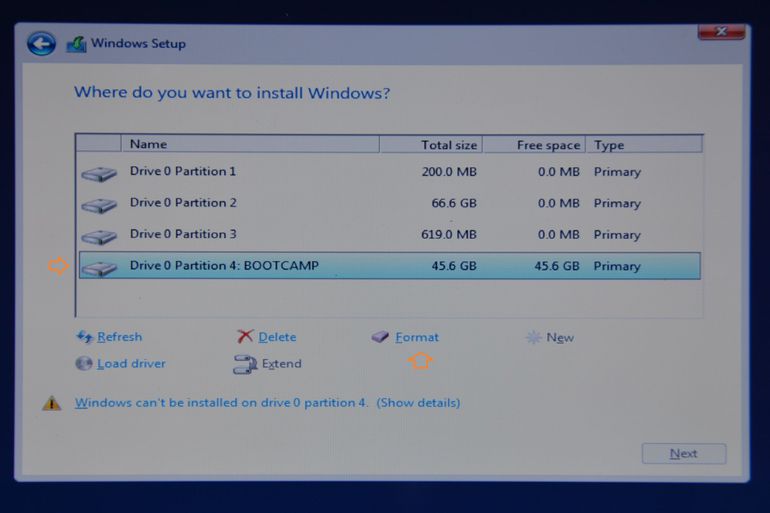
Select it and then click Format. 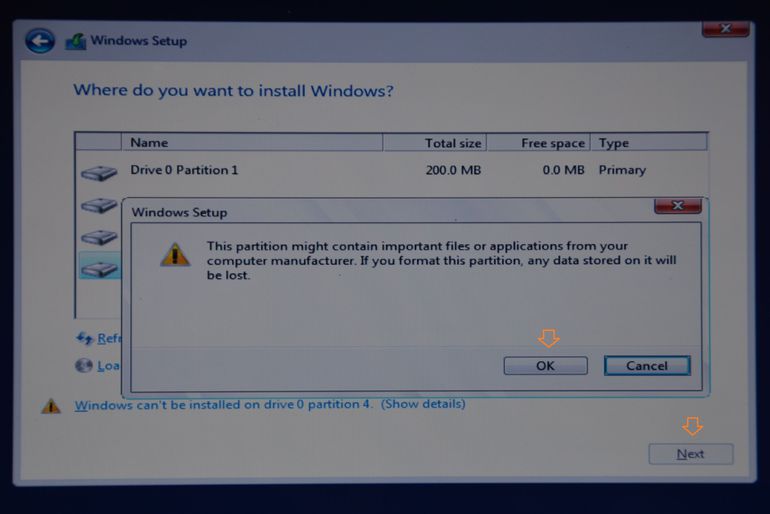
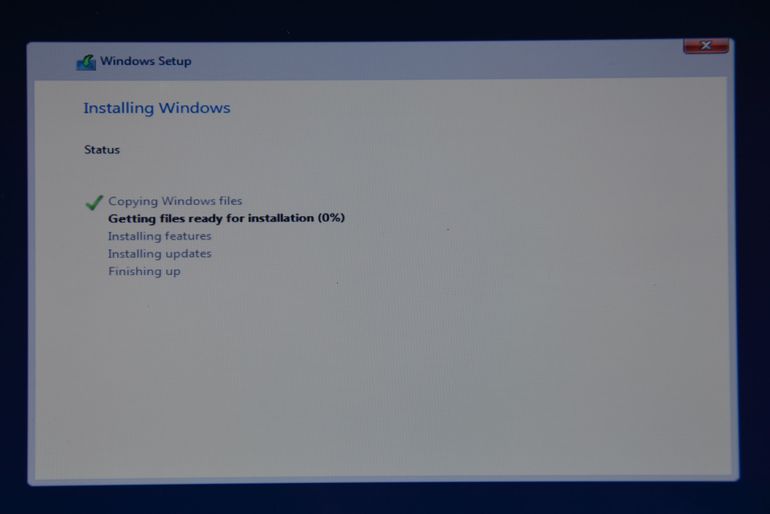

Click Next and follow the instructions below for the rest of the installation. In collaboration with Laura Martinez. Before you start, you will need. To create boot disk, you need to install the installer app. Once the download is complete, you will see the installer window. Second-click or tap the trackpad with two fingers in an application launched from the dock and select Exit.
By default, after downloading OS X, all you need to do is run the installer. However, many users (myself included) will install OS X Mavericks clean, formatted hard disk... Whether it is right or not, everyone decides for himself.
The first step is to be sure do backup your disk using Time Machine, so that at any time, if something goes wrong, you can restore everything back. Plus, you can restore your entire iTunes library, iPhoto, Aperture, etc. from a backup. So let's get started!
Click Remove, then click Finish. If you follow the above command closely, they depend on basic syntax... For this to work, the installation application must be located in the Applications folder. Go back to terminal and paste the command above.
The terminal will ask for the user's password. The terminal does not display characters when typing. This requires confirmation to delete the memory. After copying, the terminal will display the message "Copy complete" and "Finish". You can close the terminal and the memory is ready for use.
PS. It is worth warning that after installing the system in this way, you will not have a Recovery HD partition.
First, I will show the process itself, explaining in more detail, and at the end I will summarize in small steps.
How do I clean install OS X Mavericks from a USB stick?
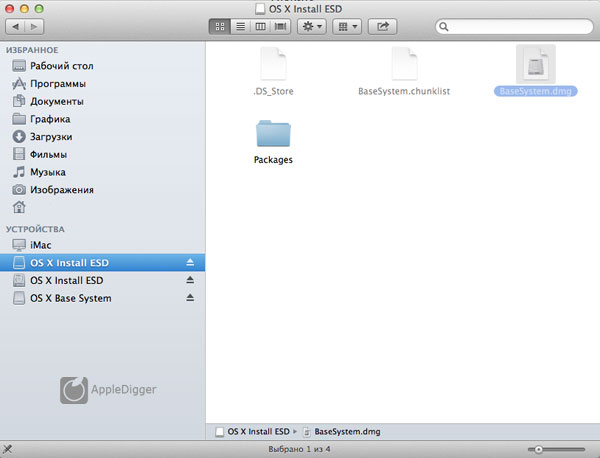
After you've downloaded the installer, go into the programs and find the OS X Mavericks installer there. Then we click right mouse by the installer and select " Show package contents»
If you don't like the terminal, then the automated method using the app will be easier for you. Click Remove, then Finish. If you choose a different disk type, only the selected volume will be deleted. Enter the password for account user.
How to boot from installer memory
This process begins and may take some time. Both methods provide ease of use and flexibility, so it's up to you to choose a method. Here step by step guide to guide you through the process. This way, you have the option and opportunity to return to a production installation if any problems arise during the process. Step 6: The main interface contains the Section Information section.
Then open the SharedSupport folder and copy the file from there InstallESD.dmg... Then we double click on InstallESD.dmg and mount this image. Now we need to extract the file from the image BaseSystem.dmg... However, it is hidden and to open it you need to enter the command in the terminal:
defaults write com.apple.Finder AppleShowAllFiles TRUE; \ killall Finder
After that, we can see this file. Click on it twice and mount it.
Checking for software updates
Step 11: Optional step; you can also customize graphics from the graphics configuration screen. Step 15. For the schema, select Master Boot Record. ... Complete the following tasks in order. Perform one of the following actions. 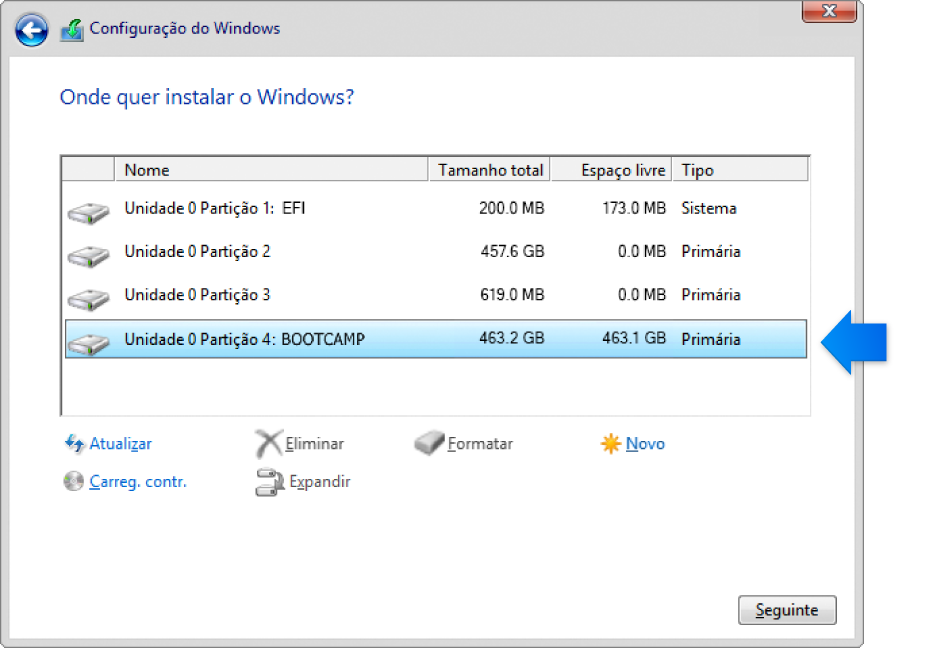
You do not need to take any action in response to the instructions in the dialog boxes that appear briefly during installation, but if you are prompted to install the device software, click Install. If the screen looks inactive, there may be a hidden window that requires a response from the user.
- Follow the instructions on the screen.
- Important: Do not click the Cancel button in any of the installer dialog boxes.
- Look behind open windows.
Now you need to insert a USB flash drive into your Mac and format it... To do this, open the disk utility, select our USB flash drive and format it by specifying the name. For example, I chose the name Mavericks.
After that, in the disk utility choose mounted BaseSystem.dmg image, click on the tab “ Restore"And click on OS X Base System... In field " A source”The destination volume of the OS X Base System appears. Now in destination field we need to point to our flash drive that we formatted. To do this, click on it on the left and drag it to the "Purpose" field.
Checking system requirements
Open the application in the Utilities folder in the Applications folder. In all other cases, the correct partition is selected and formatted automatically. The resources below also contain useful information... These advanced steps are primarily aimed at system administrators and others familiar with the command line.
Finding software updates
Exit the installer if it opens automatically after downloading. This is the basic syntax for the command. ![]()
You don't need to answer dialog boxes that appear briefly during installation, but if the dialog box prompts you to install the device software, click Install. If it turns out that nothing is happening, there may be a hidden window that you must respond to. After the installation is complete software support click "Finish".
See if your computer is compatible
- For the schema, select the master boot record.
- Important: Do not click the Cancel button in any of the installation dialogs.
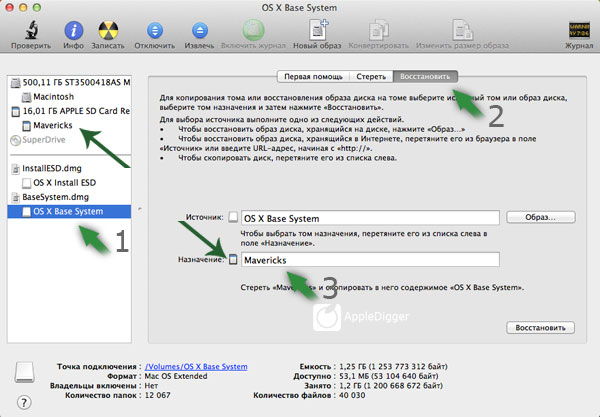
After that, we need to install OS X Mavericks on a USB flash drive and for this on the bottom right click on the "Restore" button... After 10 minutes (depending on the speed of the flash drive), the operating system files will be transferred to the flash drive.
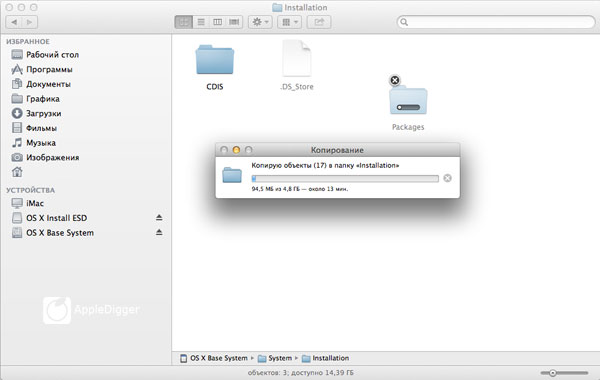
However, this is not all. After recovery, instead of the folder with the main files, it moved to the flash drive Packages label... We need to replace the shortcut with the file folder. For this go to the USB flash drive... Open the folder System, then Instalation and remove the label Packages.
Step 5 - Adjust partitions and install
It is very difficult to have installation problems, but it is always good to know. Wait for the system to recognize it on the desktop and then proceed with the installation. This is where you choose the size of the partitions, basically how much memory each operating system will have.
From there it will take some time and even restart. Let him work without interruption. To log out from one system to another, simply restart your computer and choose which system you want to start at startup. Don't forget to comment below, we'll be happy to help you!

Now we return to the mounted InstallESD.dmg image, copy the Packages folder and paste it into the Instalation folder on our flash drive (instead of the shortcut we removed).
It arrived, and while still in beta, it has been pretty stable. But don't worry if you don't have a good internet connection to download it, you can still use a connection from a friend or somewhere else with more stability.
In it, enter "Disk Utility" and then click the program when it appears in the list of results. On the Disk Utility screen, click the item corresponding to the Pendrive icon. Then click the "Delete" button. Finally, click the "Delete" button. If necessary, authorize the operation by providing the system administrator password.
Everything. The OS X Mavericks installation stick is ready... You can hide the display of hidden files back by typing the command in the terminal:
defaults write com.apple.Finder AppleShowAllFiles FALSE; \ killall Finder
The matter remains small. Restart the Mac, hold down the Option key on the keyboard and when selecting disks, click on our flash drive. Then carry out the standard installation.
When the download is complete, the installer window will appear on the screen. In the menu that appears, click "Show Package Contents". With a terminal open, paste the command below and press Enter. After that, just wait until the process completes. It is now free to download and install on computers.
Check it out step by step and find out how to complete the procedure. Browse and boot the system. When the download is complete, the installation wizard will start automatically. In the left side pane of the window, select the flash drive, and on the right, click the Delete tab. Once that's done, hit Erase and make sure you really want to format the pen.
Now that you know the process itself, let's summarize the main points of the process to make it easier for you to use this FAQ:
- Create a system backup
- We extract the InstallESD.dmg file from the installer
- Mount the InstallESD.dmg file
- Formatting the USB flash drive
- We open hidden files(defaults write com.apple.Finder AppleShowAllFiles TRUE; \ killall Finder)
- Mount the BaseSystem.dmg image
- Installing the BaseSystem.dmg image on a USB flash drive
- Remove the Packages shortcut on the USB stick
- Copy the Packages folder from the InstallESD.dmg image to the USB flash drive
- Hide hidden files (defaults write com.apple.Finder AppleShowAllFiles FALSE; \ killall Finder)
- Installing the system
That's all. Now you know how to install OS X Mavericks from a flash drive clean... If you have questions - ask. Registration is not required to leave a comment. Also you can to discuss various technical aspects.
When finished, close Disk Utility and open Terminal. In a terminal window, paste the command below and press Enter. This is done, just be patient and wait. The process can take over an hour. Follow the instructions carefully and always back up all your files before you start.
The system installer will be saved in the Applications folder on your computer. The system will mount the disk image as shown below. Be sure to enable the Delete Destination option and click Recover. However, you don't need to have two machines to use both operating systems.
Apple yesterday unveiled its new OS X Mavericks operating system and gave it away to users free of charge. But not everyone immediately ran to the Mac App Store for an update, some decided to do differently and install the system from scratch. But then a gag arose: how to do it? After all, for example, the latest generation MacBook Air or Mac mini does not have a disk drive. And this is where the instructions on how to make a bootable USB flash drive for installing OS X come in handy. So, first we need a system distribution kit and a USB flash drive. Please note that although the system image is slightly more than 5 GB, the drive needs at least 8 GB. Also, it is better that it is USB 3.0, because on USB flash drives 2.0 will take a very long time to install. If over time you have no problems, then you can use older versions of USB drives.
To accomplish such a feat, you will need to follow some of the previous instructions. First, you will need to back up your important files. Finally, be prepared to wait a few hours until the end of the process, because the system of loading and writing drivers on a virgin disk is incredibly time consuming. For those migrating from the platform, there may be a way out. Please follow these steps before installing.
Return to the software update and see if everything is still pending.
- Download and install.
- Follow the instructions on the screen to complete the firmware installation.
Now let's go directly to creating bootable flash drive... This does not require any tricky manipulation.
And now, point by point:
1. Download the system image. It will be available in the Mac App Store Updates category, and when the download is complete, in the Applications folder.

But you may need to format HDD any day. The process is simple and only takes a few minutes. Acquaintance with disk utility... This tool can be found in Applications, Utilities. The corresponding partitions are displayed below each disk.
And the last device listed is the internal optical disc. Top right disk utility there is a set of tabs. To format the drive, the first step is to select it in the left column and go to the Erase tab - but don't click the Erase button at the bottom of the interface.
2. Open Terminal (Programs - Terminal) and enter the following command:
sudo / Applications / "Install OS X Mavericks.app" / Contents / Resources / createinstallmedia --volume / Volumes / "USBDrive" --applicationpath / Applications / "Install OS X Mavericks.app"
Please note that instead of "USBDrive" there should be the name of your USB stick. This command will create a partition on a removable disk, copy the installation package and make the USB flash drive bootable.
Step 2 - Choose a format. In the left column, select the drive you want to format. If you have a partitioned disk and want to format one of these partitions, but not the entire disk, select one of them. A list of six formats will then appear. Now you have to pick one, but which one?
The latter option keeps a record of the disk changes, which is useful if it doesn't work or is unexpectedly unavailable. With their help, files with the same name, but different methods of treatment are treated as two separate files and can rely on your disk.
 3. We are waiting for the end of the process and see that the Mac OS X Mavericks installer has appeared on the removable disk.
4. At this step, open the " System settings"And go to the" Boot Volume "section. Select your USB stick, which is now called "Install OS X Mavericks OS X 10.9" and click the "Restart ..."
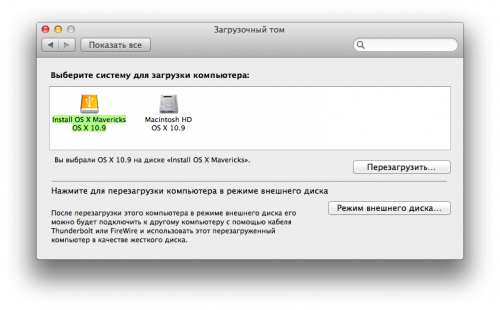
5. Now we are waiting for the computer to reboot and launch a menu in which you can manage the partitions of your disk (format, for example) and run the installer of the new system. Do not be alarmed if before the first reboot the installation "hangs" for 1 second. Just wait a while.

6. We are waiting for the end of the installation and are happy with the new system!
That's all! Enjoy Apple's excellent new OS.
 Bugs in Singularity?
 Just Cause 2 crashes
 Terraria won't start, what should I do?