Contacts - Google Forms. The Complete Guide to Google Forms How to Create and Use Google Forms
Good afternoon, dear IP!
And the first video will be a video about the Google Forms service. You can watch a short six-minute video, or read the regular text version below.
So, let's begin. First of all, you need to create a Google account:
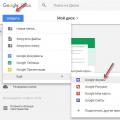
If you already have mail in Gmail, you can immediately start creating your first survey. To do this, you need to go to Google Drive
And immediately create a survey through the “Create” menu

Fill in the name of the form and answer options:

There is nothing complicated here, you will quickly figure it out. To add another question to your questionnaire, just click on the icon with the “+” sign (see above).
To change the color scheme, change the color palette as in the figure below:

But before publishing the survey to the public, you need to make a few more settings:

- “Collect email addresses”- I do not recommend setting this setting, as it will scare away your respondents. Why on earth should they “shine” their email address?
- “Submit the form no more than once”- also not necessary, since in this case only those people who have a Google account will be able to take the survey. And in Russia, not everyone has it. And people don't want to hand out their emails right and left.
- “Modify responses after submitting the form”- at your discretion. If the respondent wants to change the answers, he will be able to do this if given the opportunity in the settings.
- “See other answers and pivot charts”- I do not recommend, especially for commercially important surveys. In this way, you will simply leak valuable marketing data to your competitors. I would leave this opportunity to view the answers only for insignificant surveys. For example, for a survey from the series “What breed of cats do you like?”
And the last significant setting in Google Forms that needs to be done:

This is the access to the survey, which needs to be configured correctly. Otherwise, all and sundry will be able to add their own questions and answers, which will reduce your work to Sisyphean labor.

Make sure that the access settings are set as in the picture above and click on the “Save changes” button
How to post a poll? What link to use?
Click on this icon in the upper right corner:

And we see our first simple poll:

You can make sure it works and even answer questions. As soon as you reply, I will receive an email notification. Magic, and only =)
How to see answers? Where are the statistics? How to get responses to email?
Just open the "Answers" tab to admire the beautiful charts that are very helpful in making decisions.

And the last thing about the poll settings:
In order not to forget about your own survey =) Set up notifications about new answers to your e-mail. To do this, click on the inconspicuous icon with three dots:

And enable email notifications:

It will be possible to download answers in CSV format for processing in Excel. But this option will be useful for Excel wizards and lovers of beautiful presentations.
- No need to fence the survey of many questions. No more than 5 simple questions that will take no more than 1-2 minutes. If the survey turns out to be very complex, then it would be wiser to break it into several parts. But in no case do not torment your target audience.
- Very clear questions and answers. No need to write questions in the style of letters from the Ministry of Finance =) No one will even read too long or abstruse formulations.
- Before sending a respondent to a survey via a link, explain to people WHY your audience needs it. Outline the problem and what it will give the respondent. This is an important point that is often forgotten. No need to write that YOU need it. Nobody really cares what you want. But I think that most IPs already know this, since they have already gone through a good school of survival =)
- It is necessary to make an eyeliner for the survey. It can be a letter, an article on a website in which you appeal to the collective mind. If you simply place a button on the site or in social networks “Take my survey”, then the effect will most likely be zero.
- There is no need to collect personal data, as this will immediately raise many questions and distrust.
- Be sure to state that the survey is anonymous. It is clear that he really should be anonymous.
The article turned out to be too big, it's time to wrap it up, otherwise I can write on this topic for a long time. If you have something to add, you can write about it in the comments.
Google Forms is one of the Google cloud services related to cloud and spreadsheets. As with any other Google product, authorization is as simple as having a Gmail account.
Google Forms is a simple, convenient and reliable tool. It's intuitive, easy to learn, fast to implement, and best of all, it's free.
It is important to note the simple, concise design and high level . In addition, the appearance can be customized according to the proposed themes and even create themes yourself. To do this, you just need to upload a logo or header, and the algorithm will automatically select the appropriate interface palette.
The service has many subtle settings. Questions can contain anything from text fields to checkboxes.
When designing, you can use pictures and videos.
The structure of the survey may not be linear, but variable. When answering questions, people will end up on different pages, depending on what answers they give. This greatly expands the potential areas of application and creates room for creativity.
The service is cross-platform - you can use it on PC, tablets and smartphones. The data is correctly synced.
Work with forms is provided both for one specialist and for a team.
Applications
The product allows:
- Conduct surveys;
- Register event participants;
- segment customers;
- Brief clients;
- Receive feedback;
- Collect feedback;
- Conduct tests and quizzes;
- Collect contacts for mailing lists.
In addition, you can use Google Forms for lead generation, using them as a landing page.
User results are recorded in Google spreadsheets.
Applications: from education to solving business problems.
Where do the answers go?
Statistics and responses can be viewed both directly in the Google forms themselves, and in a separate table that is created automatically by default. You can also specify a previously created one.
In the personal account, a general summary and answers of individual users are available.

Clicking on the green icon opens the corresponding Google spreadsheet with all the answers.

The "Responses" section has its own menu that allows you to manage notifications of new responses by email, configure which table to save responses to, disable the connection with the form, download responses in CSV format, print responses and delete them.

Functional overview
You can start working with the service by choosing one of the proposed templates for various topics.
In most cases, work begins with a clean slate for a specific format. An empty form is created, which is configured, access rights are distributed to it. After that, the appearance is drawn up and blocks of questions are constructed.

This section has three subsections
- Are common;
- Presentation;
- Tests.
Let's take a closer look at each of them.
General settings allow you to:
- Manage the collection of contacts of respondents;
- Send them copies of their answers;
- Limit the number of attempts to fill out the form;
- Set up the ability for respondents to edit responses after submission.
In the "Presentation" subsection, you can configure:
- External visualization of progress when filling out the form - understanding by users of what stage they are at and how much is left. In most cases, it increases their involvement and the percentage of those who filled out the form to the end.
- Issue questions in random order.
- Enable or disable the refill link.
- Editing the confirmation text that is displayed after the response is written.
The "Tests" subsection allows you to evaluate answers and award points for them. Respondents can see the score immediately after submitting the form or after manual verification.
You can also set the highlighting of correct and incorrect answers after filling out the form, as well as the total number of points and points for individual questions.

Access settings
The "Submit" button allows you to share the form via email, Facebook and Twitter, by sending a direct link or embedding on an external site.

When generating HTML code, it is possible to change the size of the future block with the form for correct display on the site.
This is the main part of the service functionality, so let's consider it in as much detail as possible.
Menu
The constructor has its own concise, but quite functional menu that allows you to:
- Add a question;
- Insert a video from YouTube via a direct link or by finding it in the search;
- Edit the name and description of the block;
- Import questions;
- Add section.

Sections
Each section has its own menu that allows you to copy, move and delete it, as well as merge with the section above.
You can change the order of questions by dragging and dropping.
Images can be downloaded directly from the device, as well as take a photo in the moment, upload a picture via a direct link, from Google Drive, or find it through a search.
Let's consider in detail the possibilities in the formation of questions.

Responses can be presented in plain text, as a single line, or as a paragraph.
Functions for adding a description and checking answers by number, text, number of characters and regular expression are available.
Checking by number allows you to select one of the proposed logical conditions and the required values.
The "Text" option checks the validity of the entered email address and web link, and also evaluates the content for the content or absence of a certain word or expression in it.
The "Length" item regulates the minimum or maximum number of characters that the answer should consist of.
"Regular expression" may or may not contain, fully match or not match the specified pattern.
There is an option to select one answer from the list provided. You can add a text description, select a next action for each answer option, and randomize the order in which the suggested answer options are given.
The "Several from the list" option allows you to receive answers in the form of checkmarks in checkboxes. You can add a description, check answers - choose no more, no less or a strictly specified number of items.
There is a drop-down list familiar to many. A description is added to it, the choice of further action is configured after each answer option and the possibility of mixing them in random order.
The need to upload custom files has been felt for a long time - for example, photos, videos, documents. Google Forms has recently added this option. The user can upload files with a total volume of up to 1GB per form. You can also define the types of files that can be uploaded:
- tables;
- PDF;
- Video;
- Presentations;
- Images;
- Audio.
In addition, you can limit the number of downloaded files and their size.
In the question menu, only adding and editing its description is available.
In cases where visual clarity is important, you can invite users to interact with the scale, to which a description is added, as well as labels at the beginning and end of the scale.
For respondents, the scale looks like this:
Another complex format is the multi-select grid. In addition to the description, you can set an arbitrary number of rows and columns, include a restriction - no more than one answer per column - and the ability to randomize the order of columns and rows.
The grid is displayed like this:
The checkbox grid is also useful in cases where you want to offer users multiple choices. Additional options of this format are similar to the multiple choice grid.
If necessary, a block for entering the date is added. It can have an arbitrary description, the ability to enable or disable the input of the year, as well as fields for entering the exact time.
The "Time" block allows the user to add time, and if the answer type is switched to "Duration" in the question menu, the format changes tohours: minutes: seconds.
Hello blog readers!
There are times when you need to collect some data from your readers, conduct a mass survey, accept several applications, etc... Usually this is done through a feedback form, or in the comments. But this is not very convenient and aesthetically pleasing. I propose to consider the option with a form from Google services. In my opinion, it is convenient, functional, nice and, if desired, can be easily integrated into the page, and if necessary, you can publish the results separately. You will see an example below.
Google Forms.
I don’t remember why it was the first time for me, I needed such a form, but I met her about 3 years ago. Since then, it has grown significantly with new features. Usually used to accept applications for participation in the competition, enroll in training, and once conducted a survey. If you think carefully, there are many applications. And so, let's start creating the form.
We go into our mail gmail.com, on the right side at the top we see a grate near our name, by clicking on which the main Google services open. Your location of the icon may differ from mine, as I arranged them in a convenient order for me.
Now we turn our eyes to the upper left part of the opened disk and click on the “create” button. From the drop-down menu, select "form" and proceed to its creation and design.

First of all, we enter a name and select a theme for our form. These settings can be changed after creation.

After that, the form itself opens for creating questions, which can consist of different elements. I will list the main ones:
- Text
- Paragraph
- One of the list
- A few from the list
- Dropped off the list
And it is also possible to insert pictures, video, scale, date, time, etc... If you want to make any of the questions mandatory, then do not forget to check the corresponding checkbox.

To add the next element (question) at the bottom there is a corresponding button.

Well, in conclusion, click "send", a window appears with a link to the form. You can also enter the email addresses of people to whom you want to offer to fill out a form (questionnaire). And if you want to embed the form into a blog page, then click on the button of the same name, copy the code and paste it into the desired part of the page.

Let's see what Google form we got.
When embedding a form on a page, consider the dimensions for correct display. The width is usually 600, and the height depends on the number of elements in the form.
The survey below is working and you can answer questions, the answers can be published or left confidential.
If you want to publish the form on a separate page, then you first need to create this page and then also insert the iframe code. An example can be seen in my post, click on the picture below, the application form for participation in the competition will open.
You can not create such a page, but use it, the link is given immediately, before the iframe code is received.
Hello everyone!
Today is Friday again, the weekend is coming soon. Everyone wants to get away from thoughts about work and have a little rest before new everyday life. Therefore, today's lesson is on such a simple topic - how to create a survey in Google Forms.
In general, surveys on the Internet are necessary for an entrepreneur, especially if he works with something massive, like me, for example. Are you reading my blog? Draw some knowledge from it. But how can I write about what interests you? How can I understand who you are? How can I even know you? Right! Only by conducting a survey among their readers.
Surveys help you get to know your audience better, help you understand what they need, and that's the beauty of it. More than a year ago, I conducted a survey among my subscribers, and then I realized who was reading me and what was most interesting to you: as a rule, these are small or medium-sized business owners, novice Internet marketers who want to get to know contextual advertising better and how to analyze it. This year, the audience has become a little more serious and people are already interested not only in CR, but also in end-to-end analytics, which is very, very difficult to build.
Naturally, I try to touch on all these topics more than any others. Therefore, for a very long time there were no lessons on,.
Anyway. Let's move on to our topic today. So, the easiest way to create an online survey is to use Google Forms, which is what we're going to do now. By the way, it's completely free. All you need is to be registered with Google.
Creating a Google Forms Poll
So go to this link. You will be greeted by a familiar interface - exactly the same looks and and much more in this eco-system.  Click on a blank sheet and a form for creating a survey will appear in front of you. Here you can add questions of different forms: one from the list, multiple choice (several from the list), in the form of a scale, in the form of a grid and a few others:
The question itself fits into the field, where the default is “Question without a title”, and the answer options are below. You can also make a question mandatory by simply switching the toggle switch in the lower right corner of the editor. 
A new question is added by clicking on the plus sign in the right column: 
Here you can add video, picture, text.
Once you've created a survey form, you need to send it out to your audience. This is done by clicking the "Submit" button in the upper right corner: 
Here we have several options:
- By email. You can send a survey to a specific person by e-mail, but I think this will be of little interest to anyone;
- Post a link. You can place a link to the survey page on your website, in a social network. Where is it convenient and where is your audience located;
- Position the frame on the page. It's even more convenient. You can place a frame with a survey on the site page and your visitors will be able to complete the survey without going to another page.

You can view the survey results here, on the page of the form editor in the "Answers" tab. The results here are presented in the form of charts, if the answer to the question must be selected from the list. Answers to text questions (where a person has to write something himself) are visible “as is”: 
Conveniently? Conveniently! In general, Google has a lot of interesting and useful tools. Enjoy!
I hope this lesson was useful for you!
Create an online survey using Google Forms
docs.google.com/
At the very beginning of the master class, we already made presentations using the resource
Google Docs. This service also allows you to create and publish surveys, or
Look at the brief but bright instructions for working with forms (author M. Smirnova)
http://docs.google.com/present/view?id=dgtqtkvs_686ftd3j8dd
Using the suggested tool, create your own form that could
useful in working with students. This could be, for example, a biology assignment.
or questionnaire.
For your convenience, I offer step-by-step instructions for creating a survey "Landscaping
1. Go to http://docs.google.ru, introduce yourself to the system using your login and
password for Google (1 lesson).
2. Using the menu Create select Form(form)
3. Name the survey, write a message to the respondents and/or a brief
instructions for the entire questionnaire as a whole.
4. Having finished with one question, move on to the next and so on until
the entire questionnaire will not be ready.
6. How do I invite other people to take a survey? Please note that below
This is what you need to send to the respondents.
7. How do I view survey results? The service quickly and clearly presents
View responses to open them in Summary or Table view.
8. How do I open the form and responses when I sign in to docs.google.com again?
First, find the desired file, open it.
 A table with the results of the survey (task) will immediately open.
You can switch to edit mode using the menu Form - Edit

In the same Form menu, you can choose another type of presentation of results -
Show a summary of responses.
How to quickly create a survey on your site using Google Forms?
Sooner or later, almost everyone who has their own website is faced with the need to create feedback forms to collect data (surveys) from site visitors. This may be a form in the contacts section, through which site visitors will send you questions of interest to them, it may be a form for collecting applications from customers (for example, requests for a callback or applications for the purchase of goods), or it may be a form for conducting a survey or voting on topic that interests you. There are several approaches to creating such forms: Forms can be created using HTML tags and tied to pressing the “Submit” button with sending the entered data to your email You can make a PHP + MySQL bundle (or any other programming language and database) and save all the entered data to the database for further work. If your site is made using some popular CMS (for example, Joomla, Drupal or WordPress), then you can search the web for plugins, modules and components that simply allow you to create forms. And you can use free tools to create feedback forms for everyone famous Google.Docs And in this article I would like to show you how you can easily and quickly create all kinds of survey forms for your sites using Google.Docs. So, let's begin! The first thing you need to do is to log in to your mailbox in the Gmail mail service (to your account in the google service): https://accounts.google.com/ Next, select the Disk item in the top vertical menu.  On the page that opens, in the left vertical menu, press the "Create" button and select the "Form" item from the drop-down list
  After that, we find ourselves in the free form editor from Google.Docs, and it is in it that we will create our forms. In the first window, the google form editor asks us for the name of our future form and offers to choose a design theme from existing themes.
  After the name is entered and the choice of theme is made, click the "OK" button, and we get to the page for editing our form. I will not talk about all the features and settings of the Google form editor in this article, because. most things are known by the “poke method”, plus everything, there is not the worst help from Google: support.google.com/drive/bin/topic.py?hl=en&topic=1360904&parent=2811744&ctx=topic. Here I want to dwell only on those points that you need to know in order to create your first form right now. So, here is the interface of the Google form editor:
  At the top of the editor there is a small horizontal menu responsible for the basic settings of the form. In it, you can change the design theme, change the settings for saving the input data (save to a new Google.Docs table or to a new tab of an existing table), and also open the created form for viewing by clicking on the "Open Form" button Remark: Be sure to set the save settings by clicking on the "Save answers" button. If you select "New Table" in the save settings, Google will automatically create a new table for you, the name of which will match the name of the form you created and the postscript (Answers) Below are the visibility settings for your form. Using these settings, you can allow the form to be viewed by everyone (uncheck all checkboxes), or vice versa, make the form available only to users of this domain and you will need to go through authorization to fill it out. Be careful with visibility settings. Although there are only two checkboxes out of all the settings, if you make a mistake in them, then your entire survey may fail, people simply will not get access to the form. Next, there are buttons for editing the element added to the form. At any time, you can change the caption for the form element, the hint (explanation), change the type of the element (Google offers us a choice of 7 different elements, from a simple clock input field to a whole two-dimensional array of radiobutton elements), any element can be made mandatory for filling, etc. At the very bottom of the page with the editor is the "Change Confirmation" block. Here you can allow the form to be re-filled, make the link to the results of the survey being conducted visible to everyone, allow respondents to change their answers after filling out, and change the confirmation text that will be displayed to all respondents who completed the survey form. The ability to change the text displayed after filling out the form will give you the opportunity not only to thank the respondent who completed the survey more exquisitely, but also, for example, give him a link to download some gift as a reward for the work done. After all the necessary form fields are added, in the top menu, click on the "Open Form" button and you will see your brainchild with all the elements and input fields:
  Then you can send your created survey form by mail, send a link to this form to the respondent, or embed it into your website. Embedding in the site is elementary. You just need to select the “File->Embed into Web Page…” item in the top menu of the form editor and the system will generate an iframe for you to insert into your website, blog, etc.
  That's it, our new site visitor survey form is ready! All data filled in by respondents will be available to you in Google Spreadsheets. In addition, at any time you can see general statistics on the dynamics of filling in the fields of your new form in the section of the upper horizontal menu "Answers->Summary of answers":
  As you can see, such a tool is quite flexible in settings and will allow you to create and conduct a survey of visitors to your site or any other group of respondents in a matter of minutes. At the same time, you do not need to create an HTML form yourself, you do not need to organize interaction with the database, you do not need to search for plugins, modules and components suitable for the CMS you use. Also, there is no need to code interfaces for displaying statistics with displaying survey results. Plus, if you throw a lot of traffic on such a survey form, then with a high probability Google servers will withstand it! And all the data entered by the respondents will always be available to you in your Google account.
 The Complete Guide to Google Forms How to Create and Use Google Forms
 Virus Petya: the battlefield - Rosneft
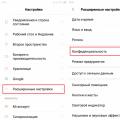 Yandex Navigator not working