Installing mac os over the network. Mac OS installation on MacBook. How to reinstall OS X using network recovery
Mac OS X Yosemite is a system introduced by Apple in 2014. This is the most up-to-date and advanced Mac OS system offered by the Apple technology manufacturer. Let's find out how it's done installation from scratch. We will also analyze the issue of reinstalling the Yosemite system itself to restore factory settings.
What is the best way to install the system?
Mac OS X Yosemite is available on the Appstore. There are two options for installing it:
- Over the old system ;
- Clean install from scratch.
You have the option to install Mac OS X Yosemite right on top of your old OS X Mavericks. This is advisable if you value the current state of the file system, installed programs and their settings. All data will remain in the same place, the changes will affect only the operating system. But the performance of many programs can be broken. Compatibility issues and updates can cause a lot of inconvenience.
Installing from scratch eliminates many system problems. The factory settings will be fully restored. This will help get rid of unnecessary installed applications, unnecessary data, etc. Let's take a closer look at this process.
Installing Mac OS X Yosemite from Scratch
Creating a USB flash drive
After downloading the update from the Appstore, proceed as follows:
- Launch Disk Utility
- In the left panel, select the drive, on the right - go to the "Disk Partition" tab;
- Select "Partition 1" from the "Partition Scheme" menu. The name of the disc is "Yosemite" and the format must be "Mac OS Extended (Journaled)".
- Go to "Settings", select the GUID partition scheme. We click "Apply".
- Disk Utility starts formatting the flash drive.
- From the "Utilities" folder, launch the "Terminal".
- To create a flash drive, run the following command:
- Enter the administrator password.
- It will take 10-15 minutes to create a bootable flash drive.
- After successful completion of the procedure, restart the Mac. Hold Alt while loading.
- You are now ready to install Mac OS X Yosemite.
Installing Yosemite
After creating a flash drive and rebooting the Mac, follow the instructions:
- Go to the "Downloads" menu and select "Mac OS X Installer".
- You need to open the "Disk Utility" and select the disk with the system to format. Go to the "Erase" tab.
- In the "Format" menu - "Mac OS Extended (Journaled)" must be selected, the name of the disk is written.
- Click "Erase", thereby starting the process of formatting the disk.
- Close Disk Utility and open the Install Mac OS X section.
- Specify the Yosemite boot disk and start the installation process.
Starting the installation process involves following the instructions of the installer. Select the required parameters, the system will be ready for use soon. After installing Mac OS Yosemite, you can start using the system from scratch or transfer files from Time Machine.
Reinstall Mac OS X Yosemite
If OS X Yosemite is already installed, you may need to reinstall it in the following cases:
- System failures;
- Errors when installing updates;
- Disk cleaning;
- Need to restore factory settings.
So let's answer the question, how to reinstall Mac OS X Yosemite. To do this, you need to erase your Mac data and reinstall the system. Don't forget to back up valuable files. To restore factory settings, you need to use the built-in recovery disk. Reinstalling the system requires an internet connection, as well as a connected power adapter.
The order is simple:
- Restart your Mac. During boot (gray screen), press Command+R.
- Select "Disk Utility" and click "Continue".
- Select the disk, click "Erase".
- In the "Format" section, select Mac OS Extended (Journaled), enter a name, click "Erase".
- The disk is being cleared, it will take some time.
- Select "Disk Utility" and click "Finish".
- Go to "Reinstall OS X", click "Continue".
- Select the drive you are using. In most cases, it is the only one available.
- Follow the instructions of the installer, finish.
- The system has been reinstalled!
Restoring or reinstalling software
Mac OS X software
If there is a problem with your Mac software or hardware
problem, you can use the recovery utilities in Mac OS X,
to avoid problems and even restore the original factory settings
software. These utilities are available in Mac OS X Utilities,
even if your computer does not boot properly.
Mac OS X Utilities lets you do the following:
repair a computer disk using Disk Utility;

Chapter 4
There is a problem - there is a solution
restore software and data from a Time backup
machine;
restore Mac OS X Lion and Apple programs;
restore your computer to factory settings by erasing its disk and reinstalling
Mac OS X Lion and Apple programs.
If a problem is detected with the computer, it automatically opens
Mac OS X Utilities panel. You can also open it manually by rebooting
computer.
To open the Mac OS X Utilities panel, do the following:
Restart your computer while holding down the (x) and R keys.
Some utilities in the Mac OS X Utilities panel require
access to the Internet and the App Store for Mac. You may need to make sure that
The computer is connected to the Internet via an Ethernet or Wi-Fi network.
Connecting via a Wi-Fi network
Select a network from the Wi-Fi status menu at the top right corner of the screen.
If necessary, enter a password to access the network.
To connect to a private network, select Connect to another network.
Enter the network name and password.
Restoring a disk with Disk Utility
If there is a problem with your computer, or when loading
computer you see the Mac OS X Utilities panel, you may need to
restore computer disk.
Chapter 4
There is a problem - there is a solution
Select Disk Utility from the Mac OS X Utilities panel and click
"Continue".
Select a drive or partition from the list on the left and open the First Aid tab.
Click Repair Disk.
If Disk Utility can't fix the drive, try as much as you can
back up the information and follow the instructions in
“Reinstalling Mac OS X and Apple Software” on page 97.
Information about Disk Utility and its settings can be found in the Help
center, or you can open Disk Utility itself (in the Utilities folder
in Launchpad) and select the menu item Help > Disk Utility Help.
Restoring information using a backup
time machine
If you have created Time Machine backups before, you can use
Restore utilities restore all contents of the computer
to the state in which it was at a certain point in time
in the past.
Use a Time Machine backup only for restoration
information on the computer from which the backup was created.
To transfer information to a new computer, use the Assistant
migrations.
If the backup is on a Time Capsule, make sure the Mac Pro is connected
to the same Ethernet or Wi-Fi network. (To connect to a Wi-Fi network, follow
instructions on page 95).
Chapter 4
There is a problem - there is a solution
In the Mac OS X Utilities panel, select Restore from Time Backup
Machine" and click "Continue".
Select the drive where the Time Machine backup is located, and then
follow the instructions on the screen.
Reinstalling Mac OS X and Apple programs
There are times when you need to reinstall Mac OS X and Apple programs.
When reinstalling the system, you can save all files and settings.
Important.
In the Mac OS X Utilities panel, you can also reinstall and repair
Mac OS X Lion Server software, if installed on your
Mac Pro.
Make sure your Mac Pro is connected to the Internet via Ethernet or Wi-Fi.
"Continue".
When prompted to select a drive, select your current Mac OS X drive
(in most cases this is the only option available).
To install additional software, click
"Tune".
Click Install.
You can install Mac OS X without deleting the entire contents of the disk (while
existing files and settings are preserved) or clean the disk first (when
this erases all your data) to prepare your computer for reinstallation
Mac OS X and programs.
Chapter 4
There is a problem - there is a solution
After reinstalling Mac OS X, you can go to the Mac App Store and reinstall
download the software that came with your Mac and other software
that you purchased from the Mac App Store.
before attempting to restore the software. Apple
is not responsible for possible loss of data.
Restoring your computer to factory settings
Restoring your computer to its factory settings deletes everything on it
yes (accounts, network settings, files and folders). Before recovery
be sure to back up the files you need: copy
them to another drive. Make a note of your network settings so that after you reinstall Mac OS X
it was easier to connect to it again.
Make sure you are connected to the Internet via Ethernet or Wi-Fi.
(To connect to a Wi-Fi network, follow the instructions on page 95).
In the Mac OS X Utilities panel, select Disk Utility and click
"Continue".
Select the drive in the list on the left and open the "Erase" tab.
From the Format pop-up menu, choose Mac OS Extended (Journaled)
enter a drive name and then click Erase.
After erasing the drive, select Disk Utility > End
Disk Utility".
In the Mac OS X Utilities panel, select Reinstall Mac OS X and click
"Continue".
Chapter 4
There is a problem - there is a solution
To reinstall Mac OS X and Apple software, follow the instructions
Mac OS X installer.
After restoring Mac OS X and Apple programs, you can, at your discretion,
restore necessary files and programs from a Time Machine backup.
And its update. Before proceeding with the actions, it is important to decide what exactly you need to do. That is, it will be necessary to understand whether a complete reinstallation of the operating system or a simple update is required. You will also need to prepare the device for reinstallation (for example, if you are going to sell your device).
In addition, you can restore from a TimeMachine backup if you have configured this. So, first things first:
- If you want to update your Mac OS, you can create a backup just in case, so that in case of unforeseen circumstances, you can restore the system.
- If you are going to restore the operating system, then no action is required. However, you can check for backups if you want to install one of them.
- With a complete reinstallation, you will also need to create a copy, as in the first paragraph. Then be sure to deauthorize your computer or laptop in iTunes. To do this, run the program, open the "Account" tab, select the authorization item, and then open the deauthorization item. Please note that your Apple ID password may be required. Next, sign out of the iCloud service, after disabling Find My Mac, if it was previously enabled. Also, sign out of your iMessage and FaceTime account. At this stage, your preparation ends. Let's move on, friends.
Reinstallation
- First of all, please note that the following instructions provide for reinstallation with the installation of the version of the operating system that was installed when the device was purchased. That is, if you purchased a Macbook with OSX Mavericks, and then upgraded it yourself to ElCaptain, then after reinstalling the laptop will have Mavericks again. It is also worth remembering that all your data will be deleted from the computer. This method is suitable for those who want to sell their device, give it to someone, or just get the device "as it is from the box." If this method does not suit you, then go to the "Recovery" paragraph.
- So, let's get started: immediately after turning on the computer, hold down the key combination Option + Command + R.

- Once you see the Apple logo, you can release the buttons.
- If you did everything correctly, then the "Disk Utility" will start, with which you will need to clean up the built-in hard drive. Note that the Extended magazine format must be used. After that you can close the window.
- Now click on "Reinstall mac OS". Follow the prompts on your computer or laptop screen to follow the steps.
- When your device reboots, you'll see the setup assistant that opens when you turn on macOS computers for the first time. If you do not want to configure (for example, as mentioned above, when selling a device), then use the Command + Q combination to turn off the Mac. Thus, you will provide the opportunity to complete the setup to another user, your future buyer. Ready! This completes the reinstallation.
Update
Updating macOS is much easier than any other operating system on your computer. This process is accompanied by fewer problems and questions. This will be especially noticed by those people who have updated Windows at least once. In order to update your Mac computer or laptop, you only need an Internet connection and a little time.
- Launch the Mac AppStore.
- In purchases or in other sections of the store, find the new version of the operating system. Most often, it is in the first places of the "Top Chart" or in the "Selection".
- Click the "Download" button or "Install" if the system has already been loaded before. Wait for the operation to complete and continue to use the already updated mac OS.
Recovery

Recovery with Time Machine
If you have a Time Machine backup, you will need to boot the machine from the recovery partition using the Command + R combination when you turn on the computer. In the macOS Utilities window, select the item of the same name. Please note that all data from the disk will be cleared and replaced with information and files from your backup. The recovery itself is easily carried out using the instructions on the computer screen.
If you want to reinstall your Mac without erasing your data (that is, restore), repeat the steps in the previous paragraph to launch the utility window. If necessary, clean up the disk using a utility you already know. If you do not know it, then go back to the third paragraph of the reinstallation paragraph. After closing the program window, click on "Reinstall mac OS" and follow the steps that the assistant dictates to you.
Conclusion
Dear friends, today we have completely figured out all the issues related to working with macOS:
- Reinstallation with cleaning and deleting all data for further sale of the device or transfer to another user.
- Updating the operating system through the Mac App Store.
- System restore from a Time Machine backup.
- Reinstallation with saving personal data.
We hope that everything worked out for you and there are no misunderstandings or questions left. Let us know in the comments how your macOS reinstall or restore went. Have fun, dear readers!
Modern technology is constantly evolving. Along with the technology, the software also develops? under which it operates. But despite constant improvement, does the software sometimes fail? and it needs to be reinstalled. There are several ways to reinstall: restore, or the so-called - installation from scratch.
A dedicated partition on your Macbook Air's hard drive stores utilities that allow you to restore your system. To start recovery mode during boot, hold down the "Command" and "R" buttons until the Apple logo appears. The appearance of the logo indicates the start of the recovery process. After the restore is complete, a blank desktop should boot, which will include the operating system menu bar, as well as the Mac OS Utilities application window. If your desktop is loaded, then something is wrong. Start OS recovery again. It is also possible to reinstall the system via the Internet. This is used when it is impossible to recover from the hard disk when, for example, the recovery partition has been corrupted or cleared. As in the first case, to start the recovery, hold down the "Command" and "R" keys. Recovery occurs via WiFi directly from remote Apple servers. Since the recovery process is fully automated, the user's capabilities in it are significantly limited. You will be able to select a communication channel or enter a password for the WiFi connection. After the recovery is completed, the macbook will reboot - and you will see the desktop.

Macbook can also be reinstalled using a remote drive. To do this, enable this feature in the settings. Run a remote installation of the system from the "Utilities" item, which is located in the "Applications". To ensure a quality installation of the system, follow all instructions displayed on the screen.

Most modern MacBooks support the ability to reinstall from the USB drive that comes with the device. To do this, connect the flash card to the device and start it. In the window that appears, select "Reinstall MacBook". Wait for the process to complete and restart your device.

Following this instruction, you can always reinstall the system on macbook air, and this process will not take much time and will not cause any difficulties.
Not only Windows requires periodic reinstallation of its operating systems, but Mac OS also needs to be reinstalled from time to time. Therefore, users of "apple" technology should know how to install Mac OS on a MacBook, and do it yourself.
Free consultation! Free diagnostics! Job Guaranteed!
We can fix all Apple appliances ☎ 953-94-11
The installation will depend on the version of the system you want to install on your computer. You can download its image from the AppStore or from some convenient torrent if you do not want to update in the process, but plan to do it from scratch. It is recommended to download all the same from the AppStore. After that, you can start reinstalling your system. If you want to install updates, you will find useful information on how to find out which Mac OS is already installed on a laptop. For this:
- Click on the "apple" icon in the top left corner of the screen.
- Find the line "about the computer", click on it.
- A window will appear on the screen with information about the version of the installed system.
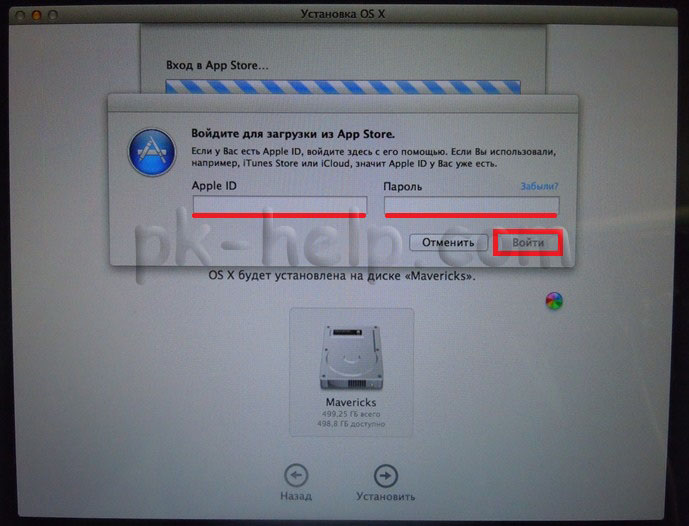
Installing Mac OS X from scratch
Installing the tenth version of the system is quite simple. But in addition to the computer, you will need a removable storage medium with free 8 Gb of space. A flash drive is not suitable for exactly 8, part of the space is still occupied there. When you have downloaded the system image, the next steps will be as follows:
- Right-click on the system image.
- Find the line "Show the contents of the package", click on it.
- Copy the InstallESD directory (to do this, first navigate to Contents/SharedSupport/InstallESD.dmg).
- Move and mount directory to desktop.
It's time to insert the flash drive and open the utility disk utility. It will be located in the Utilities in the "Programs" tab.
- Specify the media through Disk Utility.
- In the "Our media" field, find the "Partition disk" tab.
- Select a GUID scheme in the options.
- Find the Restore tab.
- Drag the system image, select "Our media" as the destination.
- Click on "Restore" and thus create a bootable USB flash drive.
After the flash drive has become bootable, the installation of the system itself begins. To do this, without pulling it out of the socket, click on "restart the computer". Next, you will need to hold down the Opt button (aka Option) on the laptop keyboard to select the boot volume. After selecting "our media", start installing the system, following its instructions.

Installing updates
Knowing how to reinstall the system, you can roll it back after the update, or simply install the version that suits you best. But Apple offers users to update their system as updates are released, they can be very useful. To update MAC OS, you need:
The Service Center is not responsible for your actions. Articles are for informational purposes only and are not instructions for action.
MAC OS, like Windows, sometimes requires reinstallation. This may be due to the slow operation of your MAC device or in connection with its sale (I do not think that you will be satisfied with selling the MAC with your personal information). Or, on the contrary, buying a MACBOOK (PRO, AIR) or iMAC with a bunch of incomprehensible files or unnecessary programs. In general, there can be many reasons for reinstalling MAC OS. In this article, I will describe in detail how to reinstall MAC OS and get a "clean" operating system.
So, before you start, you need to transfer all the necessary information to external media, because after reinstalling MAC OS, it will be almost impossible to restore anything.
In order to reinstall MAC OS you will need:
1 Powered MACBOOK (PRO, AIR) or iMAC;
2 Internet access with MACBOOK (PRO, AIR) or iMAC;
3 This article and about an hour of time.
To reinstall MAC OS using the method described below, you must be using OS 10.7 and higher (10.8, 10.9). In order to check which version of the operating system you have installed, click on the apple in the upper left corner and select "About this MAC". In the window that opens, there will be information about the installed version of MAC OS.
If you are using a version older than 10.7, you need to update it.

You should have "OS X Utilities" loaded, if this did not happen, repeat the procedure with a reboot and pressing the "COMMAND" + "R" key combinations.
Select Disk Utility.

IMPORTANT!!! The following steps will delete all data on your drive, so you need to be sure that the necessary files are not on the MAC.
Then select the disk with the system, on the right, open the "Erase" tab and click the "Erase" button.

Confirm the deletion by clicking the "Delete" button.

Then close the "Disk Utility" window and select "Reinstall MAC OS".

After that, confirm the installation, click the "Continue" button. With the release of the new OS X 10.10, OS X Yosemite will be installed.

In the next information window, click "Continue".

The next step is to read the license agreement and accept it.


Then select the installation drive. In this case, the choice is obvious. Click the "Install" button.

After that, the MAC OS download process will begin.

After that, the MAC will automatically reboot and the installation of MAC OS will begin.

After the installation is completed, you will receive a "clean" MAC OS operating system, it remains only to set some settings.
The next step is to select the country where you plan to use MACBOOK (PRO, AIR) or iMAC.

Select a keyboard layout.

You can connect to a Wi-Fi network (you can skip this step if you wish).

If you want to restore data previously made using Time Machine or from a Windows computer, select the appropriate item, if you do not plan to restore anything, select "Do not transfer any information" and click "Continue". Data that you have transferred to external media can be transferred later.

The next step is to sign in with your Apple ID. In this example, I won't do it.

Then read the license agreement and accept it.

After that, enter the credentials (login and password) and click "Continue".

The last step is to register your MAC (this step is optional).

And in the end you will get a "clean" MAC OS.
Video of reinstalling MAC OS on iMAC/ MACBOOK PRO/ AIR.
In my opinion, the installation of MAC OS is simplified to the point of impossible, even disks with the operating system are not required - pressing a few keys + an hour of time and you have a "clean" MAC OS.
Sooner or later, the day comes when you need to reinstall the Mac OS operating system on your MacBook PC. This task is no more difficult than reinstalling Windows. This will be discussed.
operating system on macbook
The reasons for reinstalling the macOS operating system on a Mac computer are as follows:
- damage or deterioration of the built-in drive (HDD);
- selling or gifting a MacBook to another person;
- "moving" to another MacBook (newer model, but with the same version of MacOS);
- transferring data to Apple gadgets or to another computer.
What is the reinstallation of MacOS:
- "from scratch", including formatting the built-in disk;
- reinstallation "on top", with the preservation of personal data and applications (updating MacOS).
For example, using the MacAppStore, you can upgrade OS X Lion and OS X Mountain Lion to the newer OS X Mavericks.
The procedure for selling or transferring a Mac to another user is as follows. It deserves special mention.
- Backing up personal data from a MacBook to a separate media or cloud service.
- Disabling special services and functionality that manages copying and transferring data.
- Erase all personal information from the drive.
Attention! Before you start reinstalling MacOS on your MacBook PC - take the trouble to save all your data on external media! This will be discussed first.
Backing up data with Time Machine
Time Machine is designed to back up personal files from your MacBook and restore them back to it. But it requires external USB drives (HDD, SDD drives) formatted in MacOS Extended or Xsan - FAT/NTFS file systems designed for Windows and Android are not supported. If the disk was previously formatted in FAT / NTFS formats, the MacBook will not accept it if it refuses to reformat “for itself”.
Time Machine is launched from MacOS System Preferences in the Apple menu. When an external hard drive is connected, a corresponding notification will appear.
Do you really want to destroy all data written to this drive in a different format?
If the external drive has already been formatted, Time Machine will give the go-ahead to use it. Confirm the request.
Are you sure you want to copy your data to this drive?
If Time Machine does not show disk selection, do the following.

It is interesting that backups in the Time Machine program are fully automated - the backup is "refreshed" hourly, and their saving is ordered, you will not "get lost" in them. In addition, copying is also possible to an Apple server (like iCloud) and to local network storages that support the Apple File Protocol. All this often helps in case of need to reinstall MacOS not to waste precious working time.
After copying all your data, you can proceed to reinstall MacOS.
Reinstalling macOS on a Mac
There are several ways to reinstall macOS on a MacBook: a clean install from a flash drive, an over-install of a previous version (updating from the MacAppStore), and restoring macOS from a backup.
How to reinstall Mac OS from an installation flash drive
The preliminary steps are as follows.
- Download the Mac OS X installation image from the Mac App Store or third-party sites.
- When the download is complete, right-click on the downloaded file and select "Show Package Contents".
- Go to the /Contents/SharedSupport/ folder, copy the InstallESD.dmg file to a safe location on your disk, and mount it on your macOS desktop.
We need the Disk Utility app included with MacOS. These are the next steps.
- Launch MacOS Utilities and select Disk Utility.
Select MacOS Utility Disk
- Insert the USB flash drive that is supposed to be installed.
- Launch the "Our media" component (the name of the flash drive will appear in the header) - the "Partition Disk" tab will open.
Give the drive a name that will make it easy to find
- Select the location of the partitions and under the "Options" button, check "GUID Partition Scheme".
Click OK
- Open the Restore tab. Make the MacOS image the source, and the USB flash drive the “receiver”, and click on the “Restore” button.
Specify what and where to copy
Creating an installation flash drive "Disk Utility" will perform automatically, and it does this operation quite reliably. When the copy is complete, Disk Utility will notify you of this.
Congratulations! The macOS installation flash drive has been created! You can restart your MacBook. Preparing to install MacOS is as follows.

Everything! MacOS installation started. The macOS operating system will install automatically - this will take 30-100 minutes depending on the performance of your MacBook. After it, your PC will immediately be ready to work.
How to install the system without formatting the internal drive
Installing macOS without erasing a drive is all about downloading and installing macOS updates directly from the MacAppStore. The installation flash drive is not needed here. This is similar to updating iOS on smartphones and tablets "over the air". This method is good for those who once bought a MacBook - and are not going to change it, but, on the contrary, will work on it for many years, because MacBook computers, like Apple iDevice gadgets, are of very high quality, reliable and convenient.
Before updating, make sure that your MacBook meets the hardware requirements of the new version of MacOS - otherwise it will "slow down".
Not every previous version of MacOS may work to upgrade to the desired version. So, if your MacBook is running macOS Snow Leopard (10.6.8) and your MacBook is running macOS Sierra, first upgrade to macOS X El Capitan.
The macOS Sierra version is taken as an example. Other copies are searched for and "placed" in exactly the same way. Your actions are as follows.

If you have OS X El Capitan 10.11.5 (or newer) operating system, the MacOS Sierra version is downloaded silently. You will then be prompted to install this version.
Click on the install button
During the installation of MacOS, the PC restarts several times. If this version did not suit you (Macbook performance dropped) - “roll back” to the previous one (for example, OS X El Capitan), with which PC performance was very satisfactory.
Restoring macOS from a backup
For example, a “rollback” from MacOS Sierra (10.12) back to OS X El Capitan (10.11) or OS X Yosemite (10.10) is taken. Let's say there are backups made in the Time Machine application before installing macOS Sierra.
Important! You can only restore a MacOS system from a backup on the same MacBook. Trying to transfer your copy of MacOS with data to another PC in this way is useless. Use other methods.
- Connect an external drive to your MacBook and save your existing files to Time Machine, naming the new copy macOS Sierra.
- Open an old copy of OS X Yosemite from Time Machine on another drive, after connecting it to your MacBook.
- Restart your MacBook by holding Command+R on your keyboard. The familiar macOS recovery menu will open.
- From the OS X Utilities menu, select Restore from Time Machine Backup.
- Once in the "Restore from Time Machine" recovery window, click on "Continue", and then specify the source - the disk with the "backup" of OS X El Capitan.
- The saved copy should be like this: in the case of OS X El Capitan, the MacOS version should be 10.11.x. Click the "Continue" button. Specify the installation disk to restore from a copy, click on "Restore".
Ready! The OS X El Capitan version will be reinstalled.
Transferring a copy of the operating system and your data to another MacBook
Go to "Programs/Utilities" and open "Migration Assistant". The structure of your files and folders will be preserved.
Click to continue
When running, the application requires the closure of all other running programs.
If both computers are working, but you still want to duplicate your version of MacOS and all the data on the second computer, connect the computers to each other using a LAN network cable, over a wireless Wi-Fi network. Connecting directly with a Thunderbolt or FireWire cable will require your previous Mac to be running in backup storage mode, making the Assistant a little more difficult. However, both methods work well. Instead of the previous PC, you can connect an external drive with a backup to the new PC - in this case, the work of the "Assistant" on the new PC will not change significantly.
So, the procedure is the following. For example, the usual mode of operation of the old PC with the "Assistant" is taken.

Everything! Copy session started. This can take anywhere from 30 minutes to two hours, depending on the amount of data and the performance of both Macs.
Problems when reinstalling macOS
Problems during an update or "rollback" can be as follows.
- There are no recent backups. Have you turned off backups yourself? Copy your files right now so you don't lose them by starting the process manually. Turn on backup.
- An error occurred during the next backup or when restoring personal data from a previous copy. The external disk that has been written to so far is not suitable for further use. Contact an Apple Service Center or a certified computer repair shop to restore your data. This procedure is not free.
- Error during the next MacOS update. Your Mac PC may no longer be supported. This happens every few years. You are left with the current version of MacOS until you replace your Apple PC.
- The computer began to work noticeably slower than before the update. The minimum system requirements of the next new version are equal to or exceeded the specifications of your PC. "Rollback" to any of the previous versions of MacOS. Apple usually tries to prevent this from happening - it simply stops supporting obsolete computers, just as it is no longer possible to install iOS 10.x on iPhone 4x devices.
- Your PC, after a few active years, suddenly began to "freeze" despite the fact that you did not update MacOS. Maybe it's time to replace the internal HDD / SSD drive? Try to backup your important data before replacing the internal drive - while something else is being read from it.
- It is not possible to "roll back" to one of the previously installed versions of MacOS. Rollback should be done gradually. If there are no previous backups, download a new "image" and "roll back" first to this version, and only then repeat the "rollback" to an even earlier version of MacOS.
Related videos
Reinstalling MacOS - "on top" or "from scratch" - is not difficult. It is only important to secure your data. This is a real way to extend the life of your favorite MacBook for a certain number of years. You will succeed!
Quite often, Mac users are faced with the following problem - how to return the computer to factory settings, reset all user information, and reinstall the operating system "clean". Instructions for this process are provided below.
Mac, like most other devices from Apple, is designed for personal use. And this means that usually computer owners fine-tune the system for themselves and another user will not be entirely comfortable working with it. If there is a need to completely get rid of the existing data and settings, then you need to follow the simple steps described below.
Clean Install macOS: Prerequisites
IMPORTANT: Before a clean install (reinstall, flash, factory reset) of a Mac, be sure to check:
- Is the Mac tied to your Apple ID, and not to any other
- Do you remember the credentials (login and password) of your Apple ID. You can check, for example, by logging in (from a computer).
The fact is that if the Find Mac function was activated on the Mac (located along the path: System Preferences → iCloud → Find Mac), then after reinstalling the system (resetting to factory settings), the system will ask you to enter the Apple ID to which the device is linked .

- How to find out (see) which iPhone, iPad, Mac are linked to Apple ID.
- How to recover (reset) a forgotten Apple ID password for iCloud, iTunes and the App Store.
- What gets deleted when you sign out of iCloud on iPhone, iPad, and Mac?
How to factory reset Macbook, iMac, Mac mini, Mac Pro (how to reinstall macOS)
1. Make sure you have an Internet connection (for later installation of macOS), and an electrical connection for a MacBook.
Attention! The following steps will lead to the complete deletion of ALL data on the Mac - save the necessary information in advance on external media;
2. Restart your computer (or turn it on if it was turned off) using the menu → Reload;
3. During the reboot process, press and hold the key combination that suits you best:
⌘Cmd+R- install the version of macOS that was running on the computer before the problems occurred. Those. your Mac will install exactly the same version as before.
Option (Alt) + ⌘Cmd + R- update to the latest version of macOS that your Mac is compatible with. For example, if the "mac" worked on High Sierra, and the breakdown occurred after the release of the final build of macOS Mojave, the system will download from the Web and install Mojave.
⇧Shift + ⌥Option (Alt) + ⌘Cmd + R- installing the version of macOS that was originally installed on the computer (or the closest available version to it).
Note: macOS Sierra 10.12.4 or newer required.
4 . Then the window " macOS Utilities»(may be called "macOS Utilities" on versions below macOS High Sierra). Here you need to select " Disk Utility" and click " Continue";

Check and fix boot disk errors (recommended)
1 . In Disk Utility, select your drive from the menu on the left (usually Macintosh HD, it's at the very top).
2 . Click on First Aid.
3 . Click Launch. The application will check the boot disk for a "health condition" i.e. performance and fix any bugs. This process may take some time.

4 . Once the verification is complete, click Done.

Erase boot drive
1. In the Disk Utility application, select a verified boot disk, go to the "Erase" section (at the top of the screen);

2. On the menu "Format" select APFS (for computers with macOS Sierra installed and an older version of the OS, select Mac OS Extended) and press " Erase";


3. When the disk formatting process is complete, click " Complete" to exit Disk Utility.
Reinstalling the macOS operating system (factory reset)
Reinstall macOS using the appropriate item (screenshot below) and follow the instructions. The latest version of macOS will be downloaded from the Internet and the macOS reinstallation process will begin. During this time, the computer may restart.
Note: when you install from scratch, you will have to configure your Mac and programs settings again.


According to yablyk
 The Complete Guide to Google Forms How to Create and Use Google Forms
 Virus Petya: the battlefield - Rosneft
 Yandex Navigator not working