Transferring windows 8 to another hard drive. Transferring Windows to another empty hard disk using AOMEI Partition Assistant. The specifics of the operation: must-read
Many probably wondered how to transfer Windows OS to a computer from another computer whose hardware is radically different from that of the old computer.
An example is given for porting Windows 8, and the same can be done with other versions of Windows starting from Windows 7.
And so, we will transfer using a utility from Microsoft called sysprep.
This utility allows you to create a customized Windows image along with the installed programs, which can then be deployed on another computer, preferably with a similar architecture, but very often I had to deploy such an image on a computer with completely different components and everything went well. And in our situation, although the motherboards were from different manufacturers, the processors were both from INTEL.
After the system is successfully deployed on another machine, you only need to enter the activation key (that is, as with a normal system installation), otherwise Windows 8 will be installed, but it will only work for 30 days. If activation fails, activate Windows 8 by phone, see the link to our article above.
Extensive information about the sysprep utility is available on the official Microsoft website, required.
Run the command line as administrator
and enter the command:

a window opens in which you can see the limit on the number of transfers Windows to other computers. In our case 1000.

Then we enter the command
C: \ Windows \ System32 \ Sysprep \ Sysprep.exe

In the window that appears with the parameters, set everything as on the screenshot and click OK.

- Putting the system into OOBE mode - the operating system transfer mode is activated the next time the system is started.
- Preparation for use - all data will be deleted from the system that should not be copied along with the image (security identifiers (SID), activation information, etc.), but the installed software should be transferred without problems.
Windows 8 takes a few minutes to prepare for transfer to a friend's computer. The computer shuts down. We dismantle the hard drive from my system unit and put it in its rightful place in the system unit of my friend. We disconnect the computer of my friend from the Internet (below it is written why). We connect the cables and turn on his computer, everything is ready for transfer.
And so, if you now back up Windows 8 prepared in this way in Acronis True Image or Paragon and save this image on DVD-disks or a USB portable hard drive, then you can successfully deploy this image to other computers, you can do without Acronis, use the Dism or ImageX tools built into the operating system, () the only thing you will need to do after installation is to enter the system license key or Windows will only work for 30 days and will ask for activation (everything is fair).
We turn on the computer, the priority of loading from the hard disk must be set in the BIOS. Immediately after switching on, the devices are being prepared.

You can activate Windows 8 after installation, click Next.

We accept the license agreement. Computer name.
Here friends attention! Microsoft itself advises to avoid conflict when transferring the system in this place, be sure to disconnect the computer from the Internet, and assign a new name to your computer, and also create a new user. Then, when transferring, you will keep your old profile with all installed programs and some settings. If you remember, during a fresh installation of Windows 8, we named our computer Makar-PK,

and created an account Makar-77

choose another name now, for example Fedot-PK. As a result, after migrating Windows 8, you will have two user profiles. The old Makar-77 profile with all the programs and the Fedot-77 profile will be saved - it turns out to be temporary and is needed only for transferring Windows 8. Click Next.

Use standard parameters.

We select Login without a Microsoft account (if you previously logged into your Windows 8 by email address, then you cannot enter it here, again, to avoid a conflict when transferring the system, and so that your old Makar-77 profile is not overwritten).

Create a new user, that is, an additional local account, different from the one already on this system. For example, before transferring Windows 8, you logged in under the Makar-77 account, now in this window create a Fedot-77 username, then assign a password with confirmation and a hint. Ready.


And finally, Windows 8 boots up. Naturally, the system is not activated until the Internet is connected, if you do not know how to activate if you have a license key, read our article "How to activate Windows 8".
We signed in to the Fedot-77 account we just created,

there is not a single program here, an empty desktop, that is, a clean profile,

but I installed the programs and they did not go anywhere. Selecting the Makar-77 account

and we get into the configured operating system, where almost all the programs I have installed are launched.

We go into the properties of the computer. We see all the information about the "new" components of the system unit.

Sometime in the very beginning, I wrote a couple of articles on this topic, these were articles about moving the folders "My Documents", "Downloads", the Appdata folder and even the entire user profile. It turned out, of course, not very nice (the first pancake is always lumpy :)), so someday I will completely rewrite these articles. And although all the folders are transferred routinely, remembering the search engines, I will write a couple more articles: this one, about moving the desktop, and about moving the Downloads folder. Remembering to save the SSD drive, these actions will not only free up space on the system drive, but also extend its uptime. So, let's get down to the operation. As with the rest of the system folders, there are two ways to transfer this folder:
I. Through the conductor Windows
II. Using Registry Editor Windows
I. Transferring the desktop through Windows Explorer
1) The first thing to do is create a folder that will be used to store files and desktop shortcuts:
2) Next, go to the user folder. If in Windows 7 it was quite simple (you just need to open the start and select the username in the right column), then starting with Windows 8 you need to go through the path:
C: \ Users \ * username *
We find ourselves in a folder containing the following: 
3) Right-click on the "Desktop" folder and open its properties: 
4) Go to the "Location" tab and click the "Move" button: 
5) Go to our folder created in the first paragraph and press the "Select folder" button: 
6) Click the "OK" button to apply the changes: 
And we agree to transfer files and folders by clicking "Yes": 
7) Files and shortcuts have been successfully moved, and now everything that you save to the desktop is saved on a different partition. 
II. Transferring the desktop by making changes to the Windows registry
1) Open the Windows Registry Editor. To do this, press the key combination Win + R and introduce regedit :
2) We follow the path:
HKEY_CURRENT_USER \ Software \ Microsoft \ Windows \ CurrentVersion \ Explorer \ Shell Folders
And we are looking for a parameter Desktop:
Even novice users know why it is worth transferring an operating system from HDD to SSD. Nevertheless, such computer optimization for many remains an unfulfilled dream. Why? Perhaps, simply because the methods proposed by system specialists are often described so vaguely and vaguely that after reading them you want to take a hammer and break your computer. But this is hardly the best solution, you must agree! Do you want to know how to transfer your favorite Windows 8 to SSD without much difficulty? Then listen carefully!
Method number 1: Installing OS on SSD via Recovery program
The most commonplace and at the same time effective way to transfer all system data from HDD to SSD in Windows 8 is to use the tools of the Recovery utility built into the system. It's very simple to start it: simultaneously press on the keyboard and Q, type in the name of the program into the search and double-click the left mouse button on the result found. As a result, such a window will appear before your eyes: 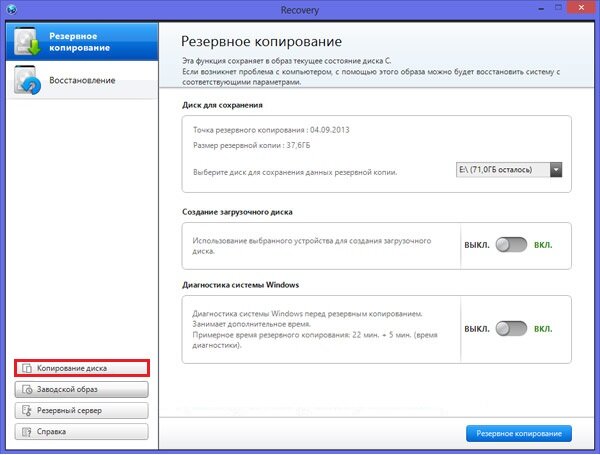
In it, we are looking for the "Copy disk" tab in the lower left corner and click on it with the mouse after connecting our SSD to the computer using a SATA-USB cable. As a result, a new window will appear on the screen, where information about the HDD (source) and SSD (target) will be displayed: 
What do we need? Find the "Disk recovery point" section, select "Restore disk to factory settings" and click the button at the bottom of the "Copy disk" window. After that, Windows 8 will restart automatically in system recovery mode.
Note that this process will transfer, install and split data from the HDD to the SSD. This process can take a lot of time: from 45 minutes to 1.5 hours. Therefore, after the process has begun, you can safely go to the kitchen for breakfast, lunch or dinner (whatever is ripe for you there). After the data transfer has been successfully completed, we turn off our PC, replace our old drive with a new one, restart the computer and work on Windows 8 already with an SSD. What could be easier?
Method number 2: Transferring data from HDD to SSD using the Aomei program
If the Recovery utility is not installed and working on the computer, you can transfer data in Windows 8 to an SSD hard drive using the Aomei program. Note that this program is paid, but the developers provide users with the opportunity to get acquainted with its work during the trial period for free. What do you need? Nothing special. Just download and install it on your computer with Windows 8. This process, as heavy as a blue whale, will take as much as a few minutes, no more.
After the installation is complete, connect the SSD and open the Aomei program. This window will appear: 
In it we find in the list the hard disk we need, point the mouse cursor over it and click on it with the right mouse button. In the list, we find the item "Deleting sections" and click on it with the left mouse button: 
As a result, all data on the disk will be deleted, and it will be ready for transferring Windows 8. After that, find the "Transfer ..." tab in the left window and click on it with the left mouse button: 
A welcome window should appear, which will notify you that the configuration and data transfer from one disk to another is starting. Without hesitation (what is there to think about?), Click the "Next" button: 
After that, the installation wizard will prompt you to select the drive to which Windows 8 information will be transferred from the HDD: 
To select a disk, just hover over it and click once with the left mouse button. After that we press the button "Next" and in a new window "Finish". As a result of such actions, the computer is sent to reboot and automatically starts transferring information from the disk to the hard disk of your choice: 
This process lasts a little: well, about 1 hour. What does a lot mean? For the sake of such a thing, even 3 hours can be tolerated, isn't it? In any case, after the transfer of materials from disk to disk is carried out, the computer will reboot, and we seize the moment and enter the Bios. What we need here is to configure the computer to start from a new hard drive. After that, your favorite PC with Windows 8 installed on it will reboot and be ready to plow like an ox from a brand new SSD. Quite a simple installation, right?
Method number 3: We transfer information from the HDD using the Paragon Home Expert program
A process such as optimizing Windows 8 by copying data to an SSD can also be done through Paragon. It, like the Aomei program, is currently paid, but by registering on the official website, you can test it absolutely free for 30 days. During this time, you must admit, not only transferring data from Windows 8, but moving mountains if you wish is real.
What we need? Nothing at all. Download this program from the official website, install it on your adorable Windows 8 PC and get started. However, first, take care to connect your SSD to your computer. After this is done, we launch the almighty Paragon and immediately (why wait?) We find among the tabs on the left the one called "Copy and Migration": 
To copy our beloved Windows 8 to the SSD, select the corresponding tab in the new window. To do this, simply click on it with the mouse: 
After that, wait for the welcome window from the great sensei, that is, the Master of Migration. Carefully read the information so that the installation goes smoothly and then there are no incidents: 
Have you read it? That's all right! Well then hold on setting! We go! And for this we press the "Next" button and the Wizard, so why the Migration guru will find the SSD you previously connected. You didn't forget to connect it, did you? In this case, put a tick in front of the "Use all ..." item and press the "Copy" button: 
With the help of such a program, data is copied very quickly, no more than 30 minutes, and besides, without restarting Windows 8: 
At the moment when the installation of the operating system is completed, a new window will appear on the screen: 
We read everything that is written in it very carefully, so that after the described process can be repeated. System setup is a delicate matter, remember that! In short, what we do next is how: we press the "Close" button, restart the PC, enter the BIOS and make our SSD drive the first in the boot list. Point.
When equipping a computer with a new hard drive or SSD, the user is unlikely to want to reinstall the operating system. In such a situation, it is possible to transfer Windows to another storage medium. Moreover, in addition to the operating system, it is possible to move all the components used.
Paid or free programs that are easy to find on the World Wide Web will help to carry out the process. Some of them are able to interact with disks of certain manufacturers, for example, Western Digital or Samsung, the rest are perfect for a wide variety of models. Let's consider the simplest free options, the use of which does not require special preparation.
Acronis True Image WD Edition.
The Western Digital brand enjoys widespread popularity. If one of the disks located on your PC belongs to this brand, then Acronis True Image will be an excellent solution for moving Windows. It supports all existing versions of the 7 and 8 versions of the operating system, as well as XP, has a Russian-language version.
After you download and run the program, in the main window, find the "Clone disk" section. Moving OS is available for an optional hard drive as well as an SSD.
The first step is to select the travel mode. The program suggests stopping at automatic mode. In this case, all information from the source disk will be transferred to the target one. If there were any files on the latter, they will be deleted, after which the disk will become bootable. That is, the OS will start from it.
After that, select the target and source disk, start the cloning process. The transfer of information can take quite a long time, since it depends on the speed of the device and the amount of information.
Seagate DiscWizard.
This program can be called a complete analogue of the previous one. The only difference is that you must have at least one Seagate hard drive on your computer for it to work. The interface and sequence of actions for cloning Windows are completely the same. You can download it from the official website absolutely free.
Samsung Data Migration.
Already by the name you can understand. that the program is designed to transfer data from any hard drive to a storage device made by Samsung. The process itself looks like a transfer wizard, the sequence of actions in which is performed in the form of steps. Considering that the dimensions of SSDs are somewhat smaller than those of modern hard drives, the developers have provided in the modernized versions of the program the ability to transfer not all data, but only a certain part of it.
Macrium Reflect.
The Macrium Reflect program is absolutely free, but at the same time it allows you to clone all information from hard drives or a certain part of it, regardless of the manufacturer of the storage medium. After launching the program, in the main window select the disk that you want to copy. In the next step, specify the drive to which you want to transfer the information. Further, the process will be performed automatically.
Rate the article!After buying a new HDD or SSD, the first thing to ask is what to do with the operating system you are currently using. Not many users have a need to install a clean OS, but rather want to clone an existing system from an old disk to a new one.
So that the user who decides to update the hard drive does not have to reinstall the operating system, it is possible to transfer it. In this case, the current user profile is saved, and in the future you can use Windows in the same way as before the procedure.
Usually those who want to divide the OS and user files into two physical drives are interested in the transfer. After moving the operating system will appear on the new hard drive, and will remain on the old one. In the future, it can be removed from the old hard drive by formatting, or you can leave it as a second system.
First, the user needs to connect a new drive to the system unit and make sure that the PC detects it (this is done through BIOS or Explorer).
Method 1: AOMEI Partition Assistant Standard Edition
Unlike the previous two programs, Macrium Reflect cannot pre-allocate a free partition on the drive where the OS will be transferred. This means that the user files from disk 2 will be deleted. Therefore, it is best to use a blank HDD.
- Click on the link "Clone this disk ..." in the main window of the program.
- The Transfer Wizard will open. At the top, select the HDD you want to clone from. By default, all drives can be selected, so uncheck the drives you don't want to use.
- At the bottom of the window, click on the link "Select a disk to clone to ..." and select the hard drive you want to clone to.
- After selecting disk 2, you can use the link with cloning options.
- Here you can configure the space that will be occupied by the system. By default, a partition with no free space will be created. We recommend adding at least 20-30 GB (or more) to the system partition for correct subsequent updates and Windows needs. This can be done by knobs or by entering numbers.
- If you wish, you can choose a drive letter yourself.
- It is not necessary to change the rest of the parameters.
- In the next window, you can configure the cloning schedule, but we do not need this, so just click "Next".
- A list of actions that will be performed with the drive will be displayed, press "Finish".
- In the window with the offer to make restore points, agree or reject the offer.
- The cloning of the OS will begin, upon completion you will receive a notification "Clone completed", indicating that the transfer was successful.
- Now you can boot from the new drive, having previously made it the main one for booting into the BIOS. How to do this, see Method 1.


We talked about three ways to transfer an OS from one drive to another. As you can see, this is a very simple process and you usually don't have to run into any errors. After cloning Windows, you can test the disk for operability by booting the computer from it. If no problems are observed, you can remove the old HDD from the system unit or leave it as a spare.
 Architecture of a distributed control system based on a reconfigurable multi-pipeline computing environment L-Net "transparent" distributed file systems
 Email sending page Fill relay_recipients file with addresses from Active Directory
 Missing language bar in Windows - what to do?