How to enable troubleshooting a Windows 7 computer. Step-by-step PC troubleshooting. Diagnosing and preventing computer problems
opportunities to address
computer problems
Theme for computers and laptops,
with Windows OS installed.
I must say right away that under computer problems - I have
due to a problem with Windows. Not purely technical questions. When something burns out, breaks or breaks.
When problems arise in Windows, the system itself
and fixes. With your help. You only need to know -
where to find these opportunities.
Diagnosing and preventing computer problems
Remember that your goal here is to solve an existing problem, not create a new one. If you feel uncomfortable doing something, call someone with more experience.
- The computer did not turn on, the computer turned on, but the monitor is blank.
- The computer did not boot from hard drive.
And if after turning on the computer, Windows in general
not loading - you can paste recovery disk
systems into the drive and, since the disc contains
system restore, the computer will resume.
Topics on this page
The computer is working, but the monitor is blank
To troubleshoot your computer, follow the instructions in each section below. If the computer is turned on with no devices, add the peripherals back one at a time until you can determine faulty device. For laptops, in addition to the above, remove and reinsert the battery and turn on the device without a cord. When you click on them, they will light up and show how fully charged the battery is. If the indicators do not light up even after the laptop has been connected for a while, the battery needs to be replaced. Replacements may be obtained from the manufacturer or online through third party resellers. If you are buying from an online retailer, please make sure you confirm that the replacement is for your laptop model. Laptop batteries must match each specific model. Is the monitor firmly plugged into a working wall outlet or power strip, and is the power strip turned on? If they are bent, straighten them with needle nose pliers. If the monitor is not working, your graphics card may not be working and you will probably need a professional to more accurately diagnose the problem.
Computer not booted from hard drive
If you get a series of beeps or error messages, write them down as they may help diagnose your problem. You can also get this information from the manufacturer's support page for this model. If you receive an error message, please copy the error message to search engine. However, do not sell or download software designed to do so. For older computers without a solid state hard drive, listen to make sure your hard drive is spinning. On these machines, see if the hard drive light is flashing. the hard disk light is flashing, but the computer does not start, turns off and restarts the device. If the hard drive light is not blinking, this is an indicator that it has failed. If none of the above work, check to see if your computer is under warranty. If so, contact the manufacturer for technical support.- Most laptop batteries have charging indicators.
- If this is the case, try plugging the monitor or power cord into a different outlet.
- Is the monitor's power button turned to the on position?
- Are the monitor's brightness and contrast controls adjusted correctly?
- Check both ends of the video cable for bent pins.
- Delete everything external drives or device and try restarting your computer.
- You may be able to diagnose the problem this way.
Diagnosing and preventing computer problems
Diagnosis and prevention
problems on the computer
The path to solving problems on the computer - Start → Panel
management → in the "System and security" section, select
Finding and fixing problems. A window like this will open.

After that, you will also need to restore your data if you supported it. If troubleshooting fails, feel free to contact your computer manufacturer if your device is under warranty, or get professional help if it isn't.
Troubleshooting Your Computer
Below are some steps to help you identify problems. Make sure everything is inserted in the right place: sometimes you forget to connect a wire or other device that can cause a problem. Make sure you have the latest software: Sometimes device drivers can cause a problem if they are not updated, so make sure you update your system with the latest software to make the system compatible. Check your antivirus software: Sometimes antivirus software can cause problems due to some damaged file.
Poor image quality on your computer
- You should check for free connections on your computer system.
- You need to make sure your antivirus is working properly and up to date.
- When all fails, you should call a specialist.
In this window you can find solutions to those problems
that are on your computer.
In the "Hardware and Sound" section - you can
fix hardware and audio problems.
On the "Device Settings" button - you can troubleshoot
with all devices connected to your computer.
Click on the "Device Settings" button - a tab will open
"Diagnosing and preventing computer problems."
Change the screen resolution, i.e. if the current screen resolution is 800 by 600 pixels, change it to the maximum recommended image quality.
- The Screen Resolution window will appear.
- You may need to confirm the changes.
Check the monitor's video cable to see if it has any bent or missing pins. If the contacts are missing, you must replace them. . If you have just installed a new device on your computer system and it is not working properly, follow these steps.
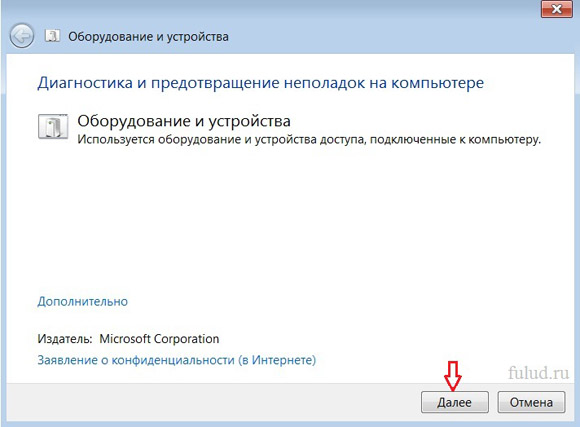
In this tab, you need to click the "Next" button at the bottom
and troubleshooting will begin in the next tab.
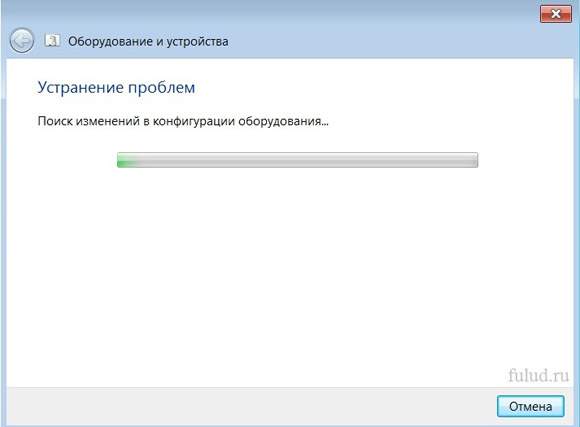
When the search for problems is over - the system
can show you such a window.
You must carefully read the hardware installation manual and follow the instructions provided. Also make sure that the hardware is not lost and that its connection to the computer is tight and secure.
- Make sure the equipment is properly connected to its place.
- Try installing and reinstalling the hardware.
- Try updating the device driver for that particular hardware.
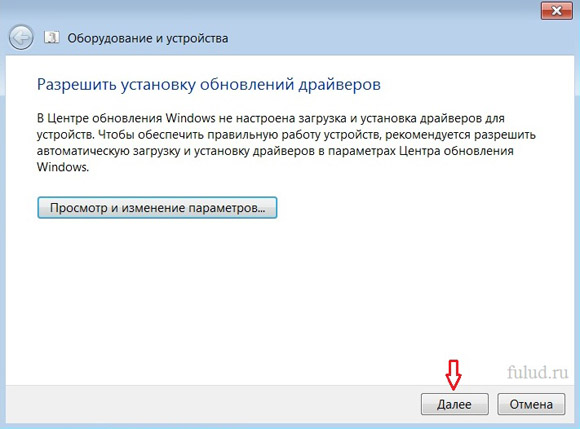
Of course, the system asks for this permission, provided that
that you will find a problem similar to mine.
If similar problem if it doesn't, it will appear
final window with diagnostics.
Is the internet growing in certain time day? Check if the problem is overloaded. Sometimes the problem isn't the Internet connection, but slow browsing response times - or maybe your browser just hangs. If the printer won't print, the first step is to determine the type of problem the printer has.
Many models have a built-in self-test feature that allows you to print a test page by holding down the feed button for a few seconds. The power button will flash and a test page will print. If the printer self-test fails, the problem is with the printer itself, not with the printer cable or computer. If this happens, contact a technician.
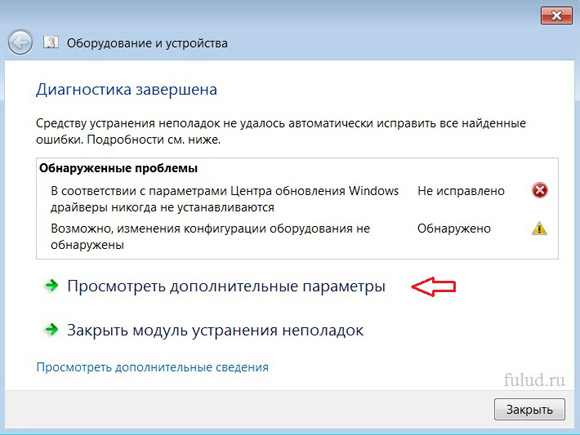
This window shows what problems
the system was unable to automatically correct.
If there are no uncorrected problems, then the program simply
will notify you when the troubleshooting is complete.
In the same way as with the "Device Settings" button described above,
from, solve problems, if they exist - both with the operation of the printer, and with sound recording, and with sound reproduction.
Select properties and click the Print Test Page button. If the test page does not print, make sure the printer cable is securely attached to both the computer and the printer. You should also check the ends of the printer cable to make sure none of the prongs are bent.
If the test print fails, or if the print consists of meaningless characters or a few characters printed on many pages, you need to uninstall and reinstall the drivers for your printer. Paper feed problems and jams can often be resolved by using paper that meets the printer manufacturer's specifications. On inkjet printers, the rubber rollers that lift each sheet can sometimes become coated with paper residue, which reduces friction. Cleaning up the residue can sometimes solve paper feed problems.
About troubleshooting the mouse -
What to do if the keyboard stops working -
On my own laptop, on which I mainly work, I have installed
version of Windows 7 (Initial). She's pretty cut. Perhaps that is why the system was not able to fix two problems automatically.
In addition, the AMD driver, which "according to the parameters of the Center
windows updates, is never installed" - junk on many
computers. This is the weak link in Windows. But while the system itself
"successfully restores" its work - I change this driver
I do not plan. I don't really have problems like this.
All system recovery methods
Today, we will look at some of the most common problems and how to fix them. 


Once you have identified the driver causing the problem, try logging into safe mode and uninstall or update the driver that caused the problem. Sometimes the driver was not visible so you will need to use the trick command line, to show hidden devices in device manager.
The second item in my unresolved issues is changing
hardware configuration. It's me myself updated mouse configuration .
After this update, the mouse began to work much better.
Quite naturally, I do not consider this a problem.
PC works but no picture
While you're there, it's a good idea to look for other resource-wasting apps that we can kill. Use Reliability Monitor. Just type reliability in the start menu search box and you can see everything and even jump to specific errors to see more detailed information. 
Disabling and re-enabling your connection If you are not getting a response, you can try disabling and re-enabling your wireless connection, which resolves more problems than it really should be.
All methods of system recovery on a computer
All Methods
system recovery
If a serious problem remains uncorrected, then you can,
, click the "View advanced options" button.
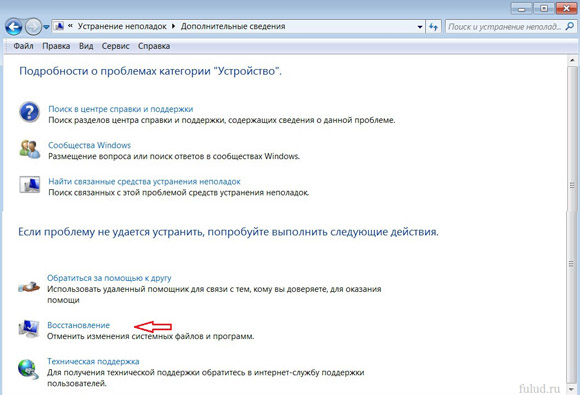
You can, in a new window, select Help to read
details about issues in the Device category. Or any other button
in this window. But, the most decisive (problem) button is “Recovery”.
If you're still having issues, there's a good chance your internet connection is just down. Slow response times Sometimes the problem isn't with your internet connection, but slow response times while browsing, or maybe your browser just hangs.
Disabling the wireless connection If you are having trouble connecting to your wireless network and stay connected, you may need to set up a connection. You can change your wireless channel to optimize your signal, but if you really want to improve your connection, try or activate your signal.
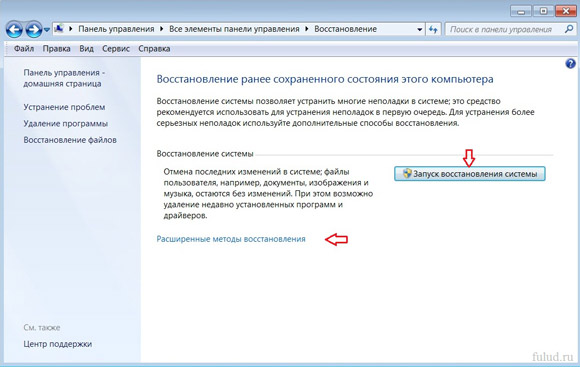
Click on the button; "Recovery" - such a window will open.
There is another way to access this window:
Start → Control Panel → under System and Security
select Find and fix problems.
At the bottom of the left column is the "Restore" button.
Click and the same window will open.
In this window there are two buttons for system recovery.
The first, which is recommended to be applied in the first place -
"Starting System Restore". This possibility of elimination
problems that slow down or block your computer.
And programs and drivers that
you installed it yourself - you have to sacrifice.
Although, if it is any free apps
(such as browsers) or drivers - you can download them again.
But don't forget
.
Desktop problems can have various causes. By following our tips, you can quickly fix any problem.
PC failure can manifest itself in different ways. For example, after pressing the power button, the machine does not show signs of "life". Or the computer turns on, but certain components do not function. The first step is to figure out what works and what doesn't. Are the motherboard LEDs on? Are the fans spinning? Is the monitor receiving an image signal? Are BIOS messages displayed? Based on these observations, most problems can be divided into six categories (see below). For each category, we provide step-by-step instructions that will help you eliminate the possibility of the simplest problems so that you can then proceed to more complex diagnostics. If at any stage you are not successful, move on to the next until you solve the problem. Even if you stop at some step, the results of your testing will later become a good help for the service center employees.
1. Without signs of life
If the computer does not respond in any way to pressing the power button, first of all, you should check the power or the button itself. We will help you localize the problem.
1.1. VISUAL INSPECTION. First of all, check if the power cable is connected well and if the surge protector is turned on. It is possible that the power supply button on the back of the computer is in the "Off" position.
1.2. HOUSING CONNECTORS. Open the PC case and check that the connectors are connected securely and that the cable is not damaged in the area between the switches and the LEDs of the case and motherboard- perhaps some connector has moved away from the plug. If one or more cables are disconnected, open the motherboard manual and check if the cables are properly connected to the plugs.
1.3. POWER BUTTON. If the chassis connectors are connected correctly or if reconnecting them does not work, disconnect all connectors from the motherboard. Then close the two pins labeled "Power Switch" with a paperclip. If the computer turns on, two options are possible. The first is a faulty power button on the case. In this case, you need to connect both connectors labeled "Reset Switch" to the pins labeled "Power Switch" on the motherboard. From now on, the PC will be turned on using the reset button, and the power button will no longer perform its function. Another reason for such a malfunction may be a short circuit in the reset button: in this case, the usual button will not work, and starting the PC will only be possible by closing two contacts on the motherboard. Confirmation of this assumption will be the possibility of starting a PC with the reset button disabled. In this case, leave the power button connected and disconnect the reset button. After all these steps, your PC will most likely turn on again without any problems. If, even when using an office paper clip, the computer refuses to “start”, then you should check the power system.
1.4. POWER THE MOTHERBOARD. Check that all power supply connectors are properly connected to the motherboard. We are talking not only about a wide ATX connector with 24 pins, but also an additional four-pin P4 connector for powering the processor.
1.5. POWER UNIT. Next, you need to exclude the possibility of failure of the power supply. To do this, connect a working PSU to the PC - for example, from a second computer. Connect the 24-pin ATX connector and the 4- or 8-pin P4 connector of a working computer to the motherboard of the failed PC and try to start it. If after that it turns on, then the whole thing is in the power supply, which will need to be replaced.
1.6. MOTHERBOARD. If all the above measures did not help, then, most likely, the motherboard, which is best replaced, since repairs not under warranty, as a rule, do not justify themselves. One way or another, replacing the motherboard means a complete disassembly and reassembly of your PC. But it is recommended to proceed with this procedure only when other possible malfunctions are excluded.
2. PC works but no picture
After power on, the screen remains black, although the PSU, CPU, and video card fans are running and the LEDs on the system board are lit.
2.1. MONITOR CHECK. First of all, you need to eliminate a banal malfunction by answering the question: does the monitor turn on? If not, there may be a power problem: the cable is unplugged from the display or from the outlet, or the display has a switch that is set to "off". If the monitor turns on, open the OSD menu and check if the correct signal source (VGA/D-Sub, DVI, HDMI) is selected.
2.2. SOUND AND LIGHT SIGNALS. If the monitor is not getting an image signal, the motherboard will often let you know by beeping or flashing to help you figure out what the problem is. Consult your motherboard manual to determine what the signals mean. One of the typical defects that are reported in this way can be faulty or incorrectly installed RAM modules, which the motherboard, depending on the model, warns with sound signal or burning LED lamps.
2.3. RESET BUTTON. A short circuit in the reset button can also be the cause of these symptoms. Carry out the check (point 1.3).
2.4. BIOS. Sometimes the cause of such startup problems can be wrong settings BIOS. To reset the BIOS, find the jumper on the motherboard Clear CMOS. We are talking about three contacts, two of which are connected by a jumper. Remember the original position of the jumper, then pull it out and connect another pair of contacts with it, wait at least ten seconds. After that, set it back to its original position. If the system board has a reset button, press it. If the computer turns on, check BIOS settings. In most cases, you must choose correct mode the operation of the SATA controller, which, starting with Windows XP, is "AHCI" and not "IDE". After that, the indicated problem should disappear. One of possible causes If the BIOS settings are wrong, it may be a dead motherboard battery - this will be discussed in paragraph 3.1.
2.5. RAM. Faulty memory is signaled by most motherboards using sound or light (LED) signals (see paragraph 2.2). However, we recommend checking the functionality of the modules random access memory without waiting for the warning signal. The computer must have at least two modules installed - remove one and try to boot the computer with it. If the PC does not turn on with this module, try starting the system with another module installed. If the computer starts with only one memory module, it usually means that the other one is bad.
2.6. VIDEO PAYMENT. Among PC components, the problem should first of all be looked for in the source of the image signal - the graphics card. If your computer has an integrated video card, remove the discrete card and test the system with the integrated GPU. Otherwise, check if the PC works with another graphics card. If yes, then your discrete or integrated graphics card is faulty.
2.7. CPU. A faulty processor can also cause the computer to operate but not produce an image signal. Therefore, if possible, test the performance of the PC with another compatible processor before the next very difficult step.
2.8. MOTHERBOARD. With all other possible sources of problems now ruled out, the last "suspect" remains the motherboard. The problem here may be, for example, in the CMOS chip in which the BIOS is stored, or in the PCIe bus to which video cards are connected. Troubleshooting in most cases does not justify itself, therefore best solution will immediately replace the motherboard.
3. BIOS stops working
The task of the BIOS is to prepare the computer for booting. operating system. If problems occur during the operation of the BIOS, then, as a rule, error messages appear, with the help of which you can localize them.
3.1. BIOS SETTINGS. With computers released four or five years ago, situations often occur when they suddenly refuse to boot. The reason lies in the BIOS settings. In this case, the message “Please enter Setup to recover BIOS setting | CMOS Date/Time Not Set". You can enter the BIOS, as a rule, using the "F1" or "Del" button when you turn on the PC. After that, you need to restore all basic settings - for example, the date, the sequence of boot devices, or such important parameter, as the mode of operation of the SATA controller (AHCI). After restoring the settings, there should be no problems booting the PC. However, the reason that the settings went wrong is most likely the following: the motherboard has a round flat battery, which is an “emergency” power source for the CMOS chip so that the latter does not lose settings. If this battery is dead, it must be replaced, otherwise the BIOS settings will be lost every time the PC is turned off.
3.2. SEQUENCE OF BOOT DEVICES. If the BIOS reports that it cannot find bootable media, then there may be several reasons. First, check the boot device sequence in the settings. In modern motherboards, this requires two steps. In the boot options you will find the item "Boot priority" ("Priority of boot devices"), which specifies components such as hard drives, removable media or optical drives. HDD must have the highest download priority.
3.3. DISK MALFUNCTION. If the drive does not appear in the BIOS media selection menu, open the PC and check that the power and interface cables for the appropriate media are securely connected. If the problem persists, test the drive with a different cable, in a USB HDD case, or in another computer. If this does not help, then most likely the media has failed as a result of damage to the controller. In this case, most likely, only a specialist will be able to recover the data for quite a lot of money. If you regularly create system images and backups data, you only need to replace the disk and copy the data. Otherwise, you will have to completely reinstall the system.
3.4. BOOT SECTOR. If the boot device is displayed in the BIOS and you can view its contents when connected to another PC, then it is most likely corrupted boot sector. This happens quite often when an unsuccessful attempt to reallocate disk space or when removing Linux, used as a second operating system. To fix the error, boot from the installation DVD or rescue disk. During the boot process, select "Repair your computer" or "PC recovery options", then click on "System Restore", then follow the wizard. If this does not solve the problem, then try to restore manually. Boot the PC again as described above and in the system recovery settings open a command prompt window. Enter the following commands in it:
bootrec /fixmbr bootrec /fixboot
bcdedit ;/export C:\bcd_1 c: cd boot attrib bcd -s -h -r ren bcd bcd_2 bootrec /RebuildBcd
After that, Windows should boot up. If you are still having difficulty, follow the instructions below.
4. Unable to boot OS (Windows logo appears, but the system does not start)
Your computer starts to boot, but just before the appearance user interface"hangs". With these symptoms, many hardware and BIOS problems can be ruled out.
(to be continued)
 Samsung Galaxy S Advance - Specifications Battery life
 Samsung C3322 review: elegant conciseness Specifications samsung c3322
 Nubia Z11 Max - Specifications Various sensors perform various quantitative measurements and convert physical indicators into signals that a mobile device recognizes