Wireless network properties are what should be. Installing and Configuring Wireless Networks in Windows XP
As expected, the new features of SP2, first of all, affect the most relevant areas today: system security and wireless communications.
New firewall WindowsWindows XP SP2 introduces a new Windows Firewall, replacing the Internet Connection Firewall (ICF) in Windows XP with SP1 and in a clean install. The firewall prohibits traffic coming from the Internet by passing:
Information that came in response to a request from your PC;
Information that matches the rules of the specified filters.
In SP2, the firewall has been enhanced. However, let me remind you that systems based on the NT5 kernel (Windows 2000, XP) already have a good firewall available through the Windows IP Security Policy ( Local security policy? IP Security Policy).
In Windows XP with SP1 and in the clean version, ICF firewall was disabled by default for all connections. You could enable it using the Wizard when creating a new connection to the Internet, or through the “ Additionally"In the properties of the connection. At the same time, it was allowed to pass traffic outside through the filters of TCP or UDP ports.
There have been many changes in Windows XP SP2, including:
The system is protected from the very beginning;
Firewall is used by default for all connections;
The settings are the same for all connections (although you can choose the connections on which the rules will apply);
Allowing traffic through both ports and programs;
Allowing traffic transmission by ranges of IP addresses;
Built-in support for IP version 6;
New configuration options via netsh utility or group policy.
Configuring Windows Firewall
You can use the control panel icon " Security Center"By clicking which you launch the control interface. In the lower part " Security Options Settings»Select« Windows firewall». ( Note: if in " Control panels"You have turned on the classic view, then just select the icon" Windows firewall"). On the first page, you can enable / disable the firewall, as well as enable the parameter " Don't Allow Exceptions», Which is convenient to use when connecting to networks, the reliability of which is not guaranteed. Let's say when you are working in a public hotspot. In this case, the settings on the “ Exceptions»Are ignored.
Here's a typical scenario: in local network your organization, you shared a folder on your laptop (set the exception “ File and Printer Sharing"). Then you go on a business trip - and connect to the guest network to read your mail. In this case, you should check the box " Don't Allow Exceptions»So that no one can access your folder.
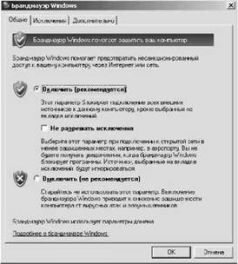
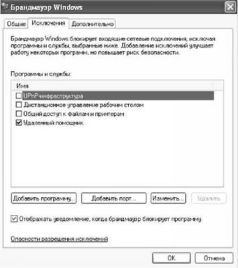
If you only use the Internet to browse the web or read mail, then you will not need exceptions at all. They are needed if any special or server programs (ftp-server, www-server) are running on your computer, or if you want to provide access to your folders on the network. To configure exclusions, go to the “ Exceptions". Several default services are already present here. Note that the tab “ Additionally»Allows you to specify exceptions separately by connection. On the tab “ Exceptions»Specifies the exceptions that will apply to all connections.
Basically, during installation Windows programs XP itself will warn you to add an exception for it.
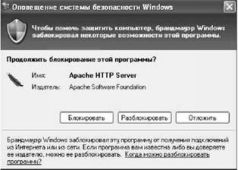
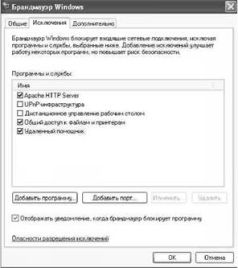
If you press the " Unblock", An exception will be added for this program (Apache web server).
Exceptions can also be added manually. To do this, use the keys " Add a program" or " Add port».
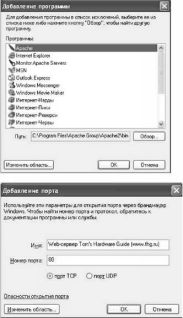
To add an exception, you can use either the program or the port - any of these methods will work. Use the whichever is more convenient for you.
Please note that for each exception, you can set a scope:
Any computer (including from the Internet);
Local network (subnet) only;
A special list.
The latter option allows you to specify a list of IP addresses (including the mask) for which the exclusion will apply. It should be noted that the same Windows "File and Printer Sharing" by default is limited to the local network only. So hackers from the Internet won't get to you.
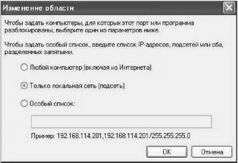
You can change the area when adding an exclusion (key " Change area") Or later by selecting the exception and pressing the" Change", and then " Change area».
At the bottom of the exclusions tab, there is a checkbox “ Display a notification when a firewall is blocking a program". If you want the corresponding window with a message to appear in every such case, then the checkbox should be checked, but if you do not want to be distracted, remove it.
The last tab of the firewall settings " Additionally"Is very useful. To begin with, the firewall can be turned on or off for a specific network connection.
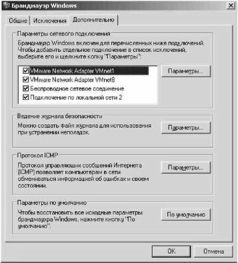
Let's say you can completely disable the firewall for your local network (by simply unchecking the checkbox) and leave it for your wireless network or internet connection. However, it's best not to do this - take advantage of the exceptions.
On the tab “ Additionally»You can configure the firewall separately for each connection. For example, the same Apache web server can be used to serve only local network clients. To do this, remove the exception (the “ Exceptions"), And then on the tab" Additionally»Select the one you want network connection(say, local network) and press the " Options».
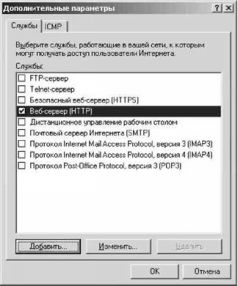
V this example it is enough to indicate the service " Web server (HTTP)". After that, local network clients will be able to connect to your web server. You can also add your own service (key " Add"), But for this you need to know its working port. Note that you won't be able to add application-specific exceptions here - this function works only for general exceptions (the “ Exceptions»).
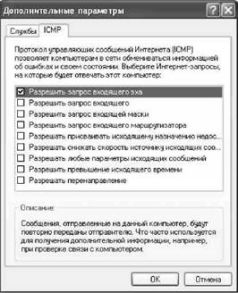
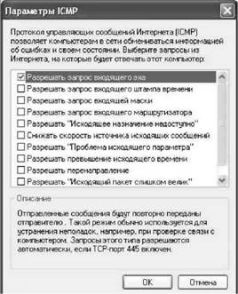
Here, in the window “ Extra options"You can adjust the operation of the ICMP protocol for each connection (the" ICMP»).
We recommend that you check the box “ Allow Incoming Echo Request"So that you can ping the network from other computers to yours. However, ICMP can be configured for all connections at once.
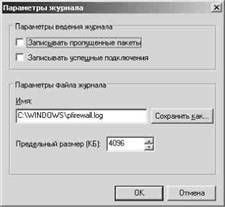
Next on the bookmark " Additionally"There is an area" Security logging". Key " Options"Allows you to set the name of the log file, the size and parameters of the records. By enabling logging, you can monitor the firewall activity.
Region " ICMP protocol"On the" Additionally»Allows you to set ICMP parameters for all connections at once.
Finally, the last point “ Restore defaults"On the" Advanced "page allows you to return all settings to their original values.
Wireless networks in Windows XP SP2
In SP2, Microsoft has improved wireless networking with the following changes.
Built-in WPA support... If earlier it was required to download the add-on for this, now all the necessary parameters are set on the connection properties tab. Naturally, the adapter and driver must support WPA for this.
Easy Wireless Setup Service... This update automates and simplifies wireless configuration, making it easier to connect to hotspots.
It allows you to perform step by step setup wireless network and save the configuration to a USB stick, which can later be used to configure other systems.
Wireless Zero Configuration Service Logging... The service is responsible for discovering and connecting to preferred wireless networks, so its logs will help you understand possible problems establishing a connection.
Restoring a wireless connection... To use recovery, just click right click mouse on the label of the corresponding connection and in context menu select " Restore". In fact, it will only disconnect and re-enable the connection.
Behavior has changed when using 802.1x authentication. If the wireless client is automatically disabled when authentication fails, 802.1x is automatically disabled when you manually set the encryption key.
The window for wireless network connections has also undergone significant changes.
Available networks
Here, as before, a list of all available networks is displayed, and parameters such as network name, network type (Ad-Hoc or Infrastructure) are available for viewing. Among the new products, it should be noted the appearance of the signal level (indicator on the right side of the available network window), network protection, status (a special icon is displayed for the connected network) and the preferred network.
Now you can start a search for available networks, set up wireless networks, change the order of preferences, view the properties of wireless connections with one key.
The connection process is now visible and visible to the user. If the connection was successful, and access was allowed, then the next step will be to obtain network address... If the address could not be obtained, that is, the DHCP server is not available, then the adapter will automatically be assigned an address from the 169.254.0.0/16 range, which will be displayed on the connection status (warning with an exclamation mark). That is, at a glance, the status of the connection becomes clear: connected, disconnected, limited, or the connection is being established.
Installing a wireless network
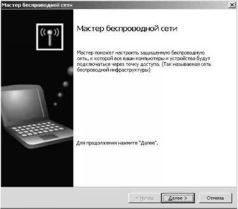
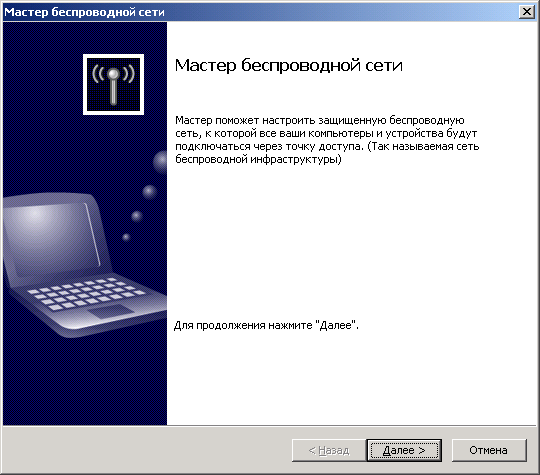
Setting up a wireless network has also been greatly simplified. Let's start by creating a wireless network. First you need to go to " network environment "And select the item" Set up a wireless home or small office network”, After which the Network Setup Wizard will start. You can go the other way: Start- All programs -Standard -Connection -Wireless setup wizard... It should be noted that the Wizard only allows you to configure networks using an access point (mode Infrastructure). If you are planning to deploy an AdHoc network (without an access point, based on only wireless cards), then you have to use manual setting.
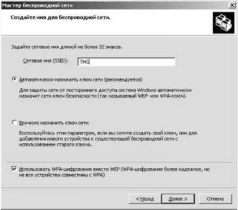
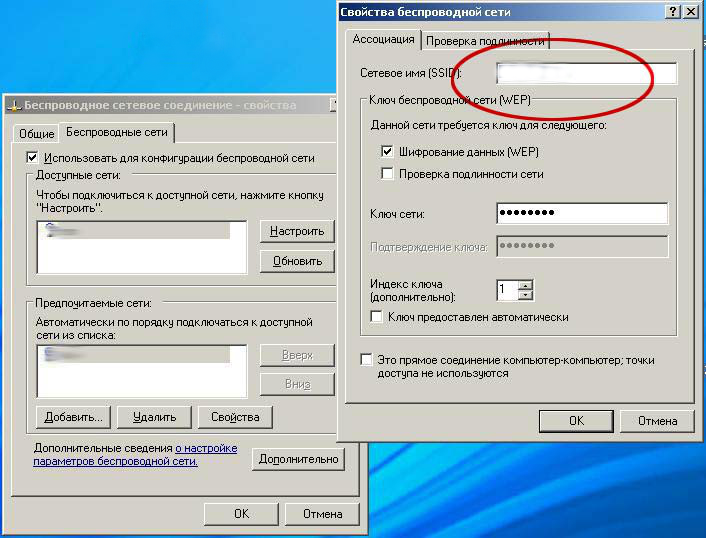
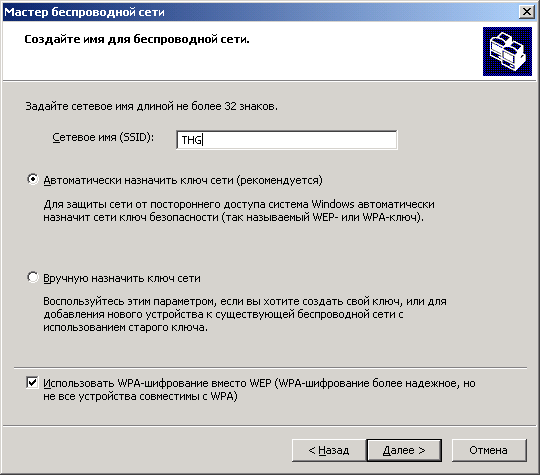
The next screen prompts you to set the SSID name, which should be the same for the entire network, determine the method for assigning encryption keys and select the encryption method directly (WEP or WPA - using the checkmark at the bottom of the window). Let us remind ourselves once again that WEP protection is not very reliable, although for home network it will be enough. If possible, it is better to use WPA (if the adapter and driver support it - refer to the documentation).
Encryption keys can either be assigned automatically or you can specify your own. If you choose your own, the following window will appear prompting you to enter the keys.
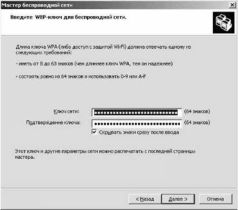
This step will be skipped during automatic generation.
After assigning all the necessary parameters, proceed to the next screen. You will be prompted to either use a flash key fob or manually configure the network.
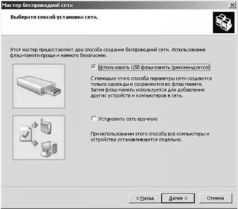
The first method allows you to easily transfer the configuration to other computers on the wireless network. To do this, it is enough to carry out the setup procedure only once, while saving all the parameters to the key fob. By the way, if the access point does not support entering information from USB sticks, then it will have to be configured manually.

Now, following the instructions, you need to disconnect the key fob and connect it to all computers that need to be added to the network.

When you connect the key fob to another computer, you will be prompted to add it to your wireless network. If the prompt does not appear, run the setupSNK.exe file manually from the keyfob. After you go around all computers with the key fob, insert it back into the first one and complete the Wizard.
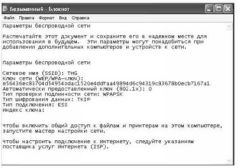
After that, don't forget to print out the network settings.
You can now connect to the installed wireless network. But to work, you also need to enter the IP addresses on each computer. To do this, select the network 192.168.x.y, where x is the number of your network (from 0 to 255), and y is the number of the computer on the network (from 1 to 254). All computers on your network must have the same network number and different number computer. Let's say 192.168.0.1, 192.168.0.2, etc. The IP address is set in the connection properties (find the connection icon, right-click on it and select " Properties"). Then on the tab “ General"Select the protocol" Internet Protocol (TCP / IP)"And press the" Properties". In the window that appears, select " Use the following IP address". Specify 255.255.255.0 as the mask.
Follow the procedure for entering the IP address on all computers.
You can use the ping utility to test the connection. To do this, you need to run the command line ( Start>Execute) type in it “ cmd», Confirm the entry. V command line type " ping”And enter the IP address of the other computer (for example, 192.168.0.2). By the way, you may have disabled support for ICMP exceptions - then you will not receive a ping response.
If there is a connection, you will receive ping responses as shown in the illustration.
Congratulations, your network is set up.
You can get information about the operation of the wireless network in the connection status window. To do this, click right key mouse on the connection icon and select " State».
The connection status window displays the connection status (connected, disconnected, or limited or not connected), the network name, that is, SSID, connection duration, connection speed and signal strength. If you see an exclamation mark next to the connection icon, this means that the connection is limited or not available, that is, the system was unable to obtain an IP address. The lock speaks of the protection of the connection.
Setting up a wireless network without an access point (AdHoc mode)
Unfortunately, the Wireless Setup Wizard does not allow you to create an AdHoc network - that is, a network without an access point, only between adapters. To configure it, right-click on the wireless adapter (connection) icon and select " State"(Status). Then go to the window " Properties"(Properties).
In this window, select the tab “ Wireless networks "(Wireless Networks).
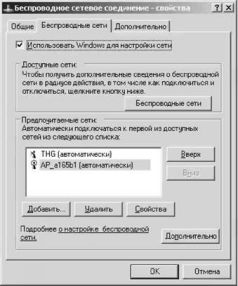
Press the " Add"(Add).
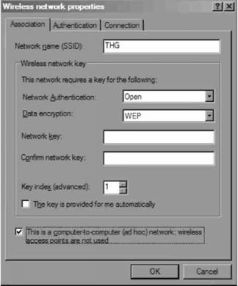
In the window that appears, specify the name of your network (for example, "THG"), as well as the WEP or WPA encryption key (if supported by the adapters). Uncheck the automatic key generation checkbox and type it manually. Also, at the bottom of the window, check the box indicating the AdHoc network. Then provide an IP address for the adapter.
After you have created a wireless network on one computer, you should add other computers to it. It's even easier to do this. In the window " State"(Status) wireless connections of other computers, press the" Wireless networks»(View Wireless Networks). There you should see your newly configured network that you can easily connect to. In this case, you will need to enter the WEP (or WPA) key, and also specify the IP address.
The changes that came with the second service pack (Service Pack 2) for Windows XP affected wireless networks and the firewall. The new Setup Wizard allows you to consistently set all the necessary parameters for connecting to the selected network, and the ability to save the configuration to a flash keyfob makes it easier to configure other wireless stations, which is very convenient in a large network.
The new firewall has not only good flexibility, but also a fairly user-friendly interface, which is important for the mass use of the product. Now you can allow access not only by ports, but also by applications.
PCTEL wireless network detector: looking for access points

The detector is not as simple as it might seem at first glance. In fact, it only detects access points, not paying attention to adapters in AdHoc mode. I also tried to define APs in WDS bridging mode, but all efforts were futile, which cannot be said for repeater mode. The detector successfully detected a WDS repeater access point, but lost it when switching to bridge mode.
Idle wireless clients do not affect device performance. Disconnected first wireless adapter when the detector is operating. Later it turned out that it does not react to the wireless adapter in any way, even when it is connected to the WRT54GS, but does not transmit data! Also, the detector does not react in any way to the built-in bluetooth adapter The H2210 iPAQ is searching for other devices.
If you consider yourself to mobile users who often need to determine the presence of a wireless network, then this detector is exactly what you need.
With the advent of wireless connectivity, humans have gained amazing mobility. Thanks to Wi-Fi, high-speed Internet has become available, no matter where you are - at work, in a cafe or at home. The main thing is that this place is included in the coverage area of the network.
You will need
- Connected Wi-Fi router Windows computer running, wireless client
Instructions
Select "Settings" and in them - " Network connections". Right-click on the "Network Neighborhood" icon, call the drop-down menu, in which select "Properties".
If the "Wireless Networks" tab in the "Wireless Network Connection" - "Properties" window is missing for some reason, click OK. Go to the "Start" menu, select "Settings" and go to "Control Panel".
In the new "Control Panel" window, double-click on the "Administrative Tools" and "Services" icons.
Make sure that the service " Wireless setting"Is in working order. Otherwise, double-click the "Wireless Settings" icon, and in the new properties window, click "Start" and OK. Return to the "Network Connections" window. Right-click on the "Wireless Network Connection" icon to open the drop-down menu and go to "Properties".
Make sure the "Use Windows to configure your network" button is checked on the Wireless & Networks tab.
Imagine how convenient it is to surf the Internet, sitting on the couch in the hall, chatting in the evenings with your friends and acquaintances while in bed, watching movies and listening to music in any room. All of these benefits are available with a wireless network connection on Windows XP. Immediately after you connect the network, you can fully experience how pleasant it is to use the Internet, how flexible the wireless network provides. And it is not difficult to configure it - you need to follow a simple algorithm for configuring and launching the network.
Equipment selection
Is it possible to set up a wireless network on Windows XP without special hardware? No. That is why to create wireless connection you need the following devices and components:

The wireless network is almost ready for installation on the Windows XP operating system. Further - a matter of technology.
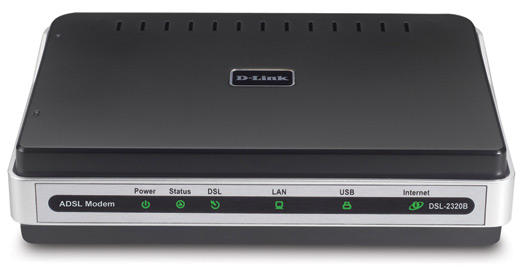
Setting up a modem and Internet connection
Have all the equipment already been purchased? Then you can set up a wireless network on Windows XP, and you need to start with a modem. If the modem was not installed by an Internet service provider, then the installation and connection rules can be found in the instructions for the equipment. If a DSL line is used, then you need to connect the modem to the general power supply, if you use a cable, then you need to use a connection through a cable outlet. Certain nuances that relate to the precise setting of the modem and the determination of access to the Internet are contained in the primary documentation that comes with the modem.
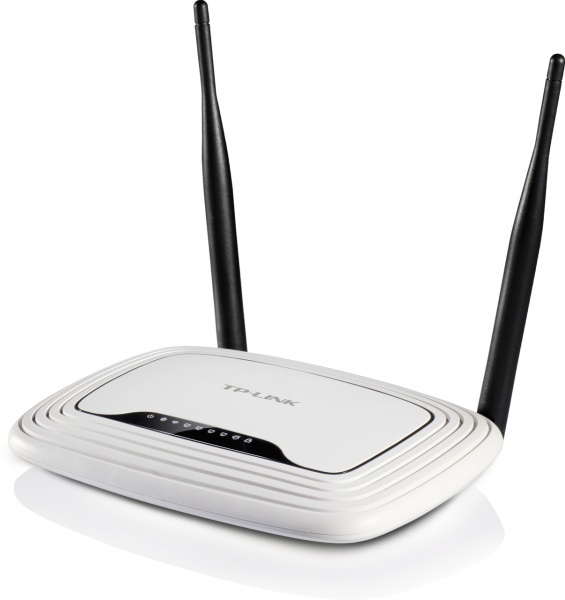
Placement of the wireless router
The user needs to place the router in a location that is most immune to interference and can achieve a strong signal. To achieve this result, it is necessary to take into account the following recommendations:
- The wireless router should be located in the center of the service area. In order for the signal to propagate as efficiently as possible to all rooms, it is necessary to place the transmitter closer to the center of the apartment or other room.
- Place the wireless router as far away as possible from objects that will interfere with use or interfere.
- Wireless routers that operate on 802.11g signals operate at the 2.4 GHz frequency. Many household electrical appliances operate at the same radio frequency, mobile phones... For better wireless performance on Windows XP, it is recommended to use equipment that uses a higher frequency signal (you can use the common 5.8 GHz frequency).
Taking into account all the requirements and following all the recommendations, you can achieve what your wireless network on Windows XP will give good quality signal and there will be no interference that prevents the use of such.
Wireless security conditions
Data security has always come first. But when it comes to a wireless network, then in this case, security is doubly important, since it often happens that the signal goes outside the premises. And if you do not use computer protection, then attackers (or just strangers) can have free access to information stored on network computers, go out through your internet connection and so on. As a result, there is a lack of good Internet speed required to work on the network. To protect yourself, just follow these steps:
- For protection wireless router on Windows XP it is recommended to change the default login, password and username. The manufacturer often lists standard data in the equipment documentation that other people can use to gain unauthorized access.
- Use a network security key. As is the case with many data stored under passwords, your Windows XP wireless network must have a password. This is one of the most reliable ways to protect your network. The network name and security key can be created in the "Wireless Setup Wizard", which, in turn, can be found in the "Network and Internet Connections" section. Both WEP and WPA data encryption can be used. The latter type of encryption is more secure, but not supported on legacy devices. On modern models, either WPA or WPA2 data encryption is most often used.
- The data that you entered when creating the network name and password must be saved and stored in any way convenient for you (you can just write the data into a notebook, or you can save the data to a floppy disk).
- Use windows firewall XP. A firewall helps protect your computer from various malware, files and intruders.
Adding a computer to the wireless network
There is little left to do - you just need to add your computer to the network, and then use it for your pleasure anywhere and in the room. Connecting a computer or other device is done in three simple steps:
- In the notification area (on a computer - the lower right corner of the screen), you need to open the "Connect to a network" component.
- In the list that appears, select your network and click on the "Connect" button.
- Enter the security key that you assigned to log on to the network. The key is entered manually, but for convenience, you can also use a file that stores data with passwords.
It's all - your wireless network in operating system Windows XP is ready to use. You can calmly and comfortably place yourself in any room, while being on the Internet and using all the advantages of free and quick access.
In SP2, Microsoft has improved wireless networking with the following changes.
Built-in WPA support. If earlier it was required to download the add-on for this, now all the necessary parameters are set on the connection properties tab. Naturally, the adapter and driver must support WPA for this.
Easy Wireless Setup Service. This update automates and simplifies wireless configuration, making it easier to connect to hotspots.
Wireless network setup wizard. It allows you to perform step-by-step configuration of the wireless network and save the configuration to a USB stick, which can later be used to configure other systems.
Wireless Zero Configuration Service Logging. The service is responsible for discovering and connecting to preferred wireless networks, so its logs will help you sort out possible connection problems.
Restoring wireless connection. In order to use the restore, just right-click on the shortcut of the corresponding connection and select "Restore"... In fact, it will only disconnect and re-enable the connection.
Behavior has changed when using 802.1x authentication. If the wireless client is automatically disabled when authentication fails, 802.1x is automatically disabled when you manually set the encryption key.
The window for wireless network connections has also undergone significant changes.
Here, as before, a list of all available networks is displayed, and parameters such as network name, network type (Ad-Hoc or Infrastructure) are available for viewing. Among the new products, it should be noted the appearance of the signal level (indicator on the right side of the available network window), network protection, status (a special icon is displayed for the connected network) and the preferred network. Now you can start a search for available networks, set up wireless networks, change the order of preferences, view the properties of wireless connections with one key.
The connection process is now visible and visible to the user. If the connection was successful, and access was allowed, then the next step will be to obtain a network address. If the address could not be obtained, that is, the DHCP server is not available, then the adapter will automatically be assigned an address from the 169.254.0.0/16 range, which will be displayed on the connection status (warning with an exclamation mark). That is, at a glance, the status of the connection becomes clear: connected, disconnected, limited, or the connection is being established.
Setting up a wireless network has also been greatly simplified. Let's start by creating a wireless network. First you need to go to "Network Neighborhood" and select the item "Set up a wireless home or small office network", after which the Network Setup Wizard will start. You can also go the other way: Start -> All Programs -> Accessories -> Communications -> Wireless Network Settings Wizard. It should be noted that the wizard only allows you to configure networks using an access point (Infrastructure mode). If you plan to deploy an AdHoc network (without an access point, based only on wireless cards), then you will have to use manual configuration (see the next section).
Configuration wizard.
The next screen prompts you to set the SSID name, which should be the same for the entire network, determine the method for assigning encryption keys and select the encryption method directly (WEP or WPA - using the checkmark at the bottom of the window). Let us remind ourselves once again that WEP protection is not very reliable, although it will be enough for a home network. If possible, it is better to use WPA (if the adapter and driver support it - refer to the documentation).
Wireless network settings.
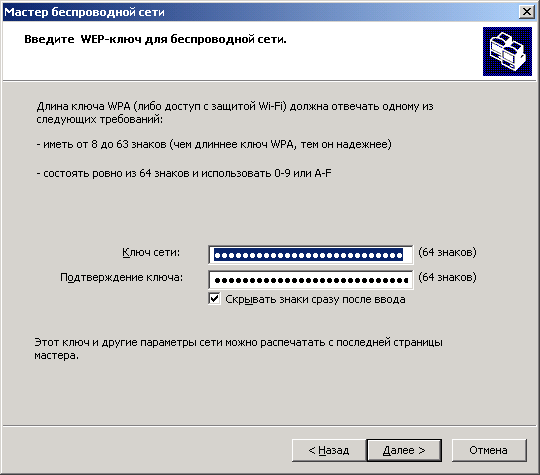
Encryption keys can either be assigned automatically or you can specify your own. If you choose your own, the following window will appear prompting you to enter the keys.
Encryption keys.
This step will be skipped during automatic generation.
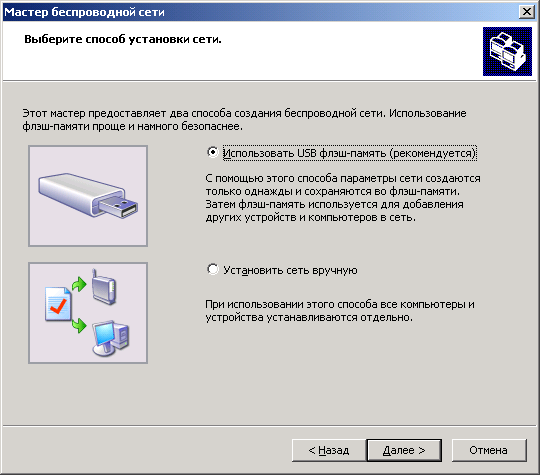
After assigning all the necessary parameters, proceed to the next screen. You will be prompted to either use a flash key fob or manually configure the network.
Choice of setting method.
The first method allows you to easily transfer the configuration to other computers on the wireless network. To do this, it is enough to carry out the setup procedure only once, while saving all the parameters to the key fob. By the way, if the access point does not support entering information from USB sticks, then it will have to be configured manually.
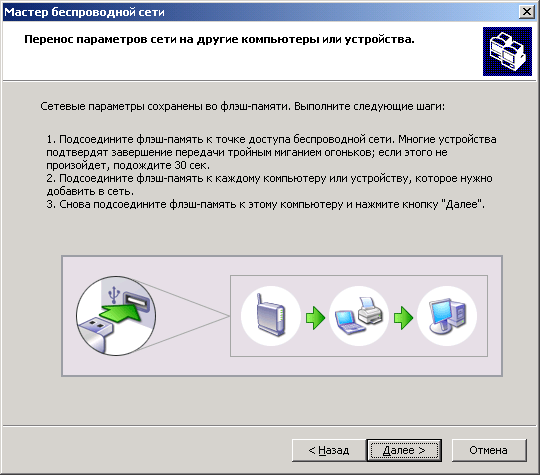
Setting up the network via a flash keyfob. We dumped all the necessary information on him.
Now, following the instructions, you need to disconnect the key fob and connect it to all computers that need to be added to the network.
We configure other computers via a key fob.
When you connect the key fob to another computer, you will be prompted to add it to your wireless network. If the prompt does not appear, run the setupSNK.exe file manually from the keyfob. After you go around all computers with the key fob, insert it back into the first one and complete the Wizard.
The setup is complete.
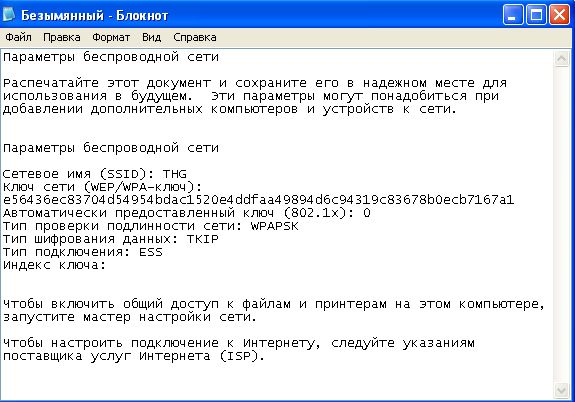
After that, don't forget to print out the network settings.
Remember to print out the network settings or save them to a file.
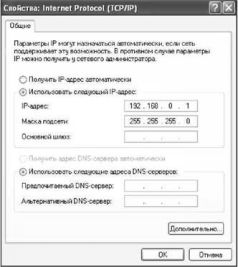
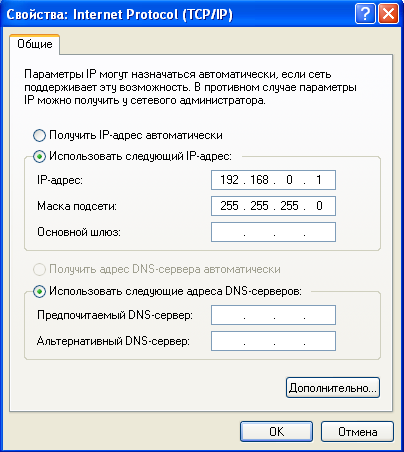
You can now connect to the installed wireless network. But to work, you also need to enter the IP addresses on each computer. To do this, select the network 192.168.x.y, where x is the number of your network (from 0 to 255), and y is the number of the computer on the network (from 1 to 254). All computers on your network must have the same network number and a different computer number. Let's say 192.168.0.1, 192.168.0.2, etc. The IP address is specified in the connection properties (find the connection icon, right-click on it and select "Properties"). Then, on the General tab, select the Internet Protocol (TCP / IP) and press the Properties button. In the window that appears, select "Use the following IP address". Specify 255.255.255.0 as the mask.
We set the IP address.
Follow the procedure for entering the IP address on all computers.
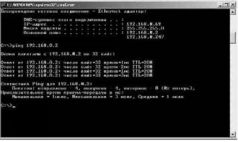
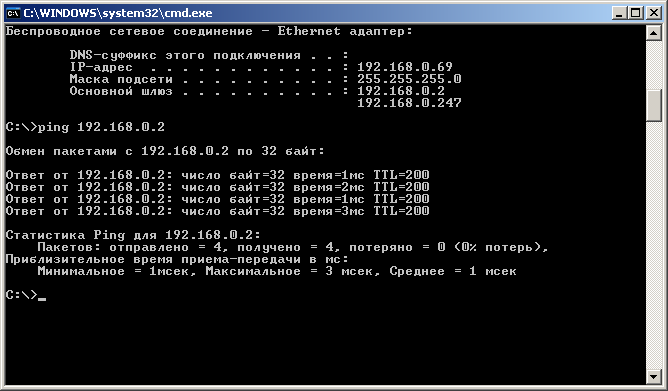
You can use the ping utility to test the connection. To do this, you need to run the command line (Start -> Run ->), type "cmd" in it, confirm the input. In the command line, type "ping" and specify the IP address of the other computer (for example, 192.168.0.2). By the way, you may have disabled support for ICMP exceptions - then you will not receive a ping response. To enable ICMP support, refer to our Firewall Configuration article.
Connection check.
If there is a connection, you will receive ping responses as shown in the illustration.
Congratulations. Your network is configured.
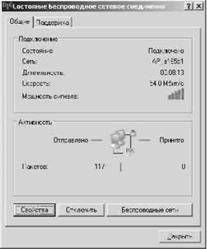
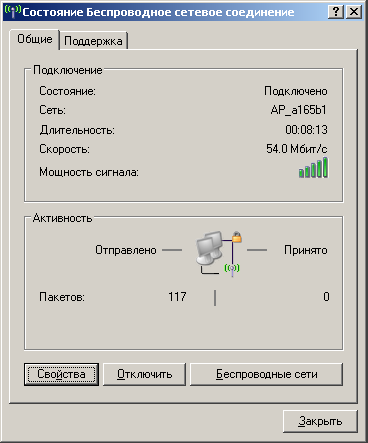
You can get information about the operation of the wireless network in the connection status window. To do this, right-click on the connection icon and select "Status".
Connection status.
The connection status window displays the connection status (connected, disconnected, or limited or not connected), the network name, that is, SSID, connection duration, connection speed and signal strength. If an exclamation mark is visible at the connection icon, this means that the connection is limited or not available, that is, the system was unable to obtain an IP address. The lock speaks of the protection of the connection.
Andrey Pirovskikh Dmitry Chekanov
Wireless networks in Windows XP SP2
In SP2, Microsoft has improved wireless networking with the following changes.
- Built-in WPA support. If earlier it was required to download the add-on for this, now all the necessary parameters are set on the connection properties tab. Naturally, the adapter and driver must support WPA for this.
- Easy Wireless Setup Service. This update automates and simplifies wireless configuration, making it easier to connect to hotspots.
- Wireless network setup wizard. It allows you to perform step-by-step configuration of the wireless network and save the configuration to a USB stick, which can later be used to configure other systems.
- Wireless Zero Configuration Service Logging. The service is responsible for discovering and connecting to preferred wireless networks, so its logs will help you sort out possible connection problems.
- Restoring wireless connection. In order to use the restore, just right-click on the shortcut of the corresponding connection and select "Restore"... In fact, it will only disconnect and re-enable the connection.
- Behavior has changed when using 802.1x authentication. If the wireless client is automatically disabled when authentication fails, 802.1x is automatically disabled when you manually set the encryption key.
The window for wireless network connections has also undergone significant changes.
Available networks.
Here, as before, a list of all available networks is displayed, and parameters such as network name, network type (Ad-Hoc or Infrastructure) are available for viewing. Among the new products, it should be noted the appearance of the signal level (indicator on the right side of the available network window), network protection, status (a special icon is displayed for the connected network) and the preferred network. Now you can start a search for available networks, set up wireless networks, change the order of preferences, view the properties of wireless connections with one key.
The connection process is now visible and visible to the user. If the connection was successful, and access was allowed, then the next step will be to obtain a network address. If the address could not be obtained, that is, the DHCP server is not available, then the adapter will automatically be assigned an address from the 169.254.0.0/16 range, which will be displayed on the connection status (warning with an exclamation mark). That is, at a glance, the status of the connection becomes clear: connected, disconnected, limited, or the connection is being established.
Setting up a wireless network has also been greatly simplified. Let's start by creating a wireless network. First you need to go to "Network Neighborhood" and select the item "Set up a wireless home or small office network", after which the Network Setup Wizard will start. You can also go the other way: Start -> All Programs -> Accessories -> Communications -> Wireless Network Settings Wizard. It should be noted that the wizard only allows you to configure networks using an access point (Infrastructure mode). If you plan to deploy an AdHoc network (without an access point, based only on wireless cards), then you will have to use manual configuration (see the next section).
Configuration wizard.
The next screen prompts you to set the SSID name, which should be the same for the entire network, determine the method for assigning encryption keys and select the encryption method directly (WEP or WPA - using the checkmark at the bottom of the window). Let us remind ourselves once again that WEP protection is not very reliable, although it will be enough for a home network. If possible, it is better to use WPA (if the adapter and driver support it - refer to the documentation).
Wireless network settings.
Encryption keys can either be assigned automatically or you can specify your own. If you choose your own, the following window will appear prompting you to enter the keys.
Encryption keys.
This step will be skipped during automatic generation.
After assigning all the necessary parameters, proceed to the next screen. You will be prompted to either use a flash key fob or manually configure the network.
Choice of setting method.
The first method allows you to easily transfer the configuration to other computers on the wireless network. To do this, it is enough to carry out the setup procedure only once, while saving all the parameters to the key fob. By the way, if the access point does not support entering information from USB sticks, then it will have to be configured manually.
Setting up the network via a flash keyfob. We dumped all the necessary information on him.
Now, following the instructions, you need to disconnect the key fob and connect it to all computers that need to be added to the network.

We configure other computers via a key fob.
When you connect the key fob to another computer, you will be prompted to add it to your wireless network. If the prompt does not appear, run the setupSNK.exe file manually from the keyfob. After you go around all computers with the key fob, insert it back into the first one and complete the Wizard.

The setup is complete.
After that, don't forget to print out the network settings.
Remember to print out the network settings or save them to a file.
You can now connect to the installed wireless network. But to work, you also need to enter the IP addresses on each computer. To do this, select the network 192.168.x.y, where x is the number of your network (from 0 to 255), and y is the number of the computer on the network (from 1 to 254). All computers on your network must have the same network number and a different computer number. Let's say 192.168.0.1, 192.168.0.2, etc. The IP address is specified in the connection properties (find the connection icon, right-click on it and select "Properties"). Then, on the General tab, select the Internet Protocol (TCP / IP) and press the Properties button. In the window that appears, select "Use the following IP address". Specify 255.255.255.0 as the mask.
We set the IP address.
Follow the procedure for entering the IP address on all computers.
You can use the ping utility to test the connection. To do this, you need to run the command line (Start -> Run ->), type "cmd" in it, confirm the input. In the command line, type "ping" and specify the IP address of the other computer (for example, 192.168.0.2). By the way, you may have disabled support for ICMP exceptions - then you will not receive a ping response. To enable ICMP support, refer to our Firewall Configuration article.
Connection check.
If there is a connection, you will receive ping responses as shown in the illustration.
Congratulations. Your network is configured.
You can get information about the operation of the wireless network in the connection status window. To do this, right-click on the connection icon and select "Status".
 Bugs in Singularity?
 Just Cause 2 crashes
 Terraria won't start, what should I do?