Do-it-yourself flushing fluid for hp. Instructions for using flushing fluid. Application methods for heads that cannot be removed from the printer
In contact with
classmates
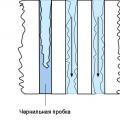
Printhead- the most "capricious" element of an inkjet printer. Long periods of inactivity of the print head can cause a slight blockage in its nozzles. The first signs of a clogged inkjet printhead are horizontal white streaks on the printouts. If the blockage is not removed in a timely manner, it can develop into an ink plug, which paralyzes the operation of nozzles clogged with dried ink. A visual comparison of a light blockage and an ink plug of the print head of an inkjet printer is shown in the figure.
 |
Slight blockage and ink plug in the inkjet print head nozzles
There are many ways to resuscitate a dried inkjet print head. Let's consider some of them.
USING THE PRINT HEAD CLEANING UTILITY
Inkjet printer manufacturers provide utilities for checking the condition of the print head nozzles with their products. If, after running such a utility, it turns out that some of the print head nozzles are clogged, you should run 1-2 cleaning cycles. Purge is the movement of ink through the nozzles of the print head. The increased pressure under which the ink is driven allows the nozzles to be freed from light ink plugs and accumulation of air bubbles.
One or two such cleanings will be enough. If you run the print head cleaning cycle many times in a row, then air-ink bubbles can form in its nozzles and the situation will only worsen. It should also be borne in mind that cleaning the print head consumes a certain amount of ink, which would be enough to print 3-5 sheets of high-quality A4 text. After cleaning the print head nozzles, leave the printer alone for 2 to 5 hours. After that, you need to start printing a test page. If the print still shows horizontal white streaks, you can run another cleaning cycle.
SOAKING THE PRINTHEAD IN CLEANING LIQUID
If cleaning the print head of an inkjet printer does not help, you can try soaking it in a special cleaning liquid. Only removable printheads (most Canon printers and older Epson printers) and cartridge-integrated printheads (HP, Lexmark) can be soaked. To do this, you need to take a small clean container, pour 2-3 millimeters of cleaning liquid preheated to a temperature of 40-50 ° C into it, and put the print head into the liquid with the nozzles down. To reduce the evaporation of the cleaning liquid, the container can be covered with a plastic bag. After that, the print head should be left alone for a period of 1 to 3 days, depending on the degree of contamination. Since the cleaning liquid has an ethereal nature and periodically evaporates, it should be added to the container as its volume decreases. After the specified time has elapsed, the cartridge with the soaked print head is inserted into the printer and, based on the print quality of the test page, it is concluded whether further flushing of the nozzles is necessary.PRINTING WITH CLEANING LIQUID
To revive a non-removable print head, you should run a print cycle with cleaning fluid. To do this, fill the cartridge with cleaning fluid instead of ink and start the print head cleaning system. If printing defects do not appear on the entire image, but only on areas of a certain color, then the liquid must also be poured into the cartridge of the corresponding color. After cleaning, the printer must be left alone for about 2 hours to allow the cleaning fluid to dissolve the dried ink in the nozzles.
After two hours, you should create a sheet in any graphic editor and fill it with the appropriate color: if a magenta cartridge was reanimated with a cleaning liquid, then the sheet should be filled with magenta, if yellow, then yellow, etc. It is better to do this in Photoshop, which allows you to use the CMYK color scheme when filling the page. The resulting ink-filled square is printed on standard paper, having previously set the highest print density. The cleaning fluid mixes with the remaining ink in the ink bottle, leaving prints on the sheet. If horizontal white streaks are visible on the printout, then the print head has not been cleaned, if the fill is solid, then the ink plug has been eliminated.
For the final check of the print head, the cartridge is refilled with ink of the corresponding color, the nozzles are cleaned, and the same ink-filled sheet of paper is printed. If the ink plug is not eliminated, the procedure for printing with cleaning liquid can be repeated.
FLUSHING THE PRINTHEAD WITH HOMEMADE SOLUTION
For washing you will need: glass cleaner with ammonia, distilled water, cotton wool, a small cup, a plastic bag, two syringes with a capacity of 10-20 ml, paper napkins and a hair dryer.
The print head is carefully removed from the printer carriage. A paper towel folded several times blots the surface of the print head. The napkin needs to be changed until the ink marks on it disappear. With a new cloth moistened with washing liquid, lightly wipe all surfaces of the print head, with the exception of the electrical contact board, with which the head is joined to the printer. Before soaking, the print head must be completely clean. The washing liquid is drawn into the syringe and is released from a short distance to areas where ink residues are visible.
If the printer is equipped separate cartridges, it is necessary to rinse the intake fittings from the syringe. If the printer uses built-in cartridges, you should empty all the contents from them and rinse the inside of the ink tank several times with flushing liquid using a syringe with or without a needle, depending on the structure of the cartridge. After the procedure is completed, the print head is blotted with a clean and dry paper towel.
If the printer has removable cartridges, then the intake fittings should be closed with cotton wool, abundantly moistened with flushing liquid. Cotton wool should be moistened with liquid until the liquid begins to leak from the print head. Next, the print head must be placed in a small cup with the nozzles down. 2-3 mm of flushing liquid, heated to a temperature of 35-45 ° C, is collected into the cup. Thus, the nozzles of the print head are immersed in the flushing liquid. The cup is placed in a plastic bag and tightly tied. In this state, the print head is left for a day. A day later, the form opens, the cycle of washing and soaking the print head in the washing liquid for a day is repeated.
Flushing the epson print head with a syringe (click to enlarge)
Such a procedure as cleaning and rinsing the Epson print head (like any other printer) must be carried out as needed. When some cartridges start to print poorly.
At the moment, there are many different methods. We will consider flushing programmatically and physically, without disassembling the printer.
Software cleaning
Open the Start menu and go to the "Devices and Printers" section.
We find our Epson printer and click on it with the right mouse button. Select "Properties".
On the Tools tab, click Printhead Cleaning. First time .
After cleaning is completed, we do a nozzle test and if the image is without gaps, the head is clean. If not, then we do a simple cleaning 2 more times. If this does not work, we do an enhanced cleaning of the nozzles. If again nothing, a physical flush is needed.

Click to enlarge
It is necessary to purchase flushing fluid, find a syringe and get a tube from a dropper. You will also need scissors, gloves so as not to get your hands dirty and a napkin so as not to smear Epson.
Cut the drip tube with scissors. We need its length to be about 5-10 cm. This tube must be put on a syringe and draw flushing fluid.
Turn on the printer, open the cover. We are waiting for the carriage with the cartridges to move to the replacement position. Disconnect the printer from the mains.
We move the print head to the right, put the napkin and run the head on the napkin.
Take out the cartridges. How to do this is written in the instructions for the printer or, if you have a continuous ink supply system, in the "manual" for the CISS.

Click to enlarge
We insert the tube from the dropper with the syringe into the cartridge connector, which cheats when printing :-). Gently, give him a couple of cubes of flushing fluid.
This is how we deal with each clogged head connector.
We assemble the system (insert cartridges or connect CISS) and do 2 simple cleanings programmatically.
If this does not help, then I would try again the enhanced cleaning with the help of the software. If again nothing, then you need to remove the print head from the printer and rinse. This may take several days.
Branded or homemade flushing fluids. Which ones to give preference? Which ones to use so that the printer works again, and does not bring harm to it?
As we promised in previous articles, after reviewing the composition and properties of inkjet inks, a review of printhead flushing fluids will follow.
No matter how complex the ink compositions are and no matter how hard the manufacturers try to give the ink useful properties, it happens that the print head (PG) is clogged. And this happens the more often, the more often you fill in counterfeit ink. And if it happened that the PG stopped printing due to clogging, you can rinse it yourself. Many users who treat technology with great care, before filling the next portion of ink, wash the containers and ink supply paths to the PG. This will avoid conflicting inks from different manufacturers. And such a conflict can lead to a chemical reaction, precipitation and nozzle clogging. Keep in mind that the ink has a shelf life of one year, after which a precipitate will form in the pigment ink. If they are diluted, the precipitation process may be accelerated. But the main reason is the drying of the paint in case of infrequent printing. This affects both printers with thermal GHGs, and with piezoelectric and built-in CISS.
In all of the above cases, flushing fluid may well help you restore performance. The composition of the liquid is close to the composition of the ink, and, in addition, the composition should not act aggressively on the material of the PG itself.
Consider the composition and action of flushing fluids (LF). The most harmless, but effective remedy is distilled water. But to increase the cleaning efficiency, various detergent additives are added to the pancreas. Therefore, depending on the composition of the liquid are divided into neutral, alkaline and acidic .
NeutralPZH are universal, suitable for all types of PG and ink. The composition of such a liquid consists of 80% distilled water, 10% glycerin and 10% isopropyl alcohol, respectively.
alkalineThe pancreas in its composition contains, in addition to the above components, also ammonia. This liquid is suitable for printers Canon and Epson.
AcidicThe pancreas includes distilled water, alcohol and the essence of acetic acid. Most well washed PG color printers HP.
Of the branded pancreas, the first agent that we can recommend and which was used by our engineers, that is, it was tested - flushing liquid inktech, designed for Canon and HP thermal inkjet printers. For Epson printers suitable means of the company LOMOND . Good flushing products from companies contour and ocp.
In addition to the above branded products, you can prepare the flushing fluid yourself. This is the way we have half of the engineers. And this is not dictated by any of their stinginess or frugality. It's just that their experience shows that such liquids are more effective and bring positive results faster. To prepare the liquid (according to the recipe of engineer Krutykh), you need distilled water, which can be bought at any auto parts store, and glass cleaner, such as Mr. Proper, Mr. Muscle, etc. Again, these compounds have slightly different compositions, it is better to take one that includes isopropyl alcohol and sodium sulfoethosylate. These components can speed up the cleansing process by softening the dried parts of the paint. What is the composition? Optimal - 9 parts of water and 1 part of the product. If this ratio of parts does not help, increase the composition of the detergent, but only slightly. But you can not endlessly add detergent. We warn that a ratio in favor of detergent of more than 50% may cause damage to the head. Which lies in the fact that such a tool can corrode the “mastic” that seals parts of the PG from mixing inks of different colors.
Which method is better to use - in our company, the discussion did not lead to a consensus or division into Bolsheviks and Mensheviks. We hope that this article will inspire you to make the right decision or action when the printer is urgently needed, but the ink is not flowing.
OCP RSL
■ flushing ■ yellow ■ designed for any inkjet printers
For washing the internal surfaces of cartridges (foam-free or after removing the foam rubber), as well as printheads and components of continuous CISS supply systems (loops, capsules, cartridges, donor cans).
It is used before changing ink to another manufacturer, before changing pigment ink to water ink (for wet pigment), and after applying cleaning or soaking liquids (to neutralize their residues) before refilling with ink.
Peculiarities. Can be used at room temperature or heated. The washing process is accelerated if the liquid is preheated in a "water bath" to a temperature of 35C.
· Mode of application
Fill the volume to be washed with this liquid and let it stand for at least one hour, but not more than one day. Then drain the liquid from the volume being flushed and fill the volume with ink. For a heavily contaminated volume, it is allowed to alternate filling with clean liquid, settling and draining several times, but the total time of exposure to this liquid should not exceed one day. Do not allow the liquid to dry out in the washed volume.
OCP CCF (OCP CISS)
■ flush ■ light blue ■ designed for EPSON inkjet printers
For washing the internal surfaces of cartridges (foam-free or after removing the foam rubber), as well as printheads, components of continuous CISS supply systems (loops, capsules, cartridges, donor cans).
It is used before changing ink to another manufacturer, before changing pigment ink to water ink (for wet pigment), and after applying cleaning or soaking liquids (to neutralize their residues) before refilling with ink. In addition, to preserve the print heads of inkjet printers before a long break in work.
Method of application for preservation of the print head
Fully refill healthy empty cartridges with this liquid (it is recommended to use refillable cartridges with filling holes), install the cartridges in the printer and run the print head cleaning program once. (If before that the printer was standing with empty cartridges, then run the cleaning program three times in a row, turn off the printer with the button, leave "until the morning" alone, and then turn on the printer and run the print head cleaning program once). This will fill the printheads with liquid. Then, without removing the cartridges from the printer, turn off the printer with the button and pack it in a sealed plastic bag for the preservation period. This fluid can be left in the printheads for an extended period of time, but the fluid must not dry out.
OCP ECI (OCP EPS)
■ cleaning ■ blue ■ designed for EPSON inkjet printers
To clean the print heads from dried ink.
Peculiarities. Used at room temperature.
Methods of application:
a) clean the heads with this liquid according to the "Cleaning Cartridge" method (described separately). The time of exposure to this liquid should not exceed one day. Immediately after using this liquid, remove the cleaning cartridges from the printer, install the ink cartridges in the printer, and run the print head cleaning program twice in a row to replace the liquid in the heads with ink;
b) soak the nozzles of the heads from the outside with this liquid according to the "Sandwich" method (described separately). The time of exposure to this liquid should not exceed one day. Immediately after the head soaking is completed, run the print head cleaning program at least once.
OCP NRC (OCP NRS)
For cleaning printheads from dried water and pigment inks.
Peculiarities. Use only at room temperature, without heating.
Method of application for heads removed from the printer
Soak the nozzles of the head from the outside with this liquid according to the "Drop" method or the "Bath" method (described separately). The time of exposure to this liquid should not exceed one hour.
OCP LCF III
■ soak off ■ colorless ■ suitable for all inkjet printers
For soaking and cleaning printheads from pigment, soaking heavily dried pigment ink in cartridges (foam-free or after removing foam rubber) and in components of CISS continuous supply systems (loop lines, capsules, cartridges, donor banks).
Peculiarities. Can be used at room temperature or heated. The soaking process is significantly accelerated if the liquid is preheated in a "water bath" to a temperature of 60-70C.
· Methods of application for non-removable heads from the printer:
a) clean the heads with this liquid according to the "Cleaning Cartridge" method (described separately). The time of exposure to this liquid should not exceed one hour. Immediately after the use of this soaking liquid, before refilling the heads with ink, remove the cleaning cartridges from the printer, install cleaning cartridges with another - washing - liquid into the printer and run the print head cleaning program twice in a row. Then remove the cleaning cartridges from the printer and install the ink cartridges into the printer;
b) soak the nozzles of the heads from the outside with this liquid according to the "Sandwich" method (described separately). The time of exposure to this liquid should not exceed one hour. Immediately after the head soaking is completed, run the print head cleaning program at least once.
b) for a print head combined with an ink tank into a monoblock, with strongly dried pigment ink. Lay an oilcloth and several layers of newsprint on the table. Carefully separate the upper plastic cover from the monoblock with a knife blade, swinging around the perimeter, completely remove the foam filler from it (do not throw it away!) And drain the remaining ink from the monoblock. Steadily place the monoblock on the table on a soft, dry napkin. Heat this soaking liquid in a "water bath" to 60C-70C and fill the internal volume of the monoblock completely with it. Allow to stand until the liquid cools to room temperature (but not more than an hour). Then drain this liquid, fill the internal volume of the monoblock with washing liquid and drain it after 10-15 minutes. Install the foam filler back into the monoblock and glue the upper plastic cover of the monoblock back to its original place. Fill the monoblock with ink, install it in the printer and run the print head cleaning program several times in a row.
OCP CFR
■ cleaning ■ red ■ designed for external plastic surfaces
To remove ink and dirt from external plastic surfaces of various products - cartridges, printheads, components of continuous supply systems of CISS, printer cases, computers, etc.
Peculiarities. Do not pour into cartridges or printheads.
· Mode of application
Saturate a soft cloth with this liquid and wipe the surface to be cleaned with a damp cloth.
![]()
![]()
Service fluids InkTec, Ink-Mate (Korea)
InkTec MCS, Ink-Mate CS
■ cleaning ■ colorless ■ designed for any inkjet printers
For cleaning the print heads from dried ink, including sublimation.
Peculiarities. Use at room temperature. InkTec MCS and Ink-Mate CS fluids are used in the same way
Method of application for non-removable heads from the printer
Soak the nozzles of the heads from the outside with this liquid according to the "Sandwich" method (described separately). A single time of exposure to this liquid is not recommended for more than 10 minutes. Immediately after the head soaking is completed, run the print head cleaning program once and then the nozzle test. If the nozzle test shows an unsatisfactory result, repeat the process of soaking the nozzles according to the “Sandwich” method 2-3 more times for 10 minutes.
· Methods of application for the monobloc heads removed from the printer (combined with an ink tank):
a) place the print head with nozzles under a slow jet of running hot water at a temperature of 40-50C to a depth of 1 cm for about 10 minutes. Then put a suitable container (for example, a plastic plate) on the table and put a dry napkin on the bottom of the container. Pour the cleaning liquid into the container (up to 1 cm deep). Put the nozzle head into the liquid, on a napkin. Be careful - the contacts of the head should not get wet! After 10 minutes, remove the head from the container and blot the nozzles with a dry cloth. Check - if the liquid has leaked under the electric cable of the head, then the cable must be completely dried before installing the head in the printer! Then install the head in the printer, run the print head cleaning program once and then the nozzle test. If the nozzle test shows an unsatisfactory result, put the nozzle head into the cleaning liquid again and repeat the entire process described 2-3 more times;
b) in the presence of a professional ultrasonic bath. Place a suitable container (for example, a plastic plate) on the table and put a dry napkin on the bottom of the container. Pour the cleaning liquid into the container (up to 1 cm deep). Put the nozzle head into the liquid, on a napkin. Be careful - the contacts of the head should not get wet! After 3 minutes, remove the head from the container. Then, for 5 (five) seconds (no more, in order to avoid damage to the head!) immerse the head with nozzles into an ultrasonic bath filled with distilled water. Remove the head from the bath and blot the nozzles with a dry cloth. Check - if the liquid has leaked under the electric cable of the head, then the cable must be completely dried before installing the head in the printer! After that, install the head in the printer, run the print head cleaning program once and then the nozzle test. If the nozzle test shows an unsatisfactory result, again put the nozzle head into the cleaning liquid and repeat the entire process described 2-3 more times.
Service fluids InkMaster (England)
InkMaster Flushing ("flushing")
■ washable ■ colorless ■ suitable for all inkjet printers
For final washing of the internal surfaces of cartridges (foam-free or after removing the foam rubber), as well as printheads, components of continuous CISS supply systems (loops, capsules, refillable cartridges, donor cans).
It is used before changing ink to another manufacturer, before changing pigment ink to water ink (for wet pigment), as well as after applying cleaning or soaking liquids (to neutralize and wash out their residues) before refilling with ink. In addition, to preserve the print heads of any inkjet printers before a long break in work.
Peculiarities. Used at room temperature.
Method of application for flushing
Fill the volume to be washed with this liquid and let it stand for several hours. Then drain the liquid from the volume being flushed and fill the volume with ink. For a heavily contaminated volume, it is allowed to alternate filling with clean liquid, settling and draining several times. This liquid can be left in the volume to be washed for a long time, but the liquid must not be allowed to dry out.
Method of application for the conservation of the print head of the printer
Fully refill healthy empty cartridges with this liquid (it is recommended to use refillable cartridges with filling holes), install the cartridges in the printer and run the print head cleaning program once. (If before that the printer was standing with empty cartridges, then run the cleaning program three times in a row, turn off the printer with the button, leave "until the morning" alone, and then turn on the printer and run the print head cleaning program once). This will fill the printheads with liquid. Then, without removing the cartridges from the printer, turn off the printer with the button and pack it in a sealed plastic bag for the preservation period. This fluid can be left in the printheads for an extended period of time, but the fluid must not dry out.
InkMaster Recovery ("recovery")
■ cleaning ■ colorless ■ designed for any inkjet printers
For cleaning and restoring printheads from dried water and pigment inks.
Peculiarities. Has high efficiency. Use only at room temperature, without heating.
· Methods of application for non-removable heads from the printer:
a) clean the heads with this liquid according to the "Cleaning Cartridge" method (described separately). The time of exposure to this liquid should not exceed one hour. Immediately after using this cleaning fluid, before refilling the heads with ink, remove the cleaning cartridges from the printer, install cleaning cartridges with another cleaning fluid in the printer, and run the print head cleaning program twice in a row. Then remove the cleaning cartridges from the printer and install the ink cartridges into the printer;
b) soak the nozzles of the heads from the outside with this liquid according to the "Sandwich" method (described separately). The time of exposure to this liquid should not exceed one hour. Immediately after the head soaking is completed, run the print head cleaning program at least once.
· Methods of application for heads removed from the printer:
a) soak the nozzles of the head from the outside with this liquid according to the "Drop" method or the "Bath" method (described separately). The time of exposure to this liquid should not exceed one hour;
b) for a print head combined with an ink tank into a monoblock, with very dry ink. Lay an oilcloth and several layers of newsprint on the table. Carefully separate the upper plastic cover from the monoblock with a knife blade, swinging around the perimeter, completely remove the foam filler from it (do not throw it away!) And drain the remaining ink from the monoblock. Steadily place the monoblock on the table on a soft, dry napkin. Fill the internal volume of the monoblock completely with this liquid. Let stand one hour (but no more than an hour). Then drain this liquid, fill the internal volume of the monoblock with washing liquid and drain it after 10-15 minutes. Install the foam filler back into the monoblock and glue the upper plastic cover of the monoblock back to its original place. Fill the monoblock with ink, install it in the printer and run the print head cleaning program several times in a row.
Methods of exposure to service fluids
Printhead Cleaning Method "Cleaning Cartridge"
Fully refill spare serviceable empty cartridges with the required service fluid. (If possible, it is recommended to use refillable cartridges - they have ready filling holes with plugs). Install the resulting cleaning cartridges in the printer. Run the print head cleaning program twice in a row. The liquid from the cartridges will fill the printheads of the printer. Then, during the required time of liquid exposure to the heads, print some texts, images on plain paper and periodically run a nozzle test. (If the liquid is colorless, you can pre-tint it with one drop of colored ink and see the print quality of the heads on paper). The time of exposure of the liquid to the heads must be controlled - it is different for different liquids.
(Be careful - when servicing the heads, do not remove the cartridges from the heads for more than a minute, in order to avoid airing the channels of the heads. A sign of airing the channels of the heads - there is ink in the cartridges, but when printing, the ink does not pass through all the nozzles onto the paper, and start-up does not help cleaning programs If you turn off the printer and leave it alone "until morning", the air will come out of the heads on its own).
At the end of using cleaning cartridges with cleaning or soaking liquid, if there are metal elements inside the cartridges (for example, a strainer, outlet valve spring), then it is necessary to drain the remaining liquid from the cartridges and then flush the volume of the cartridges with washing liquid to avoid metal corrosion. Foam-filled cleaning cartridges cannot be drained. Therefore, if they contain metal elements, then the resource of such cleaning cartridges will be limited.
"Sandwich" Printhead Nozzle Cleaning Method
Prepare dry, thick paper napkins or toilet paper - such that the villi do not separate from them, and that the paper does not spread into shreds when wetted. Prepare a piece of smooth plastic film (for example, cut out of a thick bag or from the side of a drink bottle) a little larger than a “cap” in the printhead parking space in the printer. Turn on the printer. Push the printheads to the ink cartridge replacement position, and then unplug the printer's power cord from the electrical outlet. (At the same time, the printer heads should remain in the cartridge replacement position. Do not remove the cartridges). If you are using CISS, temporarily plug all caps on CISS donor jars. Gently spread the prepared piece of film over the surface of the cap. On top of it, put a piece of prepared paper of approximately the same size and evenly saturate the paper with the desired service liquid using a bottle with a long spout or a syringe. Carefully push the printheads by hand to the extreme position of the parking space, making sure that the sandwich from the film with paper does not move to the side. In the extreme position, the sandwich will be pressed against the nozzles of the heads. Leave the heads alone for a while. Since the paper with liquid gradually dries up, during the total exposure time, it is possible to extend and retract the heads several times at the same time as changing the paper to a new one, re-impregnated with liquid. The time of exposure of the liquid to the heads must be controlled - it is different for different liquids. Immediately after the end of exposure to the cleaning or soaking liquid, you need to extend the heads, change the paper of the sandwich to a new one soaked with a new - washing - liquid (to neutralize the remnants of more aggressive liquids), push the heads back into the parking space and leave the heads pressed against the sandwich for another 10-15 minutes. After that, extend the heads, remove the sandwich from the "cap" and push the heads back into the parking space.
"Drop" Print Head Nozzle Cleaning Method
Cover the table with oilcloth and several sheets of newsprint on top of the oilcloth. Remove the print head from the printer and put it on the table "upside down" - so that the nozzle plate is on top and is parallel to the surface of the table. Gently apply 2-3 drops of the desired service fluid to the nozzle plate. Droplets will slowly seep into the nozzles. Be careful - do not let liquid leak onto the electrical cable and head contacts! During the required exposure time, apply liquid drops to the nozzle plate again. The time of exposure of the liquid to the head must be controlled - it is different for different liquids. Immediately after using the cleaning or soaking liquid, blot the nozzles of the head with a cloth moistened with washing liquid. Check - if any liquid has leaked under the electrical cable of the head, then the cable must be completely dried before installing the head in the printer! Install the ink head in the printer and run the nozzle test at least three times in a row, as well as the print head cleaning program once. (Because the head has been upside down for a while, ink may leak from the head and it may not print immediately. In this case, leave it alone in the printer for one to two hours, and then run the print head cleaning program several times.)
"Bath" Printhead Nozzle Cleaning Method
Place a suitable container (such as a plastic plate) inside the plastic bag on the table. Put a dry cloth on the bottom of the container. Pour the required service fluid into the container (3-5 mm deep). Remove the print head from the printer and immerse the nozzles in liquid on a napkin. Be careful - the contacts of the head should not get wet! Top tightly tie the neck of the bag to reduce the evaporation of the liquid. After the desired exposure time has elapsed, remove the head from the liquid container. The time of exposure of the liquid to the head must be controlled - it is different for different liquids. Immediately after using the cleaning or soaking liquid, blot the nozzles of the head with a clean cloth moistened with washing liquid. Check - if any liquid has leaked under the electrical cable of the head, then the cable must be completely dried before installing the head in the printer! Install the ink head in the printer and run the nozzle test at least three times in a row, as well as the print head cleaning program once.
Washing liquid Korean-made Ink-Mate (Cleaning Solution) used in washing the print heads (PG) of cartridges, MFPs and printers of the HP brand.
As part of the liquid, there are special substances that can easily cope with dried pigment and water-soluble inks. In addition, they do an excellent job of washing out all sorts of debris that has accumulated in the print heads of cartridges and HP devices. Likewise, when printing MFPs and printers with slam-shut or CISS with low-quality ink, you should regularly flush the HP PG. Washing liquid is also used when changing from one type of ink to another.
V MFPs and printers HP PG is one of the most expensive items. If cartridges in MFPs or printers have not been used for a long time, or low-quality ink has been used, then to maintain the print head in working condition, you need to rinse it regularly. In this case, it will not fail.
If the inkjet printer is not used for a long time, the PG will begin to dry out. Unprinted areas may appear on sheets during printing. If the standard cleaning of the MFP or printer using a computer does not lead to a positive result, then you can use flushing fluid Ink-Mate Cleaning Solution.
You pay in cash to the courier or in our office. You are given documents for reporting (cheque, sales receipt, invoice, waybills, etc.). On the checkout page, select "Cash", payment is made upon receipt of the order.
Bank card (Online).You can pay with any bank card (VISA, MasterCard, VISA Electron, Maestro) after placing an order. If you have chosen to pay by card, you will be redirected to the bank's secure website, where you will enter your details and make the payment immediately.
Bank card.You can pay with any bank card (VISA, MasterCard, VISA Electron, Maestro) to the courier or in our office through the terminal. Payment occurs upon receipt of the order.
Cashless settlement of legal entities.When confirming the order, an invoice-offer will be sent to your E-mail, with the help of which you can pay from the current account of your organization. We have a simplified taxation system, we work without VAT. When the bank credits money to our current account, we will contact you and clarify the information on the order. The original invoice-offer or delivery notes are transferred to you with the order.
After placing an order, an invoice-offer with our payment details will be sent to your E-mail. You can pay at any bank.
QIWI. When placing an order, you need to specify the phone to which QIWI is attached. After placing the order, you will be redirected to the QIWI website, where you will pay for the order. If it is convenient for you to pay using QIWI terminals, then you can also do this.
Yandex. Money. After placing the order, you will be redirected to Yandex.Money, where you will make the payment. There must be money on your Yandex.Money account that you can spend on our website. Money will not be debited from a card that is linked to a Yandex account.
It is possible only if you have chosen delivery by Russian Post. You pick up your parcel at your branch after paying for the delivery, the cost of the goods and the commission of the Russian Post.
V section "PAYMENT"
Moscow courier.We deliver the order by courier at a convenient time for you. If you place an order before 5:00 pm, The courier delivers the order on the next working day. Express delivery is available for an additional fee. (Monday - Saturday)
Courier in the Moscow region.We deliver the order by courier at a convenient time for you. The courier delivers the order within 1-3 business days. (Monday - Saturday)
You can receive an order at any working time in the office, which is a 5-minute walk from the station. metro Perovo. We work from Monday to Saturday, check with managers by phone or on the website at the bottom of the page.
Post office. You will receive your order at the post office. We deliver to our post office within 2-3 business days. You can find out the exact delivery times on the official website of Russian Post. You can track your order on our main website - ThePrint.ru. The site calculates the shipping cost automatically.
EMS. Delivery of the order to your address. We deliver to our post office within 2-3 business days. You can find out the exact delivery times on the official website of Russian Post. The site calculates the shipping cost automatically.
Transport company.We deliver to the transport company within 2-3 working days. You pay for the delivery of transport companies on your own, upon receipt of the order. You can track your order and find out the exact delivery time on the websites of transport companies.
V section "DELIVERY" , you can read more.
 Instructions for using flushing fluid
 Why do printheads burn out on Epson printers?
 Installing and configuring the Canon i-SENSYS MF3010 printer Download driver for canon 3010 for scanning