Changing system information windows 7. How to add additional fields in system properties
In this article I want to tell you, dear readers, about how easy it is to change OEM information and Microsoft logo in Windows 8 operating system. It is possible that my article will be of interest to two categories of users of this axis. The first is those who officially purchased (bought for their hard-earned money) Windows 8 and want to change (replace, insert) something in the system, namely in "basic information about your computer." I don’t know and don’t understand why they need this, but judging by the questions on various forums, there are such people (I emphasize once again - oddly enough, these are official Microsoft clients). That's how it is... The second category (it is many times larger than the first) is the users of pirated versions of Windows 8, popularly referred to as "assemblies".
I want to note that using pirated assemblies of Windows is bad. Firstly, good assemblies still need to be looked for, and those that are there are full of holes in them (free cheese happens only in a mousetrap), and there are enough glitches in them and because of them. Secondly, no one has canceled Article No. 146 (violation of copyright and related rights). So, I advise you not to forget this before you are going to install someone else's creation downloaded from torrents on your computer. Sorry, got a little carried away. So, there are a lot of different builds of Windows 8, finding them on the Internet is quite simple. Their authors, for the most part, in an effort to show the whole world their "smartness, advancement and genius" decorate such "releases" with all sorts of hastily riveted logos with photographs of their houses, districts, villages and cities, plus insert images of their own into the Windows 8 logo instead of Windows windows. family emblems. Here is one such example:
Probably (according to the author) this region is both cool and superb. However, I don’t know about you, but this “collective farm tuning” just annoys me. Well, what is it, whatever the assembly - then it is decorated with either naked heifers or New Year trees (he said almost in verse). I'm not even talking about tons of all kinds of software, which the authors for some reason tend to stick with the operating system. My opinion is that a normal assembly should be as close as possible to the original image. It should not contain anything superfluous - no software, no gaudy decorations (themes, wallpapers, graphic banners, drawings), etc. Everything that is needed, each user can choose, find, install and replace on their own. After all, he found it on torrents and downloaded the axle assembly, which means that everything else is within his power.
So, as an example for the experiment, I decided to choose an assembly from the author under the name SURA SOFT, which, as you can see from the previous screenshot, claims to be the manufacturer of Windows 8 corporate edition. I can’t say anything bad about the author of this G8 assembly, as well as about its work and functionality (I didn’t test it). Perhaps the author is a gifted and talented schoolboy and his creation is quite efficient. But, it just so happened that it was his assembly that fell into my hands and, using its example, I decided to show how you can change OEM information about Windows 8, change the system logo, etc. (i.e. remove all unnecessary rubbish).
To view OEM information for Windows 8, do the following. We go to the right sliding menu - "Settings" - "Computer Information" - we get into a window called "View basic information about your computer." This window displays OEM information about Windows 8 (Windows edition, system information, computer name, and Windows 8 activation information). So our tasks are:
1) replace the logo at the top of the window with the family coat of arms from SURA SOFT with the standard Windows 8 logo with blue vents;
2) remove the photograph of some monument below (a man with a stick against the background of a horse). I do not exclude the option that this is a monument (during his lifetime) to the creator of the assembly himself.
3) remove from the system the lines "Manufacturer: SURA SOFT" and "Model: HARDWARE"
4) remove the "Support" section.
Let's get started
In order to remove unnecessary information (hardware, website, support ..) we use the Windows 7 OEM Info Editor program ( ). Despite the fact that its name contains Windows 7, the program will perfectly cope with the eight. We see such a window with the manufacturer's parameters:

Here I deleted all the lines and instead of a man with a horse, I inserted the logo of the Samsung manufacturer. This is how the basic computer information window now looks like:

As you can see, all sorts of stupid inscriptions have disappeared and OEM information has become more or less presentable. Of course, it was possible to remove the manufacturer's logo altogether and change all the inscriptions in the "Support" section to your own. Just in case, I’ll say that I used an image in bmp format with dimensions (180x180 px) as the Samsung logo for insertion. It was possible not to resort to the services of the Windows 7 OEM Info Editor program, but to use editing the system registry. Run - enter regedit - find the branch:
HKEY_LOCAL_MACHINE\SOFTWARE\Microsoft\Windows\CurrentVersion\OEMinformation

By removing the values in the corresponding parameters, we would get the same result. Moreover, in this registry branch, you could add some of your own lines. You can experiment yourself.
Now let's replace the top (corrupted) logo with the standard logo of the Windows 8 operating system of the following form:
![]()
To do this, we need the shellbrd.dll file and the Restorator 2009 resource editor. The shellbrd.dll file is located in the Windows\Branding\Shellbrd\ folder, and the Restorator program can be taken from .
Copy the shellbrd.dll file from the system folder to any other folder on your computer. Install Restorator. Next, open the shellbrd.dll file in the program and find the Bitmap folder. Our unsightly logo with the SURA SOFT coat of arms is located in three subfolders: 1050, 2050 and 3050. We prepare a normal Windows 8 logo in advance and save it in bmp extension in 32-bit version. I used it with dimensions (348x58 px). Copy it to the clipboard (in any graphic viewer, open the created logo and press Ctrl + C). Then, sequentially in each of the three folders (1050, 2050 and 3050), right-click to open the menu list, select the Paste command from it (I remind you once again that our bmp image must first be copied to the clipboard) and make a replacement.
We save the changes in the shellbrd.dll file (click "Save") and overwrite it in the Windows\Branding\Shellbrd\ system folder in place of the existing one. Here is what we got as a result:

In my opinion, everything looks quite decorous and noble. We've removed all the rubbish. I recommend using the Restorator program as a resource editor, and not Resource Hacker. Because if you use Resource Hacker, then the inserted Windows 8 logo is not displayed in the system information (instead, it is an empty space). I also want to note that all of the above in this article is quite suitable for the Windows 7 operating system (or assemblies based on it). For now, I'll end with this. If you have any additions, tips and comments - write. I'll gladly post it.
If you have dealt with computers on which the manufacturer preinstalled Windows right out of the box, then you probably noticed that the system properties contain not only the characteristics of the device, but also some information about the manufacturer. If you wish, you can edit this data or even add your own if you are building a computer yourself or just want to add a little uniqueness to your "bakery". How to change information about the computer tells this instruction.
How to add or change OEM information on Windows 10
The instruction is extremely simple and will require you to add just a couple of keys to the registry of your computer. If you enter the keys incorrectly or enter the parameters by mistake, your computer is unlikely to stop working, but remember that you are solely responsible for your actions.
Click Win + R and type regedit. Then go to:
HKEY_LOCAL_MACHINE\SOFTWARE\Microsoft\Windows\CurrentVersion\OEMInformation
clue: On Windows 10 Creators Update and above, you can paste the registry path directly into the address bar for instant navigation.
If the OEMInformation key does not exist, create it. All subsequent parameters will be created through the context menu Create - String Parameter. In it, you must specify the name of the parameter and the value.

On self-assembled computers, all OEMInformation data is usually not available, so they must be created and written by yourself. You can specify any parameters with your favorite values as you wish. Just keep in mind that the names of the keys must match those given below. Their meanings are up to you. Destroyer9000, ololosh, DarkAngel, Minecrafter90lvl or whatever else is fashionable to write now.
- manufacturer- manufacturer. For example, Samsung.
- Model- specific computer model. For example, Swift 7.
- SupportHours– support hours. This indicates the time during which technical support is provided. You can specify if you are making a computer for someone. For example, 9:00-17:00. The key is limited to 256 characters.
- Support Phone– phone number of technical support. The key is limited to 256 characters.
- SupportURL– address of the technical support site. The link will be clickable in the system properties window.
- Logo- manufacturer's logo. In order for the logo to be displayed in the system properties window, it must be created in BMP format with a resolution of 120x120 and a color depth of 32-bit. Place it on the system drive and specify the path to the file in the value of the registry key.
If these values are already set, you can remove them or edit them as you wish. After completing all the procedures, log out and log back in for the changes to take effect. Alternatively, you can simply restart the Explorer.exe process in the Task Manager.
If someone does not understand what I mean, then I explain that this is what opens when you click RMB on My Computer and in the Properties is:
And also this information is displayed in other programs, on websites and everything else that asks for such information.
Above, I showed the information that we will change.
There are two ways to change Windows information.
1 way - change information about the computer through the registry.
Open (keyboard shortcut) Win+R and enter regedit ) and go to the branch
HKEY_LOCAL_MACHINE\SOFTWARE\Microsoft\Windows\CurrentVersion\OEMInformation
For windows 7 and 8
Here we see the following window:

In it, and you can change all the information about the "Windows". I explain some parameters, if it is not clear:
Manufacturer - manufacturer's name,
Model - computer model,
SupportHours - support service hours,
SupportPhone - support phone,
Logo - logo of the manufacturer's company.
To change - double-click on the desired parameter and write anything in the window that appears:

Explanations:
1) If this section is empty, then you need to create these parameters (top menu Edit -> Create -> String parameter).
2) If you want to change the logo, first prepare a picture in bmp format and specify the path to it in the field. For an example, see how it is written there.
If you want to remove information - just remove the value.
To change information about the processor, go to the registry branch
HKEY_LOCAL_MACHINE\HARDWARE\DESCRIPTION\System\CentralProcessor\0
Finding the parameter ProcessorNameString and change it in the same way as the parameters above:

Method 2 - how to change information about Windows through the program.
There is a free program Windows 7 OEM info Editor
It is suitable for both Windows 7 and Windows 8. Not tested on XP.
It does not require installation and is not Russified, but it is quite easy to figure it out.
Download, run, see this window (I already changed the settings there):

As you can see, all registry settings are the same. Only the processor cannot be changed.
Just enter the required values in the fields, and then save with the button Save.
To change the logo is even easier - click the button ... and show the file.
If you have any questions about how to change information on a computer under Windows - write in the comments.
Today in this article, I will guide you on how to add/change OEM information (Original Equipment Manufacturer Name) and logo in the System Properties dialog box in Windows XP.
In the following screenshot, you can see the modified view of the "System Properties" dialog box, which you can get after following the steps described in this article:
Click on the picture to enlarge
Pay attention to the new lines of OEM information and the logo opposite the brand of the processor and memory.
By clicking on the button "Support Information", a new dialog box will open in front of us:
So now I will describe in detail how and what to do:
1. We will need to create (or modify) 2 files, which then need to be placed in a folder "Windows\System32". These files will contain information about OEM information and the logo of the "System Properties" dialog box, these are the files:
OEMlogo.bmp
-OEMinfo.ini
Note:
some users may not have the OEMlogo.bmp and OEMinfo.ini files in the C:\Windows\Sytem32 folder. If you do not have these files, you can download them from our site.
File OEMlogo.bmp contains information about the logo. You can create your own image for the logo, while the file must be in *.bmp format. To do this, you can use such graphic editors as Adobe Photoshop, Paint.Net, MSPaint. The maximum allowed resolution of a BMP logo file is 180x114 pixels. However, you can use an image for the logo at a lower resolution.
File OEMInfo.ini is a text file whose contents can be easily edited using any text editor, such as the standard Windows text editor Notepad. It contains some setting values, in the following format:
|
Options for the first section (General) must be completed, but as for the second (Technical Support Information) lines can be left blank.
You can put any text on each line after the equal sign (=)
2. Creating and editing files OEMLogo.bmp and OEMInfo.ini copy them to a folder %windir%\System32. Where %windir% is the root folder where "Windows" is installed, usually C:\Windows.
3. That's all. We restart the computer. You can now see the new OEM information and logo in the System Properties dialog box in Windows XP.
Note: If you want only the logo to be displayed in the dialog box, the OEMLogo.bmp and OEMInfo.ini files must still be located in the "Windows\System32" folder.
PS: If you are using Windows 98 or Me, you must place the files in the folder "Windows\System" instead of "Windows\System32" if you are using Windows 2000 - to the folder "WinNT\System32".
Note: For your convenience, I have created sample OEMLogo.bmp and OEMInfo.ini files for you, which can be downloaded from the following links:
After downloading the archive, unpack its contents and you will find the files you need. These files can be edited: replacing the image with your own or editing text lines.
 The Complete Guide to Google Forms How to Create and Use Google Forms
 Virus Petya: the battlefield - Rosneft
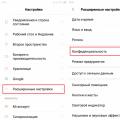 Yandex Navigator not working