Why does the flash drive not work? Convert a bootable floppy disk to a bootable flash disk. Creating a bootable USB flash drive for password recovery
The word "flash drive", widespread in modern Russian speech, means a storage module, a portable external storage medium connected to a PC or other computing device via a USB interface. Flash memory chips are the data storage device in a USB flash drive. The name: "flash" - a flash, the technology for changing and registering an electric charge in a semiconductor structure was given because the process of erasing the contents of the memory reminded the development engineers of a photographic flash. The flash drive is the most popular storage medium today.
In this lesson, we will look at some of the properties of a flash drive and how to work with it.
First, you need to know that the working resources of the flash drive are limited. The memory chips of most devices can withstand about five thousand write-erase cycles. And USB connectors will reach their limit after 1500 connections.
If, when using a flash drive on a computer, no writes were made to it, that is, no files were copied, you can freely extract it without using the "Safely remove devices and disks" function -.
Modern flash drives have significant amounts of memory: 8, 16, 32 or 64 gigabytes. However, in order to write files weighing 4 gigabytes or more to such flash drives, you will have to reformat them. Highlighting the flash drive in the "My Computer" folder right click with the mouse, open the context menu and select the "Format ..." command:
Let's change the FAT32 file system installed on the flash drive by default to NTFS and press the "Start" button. Do not forget that formatting will destroy all data on the media. Therefore, we will first copy and save the necessary files.
After reformatting to NTFS, you can write files over 4 GB to a USB flash drive.
When there are several removable drives connected to your computer, it is not so quick to find the desired USB drive among them. You can make your flash drive recognizable by installing the original icon on it.
To do this, open the standard Notepad application and write in it the text of two lines shown in the following screenshot. Then save the file to a USB flash drive. In the notebook with the "File" button, using the "Save As ..." command, open the explorer. In the "File Type" line, replace text format for all types of files. Let's name the file autorun.inf and press the "Save" button:
Thus, we have created a file for automatic start Images 001.ico and placed it in the root directory of the flash drive. Now let's prepare the picture.
Beautiful ready-made flash icons in ICO format are easy to find and download on the endless expanses of the Russian Internet.
For my flash drive, I took a photo in JPG format, cut it down to 64x64 pixels and converted it to ICO format using the service goo.gl/bCPpXu... I renamed the finished icon file to 001.ico and also put it in the root directory of the flash drive:
After that, safely remove the USB flash drive. Connecting it to the PC again, in the "My Computer" folder, we observe the media with a unique autorun icon:
Autorun.inf files are used in operating Microsoft systems Windows for automatic launch or installation of applications from storage media. This file is located in the root directory of the application's file system. The content of the file is composed of records consisting of structural elements - blocks. The block name is enclosed in square brackets. The block description consists of a pair: parameter - value. Parameter icon serves to assign an icon file to the device. And the parameter value is the icon file - 001.ico.
If a virus is written to a USB flash drive with an autorun icon, it will replace the autorun.inf file with its own and the drive icon will not be displayed. Thus, the icon is a kind of indicator indicating an unwanted injection.
In this case, you need to scan the carrier with anivirus and remove malicious files... More about antivirus programs we read on the page: antivirusnik avast.
However, the anti-virus is not always able to detect infected objects. Effective solution- formatting that will destroy all data on the medium.
As you know, initially, the idea of placing files on a remote server is cloud storage information was born as an alternative to removable storage. Cloud storage with its undeniable merits of synchronization and ubiquitous file access over the Internet, it seemed that portable storage devices would eventually be eliminated. This did not happen, and for many users a flash drive remains the most optimal means of accumulating, backing up and transferring files.
Instructions
Some FM modulator We have functions for adjusting the sound. To do this, use the appropriate buttons using the remote control. You can also set up the queue for playing audio tracks.
In the life of a modern person, radio has long and firmly been present. It all started with the era of radio development over a hundred years ago. Today, with the help of radio, people listen not only to music, but also to learn latest news, listen to reports of events taking place in many parts of the world. But it is not only with the help of a radio receiver that you can listen to radio broadcasts and radio stations.
Owners of personal computers often have WinAmp installed. It is very convenient for listening to mp3 music files. But it also has one more interesting feature - it is listening to Internet radio stations. Of course, you won't surprise anyone with such functions; sometimes it is enough to go to the site of a popular radio station and listen to the broadcast over the Internet. But WinAmp offers users almost 9000 radio stations. And not only offers, but sorts by style, direction, language and country.
How to tune the radio in WinAmp
To tune the radio correctly, you need to additionally install the WinAmp Library component for the WinAmp player. It is available for download from the Internet from the manufacturer's website. After downloading and installing the additional component, launch WinAmp. Let's start tuning the radio. Go to "Settings" and in the Online Media tab set the number of radio stations to listen to. By default, there are only 600 stations installed, and there are thousands of them on the Internet. We set the value with a margin of 20 thousand. We exit the player's settings and start searching for radio stations.
Choose Internet Radio from the menu. Then in the window on the right we activate the Refresh button. The download of the list of available radio stations will start. From now on, you can listen to radio stations.
To tune the radio correctly, you need to filter the list by styles and directions. To do this, in the Genre menu, you can specify several types of music - classical, rock, pop, jazz, etc., and you can also select countries. If the user's priority list includes not only music, but also news, then you can activate filters by topics - politics, sports, regional news. In addition, there is a function to search for radio stations by name. Having chosen the radio station of interest, we activate playback either using the Play button, or double click mice. The radio stations you like can be added to your “Favorites” list.
With WinAmp, you can find many unexpected radio stations on the Internet. Foreign radio amateurs often broadcast "intercepted" police or air traffic control radio communications on the Internet. In a word, the survey of the radio air is as entertaining as a simple "wandering" on the Internet. Studying radio stations will take several months of time and a solid gigabyte traffic.
It should be borne in mind that WinAmp in radio mode consumes about 62 megabytes of Internet traffic per hour of listening. Radio stations transmit at 128 kbps, so owners of limited packages should take this fact into account.
At one time, the radio in a car was a symbol of status and luxury. Today, those models of radio tape recorders that were previously admired and dreamed of are outdated against the background of full-fledged car media players. But not all people are chasing technical progress. Many are quite happy with CDs, therefore they often face the need to burn a disc for a radio tape recorder.
Instructions
To burn a disc for your radio that it will read for sure, search the Internet for a user manual for your player model. Or, if you have it from the time of purchase, then use it. Find information about the playback formats supported by your radio. The most frequent and widespread formats that are played by radio tape recorders:
The CDA format is a regular music CD. The other two formats require specific decoders for playback.
To burn a disc, download and install CD burning software on your computer. There are a lot of similar programs: Astonsoft DeepBurner, Ashampoo burning Studio, Free Easy CD DVD Burner, Small CD-Writer, CDBurnerXP, Nero and others. Further actions we will describe it using the example of a program from Ashampoo.
Insert into CD-R drive or CD-RW disc and run your disc burning software. On the left side of the window there is an option "Burn", clicking on which you will see a list of commands, for example, "Create Audio CD" and "Create MP3 disc". You can take advantage of these possibilities and burn a disc for a radio tape recorder from any audio tracks of different formats that are on your computer's hard drive. The Burning Studio program itself will recode them into MP3 format, after asking you to specify the encoding quality. However, the music recoding itself will take some time, and the resulting sound may not be very clear. Except when your radio only supports Audio CD format. In this case, select the appropriate command from the menu.
It is easier to burn a disc for the radio through the submenu "Burn files and folders" - "Burn new disc". In this case, just add MP3 and WAV files to the recording list and follow the further instructions of the program. The radio tape recorder will successfully play the disc recorded in this way.
note
Windows 7 how to burn CD / DVD, burn CD or DVD in Windows Explorer 7. - from the context menu select Send -> DVD RW drive (drive letter :); - in the Burn Disc window - How do you plan to use the disc? select the desired radio button - As USB flash drive (set by default) or With CD / DVD player
On them, with the help of a laser, information is recorded and read out. Many people mistakenly believe that DVD disc ah can only record cartoons and feature films, and everything else on CDs: text documents, photos, music. Nowadays it is very popular to sell licensed films on DVD discs. Also, documents, music, photographs and other files can be burned both to a DVD disc and to a CD disc.
Sources:
- how to burn music to disc correctly
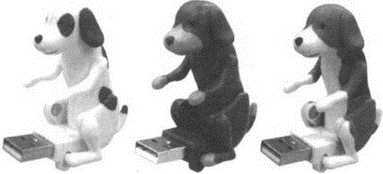
Information carriers every day do not cease to amaze with more and more capacity and smaller size. There were flash media that did not fit in your pocket, were heavy and ugly. Now, on a thin cord, you can freely wear a flash drive in the form of a unique pendant around your neck or an original bracelet on your wrist. You can customize the flash drive yourself.

You will need
- Personal Computer, basic components, software for working with flash media, the flash media itself.
Instructions
Connect this device To usb port... This port is located on the front panel of the system unit or on the rear panel. Basically, these ports are paired on the front panel.
After installing the software and drivers, run the Flash Media Setup Utility.
Related Videos
note
Install only verified software. Otherwise, third-party software may carry a dangerous virus.
Helpful advice
Remove the flash media programmatically, this will extend its life.
Sources:
- How to use flash media correctly.
It is not enough to simply buy and install an audio system in your car, even if it is high quality and expensive. Depending on the installed system sound will be more or less high quality, but without tuning the potential of the sound will not be revealed. To make the settings, first find out if the audio system is played from the radio or from separate amplifiers without a processor.

Instructions
If sound output from an audio system without amplifiers, set it up as follows. Put on the music you like and set the level sound and on the border of the beginning of interference ("wheezing"). That is, so that at the slightest increase in volume, "wheezing" begins. Begin to slowly pull out the high and low frequencies. Set the upper ones to your liking, and set the lower ones to the maximum, at the border of the beginning of the "break" of the speakers.
Adjust the fader and balance of the audio system. To do this, study with the instructions of the adjustment menu. Set the rear components (speakers) only for background sound. The main music should come from the front speakers. A fader is provided to adjust the level of the front and rear speakers. Adjust the components so that the level sound and the frontal was more than the rear by 15%.
If you have component speakers, adjust the crossovers sound tweeters by 2 dB. And in the same way as in step 2, bring the main sound to the front speakers. When setting up sound and on the right / left speakers, use the balance controls. And set the balance of the right components by 10-15% more than on the left ones, softening the latter somewhat.
If your audio system is equipped with power amplifiers, further adjust the filter settings and amplifier power level. Pre-match the signal level of the radio with the signal level of the amplifier.
To do this, reset all settings to zero or factory settings. Turn the amplifier power level to minimum sensitivity. Start to increase the volume of the radio to the border of the beginning of distortion sound a. As soon as they start, lower the level. Get to the amplifier (usually located in the trunk) and gradually increase the power level until distortion appears sound a. As soon as they appear, reduce the power.
Find high pass and low pass filters on the amplifier. Set the high-pass filter to 80-100 hertz. Low-pass filter - to the level of 70-90 hertz. Experiment with the filter settings to sound The new picture was more accurate. After that, adjust the level ratio with the fader and the balance. sound and the front / rear and right / left speakers as described above.
note
Any new acoustics has a "run-in" period that lasts 1-1.5 months after the start of its operation. During this period, avoid turning on the sound at full power. If the system includes subwoofers, increase this period to 2 months. Then reconfigure the power amplifier again.
Helpful advice
For all adjustments, try to make sure that when playing music, you do not have the feeling that all the sound comes from the windshield of the car. It should feel like the sound isn't coming from the speakers.
Car fm modulator is a decoding device capable of converting and streaming music from a memory card or flash drive. In most cases fm modulator They have a predetermined range of variable frequencies, although there are also models of transmitters with a broadcast bandwidth fixed at a specific frequency.
How it works technicallyEvolutionarily flash memory is a kind of EEPROM (Electrically Erasable Read Only Memory), that is, non-volatile ROM with electronic erasure. EEPROM operates on the basis of logic built on CMOS elements (complementary metal oxide semiconductor, or Complementary Metal Oxide Semiconductor, CMOS). Unfortunately, when erasing the contents of a CMOS memory, a sufficiently high voltage must be applied to its electronic cells, so this process takes a lot of time. Unlike the "progenitor", in flash microcircuits, information is deleted differently - in whole blocks - and this happens much faster.
The primary cells of such chips are field-effect transistors with two insulated gates: control and floating. Under the influence of the controller, a channel is created for the movement of charged particles from the source to the drain, and some high-energy electrons overcome the resistance of the insulator and fall on the floating gate. This process is called injection.
A hidden, or "buried" charge is formed, which can be stored on the floating gate for several years. In order to encode information, a small amount of charge on the gate is assumed to be equal to a logical unit, and a larger one - to zero.
When erasing, a high negative voltage is applied to the control gate. Then the electrons from the floating gate "flow" to the drain (tunnel).
Rice. 1.1. Writing and erasing data in flash memory
While conventional volatile memory requires multiple transistors and a capacitor to store each bit of data, flash memory uses only one. This makes it possible to greatly reduce the size of microcircuits, simplify their production technology and reduce the price of the product.
Flash memory can be implemented on two types of electronic logic gates: the previously very common NOR (with direct access), as well as cheaper NAND, which have become widely used in recent years (the latter is accessed via an 8-bit data and address bus, which has separate command channels).

Rice. 1.2. There are very different types of flash drives.
In memory chips based on NOR (Not OR, negation "or"), each cell (field effect transistor) is connected to three independent channels: bit lines, word lines and a charge source. For sampling, you need to apply voltage to the word line connected to the gate. If in this case the charge "buried" in the floating gate is high enough, an obstacle is created for the movement of electrons between the source and drain. Accordingly, the potential difference between them remains significant. In a logical interpretation, this situation is recognized as zero, the opposite - equal to one.
NOR-based microelectronics has big size cells, provides high rewriting speeds and short access times. Each microcircuit of this type can store from 64 Kbit to 8 Mbit of data. The main problem is that it is difficult to increase it to achieve a higher capacitance, since it is impossible to reduce the size of each of the transistors - this is due to the very way of organizing the matrix of cells: a separate isolated contact electrode must be brought to each of them.
NAND chips (Not AND, negation "and") have higher reliability and capacity, small block and cell sizes. Field-effect transistors are connected to the bit lines in series, in groups.
If they are turned on (open), then the corresponding conductors are grounded; the potential difference between them and the lines of words disappears. True, since the voltage drop occurs at once on many transistors, reading the information becomes difficult. But due to the fact that the access occurs simultaneously to a whole group of cells, the reading speed increases.
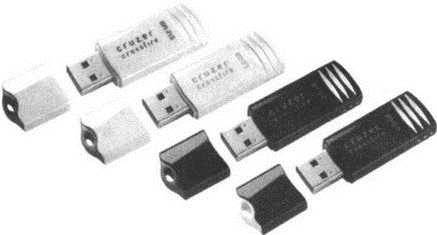
Rice. 1.3. Standard form of flash drives
In practice, the organization of NAND memory implies that its cells can only be addressed sequentially. To compensate for time delays caused by the "batch" nature of the operation, an internal cache of adequate capacity is used. When writing in transistors of the NAND architecture, tunneling injection of electrons is used, and when erasing, their tunneling release. This saves energy consumption. The capacities of the microcircuits range from 500 Kbps to 8 Mbps.
In both types of flash memory chips, logic elements are combined into blocks (128 Kbit in NOR and 8 Kbit in NAND). In NAND chips, cells are pre-grouped into "pages" of 256 or 512 bytes each. In each of them, 16 bytes are allocated for the service area, where metadata and error correction codes are stored.
Simultaneously with Intel, AMD, known at the dawn of its development precisely as a manufacturer of flash memory, developed new technology MicroBit for the implementation of the NAND architecture in chips, thanks to which the cell capacity can be doubled. The solution, in fact, is simple: the floating gate of the cell (field-effect transistor) storing the charge is physically divided into two structural elements independent of each other. Thus, instead of one storage location, memory deals with two at once.
Features of using flash drivesCompared to a conventional hard drive, flash drives have several fundamental differences. To begin with, it is worth noting that writing to a USB flash drive is possible only on previously erased (cleaned) cells. In the case of a hard disk, it is quite common to overwrite data, when some data is written over others. I think it's not a secret for anyone that when you delete a file, it still remains on the hard disk, the information about it is simply erased from the file system table, and it becomes, as it were, invisible. Hence the existence of the so-called recovery software for deleted files. They simply return a record to the filesystem table.
Due to the need for preliminary stripping (erasing) of cells, there is some confusion for flash drives with data portions: bit, byte, read / write unit and erase area. Byte - the minimum value of the recorded information; and a block is the minimum number of bytes that can be read from memory in one access cycle. The erasing area is a collection of cells, the contents of which are erased in one operation. The smallest unit of information storage on a hard disk is a sector. So, the data portions of the flash drive (blocks, erasure area), as a rule, do not coincide in size with the sector hard disk... To avoid incompatibility, the operating system implements, as it were, virtual sectors for flash drives, which are actually formed by read / write blocks, into which, in particular, the erasure area is divided.
Finally, it should be noted that flash memory, unlike a hard disk, withstands a limited number of write-erase cycles. Whereas for a hard drive, its durability depends on mechanical endurance. Ideally, practically unlimited operation is technologically possible (know yourself to magnetize and demagnetize). For different flash drives, the number of repeated erasures varies from about 100 thousand to 1 million. To estimate these figures, imagine that every day, 365 days a year, you will torture your flash drive 100 times a day. So, even with the worst prognosis, you should have enough for three years. There are, of course, exceptions (marriage, improper operation), but in general this is the case.
As it approaches the limit value of the read / write cycles, the flash memory cell begins to behave worse and worse: either the write is made with an error, or the block cannot be erased on the first try. As a result, the block is soon marked as defective and no longer participates in the operation of the flash drive.
Hence, the most common way to extend the life of a flash drive is the Wear Leveling Control technology, the essence of which is to ensure the most even use of flash memory cells by evenly distributing read / write cycles across different blocks.
As for the control of the reliability of information storage on a USB flash drive, it is performed directly during recording: the built-in mechanism correlates the stored information with the original one using a comparator. An additional check is also possible. It all depends on what technologies the manufacturer has incorporated into his products.
Virtual Flash SpaceThe Flash File System (FFS) consists of space management, garbage collection, wear, and interface modules, and an initialization block. Communication between the OS and the flash drive begins with a disk interrupt (IRQ14), which activates the drive. If a data sector read is requested, then its coordinates are converted to the address of a physical memory block. Then the corresponding crystal is sampled, the data is actually read and transferred to the OS buffer.
When written, the sector coordinates are converted to the flash drive's own system. It checks for free read / write blocks. If there are any, the recording mode is set for the corresponding crystal and the data is stored in its cells.
If there are not enough blocks or the free space is less than required, garbage collection is activated, which, together with the wear control mechanism, collects the erasure area and checks if it contains valid read / write blocks. When the latter are found, they are moved to the reserve space. The selected erasure area is cleared, then a free recording block is selected from its composition.
Space management is carried out by translating the logical sectors of the OS disk model into physical blocks of flash memory (Flash Translation Layer, FTL). In this case, the registration of defective and invalid blocks takes place. The available virtual storage space is described in control tables, which act as the file allocation tables (FAT) of the disk OS.
The process of removing stored but no longer used (invalid) blocks of memory is called Garbage Collection.
In the early days of flash memory, a simple mechanism was used for this. The blocks containing the payload were moved to the free area, after which the invalid clearing mechanism was started. Because garbage collection is infrequently triggered, this process consumes negligible power and does not degrade memory performance. However, it cannot be considered quite optimal. Therefore, today this procedure is launched in those moments when there are no system calls to the virtual disk.
Before performing garbage collection, it is necessary to search for the corresponding fragments of memory, take into account the number of invalid read / write blocks and the number of previous erase cycles, and also identify areas in which information is updated more often than in others (in such cases, the problem of physical wear is of particular importance memory cells).
The technical characteristics of flash drives indicate two write speeds: peak and average (the latter is 2-3 times lower). Average speed characterizes the actual performance of the electronics, as it is determined by the efficiency of the garbage collection mechanism. If the garbage collection mechanism is not efficient enough, it will degrade the performance of flash memory.
1.3. USB bus
A flash drive (USB stick) is connected to a computer via a USB port. To do this, there is a USB connector on the flash drive. In short, data transfer is carried out via the USB bus, so it would be useful to know a few details about it. The main thing to know is that at the moment there are two USB standards: USB 1.1 and USB 2.0 (USB 3.0 is being prepared, but it is still far from the start of its mass adoption).
All modern flash drives have been produced in the USB 2.0 standard for a couple of years, no less. At the same time, there are non-new computers in which the USB port operates according to the USB 1.1 standard, which is several times slower than USB 2.0. In the end, if you even connect a USB 2.0 flash drive. to USB 1.1, data transfer will be carried out at USB 1.1 speeds, that is, very slowly.
Rice. 1.4. USB symbol
To get an idea of the inherent speeds of USB 1.1 and USB 2.0, please refer to the specifications below:
Specifications USB 1.1:
Speed: 1.5 to 12 Mbps;
The maximum cable length for a high exchange rate is 5 m;
Maximum cable length for low baud rate - 3 m;
The maximum number of connected devices (including multipliers) is 127;
It is possible to connect devices with different exchange rates;
Supply voltage for peripheral devices - 5 V;
Maximum current consumption per device - 500 mA,
The technical characteristics of USB 2.0 are about the same, except for the exchange rate, it is up to 480 Mbps. In fact, although in theory the speed of USB 2.0 can reach 480 Mbit / s, devices such as hard drives and any other storage media in general never reach this bus speed, although they can develop it. This can be explained by the rather long delays of the USB bus between the request for data transfer and the actual start of the transfer. For example, another FireWire bus, although it provides a maximum speed of 400 Mbit / s, which is 80 Mbit / s less than USB, in reality allows you to achieve high speeds of data exchange with hard drives and other storage devices.
1.4. What's the flash drive inside?
We will not go into the details of this issue. Let's just find out for general development, what does the flash drive have inside? The flash drive device is shown in Fig. 1.5.
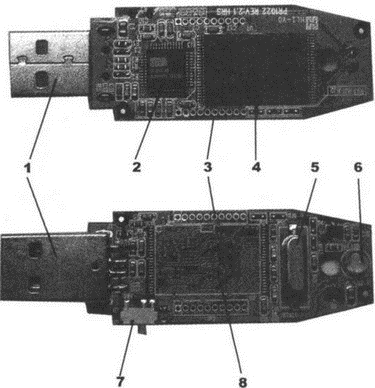
Rice. 1.5. USB flash drive from the inside
The figure indicates:
1. USB connector.
2. Microcontroller.
3. Control points.
4. Chip Flash-memory.
5. Quartz resonator.
6. LED.
7. Switch "write protection".
8. Space for an additional memory chip.
Chapter 2.
Secrets of effective use of a flash drive
2.1. Safely remove Flash devices
Quite often, a flash drive is treated rather casually. They insert it into a computer (USB port), write data to it (or from it), then pull out the USB flash drive. In principle, everything is as it should be, with the exception of the last stage. You can, of course, do this (just pull out the flash drive from the USB port), but the risk of data loss is quite high. It happens quite rarely, but when it happens, it is very difficult to recover the lost data, and most often it is impossible. In addition, since the USB port is power supply (electricity is supplied through it to the connected devices), there have been cases when the flash drive simply burned out due to a power surge.
You can protect yourself from such incidents in two ways: either use the built-in Windows ejection mechanism each time, or configure the procedure for quickly ejecting a Flash disk from a USB port. The first method is the most reliable, but slowest. The second - allows you to pull out the flash drive as you please, but there is no guarantee of the safety of the flash drive files with which you are currently working.
We will look at the standard extraction mechanism now, and setting up fast extraction in the next section of this chapter.
1. As long as the Flash drive is connected to the computer, in the area Windows notifications(in the right corner of the taskbar) the Safely Remove Hardware icon is displayed. It is on it that you should double-click the mouse when you want to remove the USB flash drive from the USB port. After you do this, a dialog box will appear on the screen in which you will have to specify the Flash drive that you want to disconnect (Fig. 2.1).
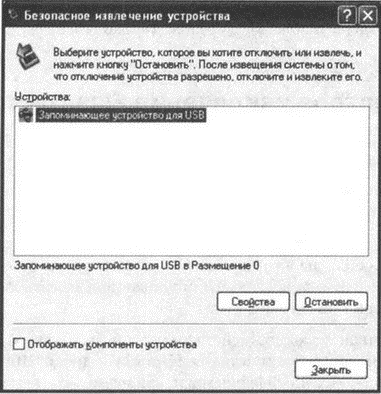
Rice. 2.1. Safely Remove Hardware Dialog Box
2. After you select the required Flash drive (perhaps you have several flash drives connected to your computer), press the button Stop... As a result, a dialog box will be displayed on the screen. Stopping the device, which will display a list of stopping devices. Make sure that it contains the USB flash drive to be removed, and only then click the OK button (Fig. 2.2).

Rice. 2.2. Stop Device Dialog Box
3. A message will appear in the notification area stating that you can eject the Flash drive. Just do it now.
2.2. Quick extraction of Flash devices
To configure fast ejection of Flash drives from USB ports, you need to do the following:
1. Go to Control Panel choosing Start → Control Panel.
2. On the Control Panel, click System. A dialog box will open on the screen. System properties, in which you need to go to the tab Equipment and press the button Device Manager(see fig. 2.3).

Rice. 2.3. System Properties Dialog Box
3. In the Device Manager window that appears, in the list of devices, find Disk devices → Flash disk name... Right-click on the name of the flash drive and in the appeared context menu select team Properties.
4. In a dialogue Properties window go to tab Politics and in the radio button group Write caching and secure deletion(fig. 2.4) set the switch to position Optimize for fast removal. Click on OK in the window Properties. This completes the procedure for quick ejection of Flash disks.

Rice. 2.4. Configuring quick extraction
Once the quick eject is set up, you can easily remove the sticks from the USB port with a clear conscience. However, make sure before that that there is no copying of files to the USB flash drive or from the USB flash drive, and there are no programs running from the USB flash drive. Otherwise, they may be damaged during extraction.
In this regard, one more point should be noted. Quite a typical situation is when a virus is placed on a flash drive (no wonder - flash drives are constantly stuck into all computers in a row, and for certain on some of them an "infection" may be hiding). The usual means of the virus may not be visible, you may not be aware of its existence, and its vital activity is probably not particularly advertised.
So, it may turn out that when you remove the flash drive, you still have a program (virus) running from it. Maybe it's okay, or something unpleasant can happen - the file system of the flash drive "flies" or the flash drive is damaged. In this case, you can advise either not to use the quick extraction, or more often to go through the flash drive with an antivirus.
2.3. MyUSBOnly. How to limit the use of flash drives so that only you can use a flash drive on your computer
Flash drives as a means of transferring data can be very undesirable for one reason or another. For example, it is very wonderful to spread viruses through a flash drive, transfer personal / service / closed data, interfere with the operation and settings of the system, launching some of your programs from a flash drive, etc. etc. Therefore, in many enterprises and in many firms, the use of Flash media is simply prohibited (data can only be transmitted over the network, and the means of monitoring network activity are very advanced).
At the same time, there are software, which allow flexible enough to allow or prohibit the use of Flash-devices on certain computers. One of the most convenient of these programs is MyUSBOnly, which you can use both at home and at work at will and discretion.
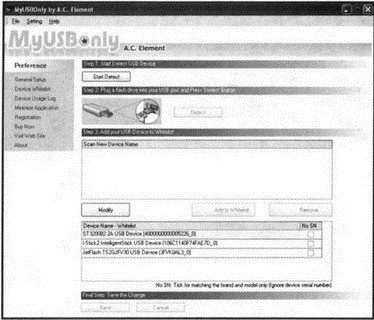
This program allows you to set a password for the use of connected flash drives. That is, when a USB flash drive is connected to the computer, a small window appears in the lower right corner of the screen, approximately above the notification area, prompting you to enter a password (see Fig. 2.5). So, only by entering the correct password, you can use the Flash disk. In addition, for convenience, you can create so-called "white lists" in which to enter those flash drives, the use of which is allowed without entering a password.

The installation of the MyUSBOnly program is quite typical and should not cause any difficulties. Immediately after installation, the program will be launched, its small icon will appear in the notification area. To start MyUSBOnly every time the system boots, add it to autorun. In principle, she does this herself by default.
As already mentioned, now every time a Flash drive is inserted into the USB port, the program will automatically ask for a password. The default password is 0000 (four zeros). You can use it at the very beginning of using the program. Subsequently, it is advisable to change it. The password is the same for all flash drives. Disabling the program is not so easy, as there is no command to close the program in the menu that appears when you click the MyUSBOnly icon in the notification area. In addition, it does not appear in the list of running programs in Device Manager. You can close the program only from the main window, which can only be called if you have a password.

Rice. 2.6. Different flash drives are needed, different flash drives are important
To access the program settings, right-click on the MyUSBOnly icon in the notification area and select the command General Setup... Then you will need to enter the password again (all the same 0000). As a result, the main program window with a list of settings will appear on the screen (see Fig. 2.7). To close the program, and it was said earlier that this can only be done from the main program window, select in the menu bar File → Close.

Rice. 2.7. The main window of the MyUSBOnly program. Program settings
Sections of the program are selected in the left part of the window. Selected by default General Setup, which contains all the basic settings of the program. So, using the section settings Setup Window Access Password you can change the password used by the program. To do this, you just need to enter New Password into the box at the top. Checkbox Instant prompt for unknown USB storage devices enables automatic instant password request / verification for every unknown Flash drive. Checkbox Display tray icon turns on the display of the application icon in the notification area.
Using group settings Syslog notification you can configure the logging of all actions with a USB flash drive, and using the group settings E-Mail Notification- the mode of sending messages about the use of flash drives by e-mail to the specified address.
By going to the section on the left side of the program window Device Whitelist, you will be able to configure the so-called "white" list, in which you can enter those Flash disks, the use of which is allowed without entering a password (Fig. 2.8).
Rice. 2.8. Configuring the "white" list of Flash drives
In this case, for each device that you want to add to the "white" list, you must perform the following sequence of actions:
1. At the top of the MyUSBOnly window, click the Start Detect.
2. Insert the USB flash drive into the USB port of the computer and press the button that appears Detect.
3. After the flash drive is recognized (Fig. 2.9), select it in the list of found devices Scan New Device Name and click on the button located just below first Add to Whitelist, and then - Save.

Rice. 2.9. Adding a flash drive to the "white" list
If you need to remove any flash disk from the "white" list, then select it at the bottom of the program window - in the list Device Name - Whitelist- and press the button Remove.
And finally, going to the section Device Usage Log, you will be able to get a detailed report on all operations in which this or that flash drive connected to the computer took part (see Fig. 2.10).
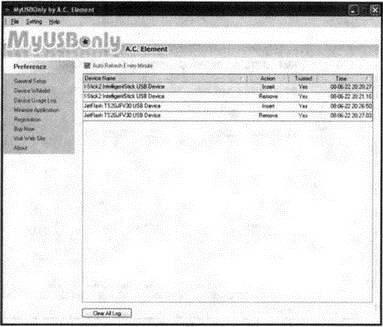
Rice. 2.10. Report (log) on the use of the flash drive. All moves are recorded
2.4. How to ensure a long life for a USB flash drive. Problem solving
1. There are times when when you try to remove the USB flash drive from the USB port in the correct way by clicking on the icon Safely Remove Hardware a dialog box appears in response. Problem while removing "USB Mass Storage Device": Generic volume device cannot be stopped right now. Try to stop it later. Translated into Russian, this most likely means that at the moment some files from the flash drive are open, are involved. Just close these files and try to remove the flash drive again. If you are convinced that, despite the appearance of the above message, open files from the flash drive is not observed - then disable it without clicking on the icon Safely remove hardware.
2. If after inserting the USB flash drive in the notification area of the Taskbar for some reason the icon for safe removal of the USB flash drive does not appear, but the USB flash drive itself is visible in the system, then you should not despair. Just before removing the Flash-disk, make sure that all files from the flash drive are closed and nothing is copied from it or to it. For greater confidence in such cases, the USB flash drive can be removed after turning off the computer. Then certainly nothing threatens.
3. Despite the fact that a USB flash drive, like a solid state drive without any mechanical devices, is one of the most durable storage devices, try to treat it with care and do not drop it again, do not wet it or expose it to strong electromagnetic rays. In principle, experiments were carried out: employees of a magazine dropped a flash drive from the 6th floor and watched what would happen, nothing happened to it, but still. If you want your flash drive to last longer, take good care. In addition, one should not exclude the possibility of damage to the controller, which is present on each flash drive and the failure of which will make it impossible to read data from the flash drive. If you replace it, then everything will be fine and wonderful again, but why complicate an already difficult life for yourself.
4. To judge whether any operations are performed with data from a flash drive or not, in most models of these devices, you can use the light indicator: if it blinks, it means that something is happening there. If it so happened that you still pulled out the flash drive at the time of copying any files to it, in 8 cases out of 10 errors will appear in the flash drive's file system, which in turn can lead to damage to other files. Therefore, when such a situation did occur, copy everything you can from the USB flash drive and format it (a description of this process is given in Chapter 3).
5. Please note that you should insert the USB flash drive into the computer's USB port either before turning on the PC, or after downloading operating system... If this operation is undertaken during system boot, the system may simply not "see" your flash disk.
6. Sometimes when connecting flash drives to USB ports located on the front panel system unit, flash drives are poorly recognized by the system. In such cases, it is recommended to try connecting them to the USB ports on the back of the system unit, which correspond to the USB root hubs.
7. Whenever possible (especially on computers with a weak power supply and / or a huge number of installed and connected devices), try to connect flash drives through USB-splitters (USB-hubs). The fact is that USB ports, as noted earlier, are power ports and there may simply not be enough voltage for the whole host of flash drives that you want to connect to one USB port through a USB hub. In this case, as a rule, all sorts of problems arise with the recognition of the flash drive by the operating system, which starts to issue messages like :. In this situation, just do not press Yes with fright, otherwise all your data on the flash drive will come to a quick and complete end.
8. Sometimes a message The disc in the device is not formatted. Format it? Not really appears even after connecting the flash drive to the USB port on the back of the system unit (to the USB root hub). This happens, you should not be afraid, just restart your computer. This should most likely help.
9. There are times when we do not see our files when accessing a USB flash drive. At the same time, the properties of the removable disk indicate that the type of the file system is unknown, busy - 0, free - 0, i.e. it is indicated that the flash drive is empty. Do not panic! Try disconnecting and reconnecting the USB flash drive (via the Safely Remove Hardware icon). If it does not help, you need to restart the OS.
Rice. 2.11. What kind of flash drives do not come up with
10. Please note that if messages appear when accessing files on a flash drive Can't find file<Имя_файла>... Create new file with that name? or Unable to create file<Имя_файла>... Check if the path and filename are correct, then in most cases this means that there was a failure in the file system of the flash drive. To check, right-click on the flash drive icon and select the command Properties... If the dialog box that appears says that the file system type is unknown, the capacity is 0 bytes, 0 bytes are occupied, 0 bytes are free, then you need to urgently (!) Check and correct errors in the file system of the removable disk. This can be done using the programs discussed in Ch. 6 of this book.
12. During the operation of the flash drive, it is recommended to periodically check its file system. To do this, right-click on its icon, in the appeared context menu, select the command Properties, and then, in the opened dialog box Properties: Removable Disk, go to the tab Service and press Check ...... As a result, a dialog box will appear on the screen. Disk check Removable disk in which check the boxes Automatically fix system errors and Check and repair bad sectors... To start checking, click the button Launch... Attention! Before checking, make sure that all files from the flash drive are closed and not in use. Otherwise, the verification program will display a warning that the disk check will be performed only after the PC is restarted.
13. When connecting several flash drives, there are times when some of them become invisible in the window My Computer (Computer)... Do not be afraid of this, just close and reopen the window. My Computer (Computer)... Most likely, this will solve the problem.
14. There are times when, even after correctly removing one flash drive, it is not possible to connect another. At the same time, the "phantom" of the previous flash drive is saved in Windows Explorer: there is a red circle on its icon with a white question mark inside. When you click on the icon, of course, a system error message appears that the removable disk icon refers to an inaccessible location. In such cases, a reboot of the OS is required.
15. Sometimes, after some more or less long time of operation, the size of the flash drive, determined by the system, can significantly decrease. For example, you had a 2 GB flash drive, but it began to be defined as 512 MB. As a solution to this problem, you can recommend formatting the USB flash drive, and if this does not help, restore it using the EZ Recover program. If this did not lead to any result, the flash drive needs repair or replacement.
16. Against the background of the existence of a large number of viruses infecting files on flash drives, the design of many flash drives provides for the ability to block writing to them. Do not forget to turn it on if you need to copy something from a USB flash drive, having previously connected it to a dubious (and not only) computer.
Chapter 3
File system and formatting of Flash devices
3.1. General information about file systems. What is the best file system for a Flash drive
Windows operating system supports multiple operating systems: NTFS, FAT and FAT32. In principle, the choice of the file system is based on what operating system is used, what is the size of the flash drive, as well as what are the goals and level of training of the user. Already at the very beginning of this chapter, it should be noted that by far the best file system under Windows is NTFS.
The advantages of NTFS relate to almost everything: performance, reliability and efficiency of working with data (files) on the disk. So, one of the main goals of creating NTFS was to ensure high-speed performance of operations on files (copy, read, delete, write), as well as provide additional features: data compression, recovery of damaged system files on large disks, etc.
Another main goal of NTFS was to implement increased security requirements, since FAT / FAT32 file systems were generally not good in this regard. It is in NTFS that you can allow or deny access to any file or folder (differentiate access rights).
Let's first look at the comparative characteristics of file systems, and then dwell on each of them in more detail. Comparison, for greater clarity, will be carried out in tabular form.
First, let's see which file systems are supported by which operating systems (Table 3.1). And then let's see what size the volumes and files can be when using different file systems (Table 3.2).
Table 3.1. File and operating system compatibility
| Operating system | File system | ||
|---|---|---|---|
| FAT | FAT32 | NTFS | |
| MS-DOS, Windows 3.x, Windows 95 (up to OSR2) | Supported | Not supported | Not supported |
| Windows 95 OSR2, Windows 98, Windows ME | Supported | Supported | Not supported |
| Windows NT 4.0 | Supported | Not supported | Supported (after installing Service Pack 4) |
| Windows 2000 / XP / Vista | Supported | Supported | Supported |
Table 3.2.File system options
| File system | Parameter | |
|---|---|---|
| Volume dimensions | Maximum file size | |
| FAT | From 1.44 MB to 4 GB. | 2 GB |
| FAT32 | The theoretically possible volume size is from 512 MB to 2 TB. But in practice Windows XP / Vista supports smaller FAT32 partitions. So, you cannot format a volume larger than 32 GB in the FAT32 file system with the standard Windows tools(although already formatted disks are larger Windows size supports). | 4 GB |
| NTFS | The minimum recommended size is 10 MB * and the maximum is 2 TB. | The maximum size is limited only by the size of the volume |
* Please note that floppy disks cannot be formatted in NTFS file system.
As you can see from the table. 3.2, the FAT file system for modern flash drives, although at the limit, can still be used. But it is morally outdated and practically never applied. As for FAT32, it is exactly what is used now for the vast majority of flash drives. After all, the maximum volume size in FAT32 should not exceed 32 GB, and besides, most users do not store files larger than 4 GB on flash drives. In addition, FAT32 provides the greatest compatibility as it is supported by almost all modern computer devices.
The ideal solution for performance, reliability and quality of various functions is NTFS, which, moreover, is devoid of the above disadvantages of FAT32. So, without even going into the details and special features of the NTFS file system, you can opt for it. Formatting a flash drive in NTFS not only allows you to forget about such misfortunes of FAT / FAT32 as lost clusters, but also increases the reliability and durability of flash drives, and also allows you to slightly increase the speed of reading / writing data.
If you are going to use a USB flash drive on computers running Windows 98. Which is unlikely, but it may well be.
If you are going to create a bootable USB stick.
3.1.1. FAT file system
The FAT file system (usually FAT 16) was developed a long time ago and was intended to work with small disk and file volumes, a simple directory structure. The abbreviation FAT stands for File Allocation Table (from the English. file allocation table). This table is placed at the beginning of the volume, and two copies of it are kept (for greater resilience).
This table is used by the operating system to locate the file and determine its physical location on the hard drive. If the table (and its copy) is damaged, the operating system cannot read the files. It simply cannot determine where which file is, where it starts and where it ends. In such cases, the file system is said to have crashed. I would like to wish you to avoid such "pleasure".
The FAT file system was originally developed by Microsoft for floppy disks. Only later did they begin to use it for hard drives, and now for flash drives. At first it was FAT 12 (for floppy disks and hard drives up to 16 MB), and then it grew into FAT 16, which was introduced with the MS-DOS 3.0 operating system. Further it is supported in Windows 3.x, Windows 95/98, Windows NT / 2000. Well, in Windows XP / Vista, its support was still included: for compatibility with old equipment and old software.
3.1.2. File system FAT 32
Starting with Windows 95 OSR2, Microsoft began to actively use FAT32, a 32-bit version of FAT, in its operating systems. What to do, technical progress does not stand still (and in the computer industry it generally moves by leaps and bounds), and the capabilities of FAT 16 are clearly not enough.
Compared with it, FAT 32 began to provide more optimal access to disks, faster I / O operations, as well as support for large file sizes (disk capacity up to 2 TB).
FAT 32 implements more efficient use of disk space (by using smaller clusters). The benefit compared to FAT 16 is about 10-15%. That is, when using FAT32, 10-15% more information can be recorded on the same disk than when using FAT16.
In addition, it should be noted that FAT 32 provides higher reliability and faster launching of programs. This is due to two significant innovations:
Ability to move the root directory and FAT backup (if the main copy is damaged);
The ability to store a backup of system data.
3.1.3. File system NTFS
General informationThe NTFS file system is an outstanding achievement in structuring: each element of the system is a file.
None of the FAT versions provide any acceptable level of security. This, as well as the need for additional file mechanisms (compression, encryption) led to the need to create a fundamentally new file system. And it became the NT file system (NTFS).
As already mentioned, its main advantage is security: access rights (read, write, etc.) can be assigned to NTFS files and folders. Thanks to this, data security and system stability have been significantly increased.
The assignment of access rights allows you to prohibit / allow any users and programs to perform any operations on files. For example, without sufficient rights, an unauthorized user will not be able to change any file. Or, again, not having sufficient rights, the file cannot be corrupted by a virus.
In addition, NTFS, as mentioned above, provides better performance and the ability to work with large amounts of data. Let me remind you that formatting a USB flash drive in NTFS not only allows you to forget about such misfortunes of FAT / FAT32 as lost clusters, but also increases the reliability and durability of flash drives, and also allows you to slightly increase the speed of reading / writing data.
Starting with Windows 2000, NTFS 5.0 is used, which, in addition to the standard ones, allows you to implement the following features:
Data encryption- this feature is implemented by a special NTFS add-on called Encrypting File System (EFS) - an encrypting file system. Thanks to this mechanism, the encrypted data can only be read on the computer on which the encryption occurred. In Windows XP, this mechanism has been significantly improved, the shortcomings have been eliminated.
Disk quotas- it became possible to assign users a certain (limited) size on disk that they can use.
Efficient storage of sparse files. There are files that contain a large number of consecutive empty files. So the NTFS file system allows you to optimize their storage.
Using the change log- allows you to register all operations of access to files and volumes.
And one more innovation of NTFS - mount points. With mount points, you can define different, unrelated folders and even drives on your system as a single drive or folder. This is of great importance for determining in one place heterogeneous information in the system.

Rice. 3.1. What USB flash drive manufacturers will not come up with
NTFS device. Master MFT File TableLike any other file system, NTFS divides all of the usable space into clusters - the smallest blocks of data into which files are split. NTFS supports almost any cluster size from 512 bytes to 64 KB. However, the generally accepted standard is a 4 KB cluster. It is he who is used by default. The principle of the existence of clusters can be illustrated by the following example.
If your cluster size is 4 KB (which is most likely), and you need to save a 5 KB file, then 8 KB will actually be allocated for it. Since it does not fit into one cluster, and for the file disk space is allocated only by clusters.
There is a special file for each NTFS disk - MFT (Master Allocation Table). This file contains a centralized directory of all files on the disk. When creating a file, NTFS creates and fills in the corresponding record in the MFT, which contains information about the file attributes, file contents, file name, etc.
In addition to MFT, there are 15 more special files (together with MFT - 16), which are not available to the operating system and are called metafiles. The names of all metafiles begin with a $ symbol, but it is not possible to view them by standard means of the operating system and generally not see them. The following are basic metafiles for example:
$ MFT- the MFT itself;
$ MFTmirr- a copy of the first 16 MFT records located in the middle of the disk;
$ LogFile- logging support file (see below);
$ Volume- service information - volume label, file system version, etc .;
$ AttrDef- a list of standard file attributes on the volume;
$ - root directory;
$ Bitmap- map of the free space of the volume;
$ Boot - boot sector(if the partition is bootable);
$ Quota- a file in which users' rights to use disk space are recorded;
$ Upcase- file-table of correspondence of capital and uppercase letters in the names of files on the current volume. It is needed mainly because in NTFS file names are written in Unicode, which is 65 thousand different characters, the search for large and small equivalents of which is very nontrivial.
As for the principle of organizing data on an NTFS disk, it is conditionally divided into two parts. The first 12% of the disk is allocated for the so-called MFT-zone - the space into which the MFT metafile grows.
It is not possible to write any user data to this area. The MFT zone is always kept empty - this is done so that the most important service file (MFT) does not become fragmented as it grows. The remaining 88% of the drive is conventional file storage.
However, if there is not enough disk space, the MFT zone may itself shrink (if possible), so you will not notice any discomfort. In this case, the data will already be written to the former MFT-zone.
In the event of a subsequent free disk space, the MFT zone will grow again, but in a defragmented form (that is, not a single block, but in several parts on disk). There is nothing to worry about, it is simply considered that the system is more reliable when the MFT file is not defragmented. In addition, with an undefragmented MFT file, the entire file system is faster. Accordingly, the more defragmented the MFT file is, the slower the file system is.
As for the size of the MFT file, it is approximately calculated based on 1 MB per 1000 files.
You can find out the exact size and degree of fragmentation of the MFT file using the standard utility Disk Defragmenter included with Windows. This utility is called as follows: Start → All Programs → Accessories → System Tools → Disk Defragmenter.
Next, in the program window that appears, select an NTFS disk and click on the button Analysis(Analyze), and after some time - Display report(View Report). Scrolling down the information received, you will receive comprehensive information about your MFT file (Fig. 3.2).
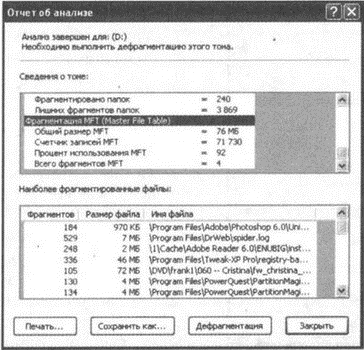
Rice. 3.2. Find out the size and degree of defragmentation of the MFT file
3.2. Operating system formatting
Attention! Before formatting a USB flash drive, be sure to copy all existing files from it. During the formatting process, all files on the flash drive will be lost, and it will be almost impossible to restore them.
To format a USB flash drive, insert it into one of the USB ports on your computer, open My Computer (in Windows XP) or Computer (in Windows Vista), and then:
1. Click on the Flash disk icon with the right mouse button and select the command Format….
2. In the appeared dialog box Format Removable Disk(see fig. 3.3), in the list File system you can choose the type of file system in which the flash drive should be formatted. It is worth noting such a feature that for some reason the standard means of the Windows operating system cannot be formatted in the NTFS file system - only in FAT or FAT32. The default is FAT32. To format a USB flash drive to NTFS, you must either use special program(one of the best is the HP Format Utility, read about it below), or take one little trick, which we will also talk about below. In a standard situation, formatting in FAT32 will suffice. Cluster size per field Cluster size it is not recommended to change.

Rice. 3.3. Format Dialog Box
3.Using the checkbox Quick (clear the table of contents) you can specify the use of quick formatting, the essence of which is to delete the table of files available on the USB flash drive. As a result, it will be perceived as absolutely clean (although the files will actually still be present, and in some cases they can still be restored). Quick formatting is done in a matter of seconds, but can only be used when the flash drive has already been formatted before. The main disadvantage of fast formatting is that it does not search for bad sectors. The main value of reformatting is precisely in finding and excluding bad sectors from work. Therefore, using quick format is not recommended. It is better to wait a couple of minutes, but get a fully formatted USB flash drive at the output, in which all sectors are guaranteed to work.
4. In the field Volume label dialog box Format Removable Disk you can enter the name of the drive, under which the flash drive will subsequently be displayed in the Explorer window and in the My Computer (Computer) window.
5. Press the button to start the formatting process. Begin.
A trick that allows you to format a USB flash drive in the file system using standard Windows tools NTFS, is to first format it by FAT32(as shown above), and then, using the mini-program convert, convert FAT32 v NTFS.
To use the program convert, choose Start → Run, in the small window that appears, enter the command cmd and press OK... As a result, a window will open. command line, in which you can use command line program commands in text (terminal) mode. To use the command program convert to convert the file system of the flash drive to NTFS, enter from the keyboard
convert h: / fs: ntfs / nosecurity / x
and press the "Enter" key. Here h:- this is the current name of the flash drive, substitute your own instead. It will take a few seconds and the conversion will be done. Description of possible parameters convert given below.
Listing 3.1. The convert utility and its optionsD: \ Documents and Settings \ markeuse> convert /?
Convert the file system of the FAT volume to NTFS.
CONVERT volume: / FS: NTFS
volume Specifies the drive letter (followed by a colon),
mount point or volume name.
/ FS: NTFS Destination file system: NTFS.
/ V Enable message display mode.
Specifies a contiguous file in the root folder to back up
places for system files NTFS.
/ NoSecurity Security settings for converted files and folders
will be available for change to everyone.
/ X Force the removal of this volume (if it was mounted).
Any open handles to this volume will become invalid.
If you are thinking of formatting a USB flash drive to NTFS, then it will probably be more convenient to use the HP Format Utility, which we will talk about in the next paragraph of the chapter.
3.3. HP Format Utility is the best tool for formatting Flash devices
The HP Format Utility (full name HP Windows Format Utility for USB Drive Key), as noted a little earlier, is generally considered by most users to be the best tool for formatting flash drives. Its size is minimal (500 Kb), you do not need to install it (you can start it by double clicking on the HPUSBFW.exe file), and it provides everything you need.
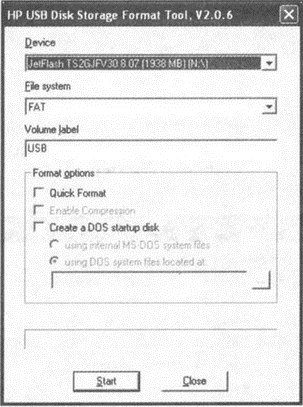
Rice. 3.4. HP Format Utility
Immediately after starting the program, the program window shown in Figure 3.4 will appear on the monitor screen. Working with the program is structured as follows:
1. In the list Device you need to select the flash drive to format.
2. In the drop-down list File System you need to specify the type of the file system. In our case, we strive to format the USB flash drive in NTFS, and accordingly, we will choose it. Check box Quick format sets the fast formatting mode (what it is, it was said just above in the previous paragraph of the chapter). Check box Enable Compressions includes compression, which will be automatically applied to all files placed on the flash drive.
3. To start formatting, in the program window, click Start.
3.4. Miscellaneous
Basically, most manufacturers of Flash drives release their own programs for formatting their flash drives. Finally, it is probably useful to note the existence of alternative programs for working with flash drives, besides the HP Format Utility. The latter, although recognized by most users as the best of its kind, may be more suitable for someone else.
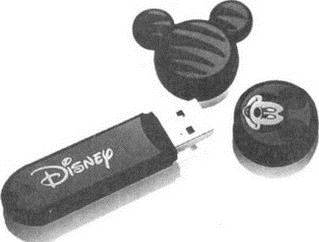
Rice. 3.5. Flash drive for the little ones
Among the alternatives, I would like to note the following:
JetFlash 120 Recovery Tool is Transcend's proprietary Jetflash recovery utility.
HDD Low Level Format Tool - low-level formatting of drives and flash cards.
Flash Recovery Tool 1.0 is a USB flash drive recovery program.
FLASH DOCTOR RUSSIAN v1.0.2 - a program for working with media (flash, hard drives). Uses a low-level disk formatting method, can create disk images and write them to media.
Flash Memory Toolkit 1.1 - a set of various tools (diagnostic and recovery) for working with flash drives.
HP USB Disk Storage Format Tool is a compact utility for formatting various flash drives.
F-Recovery - Recovers photo and video data after formatting or recording errors. Each card type has its own version of the utility.
Chapter 4.
FlashBoot program - creating bootable USB drives
4.1. Wonder-yudo-fish-beast called FlashBoot
In this chapter we will look at the wonderful program FlashBoot, which is designed to create a wide variety of bootable USB drives.
Among its main features are the following:
Creation bootable flash drive for Windows NT / 2000 / XP. However, it should be borne in mind that the USB flash drive created in this case WILL NOT contain the installed system. It will only contain a few boot files who will be able to help boot Windows installed on the computer itself in case of anything (it can be useful if there are any problems with booting on the computer).
Convert bootable CD to bootable Flash. This option refers to bootable Linux disks, and the output actually creates a USB flash drive with the Linux operating system itself. True, it may not always work (not for all distributions), but if it works, then everything will be fast and convenient.
Convert a bootable floppy disk to a bootable Flash disk.
Create a bootable DOS flash drive. At the same time, the main files of the DOS system kernel are written to the Flash disk.
Next, we will analyze in detail all these possibilities. The website of the program is http://www.prime-expert.com. From there, you can download the demo version, which has some limitations compared to the full version. So, a bootable USB drive will be created for one-time use only. That is, after the first boot, the boot record from the flash drive will be automatically deleted. The demo version of the program can also be found on the disc attached to this book. If you enter the registration license key then it will become fully functional. Where to get the key - decide for yourself.
The installation of the program is standard and should not cause you any difficulties.
4.2. Creating a bootable Flash disk based on a bootable CD
The BootFlash program allows you to create bootable flash drives based on bootable CDs. Bootstrap can be used as the latter. Linux disks and the so-called Bart PE bootable disks Windows 2000 / XP / 2003. The latter are created using the Bart PE program based on Windows distributions and are the so-called folk art. You can also try creating such a disc.
To do this, you need the Windows 2000 / XP / 2003 distribution kit itself and the Bart PE program, which can be taken from the site http://www.nu2.nu/pebuilder/ or from the disk attached to the book. The developer's website contains detailed instructions and recommendations for creating bootable Bart PE Windows-disks. However, this procedure is rather difficult, and BootFlash in the end may not cope with converting your creation into a bootable Windows flash drive. Thus, if your ultimate goal is not to create a bootable Bart PE disk, but to get a USB flash drive with Windows installed on it, then you better do this right away, as described in the chapters of the second part of this book. It's another matter if you already have a Bart PE Windows disk ready. Then you can try to convert it to a bootable USB flash drive.
As for Linux, there are a lot of bootable disks with various variants of this operating system (so-called LiveCDs). All you have to do is take one of them and try converting it into a bootable Linux flash drive. It happens that it is not possible to do this using BootFlash. A more versatile way to create your own flash drives with installed system Linux is covered in part 3 of this book. There, everything will have to be done manually, but the result is more or less guaranteed.
To create (or try to create) a bootable Flash disk using the BootFlash program, you must do the following sequence of steps:
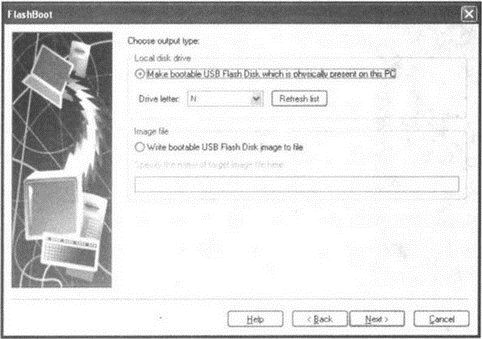
1. Start the BootFlash program and in the first window that appears, click the Next(Further).
2. The main program window will appear, in which you will be asked to select the type / method of the bootable USB flash drive to be created (see Fig. 4.1). The options responsible for converting bootable CDs to bootable flash drives are combined into the topmost group - the group Convert CD... There you can choose either option Convert Bart PE bootable disk to bootable flash disk- if you have a Bart PE Windows disk and want to convert it to a bootable USB flash drive, or the option Create bootable flash disk as copy of bootable CD-ROM disc- if you intend to get a bootable USB flash drive based on a bootable Linux disk. Having made your choice, click the button Next.

Rice. 4.1. Choosing the type / method of creating a bootable USB flash drive
3. In the next window of the program (Fig. 4.2) from you in the list Drive letter you will need to specify the letter of the CD / DVD drive in which the bootable system disk is inserted. If you have not the disk itself, but an image boot disk, then you should set the switch Load image file ... and specify the location of the file - the boot disk image. After making your selection, press Next.

Rice. 4.2. We indicate the letter of the CD / DVD drive in which the disk with the system is located
4. In the next window (Fig. 4.3) you must specify the letter under which the USB flash drive inserted into the computer "passes" now and which you are going to make bootable. Click on Next.
Rice. 4.3. Specify the letter of the flash drive
Rice. 4.4. Set the parameters for creating a flash drive
6. At the penultimate stage, there will be detailed information about all the parameters for creating a bootable Flash disk (Fig. 4.5). To start the creation process, click Finish... The process will begin, the progress of which you can observe in the program window (see Fig. 4.6).

Rice. 4.5. Free information

Rice. 4.6. The process is underway
7. At the end of creating a bootable USB flash drive, a message should appear in the FlashBoot window Done indicating that the process was completed successfully (see Figure 4.7). Close the program window by clicking the Close button.
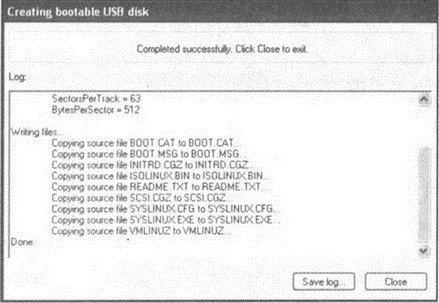
Rice. 4.7. Creation of a bootable USB drive completed successfully
4.3. Creating a bootable Windows-based flash drive used for emergency boot of the system installed on the computer
Please note that the USB flash drive created in this way is not a full-fledged bootable USB flash drive, since it does not contain the system itself. It is intended only to boot the system already installed on the computer if there are any problems with its loading. Only the files necessary for this are placed on the flash drive.
The procedure for creating such a bootable USB flash drive is built as follows:
1. Run the BootFlash program and select Create Windows NT / 2000 / XP emergency bootloader(see figure 4.8).

Rice. 4.8. Choosing the type of USB flash drive to create
2. In the next window, set the switch to Installed copy of Windows NT / 2000 / XP to create a flash drive based on the system installed on the computer. As you can see, this can be done only for the operating systems listed in the option name (see Fig. 4.9).

Rice. 4.9. We indicate creation based on the installed operating system
4. In the next step, specify the letter of the flash drive from which you want to make the bootable one. Press again Next and you will see a summary of the USB flash drive creation. To start the process, click Finish.
4.4. Convert a bootable floppy disk to a bootable flash disk
To create a bootable USB flash drive based on a bootable floppy disk in the BootFlash program window, select the type of USB flash drive to be created Create bootable flash disk as a copy of DOS-based floppy-disk(fig. 4.1). The rest of the steps are basically trivial and are similar to those we did in the previous cases. So it makes no sense to consider them again.
4.5. Creating a bootable USB flash drive for password recovery
To create a bootable USB flash drive designed to recover system passwords (suddenly you forget them), in the BootFlash program window, select the type of USB flash drive to be created Create password recovery disk for Windows NT / 2000 / XP(see fig. 4.1).
In the next window you will need to click the button Download CD-ROM image and, having connected to the Internet, download the image file. Further, in the field below, specify the location of the previously downloaded file (Fig. 4.10).
Rice. 4.10. Customization
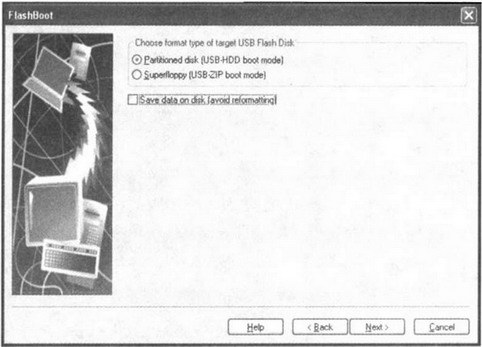
The rest of the steps are basically trivial and are similar to those we did in the previous cases. So it makes no sense to consider them again. We only note that at the penultimate stage it will be necessary to set the partitioning of the disk into partitions by setting the switch to the Partitioned disk (USB-HDD boot mode) position, as we did in section 4.2.
Chapter 5.
5.1. How to enter SETUP BIOS?
On motherboard each computer (whether it is a desktop computer or a laptop) has a memory chip that stores the basic input / output system (BIOS, Basic Input / Output System) and a program initial setup computer - SETUP BIOS (hereinafter simply SETUP). This program allows you to set various system parameters of your computer, such as date, time, hard disk parameters, etc. Among other things, SETUP allows you to set the boot sequence of the computer, that is, choose which boot device will be the first, second, etc. Your first boot device should now be HDD... If you need to boot from CD / DVD, you need to select the CD-ROM drive. And if from a Flash disk - USB Flash.
To enter the SETUP program during the initial boot of the computer (namely, the initial boot, and not the boot of the operating system), you need to press a certain key or key combination. The trouble is that different BIOS designers use different key combinations to enter SETUP. The most commonly used keys are "DEL" and "F2". When you boot your computer, you will see a message:

Rice. 5.1. Key to enter SETUP on IBM Lenovo Thinkpad laptops
It is clear that to enter SETUP you need to press the "DEL" key. But sometimes the boot messages are not displayed - a beautiful graphical splash screen is displayed instead, or the messages fly by so quickly that you don't have time to read them. In this case, we recommend referring to the motherboard manual. If you do not have one, then you can try using the SETUP access keys shown in table. 5.1.
Table 5.1. How to enter SETUP BIOS
| BIOS manufacturer | Key / key combination |
|---|---|
| AMI BIOS | "Delete" or "F2" |
| Award BIOS | "Delete" |
| Award BIOS (very old versions) | Ctrl + Alt + Esc |
| Phoenix BIOS | "F2" or "F1" |
| DELL BIOS | "F2" |
| Microid Research BIOS | "Esc" |
| IBM | "F1" |
| IBM Lenovo Thinkpad | Press and hold the blue ThinkVantage key until the SETUP program menu appears (Figure 5.1) |
| Toshiba (laptops) | Esc, then F1 |
| HP / Compaq | "F10" |
5.2. Activating boot from a USB flash drive
So, half of the way has already been passed. You have entered the SETUP program menu. You just have to activate the boot from USB Flash and save the changes. As shown above, the SETUP access keys are different for different BIOS manufacturers, but what about menu items! Obviously, they will be different for all BIOS manufacturers, so read the rest of this chapter carefully.
Phoenix BIOSBIOS from Phoenix can be found on stationary computers and on laptops from Asus, Acer, Samsung, etc.
At the top of the SETUP window, you will see a menu of the following items: Main, Advanced, Security, Power, Boot, Hardware Monitor, Exit... You need to select an item Boot... Then you will see a list of boot devices (Figure 5.2). Boot devices are listed in the order they are polled when the computer boots. The hard drive is usually displayed first, followed by the CD-ROM drive, and then the rest of the boot options. Use arrow keys to select USB HDD and press F6 to make it the first bootable device. If there is no USB HDD item in the list of devices (as shown in Fig. 5.2), then you need to update the BIOS version. This is best done at a service center. I do not argue that updating the BIOS is possible at home, but often attempts end in failure, and you still have to contact a service center.

Rice. 5.2. There is no USB HDD item in the Boot menu: Booting from Flash is not available!
To save the changes (if, of course, they were), you need to press the "F10" key and confirm the exit with saving the changes. If your BIOS does not support booting from Flash, do not worry - in the next chapter we will look at how to boot Linux Mandriva Flash using an additional CD, but for now press Ctrl + Alt + Del to exit SETUP.
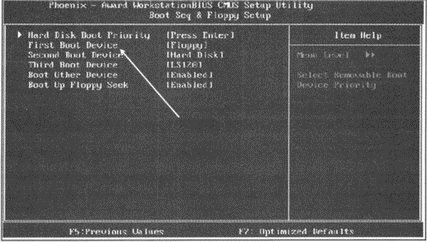
Award BIOSAward BIOS is probably the most popular. To activate downloading from Flash go to the menu Advanced BIOS Features then go to submenu Boot Sequence(In some versions of this BIOS, this submenu is called Boot Seq & Floppy Setup) and as the first boot device (parameter First Boot Device ) select USB-HDD.
To save the changes, as in the previous case, you need to press "F10" and confirm the save.
Rice. 5.3. Editing Boot Sequence in Award BIOS
Lenovo BIOS Thinkpad SeriesAfter entering SETUP go to the menu Boot, you will see the parameter Boot Priority Order, use the arrows to select a device USB-HDD and press "F6" to make it the first. Then press "F10" to exit the SETUP program with saving the changes.
HP / Compaq BIOSTo activate booting from USB-Flash follow these steps:
Go to the menu Advanced and select the item Boot options.
Use the arrows to select USB Hard Drive.
Press "F10" to save changes.
DELL BIOSTo activate booting from a USB flash drive, follow these steps:
Go to the menu System.
Select item Boot Sequence and press "Enter".
Please select USB Storage Device.
Press the "U" KEY to make the USB stick the first in the boot sequence.
Exit SETUP using the menu and confirm to save the changes.
5.3. What to do if your computer does not support booting from Flash
In most cases, there are three options:
If the computer was bought 2-3 years ago, you can try to find new version BIOS. You should only look for it on the motherboard manufacturer's website, not on the BIOS manufacturer's website. All BIOS versions adapt to a particular motherboard, so BIOS from a Gigabyte motherboard will not work on an Asus motherboard.
If the computer is older, then it is high time to replace it.
But if there is no money to buy a new computer, and you want to try the Flash distribution kit, you can use a special CD that allows you to download the Flash distribution kit. In the next chapter, we will look at such a disk that allows you to download the Mandriva Flash distribution.
Chapter 6.
Recovery of damaged flash drives, damaged files from flash drives
6.1. Small but fast program EZ Recover. Comprehensive flash drive recovery
A small but nimble program EZ Recover is designed for complex recovery of damaged flash drives. At the same time, it can restore such "difficult" cases when the flash drive is not recognized correctly by the system, its size is displayed as zero, and so on. The entire flash disk is restored at once. Selective recovery of individual files is not possible.
To use the program, launch it and, in response to the prompt about detecting the flash drive, insert the flash disk into the USB port. Perhaps the first time the program will not be able to recognize it, then you need to remove and reinsert the USB flash drive into the USB port. This may need to be done several times. When, finally, the happy moment comes and EZ Recover sees your hapless USB flash drive, the program window shown in Fig. 2 will appear on the screen. 6.1.
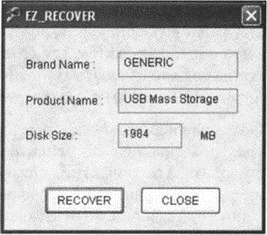
Rice. 6.1. EZ Recover window
As you can see, the program window is not replete with settings, offering you either everything or nothing. To get everything and carry out a full recovery of the flash drive, click the button Recover; to send it all away and close the program window - press the button Close... That, in fact, is all science. The only thing I would like to note is that with all the literacy of the EZ Recover program, there are still times when it cannot cope. In addition, using the EZ Recover program, you operate and risk a whole flash drive. Perhaps it makes sense to try to restore the USB flash drive file-by-file, and in general to see what is done with it. In this case, the program can help you Handy Recovery, which we will look at in the next section of this chapter.
6.2. Handy Recovery is the best program for recovering damaged / deleted files from flash drives
6.2.1. What can Handy Recovery 4.0 do?
According to the developers, Handy Recovery is an easy-to-use program with which you can easily recover files that have been deleted without any difficulty and some special knowledge. different ways from your hard drive or flash drive. Especially interesting is the fact that it is possible to reanimate even deleted or damaged partitions / flash drives that are no longer displayed by the system. At the same time, Handy Recovery will display all files on the disk even after formatting. True, it is worth making a reservation here. The above is only possible with the "fast" formatting method.
Handy Recovery can work with all Windows platforms without exception, from 95 to Vista. In addition, it supports absolutely all Windows file systems designed for hard disks, floppy disks, as well as recently popular flash drives. With Handy Recovery, it is even possible to recover compressed and encrypted NTFS files. It is interesting to note that the program even supports the HFS and HFS + file systems that are used by the Mac OS X operating system.
Handy Recovery allows you to recover data from an empty recycle bin. That is, if you recently performed the "Empty Trash" operation, you still have a chance to get them back from the "abyss".
All information about each file is stored in the file record. When a file is deleted, its record is not immediately deleted, so ordinary programs use this fact to restore it. However, file records are not always saved. But Handy Recovery can perform a thorough scan for such files.
A very convenient feature is implemented by the program in the form of a remote file viewer. You will see all deleted files that can be recovered. And they will be located exactly in those folders in which they were before deletion. If you need to find desired file, then the program is armed with the following arsenal for searching: search by name or mask, and for a more subtle search, you can set a filter by name, mask, date and file size. A special window will display the contents of any file capable of recovery.
Handy Recovery allows its users to create an exact image of a disk or its partitions, and then save the image file to any external media... Subsequently, you can restore information on any other computer.
The features of the program include the following functions:
Analysis of lost records of the main file table of NTFS disks;
Recovery of changed data streams;
Support for compressed disk images;
The ability to save the session with its subsequent restoration;
Ability to save and load information about partitions to disk;
Sector-by-sector viewing of disk contents;
Shows the probability of successful recovery of each file.
6.2.2. Installing and running Handy Recovery
The installation of the program takes place in the standard for OS applications Windows mode... From the settings, you will only need to select the destination folder for the installation of the program. However, Handy Recovery is initially delivered in English, and adherents of native languages need to install additional files in order to be able to see familiar letters.
The program is launched by double clicking the shortcut Handy Recovery which will appear on the desktop immediately after installation. The main window of the program that appeared as a result of the actions taken (Fig. 6.2) indicates that you did everything correctly.
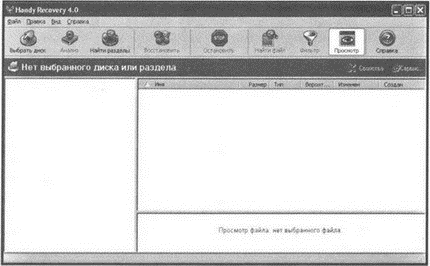
Rice. 6.2. Handy Recovery main window
6.2.3. Program settings
Handy Recovery is so easy to use that it does not have any multiple settings for its operation. There are only a few tools in the settings that regulate the execution of some program functions. The settings are presented as checkboxes. The user has the ability to enable or disable a condition suitable for his requests. To get to the settings window, select Edit → Customize…. A window will appear on the screen. Customization(fig. 6.3).
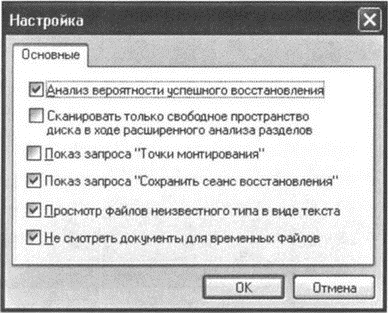
Rice. 6.3. Program settings
The settings window consists of six checkboxes. Let's take a closer look at each of these elements:
Analysis of the likelihood of a successful recovery. Select this item if you want to see the likelihood of recovery for each deleted file during the analysis of disks or their partitions. That is, you will immediately know what the chances are of bringing the data you need back to life. The information is presented to your attention in the form of a list of files.
Scan only free space disk during advanced partition analysis. By default, when performing an extended analysis of a drive, the program skips those areas of the drive that are occupied by files. However, this optimization is not always feasible when analyzing deleted and corrupted partitions. But if you do not need to check these sections, then you can significantly save search time by checking the box here.
Show the request "Mount points". NTFS 5 supports a "volume mount point" that allows volumes to be mounted at arbitrary locations in the file system in addition to the standard drive letters (C, D, E ...). If, during the analysis of the disk, the program stumbles upon such a point, it will be able to signal this in the form of a message. To do this, you need to check the box for this item of settings.
Shows the "Save recovery session" prompt. If, when analyzing a disk or its partitions, you suddenly want to change the analyzed disk or close the application altogether, Handy Recovery can open a dialog box asking you to save the results of the current analysis. If you do not need this option, uncheck the box (this service is enabled by default).
View files of unknown type as text. In the event that the file format is not supported by the applications of your system, it can be displayed in text form. If for some reason you are not satisfied with this performance unknown files, uncheck this item.
Do not view documents for temporary files. Some document files are viewed using programs included with MS Office. These programs automatically create temporary files on the system drive. This fact greatly reduces the chances of data recovery, since numerous temporary files can be written over the deleted data. If you select this option, Handy Recovery will not automatically preview your document files.
6.2.4. Recovering damaged / deleted information
Before we learn how to reanimate seemingly lost data in practice, you need to know the following. As soon as you come to your senses that you have made an irreparable mistake by deleting a file, folder or a whole section, or found that a particular file or files on the flash drive are damaged, in no case do not postpone the process of restoring information indefinitely, as every day the chances of a successful outcome will tend to zero. The fact is that during the operation of the system, a huge number of auxiliary files are created, which are created, then deleted, while the user does not even know about their existence. So, these temporary files can be written over your accidentally deleted file. However, do not despair if you realize only after a month that you have lost important information. Indeed, even after a fairly long period of time, there is every chance of its successful recovery.
Selecting a recovery driveThe first step in the data recovery process is the procedure for selecting a Flash disk that contained damaged / deleted files during its lifetime. To do this, you need to open a dialog box Select disk or partition... This is achieved by selecting the main menu item File → Select disk or partition ...... You can make it even easier and click the button Select disk located on the toolbar of the main program window.
But it's actually even easier. Here we have to admit that we were deceiving above, having written that when the program starts, the main program window appears. In fact, the first thing you see on the screen when you click on the launch file will be the dialog box Select disk or partition(see fig. 6.4). We ask you to forgive us for this incident, especially since this is not the essence of how important it is.

Rice. 6.4. Selecting a recovery drive
This window contains a list of all disks and their partitions available on your computer. If the file you are recovering was once contained on the provided partitions, select it and then click the button Analysis. However, in the case when the desired disk or its partition is not in the presented list, due to its deletion or destruction, then you will need to search for them, which we will discuss in more detail below.
In the meantime, we started analyzing the contents of the selected disk. This procedure searches for links to all deleted files and folders on the disk. The duration of the analysis directly depends on the size of the selected disk. We talked about the way to reduce the time of this process above, when describing the program settings. But in any case, you need to wait until the end of this process.
The results of the analysis will be displayed in the form of a folder tree in the left area of the main program window (Fig. 6.5).
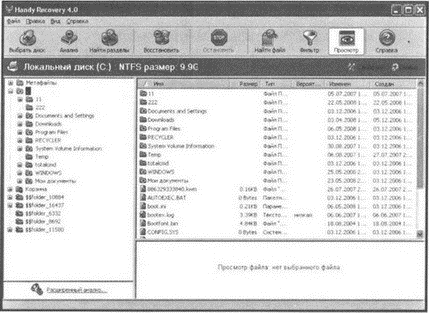
Rice. 6.5. Results of the analysis of the selected disk
In the event that the program has found the file it is looking for to restore, and there is no end and edge until the end of the analysis, you can stop the ongoing process in vain by clicking the button Stop on the toolbar. An alternative to this button is to go to the main menu item File -> Stop current operation.
Find files to recoverThe process for viewing content is exactly the same as working with Windows Explorer... The newly discovered deleted folders will already be present in this tree. The right area of the main Handy Recovery window is divided into two parts. The upper area displays the contents of the folder selected from the tree. Along with existing files and directories, previously deleted ones will also be displayed here. You can distinguish them from "live" data by the presence of a red cross on the object icon in the left part of it. For remote folders - for files -. A folder icon with a red cross in the middle means that this folder exists, but it contains previously deleted attachments (folders or files). To expand it, click on the node with the "+" sign in the disk tree. A branch is closed by clicking on a node with a "-" sign.
The lower part of the right area is for viewing the contents of the selected files.
If your flash drive is huge, and even more so if it is crammed to capacity, then analyzing the contents can take a lot of precious time and nerves from you. This is especially true if the configuration of your computer has not been updated for a long time. This is where the system for filtering the desired objects comes to the rescue. Handy Recovery has pleased its users with the number of selection criteria. With the help of them, you can create almost any task for searching. You can filter by file name (including mask), by keyword, date, size, date of creation of the object and date of its modification. You can display only existing files or only deleted files, hide empty folders... The filter can be turned on / off with a simple click of a button. Filter located on the toolbar, or through the main menu View Filter... When the filter is turned on, a dialog box with selection criteria is displayed on the screen (Fig. 6.6).
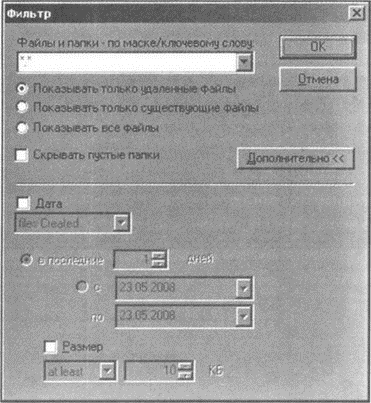
Rice. 6.6. Setting filter parameters
If you need to find a single file or a group of similar objects, you can use the search function. To do this, click the button Find file located on the toolbar. In the dialog box that appears, enter a file name or mask.
However, if you still cannot find the files you need, you need to try an advanced disk analysis. This tool will be discussed a little later, as well as the ability to recover files from an empty recycle bin.
After completing all the above procedures, the object / objects ready for recovery will be displayed in the right part of the main program window.
Recover damaged / deleted filesThe recovery procedure is very simple and does not take much of your time. First you need to decide whether you will restore all the files in the list or you only need some of them. In the second case, use the cursor to highlight the required files. If they are not in order, then selective selection is possible. To do this, hold down the Ctrl key and click the desired objects. Using any of the above methods, mark all the necessary files. In principle, you can restore objects one at a time. But there are situations when you need to bring thousands of files back to life, and doing it one by one would be crazy.
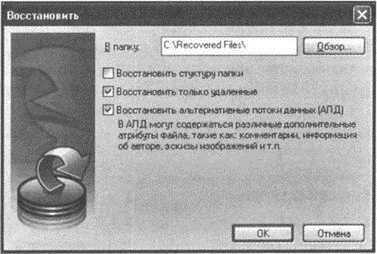
Rice. 6.7. Choosing recovery options
Here you first need to select the folder in which the restored objects will be saved. Take this point very seriously, especially when recovering many files. The fact is that if you choose the same Flash drive, an irreversible situation may result when the first recovered files will be overwritten by deleted objects, which were also marked by you for recovery and simply "wait" for their turn. Naturally, in this situation they will never have to wait for their "publication". Therefore, we strongly recommend that you select a drive for saving files that is different from the one on which they were located before deletion.
In addition to choosing the location of the target folder, the program provides the ability to select additional settings:
Restore folder structure- if you want to completely restore the directory structure as it was before deletion, check the box here. All branches of the tree will be restored to the destination folder.
Recover deleted only- if you select this option, only deleted files will be restored to the folder you selected. Existing files in this case will not be copied to the destination folder
Recover alternate data streams- if the checkbox is checked, then along with the main data, their alternative streams will be restored. Alternate data streams (ADF) are used in NTFS for storage additional information about the file, such as user comments, author information, and other file attributes.
After you have decided on all the settings, click the button OK... Now you can go to the folder of your choice and check the files for their performance. As you can see, everything is quite simple and, most importantly, convenient. But here we have looked at a fairly standard situation. However, in practice, tasks are often encountered that require a more flexible approach to solve. Next, we will look at additional features of Handy Recovery.
Advanced file searchAs we have already mentioned more than once, information about each file on disk is stored in a file record (a special hidden system file). In most cases, this information is found by parsing all the records in a file during a standard procedure. However, the search result does not always have a positive side. The fact is that some records of the file can be damaged due to the fact that the disk partition could be damaged or completely deleted. It is possible that the information in the file records could be overwritten. The reasons we have named explain the fact that the required object is not in the list of deleted files after the usual analysis. In this case, the program offers an extended analysis. Of course, it will take longer, but it will have a greater effect.
So, if you don't get the results you want, try advanced analysis. To do this, click the label Advanced Analysis ..., which becomes available immediately after the completion of the usual analysis in the lower left corner of the main program window (under the disk tree). This will open a dialog box Advanced analysis, (fig. 6.8).
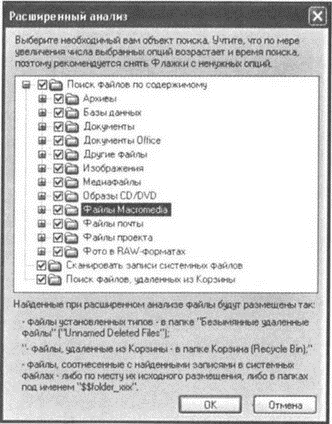
Rice. 6.8. Configuring Advanced Disk Analysis
Mark the items you want to search for. The only thing to remember is that the more options you choose, the longer the analysis will take. If possible, uncheck the boxes for objects that you definitely do not need, this will significantly speed up the search procedure.
An advanced analysis setup has three selections:
Search for files by content. Handy Recovery provides the ability to search for files of a specific type. You can choose both a specific file type or several types at the same time, and a group that generalizes them. For example, you can select to search only MP3, AVI and MPEG-4 files, or you can all existing media files at the same time by checking the box next to the item Media files... When this option is selected, the entire area of the selected section is scanned. Upon completion of the search, all found objects will be placed in the "Unnamed deleted files" folder of the program folder tree. If for some reason it becomes impossible to restore the original file names, they will automatically take the names of their types with the addition of a serial number (AudioMP3_0001.mp3, AudioMP3_0002.mp3 ... etc.).
System file write scan. When you select this Handy Recovery option, you will be instructed to search for lost file records. Since file records are stored on disk inside hidden system files, deleted records can be lost in the same way as deleted files. That is, they can also be overwritten by new objects. However, the program may try to find and recover these records in the same way that it searches for certain types of files. At the end of the search, all newly discovered files will be placed either in their original location or in a folder named "$$ folder_xxx", where xxx is an automatically assigned number.
Search for files deleted from the recycle bin. You have probably performed the "Empty Trash" operation at least once. It would seem that after this procedure, the deleted objects should disappear from your computer forever. However, this is not the case. Handy Recovery searches for such files. In case of a positive result, they will be displayed in the folder Basket folder tree. A regular disk analysis finds files deleted after emptying the Recycle Bin, but not all of them. For a more thorough search for such objects, check the box next to this option. Using advanced analysis, the folder Basket will be replenished with additionally found files.
Once you have selected the advanced analysis options you need for your particular case, click the button OK... The process of executing the file search will begin, which takes some time and directly depends on the parameters you selected and, of course, the system performance. Upon completion of the analysis, the main Handy Recovery window will look like this (see Fig. 6.9).

Rice. 6.9. Extended analysis result
We discussed further actions to restore the found objects above.
Recovering files from deleted or damaged flash drivesAs the saying goes, nothing lasts forever, and sometimes disk partitions disappear from the operating system's field of vision. We will not go into the details of the origin of this fact, we will only say that this can happen both with the "help" of the user (he himself deleted it, did not press it, did not connect it, etc.), or without his participation (power failure, physical impact, etc.). Everything, of course, nothing, in the end, the section can be created anew, but, unfortunately, along with the section, the information also disappears, for which, in fact, the computer exists.
But it turns out that not everything is so bad, and even in such a seemingly hopeless situation, one can hope for the return of lost objects. Click the button Find Sections on the toolbar or press the combination Ctrl + LFind lost partitions(fig. 6.10).
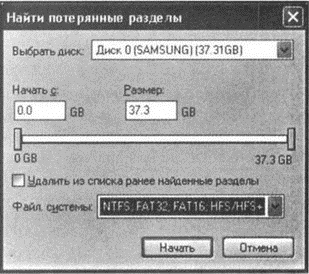
Rice. 6.10. Configuring Lost Partition Search Options
Here you are prompted to set the values important parameters search. First of all, select the disk (if there are several of them), the partitions of which you deleted or lost. To reduce the search time, the program prompts you to set the search range. You can manually type the start of the search and its duration in megabytes. It's easier to do this using the sliders, by moving which you can also select the desired range. By checking the box Remove previously found sections from the list, you will get a list of sections that will not contain the sections already found. Finally, you can choose specific filesystems or both. Click the button to confirm all settings. Begin... A dialog box appears on the screen. Selecting a disk or partition... Handy Recovery will start searching for lost partitions. Each found section will be immediately added to the window list.
The technology of searching for lost partitions in Handy Recovery is such that during the search, in addition to the "real" deleted partitions, many others will be found that have never even existed on this disk. The point is that the program tries to interpret any similar structure found on the disk as a partition. In this regard, opposite each found section or pseudo-section there is an image in the form of an icon, which displays the probability of matching the section to a real one, as well as the probability of recovering files.
While searching for sections, as soon as you see the section you are looking for in the list, immediately click the button Stop... This will save you time and stop a wasted process.
You already know what to do next. Select the section you want and click the button Analysis.
Additional features of Handy RecoveryIn conclusion, I would like to say a little about additional features programs. One of them allows you to save information about the found partitions of the disk. The fact is that if you save information about the detected partitions to disk, then next time you will not have to repeat the search. To do this, go to item File -> Save Partition Information main menu of the program. To download the saved information later, go to File -> Load Partition Information and select the file you want. However, with this way saving will lose the relevance of the content in this section of the files at the next download. During this time, many previously visible deleted files will be overwritten.
In order to be able to save complete information about the disk, you need to create a disk image. Handy Recovery also provides its users with this opportunity. To do this, select the item File -> Save Disk Image main menu and in the dialog box that opens, select the desired partition, or even the entire disk as a whole.
Then you need to click the button Save image and in the dialog box that opens, select the file name and folder to save the image. But remember that you will not be able to do this on the same partition or disk that you want to save. To open the saved image in the future, you need to select the item File -> Open Disk Image main menu and in the dialog box that opens, select the desired file.
One more opportunity provided by Handy Recovery will help you save precious time, as well as the need to start the same operation over and over again. The fact is that the program can work with only one partition or disk at a time. And if you want to restore files of another partition, you must stop the process, select a new partition and perform the analysis from the beginning.
But if you want to return to the previous analysis, you will have to repeat the process already started again. Depending on the size of the disk and its structure, this can take from minutes to several hours. You can avoid repeating the entire process if you save the current restore session. To do this, select the item File -> Save Recovery Session main menu of the program and select the file, as well as the location to save it. Then you can safely analyze another section. Upon completion, select the item File -> Continue restore session, select the saved file and continue the process. However, here, as well as when saving information about partitions, the recovered files are not up to date.
Another useful feature that the program offers is sector-by-sector file viewing. You can view the contents of any remote or existing file in hexadecimal format. To do this, right-click on the selected file and select Sector view... A window for viewing files in a sector-by-sector view will open. We will not explain how to work with a window, because who knows what it is, he knows how to work in such a window.
Well, that seems to be all.
In addition to the "pluses", flash drives also have "minuses". So, flash drives are capable of working only for a limited number of write - erase cycles, although the number of these cycles is quite large. Flash drives are sensitive to electrostatic discharge, and the speed of reading and writing information from a flash drive is limited by USB.
For the convenience of considering typical breakdowns of flash drives and their causes, all breakdowns can be divided into two types - "physical" and "logical". Physical breakdowns are characterized by mechanical damage to the device, or by exposure of the flash drive to a very high temperature (possibly even an electrostatic discharge of more than 12 volts), or moisture penetration into the device. In turn, logical malfunctions and breakdowns of flash drives are usually associated with improper use of the device, violation of the file structure, or normal wear and tear as a result of prolonged and intensive use.
The method of its repair depends on the type of flash drive breakage. As a rule, regardless of the type of flash drive, the amount of memory of this device and the manufacturer, flash drives are repaired according to the same principles.
Why does the flash drive not work and what to do now?
So, let's look at the main breakdowns and malfunctions of flash drives and methods for their repair.Physical damage to flash drives:
As you can see, in case of physical damage to the flash drive, restore its operability or at least save the data stored on it - perhaps, if the memory chip is not damaged.
Logical malfunctions of flash drives:
 Which is better iPhone 6s or 6 plus
 Where are screenshots and games in the Steam folder?
 How to delete or restore all deleted VKontakte dialogs at once?