Reset all network settings windows 7. Reset network settings.
When uninstalling Kaspersky Lab products using standard Windows tools(Control Panel → Add / Remove Programs) errors may occur, as a result of which the program will not be removed or will be partially removed. To completely remove a Kaspersky Lab product, use the kavremover utility.
The uninstall utility completely removes the following Kaspersky Lab products:
- Kaspersky Safe Kids (all versions)
- Kaspersky Secure Connection
- Kaspersky Small Office Security for Personal Computer/ File Server (all versions)
- Kaspersky Total Security(all versions)
- Kaspersky PURE / CRYSTAL (all versions)
- Kaspersky Anti-Virus (from version 2009 and above)
- Kaspersky Internet Security(from version 2009 and up)
- Kaspersky Free
- Kaspersky Password Manager (all versions)
- Kaspersky Fraud Prevention for Endpoint (all versions)
- AVP Tool driver
- Endpoint Sensor
- Kaspersky Security Scan(all versions)
- Kaspersky Endpoint Security for File Servers and Workstations for Windows (starting from version 8 and higher)
- Kaspersky Anti-Virus 6.0 / 6.0 R2 for Windows Workstations
- Kaspersky Anti-Virus 6.0 / 6.0 R2 for Windows Servers
- Kaspersky Anti-Virus 6.0 FS MP4
- Kaspersky Anti-Virus 6.0 SOS MP4
- Kaspersky Anti-Virus 6.0 WKS MP4
- Kaspersky Anti-Virus 8.0 for Windows Servers Enterprise Edition / MR1 / SP2
- Kaspersky Security 10 for Windows Server
- Nifty Security 24 Internet Security / Nifty Security 24 Internet Security 2013
- KTFS for Windows 3.0
- Kaspersky Anti-Ransomware Tool (KART) for Business(all versions)
- Kaspersky Anti Targeted Attack (KATA) Platform 2.0
- Kaspersky Embedded Systems Security 2.0
If you uninstall a product using the kavremover utility, the license information is deleted along with it. Make sure you save your product key or activation code so you can reuse it.
Working with the utility
For complete removal program, follow these steps:
- Download the kavremvr.zip archive and then unpack it (for example, using the WinZip archiver program). Or download executable file kavremvr.exe.
- Run the kavremvr.exe file by double clicking on it with the left mouse button.
- Read the License Agreement of Kaspersky Lab. Read the agreement carefully and, if you agree with all of its clauses, click I agree.
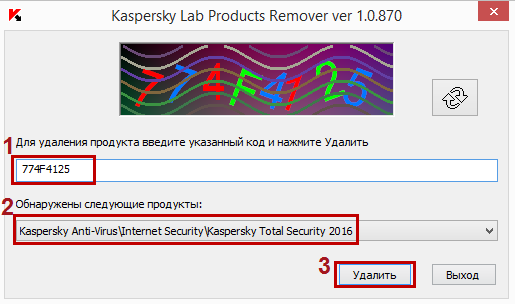
- In the window Kaspersky Lab Products Remover enter the security code in the empty field, which is shown in the picture. If the code is not clearly visible, to re-generate the code, click on the refresh button to the right of the picture.
- Select from the menu Found the following products a Kaspersky Lab application that was installed on your computer. Click on Delete... If several Kaspersky Lab products are installed on the computer, select and uninstall them one by one. You can select the program to uninstall from the list of all products supported by the uninstall utility, for this:
- Run the kavremvr utility via the command line in manual selection mode, with the nodetect parameter:
- kavremvr.exe --nodetect.
- Select from the list the desired program and delete it. If there are several such programs, uninstall them one by one.
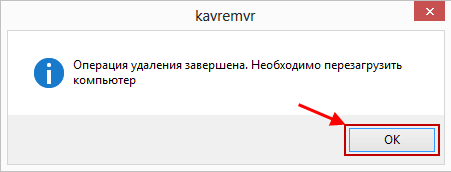
- Removal may take some time. Wait for the dialog box to appear informing you that the product has been successfully removed and click OK.
- Reboot your computer.
By default, a log of deletion of the view is saved in the folder where the utility is located. kavremvr xxxx-xx-xx xx-xx-xx (pid xxxx) .log where you can view the version of the utility:

Additional information for users of business products
When uninstalling Kaspersky Endpoint Security 10/10 CF1 / 10 SP1 MR2 for Windows, you may need to specify a password. For this:
- Run the utility from the command line with the parameter
- kavremvr.exe --password-for-uninstall:% PASSWORD% --MSIPARAM: KLLOGIN =% login%, where:
- % login%- is the username for the respective product;
- % password% - this is the password for the corresponding product.
kavremvr.exe --password-for-uninstall: 123 --MSIPARAM: KLLOGIN = Ivanov
- Select the required program from the list.
During the operation of the program, errors may occur:
Error 1001
Products that cause an error when uninstalling: Kaspersky Endpoint Security 10/10 CF1 / 10 SP1 MR2
Cause: FDE-encrypted drives or drives scheduled for FDE encryption were detected.
Error 1002
Products that cause an error when uninstalling: Kaspersky Network Agent 10 CF1, Kaspersky Endpoint Security 10/10 CF1 / 10 SP1 MR2
Reason: a password for uninstallation was set for the specified products, but the user did not enter the password in the command line.
Error 1003
An error can occur when uninstalling any Kaspersky Lab product.
Reason: KAVRemover is launched from a directory that contains not ASCII characters from a localization other than the current Windows localization. For example, such a situation may arise if the username is specified in non-Latin letters, and the user launches the utility from his desktop.
Removing Network Agent on the Administration Server will cause the server to become inoperable, so the option to uninstall Network Agent is removed in new version kavremover.
Service articles: Service utility kl1_log for collecting information in Kaspersky Lab applications
Service Specialist technical support Kaspersky Lab may ask you to get the utility log kl1_log for information about the network operation on your computer.
To get the utility log kl1_log, follow these steps:
- Download the archive kl1_log.zip and save it to your Desktop or any other convenient place.
- Unpack the archive (for example, using the WinZip archiver program).
- Disable self-defense of a Kaspersky Lab product:
- Kaspersky Small Office Security 5 for Personal Computer / File Server
- Kaspersky Small Office Security 4 for Personal Computer / File Server
- Open the folder kl1_log.
- Run the file kl1med_on.reg.
- Yes in the window Registry editor.
- In case of successful completion of data entry into the register, in the window Registry editor a message will appear: " Data from "<путь к файлу>\ Kl1med_on.reg "have been successfully entered into the registry". Click OK.

- Reboot your computer.
- Reproduce the problem situation.
- Run the file kl1med_off.reg.
- Confirm that you really want to add information to the registry by clicking Yes in the window Registry editor.
- In case of successful completion of the process of entering data into the register, in the window Registry editor a message will appear: "Data from"<путь к файлу>\ Kl1med_off.reg "have been successfully entered into the registry"... Click on OK.

The log file will be saved to the root of the disk C: with a unique name _ids.
Send a request to Kaspersky Lab Technical Support via the My Kaspersky portal, attaching a log file to the request _ids.log... You can find information on how to work with My Kaspersky on the FAQ page for My Kaspersky.
Service articles: Scanning a computer, saving a log and launching a script using the AVZ utility
AVZ utility is designed to collect information about the computer, analyze running processes for the presence of malicious code that is not yet known to Kaspersky Lab and is not detected by the current anti-virus databases.
To run the utility, follow these steps:
- Unpack the archive (for example, using the WinZip archiver program).
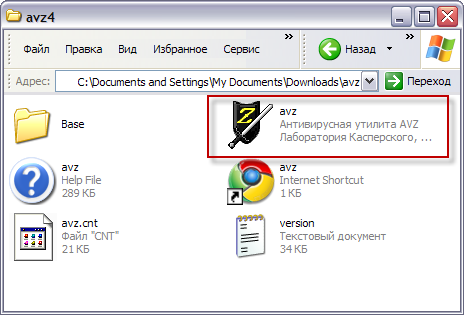
- Open the avz4 folder.
- Run the avz.exe file.
- Select the menu File → Standard scripts.

- Check the box Script for updating, disinfecting and collecting information. Kaspersky Lab.
- Click on Execute marked scripts.

- Click on Yes.

- During the execution of the script, the computer will be restarted. Save all editable documents and click OK to run the script.
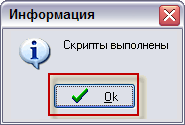
- Wait until the process of scanning and disinfecting the system is completed. In the window Information click OK.
After the script completes, the computer will reboot, and the scan log will be saved in the avz4 folder in the LOG subfolder in the form of two files:
- KL_syscure.htm
- avz_sysinfo.htm in the archive folder KL_syscure.zip
Service articles: How to disable System File Restore
For Windows users system recovery is available after a malfunction occurs.
However, in some cases, it may be necessary to temporarily disable this feature. For example, to remove from a folder _Restore infected files detected by a Kaspersky Lab product. To disable System Restore, follow the recommendations:
What to do after disabling System Restore
After disabling System Restore, run a full scan of your computer using a Kaspersky Lab product:
- How to run a full scan in Kaspersky Small Office Security 5.0 for File Server
- How to run a full scan in Kaspersky Small Office Security 5.0 for Personal Computer
- How to run a full scan in Kaspersky Small Office Security 4.0 for File Server
- How to run a full scan in Kaspersky Small Office Security 4.0 for Personal Computer
After completing the disinfection or deletion of infected files by a Kaspersky Lab product, re-enable System Restore.
Service articles: Exporting registry keys to a file and recovering from a file in Windows Vista / 7
In some cases (for example, when a computer is infected with a virus) you may need to delete / edit some sections system registry... Before editing the system registry, export the entire registry or its sections to which changes will be made (create backup). This will restore the previous state of the system registry if necessary.
1. Exporting registry keys to a file
To export a registry key to a file, follow these steps:
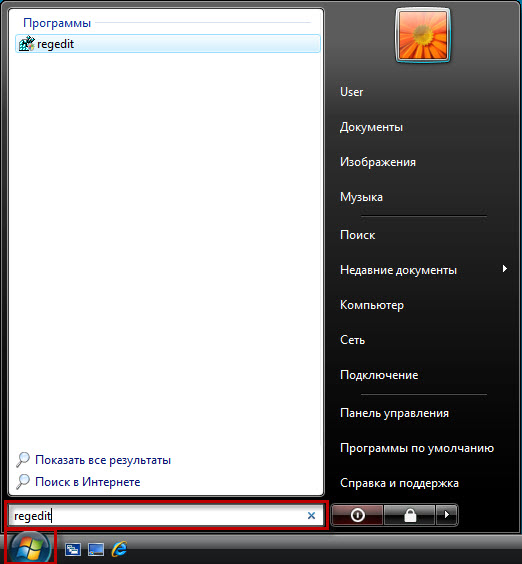
- In the lower left corner of the screen, click on the button Start.
- In the search bar, enter regedit and press the key on the keyboard Enter.
- Enter the administrator password if required.
- In the window User Account Control click on the button Proceed.

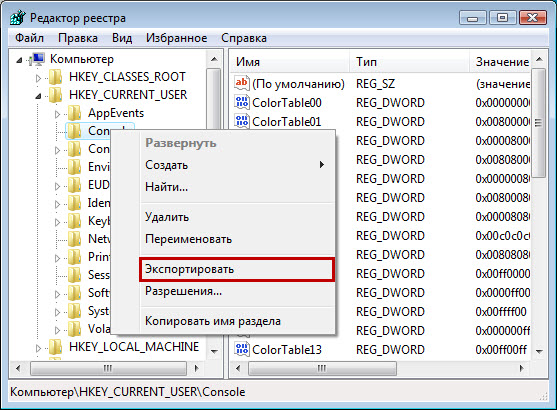
- On the left side of the window Registry editor click right click mouse on the registry key that needs to be exported and in context menu select item Export.
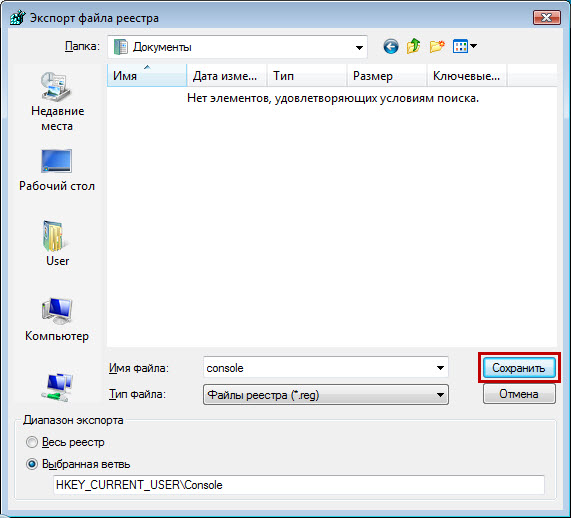
- In the window Exporting a registry file specify the path and file name in which the selected section will be saved.
- Click on the button Save.
- Close the window Registry editor.
2. Recovering registry keys from a file
To restore a registry key from a file, follow these steps:
- Double-click the left mouse button on the file to which the registry key was previously saved.
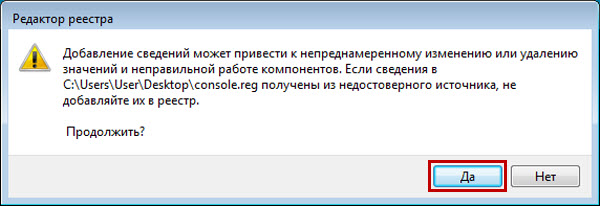
- Confirm the launch of the file, if required. For this in the window User Account Control click on the button Proceed.
- In the window Registry editor click on the button Yes.
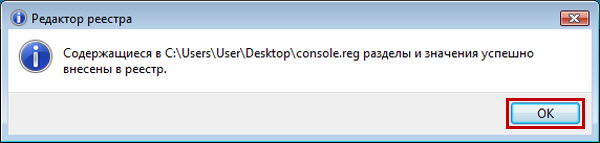
- In the window Registry editor a message appears stating that the data has been entered into the registry. Click on the button OK.
Service articles: How to restore an activation code for a Kaspersky Lab product
If the activation code was lost or deleted by mistake, you can restore it in the following ways:
Electronic version
If you purchased an electronic version of the product in an online store, find the activation code in the letter sent from the online store to the address Email specified by you when placing an order. If the letter has been deleted, to restore the activation code, contact the online store, specifying the following information in the request:
- Purchase date.
- Information about the owner (name, e-mail address).
- The number of the online order sent in the confirmation email that was sent to you after purchasing the program.
If electronic version the product was purchased from the online store http://www.kaspersky.com/store, then send an email with the above information to email address [email protected].
Boxed version
If you purchased a boxed version of the product, to restore the activation code, send a request describing the situation to Kaspersky Lab Technical Support on the portal
Resetting network adapter settings
Solution:
Right click on the network icon in the notification bar. Select. Next, in the new window, click on Change adapter settings... A window will open with available connections to the internet.
If you need to change the parameters for connecting by network cable then right click on the adapter Ethernet... If for a Wi-Fi connection, then the connection Wireless network ... Select item Properties.
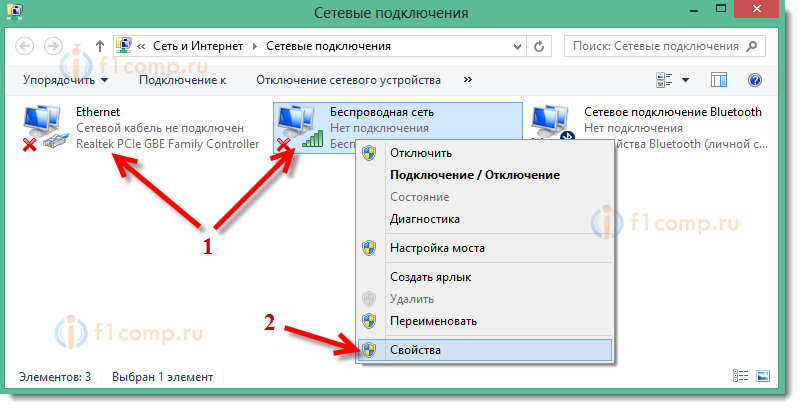
In the new window, you can set the automatic receipt of addresses for this adapter (by selecting the Obtain an IP address automatically and Obtain DNS server address automatically check boxes), or set static addresses.
After making changes, do not forget to apply the settings by clicking on the button Ok.

Restart your computer and try to connect to the internet.
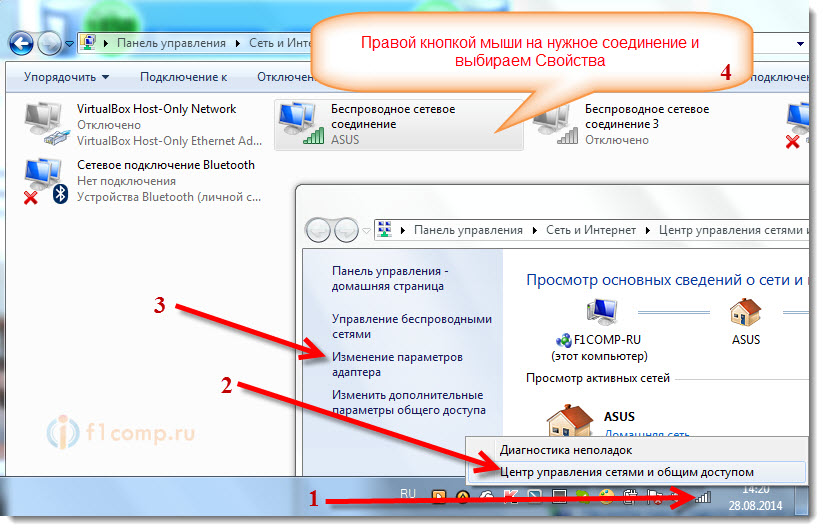
Instructions for Windows 7
In Windows 7, everything is done in the same way as in Windows 8. It would be possible not to write separately for the seven, but let it be.
Right-click on the network icon, then select the item Network and Sharing Center... Then click on AND Changing adapter parameters, and again, right-click on the adapter whose properties we want to change. In the menu, select Properties... Like this:
Highlight the item Internet Protocol Version 4 (TCP / IPv4) and click on the button Properties... Specify the required IP and DNS, or set them to automatically receive, and click Ok.
Configuring automatic acquisition (or setting static) IP and DNS on Windows XP
Press Start and open Control Panel... Then, select Network and Internet Connections.
aligncenter wp-image-8033 colorbox-8012 "src =" http://kirensk.net/images/up/28-08-2014-15-12-45.jpg "alt =" (! LANG: Windows Network Connections XP" width="649" height="446">!}
We see the network connections that are available on our computer. Right-click on the desired connection and select Properties.
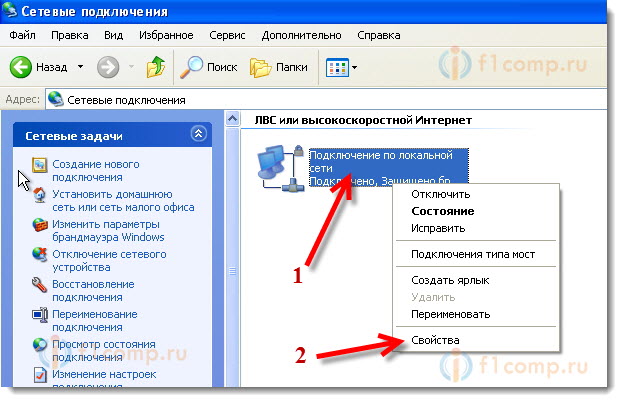
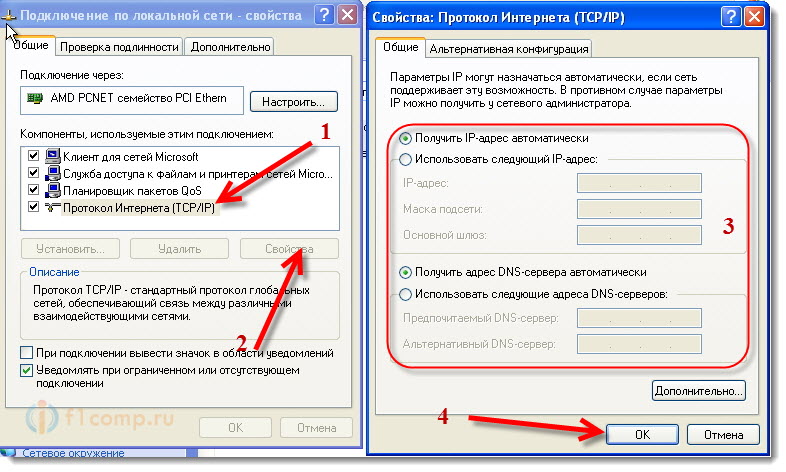
Highlight the item Internet Protocol (TCP / IP) and press the button Properties.
As in the two systems I wrote about above, we set the parameters we need for obtaining IP and DNS. Either automatic receipt, or we set static addresses and press Ok.
Sometimes, it happens, the Internet connection settings get confused or simply does not want to connect to the network (does not receive an IP address via DHCP). Similar problems may occur due to the operation of some malware(viruses). You can torture those for a long time. support from your provider or call a specialist at home. You can try to fix the problem yourself.
To reset TCP / IP in operating rooms Windows systems NT (2000 / XP / Seven) exists special program netsh.exe.
netsh.exe- (Network Shell) allows you to configure the network parameters.
Some dirty viruses will get into WinSock and dirty.
Symptoms:
- The download speed of files over TCP is very low (while over UDP it can download quickly);
- When you turn on the computer for a while, a couple of minutes, the Internet works fine, but then it disappears completely (the speed drops to 0);
- The Internet works and the download speed is normal, but the uploaded file turns out to be broken because it is not downloaded completely (most likely the virus intercepts some of the packets during transmission, but sends a notification to the source about the successful receipt of all packets).
In addition to viruses, you can also "break" your Internet connection (or "shut it down")
Some examples:
- The computer does not receive an ip-address automatically (via DHCP);
- IP addresses are pinged but not pinged by name;
- The computer receives an IP address of such a pattern 169.254. *. *;
If the viruses are cleaned, then you can proceed with the recovery. ATTENTION! The following procedures will reset the network settings. I highly recommend rewriting the settings.
What would reset Winsock:
If the first command does not solve the problem, you can reset the TCP / IP stack to "factory" settings:
In the same place on the command line, enter the command:
netsh int ip reset c: \ resetlog.txt
In this case, the reset log will be saved in the root of the C: \ drive; if you omit the c: \ prefix, the log will be saved in the current directory. After that, you should restart your computer.
After using this command, the following register branches will be reset to the "factory" ones:
SYSTEM \ CurrentControlSet \ Services \ Tcpip \ Parameters \
SYSTEM \ CurrentControlSet \ Services \ DHCP \ Parameters \
You can use these commands together one after the other. By the way, they also dump the DNS cache.
About DNS Cache Issues: For example, the site has moved to another hosting, as a result, its IP address has changed. And since you have not quite fresh data in the cache, when you enter the name of the site, you will be taken to the old IP address, where the site is no longer there.
In order not to reset all settings, try the command ipconfig / flushdns If it doesn't help, use netsh int ip reset resetlog.txt- this is guaranteed to help and reset everything related to network connections. 😉
What to do if they don't work network protocols? When you try to ping the server / ip-address, you get the error "Unable to access the IP driver. Error code 2"? Then you have something with the TCP / IP stack, let's take a closer look.
I'll start with easy and simple, ending with more difficult decisions Problems.
Perhaps you have Avast on your computer and the problems started after updating the anti-virus databases, on December 6, 2012, Avast added a file to its databases, shortly after updating the databases, Avast found this file in system files and deleted (possibly quarantined).
It does not matter, below I will write how to restore the TCP / IP stack to work, after which the network should work (if it worked before, of course):
1. The easiest way is to use avastfix.zip :
- first you need to download avastfix(links in the line above)
- unpack, let's say to disk C: \(there is a folder in the archive, so after extraction there will be a path like this C: \ avastfix \)
- if you have an avast, then turn it off: in the lower right corner, find the avast icon (near the clock), right-click on it and select control avast screens , then you need to specify shutdown forever
- run fixtcpip.bat, after which the computer will restart
- after rebooting, we check the operation of the network, for example, by pinging to the Google server: on the keyboard, simultaneously press the checkbox ( windows logo), between Ctrl and Alt, and the letter R, that is Win
+R... In the window that appears, write cmd, you have opened command line, write in it ping 8.8.8.8, should appear
Packet exchange from 8.8.8.8 to 32 bytes:
Reply from 8.8.8.8: number of bytes = 32 time = 55ms TTL = 48
or something similar, but not a network driver error
- I hope the network / Internet has worked for you, now you need to update the Avast databases, if there is no way to update, then you can exclude this file from scanning in the Avast settings:
C: \ Windows \ system32 \ drivers \ TCPIP.sys (you may have windows installed on a different partition, for example D: ) - now you can turn on the antivirus, in the same place where you turned it off, only now turn on all screens
Let's now look at what's in this "miracle" archive:
fixtcpip.bat - a script that imports standard stack settings into the registry, unpacks the archive tcpip.rar with help UnRAR.exe v C: \ Windows \ system32 \ drivers \
and reboots the computer
2. Consider now manual file recovery / copying
- for a start, nevertheless, turn off the avast (see above the 3rd point "if you have ...")
- file tcpip.sys can be copied from folder C: \ Windows \ system32 \ dllcache , but maybe Avast deleted it the same way, then you can take a bootable CD / DVD / USB disk and find this file there in ... \ I386 \ TCPIP.SY_... The file can also be taken from the working system. But if you don't get this file from where, then here is the link for SP3 (if you have SP2, you can ask)
- restart your computer
- check the operability of the network / internet, if it works, then update the avast and start the avast (see the last point of the 1st method)
3. If the previous methods did not help, then most likely Avast is not to blame. Check if the file exists C: \ windows \ inf \ nettcpip.inf if exists, then proceed to the next method. If the file is not there, then it needs to be copied from the working system, there is no working system? No problem, download from here kb299357 it is written that for reinstallation, it is enough to execute just one command in the command line:
- run cmd
- execute netsh int ip reset resetlog.txt
- restart your computer
7. And now the most difficult part is reinstalling the TCP / IP stack in windows XP manually.
- Boot windows into Safe mode , that is, turn on the computer and repeatedly click on F8 until the menu appears windows boot, select Safe mode
- Go to the registry ( Start - Execute - regedit - OK or Win +R )
- Remove two keys and exit the registry:
HKEY_LOCAL_MACHINE / System / CurrentControlSet / Services / Winsock
HKEY_LOCAL_MACHINE / System / CurrentControlSet / Services / WinSock2 - Next, you need to go to the folder % windir% \ inf(usually C: \ Windows \ inf), in which you need to find the file Nettcpip.inf and edit it (you can use a regular notepad), you need to change it in the section key Characteristics = 0xa0 on Characteristics = 0x80 ... Save and close the editor
- Go to Network connections , then go to properties and select network connection(any, since the protocol is one for the whole operating system). Click on Install- Protocol - Install from disk - insert C: \ windows \ inf(I change the drive letter to my own) - OK - select Internet Protocol (TCP / IP) - OK
- You should have stayed in the connection properties on the General tab (no additional windows), now you can delete Internet Protocol (TCP / IP) by pressing the button Delete
- Reboot your computer
- Perform the second method (if the file exists, then replace it), namely copy tcpip.sys v % windir% \ system32 \ dllcache and % windir% \ system32 .
- Now you need to install the protocol, as it was written just above (point 5)
- It should work right away, if it does not work, then restart your computer
- I hope everything worked for you, with what Congratulations!
 How to switch to “Smart mini” tariff from MTS for free - how to connect or disconnect TP?
 Beeline bonuses: accrual, accumulation, use
 How to call America is not difficult