The computer does not turn on Windows 7 startup recovery. Some classic fixes. Using the AVZ utility.
In many cases, the inability to boot Windows 7 may simply be due to an incorrectly set boot order in the BIOS. This can happen if your computer has more than one hard disk... Typically, the BIOS is entered a few seconds after turning on the computer by pressing a button. Delete or by pressing a special function key... Entering the BIOS, make sure that your HDD with Windows 7 is in the correct place in the boot queue. If you don't know where to look, read the instructions for your motherboard.
It scans your computer for known malicious files and computer infections. If you find it, you will automatically try to remove them. This information can be used by an experienced forum assistant to diagnose and remove infections that the program did not automatically remove automatically. This tool has great potential to eliminate all kinds of threats, therefore it is highly recommended that any action based on the information displayed by the program be carried out under the supervision of a well trained and well trained user.
Another possible reason not detecting Windows computer there is a hardware problem during the download. If the BIOS cannot find your system drive, then make sure that all cables are connected to it properly. If your hard drive is making a strange sound like clicking and tapping, then it might be broken. Finally, it is possible that your hard drive is experiencing data corruption issues affecting critical system data such as the Master Boot Record (MBR).
Reset system settings to standard
Failure to do so may result in problems with the normal operation of your computer. Temporary folder of the temporary Internet temporary file folder. ... Just click on the picture below. If you need help removing malware, create a help topic on one of the forums listed in the section. Each of these forums has their own rules of conduct, so before setting up your theme, find out what you need to do to get help, read sticky topics, and finally describe. exactly your problem.
If you suspect that your drive is broken, it’s a good idea to back up important data, scan it for errors from another computer, and even consider purchasing a replacement drive. Attempts to fix the boot problem on damaged disk can result in data loss, so back up your data before you do anything else.
It is advisable to print the instructions, because before closing the program, you must close all open windows, programs, including browser windows. Downloading the program is easy. Open one of the links above in a new window or tab. Then, on new page, click: Download. You should see a selection box similar to the one below.
When prompted for a location to save the file, make sure you save the program directly to your desktop - as shown in the image below. When you select Desktop as the file location, click Save. This can take from a few seconds to several minutes.
MBR and other important boot data can also be corrupted by attempting to install earlier Windows versions besides Windows 7 (like Windows XP) or third-party programs like viruses. In case of a virus, it is recommended to check the disk using antivirus software... Otherwise, attempts to fix the disk with a virus may result in data loss.
When you download the program, you will see an icon similar to the following on your desktop. First, however, we must take appropriate steps to avoid conflicts with other programs during system scans. Instructions for excluding such programs can be found. ... This warning is normal, in which case clicking Run will not harm your computer. At this point, you should see a box with a disclaimer of warranty for software.
Read the entire text of the "license agreement". Click “Agree” to continue. After successful installation, you will see the following program window. Then the program will create a backup system registry... If it is already installed, you can continue reading the instructions.
Also, the appearance of messages about corrupted boot data may be caused by incorrect assignment of the active partition of the disk, which may come from an overly inquisitive Windows user with administrative rights.
Fixing MBR and other Windows 7 boot problems is most quickly accomplished with the Windows 7 installation DVD. But if you don't have one, you can alternatively use the system disk Windows recovery 7, the creation process of which we will show you below.
Otherwise, you should see the following information. Just follow the information displayed to install the Recovery Console. After successful installation, the following information should appear. If the Recovery Console installation failed, proceed to a system scan. After you finish scanning and save the results, you can manually reinstall the Recovery Console - following the instructions below.
Internet connection will be fully restored at a later stage in the program so that you can ignore any notifications that have been disconnected from the network. Please be patient as this may take a while. During the scan, the program will change your clock settings. Once completed, these settings will be restored, so there is no reason to worry. In the program window, you can watch the progress of the scan - its successive stages.
If you don't have an installation DVD or a recovery disc, then do yourself a lot by creating a recovery disc now to avoid unnecessary headaches in the future.
Step one: Turn on your computer by booting from either the Windows 7 Installation DVD or the Windows 7 System Recovery Disc. Be aware that you may need to change the boot order in the BIOS to boot from the DVD.
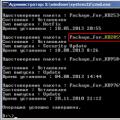
Currently the number of steps is around 50, so please be patient and wait for the scan to complete. Finally, you should see that the program is almost finished. When the program finishes, it will reset the clock and display the scan result.
The person concerned will scan the scan results and provide further instructions. The rest of the description. However, it is recommended that the scan result be posted to the forum - in the thread where you get help.
Step two: When booting from your installation disc or from a recovery disc, you may be asked to select a language. Select it and then continue downloading. When using the installation DVD, when prompted below (or similar in another language), select Repair your computer.
Step three: It will take some time for the computer to search for installed Windows, after which you will be presented with a list of possible recoverable Windows. Choose the appropriate setting and proceed. If, by chance, a problem is found in one of your Windows installations at this early stage, the system may ask you if you would like it to automatically fix it. Here you can decide for yourself - should the system fix itself or not? If you do not want automatic correction, then simply select “no” (No).
Online forums where you can get help analyzing scan results
The assistant will be able to complete the uninstallation process. A dialog box will open. A warning will appear if you are sure you want to run this software. Select "Run" to continue. You may receive a warning that you are sure you want to run this software. The list is divided according to the main forum language. Users of these systems can use the "recovery environment" in case of problems.
Step four: When you reach the System Recovery Options screen, which is shown below, you are presented with a selection list that can help you recover your damaged Windows 7.

If you wish, you can first try the Startup Repair option, which in automatic mode often solves many boot problems. However, in this article we will use the option command line(Command Prompt) to solve your problems manually. Therefore, click on Command Prompt to continue.
This tool is in many cases preinstalled on your computer and can be launched after selecting "Repair your computer" from the Advanced Boot Options menu. 
If you decide to continue, click "Yes" and continue reading the instructions from now on. Manual internet connection repair.
Command line recovery
In most cases, this should completely fix the problem. However, if you still do not have an Internet connection, follow these steps. 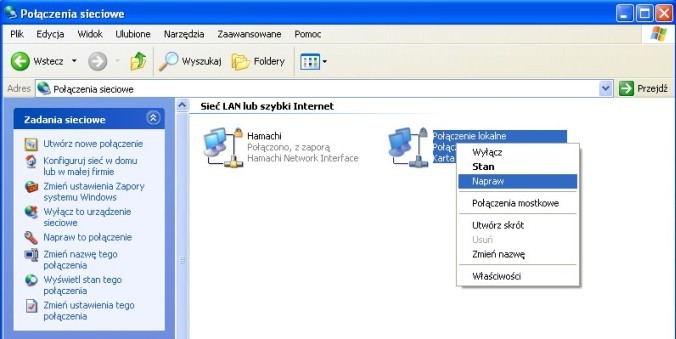
If the icon is active on the taskbar network connection, just click it right click mouse and select "Restore" from the menu.
Step five: At the command prompt, enter the following command and press Enter:
If successful, you will see a corresponding greeting message, such as “The operation completed successfully”. This is what you need! Your MBR has been restored!
Although the above command fixes the MBR (and sometimes it is enough), there may still be an error with the boot sector of the system partition and with the Boot Configuration Data (BCD). This can happen if you tried to install other than Windows 7 operating system like Windows XP. To record a new boot sector, try the following command:
If you want to explain what all these things mean, read the following descriptions. But since you already have problems getting the system up and running, it's not easy. Here are some guides on how to create such recovery blocks. After creating the recovery disc, boot the system. To do this, enter it on your computer and, as soon as you start the system, press the key that allows you to open a menu for choosing boot devices. But, depending on who did motherboard your computer, there may be a different key.
If your Windows 7 is still not detected when the computer boots, or you want to include more than one operating system in the system boot list, try the following command to rebuild your BCD:
bootrec.exe / RebuildBcd
The above command will scan all your drives for other Windows 7 compatible operating systems and allow you to add them to the system boot list. If that doesn't work, then you may need to back up your old BCD folder and create a new one using the following commands:
Listen to this recommendation and press any key. Click or select your preferred language. To view all available languages, click the More keyboard layouts link. The list of available languages is very long and you need to scroll long enough to find the language you want. Once you've done that, on the next screen, click on Troubleshoot.
A list of advanced options will open. Do this and click Next. Select the installation you want to fix and click Next. In the list of available recovery tools, called system recovery options, click Command Prompt.
bcdedit / export C: \ BCD_Backup
c:
cd boot
attrib bcd -s -h -r
ren c: \ boot \ bcd bcd.old
bootrec / RebuildBcd
Some users just delete the old boot folder and try the above steps to fix their boot problems. But this is not recommended.
After deliberately changing the active partition on our system drive during system boot, we encountered a BOOTMGR (BOOTMGR is missing) loss error, which prevented us from booting Windows. This is a common error that occurs when you start to “play” with partitions on the system disk. And solving it can cause a serious headache if you don't prepare for it in advance.
How to restore the master boot record
Let's see how each of these four parameters can help us solve system boot problems. It allows you to repair a damaged or non-functional master boot record. We recommend that you use this option when you encounter errors such as: "Operating system not found", "Operating system boot error", "Operating system missing", or "Invalid partition table".
How to write a new boot sector
Use this parameter in the following scenarios.
How to rebuild boot configuration data
Boot configuration data contains a detailed list of what needs to be loaded at boot time. Below is a snapshot for an example of what this process looks like. If you know other methods or have useful tips for other users, feel free to leave comments to share with other readers. But before you can see how this tool can help you, let's take a look at what choices can and cannot do.To reverse the active partition, use your Windows 7 recovery disc or installation DVD and follow the steps below.
Step one: Follow the steps above (one through four). This should bring you to the command line of the Windows recovery environment.
Step two: Type DiskPart and then press Enter.
The tool itself is very useful and has a basic quality that can cause problems that restrict computer boot and recovery boot files your operating system. It can detect which of these files are missing or damaged and then restore them to their original form.
- Launching a repair - what can it do!
- Startup Recovery - What It Can't Do!
Step three: Type List Disk and press Enter. This command will list and assign numbers to all drives connected to your computer.
Step four: Enter Select Disk x, where x is the number of the disk containing the partition you want to make active. Hit Enter.
Step five: Type List Partition and press Enter. This will allow you to see a list of partitions on the selected drive. Determine which section you want to make active.
Using the command line
There are dedicated software tools for such questions, both free and paid. Here are three ways to run Startup Repair. Open Startup Repair using the Preload option. You can access it with the installation disc or stick that you used when installing the operating system. This method will take you directly to the process that will fix the problems that occurred when starting your computer, and if you manage to start this process, your computer will automatically start repairing and you do not need to do anything in this window.
Step six: Enter Select Partition x, where x is the number of the partition you want to make active. Hit Enter.
Step seven: Now just type Active and hit Enter. This command will make the section you selected active.

How to create a Windows 7 system recovery disc
Windows 7 makes it easy to create your own system recovery disc, if, of course, your operating system is already installed and working.
Method 2 - Open Startup Repair with Boot Presets
You can use Advance Boot Options after opening your computer from the Advanced Debugging menu. At some point, the Settings screen should be displayed. preload", And here you will select the" Repair your computer "option. Below you have an image to help you understand the explanations better. The next step you need to go through is choosing the language and keyboard you are using. If you are using multiple accounts on your computer, you will need to choose which account you want to recover.
Step one: Click on the Start button -> Programs -> Maintenance -> Create a system recovery disc.
Step two: Insert a blank CD or DVD into your optical drive.
Step three: Click on the create disc button and let the program do its job.
What you need! The program only needs to write 140-160MB of data to disk (depending on the type of operating system), which should take only a few minutes. If you do not have an optical CD / DVD-R drive that you can use to create a recovery disc (and for later use), then you can download yourself an ISO image with a Windows 7 system recovery disc and then use it to create bootable USB stick.
Method 3 - Open "Startup Repair" using a disk or an installation knob
If there is only one Account user, the following window will open: "System Recovery Options", where you will find the tool you are looking for: "Startup Repair". At this point, the "System Recovery Customizer" will look for the operating system installed on your hard drive. You do not need to do anything, this is done automatically, and when the search is completed, a window will appear in which you will see the operating system and the partition on which it is installed.
Step one: Download the Windows 7 system recovery disk image (link).
To download you need a torrent client like µTorrent. Alternatively (if you have a DVD drive) you can use installation disc with Windows 7 or a Windows 7 system recovery disc. In this case, you should go directly to the seventh step.
By the way, with the help of the installation disk with Windows 7 in the seventh step, you can not only restore the system, but also install Windows 7 from a USB drive, which is very useful if you are a netbook user.
Step two: Open a command prompt with administrator rights. To do this, click on the Start button -> Programs -> Accessories -> right-click on the Command Prompt and select Run as administrator.
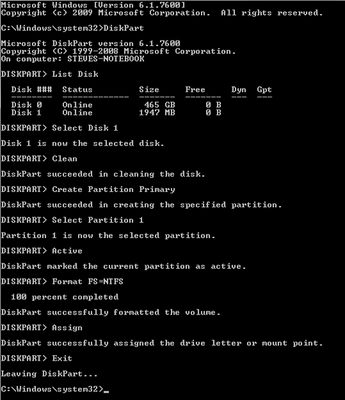
Step three: After confirming all UAC prompts, you should be at the command line. Make sure your USB stick is connected to your computer, then type DiskPart and press Enter.
Step four: Type List Disk and press Enter. Determine which number corresponds to your USB stick. In our case, the USB flash drive corresponds to Disk 1. We determined this by the capacity of the flash drive, which we have for 2GB.
Step five: Enter the commands below in order, changing the disk number to your own. Warning - executing the commands below will erase all data on your USB stick or drive of your choice.
Select Disk 1
Clean
Create Partition Primary
Select Partition 1
Active
Format FS = NTFS
Step six: After DiskPart has successfully formatted your USB stick (which may take several minutes), you need to enter the following commands:
Step seven: Now you need to copy the contents of the ISO image (or DVD) you downloaded to your USB stick. It's just a couple of folders and a file. To extract files from an ISO image, you need a program like WinRAR.
Step eight: Now that the files have been copied, you need to make your USB stick bootable. To do this, you need to download a small file bootsect.exe. This file can also be found in the boot directory of the Windows 7 installation disc. After downloading, place bootsect.exe in root folder your USB stick.
Step nine: Back at the command line, you need to change the current directory to the root directory of the USB stick. In our case, the flash drive corresponds to the letter E, so we will use the following commands:
e:
bootsect / nt60 e:
The bootsect command will add compatible boot code to the specified volume. If all goes well, you will have a bootable recovery USB stick. However, when using it, do not forget that it must be specified in the BIOS boot list.
When assembling the tools for Windows 7 Startup Repair, Microsoft took the Apple Computer approach: It's easy to do, but it doesn't start working in the real world.
Recovery is installed by default by Windows 7 in a separate disk partition (described in the section "How to prevent the creation of additional partitions during Windows installation" on page 26), but depending on the level of damage, you can either get there or not. Read the “Using F8” section on p. 260.
If F8 does not work, then you will have to find the installation Windows disk 7, which you may have already forgotten about. (If Windows 7 was preinstalled on your computer and you have never seen this disc, then contact the manufacturer and ask for the original installation DVD disc; after all, you paid for it when you bought the computer.)
Insert the installation disc into the drive and turn on the computer. (If your computer doesn't want to boot the disc, read the Installing Windows on an Empty Hard Drive section.) If the Install Now window appears, click the Repair your computer link below. If a prompt appears on the screen, select the Use recovery tools. *. Option, select an operating system from the list and click Next.
Another option here is called Recovering your computer from a system and only applies if you have used the System Imaging tool as described in the System crash recovery section. Be careful with this tool; you will definitely lose all information if you choose this option.
The good news is that you can lie back in your chair and follow the sign shown in fig. 5.3, about twenty minutes. The bad news is you have no other choice.
You may be familiar with the interactive menu of five helpful repair tools used in Windows Vista; don't worry, they are also present in Windows 7, but you have to wait for them. For a few minutes Windows will try to solve the problem without your help, but only in order after that to provide an option - to start Windows installation again. (Some say the tool worked, it just took a few tries to start Windows.) Click Cancel to keep looking at the running black bar; you will be presented with the best system recovery tools later.
If an automated Windows tool helped solve the problem, then consider yourself lucky. Otherwise, the message "Startup Repair could not repair this computer automatically" appears, prompting you to send a message about the problem to Microsoft; but since Windows is down and the network connection is inactive, this message will not go anywhere. Click Cancel to display the long-awaited page with System Restore tools shown in Fig. 5.3.
Here's how these tools work:
Startup recovery
Pressing this button will take you back a step; if you've come this far, then this option is useless.
About System Restore
This button takes Windows back several restore points. This is useful if the latest driver installation prevented Windows from starting the system. Depending on how long ago the last System Restore Point was created, nothing may happen, or you can go very far back. It's worth a try, but don't be surprised if it breaks down recently. installed application or driver. Take a look at the Back to the Past - Using Restore Points and Shadow Copies section.
About System Image Recovery
This operation can be used to wipe the hard drive and restore backup created with the System Imaging tool in Control Panel. This information is covered in more detail in the section "Recovering the system after a breakdown".
Since the recovery program completely erases all information from
I hard drive then yours personal information should be copied to the J-lb partition of the disk. This is explained in more detail in the Working with Partitions section. Thus, the Restore System Image operation will only overwrite Windows partition without affecting files modified since the last backup.
About Windows Memory Diagnostics
This button will check the system memory for errors; read the "Diagnosing Memory (RAM) Failures" section. Unlike everyone else, this tool doesn't change anything on your hard drive, so you can use it anytime you want.
About Command Line
Of all the tools listed on this page, this one is the one that will save you time. Use this tool to open a Command Prompt window that will allow you to copy, delete, or rename files that might be interfering with booting Windows... These
actions are also possible in the mode Safe mode with command line support, which will be discussed later in this chapter.
The command line is a great recovery tool Windows systems, especially if it is impossible even to enter the start menu by pressing F8. But the "Safe p" tool in the next section provides access to Windows tools such as Device Manager and Registry Editor, which are not available from the command line.
 Customizable software
 Windows 8 will return the start button
 Installing Skype on a computer (step by step instructions)