Installing windows 10 from a uefi gpt flash drive. Installing Windows: Applies the MBR or GPT partition style. Defining parameters before installation
Hello admin! How to install Windows 10 on a portable GPT USB hard drive that will boot on a laptop in UEFI mode?
I have a brand new laptop with UEFI BIOS and Windows 8.1 installed. There is also a portable USB hard drive and I want to install Windows 10 on it.
Note: I need Windows 10 installed on an external USB drive to have an independent bootloader and if I disconnect the USB portable hard drive from the laptop, it would just boot Windows 8.1. But if I connected an external USB drive to my or someone else's laptop, then Windows 10 would boot on it like a portable operating system. Is it possible?
Hello friends! It is very simple to do this, we will use the AOMEI Partition Assistant Standard Edition program and the command line, who find it difficult to work in the command line, at the end of the article we will show you how to use the WinNTSetup utility.
For example, let's take a new laptop with Windows 8.1 and UEFI BIOS installed, also take a 1TB USB portable hard drive and install Windows 10 on it.
On an external USB drive, Windows 10 will have a separate independent bootloader, and to boot Win 10, we just need to select a portable USB hard drive from the laptop boot menu, and by default Windows 8.1 will boot on the laptop. Installed on a USB portable hard drive, Windows 10 can be used as a portable system, it will run on almost any laptop with the UEFI enabled.
Laptop disk management
Disk 0 is the hard drive of a laptop with Windows 8.1 installed, GPT style.
Disk 1 is a 1TB USB portable hard drive, MBR style (will need to be converted to GPT)
The USB portable hard drive has a 29.30 GB partition, so we will install Windows 10 on it.
If you do not have such a section, then you can create, we have already done this with you in previous articles and we have one on this topic, please read. A 29.30 GB partition is enough for me to install Windows 10, but you can create a partition of any size.
After creating the partition on which we will install Windows 10, convert the USB portable hard drive from MBR to GPT, for this we will use the AOMEI Partition Assistant Standard Edition program, the conversion will take place without deleting the files on the USB portable hard drive.
In the main window of the program, select with the left mouse portable USB-hard drive and press the button"Convert to GPT"

"OK"

Apply

"Go"

"Yes"

Conversion process.

USB external drive conversion completed successfully.
"OK"

Now you need to delete the partition on which we will install Windows 10, in my case the drive (G :)
Select the section with the left mouse, on which we will install Windows 10 and click on the button"Deleting a section".

Quickly delete a section.
"OK"

Apply

"Go"

"Yes"

The partition deletion operation completed successfully.
"OK"

The section has been removed and unallocated space has formed in its place.

Run the command line as administrator and create two sections on the unallocated space:
1. Encrypted (EFI) system partition 100 MB (we will place the Windows 10 boot files on this partition).
2. Service section MSR 128 MB required in markup EFI.
Enter the commands:
diskpart
lis dis (display a list of disks).
sel dis 1 (choose a portable USB hard drive).
create par efi size = 100 (create encrypted (EFI) system partition 100 MB).
format fs = fat32 (format it to FAT32 file system).
creat par msr size = 128 (create a 128 MB MSR partition)

We return to the main window of the AOMEI Partition Assistant and click on the "Restart" button

Select the remaining unallocated space with the mouse and click on the "Create section" button

"OK"

Apply

"Go"

"Yes"

"Yes"

Partition creation from unallocated space completed successfully.
"OK"

The created section is assigned the letter (G :).


Download the ISO image from the Microsoft website.

Click on the image by double-clicking the left mouse and The ISO image is attached as a virtual drive.
Virtual drive letter (M :).

V Windows 10 ISO image we need a folder"Sources ", And in it the file install.wim with Windows 10.

DISM / Get-WimInfo /WimFile:M:\sources\install.wim(with this command, we determine the number of Windows images in the install.wim file - the install.wim file can contain multiple Windows images, and each image has its own index. In our case, the image is one - Windows 10 Single Language 64bit and its index is 1)
Dism / apply-image /imagefile:M:\sources\install.wim / index: 1 / ApplyDir: G:(with this command we expand Windows 10 Single Language 64bit From File install.wim to the (G :) section.
M: \ sources \ install.wim is the location of the install.wim file.
index: 1 is the index of the Windows 10 Single Language image.
G: - the letter of the partition to which Win 10 is deployed.
The operation completed successfully.

Now it remains to create boot files for Windows 10 (drive G :) on an encrypted (EFI) system partition of 100 MB

Run the command line as administrator and enter the commands:
diskpart
lis vol (displaying a list of disks).
sel vol 11 (choose encrypted (EFI) system partition 100 MB)
assign letter V (assign it a drive letter (V :)
exit (exit from diskpart)
bcdboot G: \ Windows / s V: (this command means - create a bootloader for Windows located on volume (G :), and place the boot files on volume (V :))
Upload files created successfully!

Important note: We create a bootloader on a live systeminstalled on gpt (UEFI mode), sothe command looks like this:
bcdboot G: \ Windows / s V:
but if we created a bootloader on a system installed on MBR (Legacy mode) then the command would be like this:
bcdboot G: \ Windows / s V: / f uefi
If you work in the WinNTsetup program, then everything is the same for it, both in uefi and in Legacy.
We reboot the laptop and enter its boot menu.
We select a portable USB hard drive for loading.

The devices are being installed.

The final phase of the Windows 10 installation begins.

If you do not have a license key, click "Do it later"

We accept the license agreement.

You can connect to the Internet now, or you can "Skip this step"

You can click the "Use standard parameters" button, or you can configure them manually according to this article: .

Coming up with a name for the local account.

Boot Windows 10 from a USB portable hard drive.

Operating system installed on (C :) USB portable hard drive and has its own separate bootloader located in the first hidden one(EFI) system partition 100 MB.


Conclusion
Friends, almost everything that we did in the article using the command line can be done with a very simple utility.
Download and run WinNTSetup
In the main window of the program, we need to specify the Windows 10 files, or rather the install.wim file located in the M: \ sources folder. We press Select.

Find the file M: \ sources \ install.wim in the explorer and click Open.

Select the disk on which the bootloader will be installed.

In the explorer window that opens, select the 100 MB encrypted (EFI) system partition we created on the USB portable hard drive (drive letter Z :), as you can see, the explorer also contains an encrypted (EFI) system partition 256 MB of the laptop hard disk, you cannot select it if we want to have a separate bootloader for Win 10.

Select the drive on which Windows 10 will be installed.

Select the drive (G :) and click on the Select folder button.

Installation

Select UEFI bootloader and click OK

The unpacking of the Windows 10 image begins.

Ready! OK.

We choose a portable USB hard drive for loading, and then you already know what to do.
Articles on this topic:
This documentation has been moved to the archive and is no longer supported.
Boot in UEFI mode or legacy BIOS mode
If you install Windows in the wrong mode, you will not be able to use the features of the firmware mode without reformatting the hard drive.
Selecting Firmware Mode During Boot
Check the options in the firmware menu to enable or disable BIOS compatibility mode.
To use BIOS compatibility mode, check the options in the firmware menu to disable UEFI SecureBoot features.
For older computers (Windows 7® and earlier) look for the option Load from file and navigate to the \ EFI \ BOOT \ BOOTX64.EFI file on this device.
Boot up your computer. When the firmware starts up, press the key that opens the boot devices menu. For example, press ESC, F2, F9, F12, or another key that opens the firmware menu or boot menu.
From the boot devices menu, select the command that identifies the firmware mode and device. For example, select USB stick with UEFI or Network - BIOS.
Note
You may see separate commands for one device. For example, you can see USB stick with UEFI and USB flash drive with BIOS... These commands use the same device and media, but load the firmware in different modes.
If the boot device option for your device does not appear, follow these steps.
Use any of these methods to make sure Windows is installed in the correct firmware mode
UEFI: To prevent the installer or Windows PE from booting in BIOS mode, delete the file bootmgr in the root folder of the media.
If you install Windows using the installer or from the Windows installation DVD, use the preformatted hard drive on the destination computer. Use GPT file format for UEFI mode and MBR file format for BIOS mode. If the computer does not boot in the correct mode, Windows cannot be installed when you run Windows Setup. For more information see.
You can remove UEFI or BIOS root files from Windows PE or Windows Setup. For example, if you include only UEFI root files in the Windows installation DVD, and you accidentally select BIOS mode during the factory install, your computer will not boot and you can start troubleshooting straight away.
In recent years, the production of computers has begun on which the outdated BIOS boot I / O system has been replaced by motherboards with a fundamentally new type of flash memory firmware. This type has the abbreviated name UEFI and has a graphical interface similar to Windows, a more stable system for duplicating and restoring boot data, internal antivirus protection and the ability to use a computer mouse. This was required due to the increase in the production of hard drives over two terabytes and advanced type of partitions (GPT), which are not supported by the BIOS. To administer the bootloader, the built-in UEFI-boot utility is used, which is similar in structure to the BIOS and significantly speeds up the startup of a laptop or stationary computer. When installing Windows 10 on a computer with a UEFI interface, a USB drive is used that has been adapted for modernized boot.
Configuring UEFI before installing Windows 10 from a flash card
UEFI is a graphical interface that is responsible for the pre-boot environment of the operating system.
UEFI is essentially a replacement for the outdated basic BIOS input / output system that has been successfully used in computer technology for decades. The world does not stand still, but is moving forward with leaps and bounds, so the time has come to part with an old trusted "friend" who has repeatedly helped in the event of various problems. Created back in 2005 and refined over the past ten years, "Extensible Firmware Interface" is much more in line with the requirements of modern computer hardware. The need for its implementation has arisen for a long time, and now all new models of personal computers are released with UEFI installed.
The UEFI-boot loader program, which controls the startup of a laptop or desktop computer, similarly to BIOS, starts to start when the computer is turned on before Windows 10 starts. With its support, all components and modules are polled to determine their readiness for work, and then Windows 10 itself is checked. The license code of the program , which prevents viruses from changing the bootloader and installing pirated copies of Windows 10, can be located in a non-volatile memory chip built into the motherboard, in a hidden area of the hard drive, or in its own network storage. UEFI management and debugging is simple to use and tailored to maximize user experience.
If you have an idea of debugging BIOS, then there will be no problems with setting UEFI:
After completing this procedure, you can start installing Windows 10.
Video: How to set up UEFI before booting Windows 10 from a flash card
Converting MBR Drive to GPT Drive
Before converting an MBR disk to a GPT disk, overwrite the entire block of information on a removableflash card, because all data will be erased... After conversion, the entire block of information is rewritten back to the hard drive.
To convert a hard drive with MBR partitions to GPT partitions, two methods are used:
- Using the interpreter Diskpart.exe:

- Using the standard Disk Management utility:

It is not at all necessary to convert the hard drive when installing Windows 10. It is enough to turn off the "Secure Boot" option in UEFI and install the "top ten" from a regular flash drive. The whole usefulness of the GPT table is that it supports drives with a volume of more than two terabytes, therefore, if the disk is smaller, then it does not make sense to convert it.
Video: How to Convert MBR Drive to GPT and Vice Versa Using Command Prompt
Create a UEFI Flash Card for Windows 10 Installation
To install Windows 10 from a flash card, you must first assign a boot priority in UEFI... There is a choice of initial boot for both a hard drive with MBR partitions and a hard drive with a GPT table. To assign a priority in UEFI, go to the Boot Priority block and place a flash card with Windows 10 installation files.

Video: How to Assign Boot Priority in UEFI
Create a bootable UEFI flash card
In cases where a bootable flash card for Windows 10 is created in the MediaCreationTool program, a Microsoft product, the structure of the FAT32 file allocation table is generated automatically. The program simply does not offer any other options, immediately making the flash card universal. Using it, you can install "tens" on standard hardware with BIOS or UEFI. There is no difference.
If your computer has an integrated bootloader that supports UEFI, you can only use media formatted according to the FAT32 standard to install Windows 10.
There is another option for creating a universal flash card using the "Command Line" administrator console. The algorithm of actions in this case will be as follows:
- Start the "Run" service through the "Standard" services in the "Start" button menu.
- Type the following commands and confirm them with the Enter key:

Download the ISO-image of the Tens from the Microsoft website.
Double-click on the image file, opening it while attaching it to the virtual drive.
Having selected all the files and directories of the image, copy them by clicking the "Copy" button.
Insert everything into an empty area of the flash card.
 Copy files to the free space of the flash drive
This completes the process of forming a universal bootable flash card. You can start installing "tens".
 Removable disk prepared for Windows 10 installation
The created universal flash card will be bootable both for computers with a basic input-output system BIOS, and for those with integrated UEFI.
Video: How to Create a Bootable Windows 10 USB Drive Using WINDOWS 7 USB / DVD DOWNLOAD TOOL, Command Prompt or Windows Media Creation Tool
Create a flash card only for computers with MBR partitions that support UEFI
Quickly create a bootable Windows 10 flash drive for UEFI-enabled PC using third-party software. One such program is Rufus. It is quite widespread among users and has proven itself well. Its main drawback is considered to be the impossibility of creating a universal bootable flash card. Does not provide for installation on a hard drive. Allows you to perform a wide range of operations:
- flashing the BIOS chip;
- generate a bootable flash card using the ISO-image of "tens" or systems such as Linux;
- apply on devices with an uninstalled operating system;
- carry out low-level formatting.
To form a bootable flash card using Rufus, software is pre-downloaded from the developer's website.
When creating a flash card for a computer that supports UEFI with a hard drive that has MBR partitions, the procedure is as follows:

Video: how to use the Rufus program
Create flash card only for GPT computers that support UEFI
When creating a flash card for a computer that supports UEFI, with a hard drive that has a GPT boot table, you need to apply the following procedure:

The Rufus software is constantly being improved and updated by the manufacturer. The new version of the program can always be obtained on the official website of the developer.
To avoid problems with the creation of bootable media, you can resort to a more efficient recovery option "tens". To do this, you need to install the system from the Microsoft website. At the end of the installation, the system itself will offer to create rescue media for recovery. Specify a flash card in the selection of media and wait until the copy is completed. In case of any failures, restore the system settings without deleting documents and installed applications. In this case, it will not be necessary to reactivate the system product, which would interfere with the user with a constantly pop-up reminder.
Common errors when installing Windows 10 to a GPT disk
When installing on a hard drive with GPT partitions of the latest generation of Windows operating systems - versions 7, 8, and 10 - problems arise due to incorrectly selected installation settings.
The first error is an attempt by the user to install a 32-bit version of Windows 10 on the drive, which is incompatible with GPT disks. As a result, UEFI imposes an installation restriction and stops writing files to the hard drive. You can fix this error by using the 64-bit version, which is perceived by UEFI, during the installation of Windows 10.
The second error is an attempt to install Windows 10 on a computer with UEFI turned off. To enable it, you need to set the required parameters for the loader program. Depending on the manufacturer, the interface of the base operating system may differ, but they are present in any UEFI variant.
 To enable UEFI mode, you need to set the correct parameters for the bootloader program
 There are a few steps to enable UEFI mode.
Before you start installing Windows 10 on a GPT disk (on a new computer with a motherboard that supports a modern API called UEFI), you need to understand the basic concepts so that you have an idea of what you have to deal with.
Having bought a new computer / laptop that supports UEFI, it is strongly recommended that you immediately convert the table of its hard drive to GPT due to the many advantages that we will consider below, and only then install Windows 10 on it and copy any data.
What do all these acronyms mean?
The outdated API, which ensured the interaction of the operating system with the hardware and transferred the first reins of control after the initialization of the equipment, was replaced by the UEFI interface.
The UEFI features that are important to the Windows 10 user are:
- support for the GPT partition scheme - we'll talk about it further;
- the presence of services, one of which is required to boot Windows 10, and the second is used in Linux to store dumps, where information is recorded about problems that arose during the last shutdown of the PC;
- modular architecture - here you can install your own (downloaded from the Internet) drivers in UEFI. They are needed, for example, to gain access to the file system on a computer without an installed operating system;
- Supports a hardware-encrypted hard drive or logical drive;
- UEFI is faster than BIOS;
- works only in 32-bit and 64-bit mode, not supporting operation in 16-bit mode;
- integrated download manager - can add your own boot menu items.
GPT is a new standard for arranging file tables on physical media, which came as a replacement for MBR. Unlike its predecessor, released to the masses back in 1983, GPT supports any hard disk that exceeds 2 TB (when using MBR, there is simply not enough address space to address all sectors), can work with more than 4 active volumes and 128 partitions on one physical medium. GPT also stores multiple copies of the boot data in various places on the partition, which is why, using this file storage standard, you can recover damaged boot sectors much faster.
Preparing the drive
 Installing an operating system on a hard drive always starts with proper preparation. In our case, this is downloading a suitable image and deploying it to a USB flash drive. Let's consider the process assuming that the ISO is on the computer and the latest version of Rufus is already running.
We will use Rufus due to its ease of use and the absence of unnecessary menu options.
- We select a flash drive that will act as a carrier for the Windows 10 distribution.
- In the second drop-down menu, be sure to select GPT for PCs with UEFI.
- It is better not to change the file system and the size of the cluster - these parameters have no meaning for the installation of the operating system.
- We activate the quick format option so as not to wait ten minutes.
- We put the checkbox next to "Create bootable disk" and click on the drive icon.
- Select the image with the Windows 10 distribution and click "Start".
Windows 10 allows you to convert an MBR partition to GPT using the standard Disk Management tool.
- It can be called by executing the command "diskmgmt.msc" or the context menu "Start".

- Select each hard drive and delete it using the context menu.

- We call the command "Convert to GPT disk" through the context menu of the hard drive.
Note that it will become active after all volumes have been deleted, and if the running Windows is not on the media whose table you want to convert.
 Convert to GPT Disk command
 Conversion will take a dozen or two seconds if the disk has no bad sectors. After that, the partitioning of the disk and the installation of Windows 10 on its active partition becomes available.
Installation problems
If the installation of "tens" on the hard drive has stopped with an error stating that the installation of Windows 10 in the UEFI system on MBR partitions is not possible, you need to convert GPT to MBR to continue. The problem is faced by the majority of users who did not complete the conversion before starting the OS installation.

This is done using a set of commands executed through the command line.
- To convert a disc, you need to restart your computer, and in the installation program, when the "Install" button appears, click "System Restore".
Keep in mind that following the instructions in the next step will clear your hard drive of all information and convert its partition tables to the new GPT standard, with no way to recover anything stored on the hard drive prior to conversion.

- After opening the command timeline, we sequentially enter the following chain of system commands into it:
- diskpart - launch a utility for working with partitions;
- list disk - visualization of a list of volumes in order to select a future system disk for conversion;
- select disk X - select the desired volume;
- clean - clears the active partition numbered X;
- convert mbr - convert mbr-section;
- create partition primary size xxxxxxx - create a new partition with a specified size in bytes;
When entering the size of the volume, keep in mind that 1 GB = 1024 megabytes, therefore, to get a 50 GB disk, its size must be multiplied twice by 1024.

- active - make it active;
- format fs = ntfs quick - perform quick formatting in ntfs;
- assign - the disc will be labeled with the first free letter of the English alphabet, starting with "d";
- exit - Exit from the Windows 10 command line.
- Click "Refresh" to get the latest information about the disk and its partitions again.
If the installation of Windows 10 on the GPT partition fails, and a familiar window appears, several additional conditions must be met:
- a 64-bit system must be installed;
- the computer must be turned on in U mode
Most likely, setting “ten” is impossible due to the second factor.

- To solve it, you need to go to UEFI, which is carried out mainly with the F2 (for laptop) or Del (for PC) keys.
- Find and activate (set the value as "Enable") the UEFI boot function.
See more: PPPoE Settings on Windows 10

Usually, it is located in the BIOS Features section or BIOS Setup.
- We switch the SATA mode of operation to AHCI instead of IDE mode. Most often, changing this option is not required, but you should check it just in case.

- We save the new settings.
In different versions of UEFI, the settings may be located in different sections and even have different names.
After that, installing Windows 10 on a partition with a new standard for placing file tables is carried out like a normal installation of "tens".
Watch the video:
From the point of view of individual marketers, this is secondary, and most importantly in a computer - a kind of UEFI substance ...
In fact, UEFI is by no means an attribute of coolness. This is simply new, improved software (firmware) of the motherboards that replaced the BIOS. Today this "beast" lives on all computers released after 2010-2011, and not only on gaming machines, but also on "typewriters". Let's see what UEFI is, what are its global differences from BIOS and how to find a common language with it when installing operating systems.
UEFI vs BIOS
From the point of view of an inexperienced user, UEFI is the same BIOS, only in a graphical shell. And on laptops, with its appearance, nothing has changed at all - the same console interface, the same sections. Yes, the BIOS and UEFI setup utilities may be similar. Outwardly, their differences are not visible, but they (like that gopher) are.UEFI is not just firmware, whose task is to check the health of devices after starting a PC and transfer control to the operating system (basic BIOS functions). It is almost a full-fledged operating system with its own services and applications.
However, new developments do not always have solid advantages. It is probably impossible to be better than the old in everything, so UEFI wins in some way, but in some way it loses to BIOS.
UEFI Benefits vs. BIOS

UEFI graphical interface
- Simple and intuitive graphical interface in many languages, including Russian (on desktop platforms) with mouse control support.
- Supports drives larger than 2.2 TB with unlimited partitions.
- Much faster loading of the operating system. So, Windows 10, installed on an SSD-disk, marked according to the new GPT standard, boots in just 4-15 seconds.
- Own OS boot manager. Allows the computer to boot from media that does not have a bootloader of its own.
- Supports the installation of third-party applications and drivers that extend the functionality of UEFI.
- Protection against the injection of malicious code into boot loaders and its own environment (provided by the Secure Boot protocol built into the interface).
- Native network driver, thanks to which updating UEFI and its components does not require the operating system to start. By the way, UEFI drivers are available for use in the OS.
- Quickly navigate to UEFI from Windows 8 and 10.
Disadvantages of UEFI Compared to BIOS

BIOS console interface.
- Lack of support for 32-bit operating systems, which limits the freedom of choice of users. Computers with UEFI support only 64-bit versions of Windows, with Vista and 7 in part. Only "eight" and "ten" x64 are fully supported.
- Lack of support for hard drives that are partitioned according to the MBR standard (a traditional partitioning type that was widely used before the release of Windows 8). The MBR specification limits the number of primary partitions to 4 and disk space to 2.2 TB, so it is now considered obsolete.
Installing a 32-bit or older system on a UEFI computer (assuming hardware compatibility) is still possible, but much more difficult. The user has to manually switch UEFI to BIOS emulation mode, sometimes wandering around the settings for a long time, since the necessary functions are often not in sight.
And in the BIOS mode, the most useful UEFI chips are disabled, such as fast computer start-up and protection against boot viruses.
How to switch to UEFI from Windows 10
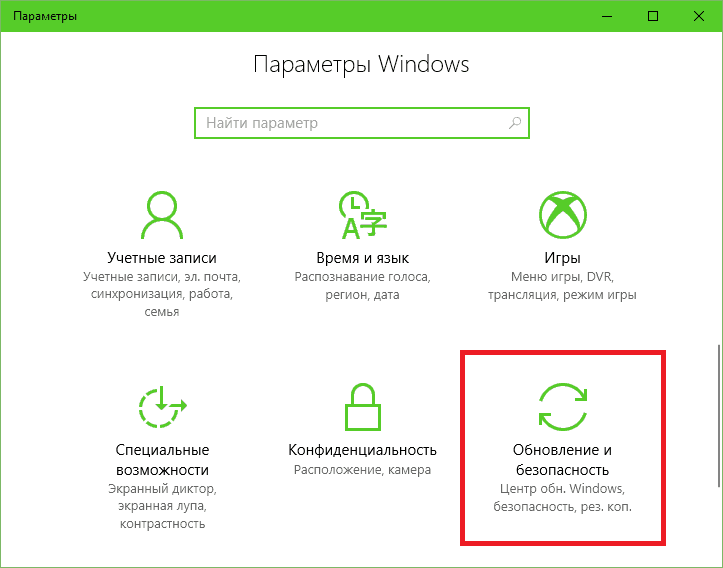
On older computers and laptops - before the release of Windows 8, to enter the BIOS settings, you have to turn off the machine and press the dedicated key the next time you turn it on. The key reacts to pressing until the operating system starts loading, which is about 2-4 seconds. With the advent of UEFI and the new standard for partitioning disks - GPT, a matter of seconds pass from pressing the power button to the appearance of the desktop, and the OS starts up almost simultaneously with turning on the computer. It's almost impossible to catch the moment when the system responds to the BIOS entry key. Therefore, Microsoft made it easier for users to do this by building the UEFI switch right into Windows.So, to go to the UEFI interface from Windows 10, save all open documents, run the Options utility and enter the " Updating and restoring».
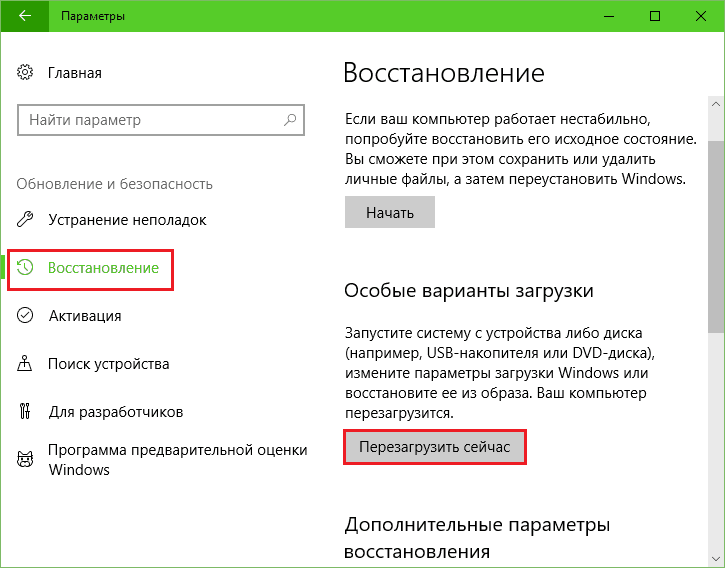
Open the subsection " Recovery"And on the right next to the item" Special download options»Click« Reboot now».
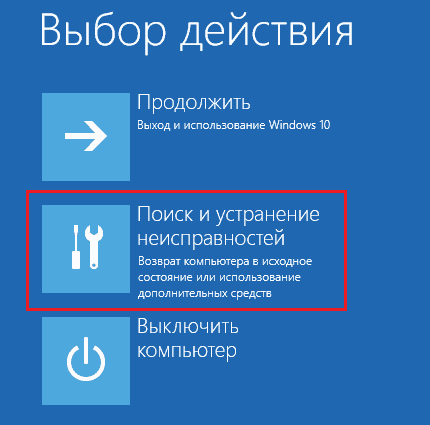
After restarting, the “ Action selection", Where you should click" Troubleshooting"(In some versions of the" tens "this item is called" Diagnostics»).
The next step is to go to " Extra options».

Finally, you are almost there: it remains to press " Firmware parametersUEFI". After clicking on this item, the computer will reboot again and take you to the desired location.

Absence in " Additional parameters The "transition point to UEFI means that the computer does not support this feature." One of the reasons may be that the PC is running in BIOS emulation mode, for example, if it uses MBR disks. On such machines, there is only one way to get into the area of interest to you - the traditional way, as in BIOS, that is, by pressing a certain key after turning on. And so that this process does not turn into a test of the speed of your reaction, the loading of Windows can be slowed down a little. For this:
- Go through the utility " Options"In the system settings, then - in the power and sleep mode section and open" Additional power options».
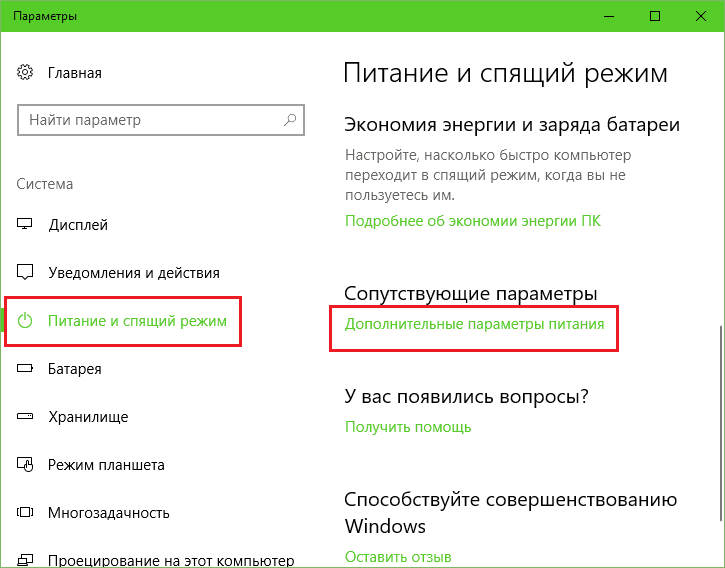
- Click in the transition bar " Button action" or " Cover closing action"(On desktops, the latter option is not available).
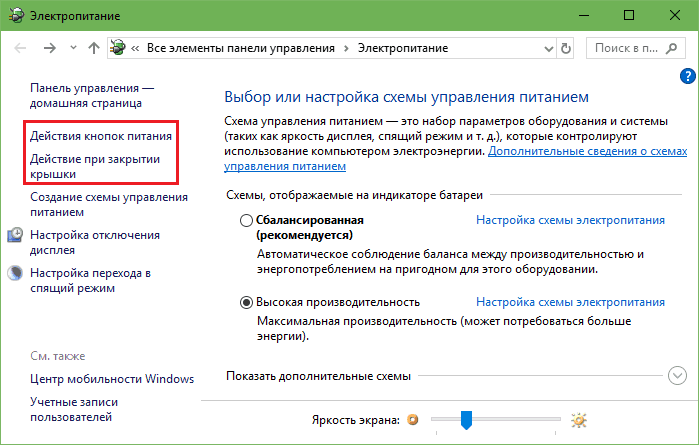
- Click " Changing parameters that are currently unavailable". In the area of " Shutdown options"Uncheck the" Enable Fast Startup". After the next start, the computer will boot slower, and you will calmly have time to press the button to enter the BIOS.

How to switch to BIOS mode to install an unsupported OS
As we have already found out, in order to install a 32-bit or old version of Windows (XP, Vista, 7) on a computer with UEFI, you need to switch to BIOS emulation mode, which in different firmware versions is named CSM (Compatibility Support Module) or Legacy. The option to switch to this mode is most often found in the "" section and is literally called:- CSM Boot.
- Launch CSM.
- Legacy.
- CSM Support.
- Legacy Support.
- Legacy BIOS, etc.
To activate, put it in the Enable state or select Disable UEFI Boot and save the setting.

How to disable Secure Boot
From the point of view of UEFI developers, older and 32-bit operating systems have unsafe bootloaders, which should be "prohibited and not allowed". Therefore, in order to install such systems on a computer, along with activating BIOS, it is also necessary to disable Secure Boot, a technology that verifies the digital signatures of bootloaders and, in the absence of such, blocks the launch of the system.By the way, on some firmwares this must be done before enabling BIOS emulation, otherwise CSM / Legacy is not displayed in the setup utility.
The Secure Boot management option can be found in the following UEFI sections:
To deactivate it, put it in the Disable state.

In some firmware revisions, after enabling the BIOS and disabling Secure Boot, it is necessary to specify the type of operating system to be loaded in the settings " Other OS»:

How to create an installation USB drive for a computer with UEFI
With the transition to UEFI, the requirements for bootable USB sticks have changed. Now flash drives created according to the old rules, for example, using the utility Microsoft Windows USB / DVD Download Tool, can only be used to install outdated and 32-bit OS versions in BIOS emulation mode.To put Windows 10 x64 on a computer in UEFI mode with Secure Boot active, the bootable media must have the FAT32 file system. This places a limit on its size (maximum 4 GB), but NTFS is unfortunately incompatible with Secure Boot. But the rest of the process of creating bootable USB drives has been greatly simplified. Now it can be done even without programs.
The easiest way to create an installation USB-stick with Windows 10 is to simply copy the distribution files onto it. In the same way as copying data from folder to folder. You do not need to create a bootloader on a flash drive, since it is already part of UEFI.
To copy the distribution kit to a USB flash drive in ISO format, you just need to open the latter in Windows Explorer.

If you don't have the Tens distribution kit, or you just prefer to create bootable media using programs, use the Microsoft utility. To prepare a USB flash drive for installation, in addition to itself and the utility, you only need Internet access. How does the "sacrament" of recording take place and what is your participation in it,.

Another simple free utility tailored for creating bootable drives for UEFI is. The necessary settings are installed on it literally in 3 mouse clicks.

The most important thing here is to choose the right partition scheme and the type of system interface. For compatibility with Secure Boot and disks larger than 2 TB, choose from the list “ GPT for computers withUEFI". Next, specify the path to the distribution package for the program and click the Start button. After 20-40 minutes, the installation USB drive will be ready.
More on the site:
What is UEFI, how to install Windows 10 (and older) on a UEFI computer updated: March 9, 2018 by: Johnny mnemonic
 Architecture of a distributed control system based on a reconfigurable multi-pipeline computing environment L-Net "transparent" distributed file systems
 Email sending page Fill relay_recipients file with addresses from Active Directory
 Missing language bar in Windows - what to do?