How to change stroke color in Photoshop. Layer Style Stroke in Photoshop. Why the Two Stroke Dialog Boxes Exist
The easiest way to make a stroke in Photoshop is to use layer styles.
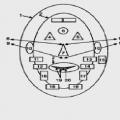
In the figure, the number 1 indicates an example of a text stroke, the number 2 indicates a figure or picture with an internal stroke, and under the number 3, the outer contour of the picture is circled. Let's see how to do it yourself below.
1. How to make a test stroke in Photoshop
In order to stroke text in photoshop, you need to activate the text layer by left clicking in the layers list and click on the icon "Add style to layer"

In the context menu that opens, select "Stroke"

Now you have a dialog box with stroke settings. You can change them as you wish.

Where 1 is the size of the stroke; 2. Stroke color; 3. Selecting the position of the stroke.
2 and 3 Stroke the outline of a picture or shape
With the contours of the picture, everything is the same as with the text, but I want to pay attention to the fact that if you select the "Outside" position, then the corners of your picture will be rounded, and if you select the "Inside" position, then part of the image will be "eaten" but the corners will remain former.
The absorption of part of the picture can be circumvented by adding additional space to it. To do this, use the "Rectangular Selection" tool to make a selection of the desired size, create a new layer and fill it with any color. Then align the layer as needed on the back of the picture and bring these two layers together with the keyboard shortcut "CTRL + E".
Good day to all, my dear friends and readers of my blog. Often I look at some pictures with inscriptions and understand that something in this inscription is missing for a prettier performance. Then I realize that it would be nice to circle the text on this or that image.
Although in fact it's not just my thoughts. People themselves understand that the inscription looks somehow unformed, but they absolutely do not know how to make a text stroke in Photoshop. Therefore, I just decided to write this article for you, so that you yourself can somehow improve your inscription by circling it. Oh, by the way, we haven’t photoshopped something for a long time.
Normal Stroke
First, I'll show you how easy it is to circle text. And this function will help us already familiar to us. So let's go!
Second layer
If you watched at least one of my videos from my youtube channel, you may have seen that at the beginning of each video I have a title that is circled in a special way. So, many people ask me how I do this technique. And now I will tell you my secret, although there is actually nothing secret in sight.

- So, for starters, you must write any text. Made? Well done! And now hold down the key CTRL and click on the icon "T" in the layers panel. After that, your text should be highlighted with a dotted line.

- Now create a new layer and make it right behind the text layer. That is, the top layer will be the inscription, and below will be our new empty layer. Yes, and immediately stand on it so that it is active with you.

- Next, we go to the top menu and select the item "Selection" - "Modification" - "Expand". In the window that appears, we must choose how much to expand our selection. In my example, I'll choose 3 pixels, but feel free to experiment. Then we press OK.

- And the next step we will need to select and change to black (well, or some other). Well, then fill in the selected area and look at the result.

- And to top it off, you can again get into layer styles and select a stroke there, and work with it. And then you get a more beautiful effect. This is what I use for my video titles.

Here are a couple of examples of what I got.


By the way, if you remember, then you can fill the area not only with the area, but also with some texture, then the effect can turn out even more interesting. So everything is in your hands. Well, if you still want to learn Photoshop from scratch in just a couple of weeks, then I strongly recommend that you study this awesome video. It simply amazingly combines simplicity, lightness and usefulness. looks just in one breath. And by promo code KOSKOMP_E73you will get a discount 10% from the cost of the course!
Well, I say goodbye to you today. I hope you enjoyed my lesson today and found it useful. So do not forget to subscribe to my channel and share these materials on social networks. Well, I, in turn, will try to please you with my articles, so visit my blog at any time. Good luck to you. Bye Bye!
Sincerely, Dmitry Kostin.
Do you want to make your text attractive and original? There was a need to issue any inscription in a beautiful style? Then read this article, it will present one of the methods of text design, and specifically - a stroke.
Stroke text in Photoshop
In order to make a stroke in Photoshop, we need the “patient” directly. In this case, it will be one big letter "A".

You can make a text stroke using standard Photoshop tools. That is, double-click on the layer, calling styles and selecting the item "Stroke". Here you can adjust the color, position, type and thickness of the stroke. This is the path of amateurs, and we are real pros, so we will act differently. Why is that? With layer styles, you can only create a linear or gradient stroke, and the method that we will learn in this tutorial will allow you to create a board of any configuration.

So, we have the text, let's get started.
- Hold down the key CTRL and click on the thumbnail of the text layer, thereby obtaining a selection that repeats its shape.

- Now we need to decide what we want to achieve. Let's make a fairly thick stroke with rounded edges. Let's go to the menu "Select - Modify - Expand".

There is only one setting here. Let's write a value of 10 pixels (font size 550 pixels).

We get this selection:

- To make further editing, one of the tools in the group must be activated. "Isolation".

We are looking for a button on the top toolbar with the name "Refine Edge".

Here we need to change only one parameter - "Smoothing". Since we have a huge text size, the value will also be quite large.

- Selection is ready. Next, you need to create a new layer by clicking on the icon at the bottom of the layers palette (hotkeys will not work here).

- While on this layer, press the keyboard shortcut SHIFT+F5. A window with fill options will appear. Here we choose "Color", it can be any.

We get the following:

- Remove selection with keyboard shortcut CTRL+D and continue. Place the stroke layer under the text layer.

- Next, double-click on the stroke layer, calling the styles. Here we select the item "Gradient overlay" and click on the icon shown in the screenshot, opening the gradient palette. You can choose any gradient. The set you see now is called "Black and White Toning" and comes standard with Photoshop.

Then choose the type of gradient "Mirror" and invert it.

- Click OK and enjoy...

- Go to the text layer and change the fill opacity to 0%
.

- Double click on the layer, styles appear. Choose an item "Embossing" and configure approximately as in the screenshot.

The final result we got is this:

With a little desire and imagination, with the help of this technique, very interesting results can be achieved.
19.08.2016 27.01.2018
There are two ways to make a stroke in Photoshop: using layer styles and through the menu Editing (Edit). In this tutorial, we'll look at both methods.
The first method, using layer styles, is applied faster (to add it, just double-click on the layer) and has the widest range of settings, thanks to which you can radically change the stroke by choosing its color, location, opacity, etc.
In the second method, some settings are duplicated, but the main advantage of the second method is the ability to remove it at any time without damaging the object itself.
Stroke with layer styles
Let's start by creating a new document. (File-Create (File-New)) and add to it some object to which you want to add a stroke. For example, a shape with a heart:
V layer panels Make the layer with the heart active and double-click on it with the left mouse button. This action will open a window layer styles (Layer Style):

Check the option Stroke (Stroke) and go to the settings menu.

Here you can choose color, size, transparency, position and blend mode strokes.
In parameter Stroke type From the drop-down list, you can select three stroke options - Color, Gradient, Pattern. If you choose one of the last two options (Gradient or Pattern) additionally you can choose a style gradient or pattern.
For example, I chose gradient stroke type and rainbow gradient.
Window layer styles with settings:

Stroke shape:

With help layer styles you can add a stroke to any object, thanks to the many flexible settings, this method is the best, but in fairness, consider the second one.
Stroke with the Edit menu
Rasterize shape layer ( RMB on layer - Rasterize layer). Turn off the peephole layer styles v layer panels and activate the selection of the layer with the object by clicking while holding keyctrl by layer thumbnail:

Create a new layer above the object layer. Layers-New-Layer (Layer-New-layer) or click on the thumbnail for creating a new layer in layer panels. This step is optional, we can apply a stroke to the rasterized layer itself, only then the changes will become irreversible and if we want to change or completely remove the stroke, it will not be possible to do this, we will either have to cancel the steps, or cut the stroke along with a "piece" of the object.

Go to the menu Editing-Stroke (Edit-Stroke), the following settings window will appear:
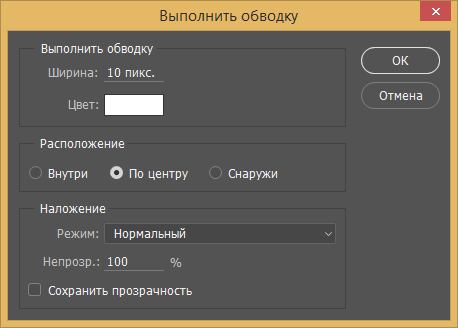
Here you can also choose stroke size (width), position, blend mode and opacity.
After applying the settings, deselect by going to Select-Deselect (Select-Deselect) or by pressing the hotkey combination ctrl + D.

So we learned how to make a stroke in Photoshop. I hope the lesson was useful to you.
Every web designer knows that the header of a site is the most difficult to render. And, accordingly, it is to this part of the work that the client makes the most demands. Sometimes, it is not possible to catch the desired wave far from the first time. And the more baggage of your knowledge, the more your imagination can roam. The sooner you roll out a successful option to the client, the less time you spend on development. And this is beneficial. Be prepared to keep hundreds of variations of text and photo processing in mind. Some of them are used almost constantly. These include text wrapping.
Adding a stroke to text in Photoshop is one of the easiest, but at the same time one of the most requested operations. Therefore, knowing how to perform it is simply necessary for any web designer. Let's get started.
Let's start with the simplest. How to make text stroke single. We create a new document. We write the text. I'll choose a large font and bold style. I added a gradient to the background layer. If you already do it, then it's beautiful.
Make a black stroke. Go to the layers window. Choose ours, with text. Click on it with the left mouse button.
We need to find "overlay options".

Select the item "stroke" and set the settings.

Result:

The settings can be changed to your liking. Stroke width. Her color and type.
Let's complicate the task a little. And let's make a double stroke. But! Unfortunately, Photoshop does not allow you to make a double stroke in the same way. Therefore, you should resort to cunning. And translate our inscription into a smart object. True, there is one drawback. Your inscription becomes a picture. That is, editing it in text mode will no longer work. In the same layers window, call the same list of operations with the left mouse button. And choose "Convert to Smart Object". It will be located just below the blending options.
The layer will look like this:

Now back to the blending options and stroke. Set the following settings.

Voila! Now the stroke is double.

It turned out that at first glance such a powerful Photoshop tool as a stroke is quite simple to create. Therefore, let's go a little further. And add a gradient stroke to the font.

I changed the background layer to make our text look better. And I added the following gradient to the text:

Plus a simple black stroke. My original image looks like this:
Now I convert it to a smart object and add a gradient stroke to it. To do this, in the overlay options in the stroke tab in the drop-down list, select "gradient"

Set the settings:

And here is what we have. Text with a gradient stroke. Thanks to the play of colors, we created the effect of a glowing inscription. Looks very interesting, don't you think?

Thanks to a couple of tools, we managed to create a cool inscription, which may well be suitable for creating a website header.
You should remember a few things.
- Stroke text cannot be done indefinitely. Everything has a limit. Either you make a lot of thin strokes, or a couple, but thick ones.
- Stroke is both external and internal. The internal has a significant drawback. It "eats" the outlined object.
- With strokes, you can create the illusion of volume. It's all about the flowers. When choosing the right combination, you can easily achieve a similar effect.
- The text stroke does not increase proportionally to the text. Let's say you made a 20px font stroke and a 2 px stroke. If you increase the size to 40 px, the stroke will remain the same size. That is, it will look completely different.
 Carrying out rescue operations in damaged (destroyed) buildings and structures
 Autocad mechanical setting dimension styles