How to access disk utility on mac. Checking and repairing disks in OS X. "Invalid size for temp file" warnings can be ignored.
Checking and repairing disks or partitions using Disk Utility does not check and repair the physical condition of the disk, it only fixes software errors on the disk. The utility itself is located in the "Programs-> Utilities" folder or via Finder Cmd + Shift + U
Recovery of a backup disk: (connected via USB)
Turn off Time Machine (in TM settings). Launch Disk Utility and select the desired disk.
Drives are displayed in each of the displayed partitions. Segmented partitions are system partitions that do not contain files that you can check or recover. Each button opens a panel that performs a different function in the application, as you can guess from their names.
The lower part of the Disk Utility window displays information about the selected disk object. The left pane contains your disk resources; the right pane shows the operation being performed on your drive. We'll start with first aid. The button bar changes depending on the object you select. If you select a drive, for example, you see all control areas.
Then select "First Aid" and "Check Disk". In case of errors as a result of the check, click the "fix disk" button
If the restore procedure ends successfully, a message will be received "Volume<имя тома>seems to be fine"
If the required drive is not listed in Disk Utility's list of available drives, then you need to make sure that it is connected directly to your computer and not through a network or Time Capsule.
Using Disk Utility with Terminal
The first aid panel shown in the figure can perform basic disk recovery operations. To check or verify a drive, select the drive and partition from the list of volumes on the left side of the window. Displays any errors found on your drive, but does not attempt to repair them. If you're having trouble installing apps or deleting files, you might be experiencing a permissions issue. Eliminate disk permissions. Correct any incorrectly assigned permissions. Permissions can only be restored to your current boot drive. Ends the current action.
- Check disk?
- You can only restore volumes other than the boot drive.
Disk Utility in normal mode cannot repair boot disk with OS X. This also requires running the disk utility from the installation procedure.
If the restore fails.
If Disk Utility was unable to repair the disk, carefully read the messages that were nearby (before the message about the failure to repair). If some of the data on the disk has been fixed, but not all of it, you need to repeat the disk recovery procedure (again and again) until there is a complete recovery or a complete failure to restore
During this process, several things are checked. When files become fragmented, fragment locations are stored here. Contains information that forms the structure of a disk. A binary disk image that records which blocks are allocated for files and which are free space.
- multichannel files.
- Files incorrectly associated with the same allocation blocks on disk.
- Catalog.
If Disk Utility Can't Repair internal disk you can try third party low level recovery utilities like Disk Warrior(http://www.alsoft.com). This utility quite expensive (about $100), but it is a very reliable recovery tool. If you decide to take such actions, make sure that the version of the utility is compatible with the version of your OS X (how to check the version of OS X)
It is essentially a quick and dirty partitioning and initialization tool; It creates a single empty partition on the selected device and erases everything that was there before. Shows the Erase panel. Enabling logging adds a minor speed bump to the drive, but helps protect your computer from data corruption if the system crashes or otherwise aborts.
Fresh hot apples
Then enter a name for the new volume. This is displayed as your drive label on the desktop. See Chapter 2. To create a more complex disk layout, use the Partitions panel. Shown is the control center for working with your drive. Be careful, changes here will remove any information about the target drive!
Using Disk Utility with Terminal
Part of the action inaccessible to the program"Disk Utility" can be made with the diskutil command in the Terminal
Many people know about the existence of "Disk Utility" in OS X. Today we will talk about how to use it effectively, because it is necessary.
The Volume Layout section of the Partitioning panel contains a visual representation of the partitions in the system. The highlighted field is the active section. You can resize a partition by dragging the separators between the partitions up and down to decrease or increase the available space. Dragging the panel changes the size box on the right side of the panel to reflect the current settings.
Partitioning a disk erases any existing information. In addition to working with the visual representation of a section, you can use various pop-up menus, fields, and buttons to set other options. Manually enter a new size for the selected partition. When checked, the Locked for Editing option overrides the current section's settings. You can continue to work with other sections, but not with the lock. Returns Returns the partition map to its original state. Partition Writes the design of the partition table to disk. This wipes out all current data on the device. Creates a fault-tolerant system by creating an exact mirror of one drive on another drive.
- Sets the name of the selected section.
- The size.
- Disk mirroring.
Regular system reinstallation is not an option for the user OS X. Let's leave this procedure to the owners of computers under Windows control. However, any mechanism needs to be prevented, the same applies to the operating system of our Mac computer. Today, we're going to start that process by doing preventative maintenance on your drive.
If the restore fails
The disk image can even be stored on a web server for retrieval over the network. To use recovery, you must first create a disk image. Restoring volumes from disk images. Then drag the drive or partition to the Destination field. After selecting a drive or partition from the list, you can choose to Mount, Disconnect, or Eject Volume.
Instead of creating an archive folder, developers write their applications to virtual disk, which is loaded into memory when used. This disk appears on the computer as a real disk and can be managed like any other disk. For the end user, this is an easy way to work with new applications. A single disk image file can contain applications, support files, and any other data the program might need and never need to be uncompressed. In fact, many applications can run directly from disk images without having to copy them to your HDD.
To do this, we do not need expensive third-party software. No, everything you need can be done in " Disk Utility”, which has been part of the standard OS X programs since time immemorial. It has a simple and clear graphical interface and is aimed at the average user. You can not understand the partition tables and varieties file systems, but at the same time keep your computer's drive in decent condition.
Adding disk images to the interface
To work with an existing disk image, drag the image file into the disk list pane of Disk Utility, or use Image, Open. It is added to the area below your standard hard drives and stays there until you drag it back.
You can check it, repair it, redo it, etc. Disk Utility can create images as well as mount them. To create an empty image file, select Images, New, Empty Image. The Create Disk Image dialog box is displayed.
So let's start with " disk utility" with help Launchpad. If you cannot find it there, then from the upper right corner and enter the name of the program you are looking for. The result will be the following:
![]()
Okay, now let's talk about what we will do and, most importantly, why. Prevention of system storage in Mac computer done for a number of reasons, the most obvious being:
Create a new empty image; Then copy the files to it. Fill in the "Save As" field, as usual, this is the name of the image file, not the volume that will be created. Choose a size for the image from the Size pop-up menu. Then choose a volume format from the Format pop-up menu.
A new disk image is created and automatically added to the Disk Utility disk space. Creating an image from an existing disk is even easier. Select the section you want to use; then select "Pictures", "New", "Device Image" where "Device" is the name of the section you selected.
- Increases system performance.
- Checks drive status and errors.
- Corrected access rights.
Let's start with the last point. Within OS X access rights play a significant role. Putting them in order, although not the solution to all problems, but it can save you from certain problems with operating system right now or in the future. The procedure is recommended to be performed regularly.
You will be prompted to save a location to save the image. Read-only images are in a good way dissemination software, because they do not allow you to make any changes to the image. This results in an image that cannot be modified or corrupted and can always be considered a working master copy.
Possible problems during verification or recovery of disks that do not include disconnection
The third way to create an image is to copy the contents of a folder or volume. This is the easiest way to create a disk image if you have all the files in a subfolder of your volume or if you want to create an image of a mounted network resource. This also results in the disc image being not prone to clipping since it is not based on a direct copy of the device.
To do this, select the main hard drive or solid state drive in the left part of the window. In the same place, select the system partition - it will be located a little lower. Below the button "Check access rights" will be available - click it.
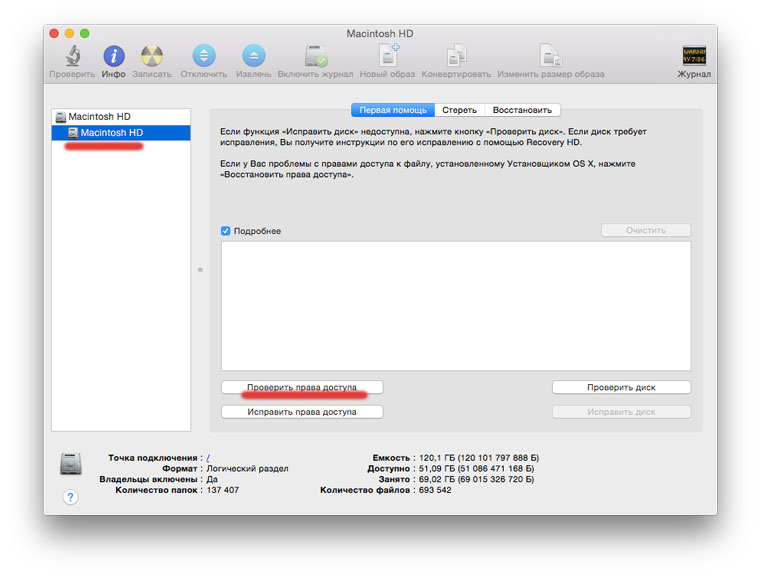
After waiting for the result of the check, after a while, boldly click "Fix access rights" and wait again until the procedure is completed.
Using the "Pictures" menu, you can check disk images, convert them to other formats, calculate checksums, and scan an image for recovery. First, file, log, displays the log of work with disk utility including repair, separation, etc.
Another revolution in data backup is the idea of supporting the "cloud" - with the proliferation of broadband Internet access and many options for online storage, many companies offer solutions for online storage. Reserve copy, which were only dreamed of in the late nineties.

The first stage of prevention is completed.

Now check the drive for errors. To do this, click the "Check disk" button. Checking takes certain time: in the case of an SSD - less, with a conventional HDD - longer.
Create incremental backups
Each user requires a different backup schedule. The standard is a full backup every two months with smaller backups of just documents and settings every week. Once a month or every month, do a complete backup on the external drive.
Alternative incremental backup method
There is a repost here from another forum from someone called "implicit" that seems to detail the required process.Yes, your drive needs special formatting. Here is some information on how to implement your requirements. You can also save these three formats to external hard disk. After selecting the copy options, the interface will switch to another interface. You can select "Basic Movie Copy", "Individual Copy" or "Full Copy" from "Copy Options" according to your needs. And you also need to select the optical driver to burn the disc if there is more than one driver.

Further, two options are possible. The check may not find errors - that's good. If errors are found, then, without hesitation, click "Fix Disk" and wait for the result. In my case, as you can see in the screenshot, there were no problems.
It remains to remember the promised increase in productivity. In fact, you may not notice it when using a solid state drive. Although if the system is two or three years old and you are running this procedure for the first time, then the result should still be. Concerning hard drive, then regular preventive maintenance is simply necessary here: this directly affects both the performance of the drive itself and the entire system. If the drive can no longer be helped, and this sometimes happens, then the only way out becomes beforehand .
You can also choose the speed and number of copies according to your needs. You can then browse the website or listen to music and occasionally keep track of the scroll bar. The program will inform you about the completion of the recording later. Wondering if anyone else has had a similar experience. Then select the desired external drive from the startup manager screen and press the enter key. If you used our method above to create a bootable installer, select "Disk Utility" from the available menu. In my example below, the disk name is "Server".
Make a note of the disk ID. Enter the administrator password when prompted. This should disable all physical disk volumes. Are you still unable to work on the drive? Are you still experiencing these annoying disk errors? The beat is harsher, but you can try turning off the volume or the entire physical drive.
This is the end of system storage prevention. Similar procedures can be arranged for other drives that you have: external hard drives, solid state drives or flash drives. It definitely won't get any worse. Now let's look at a few other useful features of Disk Utility.
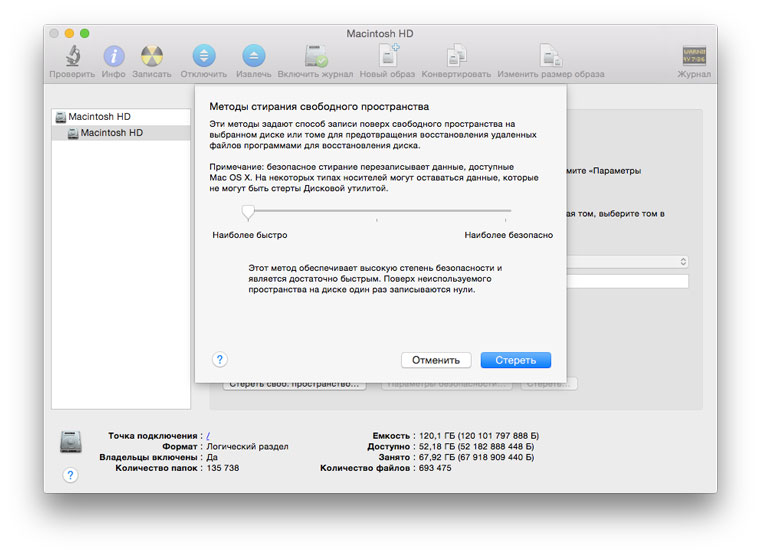
In the "Erase" section for the selected drive, you can not only completely format it, if it is not a system drive, but also " Erase free space ". This procedure can be useful if you have deleted some files and really don't want them to be restored. In the settings, you can choose the level of care for deleting data.
This should turn off the volume. This should unmount the entire physical disk and all volumes associated with it. Make sure you back up your files to an external drive or a second internal drive, the following procedure will delete everything from your hard drive!
This should allow you to partition and work with the physical disk again and again. While the author has taken care to provide our readers with accurate information, please use your own discretion before acting on information based on a blog post.
You can burn discs and create images using Disk Utility. About any connected drive or image, it will show details. This program even create a RAID array or delete an unnecessary Windows partition. The usefulness of Disk Utility within OS X cannot be overestimated, and we encourage you to simply run it as often as possible to keep your Mac's drive in order.
Don't hesitate to buy an imac from Seaplase.
Fresh hot apples:
 Customizing the Russian keyboard layout on iphone 5s
 What is the screen resolution of the iPhone What is the screen on the iphone 6
 How to write to tech support