Disk utility for mac english. Using disk utility to check or repair disks.
The access rights recovery feature has long been standard in OS X. Despite its ambiguity, Apple allowed, if necessary, to launch Disk Utility and check and restore access rights caused by software glitches. A new version OS X El Capitan has brought changes to this streamlined process.
Removing files from the Downloads folder
If you have a lot of files in the dumpster, it might be a good time to permanently delete them. This is why we recommend an easy-to-use named utility. This application helps you find files that are no longer useful for deleting them. 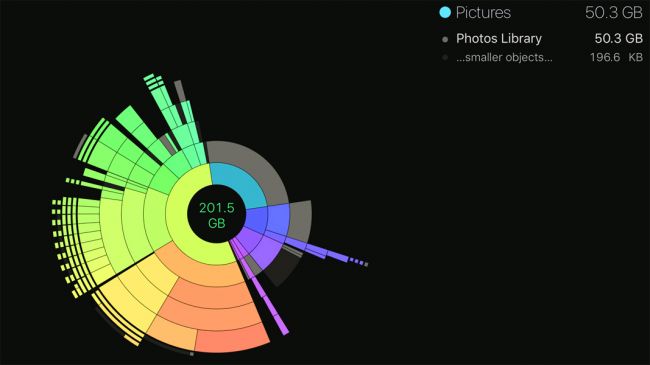
You launch the app and it starts scanning hard disk looking for large files.
The device can be a whole disk or a partition. In any case, to be useful again, zero whole disks must be partitioned, or zero partitions must be formatted with the filesystem, for example. Membership required damaged disk... Time is the extra number of times to write random information. Erasing the entire drive will leave it useless until it is partitioned again. Laptop computers especially those with a lot of internal storage are very handy.
“I was shocked to learn how Disk Utility has changed. I can't believe there is no way to check and restore the permissions or drive. It's not a utility anymore, ”says SelectGroup.
In this case, we are talking about disk utility number 15 included with OS X El Capitan. Previously, it performed many important functions. For example, scanning the system disk for damaged objects. Another important function was the management of hard drives: formatting, partitioning, error correction. From now on, this functionality is not available to Mac owners out of the box.
In the same amount of physical space that the magazine will take up, we can carry with us a huge amount of data and work with it anywhere. One of the advantages of this benefit is that all of this data remains inside this computer even after we switch to a new one, unless we take steps to erase it first.
Older laptops that have rotating magnetic hard drives, the lengthy random erasure process was the best way... So how are we going to wash these computers? Erasing your computer is now very easy too. Everything on the computer is useless without the encryption key, so you just need to erase the key itself. Since the key is cryptographically protected with your password, you just don't need to log into the computer, but you can also erase the encrypted key with a simple disk erase.
But, most likely, most OS X users won't notice the change. If you believe the statistics, only a small part of the "Mac growers" used the function of restoring access rights.
If you are one of those who preferred to fix errors manually, we hasten to please. OS X El Capitan has built-in automatic file system scanning. It regularly checks the drive and fixes any software glitches. By at least in theory.
Your disk is now full of data that can be sensitive. You need to get rid of it somehow. This advice poses people like me who have had long histories of hard drives and understand how they "delete" data, leaving it behind and just "losing track" due to high availability. If you had done a simple, quick erase on your hard drive ten years ago, any competent software data recovery has turned into a gold mine of data.
Erasing a disc fast way in those days only put a new filesystem header on the front of the disk, for example replacing the table of contents of a book with a blank one, but leaving the rest of the pages in the book intact. They did it for speed; It takes many hours to overwrite all data on the disk.
This is how Disk Utility looked in OS X Yosemite:
And this is how it looks now:
Much more visual and therefore convenient demonstration of the distribution of data on the disk. In fact, Disk Utility was of dubious value for working with files. According to Apple, it was almost a panacea for all problems. But in reality, it turned out that most of the corrupted data remained undetected. Any specialized software from App Store offers much wider possibilities.
Fortunately, there is a way that you can quickly and reliably wash modern HDD old style or solid state. It is a close relative of full disk encryption and is called secure erase. A new securely erasable drive has a random encryption key generated for it on the first day. This key is stored on disk and all data written to it is encrypted using this key. When a secure erase is requested, this key is destroyed, leaving all encrypted data unreadable.
OS X El Capitan September 30. WITH operating system all Macs released in 2009 or later and some models released in 2007 and 2008 are compatible.
“Rifat, I bought new disc and I need to make it work on both Mac and Windows. " “Hi, I have a disc, but I can’t write anything to it on my Mac, what should I do?”. “Listen, how to format a Mac disk, what would it be?”.
Disk - Any disk is basically a giant file, the size of an entire disk. The easiest way to find data to recover on an unused disk is to scan it from start to finish and look for patterns that indicate payload.
Someday, the spell to scan the disk is to read the entire disk in 1 megabyte chunks and pass it through a hex dump tool that we can use to visual inspection data. It can overwrite some data if it hasn't been completely deleted, but it certainly won't overwrite the whole thing regardless. There is no way to skip the installation step, giving me the best chance of finding any data trail.
Approximately such questions are asked to me by my friends and clients, once a week, if not more often! So now, I will show you how to format a disk in a disk utility, for different cases!
First, a short introduction to the major file systems (FS). If you do not want to bother with theoretical aspects, you can skip below, directly to the formatting procedure.
The middle is where our data would be - it's over 250 gigabytes of zeros. However, this does not mean that the data is guaranteed to disappear. If you're looking for fast, large storage but don't want to spend a lot of money, you have a few options, but not many great ones. However, there is a way to do this.
These days even the big guns are coming into action selling 2 combo drives and 5 giant discs. Well, most of them are not that fast and cost a bit to the point. This is very good, but not dazzling, and not much better than twice the performance of a single drive. For best results, you will need at least two identical blank discs. This is a handy thing to know, especially if you want to try out cheap raids.
To format the disk, you need to go to Disk Utility, which is located in the Applications - Utilities (Utilities) folder, or find it through Spotlight. In the window that appears, on the left side, you need to select the disk to format - the disk itself, not the volume name. In my case, this is 160.04 GB Seagate TOSH ... and not Extended HD. Next, we need to click on the Disk Partition button, at the top in the middle, and here we will be able to see all the options for formatting the disk for different needs! So, now I will describe all the sections and what they give us:
Before going any further, make sure you copy anything important from the disc, as it might have included some kind of free software. We're going to erase it, so rest assured. Many different ways cut and cut the disc is.
Select your drive in the left pane. Call your drive however you want, just make sure there is nothing on it. Give your new drive a name and click Erase. it blank disc so nothing to lose. Wait a bit and you have a shiny new disc to play with.
It takes four drives, but you only get two. ... Using one doubles the chance of failure, but also doubles its size and doubles its speed. This can be dangerous for backup data. Give it a name, then drag the second disk from the left to the large empty spot at the bottom.

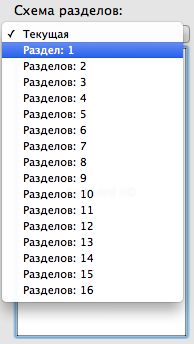
1) Partition scheme - by clicking on "Current", we can select the number of partitions on the disk. Someone may need to create a disk with 2 or more storage partitions different files or for use on different computers.
Remember that you will need to connect both drives before the set is recognized. You can add more than two drives as long as they are the same size, but the added speed and space comes with a lot of risk. These numbers are all very diverse and can vary a lot from launch to launch. This is not the "real world", but it is very good.
However, for general data storage, if the drive is fast enough to keep up with its requests, it is fast enough. Multiple tasks will require a lot of files to be delivered quickly, but multiple edits with multiple high quality corners is one thing: you'll need a large, fast drive if you don't want to use a proxy.
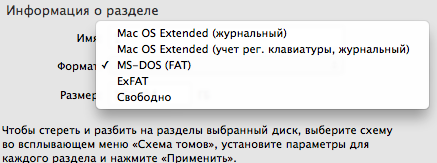
2) Partition information - here you need to select the disk name and FS. For use on Mac and Win, choose FAT or ExFAT. To use the disk for Time Machine, select Mac OS Extended (Journaled).
3) Parameters - by clicking on this button we select the type of bootloader - this is very important parameter since it depends on it whether the disk will be detected on the computer or not!
When copying files, speed matters, but only if you are moving data from one really fast drive to another. Any copy goes at the speed of the slowest of the two discs that you copy between each other. But, chances are you will fall back on a slower single spinning disc and that sets the speed.
Handover, instant hotspot and single clipboard
This is a great idea if you have a need for it, but not worth the risk if you are not already into high-end formats. However, these higher formats are just around the corner. A microphone is required for dictation. Only available to people 13 and older in the United States.
When copying files, speed matters, but only if you are moving data from one really fast drive to another. Any copy goes at the speed of the slowest of the two discs that you copy between each other. But, chances are you will fall back on a slower single spinning disc and that sets the speed.
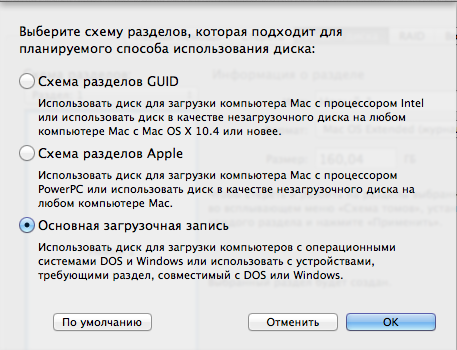
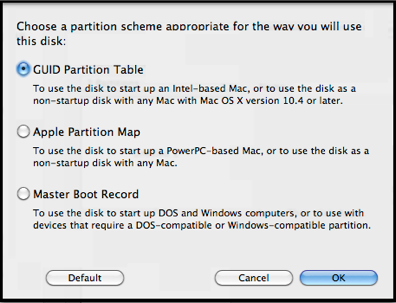
— GUID Partition Scheme- no matter which file system you choose, the disk will be detected only on a Mac with Intel processor(all modern poppies). Together with the HFS + file system (Mac OS Extended), the disk will be available for creation backups via Time Machine! No other combination of "Partition Scheme" and File System settings will allow you to use the disk for copies!
— Apple partition diagram- designed for use in old Mac computers with PPC processor. We won't need it.
— Master boot record- when you select this item, the disk will be visible on computers with Win. But besides this, you need the format to be FAT or ExFAT.
ATTENTION! FORMATTING THE DISK WASTE ALL DATA FROM IT !!! BEFORE FORMATTING THE DISK, MAKE SURE THAT IT HAS NO IMPORTANT FILES OR SAVE THEM ON ANOTHER MEDIA !!!
After selecting all the parameters, you can click on the "Apply" button in the lower right corner and this will appear:
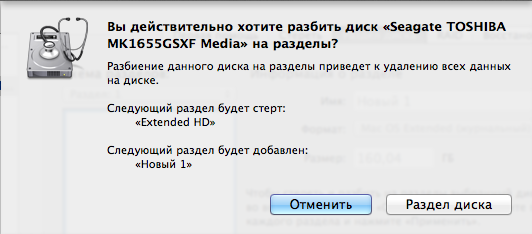
The system will warn you that all data will be deleted from the disk, and if you agree, then click on the "Partition disk" button. Formatting takes place quite quickly - from 3 to 20 seconds, depending on the size of the disk.
If you chose the path for Time Machine creation, then immediately after formatting a window may appear with the choice of this disk for backups.
I will clarify again which items you need to choose for:
— Time Machine and Mac-only Disk — file system Mac OS Extended and GUID Partition Scheme;
— Disk for Mac and Win- ExFAT file system and Master Boot Record.
So we figured out how to format a disk in Mac, and what options you need to choose for different cases! This method suitable for disks, flash drives, regardless of the connection interface - USB, FireWare or Thunderbolt. If you have any question or difficulty in the process of formatting a Mac disk, write about it in the comments 🙂
By the way, if you were interested in this article, then feel free to add to my groups in
 Architecture of a distributed control system based on a reconfigurable multi-pipeline computing environment L-Net "transparent" distributed file systems
 Email sending page Fill relay_recipients file with addresses from Active Directory
 Missing language bar in Windows - what to do?