Hard disk diagnostics. How to check the hard disk for errors and what to do with bad sectors.
Description
This is the version Data programs Lifeguard Diagnostic for Windows. It is designed to check both internal and external storage WD. It also displays the model and serial numbers of WD drives connected to your computer.Supported operating systems
- Windows 10
- Windows 8 32/64-bit versions
- Windows 7 32/64-bit versions
- Windows Vista 32/64 bit versions
- Windows XP 32/64-bit versions
Instructions
- Download the archive Windows programs Data Lifeguard Diagnostics, .zip.
- Unpack and run the WinDlg.exe program. If you have Vista or more a new version Windows then you will need to push right button mouse on the WinDlg.exe file icon and select item Run as Administrator.
- To proceed with the installation, read the license agreement and accept the terms.
- The main screen of the program consists of two windows. The top window displays a list of drives on your computer that you can check. For each drive, the model number is displayed, serial number, capacity and SMART state. The lower window displays information about the partitions of the selected drive.
- To check your drive or view SMART status, highlight the drive and then select the icon in the top row.
- After you click on the Run Check icon, the DLGDIAG - Select Action window will be displayed.
- You will be presented with the following menu items:
- QUICK CHECK - Performs a quick drive SMART self-test to collect and validate Data Lifeguard information.
- CAREFUL CHECK - Performs a full disk scan to find bad sectors. The duration of this check depends on the capacity of the drive and can take up to several hours.
- ERASE - overwrites the contents of the drive with zeros. Has two modes: full and fast erase. The file system and data on the drive will be lost.
- VIEW CHECK RESULTS - displays the results of the last check.
- Select the type of check you want to perform and click the "Start" button.
- At the end of the procedure, you will be given a message indicating whether the drive has passed the test. Click the Close button.
There is no need to talk about the fact that a computer's hard disk is an ordinary piece of hardware with a limited service life. Everyone knows this. The only question is when exactly it will fail. To prevent this from happening, a constant check of the disk for operability is required. Now we will consider what this process is in different versions, and also touch on topics such as recovering data, bad sectors and the hard drive itself in the presence of physical damage.
Why is hard disk diagnostics necessary?
As a rule, not every user of modern computer systems thinks about the state of the hard drive, which stores a huge amount of information. Unfortunately, many users begin to solve this problem only after HDD"Pours" or is, so to speak, on the verge of a foul.
Here, every user should understand that at least a weekly check hard disk performance will not only be able to increase its service life, but will also prevent the emergence of extremely hard-hitting situations associated with disruptions in the operation of the operating systems themselves.
System errors, perhaps, can be attributed to the most common phenomena. Their occurrence may be associated, say, with improper shutdown of programs, power outage at the most inopportune moment, cleaning the insides of the computer, when there is a disruption in the connection of HDD loops to motherboard etc. But what can I say, even an overestimated number of spindle revolutions when trying to speed up access to data stored on a hard drive can play a cruel joke. However, now is not about that. Let's look at the most common and most effective means by which hard drive diagnostics are performed.
Standard verification tools
To begin with, users of absolutely all versions of Windows operating systems have available tools. Although they are quite primitive, they nevertheless allow you to get rid of many problems, most often associated with system errors.
The simplest tool is the built-in hard disk diagnostic utility, called from the properties of the hard drive or logical partition in the context menu from the standard "Explorer".
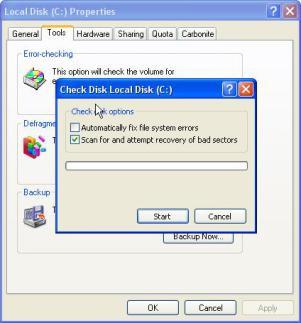
There is a special clear button for deleting junk or unused files, there is a button for checking the hard drive for errors (on the General tab), as well as two buttons in the service menu that allow you to start checking for system errors and optimization.
In addition, in any Windows versions can be used command line or the Run menu, where you enter the chkdisk command with different variations. When performing a routine check for system errors, it is advisable to enable the optional auto-fix option. In case of emergency, you can enable and check the surface of the hard drive (the so-called Surface Test).
Now let's take a look from the other side at the question of what is a hard drive diagnostics. Windows 7, for example, like any other "operating system" of this "family", can use not only the standard command for checking system errors on the hard drive. Today, not all users know that the chkdisc line can be easily supplemented with letters and symbols, the use of which as the main command will help to perform various actions.
So, for example, typing chkdsk c: / f will automatically fix errors. For file system NTFS apply the chkntfs c: / x command with the same result. In this case, it searches not only for system errors, but also checks the hard disk for bad sectors. However, in most cases the same automatic start starts even when the system itself boots after unexpected failures. Unfortunately, such a program for diagnosing a hard drive cannot always boast of a positive result. That is why many experts and experts in this field recommend using more powerful third-party utilities. But more on that later.
Defragment your hard drive
Separately, it should be noted that diagnostics and hard disk recovery cannot do without using the defragmentation process. The fact is that at this time the most frequently used files or program components are moved to the fastest areas of the hard drive. In the presence of bad sectors, this is the first way to restore application launch.
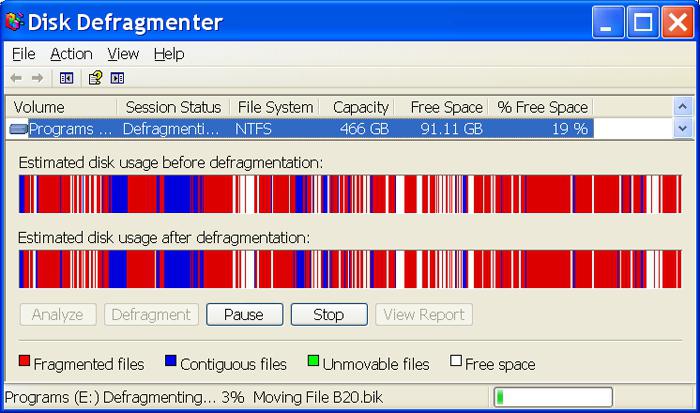
Basically, nothing special happens - the logical address with the file's checksum remains the same. Only its physical location changes. And who knows, maybe in the place where the file was originally stored, and there is, for example, physical damage? After all, no one is immune from this.
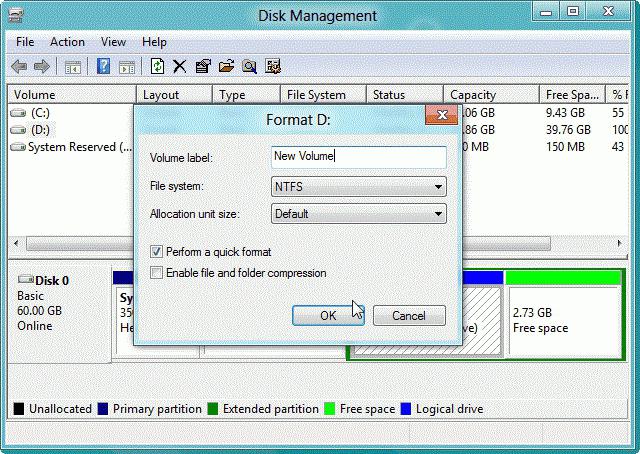
Formatting the hard drive
As a last resort, the system provides for partial or complete formatting (well, if nothing helps at all). The essence of this process is reduced in the first case to cleaning the table of contents (tables of allocation of MBR files), after which using special utilities you can recover data. In the second scenario, the situation is much worse. Full formatting deletes data permanently.
This can be illustrated by an example. During normal deletion, the file is not erased in terms of physical presence on the hard drive. It's just that its name changes the capital letter to the symbol "$". After that, neither the user nor the system itself sees such a file. But it is precisely by such a symbol that it can be restored. It is clear that any recovery utility (such as Recuva) first determines the state of the hard disk, after which it identifies the deleted files by the first character and finds out the extent of their damage and the possibility of recovery. But this applies only to those cases when certain sectors of the hard drive have not been overwritten. If in this place other information was saved over the old, no program for checking the hard disk for errors in order to further restore information will not help.
Removing computer debris
Residual or unused files can also lead to system errors on the disk. We are not talking about physical damage now. But in terms of the fact that the system constantly refers to system registry containing keys and records of absolutely all folders and files on the hard drive, this is a rather big problem.
This constant appeal only leads to the fact that even the loading of the Windows operating system itself slows down, not to mention the launch of custom programs and applications.
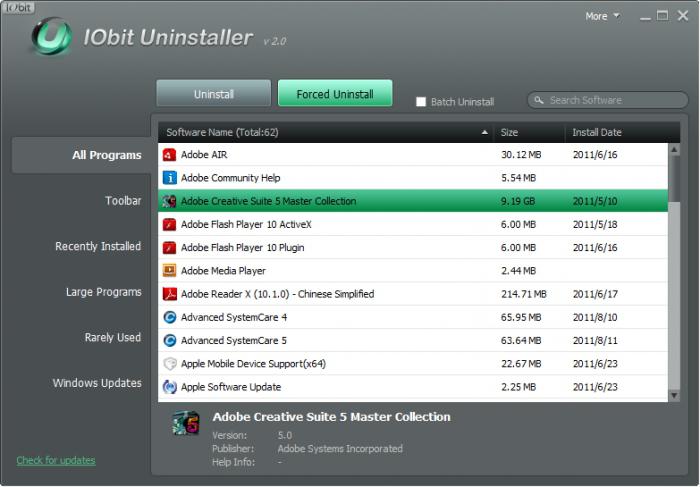
To get rid of all this, you can use the utilities complete removal installed programs or special automatic cleaners, optimizers like iObit Uninstaller, CCleaner.
Check for bad sectors
Almost every third-party hard disk diagnostic utility is capable of performing a special test for the presence of bad sectors. As it is already clear, errors of this kind are corrected by rewriting the checksums of the files to another location. In fact, defragmentation and standard checking functions are combined here. Among other things, there are quite a few software packages that even allow you to avoid repairing or replacing a hard drive if it "fell apart".
What to do if the HDD is physically damaged?
Software package HDD Regenerator is a unique program for diagnosing a hard drive that may have been physically damaged or damaged.
It works according to a completely non-standard technology. Not only does it check the hard disk for bad sectors, it is also able to reanimate the hard drive even in the presence of surface damage. The essence of the method of influence itself is reduced to the use of the technology of magnetization reversal of the hard drive.
It was created relatively recently, however, as practice shows, it managed to establish itself on the very high level... By the way, when using it, you will not even need to format the hard disk, then delete important information and identify intact sectors. And this is one of the most important advantages of the package. What do you think the FBI uses to recover data from hard drives of computer hackers and pirates? That's just it. In addition, the hard disk is checked for operability in such a way that the user does not need to interfere with the process itself. Agree, it's very convenient.
Actually, this is the most powerful program with which the hard disk is diagnosed. Windows 7, of course, is no exception as a platform for launching the resuscitator. The application works great in almost all systems, starting with the "expiration".
The most powerful utilities for checking hard drives
As for some standard utilities in this direction, you can find a lot of them on the same Internet.
Among the most interesting are applications and software packages such as Norton Disc Doctor, ScanHDD, Victoria.
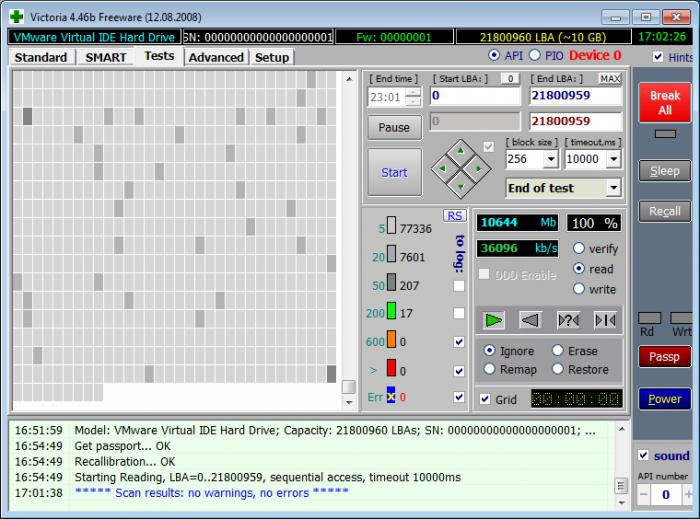
A good program with which to diagnose a hard drive is Victoria. It deserves special attention. Although it was created by an enthusiastic Belarusian programmer, it occupies one of the first places in the world of modern computer systems and technologies.
It is worth noting that this application is able to work as in normal mode (when launched in Windows environment), and in the already unsupported DOS emulation mode in many OSes. What is most interesting is that it is in DOS that the program demonstrates the highest rates.
As for the interface and control system, they are terribly simple. To start the analysis, just click the corresponding button. For most users, a hard disk check in Russian is provided by default. It is also advisable not to change the basic parameters, especially if you are not a qualified user in this area.
On the other hand, in the advanced settings of the parameters for checking the hard drive and correcting errors, a fairly flexible configuration is provided. True, in order for an uninitiated user to figure out all this, you need to at least, carefully study the accompanying technical documentation.
Recovering data from an image
Now let's get down to the issue of data recovery in case of loss or unexpected deletion. If you look at it, diagnostics of a hard drive using standard or third party funds not produced without creation control point system recovery.
Few people think about it, but in vain. Thus, even with an incorrect result of the operation of any utility, you can always make a so-called rollback to the initial state without losing data. However, in the case of using "operating systems" Windows, as it is stated, the changes do not apply to user files. However, the truth is that even when a system is restored from a checkpoint, all deleted data is restored.
In this case, it is naturally better to use a system image. At this point it will certainly be clear that only the data that was written in the image itself will be restored.
External media
As already clear, diagnostics external hard a USB HDD or an ordinary flash drive is produced according to the same principle that works for standard disk drives. The only thing worth paying attention to is the inclusion of a required component in the list of scanned devices.
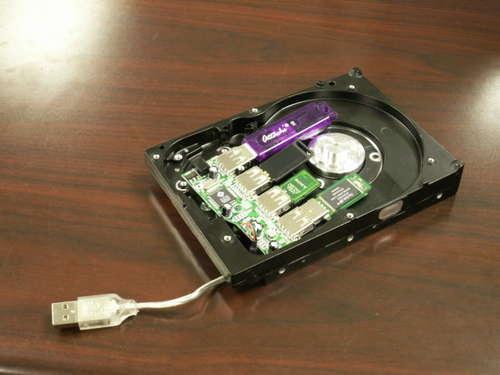
This applies equally to the standard tools of "operating systems" Windows, and to specialized utilities for checking HDD or data recovery.
BIOS
Separately, it should be noted and BIOS settings, without which some programs designed to check and diagnose the state of hard drives will simply not work.
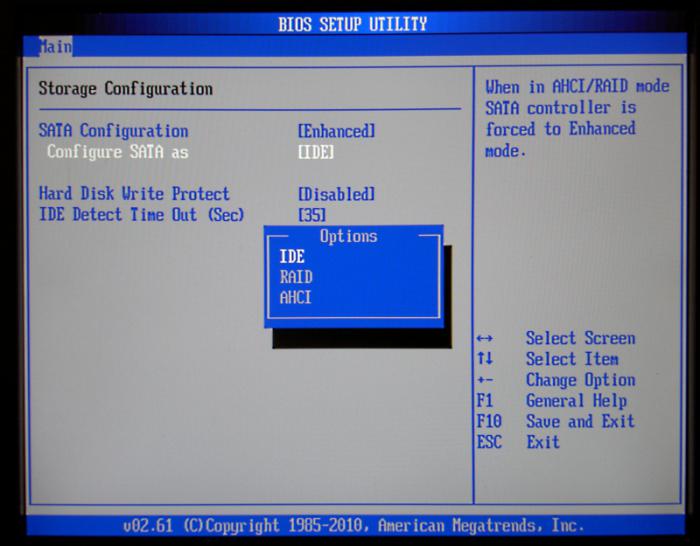
In particular, this applies to the SATA controller mode, which sometimes needs to be switched from the AHCI mode to the IDE mode. Only in this case uninterrupted access to the hard drive is guaranteed with all the ensuing consequences.
As a rule, after setting this mode, absolutely all programs can access the hard drive, of course, using user-controlled parameters. It goes without saying that accessing the BIOS on different devices carried out differently. In the standard version, this is pressing the Del key before starting the system, sometimes the use of function keys F2 and F12. It all depends on the BIOS version and the developer. However, when booting, the system itself in the status bar signals what exactly needs to be pressed to enter the basic settings.
Instead of an afterword
Now let's try to summarize all of the above. It remains to add that diagnostics of the hard disk is the key to the normal functioning of the computer system and data storage. And this applies not only to Windows performance, but also to optimize access to files and folders.
Everyone chooses for themselves which means by which the hard disk is diagnosed to be used for their needs, but with a high degree of probability we can say that better utilities than Victoria and HDD Regenerator have not yet been created. This statement is based not only on calculating the performance of the software packages themselves, but also on the results of the tests they demonstrate. And, I must say, these indicators surpass all other programs taken together, not to mention the standard tools of Windows operating systems, which, alas, are not particularly flexible and effective. Even in the top ten, the results are far from comforting.
Separately, it is necessary to dwell on the issue of the simultaneous use of several tools to check the hard drive in one system. It so happens that permanently installed software packages may conflict with each other. This is due to the fact that some of them are trying to work in background by the type of optimizer programs that constantly "hang" in the system tray.
If it so happens that there are several applications of this kind on one computer terminal, you should remove one of them, and instead use, say, the portable version, which does not install its own files and libraries into the system. This allows you to start the scanning process of the hard drive or removable media even from a regular flash drive. Even executable file programs and additional folders are present on the same flash drive, this does not interfere with the launch of the utility.
Here it is worth paying attention to one more fact. As sad as it sounds, with the transition to Windows 10 with free update from the official Microsoft site, some utilities of this type flatly refuse to work. The situation is such that the "dozen" blocks not only the installation of applications of this kind, considering them as such that can harm the system, but also does not launch even some portable versions of programs. So here you have to do a good job on the Internet to find something that works more or less normally.
If your computer is running slowly, then one of the reasons is the slow speed of the HDD (hard disk drive). Today we will consider two free small, but useful programs to test the hard disk of a computer.
CrystalDiskMark- a program designed to test the performance of computer hard drives.
CrystalDiskInfo- a program that allows you to perform diagnostics HDD disks/ SSD, USB-HDD drives.
Both programs are small in size and do not require installation ( Portable- portable software). They are very easy to use.
CrystalDiskMark
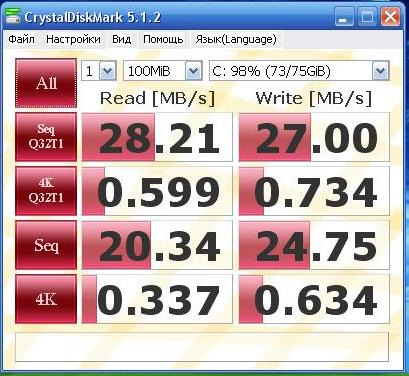
To carry out the test in the program CrystalDiskMark you only need to select a hard disk (if you have several), the size of the test file (from 50 to 1000 MB) and the number of runs (from 1 to 9). After a short test, the average speed of reading and writing to the hard disk of the main file, 512 and 4 KB blocks, will be displayed.
CrystalDiskMark- a useful application that makes it possible to carry out a comparative analysis of the performance characteristics of computer hard drives and drives.
CrystalDiskMark measures the speed of reading and writing data. Upon completion of testing, it visually displays the average indicators and saves them for further analysis.
CrystalDiskMark- a free program, there is a Russian-language localization, small in size, supports SSD drives.
After starting the program, a window will open in front of you, in which specify the disk you are going to test, the number of runs and the size of the test file.
After pressing the button All the full test will run.
Button "Seq Q32T1" you can run a test of random write / read (block size 512 KB)
Button "4K Q32T1"- Random write / read test (block size 4 KB, queue depth 32) for NCQ and AHCI.
Button "Seq"- Test sequential write / read (block size 1024 Kb).
Button "4K"- a similar test, only for 4 kilobyte blocks.
Below is an example of a window with the results of the check:
Here, the left column is the speed of reading information.
The right column is the recording speed.
CrystalDiskMark Is a free program that is designed to comparative analysis the speed of hard drives and other computer storage devices. Its performance affects the speed of the computer as a whole.
The program works in all versions of Windows operating systems (from 9x to Vista / 7 32 and 64).
CrystalDiskMark also allows the ability to change the theme, has a simple user interface with Russian language support.
- Update: 03 -02-2016
- Version: 5.1.2
- System: Windows 7, Windows 8, Windows 8.1, Windows 10, Vista, Windows XP
- License: Free
- Size: 2.9 MB Portable (zip)
- Developer: hiyohiyo
CrystalDiskInfo
CrystalDiskInfo- a program that allows you to diagnose a hard drive for a PC, monitoring for HDD / SSD drives, USB-HDD drives. The CrystalDiskInfo program is very easy to use, after launching, information about the state of the hard disk or other drive that needs diagnostics appears. You can download the CrystalDiskInfo program in Russian at the bottom of the page.
- Update 03-02-2016
- Version: 6.7.5
- Windows 7, Windows 8, Windows 8.1, Windows 10, Vista, Windows XP
- Interface: Russian / English, etc.
- License: Free
- Size: 4.5 MB Portable (zip)
- Developer: hiyohiyo
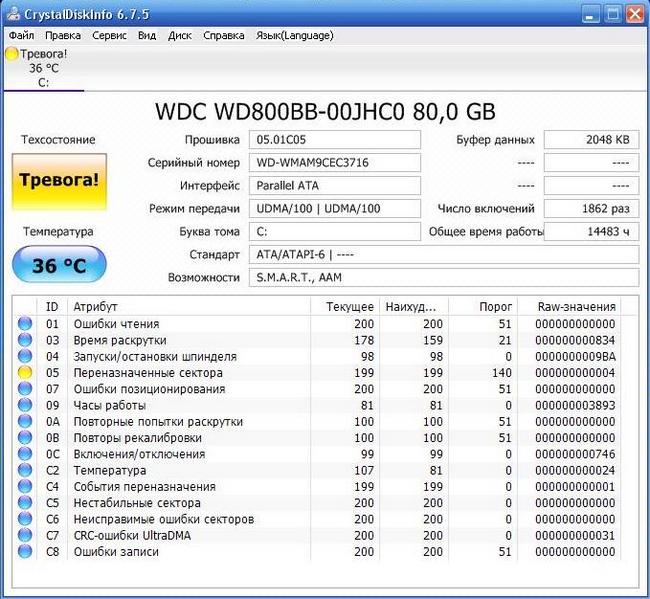
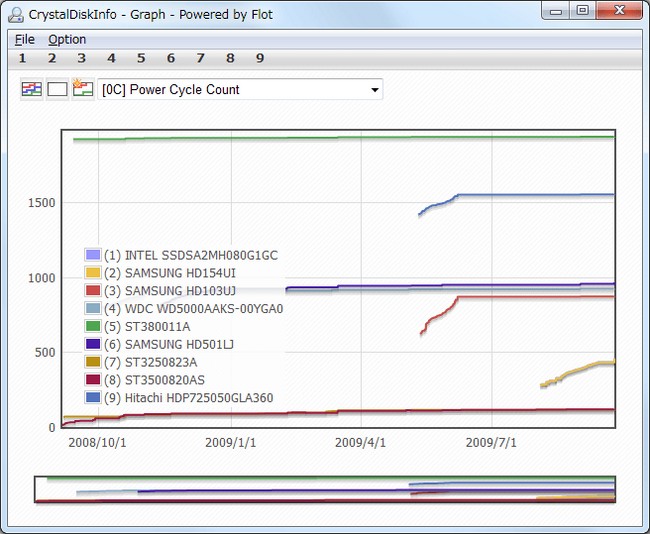
CrystalDiskInfo- detailed diagnostics, determining the parameters of a disk, external drives and plotting the characteristics of a disk or drive, the ability to use the function of comparing different graphs.
While using the utility, you can view any necessary information about the disk: model, volume, firmware version or serial number.
You can also find out the type of interface used, the mode for data transfer, the rotation speed. The program determines the size of the cache, the total operating time of the device, the number of starts.
After starting the program CrystalDiskInfo immediately displays the values of S.M.A.R.T., temperature, general state of the disk, including such values as "Wear", "Number of read errors", "Erasing errors", "Alarm!" other.
The above programs were developed by a programmer from Japan Noriyuki Miyazaki (nickname hiyohiyo).
Analogs of programs
You can also consider similar programs for testing, analysis, HDD treatment:
HDDSpeed - A free utility whose main task is to determine the speed of the hard drive. Displays information about physical characteristics and speed parameters. Can diagnose hardware problems and identify malfunctions that could lead to failure.
HDDScan - Free software, which carries out testing and diagnostics of hard drives. Checks them for errors, adjusts their work and displays useful information.
Victoria - Free software, with which you can test the hard drive and check its general condition. It has everything necessary tools to analyze performance and find errors.
P.S. HDD- one of the important components of any computer, laptop. It stores very important information, which is very difficult and sometimes impossible to recover in the event of a disk failure. Now hard drives are replacing solid-state drives (SSD) - they are faster, but more expensive and not yet so big size... After purchasing a new hard disk, you need to test it with the above or similar programs.
Popularity: 12 447 views
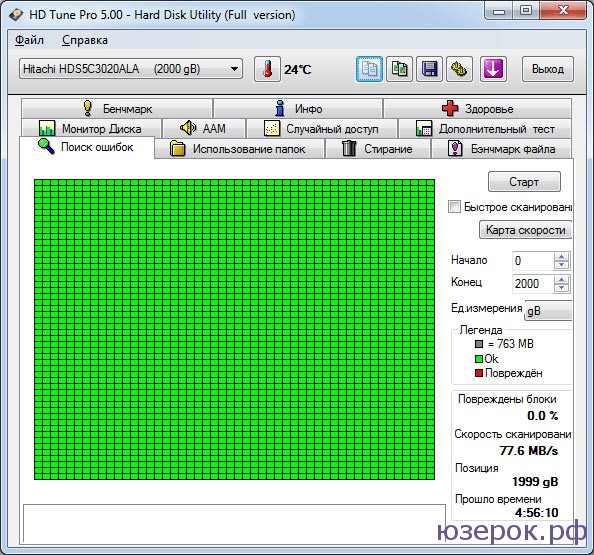
It is extremely important to monitor the "health" of hard drives (HDD) and immediately respond to the appearance of bad sectors and various errors... Failure to follow this recommendation could result in the loss of valuable data. You can check the status of the hard disk using the HD Tune PRO program (free download in Russian).
As a rule, the most common problem that happens to hard drives is the appearance of bad sectors. Now we will look at the process of finding such sectors using HD Tune PRO.
Step 1. Select the disk you want to check from the drop-down list.
In a specific case, a 2 TB Hitachi hard drive will be checked
Step 2. Go to the Error Search tab and press the Start button.
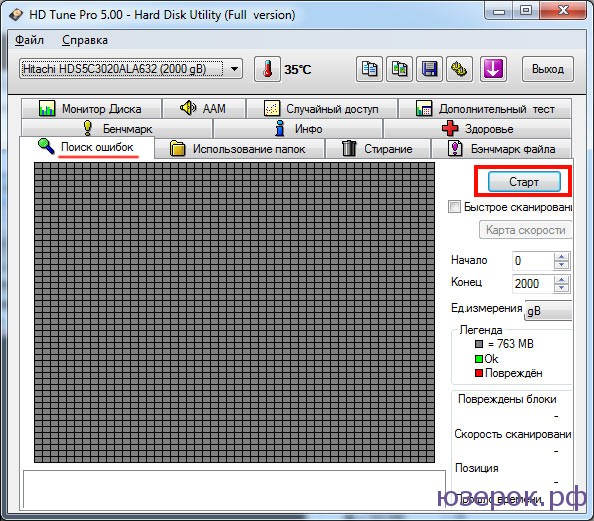
We press the "Start" button
As a matter of fact, now it remains to wait for the results of the check. It should be borne in mind that the larger the disk size, the longer the check will take. In this particular case, it took 4 hours 56 minutes to fully check the disk.
Additionally, go to the Health tab and make sure that the status of the main HDD parameters is marked as OK.
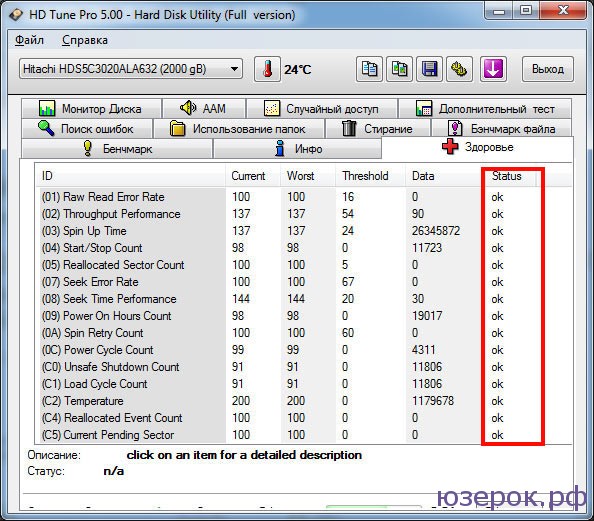
On the "Health" tab, you can check the status of the main parameters of the hard disk
As an example, let's see how the result of searching for errors on a disk with bad sectors looks like.
If bad sectors are found on the disk, then by 99% you can be sure that their number will increase over time. For this reason, you must immediately copy the data to another medium.
HDDScan
The program is designed to check hard drives and SSDs for bad sectors, view S.M.A.R.T. attributes, changes special settings, such as: power management, start / stop of the spindle, adjustment of the acoustic mode, etc. The output of the drive temperature value to the taskbar is provided.
Capabilities and requirements
Supported drive types:- HDD with ATA / SATA interface.
- SCSI HDD.
- HDD with USB interface (see Appendix A).
- HDD with FireWire or IEEE 1394 interface (see Appendix A).
- RAID arrays with ATA / SATA / SCSI interface (tests only).
- Flash drives with USB interface (tests only).
- SSD with ATA / SATA interface.
- Linear verification test.
- Test in linear reading mode.
- Linear recording test.
- Butterfly Reading Test (Artificial Random Reading Test)
- Reading and Analyzing S.M.A.R.T. parameters from disks with ATA / SATA / USB / FireWire interface.
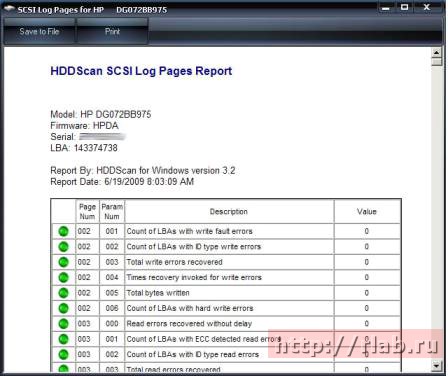
- Reading and analyzing log tables from SCSI disks.
- Launching S.M.A.R.T. tests on ATA / SATA / USB / FireWire drives.
- Temperature monitor on ATA / SATA / USB / FireWire / SCSI drives.
- Read and analyze identification information from ATA / SATA / USB / FireWire / SCSI drives.
- Changing AAM, APM, PM parameters on ATA / SATA / USB / FireWire drives.
- View information about defects on a SCSI drive.
- Spindle start / stop on ATA / SATA / USB / FireWire / SCSI drives.
- Saving reports in MHT format.
- Printing reports.
- Support for "skins".
- Command line support.
- SSD support (NEW).
- Intel-compatible computer with a processor from 1.5 GHz and memory from 256 MB.
- Operating system: Windows 2000 SP4, Windows XP SP2 or SP3, Windows Vista, Windows 7, Windows Server 2003, Windows Server 2008.
- The program should not be launched from a read-only drive.
User interface
The main view of the program at startup
Rice. 1 Main view of the program
Main window controls:
- Select Drive - a drop-down list that contains all supported drives in the system. The drive model and serial number are displayed. There is an icon next to it that determines the type of the drive.
- S.M.A.R.T. button - allows you to get a report on the state of the drive based on the attributes of S.M.A.R.T.
- New Task button (center) - clicking on this button brings up a menu with the main tasks for the program.
- Surface Tests menu item - by clicking on this item, a window with a choice of drive tests is called up (see Fig. 2).
- S.M.A.R.T. menu item - pressing this element is similar to pressing the S.M.A.R.T.
- S.M.A.R.T. menu item Offline tests - when this element is activated, the S.M.A.R.T. submenu is called. Short, Extended, Conveyance tests.
- Temperature Monitor menu item - by clicking on this item, the temperature monitoring task will be launched.
- Features menu item - when this item is activated, a submenu is called additional opportunities programs.
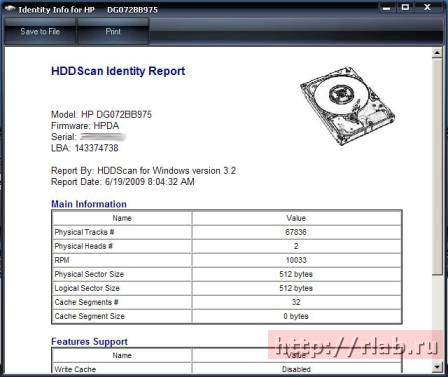
- Identity Info menu item - when you click on this item, the program will display a report on the drive's identification information.
- Menu item Skin Selection - when you click on this item, the program will open a window for selecting "skins".
- Build Command Line menu item - when you click on this item, the program will open a command line build window.
Test selection window
Rice. 2 Test window
![]()
Control elements:
- The Start LBA field is the starting logical sector number for testing.
- The End LBA field is the final logical sector number for testing.
- Block Size - block size in sectors for testing.
- The block of radio buttons Test - allows you to select the type of test: verification, reading, erasing, reading in Butterfly mode.
- Add Test button - adds a test to the task queue.
- Only one surface test can be run at a time. This is due to the fact that the author of the program has not yet managed to obtain stable high-quality results when running 2 or more tests simultaneously (on different drives).
- The Verify test may have a block size limit of 256, 16384, or 65536 sectors. This is due to the peculiarities of Windows.
- The Verify test may not work properly on USB / Flash drives.
- When testing in the Verify mode, the drive reads the data block into the internal buffer and checks their integrity; no data is transferred through the interface. The program measures the readiness time of the drive after performing this operation after each block and displays the results. Blocks are tested sequentially - from minimum to maximum.
- When testing in the Read mode, the drive reads data into the internal buffer, after which the data is transmitted via the interface and stored in the temporary buffer of the program. The program measures the total readiness time of the drive and data transfer after each block and displays the results. Blocks are tested sequentially - from minimum to maximum.
- When testing in Erase mode, the program prepares a data block filled with a special pattern with a sector number and transfers the data to the drive, the drive writes the received block ( information in the block is irretrievably lost!). The program measures the total time of transmission and writing of a block and readiness of the drive after each block and displays the results. Blocks are tested sequentially - from minimum to maximum.
- Testing in Butterfly Read mode is similar to testing in Read mode. The difference lies in the order in which the blocks are tested. Blocks are processed in pairs. The first block in the first pair will be Block 0. The second block in the first pair will be Block N, where N is the last block of the given section. The next pair will be Block 1, Block N-1, etc. Testing ends in the middle of the specified area. This test measures reading and positioning times.
Test management window
Rice. 3 Test manager
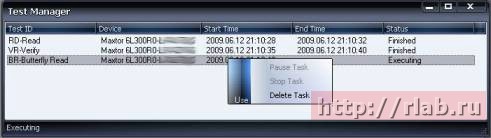
This window contains a queue of tests. This includes all tests that the program runs, as well as the temperature monitor. The manager allows you to remove tests from the queue. Some tasks can be paused or stopped.
Double-clicking on an entry in the queue brings up a window with information about the current task.
Rice. 4 Example of task information window
Test information window
The window contains information about the test, allows you to pause or stop the test, and also generates a report.
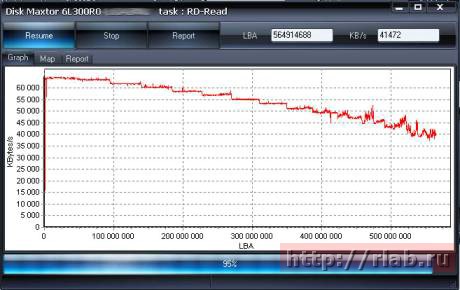
Graph Tab:
Contains information about the dependence of the testing speed on the block number, presented in the form of a graph
Rice. 5 Graph Tab
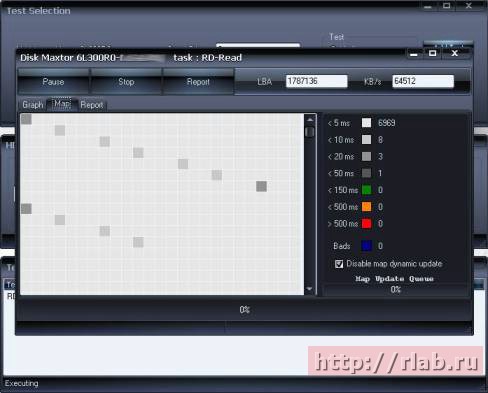
Map Tab:
Contains information about the dependence of the testing time on the block number, presented in the form of a map
Rice. 6 Map Tab
![]()
By default, dynamic drawing of the map is disabled, this is due to the fact that on weak machines drawing the map takes a lot of processor time and can affect the accuracy of tests. To reduce the impact of map rendering on testing accuracy, a special Map Update Queue buffer was introduced. The thread that tests the drive puts the tasks for drawing the map into this buffer. Another thread takes the tasks and draws the map. If the buffer is full, the drive test flow may not function properly and the test results will be less accurate. If you see the Map Update Queue buffer filling up too quickly, turn off dynamic rendering of the map. You can view the map by scrolling it with the mouse, as the results are still saved on the map, regardless of dynamic rendering.
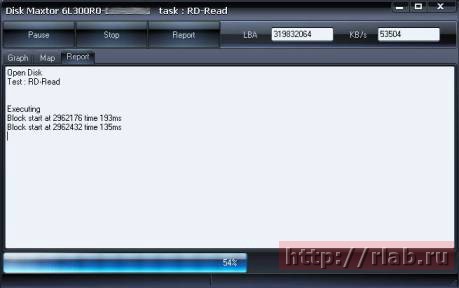
Report tab:
Contains information about the test and all blocks whose test time took more than 50 ms.
Rice. 7 Report Tab
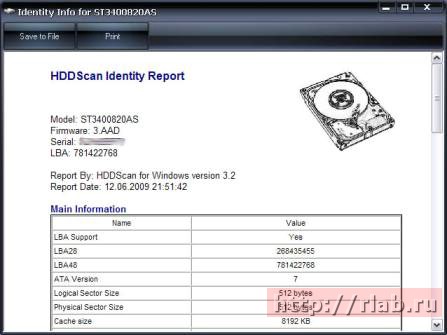
Identification information
The report contains information about the main physical and logical parameters of the drive.
The report can be printed and saved to an MHT file.
Rice. 8 An example of an identification information window for an ATA / SATA drive
Rice. 9 Example of a window for identification information for a SCSI drive
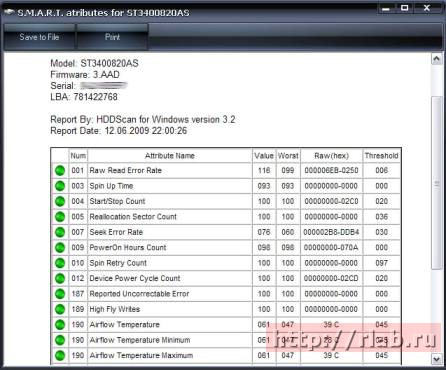
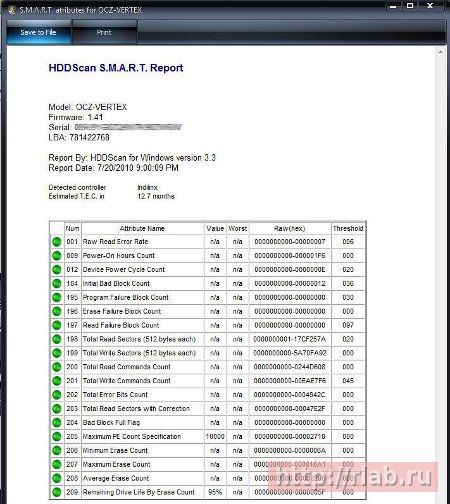
S.M.A.R.T. report
The report contains information about the performance and health of the drive in the form of attributes. If, according to the program, the attribute is normal, then next to it is a green icon. Attributes that should be paid attention to are indicated in yellow, as a rule, they indicate some kind of malfunction of the drive. Attributes that are outside the normal range are shown in red.
Reports can be printed or saved to an MHT file.
Rice. 10 Sample S.M.A.R.T. report for ATA / SATA disk
Rice. 11 Sample S.M.A.R.T. report for SCSI disk
Rice. 12 Sample S.M.A.R.T. report for SSD disk
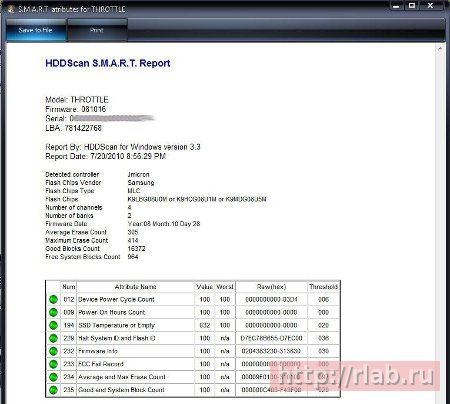
Rice. 13 Sample S.M.A.R.T. report for SSD disk
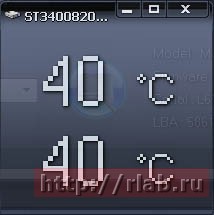
Temperature monitor
Allows you to evaluate the temperature of the drive. Information is displayed in the taskbar, as well as in a special window for information about the test. Rice. 14 contains readings for two drives.
Rice. 14 Temperature monitor in taskbar
![]()
For ATA / SATA / USB / FireWire drives, the information window contains 2 values. The second value is displayed in the taskbar.
The first value is taken from the Airflow Temperature attribute, the second value is taken from the HDA Temperature attribute.
Rice. 15 Temperature monitor for ATA / SATA disk
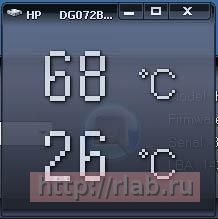
For SCSI drives, the information window contains 2 values. The second value is displayed in the taskbar.
The first value contains the maximum allowable temperature for the drive, the second shows the current temperature.
Rice. 16 Temperature monitor for SCSI disk
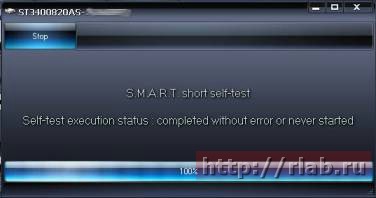
S.M.A.R.T. tests
The program allows you to run three types of S.M.A.R.T. tests:
- Short test - usually lasts 1-2 minutes. Checks the main nodes of the drive, and also scans a small area of the drive surface and sectors in the Pending-List (sectors that may contain read errors). This test is recommended for quick assessment of the drive's health.
- Extended test - usually lasts from 0.5 to 2 hours. Checks the main components of the drive, and also scans the entire surface of the drive.
- Conveyance test - usually lasts a few minutes. Checks the nodes and logs of the drive that may indicate improper storage or shipping of the drive.
Rice. 17 S.M.A.R.T.information window test
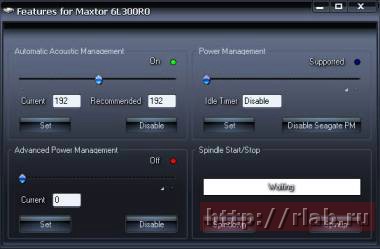
Additional features
For ATA / SATA / USB / FireWire drives, the program allows you to change some parameters.
- AAM - this function controls drive noise. Enabling this function allows you to reduce drive noise due to smoother head positioning. At the same time, the drive loses a little in performance during random access.
- APM - the function allows you to save power to the drive by temporarily reducing the rotation speed (or complete stop) of the drive spindle during idle time.
- PM - the function allows you to set the spindle stop timer to certain time... When this time is reached, the spindle will be stopped, provided that the drive is in idle mode. Any program accessing the drive forces the spindle to unwind and resets the timer to zero.
- Disable Seagate PM - a special command that can turn off the spindle stop timer on some Seagates, added at the request of users, I could not find on which drives it works.
- The program also allows you to stop or start the drive spindle forcibly. Any program accessing the drive will force the spindle to unwind.
Rice. 18 Information window of additional features of ATA / SATA drive
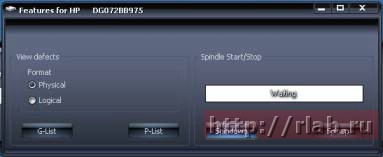
For SCSI drives, the program allows viewing defect lists and starting / stopping the spindle.
Rice. 19 Information window of additional features of the SCSI drive
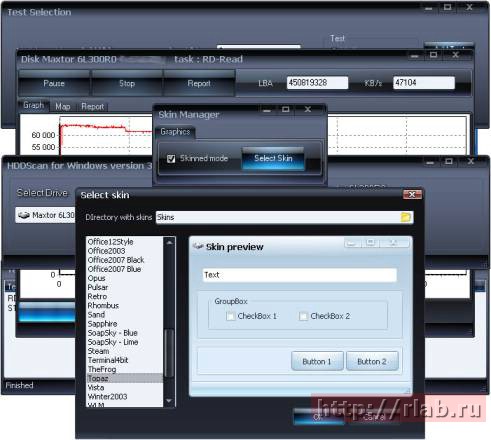
Using "skins"
The program uses the AlphaSkins component, which allows the user to change appearance applications.
You can download the available "skins" here - http://www.alphaskins.com/asdwnld.php
There you can also learn how to create your own "skins".
Create a subdirectory Skins in the folder where the HDDScan.exe file is located, download the "skins" you like to your computer and copy them to the Skins folder. Bring up the Skin Selection dialog. Press the Select Skin button and choose the "skin" you like. The program will create a main.ini file, in which the parameters of the current "skin" will be saved, if you delete the main.ini file, the program will use the built-in "skin". The Skinned mode checkbox allows you to enable or disable the use of "skins" (enabled by default).
Rice. 20 Window for managing "skins"
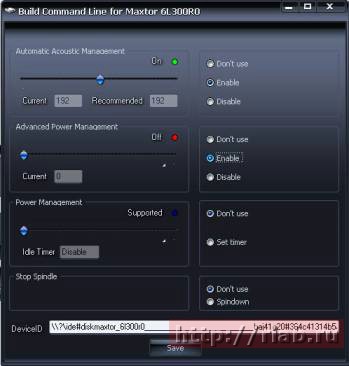
Using the command line
The program can build a command line to control some drive parameters and save this line to a bat or cmd file. When such a file is launched, the program is called in the background, changes the drive parameters in accordance with the specified ones, and closes automatically.
Rice. 21 Command line build window
Appendix A: USB / FireWire Drives
If the drive is supported by the program, then tests are available for it, S.M.A.R.T. functions and additional features.
If the drive is not supported by the program, then only tests are available for it.
USB / FireWire drives supported by the program:
| Storage device | Controller IC |
| StarTeck IDECase35U2 | Cypress CY7C68001 |
| WD Passpopt | Initio INIC-1610L |
| Iomega PB-10391 | Unknown |
| Seagate ST9000U2 (PN: 9W3638-556) | Cypress CY7C68300B |
| Seagate External Drive (PN: 9W286D) | Cypress CY7C68300B |
| Seagate FreeAgentPro | Oxford |
| CASE SWEXX ST010 | Cypress AT2LP RC7 |
| Vantec CB-ISATAU2 (adapter) | JMicron JM20337 |
| Beyond Micro Mobile Disk 3.5 "120GB | Prolific PL3507 (USB only) |
| Maxtor Personal Storage 3100 | Prolific PL2507 |
| In-System ISD300A | |
| SunPlus SPIF215A | |
| Toshiba USB Mini Hard Drive | Unknown |
| USB Teac HD-15 PUK-B-S | Unknown |
| Transcend StoreJet 35 Ultra (TS1TSJ35U-EU) | Unknown |
| AGEStar FUBCP | JMicron JM20337 |
| USB Teac HD-15 PUK-B-S | Unknown |
| Prolific 2571 |
USB / FireWire drives that the program may support:
| Storage device | Controller IC |
| AGEStar IUB3A | Cypress |
| AGEStar ICB3RA | Cypress |
| AGEStar IUB3A4 | Cypress |
| AGEStar IUB5A | Cypress |
| AGEStar IUB5P | Cypress |
| AGEStar IUB5S | Cypress |
| AGEStar NUB3AR | Cypress |
| AGEStar IBP2A2 | Cypress |
| AGEStar SCB3AH | JMicron JM2033x |
| AGEStar SCB3AHR | JMicron JM2033x |
| AGEStar CCB3A | JMicron JM2033x |
| AGEStar CCB3AT | JMicron JM2033x |
| AGEStar IUB2A3 | JMicron JM2033x |
| AGEStar SCBP | JMicron JM2033x |
| AGEStar FUBCP | JMicron JM2033x |
| Noontec SU25 | Prolific PL2507 |
| Transcend TS80GHDC2 | Prolific PL2507 |
| Transcend TS40GHDC2 | Prolific PL2507 |
| I-O Data HDP-U series | Unknown |
| I-O Data HDC-U series | Unknown |
| Enermax Vanguard EB206U-B | Unknown |
| Thermaltake Max4 A2295 | Unknown |
| Spire GigaPod SP222 | Unknown |
| Cooler Master - RX-3SB | Unknown |
| MegaDrive200 | Unknown |
| RaidSonic Icy Box IB-250U | Unknown |
| Logitech USB | Unknown |
USB / FireWire drives not supported by the program:
| Storage device | Controller IC |
| Matrix | Genesis Logic GL811E |
| Pine | Genesis Logic GL811E |
| Iomega LDHD250-U | Cypress CY7C68300A |
| Iomega | Prolific PL-2507 (modified firmware) |
| Iomega | |
| Maxtor Personal Storage 3200 | Prolific PL-3507 (modified firmware) |
| Maxtor One-Touch | Cypress CY7C68013 |
| Seagate External Drive (PN-9W2063) | Cypress CY7C68013 |
| Seagate Pocket HDD | Unknown |
| SympleTech SympleDrive 9000-40479-002 | CY7C68300A |
| Myson Century CS8818 | |
| Myson Century CS8813 |
Appendix B: SSD Drives
Support for a particular drive largely depends on the controller installed on it.
SSD drives supported by the program:
SSD drives that the program may support:
| Support: |
 Odnoklassniki: Registration and profile creation
 E is. E (functions E). Expressions in terms of trigonometric functions
 Social networks of Russia Now in social networks