What needs to be installed after installing windows 8.1. Check if the update is installed. What you need to know.
The developers of Windows 8.1 have tried to make it as simple, friendly and convenient as possible. And they did it. In this article, I will show you how to install Windows 8.1 on a computer or laptop, and you will understand how easy and simple it is.
In fact, the installation of this operating system differs from other, earlier versions. Everything here is created for an intermediate user, and now you don't need to call a specialist to reinstall Windows.
Before installing Windows 8.1, you need to prepare. To do this, make sure of the following:
- You have at your disposal a disk with Windows1, which is healthy and working, or a bootable USB flash drive.
- There are no important documents on the C drive (the one where Windows is usually installed). They need to be re-saved to another disk or to a USB flash drive.
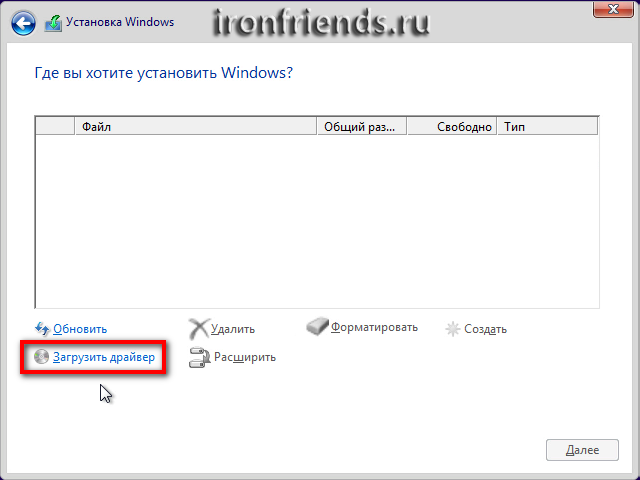
- You should have drivers for all devices at your disposal. If you do not have them, then do it before reinstalling.
- Make sure you have setup files all the programs you need.
Installing Windows 8.1
Operating room installation Windows systems 8.1 is divided into three traditional stages:
- BIOS setup for booting from media with a Windows distribution kit;
- start of installation;
- completion of the installation.
BIOS setup
BIOS is a firmware that is written into microcircuits motherboard... It controls the basic parameters of the computer.
Before installing Windows 8.1, you need to configure the BIOS. Depending on the version, the settings will differ, so I will not talk in detail, I will limit myself only to what should be done so that the computer starts to boot not from the hard disk, but from a CD or flash drive, that is, from the media on which it is recorded Windows distribution kit.
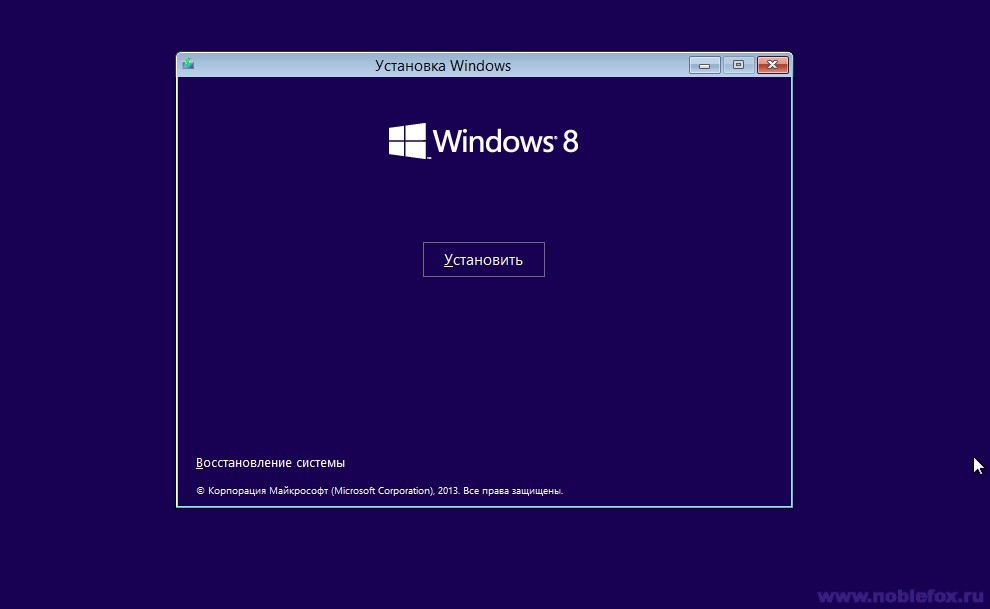
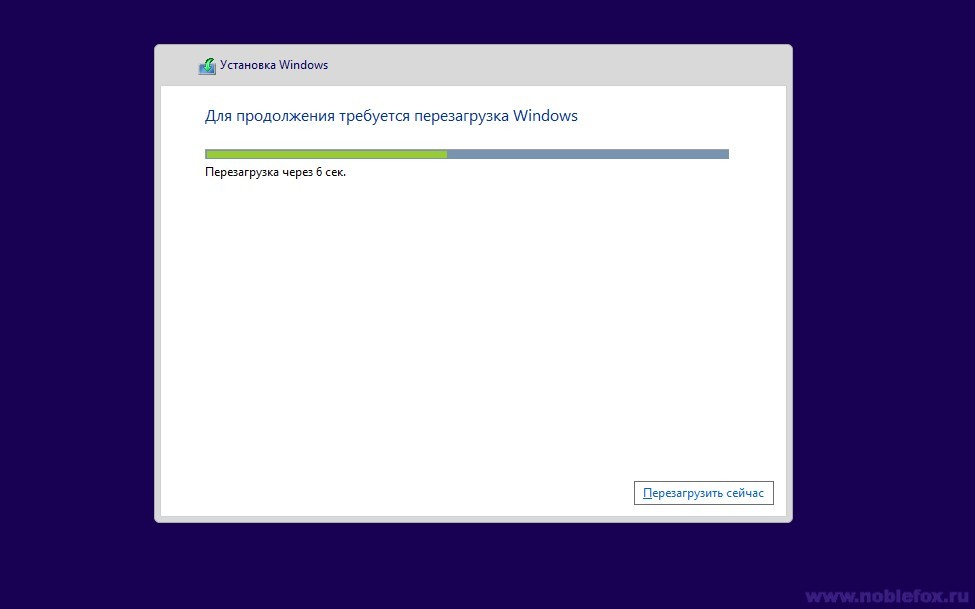
Then click the "Install" button.
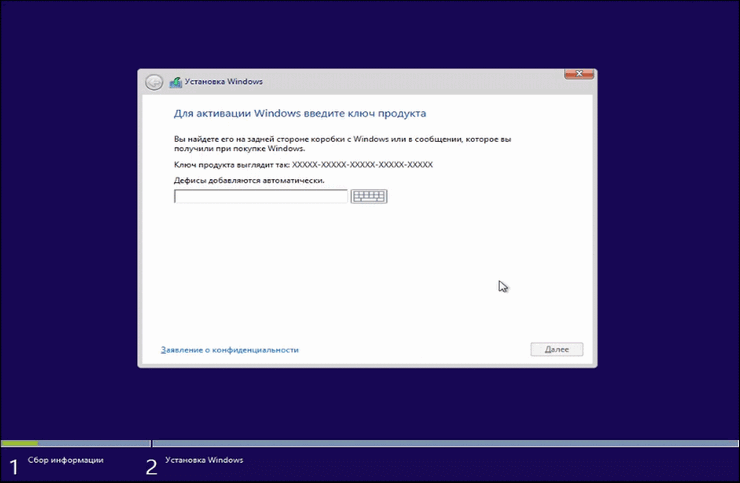
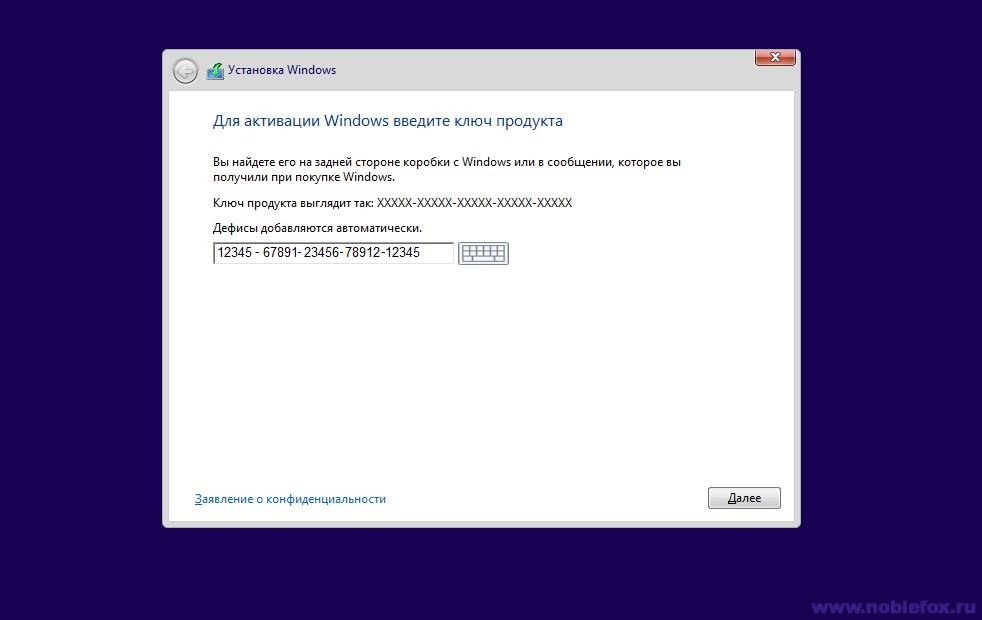
Then enter the product activation key (in some Windows assemblies this stage may not exist) and click the "Next" button.
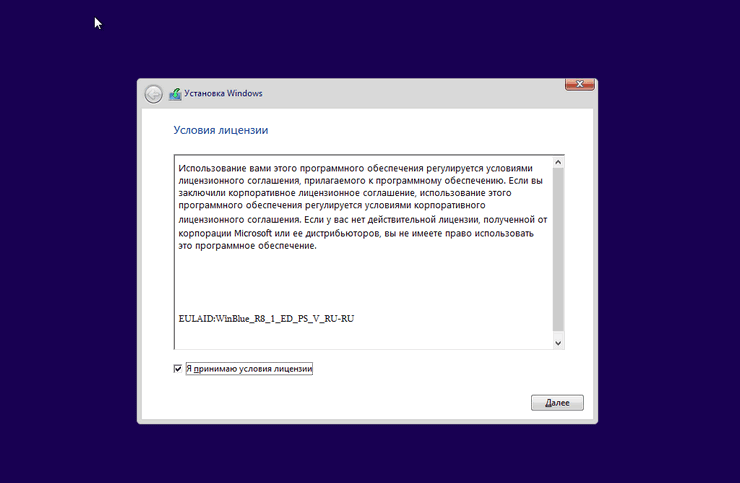
Agree with the license and click Next.
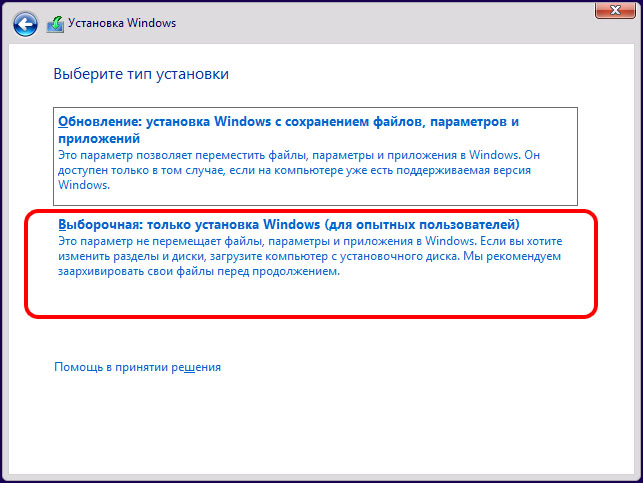
You will now be prompted to upgrade your existing Windows or install from scratch. Here you need to choose the second, that is, a clean install. To do this, click "Custom: Windows Installation Only".
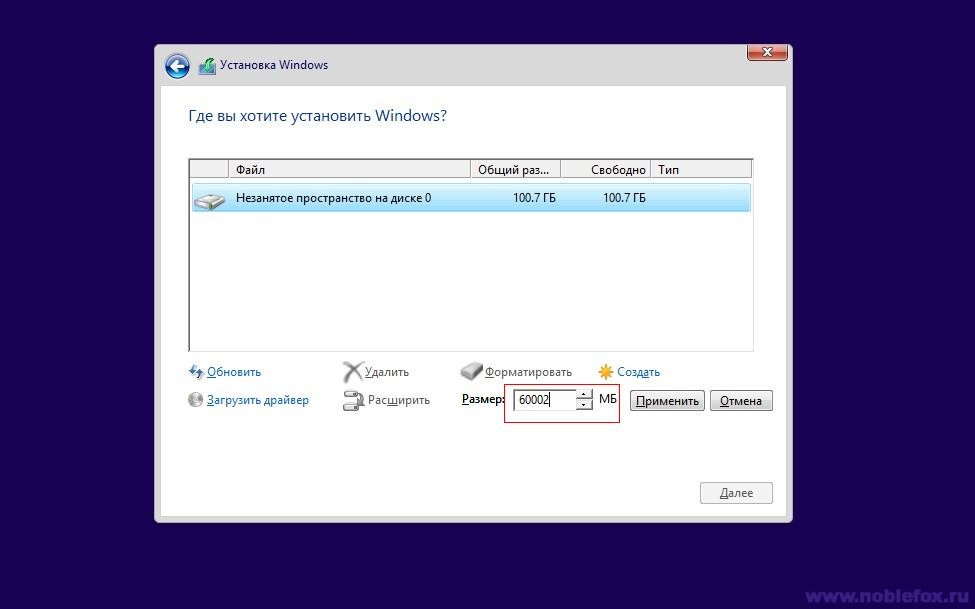
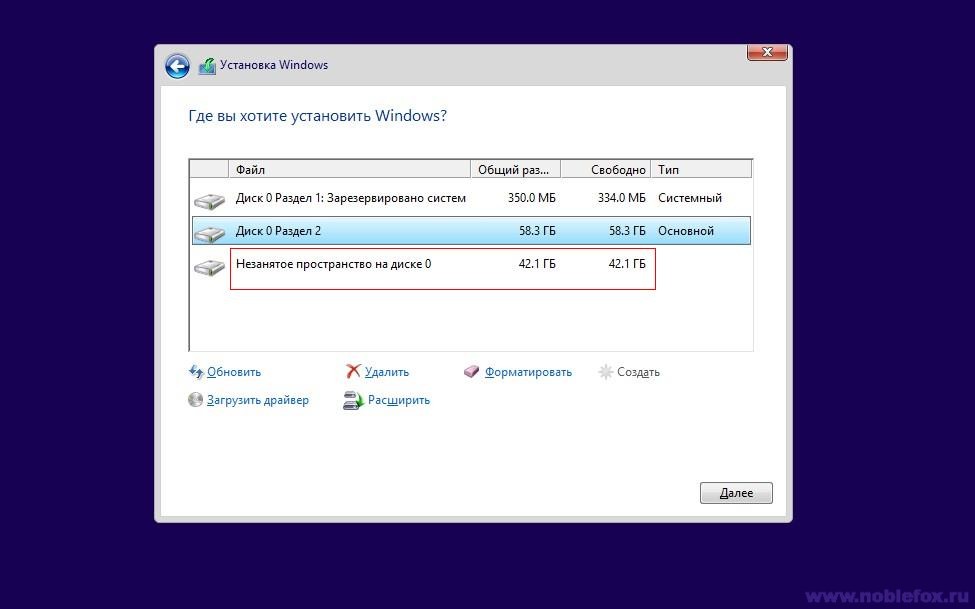
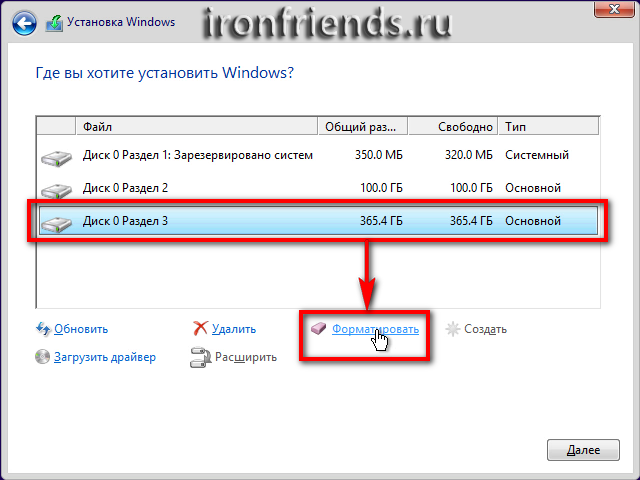
Finally, before installing Windows 8.1, you need to select the partition to install on. The utility for working with the hard disk allows you to operate the device: you can create and delete partitions of the required size. When the partition for installation is created, click "Format", and then click "Next".
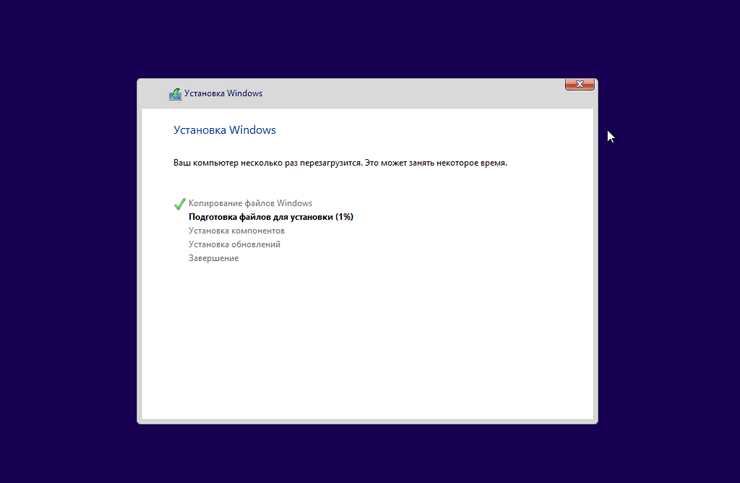
Now the Windows installation process is taking place. This may take some time. On the screen at this moment you will see the progress of the process.
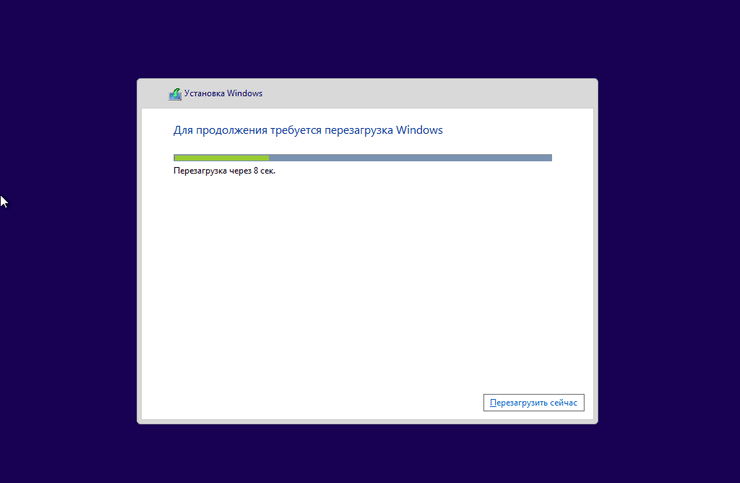
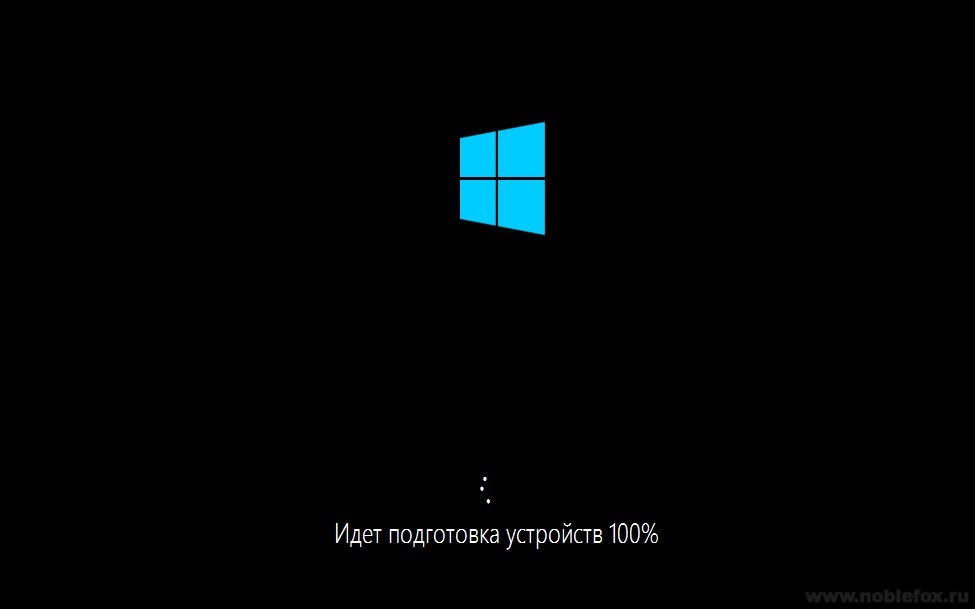
When the installation is complete, the computer will restart and begin preparing for the first login. Perhaps there will be several reboots.
Completing the installation
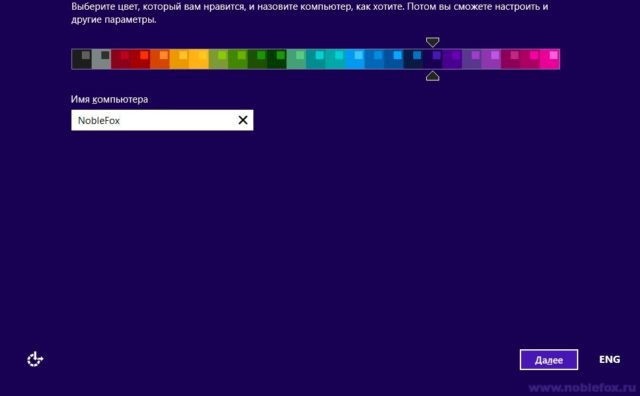
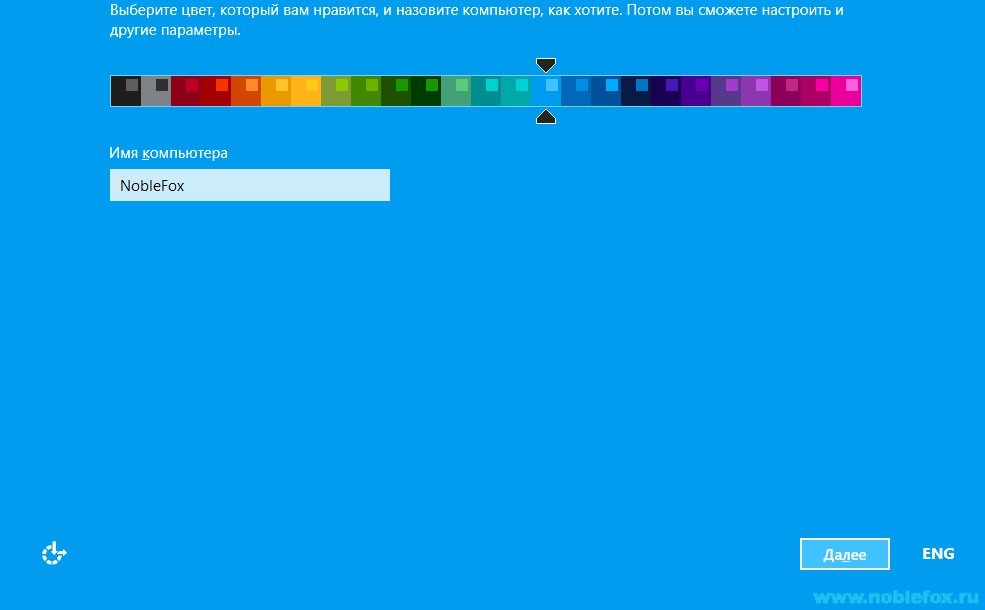
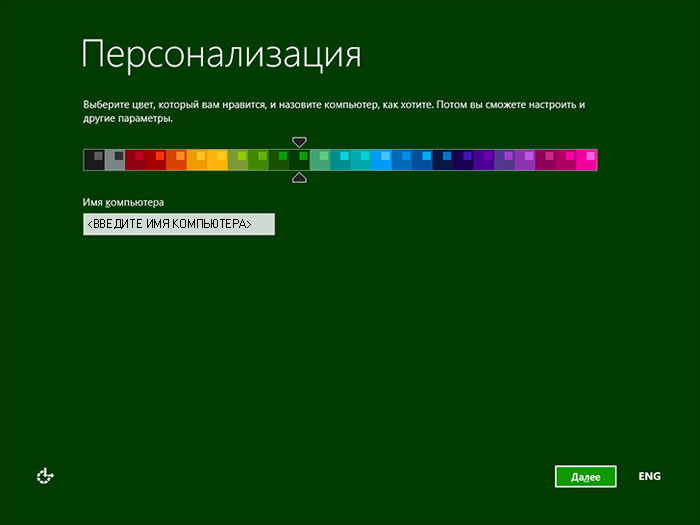
After Windows 8.1 has been successfully installed and the computer has successfully rebooted, the setup phase begins. First you need to choose an interface color and give your computer a name. If necessary, these parameters can then be changed.
After that, if your computer has wifi adapter, a list of available networks will be offered, and by entering the password, you will be able to connect to the Internet. If you do not have wi-fi, then you will not see such a message.
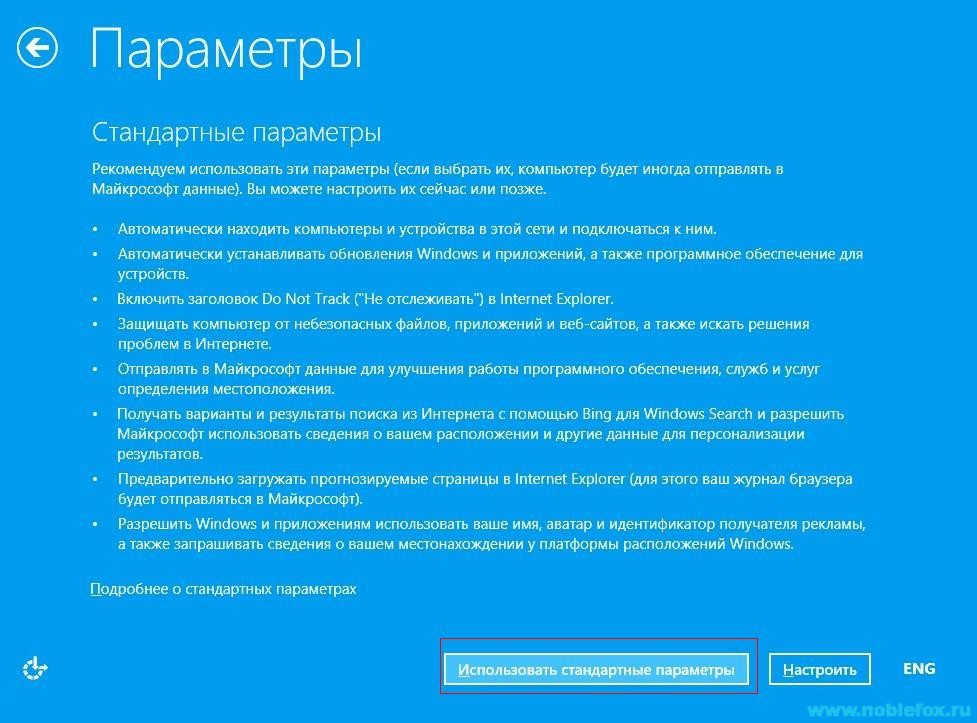
Then you need to choose whether you will use the computer with standard default settings (recommended for beginners) or want to make your own settings. If you have chosen the second option at this stage of the Windows 8.1 installation, then click the "Configure" button.
![]()
The Windows 8.1 operating system can be installed in three ways: by updating the Windows 8 operating system installed on the computer to Windows versions 8.1 using the web installer, or new installation operating system to the computer.
After the release of the version of the Windows 8.1 operating system, every user of the Windows 8 operating system can upgrade it to new version... There are some exceptions to this rule, when in some cases it will not be possible to update the system according to Microsoft requirements. You can read more about this on the Microsoft website.
When upgrading from Windows 8 to Windows 8.1, you will need to download the update from the Windows Store to your computer and then start the operating system installation process.
You can install Windows via the web installer. Microsoft will verify your product key, and then you can download the system image to your computer. Then you can install the system or save the system image to your computer. In the future, this image can be recorded on DVD disc or create a bootable USB flash drive.
For a clean install on your computer, you will need to install the system from a DVD or using bootable flash drive.
First, you will need to burn an image from Windows 8.1 to a DVD disc or create a bootable USB flash drive for this, for example, using programs that you can read about on my website in the "Programs" section. Then you should set the priority for booting from the corresponding media in the BIOS, and then start the Windows installation process.
Installing Windows 8.1 is almost the same as installing the Windows 8 operating system on a computer.
Installing Windows 8.1 on a computer
After downloading, the installation of Windows 8.1 on your computer begins.
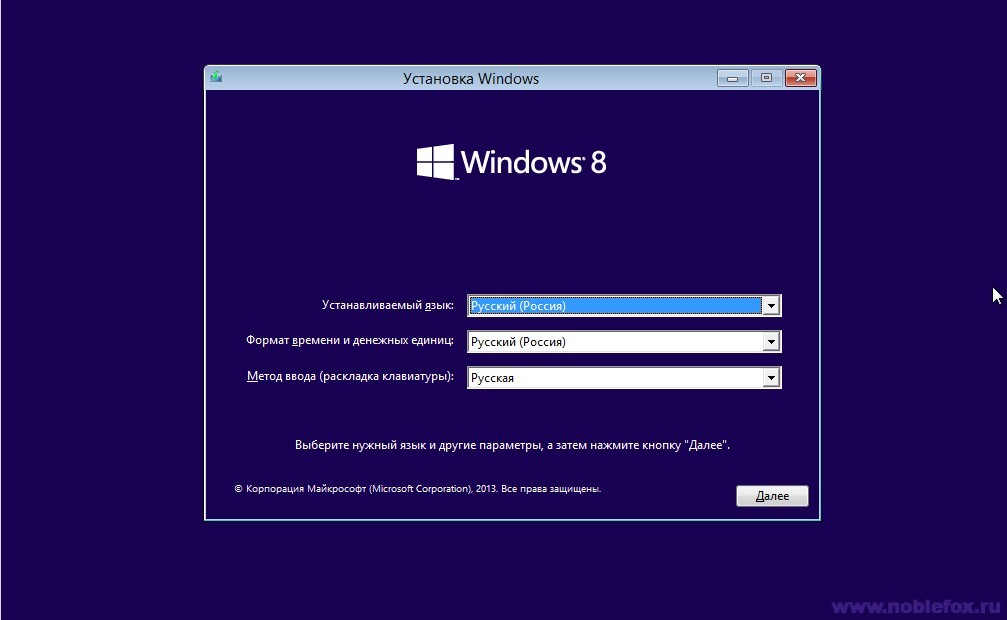
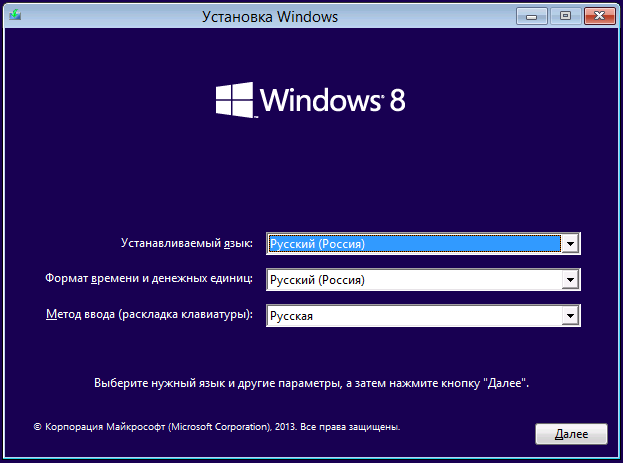
The "Windows Setup" window appears, in which you will need to select the language to install, the time and currency format and the input method (keyboard layout). Since the operating system being installed on the computer already has Russian localization, the Russian language and other parameters were selected automatically.

In the next window, click on the "Install" button.

When installing the corporate version (VL) of the Windows 8.1 operating system on a computer, this window for entering the activation key will not appear. In this case, you will need to activate the system after installing it on the computer.
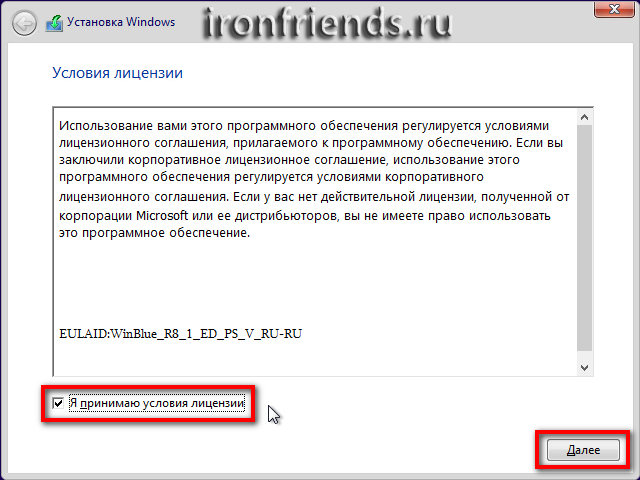
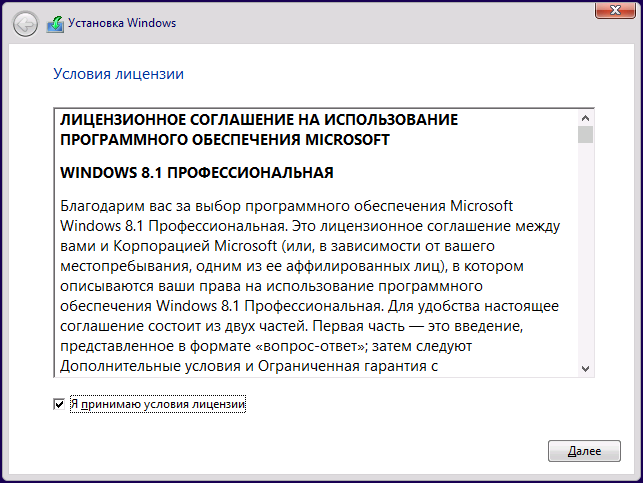
In the "License Terms" window, you will need to activate the item "I accept the license terms", and then click on the "Next" button.
In the next window "Select the type of installation" you should select and click on the item "Custom: installation only (for advanced users)".
The Update: Install Windows while preserving files, settings, and applications installation type installs Windows 8.1 over a supported operating system already installed on your computer.

In the "Where do you want to install Windows?" it will be possible to create new section on your local drive. To create a section, you will need to click on the "Create" link. It is not necessary to create a new section, so you can immediately click on the "Next" button.

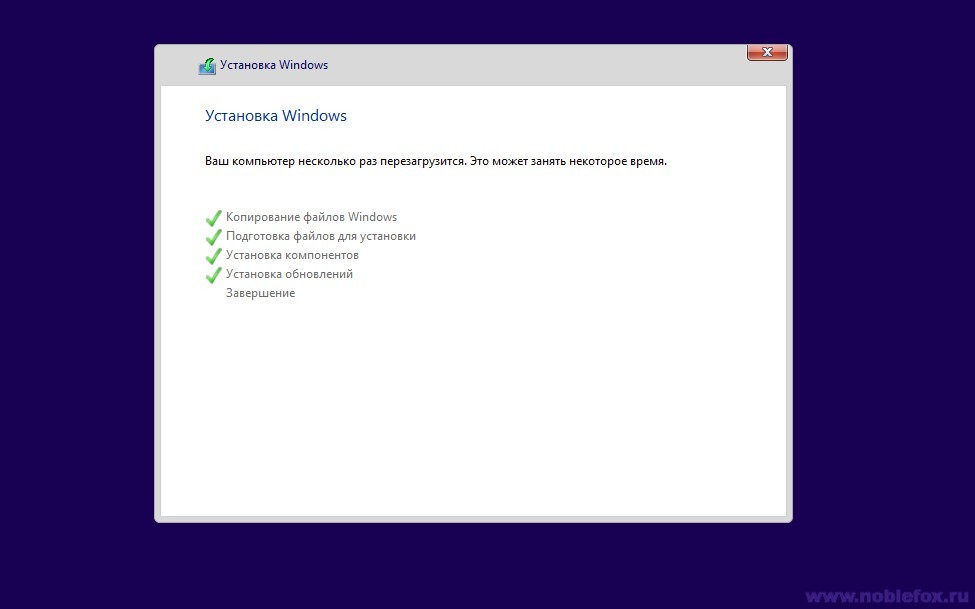
In the "Install Windows" window, the operations to install the Windows 8 operating system on the computer are sequentially performed. Files are copied, and then files are prepared for installation, components are installed, updates are installed, and the installation is completed.
After completing this phase of the operating system installation, a Windows restart is required. You don't have to wait for an automatic reboot, but for more quick launch during the reboot process, click on the "Restart now" button.
After restarting the computer, the configuration of the operating system continues. The system is being prepared.

In this window, you can choose the color that you like best, and you will also need to give a name to the computer. You can then adjust these and other parameters after installing Windows on your computer.
After installing Windows on your computer, until the system is activated, you will not be able to change the personalization settings.
After you enter any name in the "Computer name" field, click on the "Next" button.

The following windows are used to configure the parameters of the operating system.
The first "Options" window offers standard options for using windows... Microsoft recommends using these options. You can now configure the standard parameters or do it later, after the installation of the operating system on your computer is complete.
Click on the "Use standard parameters" button.

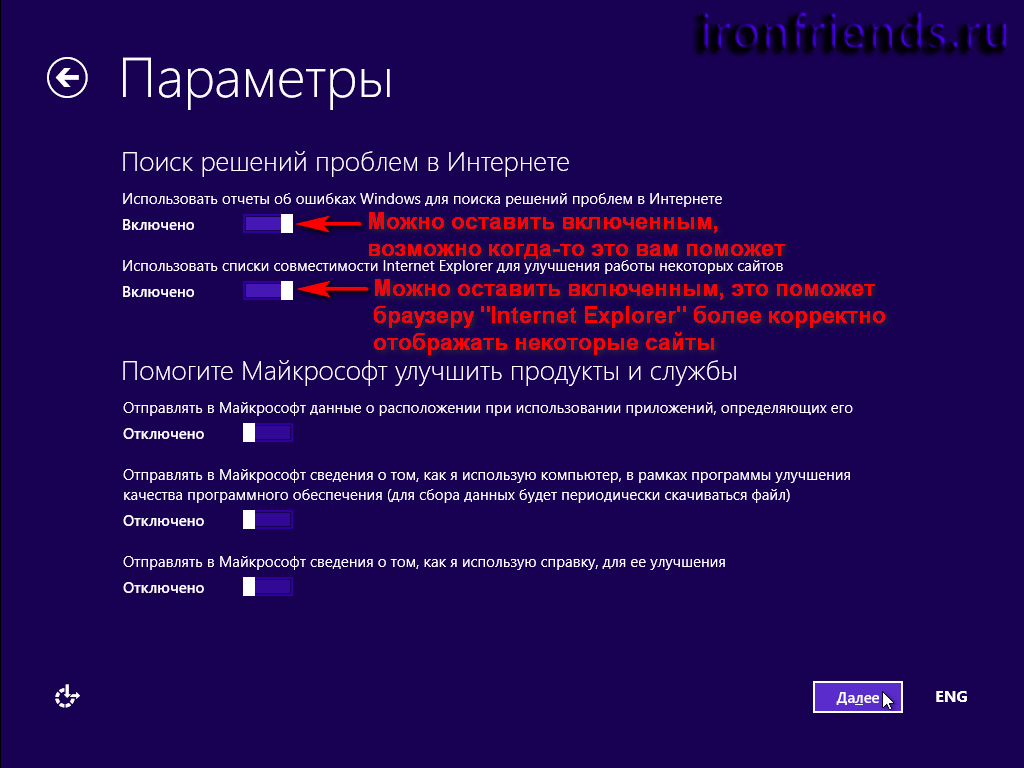
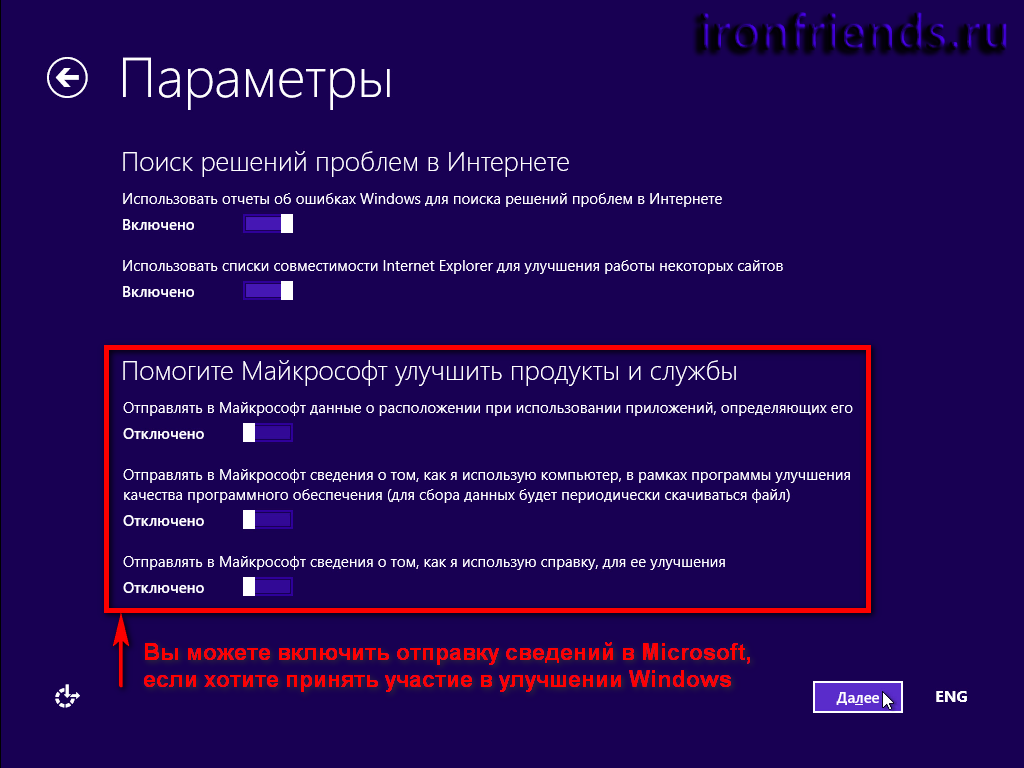
In the next window, you can make settings for the "Update your computer and applications" and "Protect your computer and privacy" settings. If you are satisfied with the default system settings, then you will need to click on the "Next" button.

In the next settings window for "Find solutions to problems online" and "Help Microsoft improve products and services," you can accept the default settings, and then click Next.

In the Send Data to Microsoft and Other Services window, you configure settings for how you interact with the user and various Microsoft services. After configuring these parameters, click on the "Next" button.
This completes the parameter setting. After the installation of the operating system on the computer is complete, you can change these parameters in the future, if you need to.
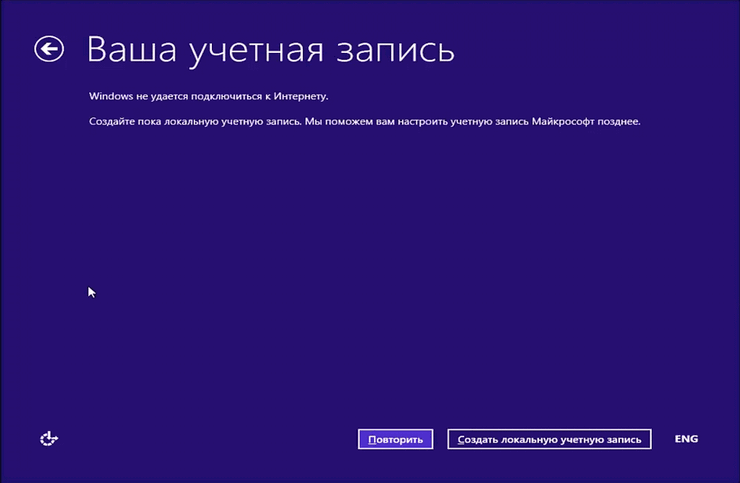
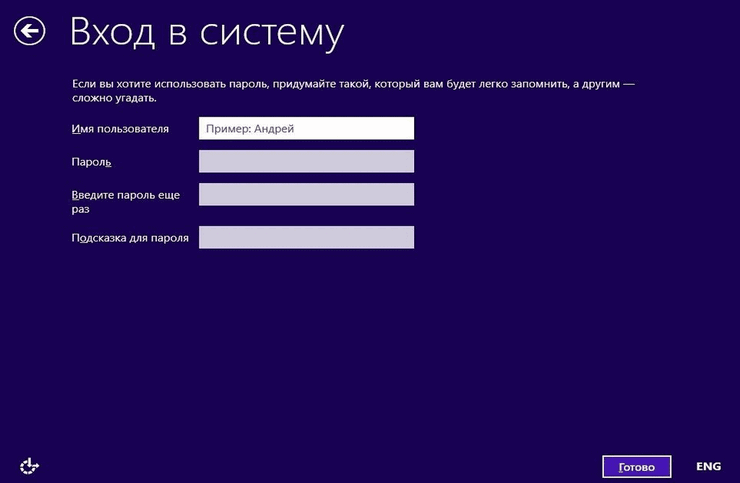
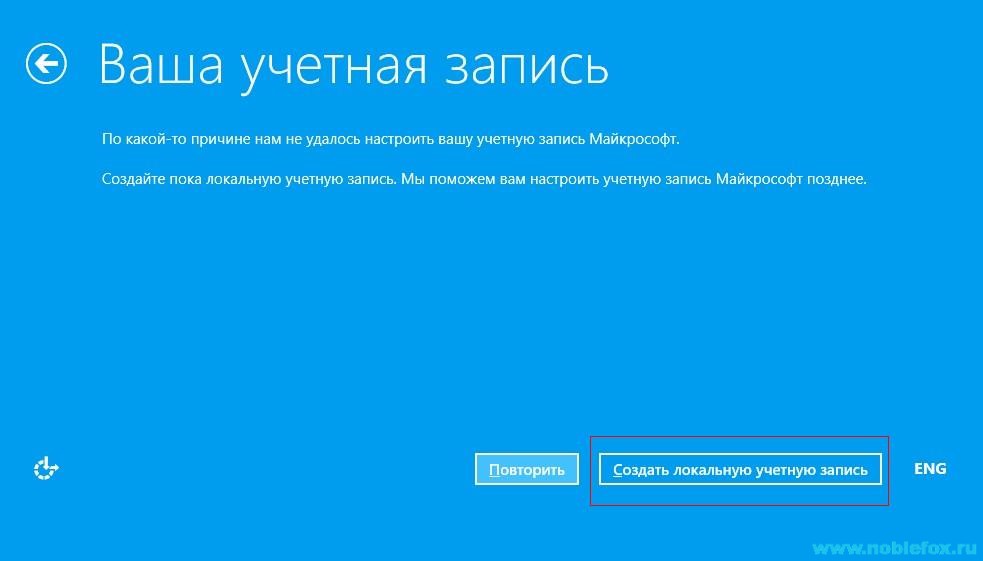
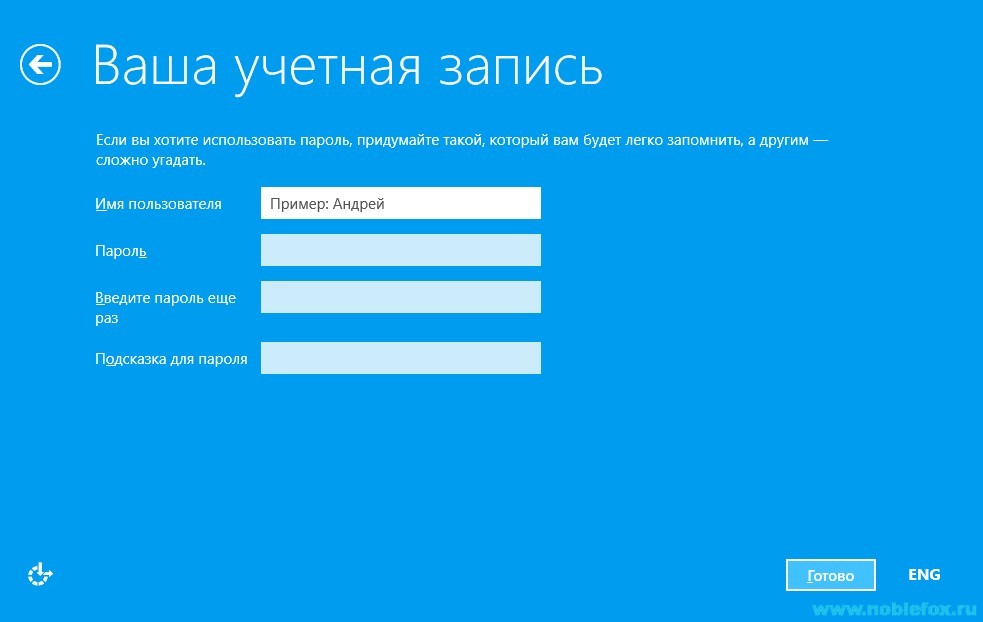
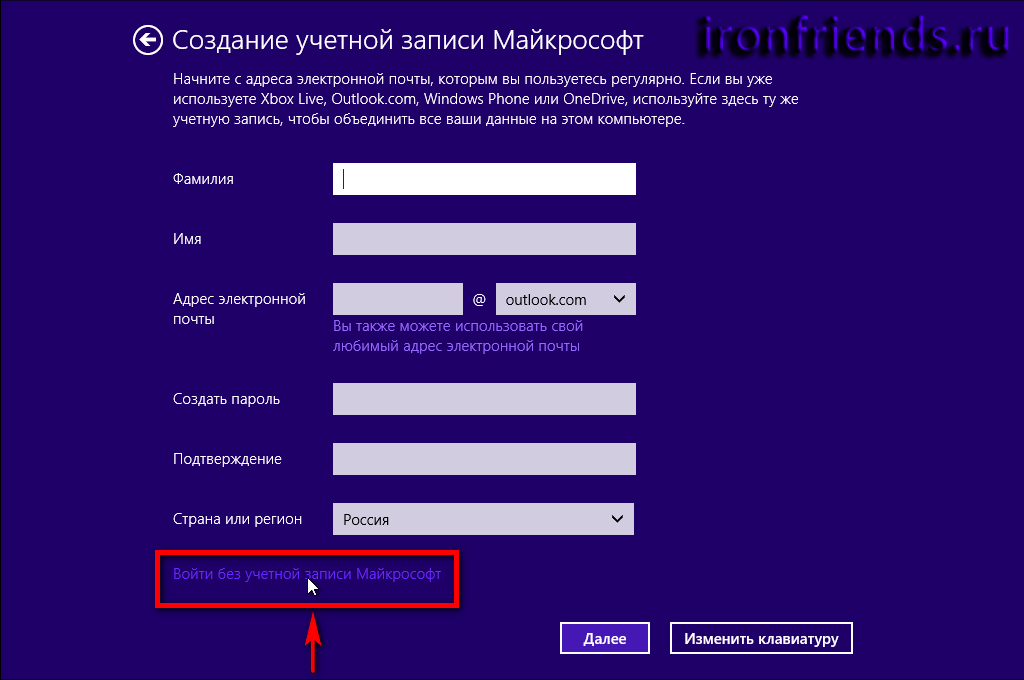
The Windows operating system checks the internet connection. Depending on the result, different windows will open in which you will need to either create a local account or enter your data. account microsoft.
If there is no Internet connection, a message will appear in the "Your Account" window that the Windows operating system could not connect to the Internet.
Therefore, you will be prompted to create a local account for now. You can set up your Microsoft account later. In this window, you will need to click on the "Create a local account" button.
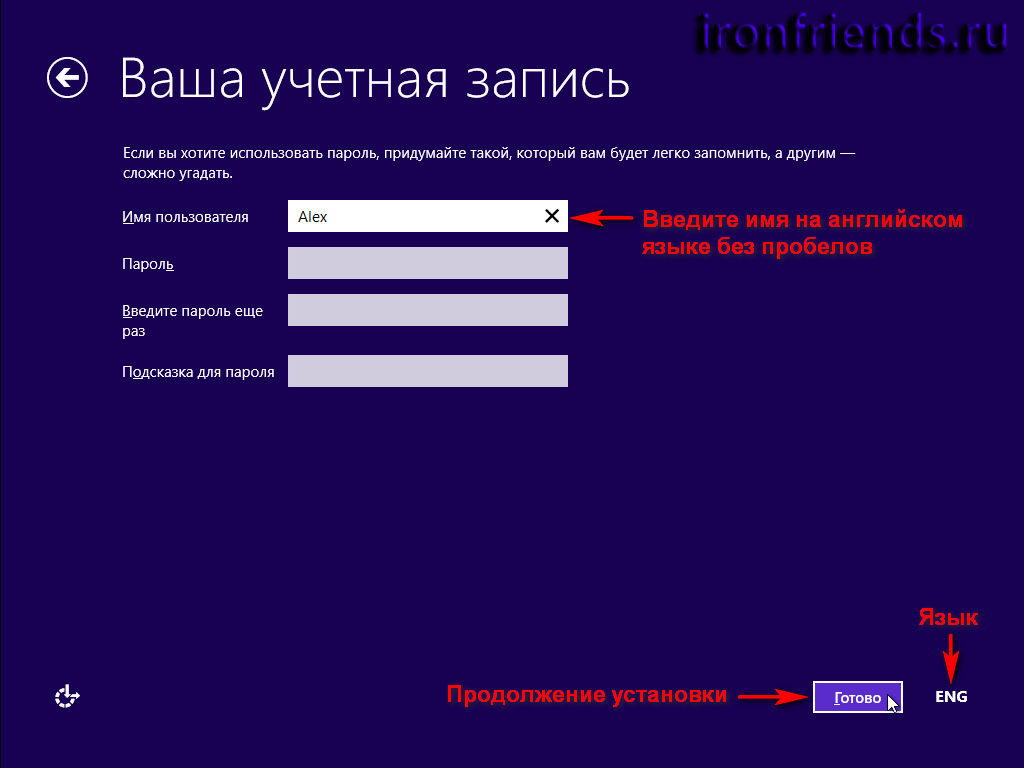
In the next "Login" window, you will be required to enter a username, then enter a password, password confirmation, and a password hint. After entering the data, click on the "Finish" button.
In the event that you are upgrading the Windows 8 operating system to the version of the Windows 8.1 system, then the Internet connection will work on your computer.
Therefore, the "Sign in to your Microsoft account" window will open. In the appropriate fields, you will need to enter the mailbox address and password from the account. If you do not have a Microsoft account yet, then you can create a new account by clicking on the "Create a new account" link.
In any case, you will have to create such an account, because in the Windows 8.1 operating system, many services and services are closely associated with an account.
After entering your data, click on the "Next" button.

In the window "Help us protect your information" you can send an SMS with a code to telephone number that was linked to your Microsoft account. After sending the code, click on the "Next" button.

In the "Enter the code you received" window, enter the received code, and then click on the "Next" button.

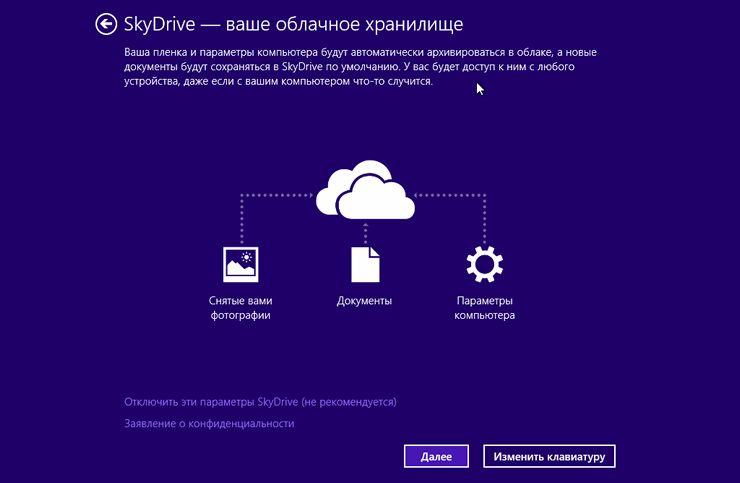
Next, your account is configured. The Sky Drive - Your Cloud Storage window introduces you to Sky Drive cloud storage, which is now tightly integrated into the operating system. In this window, click on the "Next" button.
This completes the account setup.
Then the installation of applications begins. During the installation period, a color window will be displayed on the monitor screen, which will change its color several times. At the bottom of the window, you can see the inscription "Installing applications".

At the final stage of the installation of the operating system, the preparation of applications will be performed. At the bottom of the window there is a warning "Do not turn off your computer."

After the installation of the Windows 8.1 operating system is complete, the Start screen will load on your computer.
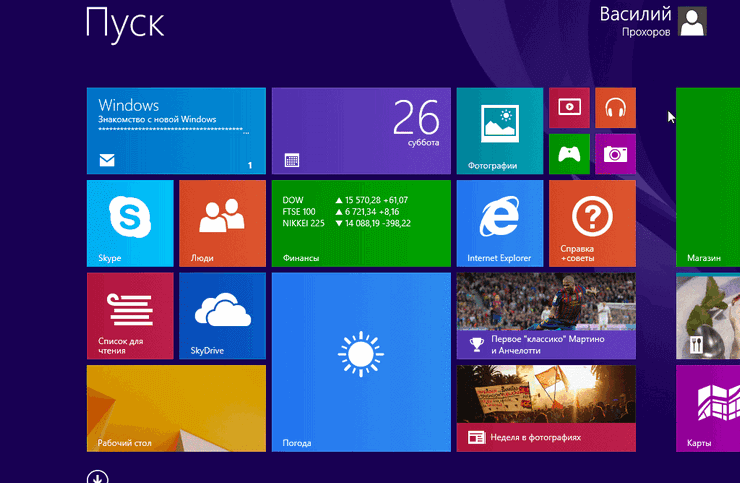
The Windows 8.1 operating system was installed on the computer.
Conclusion
If necessary, the user can install Windows 8.1 in order to use the new operating system on his computer.
Installing Windows 8.1 (video)
Install OS Microsoft Windows 8.1 on a laptop or computer, you can from a disk or flash drive. Today we will not talk about updates, but about a clean installation of Windows 8.1 via BIOS. For this we need a Windows 8.1 distribution. If you have already purchased a licensed disc, then you can proceed with the installation, if you do not have one, then you need to use the tools to create your own installation media using a USB flash drive or DVD.
How to do this, read the instructions -.
Now that you have your installation media, namely a DVD or the original Windows 8.1 operating system, you can proceed with the installation. Another important step is the key to the Windows 8.1 distribution, we hope you have it. We remind you that the keys from Windows 8 will not work with Windows 8.1, especially since the keys differ from each other depending on the editions of the operating systems. Windows systems 8.1. For example, keys from Windows 8.1 Professional (Professional) differ from the keys of the Home editions, and even more so Enterprise.
Comparison of Windows 8.1 editions
- An optimized for home use version of Windows 8.1 will mostly be installed on the laptop when you buy it. Available for retail sale.
- an updated version of Windows 8.1, will be available on expensive laptops/ netbooks and is available for retail sale.
Windows 8.1 Enterprise- Windows 8.1 version for large enterprises under a Volume License, with all available options.
Windows 8.1 Enterprise repeats the functionality of Windows 8.1 Pro, supplementing it with some add-ons for IT management and high-quality organization of work in a single network. So, the function of starting the system with external media information - Windows To Go as well as the ability to filter app launches with AppLocker. Windows 8.1 Enterprise license is available only for corporate customers by subscription Software Assurance... Most users will be completely satisfied with Windows 8.1 Pro, because special functions it is rarely used.
- designed for mobile devices based on ARM processors, its functionality is limited by the technical capabilities of the platforms.
Attention! Be sure to carefully read this manual before starting the installation of the operating system! Pay attention to paragraphs 28 and 30 of this manual.
1
- Before installing on a computer / laptop, any operating system, it is important to know the basic rules - Three important steps before installing all versions of operating systems.
2
- Insert a disc with the Windows 8.1 distribution kit or a prepared bootable flash drive into the USB port into the DVD drive.
3
- We go into BIOS. If you do not know how to do this, read the instructions - How to enter the BIOS.
4
- Our task is that after rebooting, the computer does not boot from hard disk as usual, but from the boot device you are in this moment are using.
5 - The first window after downloading the Windows 8.1 installer (Fig. 1). You will need to select the language of the installation and the system and press the button " Further».
6 Install(Fig. 2)
7 - Start of installation (Fig. 3)

8 - If License key from previous version does not fit and the installation asks for a key, and you have it - Enter (Fig. 4). The key must be entered without spaces and hyphens, the system will put down all the hyphens by itself. ( The key in picture 4 is an example). When the key is entered, click - Further.
9 - Read the terms of the license agreement and check the box -. (Fig. 5)

10 - In our instructions, we consider a clean installation of Windows 8.1, since this option is preferable, allowing you to avoid transferring problems and errors from the previous operating system to the new one, which is why it is called - Clean install ... Select item 2 (Fig. 6). ...

11
- The next step is to select a disk and partition to install. In our example, we get absolutely clean HDD(100 GB) not yet partitioned (Fig. 7). Everything on your computer may look different, because you already had a previous system, and as a rule there will be three partitions (Perhaps four, if there were additional partitions in addition to the D drive).
Section 1 - Reserved by the system. (System)
Section 2 - Drive C (Main)
Section 3 - Drive D (Main)
In order not to be confused, you can determine the size of the partitions themselves.
12 - Let's dwell on our example. Marking unallocated disk space (Fig. 8)

13 - In the window " The size:"- we assign to our future drive C, 60 Gigabytes (Fig.9). This is quite enough for Windows 8.1, for a hard drive of the same size as ours. You may have a different sized hard drive, but do not allocate a C partition, less than 25 GB. If you have an HDD of 500 or more gigabytes, the best option would be to allocate a partition for the C - 90-100 GB., It is no longer needed, there is no need for this, but you should not make exactly 25 GB. This size is needed only for the system itself, but in addition to the system, you will also install on the C drive in the future and other programs you need, for example Office. Therefore, do not skimp, and allocate at least 60 GB for the C-Disk. And set aside the remaining gigabytes for drive D.
We remind you! In our example, we are considering the option when you do not have partitions yet, and the disk is empty (let's say a new one), or you do not have important information there, and you decided to completely redistribute the partition areas, then we mark the section, then click - Delete, and so all partitions so that they become one unallocated space, as in our example (Fig. 8)
Another option - In case you already had a system, just delete the first and second partitions to leave a 3-partition, which is drive-D. Deleted 1 and 2 sections are converted into unallocated space, then select, and without changing the values in the - Size area, click Create.

15 - As you can see (Fig. 11), we have created sections 1 and 2. Section 1 - This is Reserved by the system, and the Second section is our C drive, where we will install Windows 8.1.
16 - You can also see the remaining unoccupied space that we allocate (Fig. 12).

17 - Without changing the values in the "Size" area, click " Create"(Fig. 13).
18 - Section 3 is created (Fig. 14). In the future, this section is our disk-D, where, as a rule, we will store photos, videos, games, etc. You can format it right away, or you can format it when we install the system, there is no difference.

19 - Select Section 2 (Fig. 15), where we will have the operating system, click - Further.
20 - Windows 8.1 installation has started (Fig. 16, 17, 18), you can leave for 10-15 minutes while the process takes place. Installation time depends on the power of your computer.


21 - The system automatically reboots (Fig. 19).
22 - We just watch, the computer will turn on itself (Fig. 20)

23 - Continuation of the installation. The process of preparing devices for operation (Fig. 21)
24 - Now there is a page "Personalization" (Fig. 22), where we need to give a name to our computer. You can name your beast whatever you like, who has some kind of fantasy.

25 - We chose the Name (Fig. 23), then you can select the color scheme (Fig. 24), simply by moving the slider.
26 - The next stage is "Parameters" (Fig. 25). If you use this instruction to install the OS, then for you, without any problems, you should select the item - "". The item "Configure" for more experienced users.
27 - After we clicked "" (Fig. 25), it will be offered to set up our account (Fig. 27)

28 - If the computer is connected to the Internet, then by default you will be prompted to create a Microsoft Live ID account or enter the data of an existing one - address Email and password (Fig. 27)
29 - Here we select the first item - "" (Fig. 28).
30 - If you are not connected to the Internet (for example, you have turned off the cable from the network card, or have not connected to Wi-Fi), then for the place of the Microsoft account, you create the usual local account(Fig. 29). An account from Microsoft can be created later, after the final installation of Windows, it will be required to activate the system. (Also, you can connect to the Internet after the installation of the system.)
31 - Come up with a username and password (Fig. 30), (of course, remember the password) and click - Ready.
32 - For example, like here (Fig. 31).

33 - Completion of parameter setting (Fig. 32).

34 - The first Welcome window and the final setting of the parameters. We wait a bit (Fig. 33, 34, 35, 36).


35 - Well, here's the first login. Enter the password from the account local recording and (Fig. 37).
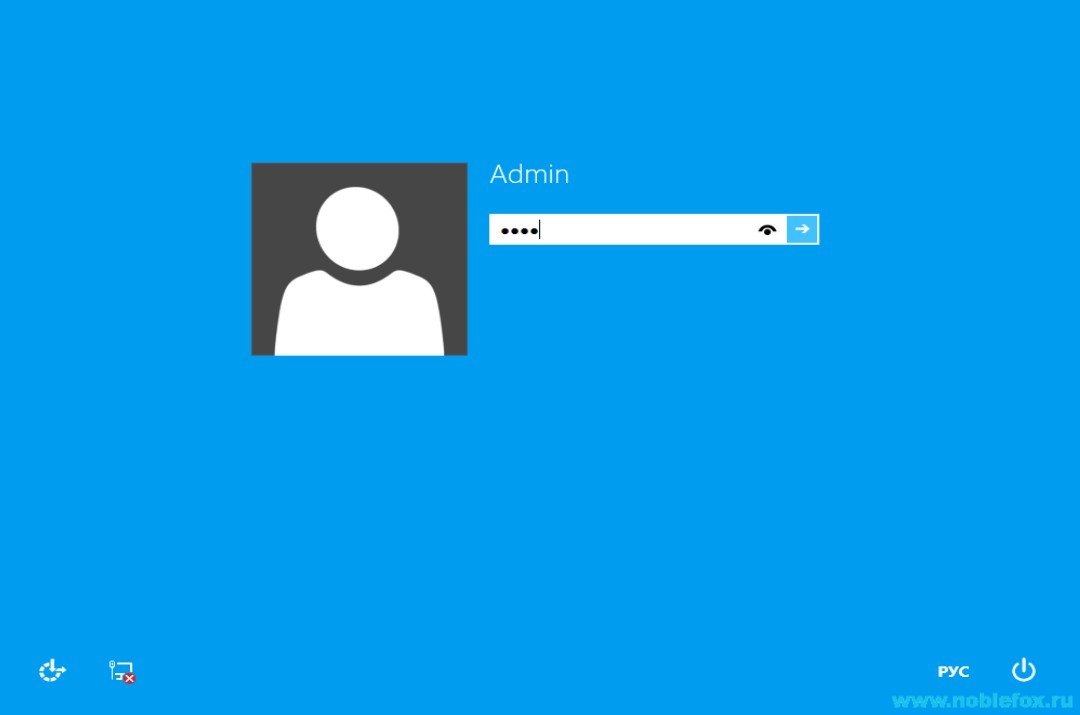
36 - Password check and login (Fig. 38).
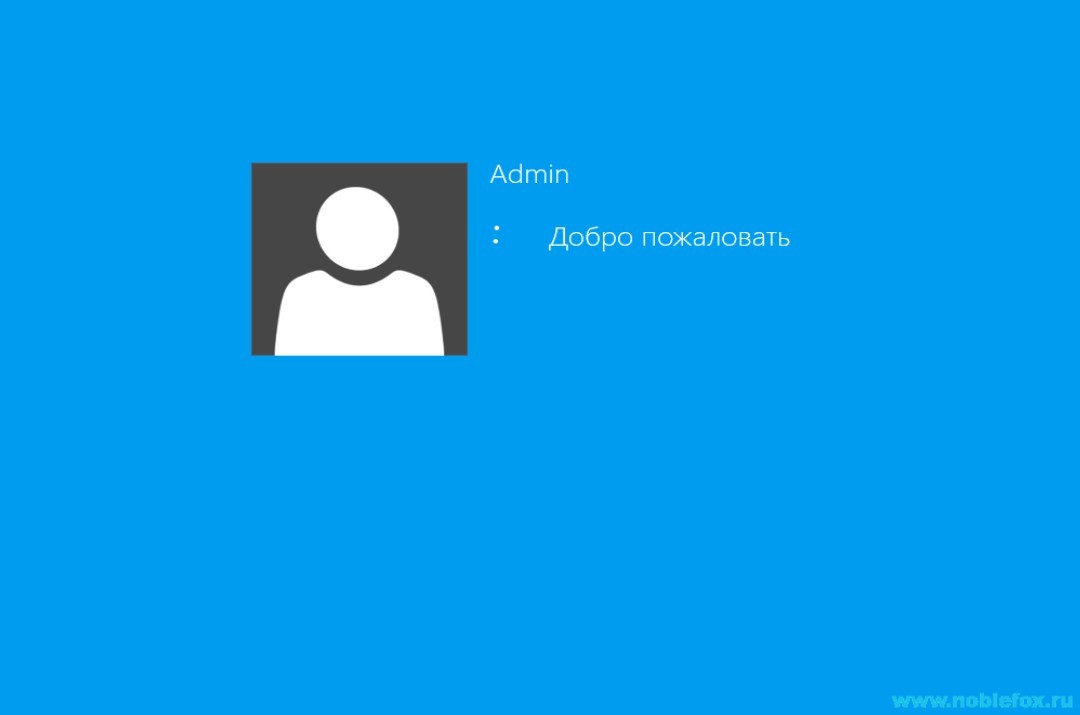
37 - So the first boot of our Windows 8.1 operating system took place (Fig. 39)
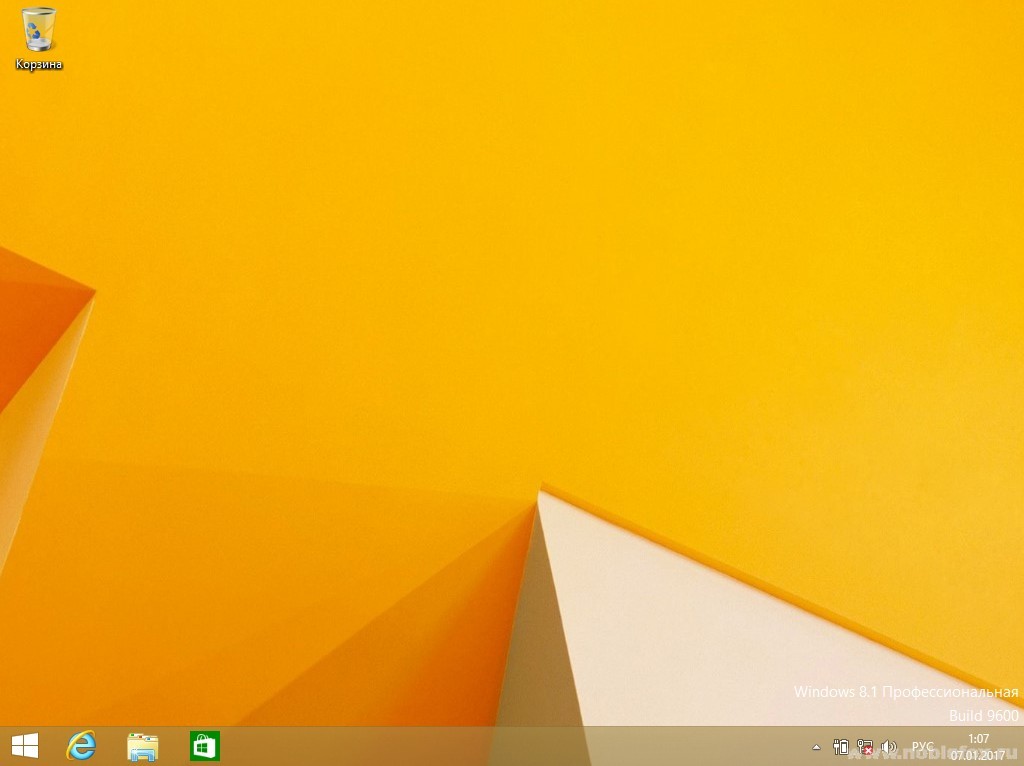
38 - (Fig. 39) On the desktop we have one shortcut "Trash". How to customize the rest of the shortcuts (Icons) read.

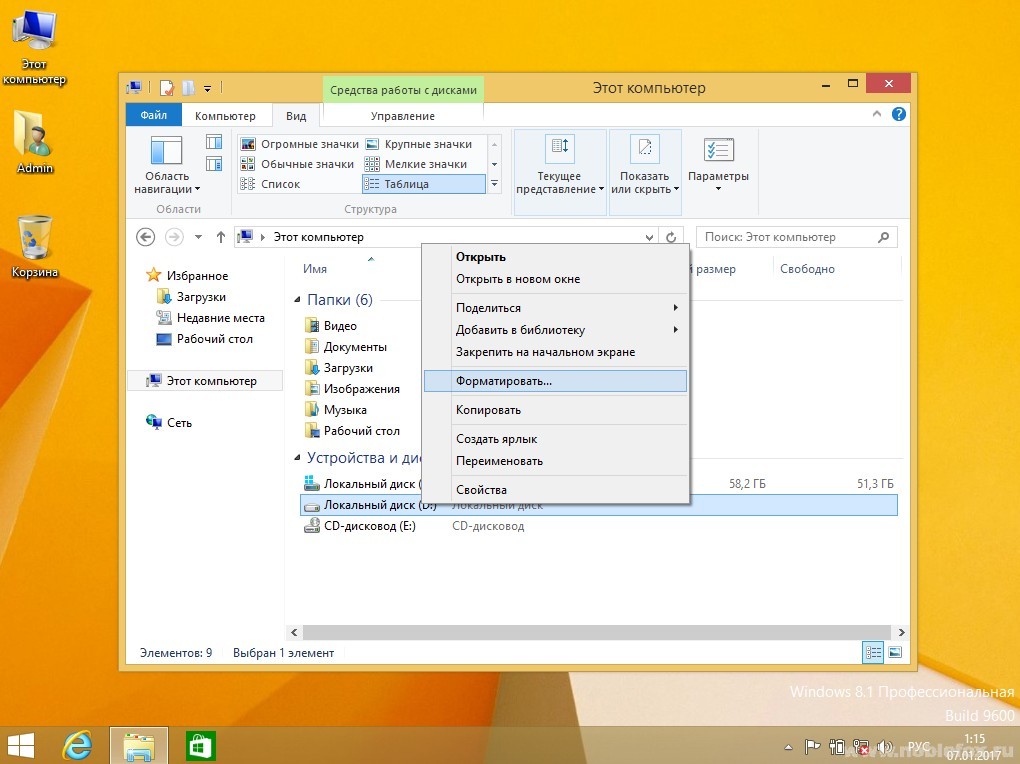
40 - In paragraph 18 of our instructions, we wrote that the D drive can be formatted after installing the system, which we are doing now (Fig. 41). We enter "This computer", right key mouse click on "Local disk (D)", then in context menu choose "Format".

41 - Click - "Format disk" (Fig. 42). Drive-D is now ready for use.
42 - So we examined the basic settings of the system. Of course, you still have to install the drivers, required programs, which you can download from our website, and get used to a little and get used to the new interface of Windows 8.1 (Fig. 43, 44,45).

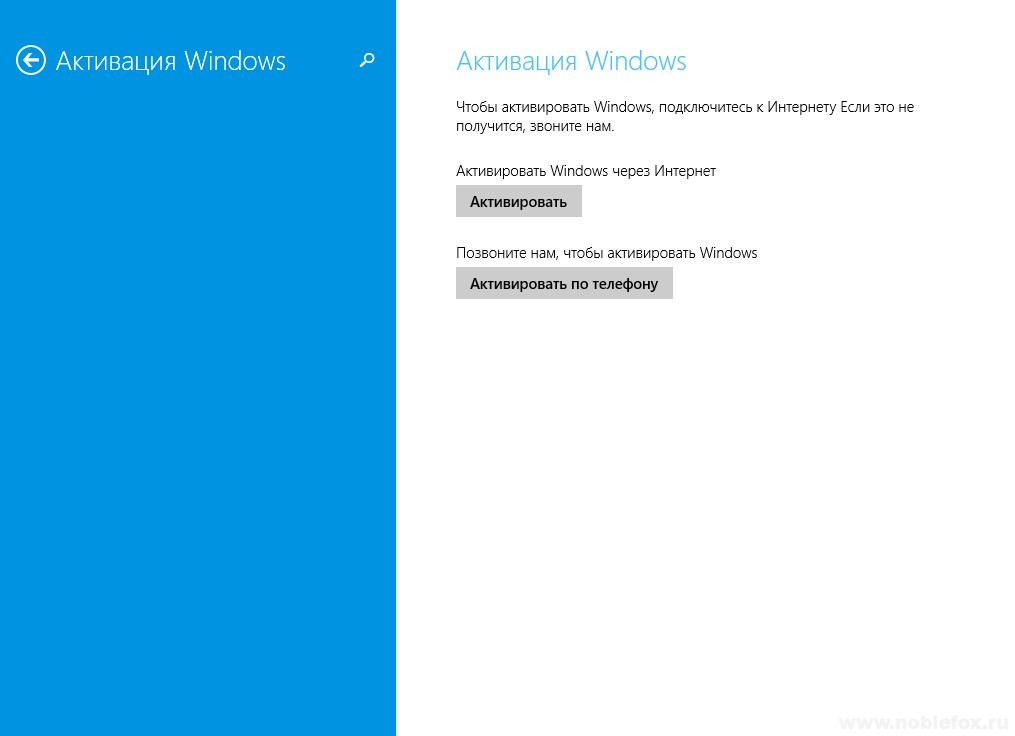
43 - Of course, as you can see (Fig. 46), if the system is not activated, then some basic functions will be inactive for settings, which is very inconvenient.

44 - Activation in this window (Fig. 47)
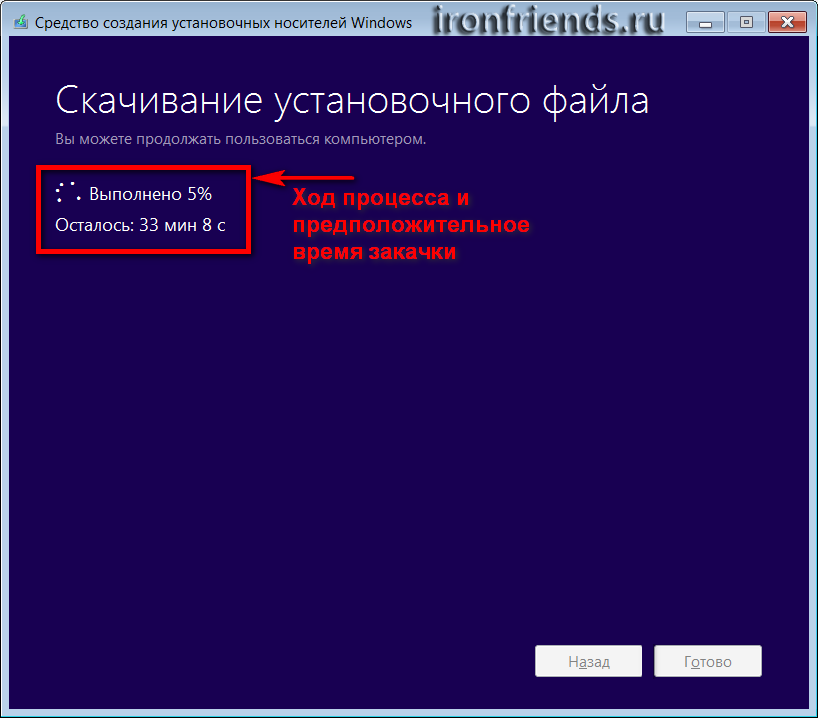
This program allows you to download the version of Windows 8.1 you need from latest updates... It works on Windows 7, 8, 8.1, 10 of any bitness. It will not work to run the program on Windows XP and Vista.
After starting the program, you will see a window in which you will need to select the language, version of the operating system (release) and bit (architecture) 32 or 64 bits.

If you already had Windows 8 or 8.1 installed, you have license key and you just want to reinstall the system, then choose exactly the version that you had before. If this is not your case, then read on.
Choose the language of the operating system, which is your native language or is well understood by you, since all inscriptions in Windows will be displayed in this language. For Russian-speaking residents of the CIS, I recommend choosing Russian.
As for the version of the operating system, if you are a regular home user or you are not very powerful computer, choose the usual "Windows 8.1", it will work faster due to the absence of unnecessary functionality.
If you like to experiment, your computer is powerful enough and you want to be on the safe side in case you need any additional functionality, then you can choose "Windows 8.1 Professional".
The version of "Windows 8.1 for one language" is intended for installation by the manufacturer on new PCs (OEM) and is no different from the usual "Windows 8.1" except for the impossibility to change the operating system language after installation. It doesn't make much sense to choose this version.
![]()
If your computer or laptop has 3 GB or less memory, then choose 32-bit, if 4 GB or more, choose 64-bit.

If you want to immediately create a bootable USB flash drive, then you can select "USB flash drive". You will need a USB flash drive with a capacity of at least 4 GB.
Insert it into a USB port on your computer and click Next. Please note that all files on it will be destroyed.
The second option "ISO file" is universal. In this case, you will be prompted to choose where you want to save this file. From this file it will be possible to make boot disk or a USB flash drive at any convenient time. After that, the download of the file will begin, which may take a long time, depending on the speed of your Internet. File size for different versions Windows 8.1 can be 2.5-3.5 GB.
At the end of downloading and checking the file, a window will appear, in which you are offered to burn the image to a DVD-disc or close the program by clicking the "Finish" button.

If you choose to burn to disc, the Windows Disk Image Burner will open.

Insert the disc into the drive, check the "Check disc after burning" checkbox and click "Burn".
2. About the license key
During the installation process, Windows 8.1 may ask for a license key. In this case, it will be impossible to continue the installation without entering the key.
If you already had a licensed Windows 8, 8.1 installed or you purchased a key separately, then get ready to enter it at the beginning of the installation. Please note that this key is only suitable for a specific version of Windows ("Windows 8.1", "Windows 8.1 Single Language" or "Windows 8.1 Professional") and a specific bit (32 or 64 bit).
If you do not have a license key yet or you want to install Windows 8.1 for trial purposes, you can disable the key request using the "ei.cfg" file, which can be downloaded at the end of the article in the "" section.
2.1. Disable key request on a USB flash drive
If at the previous stage you chose to create a bootable USB flash drive, then all that remains is to copy the file "ei.cfg" to it. If you chose to download the ISO file and now want to make a bootable USB flash drive, then use the tips from the article "".
Copy the "ei.cfg" file to the "sources" folder on your bootable USB stick. Now, when installing Windows 8.1 from this flash drive, you can skip entering the key.
2.2. Disable key request on disk
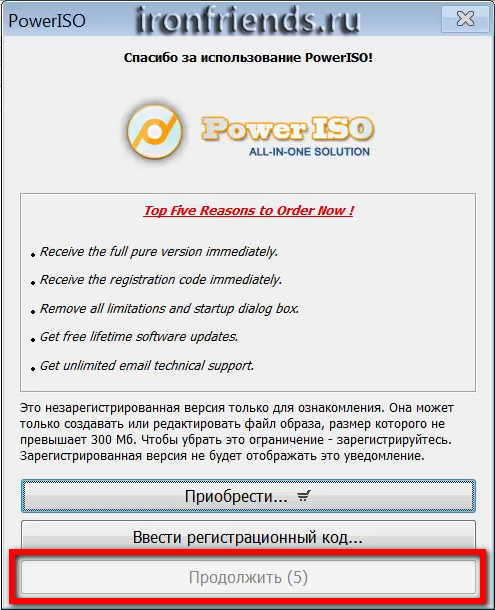
If you chose boot Windows 8.1 in the form of an ISO file, then in order to skip key entry during installation, the disc must be burned using special program by adding the file "ei.cfg". To do this, you can use the program "Power ISO" or "Win ISO", which are very similar and you can download them at the end of the article in the "" section.
We are using the free demo version "Power ISO". Click the "Continue" button, which will become available 5 seconds after the program starts.
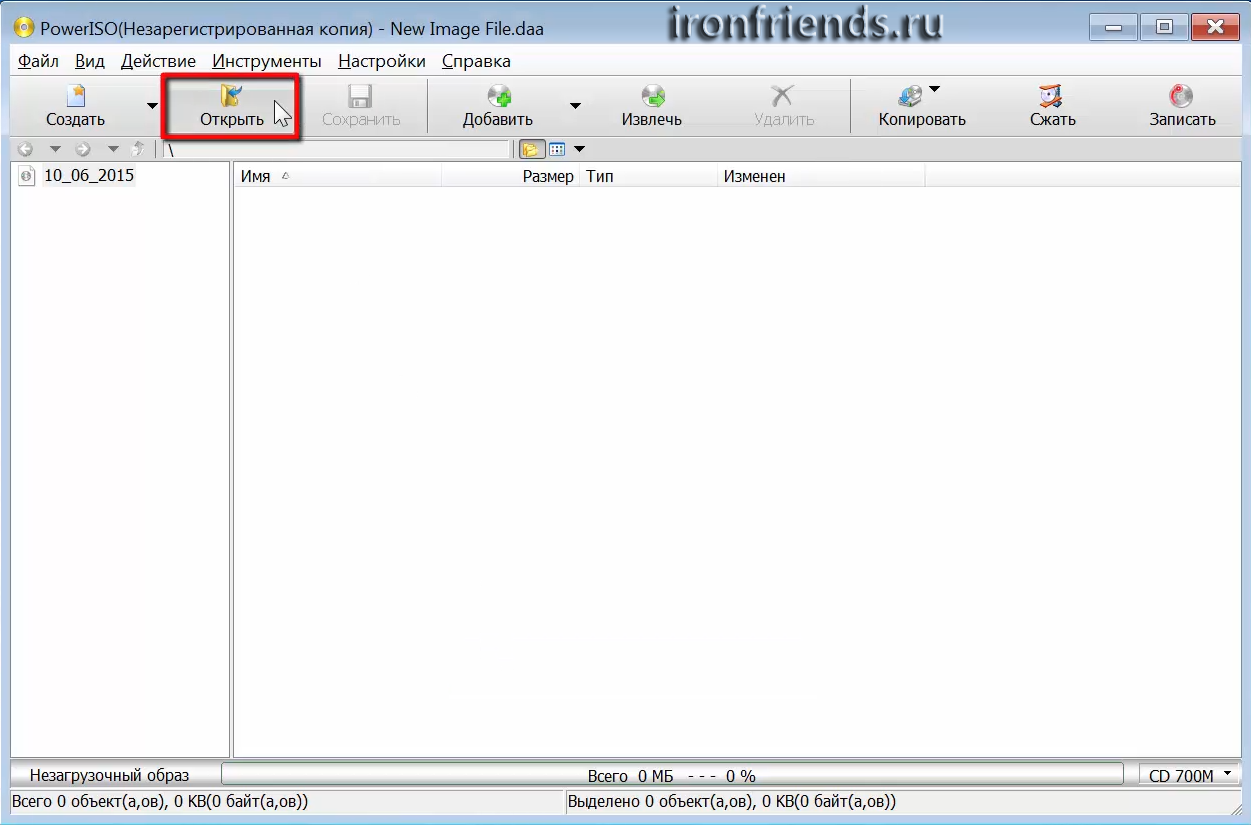
Open the Windows 8.1 ISO file using the Open button on the toolbar or the Open command in the File menu.
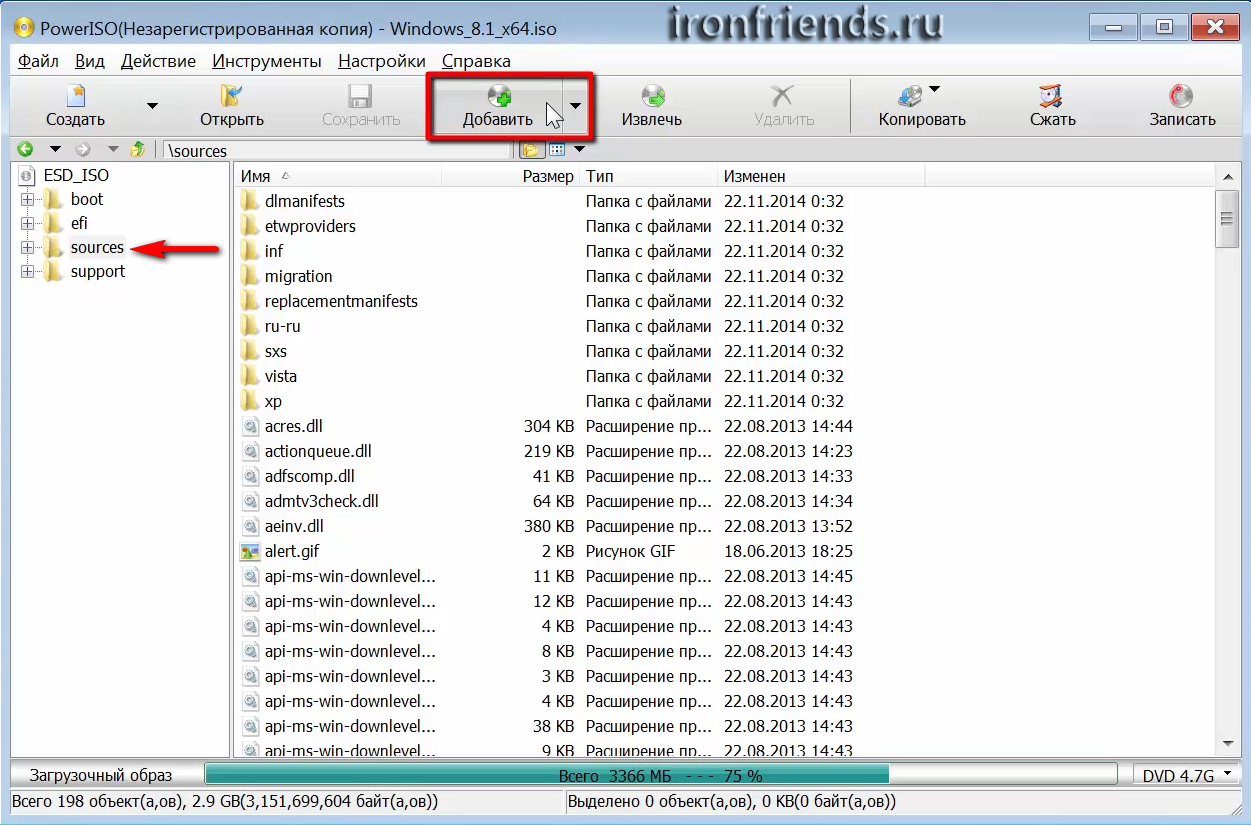
Go to the “sources” folder and copy the “ei.cfg” file into it using the “Add” button on the toolbar or simply by dragging it with the mouse into the program window.
Scroll down the list of files and make sure the "ei.cfg" file is added to the folder. Insert a blank DVD and click the Burn button on the toolbar, or select a similar command from the Tools menu.
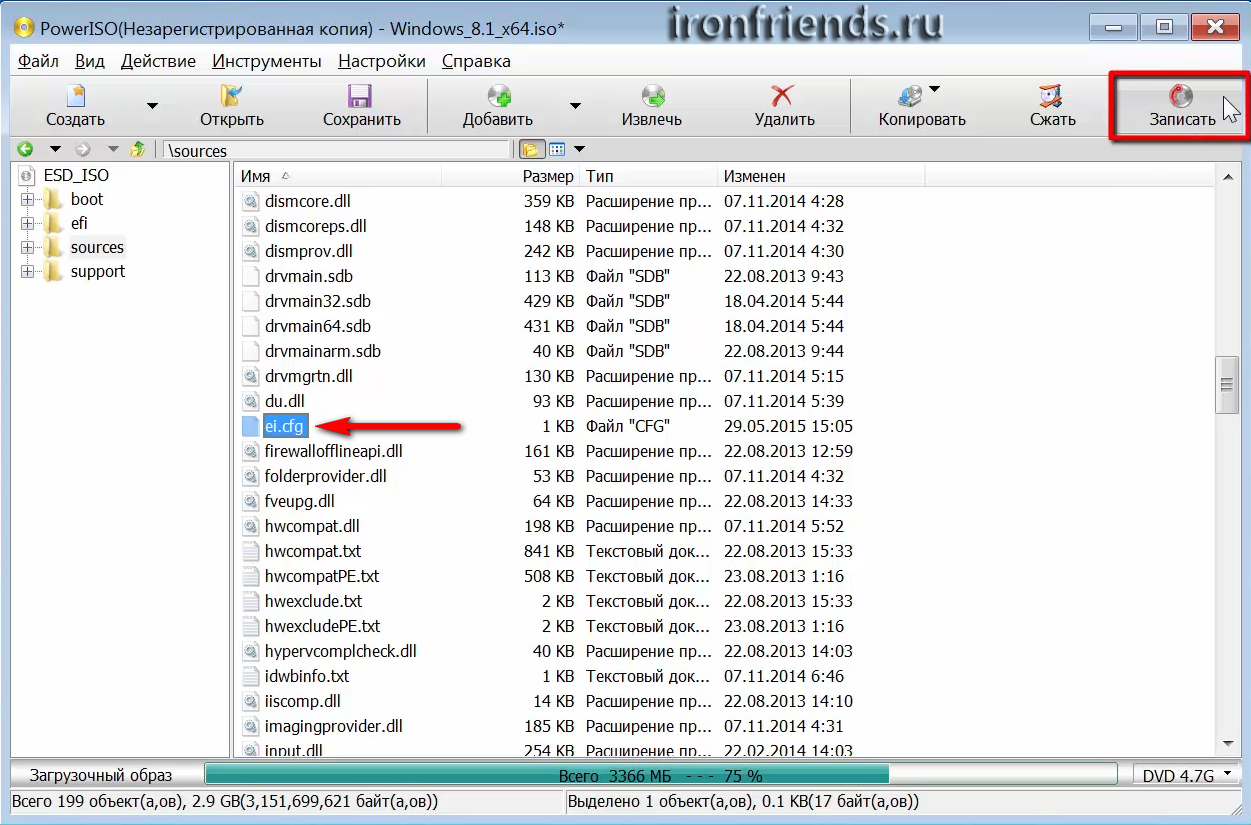
Verify that the correct DVD drive is selected, check the check disc after burning and click the "Burn" button.
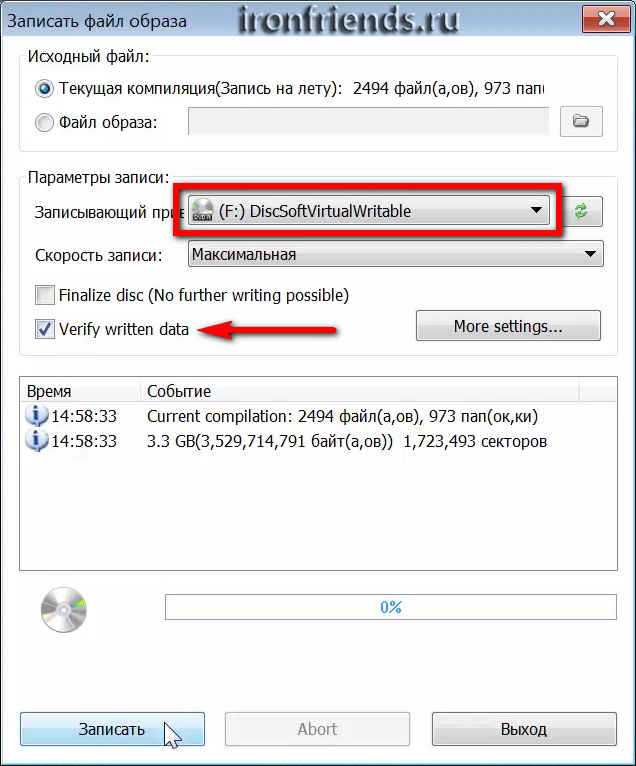
After 5-10 minutes, the program should report that the disc was written successfully. Now, when installing Windows 8.1 from this disk, you can skip entering the key.
If you have problems with "Power ISO", then try using the "Win ISO" program, which is exactly the same.
3. Speed up installation and internet connection
To speed up the installation of Windows 8.1, you can disconnect the internet cable from your computer or laptop. But keep in mind that in this case, you will not be able to create during the installation process to synchronize Windows settings with the Internet. However, not everyone needs this, and during the installation process, you can create a local account.
4. Booting from an installation disk or flash drive
Insert a bootable disk or USB stick. To boot from them, we use the easiest way - booting using the "Boot Menu" ("Boot Menu"). To call the "Boot Menu" on different motherboards and laptops, the keys "F8", "F9", "F10", "F11", "F12" or "Esc" can be used. This key is often indicated in prompts that appear when you turn on your computer.
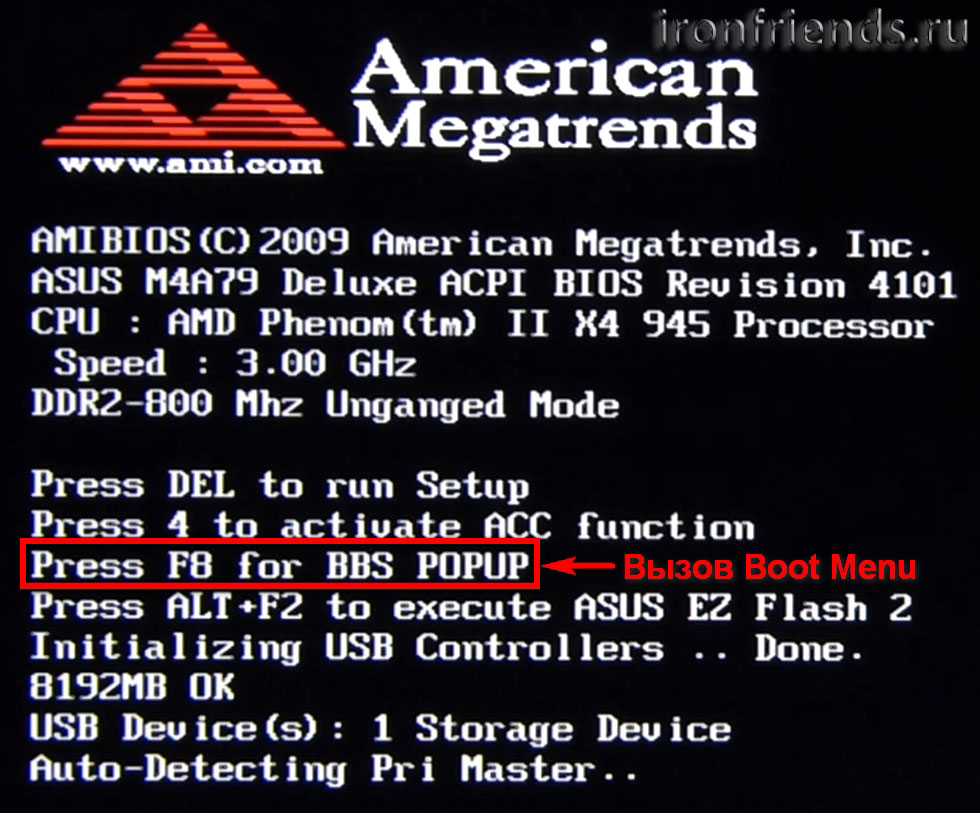
Immediately after turning on the computer, press and hold the "Boot Menu" call key until the boot device selection menu appears.
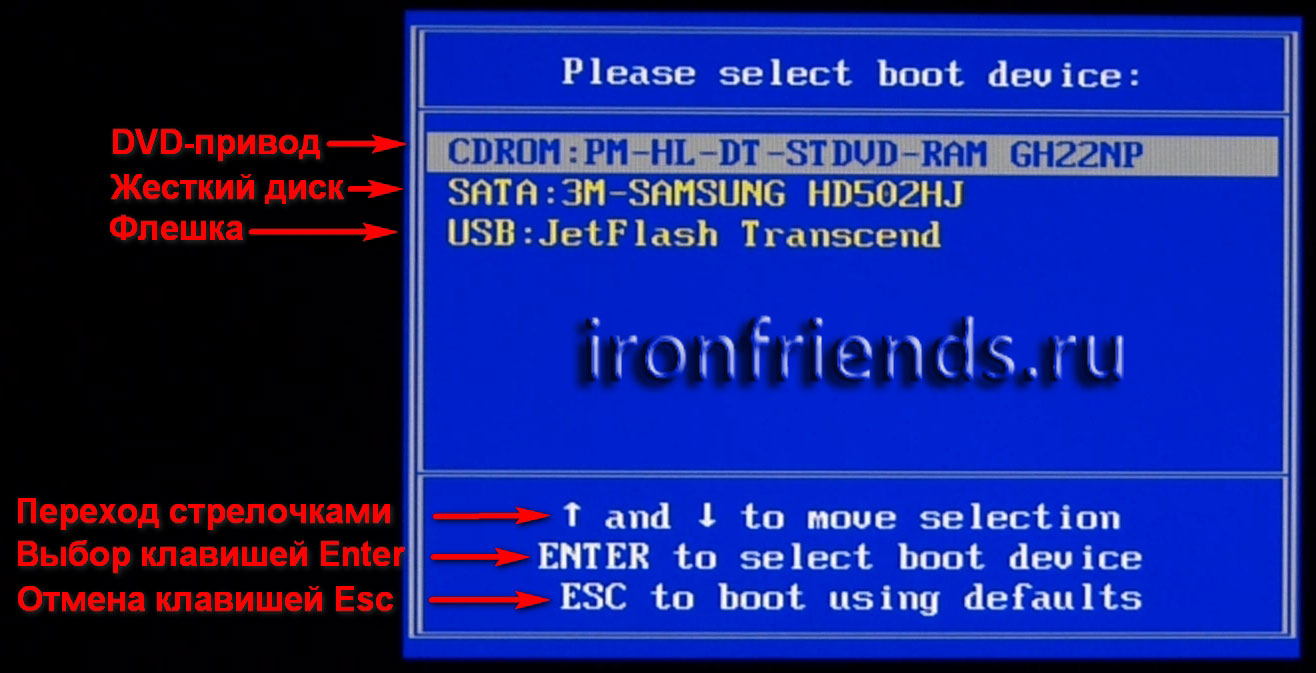
Use the "down" and "up" arrows to navigate to the DVD drive or USB flash drive and press "Enter".
If the call key is not indicated in the prompts at the initial stage of computer boot, then you can find out this information from the instructions, on the website of the motherboard or laptop manufacturer, by searching the Internet or by typing.
The first thing you should see after the BIOS messages is a line like "Press any key to boot from CD or DVD ..." or "Press any key to boot from USB ..." ("Press any button to boot from USB ...") if you are booting from a USB stick.
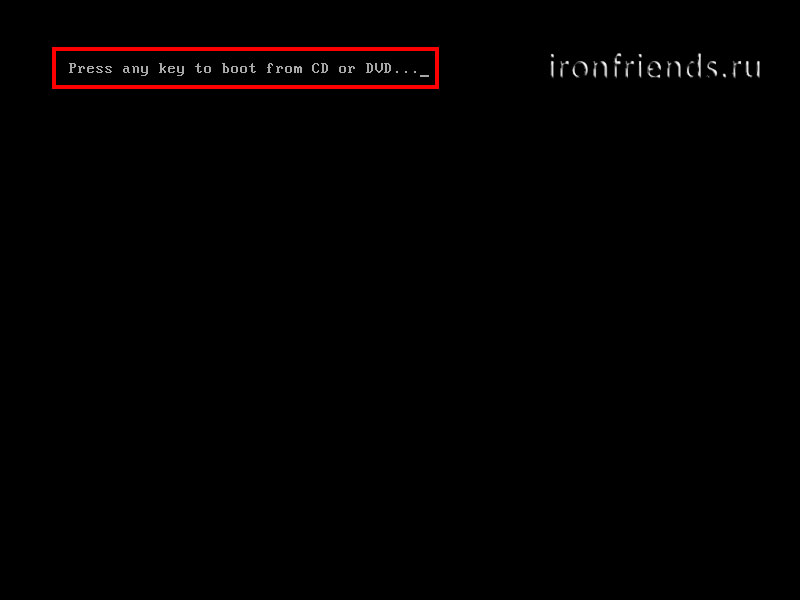
After seeing this message, you have to press any key on the keyboard within a few seconds, I usually press "Space". If you miss this moment, the installation of Windows will not start and you will have to restart the computer from the old operating system using the "Ctrl-Alt-Del" key combination or the "Reset" button on the system unit.
I draw your attention to the fact that during the installation Windows computer reboots several times and each time such a message may appear, but it is NOT NECESSARY to press "any key" on the keyboard anymore, otherwise you just repeatedly start reinstalling Windows from the beginning and you will never run out of it!
Wait for the blue Windows Setup window to appear.
6.1. Language selection
At this stage, you are asked to select languages.

The language to be installed is the language in which the operating system will display all messages. If the Windows version is multilingual, then you will have a choice. Most editions of Windows have only one operating system language and it is desirable that you understand it well.
"Time and currency format" - defines the names of months, days of the week, base currency, digital separators (period or comma) accepted in your country, etc. What does it mean? Well, for example, if you select "Ukrainian", then in programs for typing and tables the days of the week, months and monetary units will be automatically substituted in Ukrainian, regardless of the language of the entire document. Therefore, it makes sense to choose a national format only if the majority of your documents will be in the national language. However, this can be easily changed in Windows at any time.
Input Method (Keyboard Layout) is just the default input language that will be used when Windows startup and all programs. It makes sense to install the one on which you communicate and write. If you will be using your computer primarily for programming, it may be more convenient to select the US (English) layout. After installing Windows, you can add and set as default any language.
For Russian-speaking residents of the CIS, I recommend leaving "Russian" everywhere, since when installing some programs that have a multilingual interface, they may appear not in Russian, but in the one you specified in one of the fields when installing the system.
6.2. Launching the installation
In the next window, click the "Install" button under the "Windows 8" logo.

6.3. Key entry
If you have a license key and you have not disabled its entry, you will be prompted to enter the key. Enter the 25-digit license key that is listed on the disk, certificate sticker, or was obtained via the Internet.

6.4. License agreement
We put a tick "I accept the terms of the license" and click "Next".
7. Windows 8.1 installation type
We are offered two types of installation.

To upgrade Windows 7 and Windows 8 to Windows 8.1, you need to boot into the installed operating system and start the Windows update using the “setup.exe” file on the disk. In this case, you can choose to update with saving personal files or without saving.
You can also upgrade Windows 8 to 8.1 online using the store Windows applications, but this method takes more time and is not suitable for those who have a slow Internet connection, since you will need to download about 2 GB.
Windows XP and Windows Vista cannot be upgraded to Windows 8 or 8.1.
I recommend using the upgrade only from Windows 8 to 8.1, especially for a licensed version of Windows 8. In other cases, it is better not to do this, since this type of installation inherits problems from the previous operating system and it is likely that the computer will slow down or malfunction.

Custom - Installs a new copy of Windows 8.1 on a new or existing hard disk partition. When installed on new computer partitions are created on the hard disk, and when installed on old computer partitions are either deleted and recreated, or a partition with sufficient space for installation is selected. With this type of installation, you can also install Windows 8.1 with a second operating system, for example, along with the existing Windows 7. In this case, when you turn on the computer, you will be prompted for which operating system you want to load.
We select "Custom installation" and we will see a window for selecting a disk for installing Windows 8.1.
8. Disk configuration
Disk configuration is the process of creating, deleting, formatting partitions hard disk to install Windows on it.
8.1. Disk configuration on an old computer
If you reinstall Windows on an old computer, then it already has one ("C") or several partitions ("C", "D" ...). Hope you haven't forgotten from the C drive, as in the process reinstall Windows it will be cleared.
If your disk has only one partition, then it is better to delete it and create two new ones - one small for the operating system and programs, the second for all the remaining space for your files. This disk configuration will be more convenient and reliable in terms of Reserve copy and restore the operating system and your files.
If your disk has several partitions, then the first one, on which Windows is installed, can be deleted and a new one created in its place, and the second one with your files can be left as it is.
8.2. Disk configuration on a new computer
When installing Windows on a new computer, your disk is completely empty and has no partitions. The best option would be to create two partitions - one small for the operating system and programs, the second for all the remaining space for your files. This disk configuration will be more convenient and reliable in terms of backing up and restoring the operating system and your files.
8.3. Dual drive configuration
If you have two hard disk, or one SSD and one regular disk, then it is advisable to create one partition on each of them and install Windows on the one that is faster (SSD) or less in volume, and completely give the second one for storing your files.
If both disks are large, then on the first you can create two partitions - one small for the system, one for storing your files. On the second disk, you can create a partition for the entire volume and use it to install programs and games, or you can also create two partitions - the first for programs and games, and the second for files. This configuration will provide maximum speed downloads of programs and games, since Windows and the paging file will be on one disk, and programs and games on another.
9. Disk setup for Windows 8.1
9.1. Old system disk
If you reinstall Windows on an old computer, the disk will have one or more partitions. The screenshot below shows a disk with 3 partitions on which the old operating system is installed.
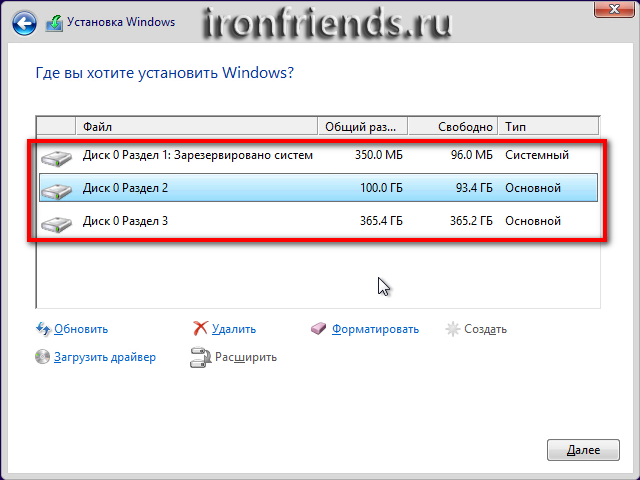
Section 1 Is a hidden boot Windows partition... If you had Windows 7 installed, then the size of this partition is usually 100 MB. In this case, Windows 8 is installed on the disk, for which a typical boot partition size is 350 MB. Windows XP does not have a boot partition.
Section 2- This is drive "C" in the old operating system, which in this case has a size of 100 GB. You can easily determine what it is, knowing the size of your "C" drive.
Section 3- this is usually your "D" drive, which you can also determine by its size.
The disk may have other partitions that you also saw in your operating system and you should be familiar with them. The "Disk 0" prefix in front of each partition means that they are all on the same hard disk. If you have 2 or more hard drives, they will be named “Disk 1”, “Disk 2”, etc.
If you are not sure where which drive is, then it is better to turn off the computer, disconnect one of the drives and try to load the old operating system to make sure that the drive on which you want to reinstall Windows remains connected.
9.2. Deleting partitions
The best option is to delete the old Windows partition and create a new one to install Windows 8.1.
Select the partition with the old operating system and click Remove.
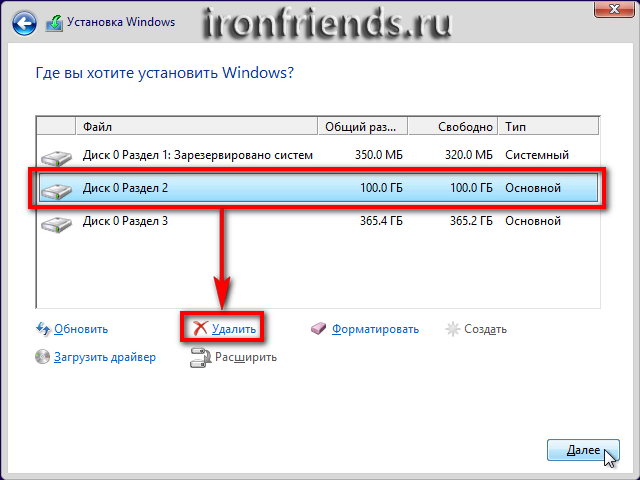
If there is a bootable partition on the disk, delete it as well.
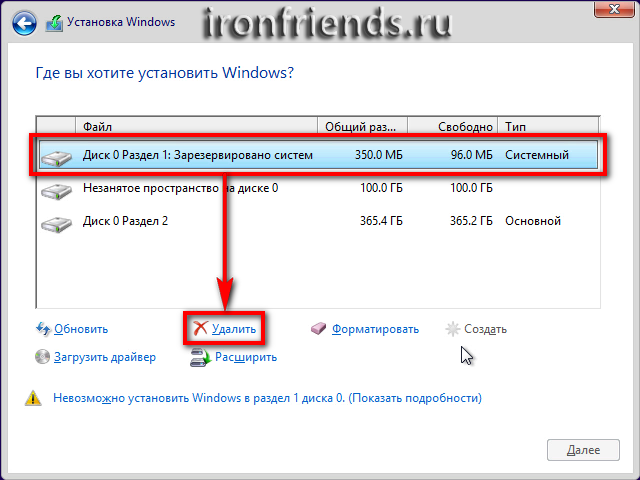
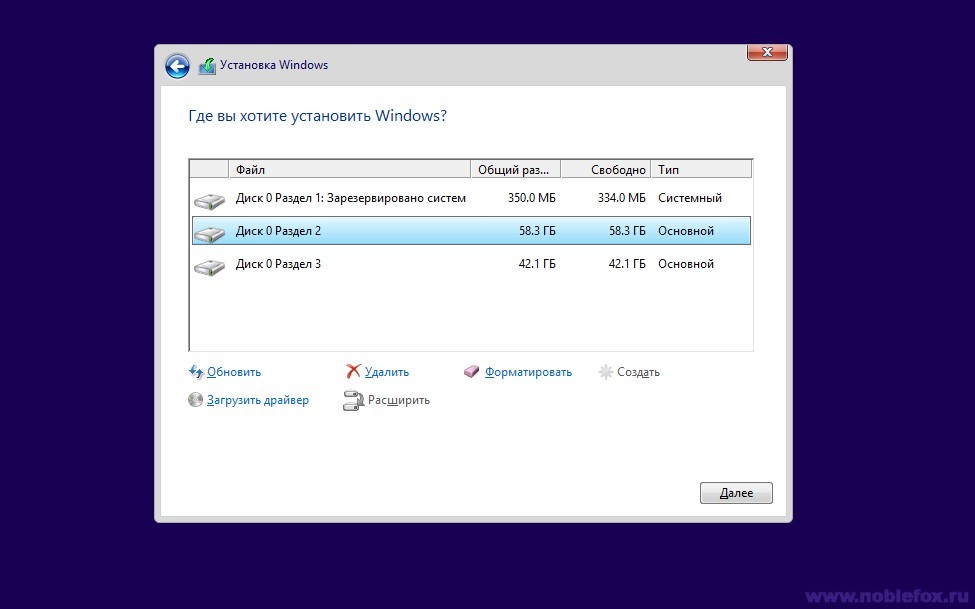
After that, "Unallocated disk space" will appear, on which you can install Windows 8.1.
![]()
It is desirable that at least 40 GB be free. If there is enough space and there is a partition with your files on the disk (drive "D"), then do not delete it so as not to lose these files. If there is not enough space for Windows 8.1, then advance your files from the "D" drive so that it can be deleted and more efficiently allocate disk space.
Let's remove the "D" drive to simulate this situation.

As a result, we get a completely blank disk, as if we were installing Windows 8.1 on a new computer.

The screenshot above shows a 500 GB drive. Don't be surprised that the actual size is 465.7 GB. Manufacturers round off sizes hard drives to a larger round number. A table with the real sizes of hard drives can be downloaded at the end of the article in the "" section.
9.3. Creating partitions

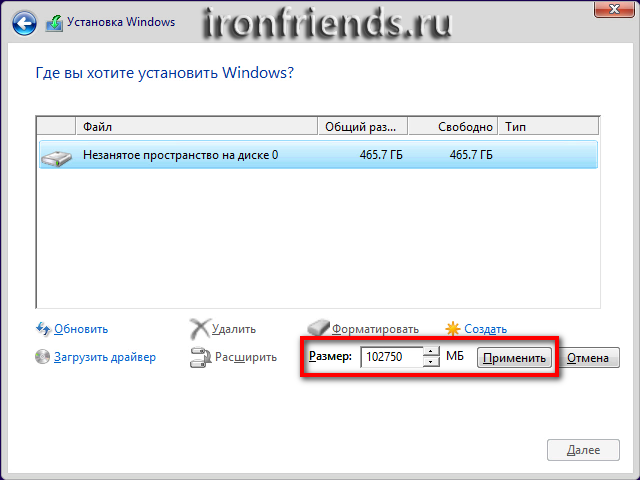
After that, a field will appear in which you will need to enter the size of the installation partition in megabytes. The optimal size of the system partition is 10-20% of the total hard disk space. For Windows 8.1 I recommend a partition size from 50 to 200 GB.
It is better not to divide the SSD drive into several partitions, but completely give it under the "C" drive for installing Windows, programs and games. Then you will get unrivaled computer speed!
I usually take 10% of the stated disk size, that is, 50 GB from a 500 GB disk and 100 GB from a 1000 GB disk. This is enough to install the main programs, and it is better to install games on the second partition along with the rest of the files, since they take up a large volume and make it difficult to backup and restore the system, which we will discuss in a separate article.
But if you like to experiment and plan to install a lot of serious programs and games, then it is better to make the system partition larger, about 20% of the disk capacity, or 100-200 GB in kind. Since some of the data still gets to the system partition and in the future there may be a lack of space on it.
Let's make sure everything is, create a 100 GB system partition. Please note that 1 GB = 1024 MB. In addition, Windows 8.1 takes 350 MB from this volume to create a hidden boot partition.
To get a 100 GB "C" drive, calculate the size in megabytes as follows:
100 GB х 1024 + 350 MB = 102 750 MB
This number must be entered in the "Size" field and click the "Apply" button.
Here is the result of the operation performed.
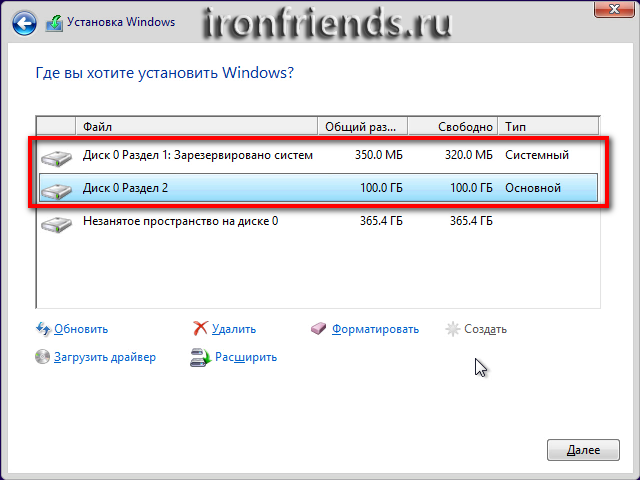
As you can see, two sections have been created. "Partition 1", 350 MB in size, is used for the boot loader and we won't see it in Windows. Partition 2 is exactly 100 GB in size and we will be installing Windows 8.1 on it.
A hidden 350 MB boot partition will appear when a new partition is created for installing Windows 8.1. If you are installing Windows 8.1 on an existing partition, the bootloader files will be located on it and a separate partition will not be created.
There is still 365.4 GB of Unallocated Space ... on which we will create another partition to store user files. To do this, select the remaining "Unallocated space ..." with the mouse and click "Create".
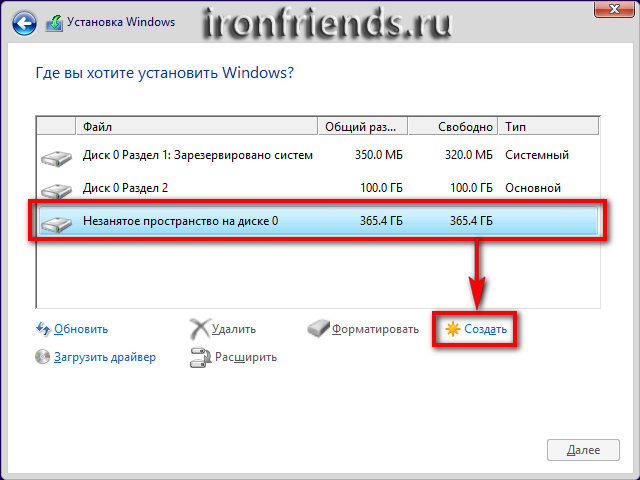
By default, it is proposed to allocate all the remaining space for it. You can decrease this value in order to leave room for another section, if you need it. But we'll leave it as it is and just click “Apply”.

After that, the new partition needs to be formatted, otherwise you won't see it in Windows.
You can create and format this partition after installing Windows, but here it is faster and more convenient.
10. Types of disk partitioning (MBR and GPT)
The partition structure we have considered will be in the event that the Windows installer performs disk partitioning in old system MBR. If Windows Installer partitions the disk on a new GPT system, multiple service partitions may be created.
MBR Is an old type of partitioning that supports drives up to 2 TB.
GPT- a new type of partitioning that supports drives with a volume of 3 TB or more, but requires support from the motherboard. There are usually fewer problems with disks mapped to the MBR, but this is not important.
11. Installing Windows on a disk of 3 TB or more
If you are installing Windows 8.1 on a disk with a volume of 3 TB or more, then you need it to have GPT markup, otherwise not all of its volume (about 2.3 TB) will be used.
If the hard drive is not used to install the operating system, but will be the second on your computer, then you can convert it to GPT after installing Windows.
If the Windows 8.1 installer created a hidden 350 MB partition and no more service partitions, it means that the disk was partitioned in the MBR system. In order for the disk to have GPT markup, you will have to delve into the BIOS settings, create a bootable UEFI USB flash drive, and possibly convert the disk to GPT yourself.
11.1. BIOS Boot Configuration
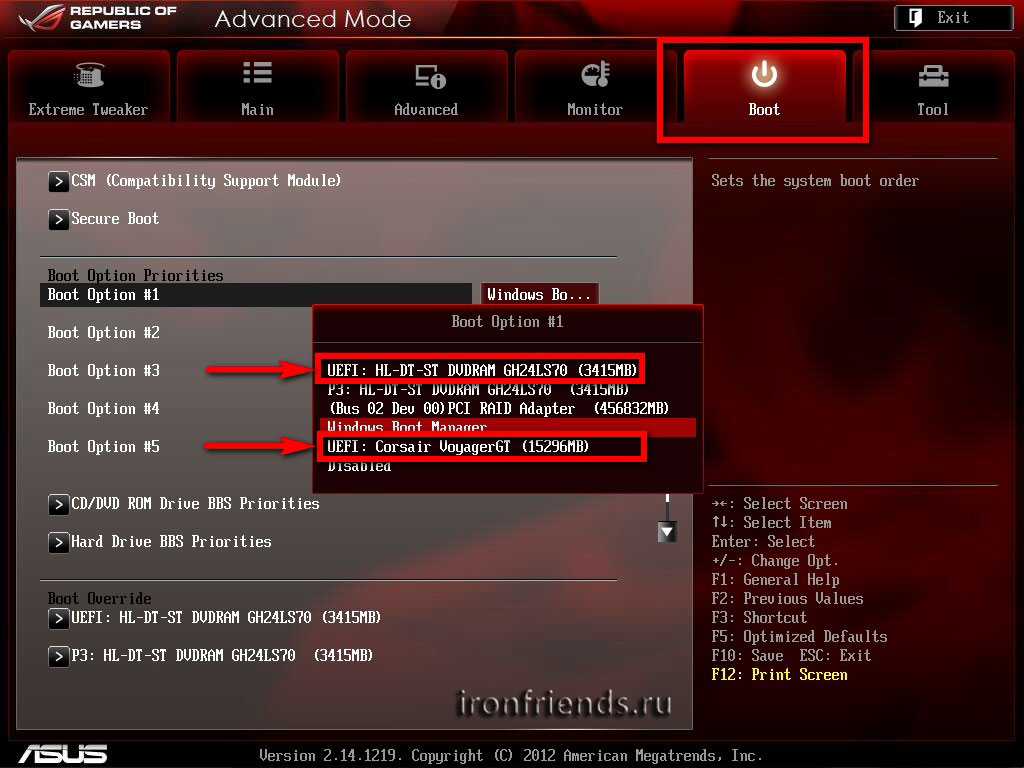
First of all, check that in the BIOS settings of your motherboard or laptop in the "Boot" section, UEFI boot devices are prioritized.
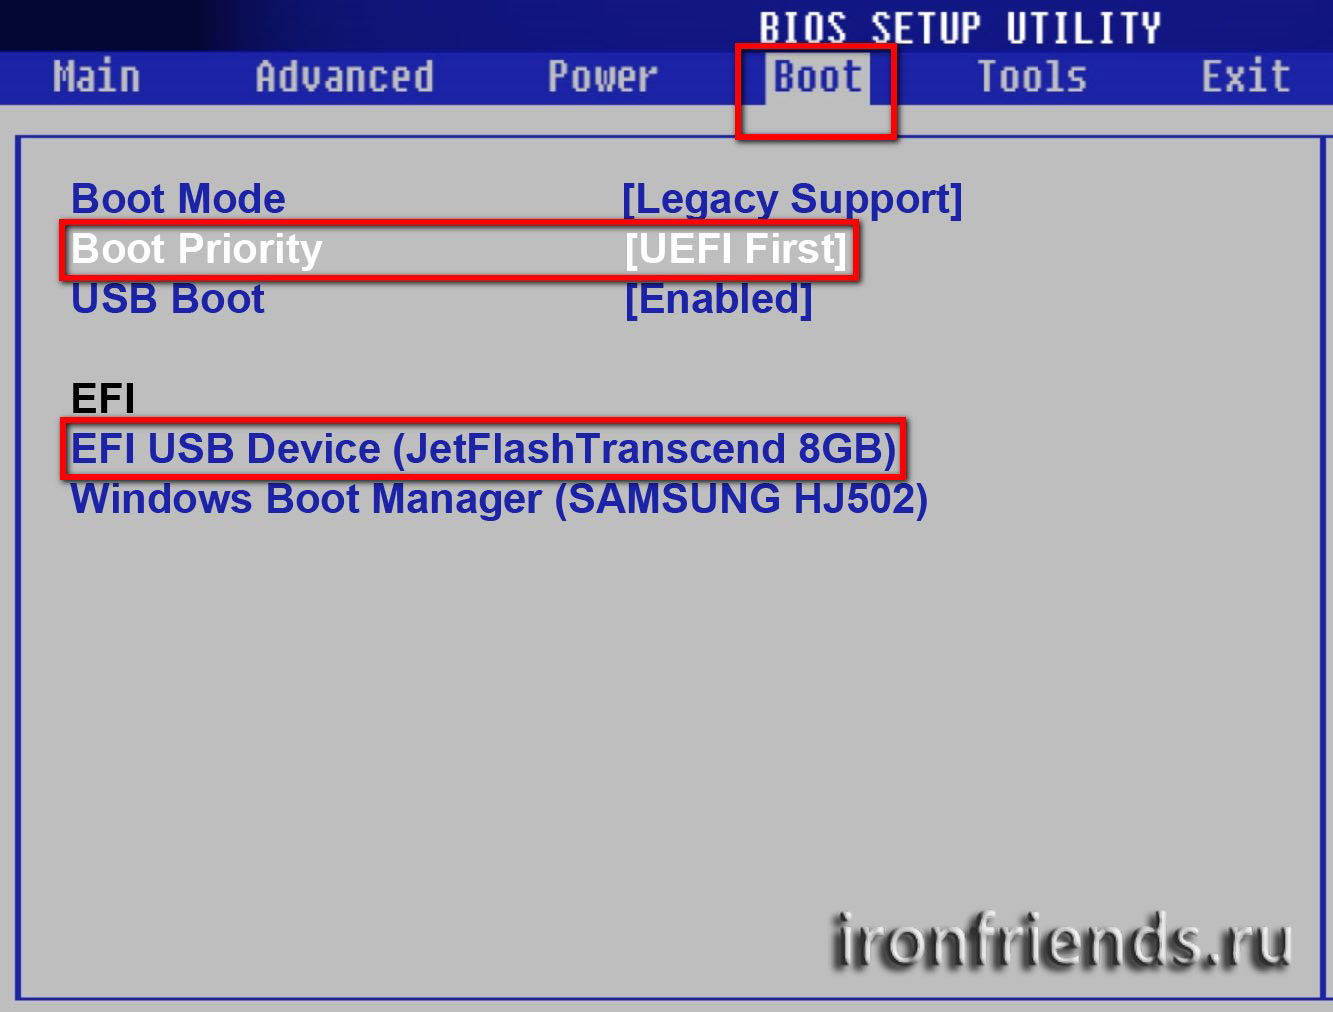
In the modern graphical interface of the "Setup" program on the motherboard, it might look like this.
After that, start the Windows 8.1 installation again from the disk or flash drive, delete the created partitions and try to create them again.
11.2. Creating a bootable UEFI flash drive
If the BIOS setup did not help, then try in the "GPT for computers with UEFI" mode in the "FAT32" file system and repeat the installation from it.
11.3. Convert disk to GPT without saving data
You can convert your hard drive from MBR to GPT yourself right during the installation of Windows 8.1. To do this, use the command line utility "Diskpart", which is on the installation disk or flash drive. But this method does not allow you to save the data partition (drive "D"). If you have such a partition, then below I will tell you how to convert a disk to GPT while preserving this partition.
Start the installation of Windows 8.1 and, reaching the disk settings window, call command line using the key combination "Shift" + "F10".

After that, enter the commands shown in the screenshot below, it's very simple. Language switching is carried out by the "Alt" + "Shift" key combination.

Please note that you need to enter the disc number shown in the table. If you have one disk, then most likely its number will be "0". But if you have two disks or you are installing Windows from a USB flash drive, then the disk number may shift. Be guided by the volume of the disc indicated in the table.
Now, for your convenience, I will give a list of commands that you need to enter, in text form with explanations.
diskpart- launching the utility list disk- viewing discs (to determine the number) select disk 0- selection of disk with number 0 clean- deleting all partitions (from the selected disk) convert gpt- convert disk to GPT exit- exit the utility exit- exit from the command lineAfter that, the command line will close and you will have a blank disk with GPT markup, on which you will need to create partitions for installing Windows.
In the same way, you can convert a hard disk from GPT to MBR by using the convert mbr command instead of the "convert gpt" command. You may need this if you have problems installing Windows on a GPT disk.
11.4. Convert disk to GPT while preserving data
If your hard disk has a data partition (for example, disk "D"), then the conversion without data loss can be done using the "Acronis Disk Director" program. How to get officially for free latest version this program and make a bootable disk or USB flash drive with "Acronis Disk Director" you can learn from the manual, which can be downloaded at the end of the article in the section "".
12. Problems during installation
12.1. Windows won't install to disk
If the installer says "Unable to install Windows on this drive", "The selected drive has the style GPT partitions"Or something similar, then try converting it vice versa from GPT to MBR using the Diskpart utility or Acronis Disk Director, in the same way as we discussed above.
12.2. Windows does not see the drive
Sometimes a situation may arise that Windows 8.1 does not detect your hard drive and it does not appear in the window for selecting a drive for installing the system.

This happens more often when installing a system using a modified distribution (assembly). It is better in this case to use a different distribution kit. But there are other ways as well.
The easiest way is to change the operating mode of the disk controller in the BIOS or UEFI of your motherboard or laptop from AHCI to IDE or vice versa.
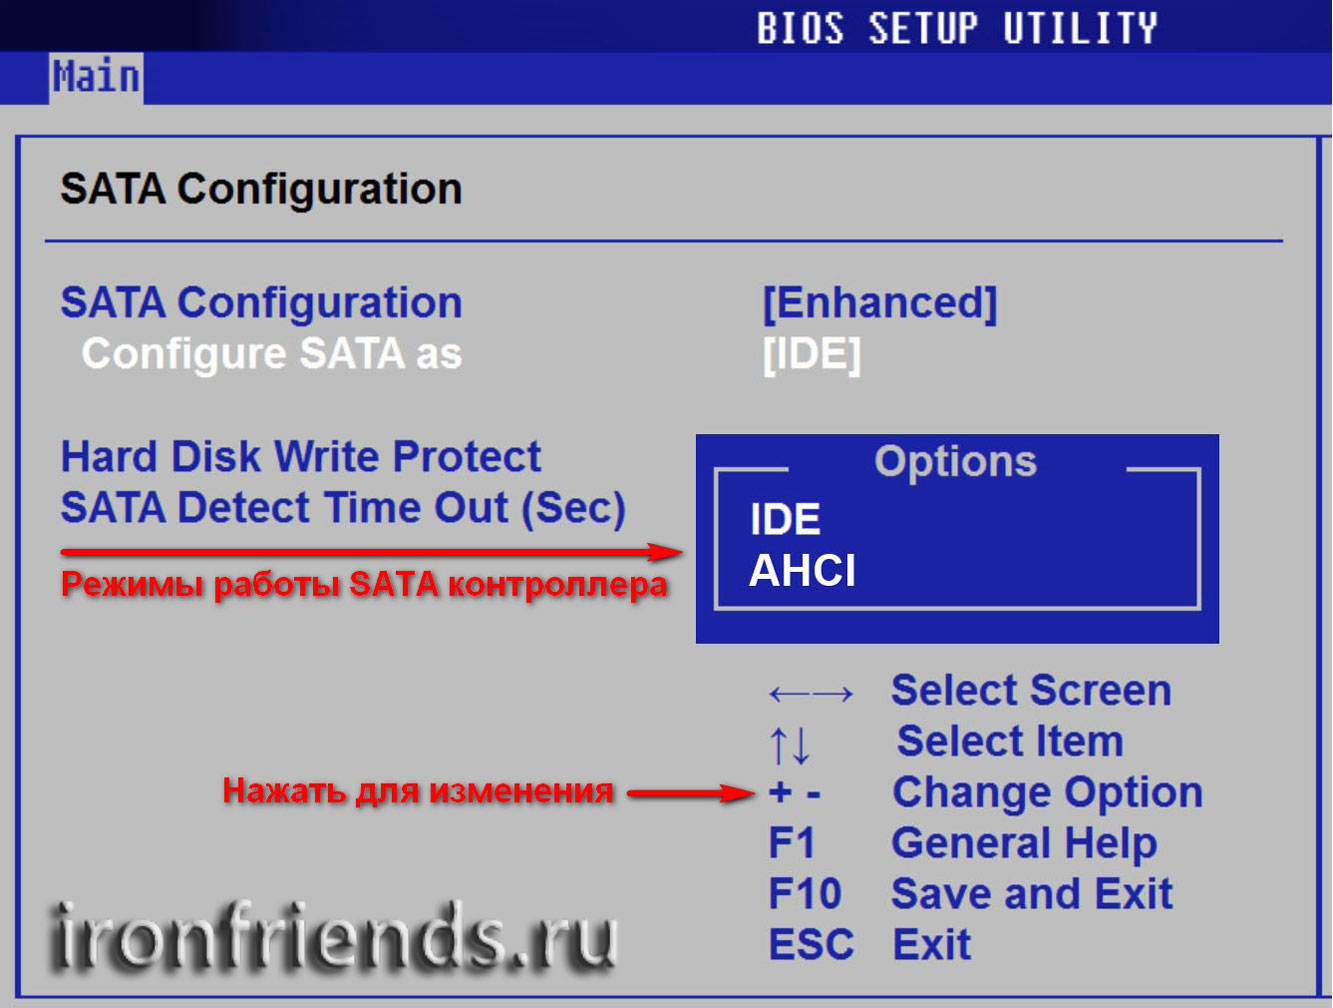
If you do not know how to do this, read about it in the article. This will have little or no effect on the performance of the hard drive. But if you have an SSD, then it is recommended to set AHCI mode and if the Windows installer still does not see the disk, then use the method described below.
Download the SATA AHCI Controller driver from your motherboard or laptop manufacturer for your operating system version: Windows 8.1 x64 (64-bit) or Windows 8.1 x86 (32-bit).
If it has * .exe extension (Windows Application), launch it and extract it to a clean folder. If it has a * .zip extension (Compressed zip folder), unzip it using the context menu ( right button mouse) or open it as a normal folder and drag the files into a new folder. Also, unpacking in both cases can be performed using the WinRAR program, which you can download at the end of the article in the "" section.
Write this folder to a USB flash drive and paste it before turning on your computer to install Windows. In this case, the Windows distribution can be located both on the installation DVD-disk, and on this flash drive.
When you reach the window for selecting a hard drive, in which it is not displayed, click on the "Load driver" button and specify the location of the driver files (folder on the USB flash drive).
If the driver matches, then the installer should detect your hard drive and it will appear in the window for selecting a drive for installation. After that, you can create partitions on the disk and install Windows on them.
Now we select "Partition 2" with a size of 100 GB, on which we install Windows 8.1, and click "Next".

Copying of files starts, which will take some time.

Sometimes this process can stop at 0% or anywhere else for a while, and then quickly complete. Be patient and don't touch the computer. It may take 15-30 minutes to wait. If after 30 minutes of waiting nothing happens, then most likely the computer is frozen or installation disk poorly readable. You will have to start all over again and if you freeze again, perhaps replace the installation disc. Also, the problem can be caused by a malfunction of the DVD drive, hard disk, random access memory or motherboard.
After copying the files, the computer will reboot several times and the installation process will continue, which requires user interaction.
Let me remind you that when the message "Press any key to boot from CD or DVD ..." appears, you DO NOT need to press anything.
14. Key request
If you have disabled the key request, then a window with a proposal to enter the key will still appear, but there will be a "Skip" button in it

In the next window, you need to enter the name of the computer on the network and, if desired, change the color of the main background of Windows 8.1 using the slider.

Enter the computer name on English language... You can use letters, numbers, and a hyphen (minus sign). Switching the language is carried out using the button in the lower right corner of the window or the combination of keys "Alt" + "Shift". If you have several computers, then the first computer can be named PC-1, PK-1 or Home-1, the second - PC-2, PK-2 or Home-2, laptop - HP, DELL, ACER or username (Alex , Misha, Vera). So it will be easier for you to navigate later, but in principle it does not have of great importance and the computer name can always be changed.
In the lower left corner there is a button to enable help for people with poor eyesight and difficulties in using the keyboard. This button will appear in the following windows during the installation of Windows 8.1.
Click the Next button to proceed with the installation.
The next window prompts you to configure the basic Windows options 8.1, or continue the installation without changing anything.
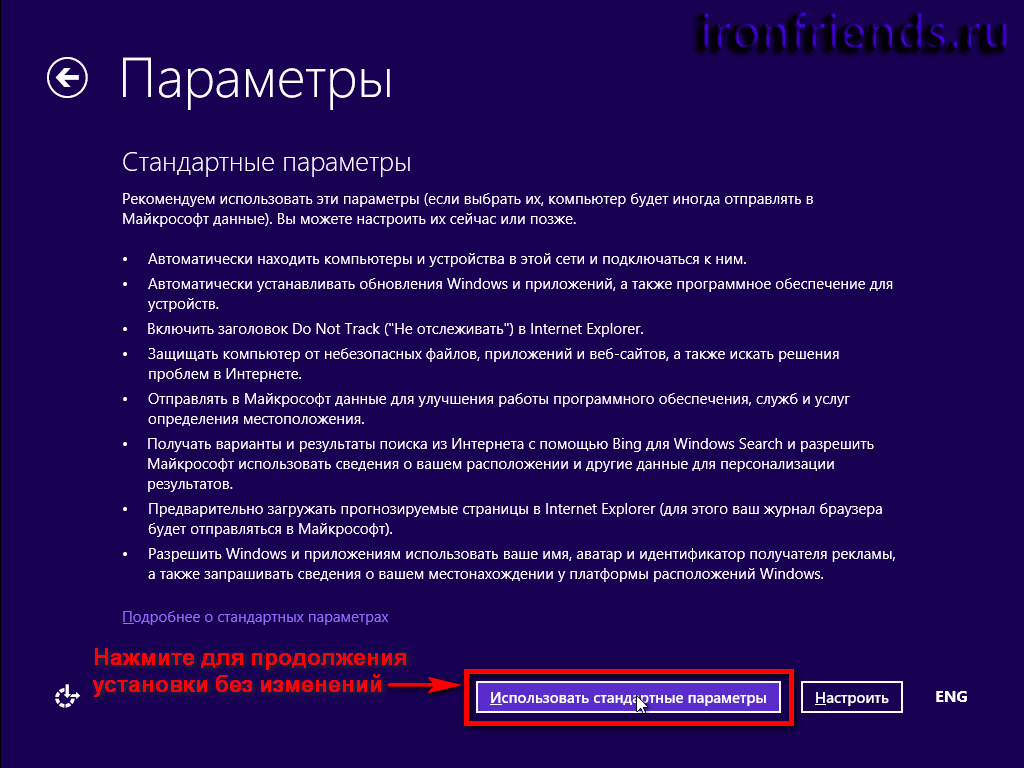
If you are in a hurry or do not want to understand these parameters, then just click "Use standard parameters", nothing bad will happen and Windows 8.1 will work fine. All of these settings can be changed after Windows is installed, but at this stage it is faster and easier to do so.
For those who like to understand and configure everything as they wish, it is offered short description parameters that can be customized, as well as more detailed information about them under the link "More about standard parameters". But I will explain everything to you in a simpler and clearer way, and also mention what is not written in the help.

Click the Configure button.
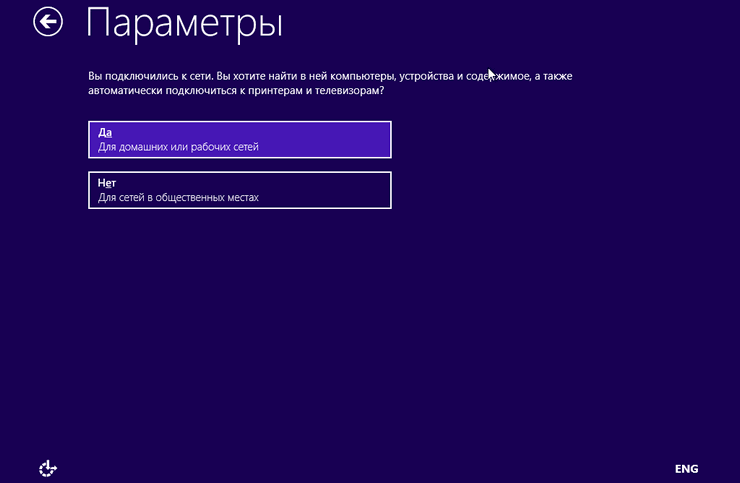
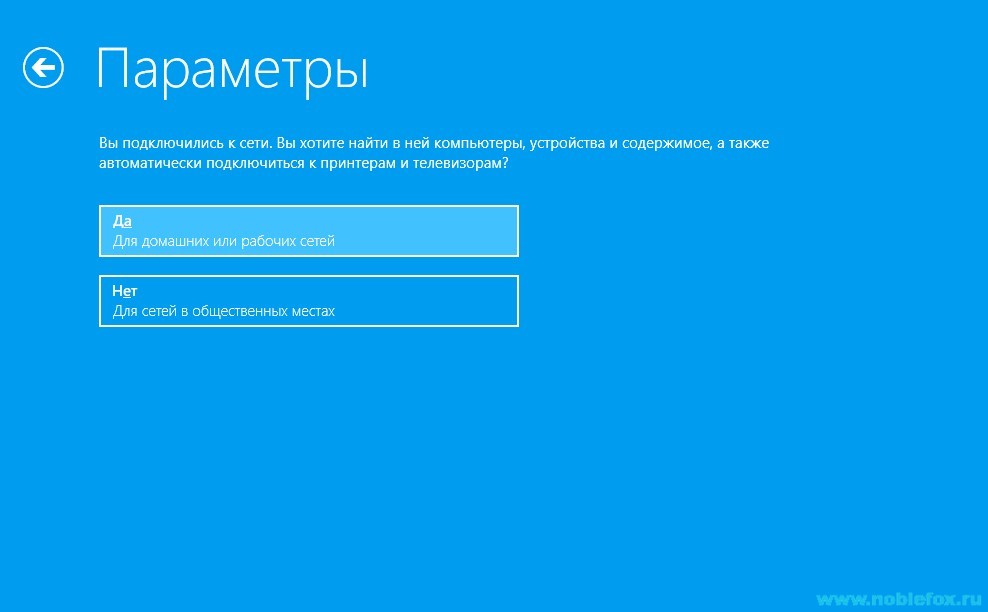
17.1. Network configuration
After that, if the computer detects the network, the network settings window may appear.
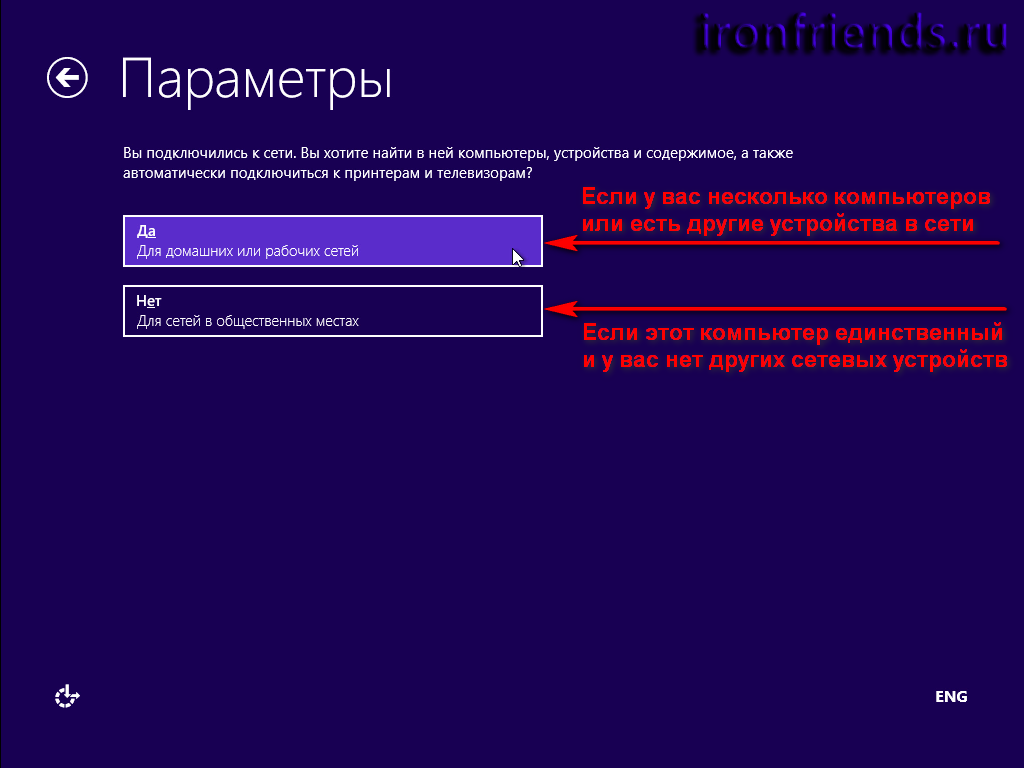
You are asked if you want the computer to detect other network devices. Such devices include other computers, TVs with network card or Wi-Fi, network printers, mobile devices, etc.
If your computer is connected via a router and you have other network devices, then select “Yes” (For home or work networks).
If the computer connects to the Internet directly or you have no other network devices, then select "No" (For networks in public places). In this case, the security of your internet connection will be higher.
17.2. Updating your computer and applications
To select the update installation mode, click on the "Windows Update" field.

In the drop-down menu, you can select one of 3 update installation modes.
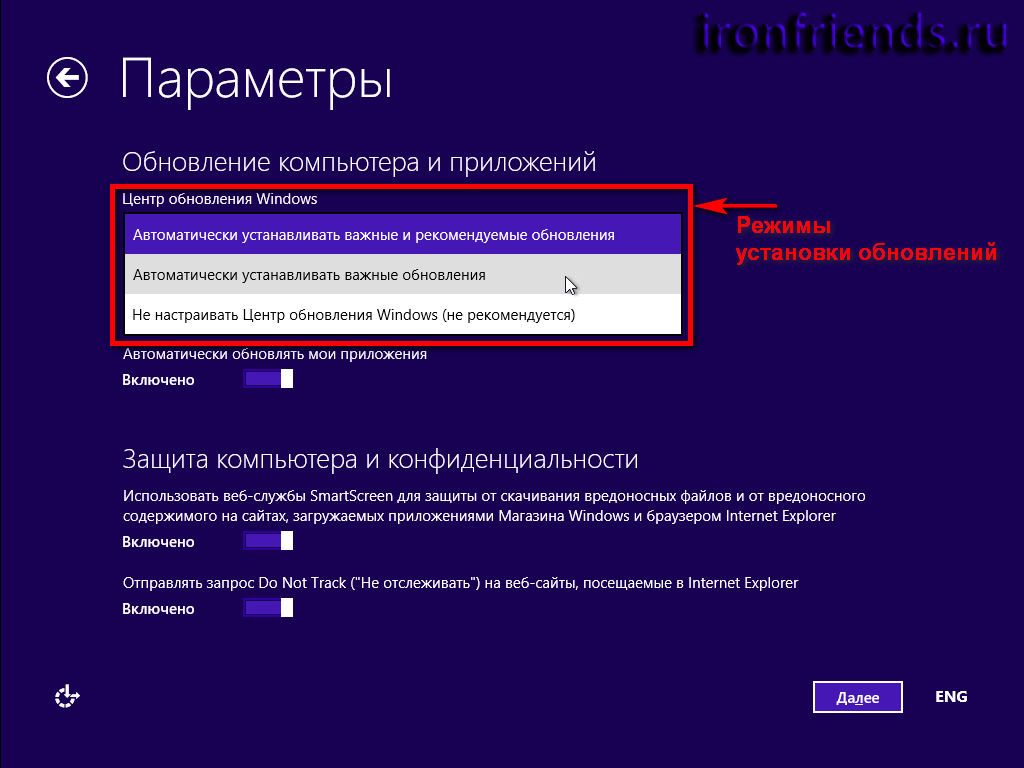
"Automatically install important and recommended updates" - Installs all updates. Important are security updates and bug fixes. Recommended - installation of additional services and other system components. Most experts advise using this mode.
"Automatically install important updates"- installation of only security updates and bug fixes.
Do not configure Windows Update - Updates will not be installed. Turn on automatic update, it will be possible later in the operating system.
On my own behalf, I want to say that if the protection of your data is important to you and you do not know how to protect yourself from security threats on the Internet, then you need to install important updates. On the other hand, multiple updates over time lead to a slowdown in the computer, and along with the recommended updates, a large number of unnecessary components are installed in the operating system. If you use your computer mainly for games, you have a well-configured security, you have a backup copy of the system and all personal files, then in principle you can do without updates and the computer will work as quickly as possible. Still, I recommend installing at least the most important updates.

There are two more parameters in the update group.

"Automatically get drivers ..." - disable this option if you do not want device drivers to be installed automatically. If you are not sure if you can find and install drivers yourself, leave this option enabled. Personally, I do not like it when the system itself updates the drivers, as this can affect the operation of programs, games and it is not always possible to understand what is wrong. By manually updating the driver as needed, you will be able to control the changes caused by it (for example, FPS in the game).
"Automatically update my apps" - turn off this option if you don't want apps from Windows Store updated automatically. Personally, I don't like most of the standard Windows 8 apps with the new interface, and I don't use them. Accordingly, it makes no sense to constantly update them, spending computer resources on this, increasing its boot time and cluttering unnecessary files... And any of the applications can be updated as needed independently.
17.3. Protecting your computer and privacy
There are only two parameters in this group related to "SmartScreen" and the "Do Not Track" request.

SmartScreen is a special service that sends suspicious sites and files to Microsoft for verification. It works in a browser " Internet Explorer»And the Windows App Store. It is not recommended to disable this feature.
Do Not Track - Internet Explorer sends a Do Not Track request to sites that tells them that you do not want these sites to collect your personal information for statistical and marketing purposes. You can leave this feature enabled, but in fact it does not affect anything, since each site decides to adhere to this recommendation or ignore it.
17.4. Finding solutions to problems on the Internet
These options are aimed at solving problems and improving compatibility.
"Use error reporting ..." - when an error occurs in the operating system or any Windows program will send the error data to Microsoft and try to find a solution to the problem on the Internet. This rarely helps, but it is better not to disable this feature.
"Use Internet Explorer Compatibility Lists ..." is intended to improve the display of some sites in the "Internet Explorer" browser and this option can be left enabled.
17.5. Sending information to Microsoft
These settings include sending information to Microsoft that Microsoft believes is useful for improving Windows.
The company declares that this data does not violate user privacy. On the other hand, even without these switches, nothing prevents the developer from secretly monitoring users. If you are a philanthropist or philanthropist, you can enable sending information to Microsoft. I prefer to save computer resources and do not enable these options.
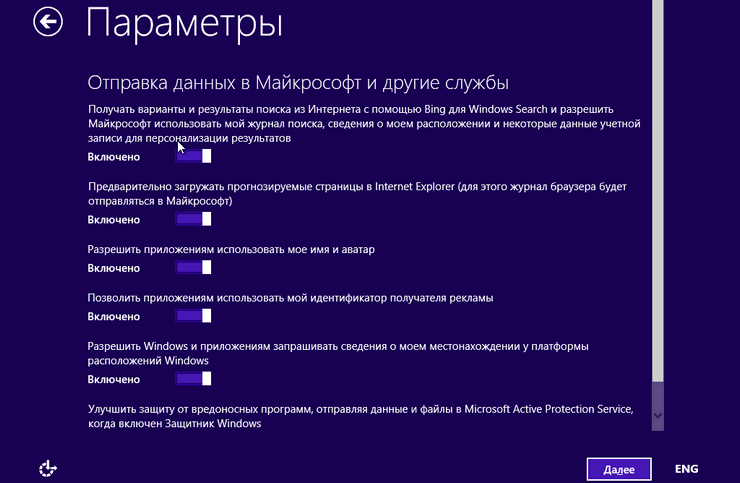
17.6. Sending data to Microsoft and other services
These options are intended for slightly different purposes than the previous ones and affect the user experience.

Get suggestions and search results from the Internet ... - The search bar that appears when you click the Search charm and is used to find files on your computer will also search the Internet using Microsoft's Bing search engine. Personally, I don't like this idea, since I'm used to using Windows search search only files on my hard drive, and for information on the Internet I search in a browser with using google or Yandex. If you do not want to search the Internet using the Search charm, which leads to unnecessary Internet queries, disable this feature.
"Preload Predicted Pages in Internet Explorer" - IE browser will load other sites based on frequency while you are viewing one site. If you are constantly visiting multiple sites, then this feature should speed up their loading process. But if you have limited Internet (for example, 3G) and you do not browse the same sites every time or your computer is not powerful enough (for example, a netbook), then it is better to disable this option.
"Allow applications to use my name and avatar" - programs like "Skype" will be able to use your account name and user icon (avatar) from Windows so that other users can see you. In my opinion, this is an interesting function, only the account name may be in English, and the icon has nothing to do with you, and it will only work in applications from the Windows store. So the value of this parameter is not that important.
Allow Apps to Use My Ad Recipient ID - Apps that display ads will serve ads based on your interests using information about what you searched on the Internet. In any case, the advertisement will be displayed. Personally, it seems to me stupid that I am repeatedly offered something that I no longer interest. Although, if you often buy something on the Internet (for example, clothes), then you may be interested in constant offers on this topic.
Let Windows and apps ask for my location is useful when viewing weather forecasts, navigational maps, finding nearby stores, and more. You can leave the function on. Location data is determined over the Internet using a Microsoft service.
“Improve protection against malware... "- information and suspicious files detected by Windows Defender will be sent to Microsoft to improve it and update signatures. If you do not want to help Microsoft in this, then disable this option, thereby saving computer resources.
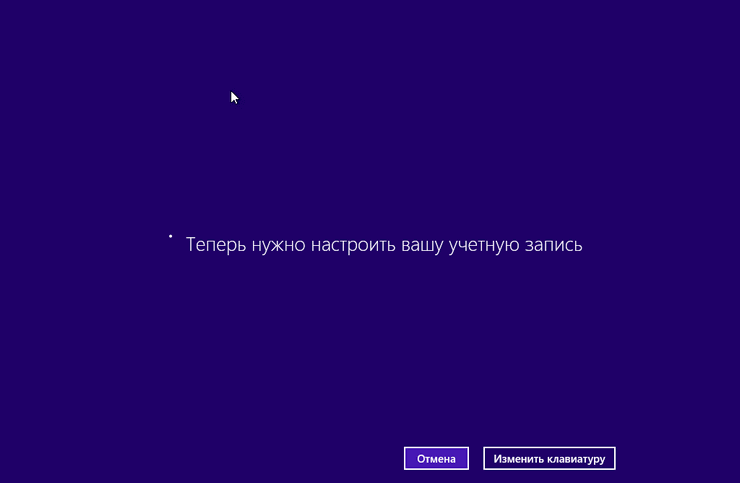
18. Logging in or creating an account
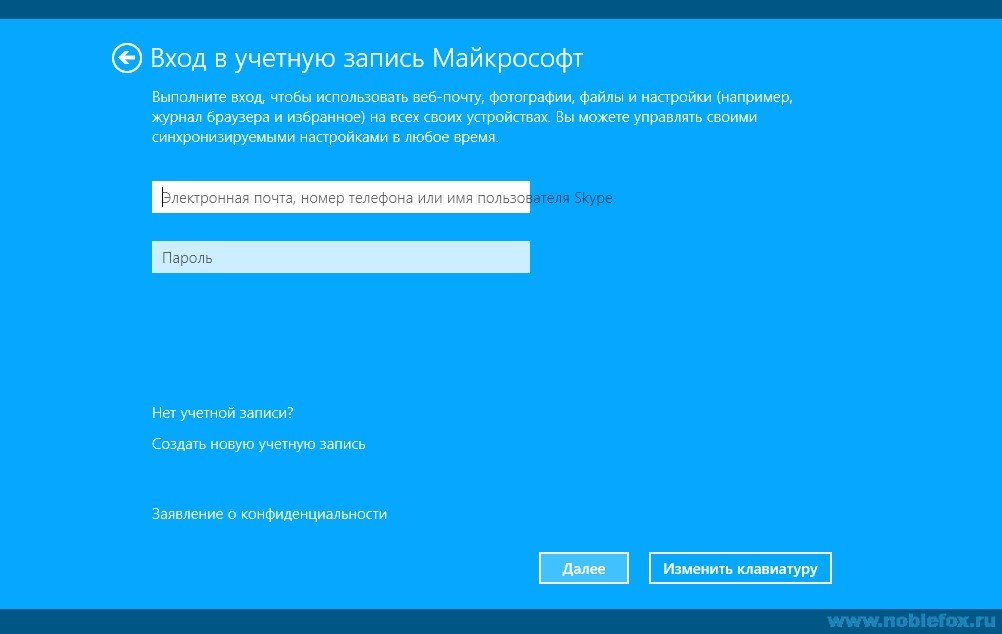
The next window prompts you to "Sign in to your Microsoft account."

If you already have a Microsoft account ( Windows Live, Xbox Live, Outlook.com, Windows Phone or OneDrive) and you know why you need it, then enter your login (e-mail) and password. The Windows Installer will then try to check this data over the Internet. If the data turns out to be incorrect, the installer will inform you about it, check the keyboard layout and try to repeat the input carefully. If the connection to the server fails, Windows will accept the settings, but synchronization will be possible only after the connection with the server is restored and the account is verified. If you still do not know what a Microsoft account is for, then read about it below.
19. What is a Microsoft account for?
A Microsoft account allows you to sync with Microsoft's OneDrive cloud storage:
- home screen design
- bookmarks and magazine Internet browser Explorer
- windows store options
- user files
Thus, if you reinstall Windows 8.1 or install it on your second computer (for example, on a laptop), your settings will automatically be restored from the Internet and you will not have to configure them again.
What do I have to say here. In principle, it is not necessary to synchronize the design of the initial screen. Synchronizing browser bookmarks is a useful thing, but most instead of the Internet Explorer browser use Chrome or Firefox, which have their own synchronization services. Windows Store options are great too if you use modern tiled apps. I personally don't like them. Synchronizing user files with cloud storage is a useful thing in the presence of fast Internet. But OneDrive can be set up and used without signing in to Windows 8.1. I also noticed that computers using a Microsoft account to log into Windows 8.1 take longer to boot. So I prefer a local account. But the difference is, in principle, small, and if you want to keep up with the modern trends in the fashion of computer technology, like to experiment and will use Windows 8.1 on several PCs, then why not?
If you don't have a Microsoft account, then you can create a local account that won't sync with the Internet, or get confused and create a Microsoft account that will sync with the Internet.
20. Creating a local account

Click Sign in without a Microsoft account.
In the next window, you need to enter the name of the primary user who will be the administrator of the computer.
I recommend entering the name in English letters without spaces, since the user profile folder will have the same name, in which the settings of programs and games can be saved. And some, even modern programs and games cannot save files to folders with Russian names.
In the same window, you are prompted to immediately set a password for this account and a hint, in case you forget it. I recommend not to enter the password at this stage, as in the process Windows settings, installation of drivers and programs, the computer will reboot many times and you just get tired of typing it.
You can set a password for the account after complete configuration and creation backup systems. Basically, if you are not afraid that someone might turn on your computer and gain access to confidential information or harm the operating system, then you can not use a password at all.
Click the Finish button.
21. Creating a Microsoft account
I warn you right away that you will have to get a little confused. It is advisable to have access to the Internet from another computer or mobile device(smartphone, tablet), email address and mobile phone... But in principle, you can do without all this.
Click "Create New Account".
21.1. Name, e-mail and password
Enter the Last Name and First Name in the appropriate fields (preferably in English).

You are invited to create new address e-mail (e-mail) on one of the Microsoft mail servers (outlook.com or hotmail.com).
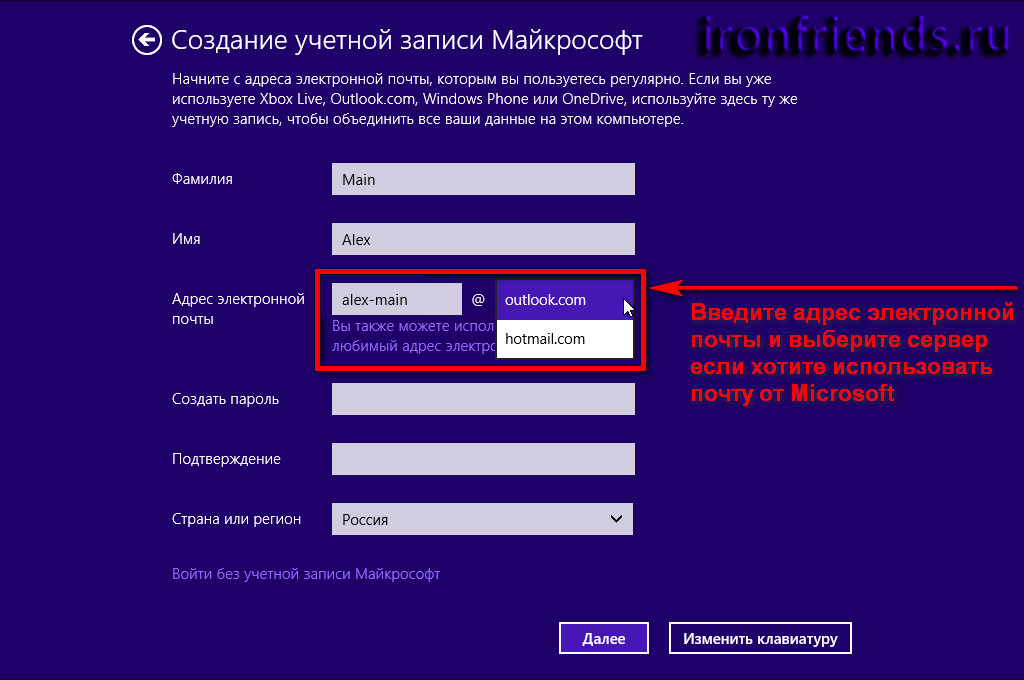
If such an e-mail already exists, then the message "This e-mail address is already a Microsoft account" appears.

Enter a different mailbox name or select a different mail server.
if you have e-mail on another mail server (@ mail.ru, @ yandex.ru, @ gmail.com, etc.), it is better to use it. To do this, click on the link "You can also use your favorite email address".

Then enter your valid mailbox, create New Password to sign in to Windows 8.1, confirm it and select the country you live in.

The password must be at least 8 characters long and must contain large, small English letters and numbers. The password should not contain your first name, last name and simple character sequences (qwert, 1234, etc.). Otherwise, the installer will not accept it.
21.2. Setting up SkyDrive (OneDrive)
After that, a window may appear (or maybe not) in which you can disable the function of backing up files and parameters in cloud service Microsoft. It used to be called SkyDrive but has been renamed OneDrive. In the Windows 8.1 installer, due to some misunderstanding inherent in Microsoft, the old name of the service appears. I don’t understand why create a Microsoft account if you don’t plan to use sync, but if you want to turn it off, click on the link “Turn off these SkyDrive settings”.

21.3. Add information to protect your account
The next window prompts you to enter your date of birth, gender, country dialing code, phone number and alternate email address.

I recommend entering all the data, including the phone number. This will allow you to restore your account in the event of a breach and loss of control over it. If you do not have one more mailbox, then you do not need to enter a spare email address.
21.4. Communication (feedback) settings
I am amazed at such Microsoft innovations as captcha input during the Windows installation process to confirm that you are a human, not a robot ... Microsoft probably implies the possibility of installing Windows by a humanoid robot that presses keys on the keyboard, but does not understand the picture
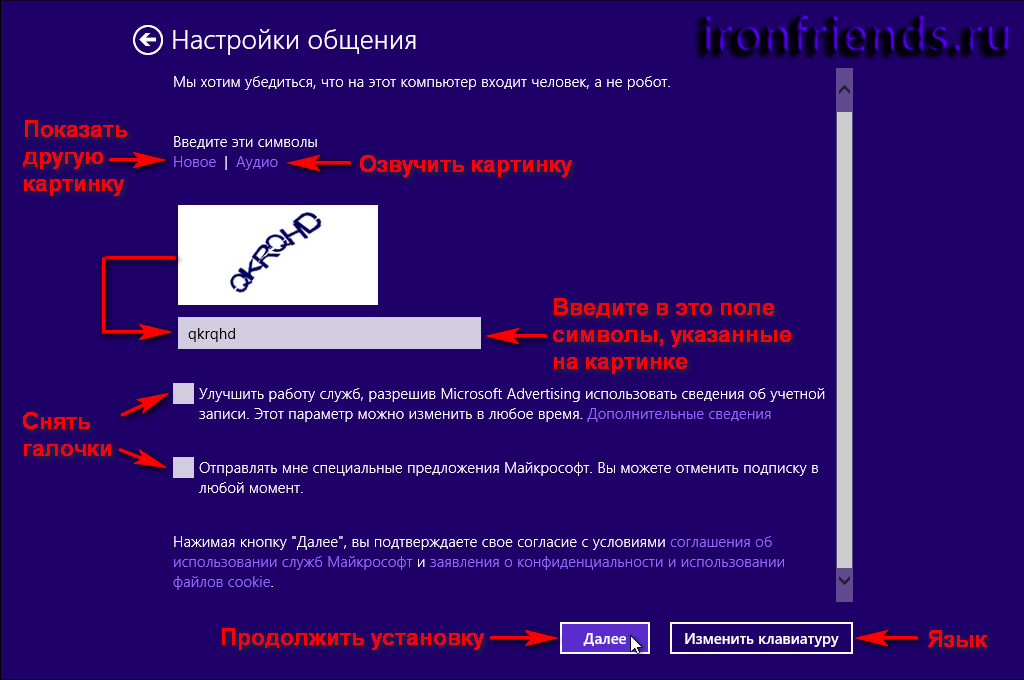
Enter the English letters shown in the picture in the box just below. Letters can be entered in both uppercase and lowercase. If you cannot make out the letters in the picture or the installer tells you that you made a mistake, click on the "New" link to display another picture and enter the letters shown on it.
Another Microsoft joke (or mockery of the visually impaired) is the "Audio" link, which is designed to say the letters depicted aloud. But I have never been able to take advantage of this opportunity, since there was no suitable driver in Windows. sound card... You may have better luck
Or maybe Microsoft just needs a little help, leaving the checkbox "Improve the operation of services ...", and they will make Windows even better. But I, having long lost hope, took it off ... I also unchecked "Send me special offers from Microsoft ..." I want to clutter up my mailbox, I have enough spam ...
21.5. Account confirmation
Microsoft again addresses us with the message "Help us protect your information", but this time I do not recommend ignoring their request. At this stage, you will need to confirm your phone number or e-mail.
Select a confirmation method, fill in the required field and click "Next". If you have previously received the code, then click the "I have a code" link. If you have not received an SMS with a code on your mobile and you do not have access to the Internet to confirm your email address, then click the link "I can't do it now." The installation will continue and confirmation can be done later.
In the next window, enter the code received via SMS or e-mail.

If you have not received the code by SMS and want to receive it by e-mail (or vice versa), click on the "Use another method" link. If you can't get the code, then click on the link "I can't do it now." The installation will continue and confirmation can be done later.
22. Final configuration and installation of applications
This is the final step in installing Windows 8.1. At this time, the background color of the screen changes and the current operation is displayed.
This stage is faster when the Internet is disconnected, but if you did not disconnect it before the installation, then it is already undesirable to do this. Please be patient, this process may take 5-15 minutes.
23. Login
At the end of the Windows 8.1 installation, if you entered your account password, a lock screen will appear.
Click or press any key on the keyboard to display the login screen.
Enter your password and click on the arrow or press the "Enter" key on the keyboard. Pay attention to the input language, otherwise you will not be able to log in. After that, the application tile should be displayed.
To get to the familiar desktop, select the tile of the same name. If you did not set a password for the account, the desktop may appear immediately after the computer boots.
To control the computer (setup, shutdown) move the mouse pointer to the lower right corner. To turn off or restart your computer, click on the gear icon.
And then on the shutdown button and select the desired action.
24. Activating Windows 8.1
If during the installation you entered a license key, then Windows activation 8.1 will happen automatically when you connect to the Internet.
If you did not enter the license key, then activation will not occur and after 3 days, activation reminders will begin to appear. But you can continue to use Windows 8.1 further. After 30 days, activation reminders will occur hourly.
To perform activation, you can purchase a licensed version of Windows 8.1 in the store, a separate license key on the Microsoft website, or activate Windows 8.1 in another way
That's all. And in the next article I will tell you how to return the familiar "Start" button, use the default desktop and configure other parameters in order to use Windows 8.1 as familiar and convenient as Windows XP and Windows 7
25. Links
Today, an operating system such as Windows 8.1 Pro is the latest distribution from Microsoft. Despite the high popularity of the OS, it has both a lot of fans and a considerable part of opponents. In this article, we will consider all the nuances of the operating system, as well as get acquainted with the method of installing this software.
Benefits of Windows 8.1 Pro
Return of the familiar Start button.
It is important to note that the developers of the Windows 8.1 operating system have heard the wishes of their users, and have returned the usual for everyone. " The updated Start button received new features, in the form of an arrangement on the taskbar, as well as, instead of the usual menu, opening the Metro interface. At the same time, the developers have significantly improved and optimized the new tiled interface.
Return to the desktop.
Many Windows 8 users have complained that after restarting the PC, the system will automatically go to the “Metro” interface. In version 8.1, this wish was fully satisfied.
Improvements to the initial screen.
Many Windows 8 users have drawn the analogy that the Start screen is very similar to the version 7 Start menu. The developers have fixed this bug by banning again installed applications displayed on the home screen. 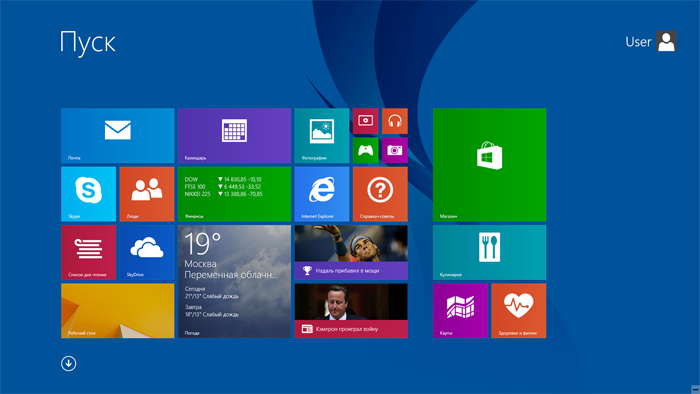
Also Windows user 8.1 Pro introduced an alternative home screen interface. Now the computer owner has the right to choose between Metro tiles and familiar lists.
Returning a combined search.
Search is one of the most requested features by most users. At the same time, many criticized the 8-ku because of the division by file type. search engine... In Windows 8.1, combined search returned as an additional feature.
Deep customization.
Windows 8.1 developers have taken care of the individual configuration of devices. Now a huge range of additional parameters opens before the user, which he can change depending on his own wishes. Also, in addition to the classic look of the options panel, a modern look was added and completely redesigned. Of course, the similarities between the two customization interfaces remain.
Changes in IE 11.
The unloved browser from Microsoft has gone through a lot of changes. The updated IE 11 received a modern one in addition to the classic interface. It is worth noting that the developers completely managed to optimize the work of IE 11, due to which the native browser became the best solution for touch screens. 
Disadvantages of Windows 8.1 Pro
Incompatibility of programs and drivers.
For many users of the updated Windows 8.1 Pro, it was a surprise that correct work favorite applications. This disadvantage of the system arose due to the fact that the driver model of the operating system was radically changed. To a greater extent, the problem of incompatibility of version 8.1 Pro affected game lovers. To a lesser extent, the problem has worn out the nerves of consumers of antivirus software, but there is always a concern that along with the update, the program may stop responding.
Update interruptions.
After the official release of the updated version of Windows 8.1 Pro, millions of users rushed to immediately receive a new product. As a result, very few people managed to achieve the desired result the first time. First, the update weighed a whopping 4 GB of disk space. Secondly, a prerequisite for downloading was the presence of broadband Internet. And thirdly, the update can be downloaded only to one computer, that is, having updates, you cannot throw it off for installation on another PC.
Despite a lot of controversy, the decision to install Windows 8.1 Pro is always up to the user.
Create installation media
There is one way to reinstall Windows 8.1 Pro, but two different media. The carrier of the Windows operating system can be either a disk or a flash card. Of course, it will be good if there is a licensed version of the OS, but in this case we will consider self-installation and creating a Windows image.
First, let's take a look at how to burn the Windows 8.1 Pro operating system directly to a CD. For us we need:
- Windows 8.1 Pro OS image (can be downloaded from any torrent tracker).
- The presence of a computer with a working disk drive.
- Installed UltraISO program.
- 15 minutes of free time.
It is important to remember that the system image can be written through any program for writing files to disk. In this case, we consider recording through the "UltraISO" program, since this method is the most understandable for a novice user.
Consider writing an image to disk in the form of step-by-step instructions:
- To get started, insert a blank DVD into your DVD burner. It is important to use DVD-R and DVD-RW discs as they have the maximum capacity.
- Opening earlier installed program UltraISO.
- In the context menu, go to the "File" - "Open" tab.
- In the window that appears, find the image necessary to install the system and click the "Open" button.
- Then go to the "Tools" tab - "Burn CD image".
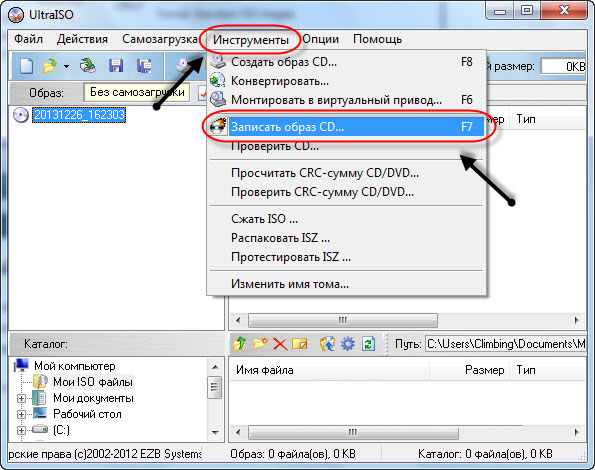
On a surface work area a new window will open, where you will be required to confirm the previously selected parameters for recording. Please note that in the "Drive" tab there should be the name of the recorder with the blank disc... It is important to remember that the lower the write speed of the disc, the more likely it is that the information will be written to the CD safe and sound.
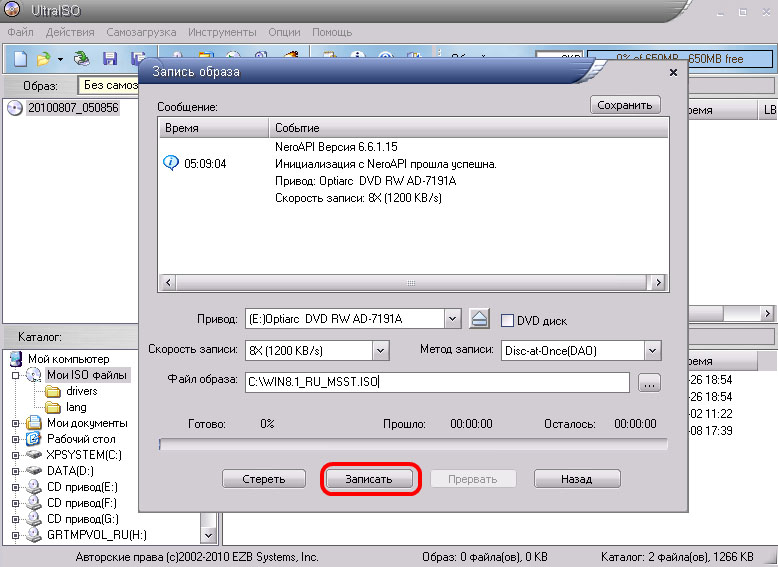
After confirming all the parameters, click on the "Save" button. As a rule, burning continues for several minutes, after which we get a ready-made media for installing Windows 8.1 Pro.
Writing an OS image to a flash card.
 As time goes by, CDs are a thing of the past, which is why most new computers and laptops come without a floppy disk drive. That is why we will consider a way to create a bootable flash card.
In this method, we will consider writing the operating system to a flash card using the previously familiar UltraISO program. This method is the most simple and practical, since writing a flash card through third party programs or the command line for a novice user will be a daunting task.
To capture an image of Windows 8.1 Pro, we need:
- 8GB blank flash card (USB 2.0).
- Previously preinstalled UltraISO software.
It is important to remember that the files on the flash card will be completely deleted after formatting. For correct recording, it is recommended to set the file system type "NTFS" in advance.
In order to record windows image 8.1 Pro, you must follow the instructions below:
- Download the operating system image.
- We open the program "UltraISO".
- In the context menu, execute the "File" - "Open" command.
- In the window that opens, select the previously downloaded image of the Windows 8.1 Pro operating system.
- After opening the image, we will see all the available files that will be located after recording on the flash card.
- In the context menu, perform the following actions: "Bootstrapping" - "Write image of tough disk ".
It is recommended to leave the values unchanged in the pop-up window, and press the "Save" button. In a new pop-up window, we confirm the formatting of the flash card, and monitor the recording process. Upon completion of the burning, we get a ready-made Windows 8.1 Pro OS for installation.
Reinstall Windows 8.1 Pro
To install the operating system, insert the DVD / flash card and press the computer restart button.
When the computer boots for the first time, press the F2 / F10 / F12 / Delete key in order to enter the BIOS and change the boot parameters of the devices. In the BIOS, you must set the boot DVD / flash card first. It is important to save the new parameters after changing the settings.

When the computer boots up, after seeing the inscription "Press any key to boot from CD or DVD", press the "Space".
After loading the system files, select the interface language and click the "Next" button.
In the window that appears, enter the product key or skip this step.

Click the "Install" button, and proceed to the choice of the installation method. After reading the license agreement, put a checkmark in front of "I accept the terms of the license agreement" and click "Next".
In the newly appeared window, select "Custom installation type", since you will need to format the system drive to install Windows 8.1 Pro.
After selecting a formatted partition, click the "Next" button and wait for the system installation to complete.

Upon completion of the installation, you must select a color scheme, enter a username and set the current date and time.
 How to put a lattice on a laptop How to type a hash symbol on a laptop
 Windows operating system All types of Windows
 Where is the file sharing site on the computer