How to enter BIOS on a Lenovo laptop. How to enter and configure the BIOS of a laptop LENOVO G500, G505 to install WINDOWS from a USB flash drive or disk
Entering BIOS for system administrators is a common procedure. Most users do not delve into the intricacies of setting up a computer or laptop, do not try to reinstall Windows on their own or use booting from a USB flash drive or CD / DVD, and generally have little idea about BIOS. For them, entering the settings of the basic I / O system is not at all necessary. Moreover - not having an idea of what and where you can configure in BIOS- you can "mess things up": in the best case, the computer simply will not boot, and in the worst case, you can irreparably damage the hardware. Usually the central processor suffers due to its (over-) overclocking and overheating ... However, if you are theoretically savvy, but have difficulty with by the entrance to the BIOS, we recommend that you familiarize yourself with the most popular ways to open its settings.
The most popular method.Go to BIOS on desktop computers familiar to all (desktop / stationary computers) it is usually quite simple - for them, for a long time, the button “ Del". In more modern models of motherboards, there is an option using the " F2". In most cases, when you turn on the computer, on the very first screen with information about the hardware, there is a hint like “ Press Del key to enter Setup Menu". Instead of " Del"A different value may be specified, but this is rather an exception. By the way, the screenshot contains a hint about how to enter the boot menu. It is to select the device from which you want to boot (usually USB Flash or CD / DVD drive) most and try enter BIOS.
Depending on the settings / configuration of the computer, this screen may appear from a split second to several seconds. To open BIOS settings you should press the button indicated in your case (until the download proceeded further). Usually they do this - when the computer is turned on, the desired key is pressed at intervals of a little less than a second. before the appearance BIOS menu ... Its modern modifications may have different looks, but ... I think you will recognize it. The screenshots show user interface motherboard "MSI Z77A-G43" and the menu for the virtual VMware machines... In the first case, we see a modern version in graphic mode with mouse support and blackjack, and in the second - an ascetic "text" menu. Note that even the VMware virtual machine has a choice of boot device.
Go to BIOS on a laptop.
I can't say why, but manufacturers don't give it so easily go to BIOS on a laptop in modern models. It so happens that when turned on, none of the " F1 ... F12»Do not allow you to open the desired settings. Recently, owners of Lenovo Notebooks of various models have come to me more often. For several modifications Lenovo G500 laptops enter BIOS succeeded by pressing the key combination " Fn + F2"After switching on (" Fn + F12"- boot menu). As it turned out, this is a fairly simple way. For Lenovo B590, everything turned out to be a little different ...
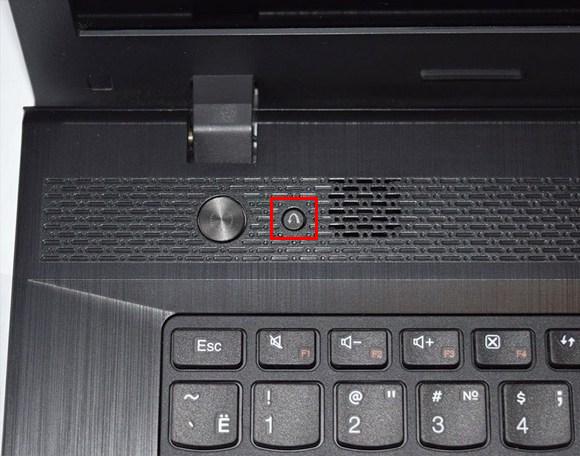
When I got in my hands laptop Lenovo B590 go to BIOS did not help either " F1 ... F12", No key combination" Fn»+« F1 ... F12". Everything turned out to be quite simple - there is another one next to the power button. additional key ... This is exactly what you need to press when off laptop... When you turn on this button, you get to service menu, which will allow you not only to get into the settings discussed in the article, but also to perform a number of other service operations.
Laptop manufacturer Lenovo G590 prudently added several language localizations for this " engineering regime". Among others, there are English and Russian languages. To go to BIOS would need 6 (six!) mouse clicks: select the Russian language, specify the Russian keyboard layout, enter the "Diagnostics" menu, open the "Additional parameters", select " UEFI Firmware Options", Click" Restart ". This is how the process evolved from one button " Del"To the chain with the most illogical (for me) item" Diagnostics ". After Lenovo G590 laptop will be loaded again - it will appear in front of you BIOS menu.
The site already has a number of articles that mention or imply a change in the boot device. For example, an article about or. Both articles describe the operations that are performed after booting from a USB flash drive... It is to install a boot from a USB flash drive that many want to get into BIOS settings, although this is not at all necessary due to the presence of a separate Boot Menu to choose Boot Device.
BIOS is very important computer program written on the chip of the motherboard. It allows the user to change the settings of the software and system software, making them low-level, provides assistance in repairs, and acts as a regulator in the operation of the motherboard. The first thing the wizard does when a computer or laptop breaks down is to enter the BIOS. In 80% of a hundred, it is from there that he receives information about the causes of a system malfunction.
Common ways to sign in on a Lenovo laptop
The most common and well-known way to enter the BIOS is by pressing the Delete key on the keyboard. However, some computer and laptop manufacturers, including Lenovo, have defined other login methods for their systems.
When choosing Lenovo when buying a manufacturer, you must remember that the computer equipment of this company is produced, as a rule, with an already installed operating system. If you want to reinstall the software on your laptop, you may face a problem: almost all modern models ignore the operating system you want, trying to return the computer to the original one. For this, you will need the ability to log into BIOS on your own in order to get around this problem.
Depending on the Lenovo model, you can enter the BIOS in several ways:
- press and hold the F1 or F2 keys;
- press the DELETE button;
- press the Novo Button.
Almost all modern Lenovo laptops have a button on their panel or side edge Novo Button... Finding it is not difficult. The manufacturer highlighted it with a corresponding pattern - a curved arrow.
If you need to get into the BIOS on a Lenovo laptop, then instead of the power button, you need to press the Novo Button. At boot, the system will enter BIOS.
Please note that the BIOS will not appear on the monitor immediately. To enter the program, you need to perform one more step - find in the menu " Novo Button"Laptop boot option" BIOS Setup", Which is selected with the mouse button. After selecting, press the Enter key on the keyboard. You are logged into the software.
How to enter BIOS from the Windows 8.1 operating system in a Lenovo laptop
This login method is not as common as the previous ones, but, nevertheless, both ordinary users and programmers use it successfully. It is proposed by experts for those cases when the laptop keyboard or the BIOS entry keys are faulty. Let's look at how to enter BIOS in this case.

Entering the program requires the following actions:
- Download the laptop with the Windows 8.1 operating system already installed.
- Select with the mouse pointer " Options"In the lower right corner of Win 8.1.
- Go to " Changing User Parameters"And choose" Updating and restoring».
- Select with the mouse pointer " Recovery» - « Special download options».
- Then you need to reboot the system by selecting the item " Reboot now».
- The “ Diagnostics". Here you need to select the function " UEFI Firmware Options».
- Restart the laptop again.
After completing a number of the listed actions, you will be taken to the BIOS. Remember that this login is only possible for Lenovo laptops with Windows 8.1.
Booting a Lenovo laptop from a USB flash drive via BIOS
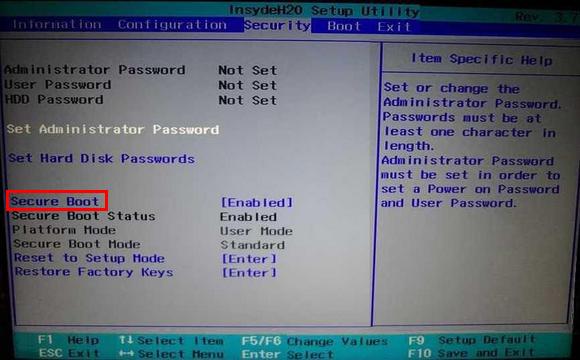
Most often, this operation is performed by specialists in order to cure a laptop from viruses. Various software is written to removable media, but it is usually not so easy to boot from it. The problem is that all the latest Lenovo laptop models, starting from the 2013 release, have UEFI BIOS software that has Secure Boot certified security keys. It is they who allow you to boot a laptop only when using a licensed installation disk Windows 8.
In order to boot from the media in such a BIOS, you must disable Secure Boot in it by following these steps:
After all the steps taken, the laptop will start the next boot from the USB flash drive.
Please note that for some Lenovo models, disabling just one Secure Boot setting may not be sufficient. You may need to enable Compatibility Mode to boot the system from removable media.
In various models, it can be referred to as CSM OS, CSM Boot, Legacy BIOS, UEFI and Legacy OS, or simply CSM.
BIOS capabilities in Lenovo laptops
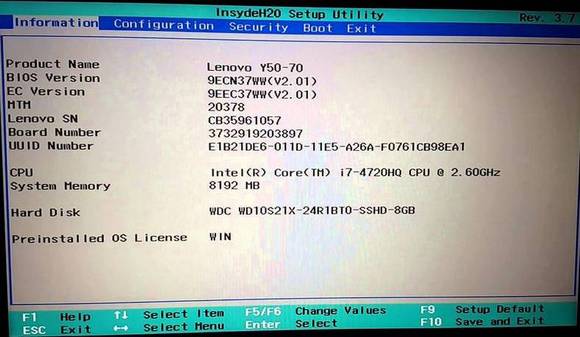
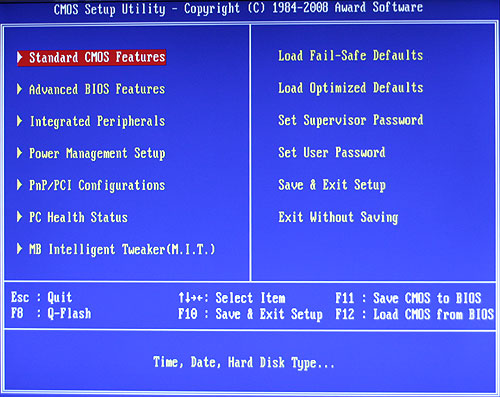
Since the main task software BIOS is testing a laptop, then the program itself is displayed on the monitor as a table, divided into a number of additional tabs. They inform the user about the configuration of the laptop, show the main specifications of this model, make it possible to download and configure the security system. On the screen, all these sections are displayed as "", " Configuration», « Boot», «», « Exit».
Pay attention to an important detail. When moving to the BIOS, the mouse connected to the laptop stops working, therefore, being in the software menu, navigation is carried out using the buttons with pointers. It must be remembered that in all configurations, without exception, the changed settings begin to work only after they are saved and the laptop is rebooted.
Remember that BIOS, like any other software, requires regular updates. Do not use dubious sites and blogs for downloading. All products installed in Lenovo laptops can be downloaded and updated from the manufacturer's official website. And it is preferable to do this on the same computer where you are going to change the software. You can find out the BIOS version by going through the POST procedure when you press the Pause / Break key.

You already know how to enter BIOS.
Conclusion
Every novice user should understand that the BIOS software is a system with which the basic settings for quick and functional work laptop. And therefore, changing them, you must clearly understand what exactly you are doing. It is better for unsure users to consult with a specialist or entrust him with testing a laptop.
Related Videos
Instructions
Connect your Lenovo laptop to AC power. If power is suddenly cut off during BIOS operations, this may adversely affect the continued operation of the computer.
If you do not have instructions for a Lenovo laptop at hand, you will have to go online and find out the necessary information on the manufacturer's website (http://www.ibm.com/ru/ru/). This can be done both online and by downloading the instructions in the form of a detailed PDF file... In order to read this manual, the computer must be installed special program, for example, Adobe Reader (http://www.adobe.com/ru/) or Foxit PDF Reader (http://www.foxitsoftware.com/).
If, for technical reasons, access to the Internet is not possible, then you will have to act independently. Turn on the computer and watch the information appear on its screen. Usually, to make life easier for the user, at the very beginning of the laptop, for a couple of seconds (just while the BIOS conducts a test poll of computer devices) a hint appears in the form of a key name or a key combination that must be pressed and not released until then, until the laptop enters the BIOS table.
Pay attention to the designations F2 and F12. It is these keys on a Lenovo laptop that are designed to interrupt the test polling of devices and prevent booting. operating system.
Press and hold the F12 key on your keyboard. Thus, you indicate your desire to enter one of the BIOS partitions, which is called Quick Boot. This small but very important subset of the computer architecture is designed to prioritize the boot of the computer. Going into the priority table, you can change the order in such a way that after successful work BIOS computer first I acted, for example, to the CD-rom, then to the USB-port and only then to the HDD. Such operations with the boot line are typical for the reinstallation of the operating system on a Lenovo laptop.
Press F2 to enter the main BIOS menu. Here advanced user accesses the settings of a large number of parameters various devices... Unlike conventional PCs, Laptop BIOS also allows:
Set up a security system;
- change the nature of the touchpad;
- correct the output of the image on the display;
- calibrate the battery, and also see serial number device, its motherboard and other equipment.
BIOS is basic software that allows you to interact with your computer without accessing a disk. It contains codes thanks to which you can control any device in the system, ports and disks. The BIOS is hardcoded into a ROM (ROM) chip on the motherboard. In most cases, at system startup, data is copied from ROM to RAM, the performance of which is much higher.
BIOS is standard, works flawlessly. However, in situations where the microcodes are not sufficiently developed, there is a discrepancy between the motherboard and integrated devices, more modern equipment appears, and it becomes necessary to reinstall the BIOS.
What is required to reinstall the BIOS?
To flash the BIOS, you will need specialized utilities developed by the motherboard manufacturer or other companies. With the help of these installation products, all the necessary firmware is entered into the CMOS chip. It is advisable to use the "native" utilities that are available on the disk supplied with motherboard, since they are fully adapted to specific equipment and exclude the possibility of failures or errors.
Since CMOS in modern motherboards is something other than flash memory with microcodes and settings, in order to correctly install the BIOS, you need to find a file with its corresponding version and a flasher program.
By the way, it is better to flash the BIOS from Windows, because it is more convenient. A similar operation from DOS will take a long time, require some ingenuity, although it is more reliable. Moreover, here you will have to create boot floppy with flasher and BIOS firmware.
And a few more important nuances. Before starting work, it is important to make a backup of the current BIOS version to external media using a flasher program. This will allow you to revert to the old version of the software in case of failure.
It is necessary to provide a stable power supply due to the "uninterruptible power supply". Otherwise, sudden sudden power surges will reduce all work to NO.
At per BIOS firmware from Windows, you will have to close all active applications and disable antivirus programs.
What do you need to be prepared for if you need to install a new BIOS?
Even a minor mistake in flashing the BIOS can cause serious complications. Therefore, you should prepare in advance to eliminate them. In particular, if the power is turned off or the system hangs, you will have to use the programmer. Although in this case it is advisable to turn to specialists.
With an incomplete BIOS flashing, it is rational to use the following method:
- We remove CMOS from a similar working motherboard turned on.
- We put several threads into the nest, thanks to which it will subsequently be easy to remove the microcircuit.
- Install the damaged CMOS, damaged analog.
- Run the firmware
- When the motherboard is off, we make a reverse exchange of microcircuits.
Sources:
- how to rearrange bios
If you often work with a laptop, then various errors may appear, and from time to time a situation arises when the laptop refuses to boot due to erroneous settings made in the BIOS. In this regard, it is required to reset it to zero.
Instructions
First, you need to find and download a program that will allow you to reset the BIOS. BIOS_PW.EXE can be used as such a program. You can download it from the website http://intellcity.ru... After downloading it, you need to unzip the program and run it. This utility is not installed on a computer, but simply launched from an archive or folder. Alternatively, you can use another program that will also help you reset the BIOS to laptop... The most optimal utility is unlock6.exe. Download from the site http://necessary-soft.net... The actions will be the same as for BIOS_PW.EXE.
Next, when you boot the computer, you need to remember the error code that the laptop gives out. Most often, this code will appear after three attempts to enter. Now you need to enter the cmd console, and then go to the software directory (Software). Next, you need to enter the name of the required software, enter the error code after a space, and after another space - the number 0. After that, you can press the Enter button. The software will generate several passwords. Try to enter each password until one of them works.
Next, you need to go into the BIOS and insert the specified password. You should now be able to set the new password as blank. It is very important to reset the existing BIOS password. On this, resetting the BIOS to laptop completed.
Related Videos
BIOS is the holy of holies in the world of computers and programming. After all, this is a kind of "beginning" of working with a computer. It is thanks to the BIOS that you can install a new operating system, remove the old one, break HDD into several departments and much more. But here's how to get into this very BIOS?
Instructions
To be fair, it is worth noting that most computers are very similar in their device. Therefore, in order to perform this or that operation, one should simply perform a certain set of actions. This applies not only to stationary computers, but also to laptops.
Therefore, in order to get into the BOIS, you must perform some actions in a certain sequence. Both on a desktop computer and on laptop... So, let's begin. First, you need to start the computer, if it is turned off (if it is turned on, start the restart via the Start menu).
Next, carefully look at the screen. An inscription in English will appear in the lower part, where the name of the key that will need to be pressed in order to enter the BIOS will be highlighted in large print. Basically this key is F2 or F12. It all depends on the components of the computer. But, as mentioned above, the mentioned keys are the most common.
When you see the name of the key, you should immediately press it. To be sure - it is better several times. Otherwise, you will have to restart the computer again and carry out the above operation again.
If the first time you managed to enter the BIOS by pressing the required key - great, you can continue to work.
When everything you need has been reviewed and, if necessary, changed, you can leave. This is done just as easily - press the F10 key if you want to save the changes and exit. If you don't need to save anything, you can see the “EXIT” tab at the top of the screen. Highlight the tab, press "Enter", and then the letter "y" as an answer to the question, do you really want to exit.
BIOS is safely left behind. Logging in and out successfully. The goal has been achieved.
Related Videos
Sources:
- go to bios
Usually, users go into BIOS when installing an operating system to change the order of boot devices. Different laptop models have different motherboard models, so the procedure does not always look the same.

Instructions
Turn off your laptop. If you have a Sony of the latest models, then to enter the BIOS, press the F2 key when loading. Enter your password if required. In some models, pressing the F2 key is relevant, but this is more true for older versions. F3 is found in very rare models. It will not be superfluous to familiarize yourself with the specification of the motherboard.
To do this, look at its labeling in the device manager. To do this, using the "Start" menu item, click right click mouse on the position "My Computer". You will see a new small window on the screen with the parameters of the laptop and the operating system. On the Hardware tab, select Device Manager.
Find your motherboard, remember its model, find it on the Internet, how will it be correct to get into the BIOS on this particular model. If you don't have the option. try to find the combination you need for your computer by trying and reading the manuals that come with the kit.
If you have an older Dell laptop, use the F2 + Esc keyboard shortcut, or any other key that appears on the monitor screen when the computer boots. If you have a Dell Studio laptop, try the Esc + F1 key combination.
To get into the BIOS of a Toshiba laptop, use the same method as in the previous paragraph (Esc + F1), but note that some of its models support the BIOS launch when you press the F8 key.
If you have Packard-Bell laptop, Gateway - be sure to look at what is written on the boot screen, try using the previously used Esc + F1, Esc + F2 combination.
For some Acer, use the three-key combination - Alt + ctrl + Esc. For rare Dell and HP models, it is typical to press F3 to access the BIOS.
note
Be careful when changing settings and saving them later.
Write down the access combination for your laptop for future reference.
Computers compatible with IBM PCs are equipped with a ROM chip that stores a special program - BIOS. It is she who starts immediately after switching on, checks the health of the equipment and transfers control to the operating system.

Instructions
A separate battery-powered static memory chip is used to store BIOS settings. These settings are changed using the CMOS Setup utility included in the BIOS. It is impossible to call this utility after the operating system has already started loading. Therefore, in order to enter it, you will have to restart the machine or start it from a shutdown state. Immediately after that, start quickly pressing the "Delete" key until the utility starts. If the operating system starts loading anyway, reboot, but this time instead of "Delete" use the "F2" key. The first of these keys is used mainly in desktop computers, and the second in laptops, but it also happens the other way around.
You may be prompted for a password after entering CMOS Setup. Enter it. If the computer is someone else's, and you do not know the password, do not try to bypass this protection. If you just purchased a used motherboard, and the owner forgot to turn off the password, turn off the computer, remove the battery from the board, close the contacts of the holder (but not the battery itself), open them, and then put the element back.
The BIOS is a very important component of the computer and is a part of the system software. With its help, when the computer is turned on, the operability of all components is tested and checked. It allows the user to make changes to the operation of individual components of the computer, set the boot priority, date and time, etc. In this article, we will look at how on laptops from Lenovo.
V different models Lenovo brand notebooks the input is slightly different. If you want to see how to do this for the first time, you can read the instructions for your laptop. There is also a way to find out which login keys your model is using. Within 2-3 seconds after turning on the laptop, they are displayed on the screen as a hint.
In general, in most Lenovo models, the F2 key or the Fn + F2 combination is used to enter the BIOS. But not all models respond to their pressing.
In order to enter the BIOS on the Lenovo g50 model, you need to press a special button, near which an arrow is indicated. This button is located near the power (charging) input. On a switched off laptop, press and hold it until the "Novo Button Menu" appears.
Then use the up / down arrows to select "BIOS Setup". Thus, you can go to the settings in the BIOS. If you change something in the settings, press Fn + F10 to save the changes and exit. After that, you will be prompted to save the changes and then press Enter to confirm them.
How to enter settings on a Lenovo b50-30 laptop
On this model, you will not enter the BIOS settings using the Delete, F2, F8 or F10 buttons, and there is no button near the power input. The button for calling the “Novo” menu is located on the right side near USB port... In order to press this button, you need a pin or sharp object. Then you will be taken to the “Novo Button Menu” menu.
Configuring BIOS on Lenovo b50-70 to install boot from a USB flash drive
To configure booting from a USB flash drive to Lenovo b50-70, install it into the USB port and go to the settings using the Fn + F2 key combination. Go to the Boot tab in the Boot Mode section and change UEFI to Legacy Support. In Boot Priority, we also change to Legacy First. Then we exit and confirm saving the changes.
After restarting the laptop, you again need to go into the BIOS settings by Fn + F2. Go to the Boot tab. Here, in the Legacy section, a hard disk, a drive and a USB flash drive have appeared. To boot from a USB flash drive, transfer it to the first place using the Fn + F6 keys.
After installing the operating system from a USB flash drive, you can return the default settings (to factory settings) in the Exit section. Here we select the item Load Default Setting.
Features of entering BIOS on laptops with Windows 8
Consider how to log into BIOS on a Lenovo v580c laptop with installed Windows 8. After pressing and holding the special button (with an arrow) near the power input, the recovery window appears Windows systems 8.
Select the language, keyboard layout, then the "Diagnostics" mode (computer recovery). Then go to "Advanced Settings", then to "UEFI Firmware Settings" and click on the "Restart" button. After we get to the BIOS menu.
Another case is when after installing Windows 8 on a v570 laptop, the BIOS entry keys F2 and F12 are automatically blocked. Also, this model does not have a dedicated Novo button.
To unlock them, you need to remove the battery, unscrew the bottom cover and remove the battery for a few minutes. Thus, the BIOS settings are reset. After that, the keys will be unlocked.
The Lenovo G50-30 Model 80G0 laptop was brought to the reinstallation of the operating system from Windows 8 to Windows 7. Excellent design of the laptop, not expensive and with usb 3.0. How to enter the BIOS of a Lenovog 50 laptop to select boot from a drive or a flash drive?
Lenovo G50-30 Model 80G0 how to enter BIOS?
To enter BIOS (boot menu) on Lenovo G50, you need to hold down the "when you turn on the laptop" button
Novo button
Novo Button - Launches Lenovo One Key Recovery System or configures Bios in Lenovo G50. Turning on is possible when the laptop is turned off or in sleep mode
Install Windows 7 on Lenovo g50 laptop
To install Windows 7 on Lenovo (Lenovo) G50, you need to change to Windows 7 OS in the BIOS in the Exit -> OS Optimized Defaults -> Win8 64bit tab.
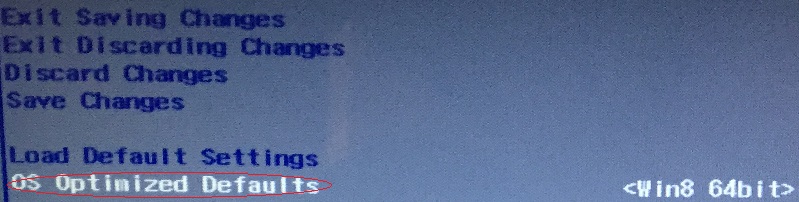

We save the settings (Save & Exit.) -> Set the boot Windows disk 7! -> Press the button "Novo"(Novo Button Menu) and select "Boot Menu".
If you have error 0X000000A5 in Windows 7 on Lenovo G50-30
If Windows 7 is already uploaded to the hard drive and the error 0X000000A5 appears, then eliminate the error blue screen death can be as follows:
- We go into the BIOS, in the second tab, change USB3.0 to USB 2.0.
- In the last tab, change the OS from Win8 OS to Win7 OS.
- Select Load Defalt Settings.
- Save & Exit.
- Install Windows 7
- Change USB2.0 to USB 3.0.
 Bugs in Singularity?
 Just Cause 2 crashes
 Terraria won't start, what should I do?