How to split a hard drive into 2 disks. Splitting on the command line. Partitioning method using disk manager
Breakdown hard disk into sections is a way to organize information storage, comparable to putting things on the shelves in a closet.
In this article, you will learn how to split HDD into sections and why.
Most users prefer to divide their disks into 2-3 partitions for the following reasons:
- so as not to mix files operating system and personal in case of OS reinstallation;
- for convenience manual search information;
- to install more than one operating system on a computer;
- so that each user, if there are several of them, has his own "corner" for personal files;
- to hide some information from other PC users (along with the section).
Note! When installing operating systems, service partitions are created - boot, recovery, for the paging file, etc., which are not visible in Explorer. These areas are hidden because changing or deleting their content breaks the operating system.
All of the above steps can be done quickly and safely using a dedicated distribution. Although the above snapshot represents the content virtual disk The following example shows an example of life. Let's move on to general partitioning problems. The amount of space that can be reclaimed depends on the amount of data the partition contains.
After creating the primary partitions, you need to create the extended partition, and the rest of the logical partitions, for example. If necessary, you can mark the highlighted primary partition as active by clicking on it right click mouse and selecting "Manage flags". Operations required to complete with the Apply command. As long as we don’t make any changes, we don’t save them to disk, and we can freely change the actions that have been made. An example of registration after approval of changes.
Some people think that it is imperative to partition the hard drive: so, they say, personal files will not suffer in the event of a system failure, they will be less fragmented, which means that they will open faster.
In fact, the files will not disappear anywhere, even if the OS completely crashes. And this will not affect performance, especially since modern systems defragment themselves without user intervention.
The short answer is, as far as we have desire and free space... Another example of life. A partition is a separate area on a hard drive where data is kept separate from other partitions. Security - when data from one section is deleted, data from another section remains intact, ordering - separation gives you the ability to log all the data on the disk, the speed of work - the system works faster when dozens of programs do not exist. This phenomenon leads to a decrease in the performance of not only the disk, but the entire system, mainly due to the fragmentation of the system partition and, indirectly, all partitions.
On the contrary, the system partition tends to fill up quickly, and if there is little space on it, the computer will first slow down and then stop loading altogether due to the fact that the system has nowhere to expand.
Do you think you still need an additional section? Then read how to create it.
Two ways to divide a disk into partitions in Windows 7, 8, 10
Features of the installed system
Starting with Windows 7, you can partition disk space using the OS itself, both during installation and after.
The way to deal with this phenomenon is to use special program- "defragmenter". One section should only include the system and installed programs, which speeds up system startup and prevents fragmentation of the system partition. This is a commercial program. We have many types of files that are worth mentioning before splitting. Each file type must be handled differently. Mixing all types on one section is definitely not a good idea.
Thus, the system partition will not be littered with programs, temporary or Internet files, hundreds of documents. Fast reading from the system partition, it is a faster system. Faster system, better performance. The size of the individual sections will best suit your needs. Confirm that you want to move the contents of the folder to a new location and get ready.
There is only one condition: when dividing an existing section, it is important that at least free space than the one to be separated.
Let's take a look at how to partition a hard drive in a running Windows 10.
- Go to the context menu of the Start button and start Disk Management.
- Open the context menu of the section to be split. Click Shrink Volume.
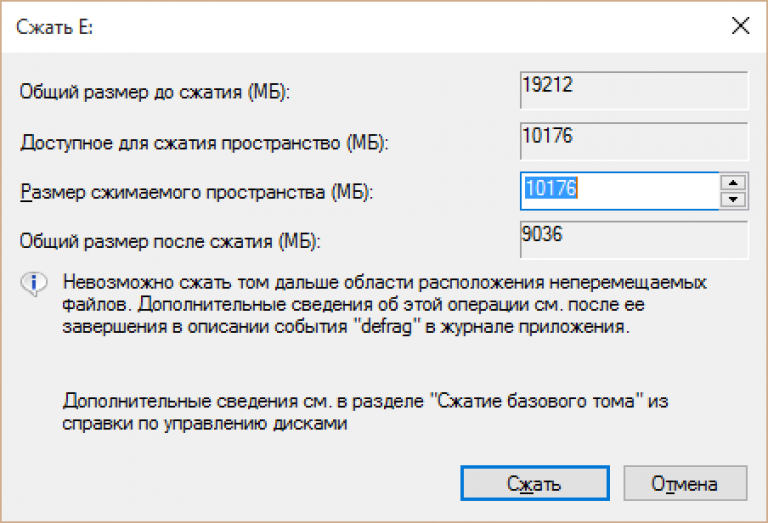
- The window that opens after that shows the total size of the area to compress and the space available for compression. From the latter, select the part that will be the new section.
As you remember, it should not exceed half of the value indicated here. Then click the "Compress" button.
Why is the system partition small?
The size of the system partition, despite its appearance, affects performance. If the partition is large and contains hundreds of files that can be successfully placed on the next partition, then most of the data is loaded into sectors that swell and become fragmented, and this is very bad.
Third, a larger partition with more files makes it easier to fragment data. The distributed allocation table shrinks as the partition size increases. Sharing files on the system partition is the default and the easiest option, if the paging file is not fragmented, the system partition works fine as its location. Plus, if you've configured your swap settings correctly and use them, you don't have to worry about fragmentation. This leads to a loss in performance. The exchange file is divided into several parts on different disks - an interesting solution. The memory subsystem manages up to 16 paging files well. If both drives have similar performance, we will get a little more, because the drive that is currently less loaded will perform faster in the swap file. There are also situations in which the system will simultaneously work with two exchange files. These are very interesting points. At that time, paging performance increased significantly. It is because of these moments that the second disc can be a little slower. It is also important to minimize the number of head jumps on the second disc. This can be achieved very in a simple way- we put a file on it that we often do not use and rarely modify. In other words, the system drive should contain: system, programs, games, and the second - storage for media, installers and other files that the system rarely refers to. It will also speed up work on the paging file on the second disk. Thus, the difference that originally existed between the disks becomes completely invalid. Sharing files on a drive other than the system is a great idea, but in a few different contexts. The disk containing the paging file must be as fast as the system disk. Its performance should be smoothed out with the loss of one resulting from using one rather than two paging files. The system drive must carry the load on the system and applications, and the second one on the paging file, and at the same time, other data, such as video, is not loaded. You might be wondering if it is better to split the paging file or move it to another drive. If your second drive is not much faster than the first, say 25%, then split the paging file. If it's faster, have him take over the exchange service. Thus, we get not only the paging file, but also all the disks in the array.
- Proper placement has a large impact on performance.
- Helps prevent file fragmentation.
- Unfortunately, there is no rose without thorns.

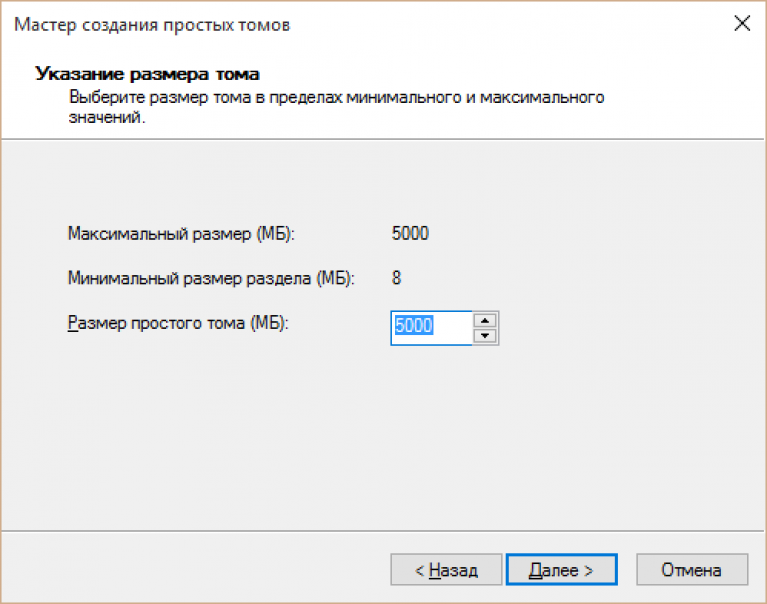
- In the wizard window, specify the size of the new volume. If you leave the default (equal to the entire area of unallocated space), the entire area you subdivided becomes a new partition.
If you enter a lower value, one part becomes a volume, and the other remains unallocated. Click Next.
What if we can't reduce the size of the non-transferable files? Our eyes can see information that the disc contains the so-called. Uncaptured files in the selected sectors that simply block the resizing. In fact, this is not our own data, but only system files most of which are part of system recovery and virtual memory. Just turn off these features for a moment, shrink the partition size and partition the disk, then turn it back on.
To turn off virtual memory, open File Explorer and right-click on the This PC tab and go to Properties. In System Properties, select Advanced system settings»In the side menu. In the new window, we are sure to be on the Advanced tab, and then under the Performance section, click the Settings button.
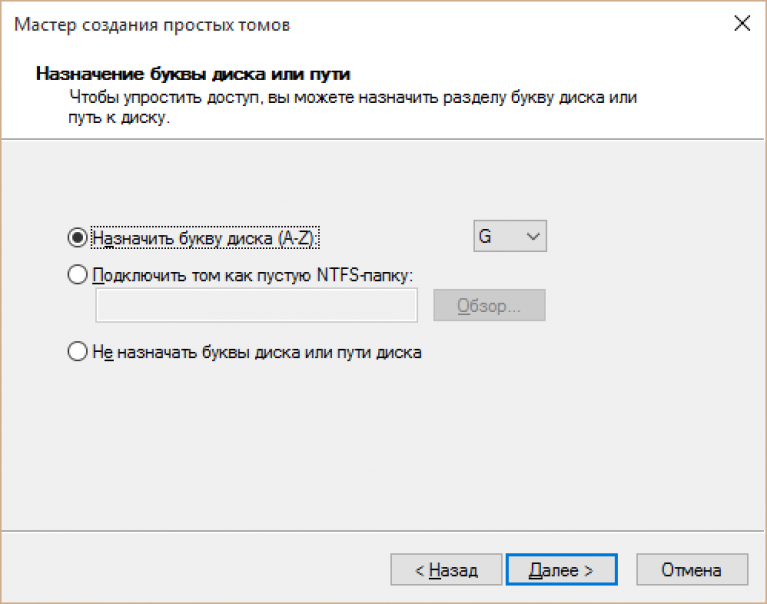
- Assign a letter to the new volume if you want it to appear in Explorer, or connect it as a folder. If you decide to do this later, select "Do not assign drive letter or paths."
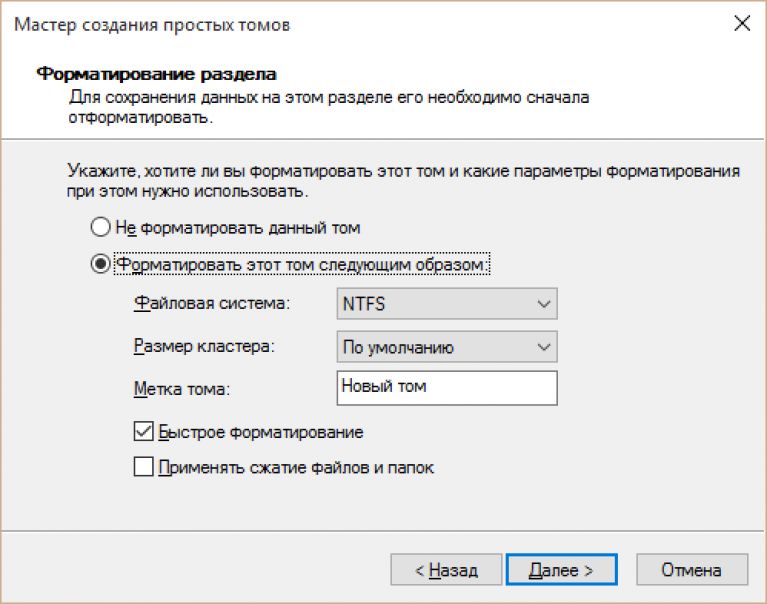
- Next, the wizard will offer to format the volume and assign a label to it. A label is a short name for a section that explains what is there. Leave this line blank if desired.
The performance settings window will appear, in which you will go to the "Advanced" tab. We will find the item "Virtual Memory" here. Disable the protection and recovery feature. As in the case of virtual memory, we go back to the system parameter, that is, go to the explorer window, and then right-click on "This computer" and enter "Properties".
Select "System Protection" from the side menu. Recently opened protection and recovery settings are displayed. In the Security Options section, click the Configure button. A new configuration window will appear. After completing the above steps, restart your computer for the changes to take effect.
After formatting, the unallocated space becomes a full-fledged partition.
Volume creation during Windows installation
Creating new partitions during Windows installations differs from the method that we discussed above, in that the shared disk will have to be removed first, that is, completely cleaned of information.
And then build a new partition structure from the unallocated space.
We should now be able to set any disk size without worrying about mysterious non-transferable data. After partitioning the disk, we will go back to the aforementioned virtual memory settings and secure the system and power it back on. In the case of virtual memory, we choose automatic sizing, and in the case of system protection, we simply select "Enable system protection".
Always save your data! Each section must have file system... Partition creation and management are not tasks that you run on a daily basis. Hence, you should read this manual and become familiar with the concepts and some of the windows that will appear.
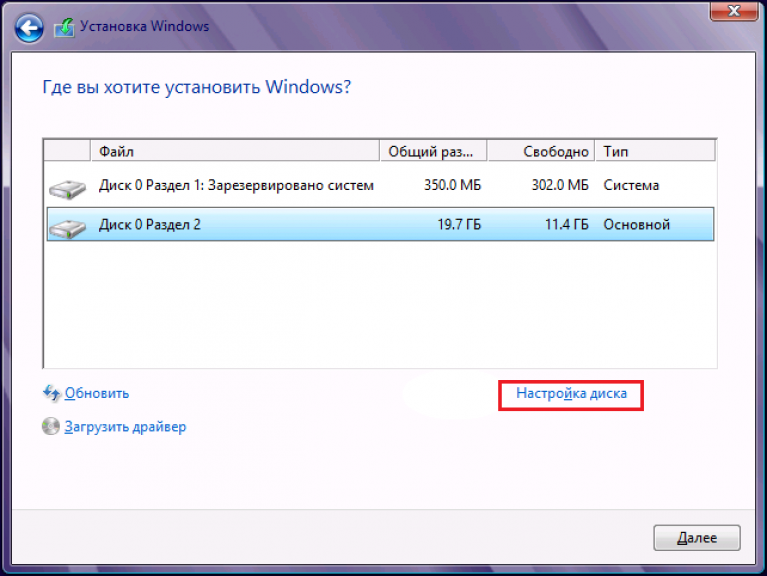
The breakdown is performed at the stage when the program asks to indicate the location of the OS installation. What to do next:
- In the "Where do you want to install Windows?" click the "Disk Setup" button.
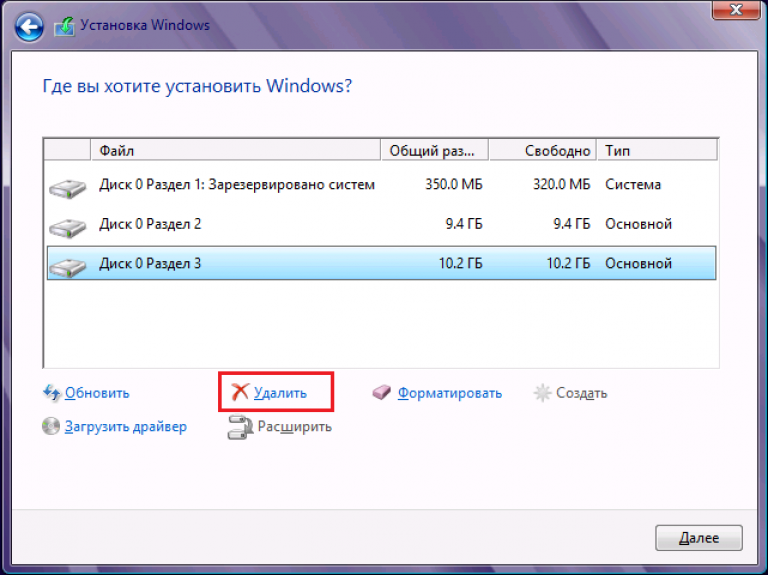
- Check the section you are going to split and delete it. An unallocated space will appear instead.
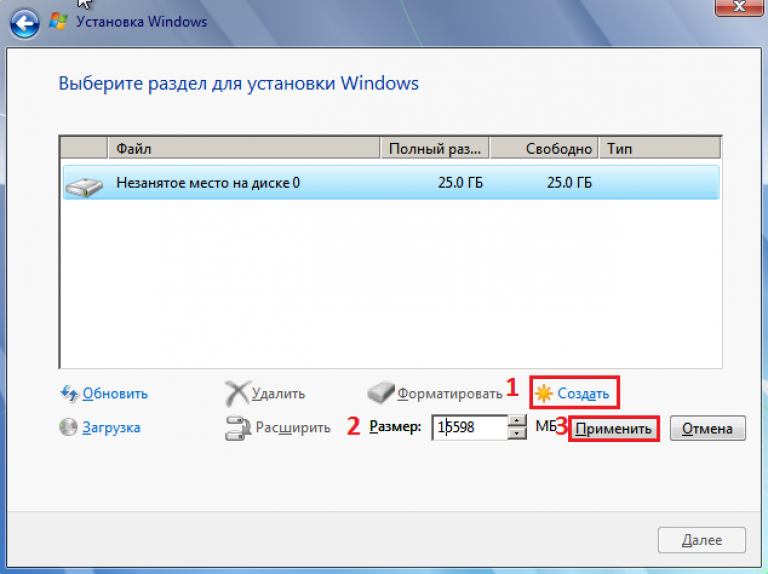
- Click the "Create" button (meaning, create a section), specify the desired size and click "Apply". If the partition being created does not take up all of the unallocated space, repeat the operation until there is no unallocated space on the disk.
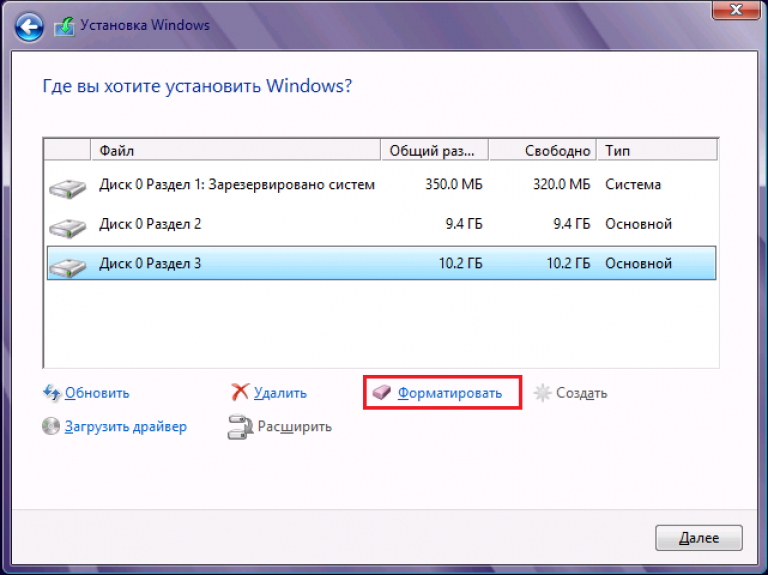
- After that, format the new partitions and proceed with the installation.
We have shown the process of creating logical volumes. On Windows 8 and 10, this is done in the same way.
During the installation of Windows, it is not necessary to mark up the entire disk space; it is enough to select the area where the system will stand. You can mark the rest of the free space later, whenever you want.
These are not the only ones, but only the most available ways partitioning disks into sections.
Own functions for working with disk space, which are in all Windows versions starting with the "seven", it is enough in almost all situations, so the need to use third party programs, such as Acronis Disk Director or Paragon Partition Manager, have already disappeared.
After buying a computer, the user often looks for an answer to such a question - how to divide a hard drive into partitions. Using the operating system tool, you can divide your hard drive in Windows 7 and Windows 8 into multiple partitions. The process of dividing a hard disk into two or more parts is no different in these operating systems.
Manufacturers of computers, especially laptops, Very often create one hard disk partition on which the operating system is installed, and there, in the future, all user files will be located.
For more convenient use of the computer, you can create another hard disk partition on which the user will store his files - music, videos, documents, and other files. So it will be easier for him to find required files because if all the files are on the same disk, then it will be quite difficult to find the folders and files you need.
In the event of an operating system failure, files located on another disk will not be lost during the reinstallation or recovery of the operating system.
You can divide the hard disk into partitions using the operating Windows systems 7 or Windows 8. More advanced operations with hard disk partitions can be done using specially designed programs, such as, for example, Acronis Disk Director, EASEUS Partition Manager, MiniTool Partition Wizard.
Keep in mind that you can only divide the disk into 4 main partitions. If you have already created 4 such partitions on your disk, then you will not need to perform this operation, since the new, created partition will not be displayed in the operating system. This is often encountered by laptop owners, because manufacturers often create hidden partitions on the disk to restore the system and to store individual programs and drivers.
How to split a hard drive into two partitions in Windows 7
To split hard Windows disk 7 you need to enter disk management under account administrator. This is exactly the way you can partition a hard drive in Windows 8. In Windows 8, the partitioning process is no different from the process in Windows 7.
After you open Explorer => "Computer", then you will see the hard disk partitions of your computer.
In this image, you can see that the hard disk has two partitions - "Local disk (C :)", which will need to be divided into partitions, and a protected partition - " Microsoft Office 2010 (Q) ", which is not subject to change.
Here you can see that the hard disk is already about half full of data. The partition itself, on which the operating system is installed and the files are located, is named after the brand of the hard disk installed on the computer.
The new hard disk partition will be created from the free space of "Local Disk (C :)".

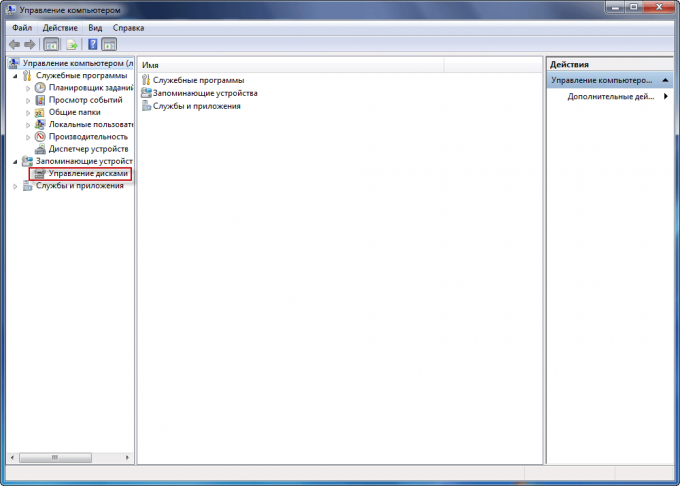
To partition a hard disk, you need to enter disk management. First you need to go to the Start menu and then right-click on the Computer button. In the opened context menu it is necessary to select the item "Management".
This will open the Computer Management window. Next, on the left side of the window, select "Disk Management".
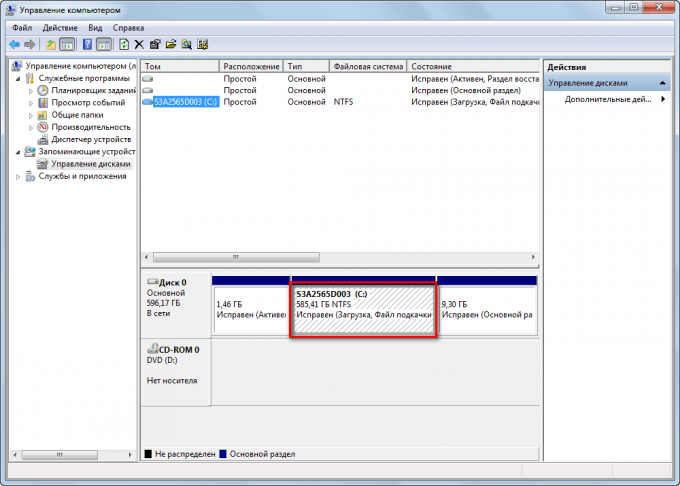
The Disk Management tab will display information about your computer's disks. In this image, you can see that there is one disk on the computer - " Logical disk(C :) ", which is named after the brand of the hard drive (hard disk). The disk has the NTFS file system. I will divide this section into two parts.
Also on the hard drive there are also two special protected partitions that were created by the laptop manufacturer - "Recovery Partition" (it does not appear in Explorer) for system recovery, and a partition with Microsoft Office 2010.
A desktop computer may not have such additional partitions, if you did not purchase a computer from a reputable manufacturer. These protected partitions will not be needed to solve our problem - dividing the hard disk into two partitions.
You can also enter Disk Management in another way. To do this, go to the Start menu, enter the expression “diskmgmt.msc” in the “Search” field, and then press the “Enter” button on the keyboard. This will open the Disk Management window.
The contents of this window are identical to the contents of the Disk Management tab in the Computer Management window.
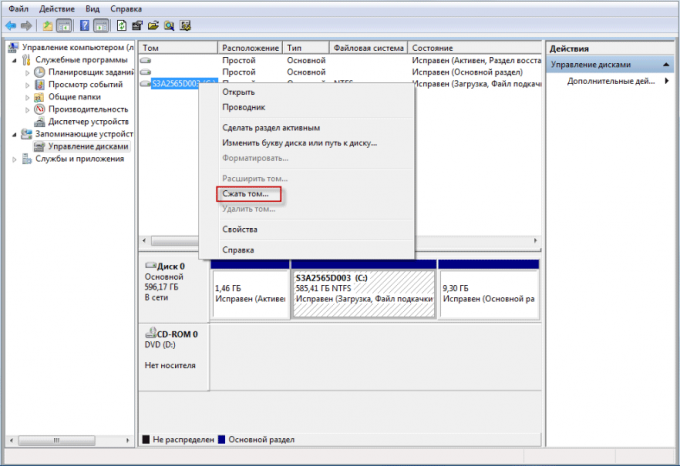
In order to split a hard disk into two parts, you need to select a disk that will be split into two parts. To do this, you will need to move the mouse cursor over the disk to be divided, in this case it is the "(C :)" drive, and then click on the "Compress volume ..." item in the context menu that opens.
This will open the "Request Compression Space" window, in which you will be informed that a poll is in progress to determine the available compression space.

In my case, there was already 342 GB of data on the hard drive.
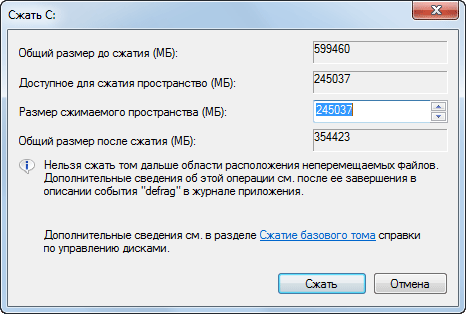
After the polling process is complete, the "Compress From:" window will open, in which the following parameters will be indicated: total hard disk size before compression (599480 MB), available space for compression (245037 MB), size of space to compress (245037 MB), and total disk size after compression (354,423 MB).
You can change the size of the compressible space. "Compressed space size" is the size of the future second disk, which will be created after the hard disk is divided into two parts. The "Total Size After Compression" is the size of the "Logical Drive (C :)" after the hard drive has been partitioned.
If you use a Windows operating system tool, you will not be able to partition the hard drive more than half. I draw your attention to the fact that the sizes of the disks should not be made the same, they should differ in size from each other. Read more about this at the end of this article.
After that, the compression process begins. After completing it, you will see that appeared new section with unallocated space.


After that, the window “Creation wizard simple volume", In which you will need to click on the" Next "button.

In the next window "Specify the size of the volume" click on the "Next" button.
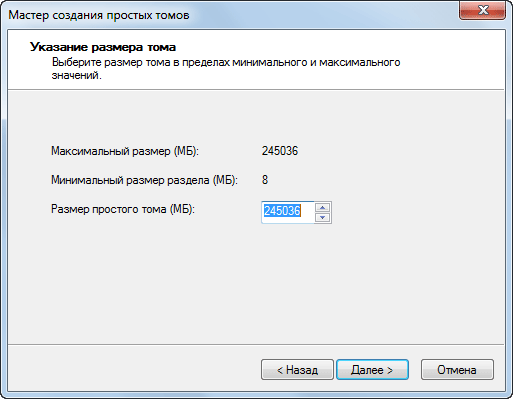
In the "Assign a drive letter or path" window, you need to select a letter for the new disk partition. If the computer already has a drive marked with the letter "C", then the second drive would be better to assign the next letter of the alphabet - "D". Then you should click on the "Next" button.

In the "Format Partition" window, some settings are already selected by default - file system, cluster size and volume label, the "Quick format" item is activated.
By default, the volume label is named " New volume". You can delete this name and leave nothing in this field, then the second partition of the disk will have the name - "Logical disk (D :)". In the future, if necessary, the title of the section can be corrected.

Then the formatting of the new one begins. partition hard disk.

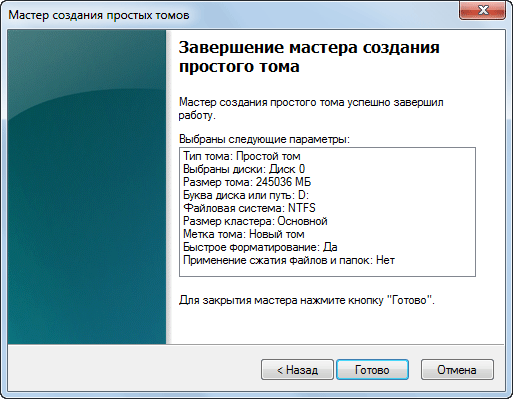
After completing the formatting process, in the next window “Completing the Simple Volume Creation Wizard” you will be informed that the creation of a new hard disk partition has been completed. You can familiarize yourself with the parameters of the created hard disk partition.
After that, you need to click on the "Finish" button.
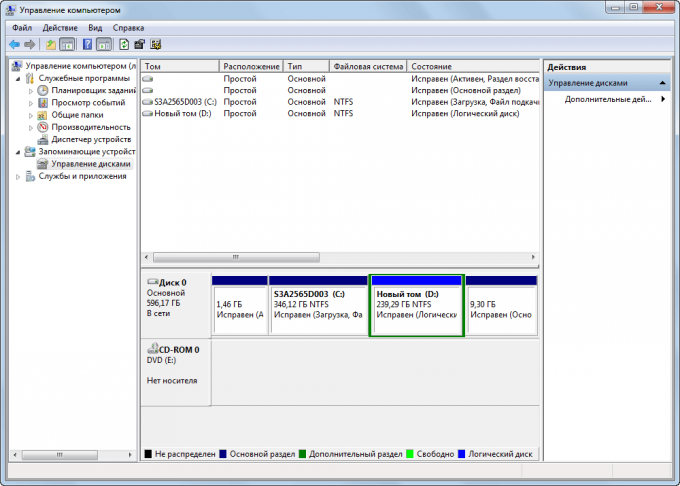
In this image, you can see that a new hard disk partition has appeared - "New Volume (D :)" with the NTFS file system.
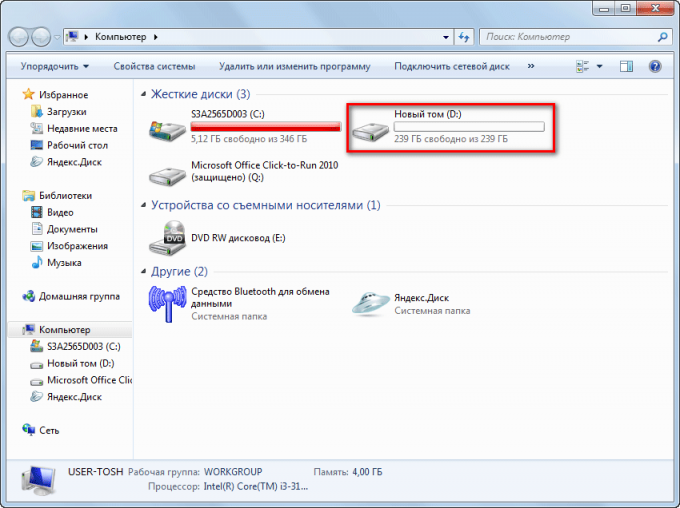
After opening Explorer, you can see the created new hard disk partition, which is still free of files, as well as "Local Disk (C :)", which is full.
Now you can change the names of the hard disk partitions, if you have not done so earlier, to other, more understandable ones.
To do this, you need to right-click on the disk that you want to rename, and select "Rename" in the context menu. Then you should enter a new name for the hard disk partition, and then press the "Enter" button on the keyboard. It is not necessary to change the section names, you can continue to use the section names already on your computer.
After renaming, hard disk partitions will have more meaningful names. In this image, you can see that I have already moved some of the files from the "Local drive (C :)" to another, just created drive - "Local drive (D :)".

If you have Windows 8 operating system installed on your computer, then you can partition the hard drive in the same way as described in this article.
How to change the drive letter
Optic DVD drive on the computer was marked with the letter "D". Since I was going to split the disk into two parts, I changed the drive letter in advance.
This is done so that the hard disk partitions have letters in the order of the letters in the alphabet, for more convenient use and perception. For example, in Explorer, the hard disk partitions will be indicated first, then the CD / DVD drive, and then the connected drives, memory cards and disks.
To change the drive letter, go to Disk Management and right-click on the CD / DVD drive. In the context menu, click on the item "Change drive letter or path to drive ...", and in the window that opens "Change drive letter or paths for D:" (your letter name may be different) click on the "Change" button.
In the window "Change drive letter or path" you must enter another letter to change, and then click on the "OK" button.

Changing the drive letter is optional. The new hard disk partition can be designated by any letter of the alphabet that is not yet occupied.
Solving the problem with the RAW file system
After partitioning the hard disk using the Windows operating system, if you made the sizes of the hard disk partitions the same, there may be a problem with the file system. After formatting, you may find that the new disk partition was not created in the file NTFS system, and in the RAW file system.
I ran into this problem myself when I was tinkering with partitioning a hard drive in Windows 8 on my daughter's laptop. In order not to arise this problem, in the process of creating a new hard disk partition, the partition being created must have a different size than "Local Disk (C :)".
To resolve this issue, you must rerun the Simple Volume Wizard process. In the "Specify the volume size" window, in the "Simple volume size (MB)" item, you need to slightly reduce the size of the partition, and in the "Format partition" window, uncheck the box opposite the "Quick format" item.
Formatting will take certain time, which will depend on the size of the hard disk partition. After completing the formatting process, the problem will be resolved, the new disk partition will now have the NTFS file system.
Using the operating system tool, you can easily split your hard drive into two parts in Windows 7 and Windows 8.
- Views: 124533
 Bugs in Singularity?
 Just Cause 2 crashes
 Terraria won't start, what should I do?