Installing windows xp from disk. Step by step installation of Windows XP. Preparing the computer for installing a new OS
Reinstalling an operating system is not as difficult as it seems at first glance. It is not at all necessary to contact a specialist for this, especially if you have a disk with the required distribution kit. Despite the fact that Windows XP is considered an outdated system, and its support will end in 2014, its popularity is still very high. That means it's time to talk about how to install Windows XP. My guide is for those with basic computer skills.
When this is complete, the installation procedure will automatically reboot the system. If the section already exists, use the arrow keys to select it, then go to step.
- The "Performing Dynamic Updates" page appears.
- Press "Enter" to continue with the configuration.
- The drives are checked and the Partition Manager is displayed.
Windows XP installation process in pictures and videos
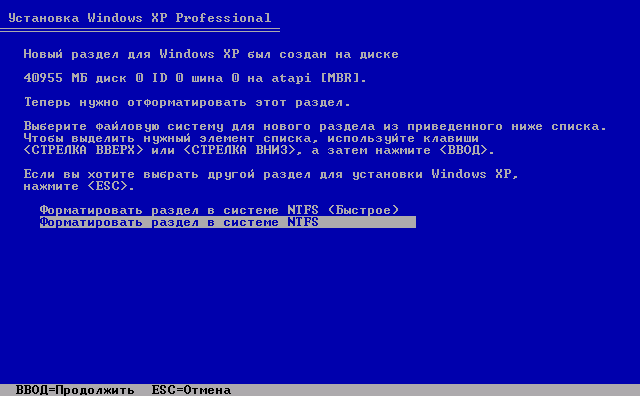
Enter the size of the partition you want to create from the unallocated space. The default size specified is the maximum size that can be created. Use the arrow keys to select the newly created section. Select the file system to format the partition. It will take a little longer, but it will ensure that the drive is properly formatted. In addition, chapters 29 and 31 contain Additional Information O file systems and formats.
To begin with, I advise you to think carefully before reinstalling the system.
People who are poorly versed in computers often have one universal solution to all problems - to reinstall the OS. Yes, it almost always helps, but most bugs and problems can be fixed more in simple ways... If you know for sure that you need a reinstallation, this guide may be useful to you. So, in order.
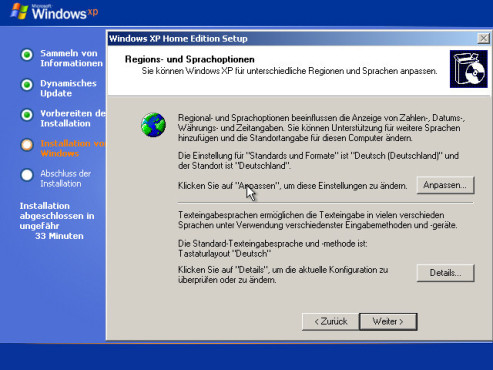
When the file copy procedure is completed, the system automatically reboots. After performing numerous operations, the installation wizard opens, displaying the Language and regional standards».
- The progress of the formatting action is displayed.
- When formatting is complete, the files are copied to the target section.
- The Personalize Your Software page appears.
- Enter your name and company name if applicable.
- The Computer Name and Administrator Password page appears.
Preparing for installation
Naturally, you will need a Windows XP distribution disc. If you are working with a laptop that does not have an optical drive, you will need to use the same distribution first. Do not forget that motherboard must support booting from Flash USB or Flash HDD. You will find instructions, for example, for installing Windows 8. Make sure that the disk or flash drive is fully functional, after which you can proceed to the next step.
It should be different from any other computer, working group or domain names on the network. You will probably want to enter your own name or a name of your choice, although the installer provides you with some kind of cryptic name. If you leave this field blank, anyone can enter system settings by simply entering "Administrator" as your username and pressing "Enter" without a password.
When you provide a password for the administrator, enter it, write it down in a safe place and remember it! If you have a modem present on your system, the Modem Number Information page appears. If found network interface, the system installs the network components, and then the Network Settings page appears.
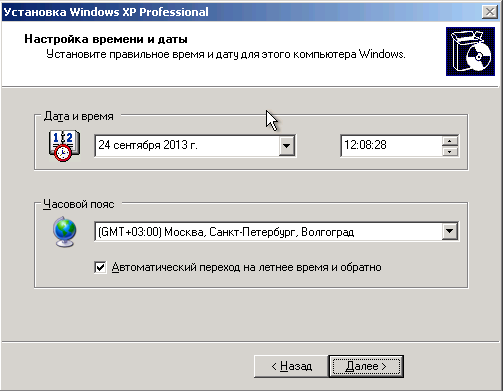
- The Date and Time Settings page appears.
- Set the date and time and select your time zone.
- If your system does not have a network interface installed, go to step.
Before installing Windows XP from a disc on a computer, you need to do backups all the files you need on the system partition.
For most, this is drive C. The point is that a "clean" install that removes the previous system requires formatting. This will lead to the loss of files, so you must first copy them somewhere. I recommend making backups from other partitions too, if you have the time and suitable media, although this is not necessary.
But only do this if you are an expert in these matters and know that typical settings will not be cut short. You will probably be fine with the default settings and you can change them later if not.
- The "Networking Components" page opens.
- The Internet Protocol Properties dialog box opens.
- You will be returned to the Networking Components page.
- The Workgroup or Computer page appears.
We start the installation
So, let's move on to the most important thing. Make sure everything is ready. Insert a disk with the system or connect a USB flash drive if there is no disk. Now you can go one of two ways. The first is to use the autorun program, in which you can select the type of installation and other parameters, after which it will restart the computer itself to start the process.
If your system is the first or only system within a workgroup, providing a name in a field on a workgroup or computer domain will create a workgroup. As a member of a workgroup, you are not putting anything as a stand-alone system, but it is still a customization requirement.
A workgroup is a more random collection of connected computers than a domain. Any computer can join a workgroup. All computers configured for the same workgroup name can share files, printers, and other resources. The installer suggests a name, but if you already have a workgroup in your office, use that name.

The second way, more preferable and universal, is to reboot yourself and choose to start from a disk / flash drive. I will tell you how to install Windows XP from disk via BIOS. You will probably need to change the settings for this. Also, before installing, you can do BIOS updates, you will find out about it. The BIOS should have a tab called "Boot" or contains this word in its name. You need to go there and change the boot queue so that booting from CD or Flash comes first. After that, exit the BIOS and save the settings. The computer will reboot itself and start the installation.
A domain is a collection of computers created by an administrator. Domains offer more security and control than workgroups. Contact your system administrator if you are unsure of your domain settings. The Network Identity Wizard guides you through joining the domain. If you are facing a problem joining a domain, join a workgroup first and join a domain later.
Preparing to install Windows XP
If this system is offline or a member of a non-domain network, select the None radio button and provide a workgroup name. If there are any problems or problems during the installation, a pop-up dialog box will appear. At this point, the installation process is complete and the system should be rebooted. This may happen automatically, or you may be prompted to confirm the restart. You must wait until he "speaks" to you. The installer checks your system for an Internet connection. Regardless of which setting determines, you must specify whether the system accesses the Internet via local area network or should establish a dial-up connection.
- The name of the workgroup is commonly used.
- This may take 20 minutes or more.
![]()
Key moment
Oddly enough, the installation itself is quite simple. At the bottom of the screen there will be hints which keys you need to press in order to perform a particular action.
First, you will see a loading screen, which takes a while. The installer will then prompt you to read the license agreement, and then ask which logical drive install the system. You should select the C drive if you have always had it as the system one. Let me remind you again, all data from this disc will be deleted. Confirm your choice.
If you do not activate within the time limit, the system will not work until the activation is complete. Activation can happen over the phone if you do not have an Internet connection. If you choose to skip activation during installation, an activation command is added to the top of the All Programs list in the Start menu.
Consider the option of installing on a clean hard drive
Registration is a separate and distinct process from activation. A message appears stating that you are using this computer with a different user screen.
- If you choose No, go to step.
- Who will be using this computer? a screen will appear.
- Enter names for six users for this system, one in each field.
The installer will format the disk and start copying the files. In general, practically nothing is required from you from now on. At the right time, the computer will reboot itself, and Windows screen XP, after which a guided installation will begin. At some point, you will be prompted to select options for language, keyboard layout, time zone, etc. These settings can be changed later. You will also need to enter serial number disk.
Basic steps to install Windows XP
S. in computer science at the University of Central Florida. Network Settings: Click Next. Press the Enter button when the screen above appears. You agree to the license agreement. ![]()
Then you need to format HDD. 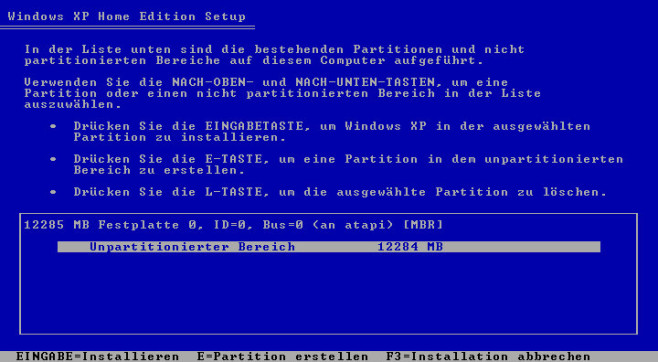
The old section has been deleted.

Now you can set the size of the future partition. 

The section is now formatted. This may take some time depending on the performance of your computer. 
The computer will restart automatically. 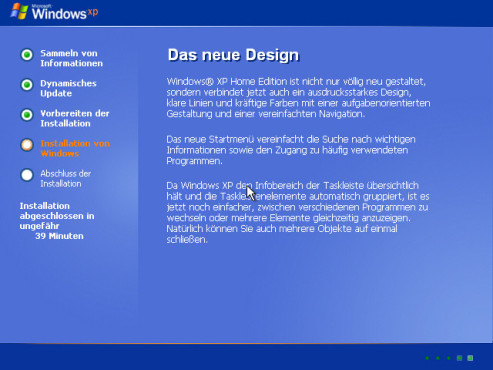
After restarting, you don't need to do anything. The copied data is being processed.
This guide is intended for those who are interested in how to install Windows XP on their own on a computer or laptop, from a flash drive or disk. I will try to highlight in as much detail as possible all the nuances associated with installing the operating system so that you do not have any questions.
To install, we need some kind of bootable media with the OS: perhaps you already have a disk with a distribution kit or a bootable Windows XP USB flash drive. If none of this exists, but there is an image ISO disc, then in the first part of the instructions I will tell you how to make a disk or USB out of it for installation. And after that, let's go directly to the procedure itself.
Now your application is required again. 
Enter your name and click Next. You can leave the field blank. 
Clicking the Next button confirms the entry. 
Enter the computer name you want to have in home network, for example "work room". 
Setting the clock time is usually also a click on the Next button.
Create installation media
The main media used to install Windows XP is a CD or an installation flash drive. In my opinion, today the best option is a USB drive, nevertheless, let's look at both options.
- To make a bootable Windows disk XP, you will need to burn the ISO disc image to CD. At the same time, it is not easy to transfer ISO file, namely "burn a disc from an image." In Windows 7 and Windows 8, this is done very easily - just insert a blank disc, click right click mouse over the image file and select the "Burn image to disk" item. If the current OS is Windows XP, then in order to make a boot disk you will need to use third party program such as Nero Burning ROM, UltraISO and others. Detailed creation procedure boot disk is described (opens in a new tab, the instructions above consider Windows 7, but for Windows XP there will be no difference, only you need not a DVD, but a CD).
- In order to do bootable USB drive with Windows XP, easiest to use free program WinToFlash. Several ways to create an installation USB drive with Windows XP are described in (opens in a new tab).
After the distribution kit with the operating system is prepared, you will need to restart the computer and set the boot from a USB flash drive or from a disk in the BIOS settings. How to do this in different BIOS versions - see here (the examples show how to set boot from USB, boot from DVD-ROM is installed in the same way).
Booting from the installation disc
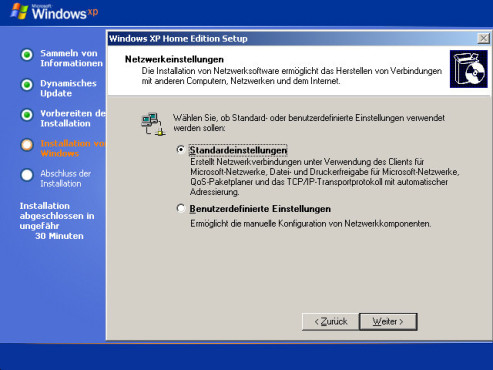
The computer works again for a while. The "Network Settings" window will open: click "Next". 
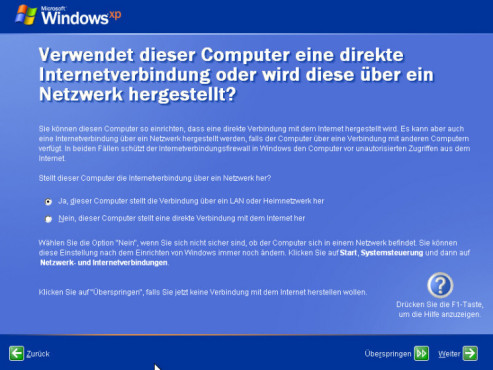
How is your computer connected to the Internet? If you want to set up your Internet connection later, click Skip. 

On this screen, you must enter at least the first username. Then click Next.
After this has been done, and BIOS settings saved, the computer will restart and the installation of Windows XP will begin directly.
The procedure for installing Windows XP on a computer and laptop
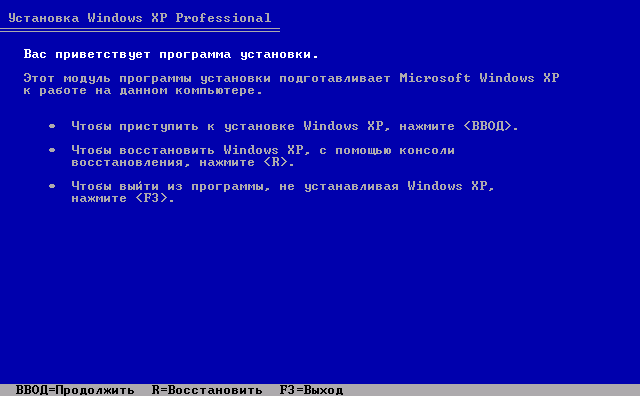
After booting from installation disk or a Windows XP flash drive, after a short process of preparing the installation program, you will see a system greeting, as well as an invitation to press "Enter" to continue.
The next thing you'll see is the Window XP License Agreement. Here you should press F8. Provided, of course, that you accept it.

On the next screen, you will be prompted to restore the previous Windows installation, if any. If not, then the list will be empty. Press Esc.
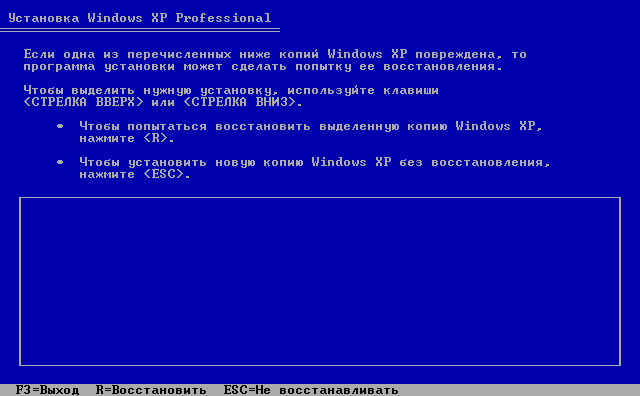
Restoring a previous installation of Windows XP
Now one of the most important steps is to select the partition to which Windows XP will be installed. A variety of options are possible here, I will describe the most common of them:

- If your hard disk was divided into two or more partitions, and you want to leave it that way, and, at the same time, Windows XP was also installed earlier, then just select the first of the partitions in the list and press Enter.
- If the disk was partitioned, you want to leave it as it is, but Windows 7 or Windows 8 was previously installed, then first delete the "Reserved" section of 100 MB and the next partition corresponding to the size of the C drive. Then select the unallocated area and press enter to install Windows XP.
- If the hard disk was not partitioned, but you want to create a separate partition for Windows XP, delete all partitions on the disk. Then use the C key to create partitions by specifying their size. It is better and more logical to install the installation on the first section.
- If the HDD was not partitioned, you do not want to divide it, but Windows 7 (8) was previously installed, then also delete all partitions (including "Reserved" for 100 MB) and install Windows XP in the resulting one partition.
After selecting a partition to install the operating system, you will be prompted to format it. It is enough to select "Format partition in NTFS system(Fast).
After formatting is complete, copying of the files required for the installation will begin. Then the computer will restart. Immediately after the first reboot, set toBIOS boot from hard disk, not from a flash drive orCD-ROM.
After the computer is restarted, the installation of Windows XP itself will begin, which may take different time depending on the hardware of the computer, but at the very beginning you will see 39 minutes anyway.
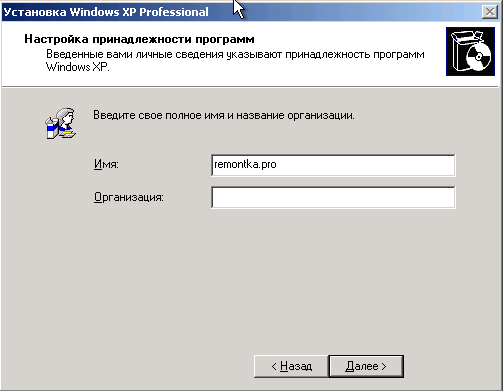
After a short time, you will be prompted to enter your name and organization. The second field can be left blank, and in the first - enter a name, not necessarily full and real. Click Next.
In the input field, enter the license windows key XP. It can also be entered after installation.

After entering the key, you will be prompted to enter the computer name (Latin and numbers) and the administrator password, which can be left blank.

The next step is setting the time and date, everything is clear here. It is advisable only to uncheck the box next to "Automatic changeover to summer time and back." Click Next. The process of installing the required operating system components will begin. All that remains is to wait.
After all the necessary actions are completed, the computer will restart again and you will be prompted to enter the name of your account(I recommend using the Latin alphabet), and records of other users, if they will be used. Click Finish.
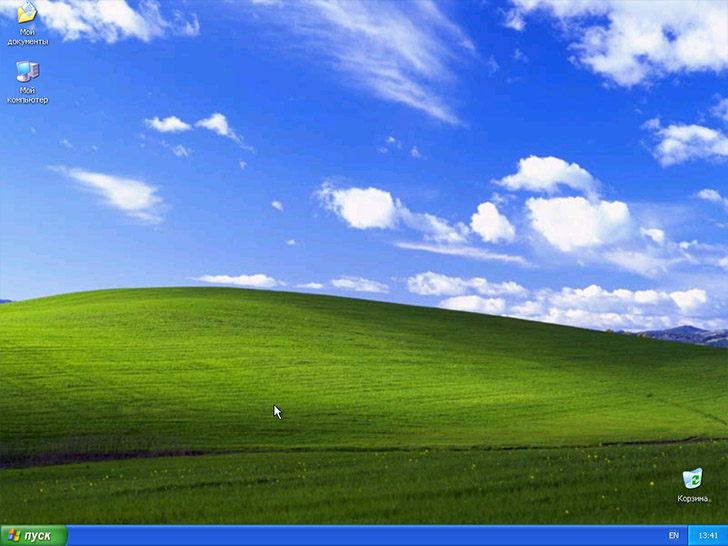
That's it, Windows XP installation is complete.
What to do after installing Windows XP on a computer or laptop
The first thing to worry about right after installing Windows XP on your computer is installing drivers for all hardware. Given that this operating system For more than a decade, finding drivers can be difficult for modern hardware. However, if you have an older laptop or PC, then it is quite possible that such problems will not arise.
However, even though I generally don't recommend using driver packs like Driver Pack Solution in the case of Windows XP, this is probably one of the best options to install drivers. The program will do this automatically, you can download it for free from the official website http://drp.su/ru/
If you have a laptop (old models), then the necessary drivers can be taken on the official websites of the manufacturers, whose addresses you can find on the page.
In my opinion, I have outlined everything related to the installation of Windows XP in sufficient detail. If you have any questions, ask in the comments.
 Alternatives to Replace Microsoft Office Visio Command Line Key
 Mhotspot installation and setup Computer did not restart after installation
 A tale of three buttons. Column by Evgeny Zobnin. We get customizable on-screen buttons Home, Back and Menu on any Android device (Floating Soft Keys) Assignment of buttons on the phone