I can't create a simple volume. Create and manage simple volumes
Basic disk Is a disk that is recognized by legacy systems (Dos, Win 9.x, NT4). You cannot change the structure on this disk without rebooting. It contains up to 4 sections and is structured:
Hardware table contains information about the physical structure of the disk: breakdown into sectors, the number of bad and good ones, their location ...
MBR (Master Boot Record) - disk partition table. It contains information about disk partitions: their location and size, type, activity ...
Extended section- there can be only one on the disk. It can be divided into logical disks (up to 32 in theory, but in reality - how many letters are enough). It may not be present on the disk.
Primary section - can be from 1 to 4 (most often 1). If there is Extended, then no more than 3. there should be no more than 4 partitions on the disk in total. From this section, the operating system is loaded, the loader of which is located on this section. Each Primary partition can have different operating systems, but only one will be loaded, the partition of which will be active.
Boot Sector - contains the program for the initial launch of the operating system boot files located on this section.
Dynamic disk: implemented only in Win2000. It contains only one partition, divided into volumes. The advantage of such a disk is the ability to change its structure dynamically without rebooting the system, which is very important for server platforms. You can dynamically delete, create, and expand volumes.
Volumes on a dynamic disk can be:
Simple - simple (like partitions on a basic disk)
Spanned - spanned (set of volumes)
Stripe - striped (RAID 0)
Mirror - mirrored (RAID 1). Removing one mirror - remove, breaking mirror -break
· Striped with parity (RAID 5). If one of the disks is damaged, it will be marked as damaged and data will continue to be written without parity. To recover, you need to replace the disk and reactivate. No reboot required.
A dynamic volume is created by converting base disk:
Computer Management - Disk Management - context menu on disk - convert to dynamic
Reverse transformation possibly only an unpartitioned disk (i.e. all volumes and data on them must be deleted before conversion)
Install Win200 can only be on a basic disk and then converted to dynamic
Dynamic volume supports file systems –FAT, FAT32, NTFS.
Simple volume - it is one contiguous area on the disk. Up to 32 simple volumes can be created on a single physical disk. Each volume can be formatted for its own file system (FAT, FAT32, NTFS). Each volume can have a letter or be mounted to a folder (we will consider this further). In fact, it is analogous to a partition or logical disk on basic disks. To create a simple volume, you need:
- allocate a free area of the disk
- Call the context menu - Create Volume - Simple Volume
- then set its size, letter or mount to a folder, type of file system, if formatting is performed right away, ...
Composite volume - It is a collection of simple volumes on one or more physical disks. It is created from multiple free areas on multiple physical disks. These free areas combine into one logical drive, which has a size equal to the sum of the sizes of all free areas in the set. This allows, for example, a very large file to be written to a spanned volume, which would not fit into any separate area.
In total, up to 32 free areas can be merged.
Thus, the spanned volume:
· Will only be available in Win 2000 and later.
· Cannot contain system or boot Windows partitions(at boot time, no one knows anything about it, since only the already loaded Win2000 system can work with it)
It does not have a fault tolerance system
The area behind the wallpaper is filled sequentially as long as there is free space
· Created in Disk Administrator - - Create Volume - Spanned Volume. Then physical disks are selected and the size of the areas on each of them. Then the steps are similar for creating a simple volume.
Creating a new simple volume
You can create an unlimited number of volumes on a dynamic disk, however, the number should meet your needs. Since each volume behaves like an independent physical disk, you can create storage volumes different types information. A simple volume, which is a single block of disk space, does not contain any other volumes or disks. As with many other operating system components, creating volumes in Windows 2000 is a wizard-driven and straightforward task. Follow these steps to create a new volume on a dynamic disk:
| 1. | Open up Control Panel, go to Administration (Administrative Tools) and double click on the icon Computer Management... In the left pane of the window that opens, select. |
| 2. | Select the desired area of unallocated disk space from the menu Action go to item All Tasks and select the command Create Volume. Figure 10-1 - Using the Action menu to create a new volume |
| 3. | Next (Next). |
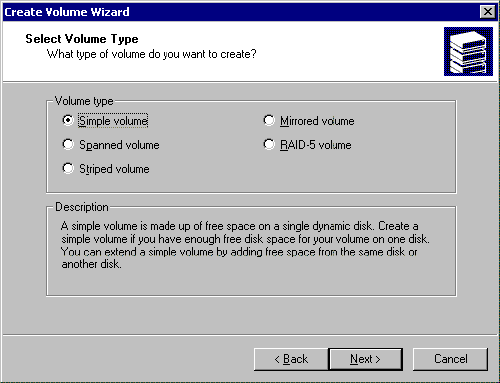
| 4. | In the window shown in Figure 10-2, Simple Volume and press the button Next (Next).
Figure 10-2 - Select a simple volume and click Next |
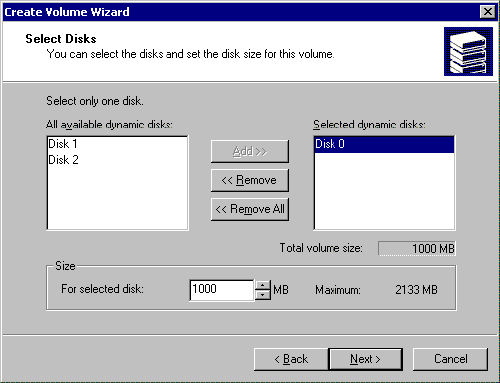
| 5. | The selected drive will be displayed on the right side of the window. Select Disks as shown in Figure 10-3. You can specify another disk (if your system has more than one disk installed) using the buttons Add, Remove and Remove All... Only one disk is used to create simple volumes. The same window displays the maximum possible size of the future volume in megabytes. You can specify the desired value in the field Size (Size) and then press the button Next (Next).
Figure 10-3 - Select the desired disk and specify the size of the volume in this window |
| 6. | The drive letter for the volume will already be indicated in the window, but you can assign a different drive letter by selecting it from the drop-down list. Here you can also mount a volume to an empty NTFS folder, which is described in more detail in the next section. You can also leave out the drive letter or path at this stage. Having made your choice, click the button Next (Next). |
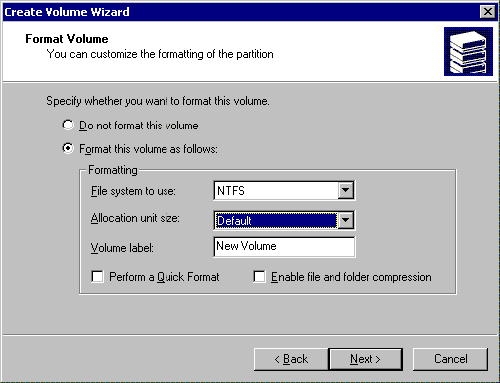
| 7. | In the window shown in Figure 10-4, you can choose whether to format this volume. If you decide to format, use the drop-down lists to select the desired file system and cluster size (you can simply leave the latter at the default). You can also assign your desired volume label in the corresponding text box. In addition, at this point, you can choose to quickly format the volume, as well as specify whether the volume will be compressed to save space. These parameters can be set by checking the corresponding checkboxes. Compression is covered in more detail in Chapter 17. Once you have made your selection, click the Next (Next).
Figure 10-4 - Select the formatting options and click the Next button Brief help. All file systems used by Windows 2000 organize the use of hard drives based on cluster size. Cluster size is the minimum amount of disk space that can be allocated to store a file. This approach ensures the rational use of free space on disk and prevents fragmentation. If you do not specify its own cluster size, the operating system will do it on its own based on the size of the volume. Quick format removes all information hard disk but does not check for the presence bad sectors... If you do not new disc, it is best to do a full format, thereby allowing the operating system to perform a thorough disk check. |
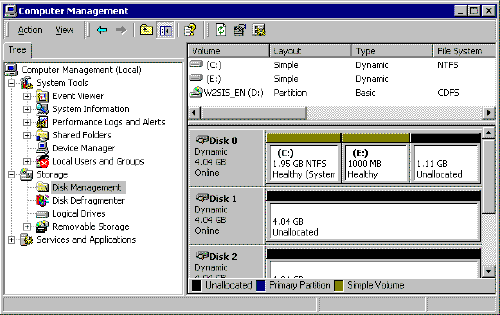
| 8. | In the final window of the wizard, click Finish... The created volume will be displayed in the snap-in Disk Management as shown in Figure 10-5.
Figure 10-5 - New volume created successfully |
Mounting a simple volume to an empty folder
Operating Windows system 2000 possesses new opportunity, extending the functionality of managing drive letters. Previously, letters were assigned alphabetically to the primary and secondary partitions of a basic disk (C, D, E, F, etc.). Of course, this limited the freedom of choice to twenty-six letters of the alphabet. Windows 2000 can work around this limitation by using a completely new way of naming volumes. The method is based on connecting a volume to an empty NTFS folder. The volume being created connects to a folder located on another local NTFS volume, however new volume can be formatted to any file system that Windows 2000 supports. This effect can be achieved by using a drive path instead of a drive letter, which is easiest to explain with an example. Let's say you want to create a “Documents” volume for storing documents. In addition, you need the volume to appear on drive C and not on your drive. You just connect the volume to empty folder“Documents”, which is located on the C drive, formatted with the NTFS file system. As a result, the new volume appears as C: \ Documents, rather than as a separate volume. This feature, specially designed for more flexible disk management, provides a number of benefits in addition to mounting dynamic volumes. For example, you can connect an optical disc (CD-ROM) to drive C so that it appears as C: \ CD-ROM, thus creating the attached drive. Translator's note. In some sources, attaching a volume to an empty folder is called a mount.
To mount a volume, you must have an empty folder on the drive (for example, on drive C). Remember to create the folder on an NTFS formatted volume. Subsequently, the volume you created can be formatted in any file system that Windows 2000 supports.
You can connect a volume to an empty folder using the Create Volume Wizard in the snap-in Disk Management... In the window Assign a Drive Letter or Path set the switch to position Mount this volume at an empty folder that supports drive paths instead of a drive letter, as shown in Figure 10-6.
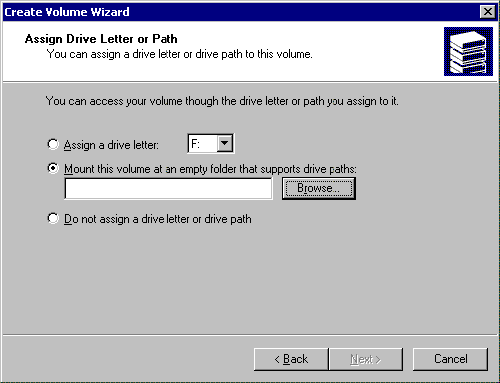
Figure 10-6 - Mounting a volume to an empty folder
Then enter the path to the folder or click the button Browse... In the second case, you can select the desired folder on the disk in the dialog box. In addition, you can create a new folder if it was not done before starting the wizard. With the folder selected as shown in Figure 10-7, click OK and then the button Next (Next) to continue the wizard.
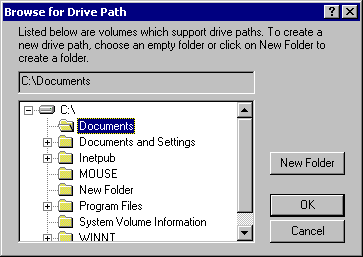
Figure 10-7 - Use the Browse button to select an existing folder or create a new one
After the wizard finishes, open the volume containing the folder with the new volume attached to it. In the Windows Explorer window, the mapped volume will be displayed as “disk within disk” as illustrated in Figure 10-8. Mounting a volume to an empty folder makes it easier to access data stored on hard disk x data, which you will be convinced of using this opportunity in practice.

Figure 10-8 - The mapped drive is displayed in the specified location
Volume expansion
By creating a simple volume, you can later increase the disk space it occupies if there is still free space on the disk. A volume can be easily expanded without the risk of losing the data stored on it, even without restarting the computer. For example, Figure 10-9 shows a simple volume F. As part of Disk 1, it takes up 1 GB of disk space. On the first disk, another 3.06 GB is available as unallocated space. With a snap Disk Management you can easily expand volume F up to 2 GB.
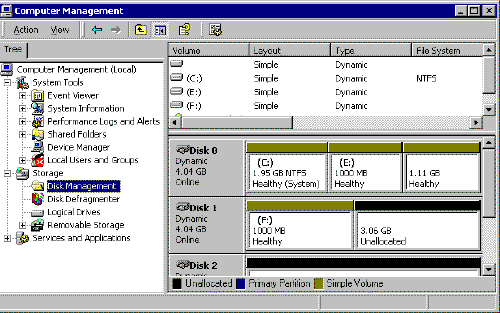
Figure 10-9 - The volume can be expanded
To expand the volume, open the snap-in Disk Management, highlight the desired volume, in the action menu Action go to item All Tasks and select a command. The Extend Volume wizard will open and you will need to complete the following steps.
| 1. | In the first dialog box of the wizard, click Next (Next). |
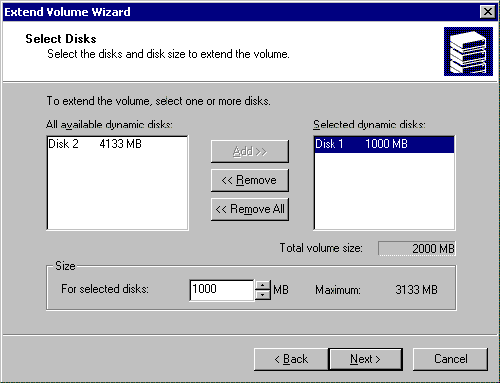
| 2. | In the window Select Disks make sure you are working with the correct disc, and in the field Size (Size) enter the desired number (in megabytes) by which you want to expand the volume. Then press the button Next (Next) to go to the last window of the wizard.
Figure 10-10 - Specify the size of the extension and click Next |
| 3. | Click the button Finish to complete the wizard. The extended volume retains its drive letter, as shown in Figure 10-11.
Figure 10-11 - The extended volume is displayed in the Disk Management snap-in |

Creating spanned volumes
Spanned volumes, called volume sets in Windows NT, allow you to combine areas of free, unformatted space into a single logical drive. For example, you might have three hard drives, and each of them has 1 GB of raw space. You can combine these three areas into one 3 GB logical drive. This solution makes it possible to efficiently manage the remaining disk space, but does not increase fault tolerance. If any of the three disks fail, all data on the spanned volume will be lost. In addition, deleting part of a spanned volume results in the loss of the entire volume. Nonetheless, spanned volumes are a good solution for efficiently using unallocated space on different disks. You can merge from 2 to 32 dynamic disks, and the areas to be merged can be of different sizes. In other words, one disk may contain an unallocated area of 1 GB, while the other may have 500 MB. free space... After you combine the scattered areas into one spanned volume, Windows 2000 will treat it as a single unit.
Free space from other disks can be added to an already created spanned volume, provided that the volume is formatted with the NTFS file system. However, deleting any of the parts will result in the loss of the entire volume.
Brief help. The Windows 2000 operating system has features that provide fault tolerance and protect your data in the event of an individual hard drive failure. The solution is based on the use of several hard drives... Although a spanned volume uses at least two hard drives, this solution is focused on data storage, not fault tolerance. Data on a spanned volume is not immune to hard drive failure and will be lost in the event of a hard drive failure.
Follow these steps to create a spanned volume:
| 1. | Action go to item All Tasks and select the command Create Volume. |
| 2. | In the Create Volume wizard window that appears, click the button Next (Next). |
| 3. | In the window Select Volume Type set the switch to position Spanned Volume and press the button Next (Next). |
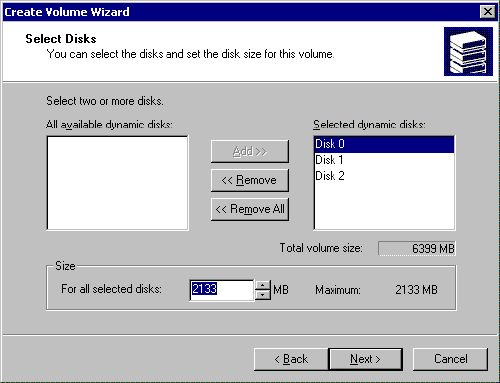
| 4. | In the window Select Disks Add... The drives will appear in the window for the selected drives, as shown in Figure 10-12. In field Size (Size) for each of the disks, you can specify the amount of free space that will be used in the spanned volume. After making your selection, click Next (Next).
Figure 10-12 - Select the desired disks and click the Add button |
| 5. | In the window Assign a Drive Letter or Path assign a drive letter for the spanned volume, or mount it to an empty NTFS folder. Then press the button Next (Next). |
| 6. | In the window Formatting a volume specify whether the operating system should immediately format the spanned volume. If you decide to do this immediately, select the desired file system, set the cluster size and set the volume label. Click the button Next (Next). |
| 7. | Finish... A spanned volume will be created, which will be displayed in the snap-in Disk Management with a purple stripe above the volume letter or volume name, as shown in Figure 10-13.
Figure 10-13 - A spanned volume is displayed in the Disk Management snap-in |

Creating striped volumes
Another solution for storing data on multiple hard drives is a striped volume (known as a striped set in Windows NT). As with a spanned volume, unallocated areas of physical disks can be combined into a striped volume, the number of which can vary from 2 to 32. However, the operating system writes data in ordered blocks of the same size to all disks in the striped volume at once. Therefore, unallocated areas on disks must also be the same size. The Create Volume Wizard will help you create striped volumes, which does not allow you to combine unequal areas of free disk space into a striped volume. Let's say you have three hard drives. One disk has 500 MB of free space, and the other two have 1000 MB. You can use no more than 500 MB from each disk for a striped volume, and the maximum volume size is therefore 1.5 GB (however, you can use smaller areas of disk space).
As with spanned volumes, striped volumes are not designed to improve fault tolerance. If any of the disks fail, all data on the striped volume will be lost. However, compared to spanned volumes, striped volumes provide better performance. They have the highest write and read speeds of any disk management solution in Windows 2000. Due to the nature of writing data to a striped volume, it cannot be expanded.
Follow these steps to create a striped volume:
| 1. | Select the desired area of unallocated disk space from the action menu Action go to item All Tasks and select the command Create Volume. |
| 2. | In the Create Volume wizard window that appears, click the button Next (Next). |
| 3. | In the window Select Volume Type set the switch to position Striped Volume and press the button Next (Next). |
| 4. | In the window Select Disks select the disks you want to include in the spanned volume and press the button Add... The drives will appear in the window for the selected drives, as shown in Figure 10-14. For each disk, you can specify the amount of free space that will be included in the striped volume. This can be done by selecting the drive and changing the value in the field Size (Size)... Note that the maximum value is determined by the size of the smallest unallocated area included in a striped volume. Click the button Next (Next).
Figure 10-14 - Select the desired disks and click the Add button |
| 5. | In the window Assign a Drive Letter or Path assign a drive letter for the striped volume, or mount it to an empty NTFS folder. Then press the button Next (Next). |
| 6. | In the window Formatting a volume specify whether the operating system should immediately format the spanned volume. If you decide to do this right away, select the desired file system, set the cluster size and set the volume label. In addition, at this point, you can choose to quickly format the volume, as well as specify whether the volume will be compressed to save space. Click the button Next (Next). |
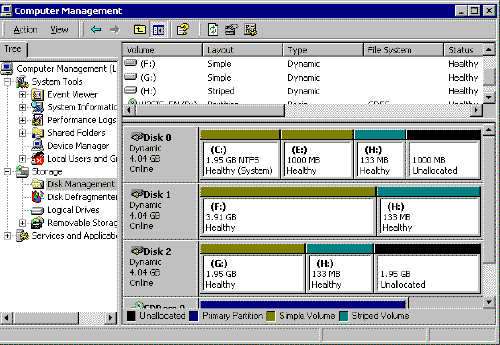
| 7. | To complete the wizard, click Finish... A striped volume will be created and displayed in the snap-in Disk Management as a single volume, as shown in Figure 10-15.
Figure 10-15 - Striped volume displayed as a single volume |
Common actions with volumes
One of the most significant advantages of the Windows 2000 Professional and Server operating systems is customization flexibility. Most of the most important configuration parameters can be changed repeatedly without risking system malfunction. Volume configuration is no exception to this rule. To perform various actions on the created simple, spanned or striped volume, select it in the snap-in Disk Management and from the menu Action go to item All Tasks... The available actions are listed below:
| Open... This command opens a volume and allows you to navigate through its folders and files. | |
| Explore... As in the previous case, this command opens the volume, but this time - in Explorer for easier navigation through the folders and files of the volume. | |
| Extend Volume... This command is used to expand simple and spanned volumes using a wizard (see the “Expanding a Volume” section earlier in this chapter for more details). | |
| Change Drive Letter and Path... You can use this command to change the drive letter of a volume or its path, and to assign these parameters in case this was not done when the volume was created. | |
| Format... If you didn't format when you created the volume, or just want to format the disk, you can use this command. It allows you to specify the volume label, select the file system, assign the desired cluster size, and also perform quick formatting and applying compression to folders and files on the volume. If data is stored on the volume, it will certainly be lost during formatting. | |
| Reactivate Volume... With this command, you can try to re-mount a disconnected volume (see Chapter 11 for details). | |
| Delete Volume... This command removes the volume along with all its contents. | |
| Properties... This command opens the volume properties, which are discussed in the next section of this chapter. |
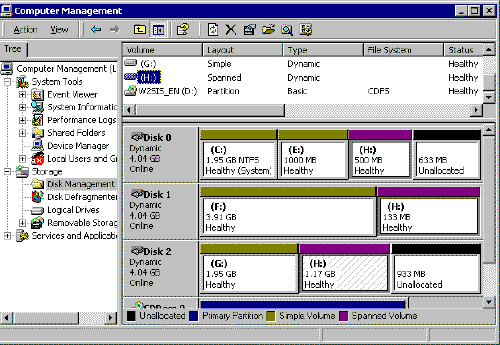
Dynamic volume states
As with enabled and offline disks, each volume can be in a specific state. The volumes are listed in the Disk Management snap-in. The top right pane displays the volume label as well as Additional Information about it: location, type, file system, state, capacity and free space. Column Status carries information about the disk, and depending on its state, the following information can be displayed there:
| State Healthy is the normal state of the volume when it is available and no errors were found. | |
| Capable of Healthy (At Risk) the volume is accessible, but disk input / output (I / O) errors have been detected. The disk on which such a volume is located is in the state. Typically, the drive can be returned to the state Connected (Online) by reactivating it. To do this, you need to click right click mouse on disk and choose from context menu command Reactivate Disk. | |
| Capable of Initializing the volume is being initialized, and after its completion, the volume status will change to Healthy... No action is required from the user when the volume is in the initialization state. | |
| State Resynching on mirrored volumes means that resynchronization is taking place between the two disks. After it completes, the volume will return to the state Healthy without any action on the part of the user. | |
| State Regenerating occurs for RAID-5 volumes when information is regenerated based on parity data. For more information on RAID-5 volumes, see Chapter 11. | |
| The volume may be in a state Failed Redundancy when the disk on which the volume is located is disconnected. In this case, the data is not provided with fault tolerance, both on mirrored volumes and on RAID-5 volumes. To avoid data loss, the volume must be recovered. For more information on RAID-5 volumes, see Chapter 11. | |
| State Failed Redundancy (At Risk) similar to the state Failed redundancy, however, the disk on which such a volume is located is usually in a state Online (Errors)... To fix errors, you need to reactivate the disk so that it goes into the state Works (Online). | |
| State Failed occurs when the volume has failed to start. It is necessary to restore such a volume. |
Configuring Volume Properties
The volume properties dialog, shown in Figure 10-16, can be opened in the snap-in Disk Management by right-clicking on the volume and choosing Properties from the context menu. The window contains several tabs that allow you to configure various parameters of the volume. More about them will be discussed below.
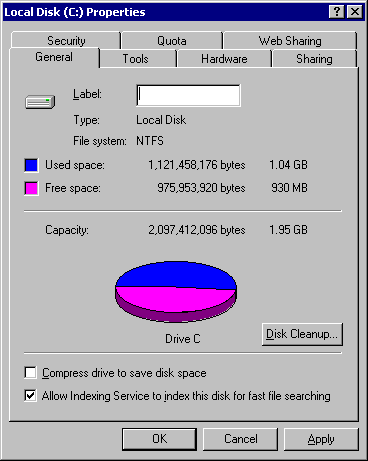
Figure 10-16 - Volume properties
| In the tab General Various information about the volume is displayed: the amount of free and used space, the file system, and the total capacity. On the same tab, you can change the volume label, run the disk cleanup utility, and use disk compression to save space. | |
| Tab Service (Tools) is designed to run utilities for checking the volume for errors, defragmenting the volume and archiving the files stored on it. This is discussed in more detail in Chapter 13. | |
| In the tab Hardware a list of such elements is presented hardware, how hard drives, floppy drives for floppy disks and optical disks (CD-ROMs and DVD-ROMs), and lists other media related to disk and volume management. From this tab you can run the diagnostic Windows utility or open the properties of individual devices. | |
| In the tab Security (Sharing and Security) You can share the volume and configure the required permissions. | |
| Tab Quota is for configuring disk space quotas for a volume, which is covered in more detail in Chapter 17. | |
| In the tab Access via the web (Web Sharing) You can configure access to the volume through a Web site (for example, an Intranet site), allowing network users to access the volume on your computer. |
Conclusion
In Windows 2000, dynamic disks solve a number of disk management problems. You can create any number of volumes on a physical disk, and even mount those volumes to empty NTFS folders instead of assigning a drive letter. You can format volumes to file NTFS systems, FAT and FAT32 (NTFS is preferred). Using dynamic volumes allows you to create spanned and striped volumes on systems where multiple hard drives are installed. This gives additional features for storing and managing data.
Questions and answers
The questions and answers presented in this section will help you in solving problems or will serve to test your level of knowledge about the materials in this chapter.
Why can't I create a volume on my hard drive even though I'm using a Windows 2000 computer?
Your disk needs to be converted to dynamic. Since volumes can only be created on dynamic disks, you must first convert before creating and managing dynamic volumes.
What file systems can you use when working with volumes?
The Windows 2000 operating system supports NTFS, FAT, and FAT32 file systems. Undoubtedly, the best choice is NTFS, so you must have a good reason to format the volume to FAT or FAT32.
Should I use quick volume formatting?
A quick format deletes data from the volume, but does not scan the disk for bad sectors. As a rule, it is not recommended to use quick format (unless you have a new disk). Although it takes longer to complete formatting, it is better to give Windows capability to check the disk and recover bad sectors during the formatting process.
What is the point of attaching a volume to an empty folder?
Mounting a volume to an empty folder allows you to use the folder name for its name, rather than just a drive letter. This feature allows you to bypass the limitation associated with the number of letters (26) in the Latin alphabet, and assign disks and volumes "real names" instead of drive letters.
Should areas of free disk space be the same size when creating spanned volumes?
No. To create spanned volumes, you can use unallocated areas of any size located on disks, the number of which can vary from 2 to 32. Spanned volumes are filled with data in order, ie. first, data is written to the first volume until it is full, then to the second, etc. Due to the peculiarities of the recording method, the size of the areas of free unallocated space does not matter. In the case of striped volumes, the unallocated areas on the disks really need to be the same size. This is due to the fact that data is evenly written to all disks at once.
Can I remove a single drive from a spanned or striped volume without risking data corruption?
No. If you remove any disk, all data on a spanned or striped volume will be lost (the same will happen if a disk fails).
about the author
Curt Simmons has worked with Windows 2000 Server since Beta 1. As an author and technical instructor specialized in operating systems Microsoft, BackOffice products and Internet technologies, he has written over ten technical books and teaching aids... Based in Dallas, Texas, Simmons is a Microsoft Certified Systems Engineer (MCSE) and Microsoft Certified Trainer (MCT).
We hope that the information from this article will be useful to you. However, you use the information provided in this article at your own risk. All information in this article is presented "as is", without any warranties, express or implied, as to its accuracy, completeness, suitability for the performance of any tasks that transfer or violate proprietary rights; Microsoft does not support or author, represent or warrant any third-party information or products mentioned in this article. Microsoft will not be liable for any damages caused by the use of this information, including direct, indirect, willful, incidental, or consequential damages, even if we have been advised of the possibility in advance. All product prices mentioned in this article are subject to change without notice.
With dynamic disks, you can create simple volumes using DiskPart. This is a basic type of dynamic volume. Unlike partitions, a simple volume can occupy the entire disk or a required portion of it.
Creating simple volumes
Before adding a simple disk volume, you should determine the amount of free disk space and see the current volume configuration. To do this, follow these steps.
- List drives and check free space on them
By choosing desired disk, you can create a simple volume with the command:
- create volume simple size = N disk = N
where size ^ N is the size of the volume in MB, and disk = N indicates on which disk the volume will be created.
After the volume is created, it automatically receives focus, that is, it becomes selected. The volume does not yet have a drive letter or mount point. To assign them, you need to run the ASSIGN command. Then, to complete the preparation of the volume, format it with the FORMAT command (a standard external Windows command, not the DiskPart subcommand). These operations are the same for volumes and partitions.
Expanding Simple Volumes
If you find that you are running out of space on a simple volume, increase its size in one of two ways. The first is expanding a simple volume within the same disk, resulting in an extended volume. And the second is expanding a simple volume to spread over other disks; then you will get an overlapped volume. In any case, the volume must be formatted for NTFS.
Follow these steps to expand a simple volume.
- Enter diskpart in command line to start DiskPart.
- List the drives and see the amount of free space on them:
- DISKPART> list disk
- List volumes: DISKPART> list volume
- Select the volume you are going to expand, for example volume 5:
- DISKPART> select volume 5
- Expand the volume.
 Bugs in Singularity?
 Just Cause 2 crashes
 Terraria won't start, what should I do?