System restore from acronis true image. How to restore the system using the Acronis image? Fixing file system problems on your hard drive
What does it give?
You can install Windows on your computer and make a full disk backup, which will contain nothing but Windows, only clean Windows. Reinstalling the operating system takes at least 30 minutes of real time, and restoring the operating system using Acronis True Image will take no more than 5 minutes. The same can be said for a hard drive with already installed programs and all kinds of files, for example, game walkthroughs or a thesis. Now this data will definitely be lost with you during a standard recovery. A diploma can be done for several months, which then may not be restored.
Acronis True Image allows you to get rid of fear for your data. You can copy your data to another drive, a hidden partition, or an FTP server. The new version of True Image has received full integration into the Windows 7 control panel, which allows you to do archiving with almost no effort. The program can be used for free in trial mode (Trial), and then it can be purchased. Learn how to backup Windows system and restore. Perform a clone of the Windows operating system. By purchasing this video course you will be satisfied
BACKUP AND RESTORE
VIDEO COURSE Restoring Windows with Acronis 2016
Acronis True Image is already quite a popular application known to many people for system recovery, data backup and archiving. This program gives you confidence in the safety of your data and their easy recovery on your computer. You can make it so that only individual folders or files will be backed up, any user data of your choice, and possibly entire partitions and even complete hard drives.
What does it give? You can install Windows on your computer and make a full disk backup, which will contain nothing but Windows, only clean Windows. Reinstalling the operating system takes at least 30 minutes of real time, and restoring the operating system using Acronis True Image will take no more than 5 minutes. The same can be said for a hard drive with already installed programs and all kinds of files, for example, game walkthroughs or a thesis. Now this data will definitely be lost with you during a standard recovery. A diploma can be done for several months, which then may not be restored.
Acronis True Image allows you to get rid of fear for your data. You can copy your data to another drive, a hidden partition, or an FTP server. The new version of True Image has received full integration into the Windows 7 control panel, which allows you to do archiving with almost no effort. The program can be used for free in trial mode (Trial), and then it can be purchased for about $ 30 (at the time of writing Acronis True Image Home 2016
with you the general purpose and settings of the very useful program Acronis True Image 2015, designed to back up your data and entire operating systems. We also created a backup copy of Windows 8.1 in the Acronis program and, for example, restored from this copy.Friends, without reading the first article You will not understand what will happen now, so I strongly recommend that you first read the first article, and then move on to this one.
In this article, we will make things more difficult for ourselves. Let's imagine a situation where our Windows 8.1 or Windows 10 won't boot due to some problems, how then to restore the system from a backup using Acronis True Image 2015?
Most of the users under such circumstances and just reinstall the operating system, but you and I have the Acronis True Image 2015 program and we will very simply restore our operating system from a previously created backup using the program's boot disk.
How to make a bootable disk or bootable flash drive of Acronis True Image 2015
- Note: You need to create a boot disk or flash drive of Acronis True Image 2015 because in most cases you will install a trial version of Acronis and after 30 days it will stop working, and the boot disk will always remain functional and you can always use it to restore your operating system from the backup.
- Not all new laptops with UEFI BIOS can be booted from such a flash drive, if you come across such a laptop, create a .
Run the program and click on the button Tools. Choose Bootable Media Builder(create bootable media to recover your computer if it stops booting)

In this window, you can choose which bootable media to create. You can create an ISO image of the program, add it to or download from it.
You can also create a simple CD, DVD disc with the program.
I will choose creating a bootable flash drive with the program Acronis True Image 2015. The flash drive must already be connected to the computer.

Proceed.

The process of creating a bootable Acronis flash drive begins.

Acronis bootable media has been successfully created on my flash drive.

In the boot menu of the computer, I select the flash drive

Acronis True Image 2015

Recovery. Disks.


We find our backup on the New volume (M:) of the portable hard drive. Select it with the left mouse once and click OK.


Check all sections.


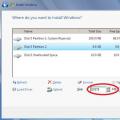
In this window we see three disks:
Disk 1 is our flash drive with Acronis True Image 2015.
Disk 2 is a portable USB hard drive that contains a backup copy of the operating system.
Disk 3 is our SSD to deploy the backup to. Here we choose it.
First, select with the left mouse Partition (Reserved by the system) (E:) and click on the button To accept .


Select the C: drive with the left mouse and click To accept.


Select the target disk for MBR recovery.
Select our SSD solid state drive and select it with the left mouse, click Next.

Proceed

The recovery process begins and ends successfully.
4 years ago Vladimir Belev 87 comments 7243 views
Good day to all! Today I will be the final article on the topic of backup and recovery using the wonderful Acronis True Image program.
In the last 2 articles, we talked about how to backup the entire system and individual files using Acronis and how to restore it all if necessary.
Surely those who read these two articles noticed that I talked about backup and restore through a program that is only available from the operating system. But here the question arises: “But how can I restore my system from a backup if Windows cannot boot?”. That's exactly what I wanted to tell you about in this final article about backup with Acronis.
In order to recover a system that is unhealthy and unable to boot for any reason, Acronis True Image must be able to start before the system boots. This can be done in 2 ways:
Burn the Acronis True Image program to a disk or flash drive, and in the event of a Windows crash, boot from the disk and restore the system.
Create a special hidden partition on the hard drive with the Acronis bootloader. Then it will be possible to load this program even before Windows boots, by pressing the F11 key when turning on the computer.
Today in the article I will tell you about both methods.
Let's start with the ability to boot Acronis from disk.
Booting Acronis True Image from a disk and restoring the system / individual files
In order for this method to work, we need a blank CD, on which we will burn the bootable version of Acronis. You can also use a USB flash drive, but I recommend the disk, because when writing to and booting from USB flash drives, there can be many different nuances and problems.
Blank discs for recording (blanks) can always come in handy. 10 pieces of CD discs from a reliable company "Verbatim" in a box cost only about 200 rubles. On them, in addition to some of your files, you can later write other useful boot programs, about which I will also write articles for sure :)
So, let's assume that we have a disk.
Burning Acronis True Image to disk
The function for burning Acronis to disk is built into Acronis True Image itself. We launch it from a shortcut on the desktop or from the Start menu.
Go to the "Tools and Utilities" tab and click on the link "Bootable Media Builder" in the section on the left "Protection Tools":
A separate program "Acronis Media Builder" will start, which will allow us to burn Acronis to disk. In the first window, simply click the "Next" button:
In the next window, you need to select which programs from Acronis will be written to disk. The choice is not great: the program itself for backup / recovery "Acronis True Image" and the program for creating reports on the operating system "Acronis System Report" (useful only for good specialists).
Both programs will fit on a simple CD, so I recommend ticking everything that is offered on the left in the window. Optionally, you can enable the "Automatically start after ..." function for one of the programs in the list and specify the time in seconds. Then, after loading from the disk and the number of seconds you have chosen, the desired program will start automatically:
Once everything has been selected, click the "Next" button.
In the next window, you are prompted to set additional boot disk parameters using special commands. This is for experienced professionals and we will not need such advanced functions, so we just click the "Next" button:
Now we are required to select a device for recording the bootable version of Acronis. In my example, there are only 2 choices: burn to disc or create an ISO image. If you select the second option, a regular file with the “.iso” extension will be created on the computer, which can later also be written to a disk or USB flash drive. The option, in principle, is needed only if you later want to burn another copy of Acronis to another disk, but from the computer where Acronis True Image is not installed.
If you connect a USB flash drive to the computer, then the option of recording to it will also be available.
We are considering recording specifically to a disk (to a USB flash drive absolutely the same) and select the item "CD burner". Insert a blank CD into the computer's drive, and then click the "Next" button:
In the last window, click the "Proceed" button to start the process of burning the Acronis program to disk:
We are waiting for the disk recording to complete:
After the disc is burned, we will receive a message in the window where we need to click the "OK" button to continue:
This completes the process of burning a disc with the bootable version of Acronis True Image. Let's move on to booting from the recorded disc and consider the recovery process.
Booting the computer from the Acronis True Image boot disk and restoring the system
Now our task is to boot from the previously recorded disk.
The "Complete" phase will provide a summary of what actions will be performed during the restore. You can also visit the “Settings” section before starting the recovery by clicking on the corresponding button at the bottom left:
Here you can enable checking the backup before starting recovery, as well as activate the automatic restart of the computer if Acronis deems it necessary. In principle, these options do not carry anything important and I usually do not include them.
To start the recovery, we just have to click the "Proceed" button below, which we do:
It remains only to wait for the completion of the operation. You can also, by selecting the appropriate option at the bottom of the window with the recovery process, activate automatic shutdown of the computer or restart it:
Insert the disc into your computer's drive and restart your computer.
If the BIOS of the computer is configured optimally (we will not go into details of this yet), then immediately after the reboot, even before your Windows operating system starts, booting from the disk will begin and you will see the inscription "Starting Acronis Loader ...".
After a few seconds, the Acronis bootloader will start and you will see a window with boot options: "Acronis True Image", "Acronis System Report" and "Windows". We chose the first two programs to burn to disk on our own, and when you select the “Windows” item, you will exit the Acronis bootloader and the Windows system will boot.
Select the very first line in this window - "Acronis True Image":
After a certain period of time (seconds 20) the program we have chosen will start. Its interface will look like the image below:
Since the interface is significantly different from what was in the Acronis True Image program under Windows, I will go through all the recovery steps again to make everything very clear. We will not touch on the backup process from the boot disk, since this action can be performed without problems from the Windows system, and I talked about this in the 1st article on backup.
Now we connect to the computer the media on which you store the created backup copy (USB flash drive, hard drive) or later specify some other location.
To start recovery, click on the "Recover" button located at the top of the Acronis interface and select the required recovery option from the drop-down list: disks and partitions or individual files / folders. I will consider in this example the process of recovering disks and partitions - i.e. I will restore the entire system with all programs and settings from a previously created backup.
With the restoration of individual files there will be absolutely no problems and questions should not arise.
The recovery window will open. In it, at the very beginning, you need to select the archive with the backup that we will restore. To select, click the "Browse" button below:
In the explorer window that opens, select the media on which your backup is located in the window on the left, and in the window on the right we are looking for the backup itself on this media. After selecting the archive, click the "OK" button:
If your backup was password protected, then a window will immediately appear where you need to enter the password. Enter the password and click "OK":
If the password is forgotten, recovery will become impossible.
Returning to the main recovery window, we will see the newly connected backup. Click the "Next" button below to proceed to the next step:
At the next stage, we can restore the entire partition (for example, the entire system with data) or restore individual files and folders. As I said above, in the example I show how to restore a partition using such a bootable version of Acronis True Image, and there will be no problems with restoring files, since there is nothing complicated there and I talked about it in a previous article.
In the next step, we select the items to restore. In this case, we can select the partitions that need to be restored. If you had chosen to restore individual files at the last step, then, accordingly, at this stage you would have just indicated those files / folders that need to be restored.
Since we are restoring the entire system, I mark all system partitions. If you do not mark one of the system partitions, then after recovery the system simply will not boot!

Well, that's all :) After the restoration, you will get a workable system, completely ready for work.
The method with a boot disk, of course, is not always convenient, so let's consider another way to launch Acronis True Image to restore a system that, for example, refuses to start at the moment.
Creation of a special hidden partition on a hard drive with the Acronis True Image boot loader to restore a damaged system from a backup
So, let's look at another way to start the Acronis program before the system itself boots up, by pressing the F11 key immediately after turning on the computer. Of course, if your system is already “corrupted” and stops booting, you will no longer be able to complete all the steps below. Therefore, I recommend activating this method of booting Acronis as soon as you start working with the program. Let's start:

Now you can restore the system in the same way as you would by booting from a boot disk, which I talked about from points 3 to 9 of the section "Booting a computer from an Acronis True Image boot disk and restoring the system" of this article.
The only disadvantage of this method compared to the boot disk is that the computer may boot more slowly. This is due to the fact that immediately after turning it on, a prompt will be displayed for several seconds to press the F11 key and boot Acronis, and only after that Windows will start loading.
Which boot method to use is up to you, but I highly recommend burning the disc anyway. It can be useful.
On this about backup and recovery using Acronis True Image, I told everything that I planned :) Feel free to ask questions in the comments :) We all once knew nothing and learned everything, so any question on the topic will not go unnoticed! ;)
In this article, I bring to your attention the principle of creating a backup copy of the system using Acronis True Image 2013, as well as the possibility of automatic recovery Windows with all necessary drivers and programs. The process of creating a boot disk for the program will also be considered. Acronis True Image 2013 for remote automatic recovery Windows.
For convenient perception and understanding of the article described below, it was divided into 3 main blocks:
- Creating a backup copy of the system partition;
- Create a boot disk for Acronis True Image 2013, to restore the system;
- Recovery Windows with all programs and drivers.
For general understanding:
Sometimes there are moments when you need to quickly recover Windows with all installed programs and drivers at the time of the operating system crash. At the moment, all manufacturers of laptops and computers complete their products with system recovery discs or hidden partitions that are located on the hard drive itself.
One of the disadvantages of recovery Windows before the factory settings is that after the restoration you will have to remove a lot of unnecessary programs that came with the laptop at the time of purchase. Another inconvenience is that you will need the original MBR, the presence of hidden partitions and a certain structure of these very partitions.
To facilitate the process of restoring the system with all the necessary drivers and programs, this article was created. This article will use a very convenient and functional program called Acronis True Image 2013. With the help of this program, you can easily create a backup copy of the system and restore it in the future. Windows from the same image that was created earlier.
So, let's begin.
In order to have something to restore, you must first:
- Install and set up Windows with all drivers and programs
- Create an image of this Windows with all necessary drivers and programs
- Create boot disk for Acronis True Image 2013 or a specific area on the hard disk to run the program without a disk
- Recovery Windows with all drivers and programs.
Install Windows. It is also worth mentioning that after installing Windows it is worth setting up, installing all the drivers and the necessary programs. After installing and configuring Windows you can proceed to create a system image.
2. Creating an image of the Windows system partition.
As you may have guessed, for this we need Acronis True Image 2013. After installing the program, run it and click on the button at the bottom left System backup:
The next step is to specify the parameters for the backup. Click on the line in the bottom corner of the program Disk backup options:
In the window that opens, click on the tab Scheme. Next, choose from the drop-down list custom scheme, and Choose a backup method Full:
Now go to the tab Additionally. As you can see, there are a lot of settings in this tab. We will analyze only the main ones.
The first of the possible useful functions is Backup protection. If you want to protect your backup with a password, then click on this line and enter an owl password for protection:
Another of the useful settings is that the created system image can be divided into several parts. For example, to write to DVD disc or even Blu-ray:
A very important point is checking the backup for errors. This may affect the recovery process later. I think it is perfectly clear to everyone that if the backup is created with errors, then it will not be possible to restore the system. Therefore, it is worth ticking Validate a backup after creating it:
You can also specify a comment for the backup. Click on Backup comment:
The next setting includes the ability to create screenshot. This will help to recognize the previous state of the data that needs to be restored. To enable this feature, check the box above the corresponding line:
This concludes the review of the tab. Additionally. If you suddenly something is not clear, then you can refer to the help by clicking on the question mark in the lower corner of the program. Help is very convenient and clear.
Go to tab Performance. In this tab, you can specify Compression level and Operation Priority, as well as Limit network connection speed:
Next tab titled Notifications has settings for various notifications. You can specify low disk space notification or send a notification about the status of the operation by e-mail:
On the tab Exceptions you can specify files that will not be included in the backup:
After making all the required settings, click on the button OK:
Now put a check in front of the section, where Windows is installed. Specify storage backup and give backup name:
Click on the button to start archiving. Archive:
This is how the start of the archiving process looks like:
After the backup is completed, the following window will appear:
The archiving process has been completed.
3. Creating a boot disk for Acronis True Image 2013.
Now it's time to create a boot drive or area to run the program Acronis True Image 2013 after a system failure.
First of all, let's create a boot disk. To do this, you need a blank DVD disc, as well as a drive. We start the program Acronis True Image 2013 and click on the tab Tools and Utilities and then to the line Bootable Media Builder:
Now just click on the button Further:
In the window that opens, select true image and press Further:
Now select our drive and click Further:
To start recording, simply click on the button. Proceed:
After the recording is completed, the following window will open:
In order to run this program, you need to boot from this very boot disk.
Creating a hidden partition to start Acronis True Image 2013 without a disk.
This method is very convenient and practical. When using this method, you do not have to bother with disks, since to run the program you only need a specially allocated space on your hard disk. To start the program in this way, it will be enough to press the key F 11 and start Acronis True Image 2013. Also, this method will suit those who do not have a CD / DVD drive.
And so, to implement this method, you need to run the program Acronis True Image 2013, go to the tab Tools and Utilities and choose Boot recovery:
Now in the program window that opens, you just need to click on the button Activate:
After the process is completed, the following window will appear:
That's basically it. After the next reboot of the system, an inscription will appear prompting you to press a key F 11 for start Acronis True Image 2013:
To disable this recovery function, just run the program, go to the tab Tools and Utilities and press the button again Boot recovery.
4. Restore Windows with all drivers and programs.
Now it's time to restore our system from the image we created earlier.
Important: when the recovery process starts, all data from the restored partition will be deleted. If there is important information in this section, then it should be copied
And so, to start recovery, you should boot from the installation disk or press the key when the system boots F 11 and from the provided menu choose True Image:
In the next window that opens, click on the button Recovery:
In the next window, select the backup copy and click on the button Disk recovery:
In the next window, put a dot over Recover disks or partitions and press Further:
Now it's time to select the recovery items. Put a check next to the section:
Important: if you run the program from a disk, you need to check the box next to MBR, if the program was launched by pressing a key F11, then the checkbox must be unchecked.
To open the next window with settings, click on the line New storage.
Now you need to specify the partition on which the backup image will be installed. It is very important that the selected partition previously contains Windows. That is, this is the partition from which we previously created a backup copy. Select and click on the button To accept:
Now click on the line Change default settings.
In the window that opens, put a dot opposite Basic and if there is no tick next to Mark section as active, then it is worth putting it and pressing the button To accept:
To start the process, press Proceed:
Now we are waiting for the end of the recovery process. You can also check the box next to Restart your computer after recovery is complete. After the recovery is completed, the computer will restart itself and you will receive
It is believed that on a new computer or on the same one, but after replacing significant components, it is better to roll Windows over a new one. But what if you really don’t want to lose a system finely tuned for yourself, configure it again, install a bunch of software, and you need to move to another hardware? In this case, you can do it in different ways:
Create your own distribution kit on the basis of the Windows that you have worked out - untie the components and pack the system into an installation image, as we once did with the Dozens example;
Connect the hard drive to a new computer, clone Windows and, if there are problems with running it on the new hardware, try to fix them;
Make a backup copy of the system, restore it on another computer and, again, play with the elimination of problems that may appear;
Resort to the previous two options, but using technology Acronis Universal Restore.
About this technology and its application, in fact, I propose, friends, to talk below.
About technology
Acronis Universal Restore is a tool to eliminate errors that may appear when restoring a non-native Windows backup on a PC or laptop due to the presence of inappropriate drivers in it. The technology was created by the developer company Acronis primarily for the business environment in order to simplify the deployment of a properly configured operating system on corporate machines. Like the standard utility for preparing Windows for deployment on other Sysprep devices, Universal Restore decouples components. But it can also do what Sysprep can't - install drivers for hard disk controllers and other components from a custom distribution. And exactly, friends, from a custom distribution. Universal Restore is just a technology for adapting Windows to new hardware, but by no means a completely working system restore tool with a database of all kinds of drivers. Only if we specify the path to the folder where we store the drivers necessary for the operation of a separate filling of the target computer, this technology can help us.
Universal Restore is not a back-up mechanism with the initial unlinking of components, as many believe. Detaching components and installing drivers on a new computer is carried out after restoring the system from a backup. This technology works in tandem with the Acronis regular backup mechanism. As, however, it can work in tandem with backup or cloning mechanisms from other developers. Or even can be applied without moving the system in cases such as changing the mode of the hard disk controller. This technology simply exists in the form of an add-on for Acronis bootable media, which, in fact, ties the user to using the backup mechanism from Acronis.
Well, now let's look at a real example of how this technology works. Let's create a backup copy of Windows on the source computer using the Acronis bootable media, restore the system on the target computer, then adapt it to the new hardware using Universal Restore.
Preparatory actions
Let me remind you, friends, Universal Restore is only a mechanism for injecting drivers into a Windows ported to another hardware. Ensuring the availability of the drivers themselves is our task. You either need to connect the DVD that came with the laptop or PC motherboard to the target computer. Or place the folder with the distribution of drivers downloaded from the Internet, say, on the same media where the system backup will be stored.
- Note: if you are transferring Windows from an old PC or laptop, where the IDE hard disk controller mode was set in the BIOS, and the AHCI mode is on the new device, be sure, friends, take care of the AHCI driver installers. The same applies to the situation of transferring the system to a device with a RAID array.
Creating bootable media with Acronis Universal Restore
Backup tools from Acronis, including the Universal Restore add-on, can be found on board various artisanal Live disks. But the official, aka honest, 100% safe way to use this technology is to create media inside the Acronis True Image program installed in the Windows environment and activated. You can create bootable media with Universal Restore in the environment of the current version of True Image 2018 as follows.
- Note: friends, in order to create bootable media from Acronis True Image, it is essential that it be activated. Media created in the trial version of the program will provide access to the Universal Restore add-in, but will not work in terms of creating a backup.
In the True Image environment, go to the "Tools" section, click "Acronis Universal Restore".
Click "Download".

We download the program to the computer using the link that opens in the browser. We install this program. And we launch. This is the Universal Restore Bootable Media Builder.

We follow the step by step wizard.

We leave everything by default.

Selecting components. Two components are of fundamental importance here - True Image (backup software) and Universal Restore technology. It is also important to choose 64-bit versions of them so as not to bother with disabling UEFI in the BIOS of computers with this interface active. But you can select all the components, it all weighs no more than 900 MB.


We select the media - a USB flash drive, an optical disc, or, as in my case, an ISO file.

In the case of choosing an ISO, give the file a name and specify the path to save it.

At this stage, IDE, AHCI, RAID controller drivers can be included in the media in case the system is transferred to a more modern, on the contrary, older or with a RAID-array computer.

We continue.

The carrier has been created.

Create a Windows backup on the source computer
You can backup Windows using Acronis both inside the system, using the interface of the installed True Image (described in detail), and using the functionality on board the bootable media. I, friends, will choose the last way.
We start the computer from bootable media. On systems with an active UEFI interface, we launch True Image in such an ascetic menu by entering the number 2.

If the regular BIOS mode is active, True Image is launched in the menu with a graphical interface.

Select disk backup.

Specify system partitions: three partitions (usually) for GPT disks and two partitions for MBR disks.

Create a new backup archive and click the browse button.

Specify the disk partition or media on which the backup will be stored. Give the backup a name.


In the summary of assigned operations, we check whether we have indicated everything correctly. Let's start creating a backup.

As a result, we turn off the computer and connect its internal disk or removable media to the target computer.
Restoring Windows from a backup on a target computer
Boot the target computer from the Acronis bootable media. And, as in the previous case, we select the True Image environment. Now we follow the "Recovery" section and look for our backup.


We restore it.


Select all system partitions to restore.

Specify the destination - the entire disk of the target computer or its individual partition.

We carefully check everything and proceed to the operation.

After that, boot from the Acronis media again. And we adapt to the new hardware using Universal Restore technology.
Working with Acronis Universal Restore
On UEFI systems, to launch the UEF of the Universal Restore environment, press the number 1.
 Preparing Your Computer Hard Drive for Windows XP Installation
 How to restore the system using the Acronis image?
 Windows 7 with uefi support