How to install windows 10 without an account
A Windows 10 account will allow you to access settings and files that are not available during normal computer use. At the same time, permanent work with Administrator rights is not safe, so after updating the device to the latest version of the operating system, you should immediately create a new profile.
Addendum
Often, when using a computer, you need to create multiple login profiles. Use one of the methods for this.
In the Settings app
User Accounts utility
- In the "Run" field, open with the command netplwiz User Accounts window. On the Users tab, click Add.

Healthy! Instead of the netplwiz command, you can also use control userpasswords2 - it opens the same window.
- Select "Sign in without a Microsoft account (not recommended)" and click the "Local account" button.

- Enter a username and, if necessary, a password to log in.

Using Command Line

Removal
You can use one of the methods to remove an unwanted profile.
In the Settings app

Important! When using this method, all folder data that is created for the profile on the system drive is erased. If necessary, all files can be copied to another disk or uploaded to the "cloud".
Via Control Panel
Unlike the previous method, in this case the system will prompt you to save all user files before deleting the profile.
- Control Panel –> User Accounts –> Delete User Accounts

- Select the profile to be deleted and then in the "Change account" window, click "Delete account". The system will prompt you to save or delete user files.

- Confirm the deletion.

Healthy! The saved files will remain on the Desktop in a folder with the name of the deleted user.
Using Command Line

Family Member Profile
Important! You can't delete a family member's profile on a Windows 10 device straight away using the usual methods. It can only be blocked so that the user is unable to use the computer.
To uninstall, log in to the Microsoft computer administrator account on the Internet. On the company website, in the "Family" section, click "Delete".
Only after performing these actions on the computer will it become possible to delete the profile of a family member using any of the above methods.
Video
In order to do everything right and not make mistakes during the creation or deletion process using one of the above methods, as well as learn about alternative options, watch the video.
Conclusion
There are several ways to create and delete a profile in Windows 10. The easiest and safest way, according to the editors, is to use the User Account utility.
If you're using Windows 8 or 8.1, you're probably already pretty familiar with the new user authentication mechanism. That is, in addition to a local account, these versions of the operating system support authorization through a Microsoft account. And although the latter can be avoided, some features and modern applications still require that you log in using it - otherwise you simply will not be able to use them. This not only created a gap between the two types of accounts, but also led to dissatisfaction among users. Fortunately, sometimes Microsoft listens to the requests and expectations of its customers, and therefore, in version 10, the company softened its policy regarding user profiles.
Let's try to understand what are the differences between these two types of accounts in the new version of the operating system and what has changed compared to Windows 8.1.
What is a local account?
In the simplest terms, these are system resources with settings and programs for a specific user, which are accessed using a combination of username and password (although password protection is not necessary at all). If your OS version was released before Windows 8, then you are certainly a user of the local profile.
As the name suggests, a local account is created for only one system, so if you have more than one computer, then you use different accounts on each of them, note that you can at any time
In Windows 10, a local account lets you install desktop apps, tweak settings, and use the operating system the old fashioned way. You can even browse the Windows Store, but you can’t download and install applications - for this, as well as for enabling synchronization of settings between user devices, a second type of account is required.
What is a Microsoft account?

This is a series of online accounts for the company's products that have simply been combined under one name. So, if you have ever used Hotmail, Windows Live and Outlook, or devices like Xbox or Windows Phone, then you already have such an account. By rebranding and merging these profiles, the company has ensured that all of its services are fully integrated into one account. This means you can use it to access everything related to the Microsoft ecosystem.
Unlike a local account, a Microsoft account uses an email address to sign in to the operating system, not a username. In this case, it can be an email from a software giant (hotmail.com, live.com or outlook.com), Yahoo!, Gmail, or even an address that was provided by an Internet provider.
This login type does not allow you to turn off password protection, but you can set the system to enter it automatically every time you log in (see ). In addition, a Microsoft account has a two-step user identification system that requires you to enter a security code when you sign in to your account from a device that is not on the trusted device list.
Why should you use a Microsoft account?
Using such an account allows you to partially avoid the hassle of configuring all your computers "for yourself", since part of the system settings can be synchronized between them automatically. In other words, certain changes made on the same computer with the "ten" will be automatically reproduced on other computers with the same Microsoft profile.
The system allows you to synchronize the theme, web browser settings (in 10, Microsoft Edge is the standard browser, so synchronization of bookmarks, logins, etc. applies specifically to it), passwords for sites, applications and networks.

Another benefit of using a Microsoft account is the ability to download, install, and restore apps from the Windows Store. With a local profile, the app store will only be available in browsing mode.
As the owner of a Windows 10 Mobile smartphone or other Windows 10 device, an online account gives you access to universal apps and games. This concept, which was originally introduced for Windows 8.1 and Windows Phone 8.1, means that once purchased, the application becomes available on all devices with the Microsoft platform. That is, by purchasing the application from any device running Window 10, it will become available on your other devices. This eliminates the need to buy the same app for every computer, smartphone, or tablet, and saves a lot of money.

Also, a Microsoft account will help you with using OneDrive, because with it you can conveniently synchronize any type of file - again, between all devices.
Another feature of Windows 10, which is only available with a Microsoft account, but still does not support the Russian language, is called Cortana. This is an application that acts as a digital assistant. The feature is closely related to the Microsoft account and needs access to the calendar, email, contacts and even web browsing history to be able to respond to the user's needs. So if you want Cortana to be able to schedule your appointments, remind you of important things, or even find good restaurants, you'll need to sign into your Microsoft profile.
Finally, using a Microsoft account in Windows 10, you will be able to link to your family. This is an advanced version of Family Safety, containing all the options to help you manage everything related to your children's online life. The function allows you to manage settings separately for each device, block sites for adults, control activities, time spent by the child on the computer and allow him to download only those applications and games that are suitable for his age category.
Why should you use a local account?
In Windows 8.x, the local account is extremely limited and prevents access to many features of the operating system. In 10-ke these restrictions were relaxed, and the status of the local account was raised almost to the level of Windows 7.
For example, in the previous version of the operating system, you can't use the Calendar, Mail, and People apps without an MS account. On Windows 10, you can use any of these tools without any restrictions using a regular, local account. Even a native email client will let you choose any account (Outlook, Gmail, etc.) and won't force you to use a Microsoft account just to run the application. This change is likely to appeal to those with only one PC, for whom the sync settings feature is completely useless, and for those who are not interested in apps from the Store.

In general, the company's policy regarding local accounts has changed in a fairly positive way; With Windows 10, the corporation tried to find a balance between the two types of accounts, and at the same time made another attempt to present the new operating system in a more favorable light.
If you made a mistake when creating a Microsoft account, it!
Have a great day!
Why install Windows 10 without a Microsoft account? Well, for example, if you used previous versions of this OS before, and now you finally want to test how the 10th one will go, but so that you don’t create a separate account.
In general, situations can be different. And yet, you can still install Windows 10 on a computer without a Microsoft account, moreover, it is completely official.
The developers of the operating system, however, did their best so that during its installation, most users simply did not notice the opportunity to skip the account registration stage, but if you know where to look in advance, then everything will work out. And now we will just talk about it. So,..
how to install windows 10 without a microsoft account
So, in order:
- we put a bootable CD / DVD with Windows 10 or connect an external boot drive to the computer (of course, it’s better to take a licensed version so that the system becomes and works properly, because here’s the link: softkey software store, recommend);
- we start the system installation procedure and follow the instructions as standard until the page “ Sign in to Microsoft «;
- but we do not enter anywhere, but simply click on the link " Create an account » at the bottom of the screen;
- on the next page (it's called " Create a Microsoft account") We also do not write anything and do not create any passwords, instead, at the very bottom, right under the last field" Country and region", find and click another subtle link" Sign in without a Microsoft account «:
- after that, the stage of creating an account or authorization will be skipped, and the operating system installation procedure will automatically continue.
We also recall that you can also use Windows 10 normally without a Microsoft account. To do this, simply log in not with an administrator account, but with a so-called local account. But to do this, first go to the administrator account, then click "Settings" -> "Accounts" -> "Your data"(in the left column). Then on the right side of the window, click " Sign in with a local account instead ". So, nothing complicated, as you can see ...
It may seem that nothing changes in user accounts in every new release of Windows. Recall that the 10-tka is the last project of Microsoft, but it will be further developed and improved. In this regard, the account and its main functionality in the new OS are the main terms that you need to learn before moving from Windows 7 or 8.1 to Windows 10. In this article, we will look at all the available features of the account panel and those innovations that made available to users.
To get into the user account, you need to enter the "Start" and click on the link to your account:

After that, we get to the section of the updated control panel called "Accounts". What we see in front of us, let's consider in order.

1. In this place you can see the name of your account, what mailbox it is registered to and what type it has. In addition to the "Administrator", the account can be "Guest" and "Regular". If you are one (one) using a computer, then for optimal work you must have the type "Administrator", because. "Normal" and "Guest" have limited rights.
2. If you used a Microsoft account to sign in, then the link to "Manage ..." will help you edit it the way you need.
 More specifically, you can change the account name and password for the account. This requires access to the Internet.
3. If you want to use a local account, ie. you are using a PC without an internet connection, then you need this link - "Login with a local account instead." But before you can change from local to Microsoft account or vice versa, you will need to enter the password of the corresponding account.

4. What is indicated by the number 4 is your avatar - a photograph or picture that characterizes you as a user. You can put your own photo, as I did (the author of articles about Windows 10), or you can put some boats, birds or pictures of nature. It all depends on your taste and desire.
5. Actually, everything that we have considered above refers to this point. In "Your Account" we will make the transition from one account to another, as well as change the avatar.
6. In "Login Options" you can control the password entry period on the lock screen, the use of PIN codes and other account security features.

7. Work access - a feature that allows you to connect to your account from another computer.
8. Family and other users - a feature through which you can create accounts for your family members, as well as for other users. It is very convenient for those who provide their PC to someone from the family to use it. You do not lose your data, but when using this, a person will not see your files and folders.
9. If you sign in from another PC with your Microsoft account, then all settings from this device will be changed to those that were on your last device (from the one from which you last logged in).

In today's instructions, we'll look at how to create a new user on Windows 10 using all the methods available in the operating system. We will also look at ways to give it administrator privileges or do the opposite - turn an account into an account with limited rights.
Most likely, all Windows 10 users are familiar with both types of accounts, from which you can work in the "dozens" environment. The first are local user accounts, which are no different from the accounts of previous editions of the operating system. The second are Microsoft accounts that require registration on the site of the operating system developer. Having such an account, all parameters will be regularly synchronized with those stored on the server of the software giant.
If you don't want Microsoft to store all your account information, or vice versa, if you want to take advantage of the privileges of a Microsoft account, in Windows 10 it is possible to turn one type of account into another in any direction.
Unlike previous editions of the OS, where accounts were created and edited through a special Control Panel applet, in the "top ten" its functionality actually replaces the "Options" menu section, called "Accounts".
1. To access the "Options" menu, use the hot key combination "Win + I".
2. Go to the "Accounts" section.
3. Activate the "Family and other users" tab located in the vertical menu.
The first section, Your Family, if you have a Microsoft account, will allow you to create limited accounts for other family members, such as children.
The next section provides options for creating a local account with administrative or regular privileges. This option will be discussed below.
4. We go down the right frame and click on the icon for adding a new user for this computer, located in the "Other users" section.

5. If you do not intend to create a Microsoft account (or want to get one, but do not yet have an email for it), click on the link "I do not have this user's login information" at the bottom of the window.

A new window will then open asking you to sign up for a Microsoft account.
6. If you want to create it, fill out all the forms and click "Next", otherwise follow the link "Add a user without a Microsoft account", which is located at the bottom of the window.


In Windows 10, any new user has regular (limited) privileges. There are a few steps you need to take to gain administrator rights on your computer.
- We go to the "Family and other users" subsection, located in the "Accounts" section of the "Settings" menu.
- In the lower part of the right frame of the window, we find the desired user and click on its icon or name.
- Click on the "Change account type" button.
- In the drop-down list with account types, select "Administrator" and click "OK" to save the new settings.


Creating a new account via command line
There is an easier way to get an account in Windows 10. To do this, we will use text commands executed via the command line.
Note that all actions will be similar to the first option, with the only difference that the commands will be executed in text mode.
Administrator privileges are required to be able to create and edit existing accounts.
1. We launch the command line with extended privileges, for example, through the search line.

2. Enter a command like "net user UserName Pass / add" and run it by clicking "Enter".
Here UserName is the name of the new account, Pass is the password for authorization in the system.

After completing all the steps in the Windows 10 environment, a new account with limited privileges will appear. To give it administrator rights, run the following command in a command prompt window: "net localgroup Administrators UserName /add".

For people using an unactivated or unlicensed copy of Windows 10, it is recommended to replace the word "administrators" with its English counterpart "administrators" in case of an error.
Creating a new account through the MMC snap-in
Back in XP, a system console appeared with many snap-ins for creating system management consoles. One of them is the "Local Users and Groups" element.
1. Run the tool through the "lusrmgr.msc" command, executed in the search line or the "Run" window (launched with "Win + R").
2. Open the "Users" directory.
3. We call the context menu of the free area of the right frame and select the "New User" command.

 Preparing Your Computer Hard Drive for Windows XP Installation
 How to restore the system using the Acronis image?
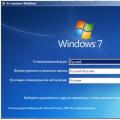 Windows 7 with uefi support