How to partition a hard drive into sections - detailed instructions. In a third party program
Partitioning a hard drive is a way to organize the storage of information, comparable to putting things on the shelves in a closet.
In this article, you will learn how to partition a hard drive and why.
Most users prefer to divide disks into 2-3 partitions for the following reasons:
- not to mix operating system files and personal files in case of OS reinstallation;
- for the convenience of manual information search;
- to install more than one operating system on a computer;
- so that each user, if there are several of them, has his own “corner” for personal files;
- to hide some information from other PC users (together with the section).
Note! When installing operating systems, service partitions are created - boot, recovery, for the paging file, etc., which are not visible in Explorer. These areas are hidden because changing or deleting their contents breaks the OS.
Some people think that it is necessary to partition a hard disk into sections: so, they say, personal files will not be affected in the event of a system failure, they will be less fragmented, and, therefore, open faster.
In fact, the files will not disappear anywhere, even if the OS completely crashes. And this will not affect the performance, especially since modern systems defragment themselves without user intervention.
On the contrary, the system partition tends to fill up quickly, and if there is not enough space on it, the computer will first slow down, and then completely stop loading due to the fact that the system has nowhere to turn around.
Think you still need an extra section? Then read how to create it.
Two ways to divide a disk into partitions in Windows 7, 8, 10
Installed system capabilities
Starting with Windows 7, you can partition disk space using the OS itself, both during installation and after.
There is only one condition: when splitting an existing partition, it is important that the partitioned part has no less free space than the one that will be separated.
Consider how to partition a hard drive into partitions in a running Windows 10.
- Go to the context menu of the Start button and launch Disk Management.
- Open the context menu of the section you want to split. Click Shrink Volume.
- The window that opens after that shows the total size of the compressible area and the space available for compression. From the last one, select the part that will be the new section.
As you remember, it should not exceed half of the value specified here. Then click the "Compress" button.
- After compression, unallocated space will appear in the list of volumes - it will be your new partition. Right-click on it and select "Create a simple volume". The Create Simple Volume Wizard utility will launch.
- In the wizard window, specify the size of the new volume. If you leave the default value (which is equal to the entire unallocated area), the entire area that you detached will become a new partition.
If you specify a lower value, one part will become a volume, while the other part will remain unallocated. Click "Next".
- Assign a letter to the new volume if you want it to appear in File Explorer, or mount it as a folder. If you decide to do it later, select "Do not assign drive letter or path".
- Next, the wizard will prompt you to format the volume and assign a label to it. A label is a short name for a section, explaining what is there. Leave this line blank if you wish.
After formatting, the unallocated space will become a full-fledged partition.
Creating a volume when installing Windows
Creating new partitions during Windows installation differs from the method we discussed above in that the partitioned disk will first have to be deleted, that is, completely cleared of information.
And then build a new partition structure from the unallocated space.
The breakdown is made at the stage when the program asks you to specify the location of the OS installation. What to do next:
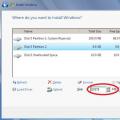
- In the window "Where do you want to install Windows?" click the Disk Setup button.
- Mark the section you want to split and delete it. Instead, unallocated space will appear.
We showed the process of creating logical volumes using the example of installing Windows 7. On Windows 8 and 10, this is done in exactly the same way.
During the installation of Windows, it is not necessary to allocate the entire disk space, it is enough to select the area where the system will stand. You can mark up the rest of the free space later, when you want.
These are not the only, but only the most accessible ways of partitioning disks.
The native functions for working with disk space, which are available in all versions of Windows starting from Windows 7, are sufficient in almost any situation, so the need to use third-party programs such as Acronis Disk Director or Paragon Partition Manager has already disappeared.
Today we will consider how to partition a disk in Windows 10 without resorting to third-party software, because such a need appears for virtually all users of the new operating system.
Whatever the adherents of specialized programs say, if the operating system has the appropriate functionality, there is no point in using them. Therefore, we will consider in detail how to partition a hard drive using the tool for working with drives integrated into Windows 10.
What is important, we will work from under the operating system itself, without even resorting to using the installation drive with the dozens distribution kit.
First of all, dividing the drive into volumes is necessary if you purchase a new device, it doesn’t matter if it’s a laptop, a computer or an increased hard drive. This is done for several reasons, the main of which are ease of use and safety.
Imagine what will happen to a 500-1000 GB hard drive if you format it during the reinstallation of the operating system in order to get rid of all the files of the old OS. Installing a new system on top of the old one makes little more sense than simply updating it from under Windows itself: all the garbage will remain, which will soon affect the performance of the computer.
And it's more convenient to store different types of data on different volumes (games - on one, video collection - on another). The operating system with software must be located on the first logical disk due to the nature of the HDD.
Launching the Disk Partitioning Utility
Working with partitions begins with the launch of the Disk Management program, which has hardly changed since its introduction into the Windows 7 operating system. The tool is launched in several ways.
Control Panel
1. Open the Control Panel via Start, Win→X (by holding the appropriate key combination) or a shortcut in a convenient place.
2. Change the visualization style of the window icons to "Small Icons".
3. We call the applet "Administration".

4. Run the last utility in the list "Computer Management".

5. Expand the "Memory Devices" section in the left vertical menu.
6. Click on the "Disk Management" item.

command interpreter
The second, and more effective, method to invoke the hard drive partitioning tool is to use the capabilities of the Run window.
1. We call a dialog for quickly executing system commands and opening resources using the Win + R key combination.
2. Enter the command "diskmgmt.msc".
3. Run it using the "Enter" key.

As a result, the same window will open as in the previous version, but without unnecessary interface elements.
How to use the built-in disk manager
The application window displays a list of all detected digital information storage devices, including those operating using flash-memory technology (solid-state drives and flash drives).
The first in the list are the sections reserved by the operating system, where the files necessary to reset the operating system to its original state, and its bootloader are stored. These volumes of 100-350 (sometimes more) megabytes should not be affected in any way.

1. In the main frame or panel below, select the hard disk or its volume that needs to be divided into the nth number of partitions.
The main thing is that it has a sufficient amount of free space, which at least slightly exceeds the size of the created partition / partitions. And if you split the system volume, you should leave at least 10 GB of free space on it. You will need it to store temporary files and install missing software.
2. We call the context menu of the selected object and select "Compress volume ...".
This operation will allow you to “cut off” the specified number of gigabytes from the partition and form a new partition or several in this place, but their total size will not exceed the amount of data allocated for this.
3. In the parametric window that opens, set the volume of the compressible space.
That is how many megabytes will be freed (turned into an unallocated area) in order to subsequently mark it in the desired way.
After specifying all the information, click "Compress" and wait. Depending on the size (and the degree of damage to the hard drive - this factor primarily affects the speed), you will have to wait from ten seconds to a couple of minutes until the application completes the task of reassigning free clusters of the unallocated area.

Upon completion of the operations, an unallocated space of the specified volume will appear on the diagram, this area is distinguished by the presence of a black bar at the top.
4. Through the context menu of this space, call the command "Create a simple volume ...".

By default, its size will be equal to the unused space, which is relevant for the formation of one volume in this area. If you need to create several partitions, enter the volume of the first one in megabytes (taking into account the fact that 1 gigabyte equals 1024 megabytes, not 1000).
5. In the wizard for creating simple volumes, select the file system. Set the cluster size and label.

It is better to choose NTFS as the file system. Even with many shortcomings, it is the best solution from Microsoft. Cluster size: if the disk will store small files, it makes sense to set it to 2096 kb or less in order to optimize the use of space, and for storing video collections and images, it is better to use a larger cluster size. Nothing depends on the volume label, and it can be easily changed through Explorer at any time.

As a result, the file system of the new partition will be formed and a new volume will appear on the hard disk. When creating several sections with an unallocated area, you will have to do the same as in steps 4-6.
Partitioning a volume during the installation phase of Windows 10
If the computer does not yet have an operating system, you can also partition the hard drive during its installation. The difference between the option is the inability to divide the drive into logical volumes without formatting, and this method will not work for hard drives with important information.
1. We boot from the installation distribution using the Boot Menu.
2. We get to the stage of choosing a disk for installing the “tens”, stopping at the “Custom” option.

3. Remove unnecessary volumes to make them an unallocated area.
4. As before, select this space and create sections of the specified sizes in it.

This article talks about how you can partition a hard drive into partitions without using third-party programs. As well as the reverse process of deleting an unnecessary partition or partitions.
Partitioning a hard disk implies the creation of several logical disks on one physical disk, which are defined by the operating system as separate physical disks.
What is it for?
Most importantly for security, the main number of virus attacks is directed precisely at the system drive, where the operating system is usually installed.
If you have to reinstall the OC, then the C drive will be formatted, which means that all your data that is there will be lost.
But not all users agree on the need to divide the "hard drive" into sections, there are many discussions on the Internet about this, opinions are divided.
But the purpose of this article is not to impose your personal idea, but to show how to divide a hard drive, and whether it is necessary for him to decide for himself.
From myself I can add that having two disks on one of which is the system, and on the other all my files: photos, music, games, etc. create certain conveniences and order on the computer for me.
How to properly partition a hard drive
To do this, we use the basic utility from the Windows system.
In or on we hover over the computer by clicking the right mouse button. In the context menu that appears, select the Manage tab.

In the window that opens, find the Disk Management item.

In the next window, we can see all the disks that are on this computer, including service ones that are not used by the user in any way, they are usually hidden.
I show on my example, someone may differ in any case, we don’t pay attention to them, but right-click on the “C” drive, select Shrink Volume from the context menu.

We are waiting for some time until the compression is processed and the available space is determined.

After that, a window will appear where you will need to select the size, I chose 1500 MB for the example, which is about 1.5 GB, then click the compress button. Leave about 100 gigabytes on “C”, provided that nothing is installed on this system disk. (note the size is in megabytes, 1 GB = 1024 MB)

After that, I had an unallocated area of 1.46 GB. By clicking on it with the right mouse button, I select "Create a simple volume".

Here, just click Next.

Here, too, leave everything as it is, click Next.

Assign any letter, Next.

And here we leave everything as it is.

To complete the procedure, click Finish.

Finally, a new volume has been created!

We go into my computer and look for the presence of a new disk. If it is not there, then after the reboot it will definitely appear.

How to delete a partition on a hard drive?
Knowing how you can partition a hard drive into partitions, let's analyze the reverse deletion process. Since my “C” drive was already divided earlier, and I don’t need another partition, I will delete it.
We go back to the computer management program, right-click on the created disk, in the pop-up window, select the Delete volume tab.

We agree.

Now right-click on the "C" drive, select the Extend Volume tab.

Click next.

We do not change anything, just click the Next button.

Click Done.

That's all for a few actions returned to its original state!
As you can see, there is nothing complicated, any of the users can divide a hard disk into partitions without resorting to outside help, as well as in its reverse process.
Convenient distribution of disk space on a computer is one of the fundamental steps for comfortable work and speed of the operating system. After purchasing a new PC or reinstalling the operating system, the question arises - how to properly partition the hard drive? The standard division into two volumes C and D will not be enough for a large hard drive. 100-150 GB are usually allocated for system files, the rest of the disk space will be correctly divided into several parts. This simple action will be the key to the speed of the OS, by reducing the rate of fragmentation of the system volume. There are three simple ways to split into parts in the Windows operating system:
- Installation of separate software.
- Using internal Windows services.
- Separation when installing / reinstalling the operating system.
When using a separate program to partition a disk, you need to prepare, namely:
- back up important personal files;
- free up additional hard disk space;
- check the hard drive for possible errors.
Protecting your personal files from loss during further work is the primary task of the user. Photos, contacts and other files should be copied to external media (hard drive, flash drive) or use the file storage cloud on the Internet. After backing up the data, you should take care of the availability of free space to create a new partition. To do this, just go to the "Control Panel" - "Add or Remove Programs". View the list and remove unnecessary software, which will give additional disk space.
Having received enough space for a new partition, you need to check the hard drive for errors. We go to "My Computer", select the desired disk and go to "Properties". After we select the "Service" tab and click "Perform verification", put both checkmarks and wait for completion. At the end of the check, the OS will ask you to restart the PC - we confirm. The disk properties interface in Windows 7 and XP is identical, so there will be no difficulties.
Working with Partitioning Programs
The interface of the program is configured mainly to solve one problem - how to divide the hard drive into convenient parts. Most of the software works with different versions of Windows 7 and XP, there are both paid services and for free use. It would be more correct to use programs for free use with a Russian interface.
Very popular are: "Partition Magic", "Acronis Disk Director", "Aomei Partition Assistant". Each uses a standard menu for working with the disc. It remains only to select the disk that needs to be divided into parts. Then set the volume for the new partition, its name and file system. Any of the programs will offer two options for the FAT 32 and NTFS file system. The first is installed when working with Windows 95/98 or Millinium Edition. Starting with XP, NTFS should be selected. For stable operation of the OS, a prerequisite is that all sections of the hard drive must be formatted under the same file system.
How to partition a hard drive into sections without installing software
The ability to divide a hard drive into partitions using system services is provided in versions of Windows 7 and higher. To do this, we find the item "Management", located in the folder "My Computer". In the "Computer Management" menu that opens, open the "Disk Management" tab. A list of disks that are on the PC will appear, as well as a hidden section “System Reserved” - a recovery system disk. We select drive C or the one that we will divide into two or three parts - additional containers. Open the list of disk functions: right button - "Volume Shrink". In the window that appears, select the location where you want to compress the disk. Provided that the hard drive was not previously divided into separate parts, the system will offer to divide it into parts approximately equal in volume. You can set the desired value. In the event that a miscalculation is made, it will be possible to return the previous size of the partition by selecting "Unclench the volume" in the disk functions. The system drive is shrinking, after which a new partition called "Unallocated" will be displayed. Open the list of functions and click "Create a simple volume ...". The New Simple Volume Wizard window will appear on the screen and prompt you to designate the new partition with a letter and give it a name. This is followed by the process of formatting into the file system. Having decided on the option, click "Continue", and in a few minutes the work on creating a new section will be completed.
Separation of the hard drive when installing or reinstalling the operating system
Partitions should be created at the moment when the OS installation reaches the moment of choosing the partition in which it should be installed. Further actions:
- Create a partition for the OS, let it be drive C, and enter its size. If initially there is 1 TB of memory in the hard drive, you can allocate 100-120 GB for the "OS" - this is enough.
- Next, the computer will ask you to allocate some more space for backup files, you need not be stingy, but click the "Agree" button.
- Create a second partition: look for the line "Free disk space", click "Create". Next, set the size for it. Name it drive "D" and click "Apply". So, there are already two sections.
- To create the third partition, we proceed in the same way as described above: “Free disk space” - “Create”. Specify the entire remaining size from the original.
- Click on the "C" drive, which was allocated for the OS and click "Next". Your Windows 7/8 installation continues.
Conclusion
As you can see, there is nothing complicated in partitioning a hard drive into several departments. Even a novice user can handle this simple process. The main thing is to do everything clearly according to the written points, and you will succeed. With proper execution, you will have several disks, each of which can store certain folders, files, etc. This will eliminate the problem of constantly searching for the necessary information on the computer.
The second important plus of splitting the hard drive is that when you reinstall the OS, due to any reason, all information can be destroyed during the formatting process. And if the OS on the computer is on one disk, and all the files are on others, the process of destroying the contents will affect only one section of the hard drive. And the speed of the system itself will be faster, the computer will not “freeze”, thanks to less “cluttered” departments. Ideal: two to four sections, depending on the size of your hard drive.
Partitioning a hard drive is a way to organize the storage of information, comparable to putting things on the shelves in a closet.
In this article, you will learn how to partition a hard drive and why.
Most users prefer to divide disks into 2-3 partitions for the following reasons:
- so as not to mix operating system files and personal files in case of OS reinstallation;
- for the convenience of manual information search;
- to install more than one operating system on a computer;
- so that each user, if there are several of them, has his own "corner" for personal files;
- to hide some information from other PC users (together with the section).
Note! When installing operating systems, service partitions are created - boot, recovery, for the paging file, etc., which are not visible in Explorer. These areas are hidden because changing or deleting their contents breaks the OS.
Some people think that partitioning a hard drive is a must: so, they say, personal files will not be affected in the event of a system failure, they will be less fragmented, and, therefore, open faster.
In fact, the files will not disappear anywhere, even if the OS completely crashes.
And this will not affect performance, especially since modern systems defragment themselves without user intervention.
On the contrary, the system partition tends to fill up quickly, and if there is not enough space on it, the computer will first slow down, and then completely stop loading due to the fact that the system has nowhere to turn around.
Think you still need an extra section? Then read how to create it.
Two ways to divide a disk into partitions in Windows 7, 8, 10
Installed system capabilities
Starting with Windows 7, you can partition disk space using the OS itself, both during installation and after.
There is only one condition: when splitting an existing partition, it is important that the partitioned part has no less free space than the one that will be separated.
Consider how to partition a hard drive into partitions in a running Windows 10.
- Go to the context menu of the Start button and launch Disk Management.
- Open the context menu of the section you want to split. Click Shrink Volume.
- The window that opens after that shows the total size of the compressible area and the space available for compression. From the last one, select the part that will be the new section.
As you remember, it should not exceed half of the value specified here. Then click the "Compress" button.


- In the wizard window, specify the size of the new volume. If you leave the default value (which is equal to the entire unallocated area), the entire area that you detached will become a new partition.
If you specify a lower value, one part will become a volume, while the other part will remain unallocated. Click next.

- Assign a letter to the new volume if you want it to appear in File Explorer, or mount it as a folder. If you decide to do this later, select "Don't assign a drive letter or path".

- Next, the wizard will prompt you to format the volume and assign a label to it. A label is a short name for a section, explaining what is there. Leave this line blank if you wish.

After formatting, the unallocated space will become a full-fledged partition.
Creating a volume when installing Windows
Creating new partitions during Windows installation differs from the method we discussed above in that the partitioned disk will first have to be deleted, that is, completely cleared of information.
And then build a new partition structure from the unallocated space.
The breakdown is made at the stage when the program asks you to specify the location of the OS installation. What to do next:
- In the window "Where do you want to install Windows?" click the Disk Setup button.

- Mark the section you want to split and delete it. Instead, unallocated space will appear.

- Click the "Create" button (meaning create a partition), specify the desired size and click "Apply". If the partition you are creating does not take up all the unallocated space, repeat the operation until there is no free space left on the disk.

- After that, format the new partitions and continue with the installation.

We have shown the process of creating logical volumes. On Windows 8 and 10, this is done in exactly the same way.
During the installation of Windows, it is not necessary to allocate the entire disk space, it is enough to select the area where the system will stand.
You can mark up the rest of the free space later, when you want.
These are not the only, but only the most accessible ways of partitioning disks.
The native functions for working with disk space, which are available in all versions of Windows starting from Windows 7, are sufficient in almost any situation, so the need to use third-party programs such as Acronis Disk Director or Paragon Partition Manager has already disappeared.
 Preparing Your Computer Hard Drive for Windows XP Installation
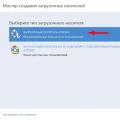 How to restore the system using the Acronis image?
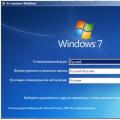 Windows 7 with uefi support