How to prepare a disk for installing windows 7. Preparing a computer hard drive for installing Windows XP. Computer location
Many of those who have experienced installing or reinstalling Windows systems know that in most cases external media such as USB drives are used to carry out this operation. If you try to start from the hard drive, the user will not get the desired result. Therefore, for Windows 7, installing from a hard disk must be done using completely different methods. For an ordinary user, there are five main options, which will be discussed now.
Windows 7: install from hard drive. Installation options
So, let's consider some directions in the installation of the seventh version of the system. The main options include the following:
- installation over the old "seven";
- installation as a second OS;
- installation using the command line;
- use of special utilities;
- installing the system on an external HDD.
Each of these methods has its own advantages and disadvantages, but for all of them, one general rule is to have an image of the installation distribution of the system, which you will later have to work with. In addition, if the computer already has hard disk partitions created, you can leave them alone when installing Windows 7. Otherwise, they will need to be created. But more on that later.
Preliminary information
Now let's look at some initial conditions that must be observed when installing the system without fail.
The system requirements are such that a 32-bit system requires at least 16 GB of free disk space, and an x64 system needs about 20 GB. And this is provided that there is an already installed system, the directory of which will be renamed to Windows.old after installation. In no case can you delete it manually (unless you do a disk cleanup). Then it will simply be impossible to roll back.
Installation over the old system
Using this technique, you immediately need to understand that formatting a hard drive when installing Windows 7 will not work, even if it is a system partition. But we will rely on the fact that the distribution is on the C drive when the partition is made. How to partition a disk will be discussed later.
As already clear, the downloaded distribution must first be placed on an independent partition (usually drive D). You can, of course, start the installation from it, but then errors will come out. Now we simply select the Setup.exe installation file from the Archive directory, followed by the installation of Windows 7, which is no different from the standard procedure.
In this case, for Windows 7, installing from a hard disk is more of a system file update tool, since the new configuration can inherit the errors of the old one. It is not comfortable.
Alternative method for installing Windows 7 as a second OS: what might be needed?
However, you can do otherwise. For, a method is provided for installing it not on top of an existing OS, but as an additional OS, which can then be loaded when selected from the boot menu (Boot). The main thing is to create a boot partition in the original volume.
To carry out all operations, you only need to have an application that can work with images and create a utility that creates an MBR boot sector on the selected partition. Let's use Daemon Tools and EasyBCD as an example.
Section creation
Just like that, it is impossible to download the installation distribution kit, even if it is located on the system disk. This is due only to the fact that the system itself does not recognize it, and, if it does, it sets a ban on downloading. Here you need to turn to the disk management section, which can be accessed through computer administration.

Fortunately, Windows 7, like all subsequent versions, has such a tool. First, we look at the virtual partition D. We call the menu and select volume compression (the specified size should slightly exceed the size of the distribution kit). Next, right-click to call up the menu and use the command to create a simple volume (without this, the system will not determine that this partition is operational).
How to partition a hard drive when installing Windows 7 is understandable. Let's get to the most important part.
System installation
Now we are directly interested in installing Window 7. Hard disk systems are such that they still do not see the distribution.
We launch the Daemon Tools program and mount the image using the appropriate command, specifying the path to the saved file. We copy it to the newly created partition (unpacked image file).

Now we launch the EasyBCD application and press the add entry button, after which we indicate the WinPE tab at the bottom, and then enter “New volume” in the name field, and in the path line we locate the boot.wim file.

After the entry is added, just restart your computer or laptop. At the same time, the standard installation of the "seven" starts.
Installing Windows 7 using the command line
Again, this option cannot be used when the original system is corrupt or buggy. But in case of recovery, it will do.

When Windows starts, press the F8 key (the standard method, unlike Windows 10) and select the troubleshooting line from the menu (the first one in the list). In the additional parameters, we specify the same thing, after which we use what we need in the language selection window, and proceed to system recovery, where we select the command line.
We write two lines in the console:
- X:\>windows\system32>E;
- E:>setup.exe
Don't be afraid to make mistakes. Drive letters in DOS and Windows do not match. In extreme cases, an error will simply be thrown, after which the corresponding symbol will need to be corrected, but as a rule this is not required. Well, then the process starts, which is no different from the standard one. Note that in this case, you do not even need to reboot the system.
Installation on top of any system using the BOOTICE utility
Now let's say we want another installation of Windows 7. We have a formatted hard drive. The trick is to create a boot device as an HDD partition.
The BOOTICE utility was created in order to emulate the continuation of the Windows 7 installation, while creating and overwriting the boot sector (there is a bootmgr folder in the unpacked distribution for this).
To start the installation, you need to change the MBR boot entry to GRUB4DOS. But here you need to take into account one feature. The fact is that the utility requires the creation of a bootloader manager name of no more than five characters (letters).

Rename the bootmgr file to GRLDR, and then run the utility itself. A new entry is immediately visible in the menu, so we put a tick there (destination disk), and then click the change installation button and in the configuration select saving to disk. It remains only to reboot the device, after which the installation of Windows 7 will be activated. Installation from the hard disk will follow immediately. As a rule, there should be no problems.
Installing Windows 7 on an external hard drive
But, despite all the nuances of installing the "seven" on a hard drive, some users are trying to install the system on removable media, in particular USB-HDD. What to say? This is fundamentally not true!

The question is: why create problems for yourself out of the blue? Booting from any USB device is much slower than from a hard drive. The external drive itself (hard drive) is subjected to a stronger physical impact and is not immune from failures and errors. However, "specially gifted" users will have to use (at least) a virtual machine. And many of these "wunderkinds" have no idea what it is.
Of course, for the rest, we can say that any virtual emulation, for example, using WMWare or the same built-in Hyper-V module, can be done quite simply. But the matter is not limited to automatic settings. Here you will have to set the parameters corresponding to the system configuration. And all those who claim that with the operating system installed in it can be created in a couple of clicks and in five minutes are absolutely wrong. Nothing like this!
Possible errors and failures
Now the saddest thing. What to do if installation Issues of equipment failure are not considered fundamentally. The external hard drive must be enabled in the BIOS, as well as boot priority from the main device.
If you have problems with the file system, you can always use a command like sfc /scannow or chkntfs x / c (if you choose partition C as the system drive). Well, if the hard drive "fell down", there's nothing to be done. Will have to change. Although ... Many experts advise first using a program that supposedly remagnetizes the surface of the disk, but this method is hard to believe.
On the other hand, when installing the system on an external drive, one cannot do without utilities like ImageX included with the Windows AIK package. In addition, the PWBoot module does not recognize Cyrillic characters at all, but works like a command line. So is it worth it?
And that is not all! When it comes to selecting multiple concurrent installations, you will have to choose between the standard VHD container format and a regular removable device. It is believed that the VHD format is read faster, but the problem of enabling this type of media lies precisely in the use of BIOS settings. And when switching from BIOS to UEFI (which is not always supported), there can be much more problems. However, for Windows 7 installation can be done by any of the above methods. But formatting partitions in most cases will not work.
Thus, the conclusion suggests itself that the simplest is the ideal solution. An ordinary user will not use specific methods with the creation of boot sectors. It's obvious. But the method of updating the system looks much simpler, but it also has its drawbacks. In general, it is better to make a “clean” installation, after copying the necessary information to another medium.
If you still think that installing an operating system is an occupation for computer masters, then you are seriously mistaken.
Using this guide, you will be able to install Windows 7, even if you are a novice PC user. So, let's get ready to start.
- Open "My computer" and see in which partition you currently have the system installed.
Remember its size and name so that you can find the correct volume during installation. - Collect in advance on a USB flash drive or other disk all the necessary drivers for a computer or laptop. If there is no driver disk, they can be downloaded from the official website of the hardware manufacturer. If you do not do this, then you risk being left without the Internet after installing a new system.
- What bit depth of windows 7 to choose -? Click « Control Panel -> System and Security -> System»
If your computer or laptop has more than 3 gigabytes of RAM, you should definitely install the 64-bit version. In general, we recommend installing x86 only on weak or very outdated hardware in the 21st century yard, after all :). Please note that the drivers for the same device are different in them, in fact these are two different systems! - Download the Windows 7 installation ISO image:
What are these images?
These are original MSDN images downloaded from the official microsoft site. The only change is the ability to select the edition of the system during installation is unlocked. No files are affected, the system is not activated.
Other versions of Windows 7 images can be downloaded. - Prepare a bootable USB flash drive with Windows 7. In this guide, we will install the system from a flash drive, because it is faster and easier. A similar instruction on how to create it can be found.
- Since during installation we will format the disk with the installed system, all important files that are stored on it must first be copied to removable media or to another hard disk partition. Remember that the files located on the desktop are also stored on the disk with the system. If you need them, be sure to move them to another place. When formatting, all previously installed programs will also be deleted, but this does not mean that they also need to be copied to flash drives and disks. Programs are easier to reinstall, so take care only of – photos, documents, music, etc.
Create a bootable flash drive with . Next, insert it into the usb port and change the boot priority in the BIOS of the motherboard so that this flash drive is loaded first. If there are difficulties at this step, here are detailed instructions. If you did everything right by changing the boot priority, then after exiting the BIOS and restarting the computer, the message “Press any key” will appear on the screen. Fulfill this requirement - press any key to start booting from the installation media.
You need to press the key only ONCE and only at this stage of the installation.
After pressing any key, a message will appear stating that Windows is loading files.
System installation
So, let's proceed directly to installing Windows 7. Wait until their extraction is completed, after which the installer's start window will appear on the screen. Congratulations, the hardest part is over!
- Choose your language, time format, and layout. Click "Further".
- Click on the big button "Install" to start the installation wizard.
- Read the license terms and accept them.
- Choose a full installation (the update does not suit us).
- After starting the full installation, the partition selection screen appears. The installer window will have several sections: The first usually reserved by the system (it stores recovery files). It weighs 100 MB and you don't need to touch it. Second is system - that is, Windows files are stored on it. A new system is being installed on it. Third section is file. User data is stored here, which remains intact even after reinstalling Windows.
There may be other options: for example, there is no system reserved partition or there is no volume with user files. In any case, you need the partition on which the previous system already stood - for good reason, in preparation for installation, we advised you to look and remember its size.
If for some reason you still have one partition, the volume of which exceeds 250 GB, then it is better to immediately divide the disk into two volumes: one for Windows and programs (about 50-100 GB), the second for personal files. To do this, using the "Disk Setup" tool, delete the existing partition and first create the first volume ("Create" - specify the volume - "Apply"), and then the second.Created volumes should be named "Section 1", "Section 2". There should be no unallocated space - the system simply will not see it.
So, you have at least two partitions, one of which is dedicated to operating system files. If it was not just created, but was already there before, then it needs to be formatted by deleting all data. Click on the link "Disk Setup", highlight a section and press "Format". When formatting, all files from the system partition will be deleted (that is, the values in the "Full size" and "Free" columns will become the same). This is exactly what we were striving for. To start a clean install, click "Further", checking again that the partition that you selected for the system is selected.
- We wait. After selecting a partition and starting the installation, a window will appear on the screen in which you can see the process of unpacking Windows 7 files and writing them to your hard drive. While you can rest, you won’t have to do anything for 15-25 minutes. During this installation time, the computer will restart several times. After the installation is complete, you need to specify some parameters for the system.
- Enter computer name Computer name The computer name is how your computer will be called on the local network. and username. It is advisable to use Latin characters instead of Russian ones, this will help to avoid problems with some programs in the future.
- You can optionally set an administrator password, but this is not required. If you set a password, you will need to enter it every time you start your computer or laptop. We will leave the field empty for now, you can “password” the account later.
- Enter your activation key if you have one. If there is no key, uncheck "Automatically activate" and skip the step by clicking "Further".
- Specify the Windows settings - it is better to choose the recommended settings, when you get to know the new system better, configure it in your own way. After selecting all the necessary parameters, the Windows 7 desktop will appear on the screen. You can start your acquaintance with the system, but first restart the computer and go into the BIOS again - here you need to change the boot priority back, putting the hard drive in first place.
- Turn on automatic system updates and wait for the process to finish. Security updates will install most drivers. If there is no Internet, you can use the program to install drivers .
Attention!
Note: choose the version of Windows for which you have an activation key (you will enter it at the final stage of installation). If there is no key, read the instructions after installation.
The instruction turned out to be quite impressive in volume, but now you know the basic nuances when installing Windows 7 and you can easily do it yourself. Carefully follow the above recommendations and the installation will definitely be successful.
Installing or reinstalling the Windows 7 operating system may be necessary in cases where, for example, you have purchased a new hard drive (hard drive), the old operating system is unstable, or you just want to update the old version of the system with a new one. In this article, we will talk about preparing for the installation of the Windows 7 operating system, since today it is most popular among users of personal computers and laptops. Preparing to install Windows 7 is the initial stage of installing the system, which in no case should be skipped. Especially if you value time and information.
Not every beginner is able to independently install or reinstall Windows 7 without detailed guidance and necessary training. And despite the fact that there are already a lot of instructions for installing Windows 7 on the Internet, I still decided that my site simply cannot do without the guide I wrote, based on my own experience, on preparing for the installation and installing Windows 7 itself. I will try in detail and accessible, step by step, to explain and describe everything connected with this. For some, this description may seem a little stretched, but it is designed for users who have just begun to take their first steps in mastering a computer.
So, first of all, you need to prepare any, be it a DVD-ROM or a flash-card (flash drive), a storage medium with the Windows 7 operating system of the version you need. You can learn more about creating a boot disk or bootable flash drive from the articles "" and "". I want to say that today there are many all sorts of so-called assemblies of the Windows 7 operating system, in which advanced users have made certain changes. I recommend that you install the original Windows 7 SP1 x64 system.
SP1 (Service Pack 1) is a system update package aimed at optimizing its operation. Roughly speaking, this package eliminates the shortcomings and fixes the mistakes made in the previous version of the system, which allows it to work faster and more stable. X64 is the bit depth of the system's hardware platform. It was designed to be able to run 64-bit applications. The question involuntarily arises, so what came first - an egg or a chicken? .. Oh well. All you need to know from this is that a 64-bit operating system supports both 32-bit and 64-bit processors and an amount of RAM that far exceeds the amount of memory available for 32-bit systems. 32-bit operating systems (x86) support a little less than 4 gigabytes of RAM. I hope you understand everything.
We will assume that you managed to create a bootable USB flash drive or disk with the Windows 7 operating system according to the instructions I suggested. Or you simply bought a ready-made disk with the system in the store. The next step before installing Windows is to save all important data from "Local Disk C" to any other local drive. Indeed, in the case of formatting "Disk C" (and this action is necessary for a clean installation of the operating system), all data from this local disk will be erased.
I, perhaps, will stop at this point and talk about formatting in more detail. When formatting a particular local drive, all data is erased from it. If, for example, your hard drive (hard drive) is divided into four local drives "C", "D", "E" and "F". And you need, as, for example, in our case, to format the "C" drive. All data from the disk being formatted will be erased, while data from other logical disks (“D”, “E”, and “F”) will remain untouched. Basically, it is for this reason that the hard disk is divided into several logical ones. It is also worth noting that all files in the "Desktop" area are files stored on "Disk C". Therefore, if you need them, be sure to save them to another local drive.
If the above is done, you can proceed to the next step. Windows 7 Installation Instructions set out in the article "".
Today's hard drives (HDDs) are getting bigger and less expensive, and many people find it better to buy one large drive - 2-3-4 terabytes - than several small ones. But not everyone is aware of the difficulties they will face when installing an operating system on such a disk. The fact is that disks larger than 2 TiB use a non-standard, new type of data organization - the GPT partition table. It hides “surprises” that await an inexperienced user.
The main differences between GPT (new) and MBR (old) disks
- Partitioning disks according to the MBR standard cannot address space exceeding 2.2 TiB, and there are no restrictions for GPT disks (or rather, their limit is an astronomical number by our standards - 8.6 billion TiB).
- GPT disks can only install 64-bit versions of Windows, starting with Windows Vista x64. 64-bit Windows XP and all x86 versions since Vista can write to and read data from GPT partitions, but cannot boot from them. Windows XP x86 and older do not support the GPT platform.
- The GPT partition table is part of the UEFI interface - the new BIOS, so to speak. Traditional BIOS computers do not support the GPT structure.
But this does not mean that modern, capacious GPT hard drives cannot be used the old fashioned way - on computers without UEFI or for installing 32-bit systems. You can: for this, the GPT partition table just needs to be converted to MBR. Part of the volume - that which is beyond 2.2 TiB, will be inaccessible, but nothing can be done about it.
Convert partition table from GPT to MBR
Working with a hard drive up to 2 TiB
When installing Windows 7 x86 (32-bit) on a GPT disk, an error message pops up clearly indicating the cause:

If your hard drive is less than 2 TiB, a full format will solve the problem, removing all partitions. This can be done through the “Disk Setup” option from the distribution kit.
- When, during the installation of Windows 7, you get to the selection of the partition where to install the system, and you see an error message, click the “Disk Setup” button.

- Select each section, starting from the bottom, and delete by pressing the button of the same name. You should end up with one total unallocated space equal to the size of the entire hard drive.

- Now you need to create each section again. To do this, click the “Create” button, set the desired partition size and click “Apply”. Repeat the operation as many times as you want to get sections. The system will ask you to allocate an area for its needs (boot partition 100 mb), it is advisable to agree.

- Formatting newly created partitions is done by pressing the “Format” button. After these steps, the GPT hard disk partition table will be converted to an MBR suitable for installing a 32-bit version of Windows 7. Further installation proceeds without any special features.
Working with a hard drive larger than 2 TiB
To create an MBR on disks of such a large capacity, you will need a utility diskpart, which is part of the distribution of the seven. It starts and runs through the command line.
- Having reached the choice of installation location, launch the command line by pressing “Shift” + “F10” on the keyboard. In the black box that opens, enter: diskpart and press Enter.
- Then command: list disk– to view all hard drives installed on the computer.
- Select the drive on which you will create the MBR. If there is only one, enter the command select disk 0, if there are several, instead of zero, substitute the serial number of the disk that you need.
- Then delete all data and all markup from the selected HDD with the command clean.
- Team convert mbr converts GPT table to MBR.
- To close the console, type: exit.

- Then you can proceed to install Windows 7.
Preparing a disk for installing Windows 7 using third-party programs: partitioning, formatting, and more
You can also partition and format the HDD before installing Windows 7 using third-party programs such as “Acronis Disk Director”, “Paragon Partition Manager”, etc. There are enough applications for these purposes, but these two are familiar to very many and are the best in class, so we will consider them.
Acronis Disk Manager
Powerful disk management tool. It is produced in two versions - for work in the Windows environment and as a boot image. The second allows you to repartition, format, delete, move and restore volumes, transfer data from partition to partition without booting into Windows.
The principle of using Acronis Disk Director is intuitive - each of its options has a clear, unambiguous definition. Interface - English and Russian.

In order to divide the HDD into partitions and format it in any of the proposed file systems (their list is quite solid), select the “Create Partitions” item and follow the instructions of the wizard.

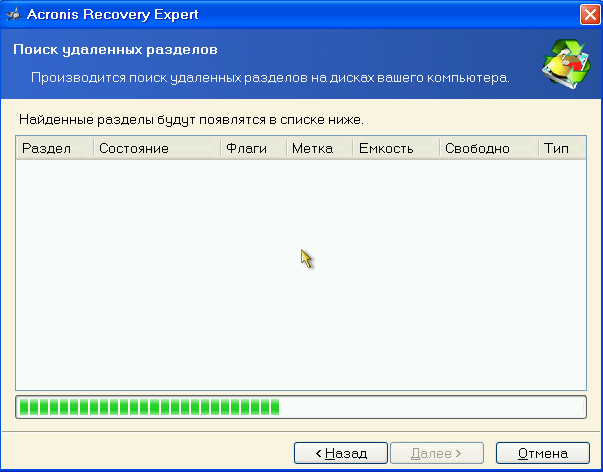
Acronis Disk Director has one very useful feature - the Partition Recovery Wizard. It allows you to recover deleted volumes with all their data on a disk. Unless, of course, the information was overwritten.
Paragon Partition Manager
Another full-featured set of disk management tools. It is a boot image with which you can do a lot of things: split disks into volumes, format them in various file systems, create boot menus, create installation packages for OS distributions (not only Windows), manage system loaders, etc.
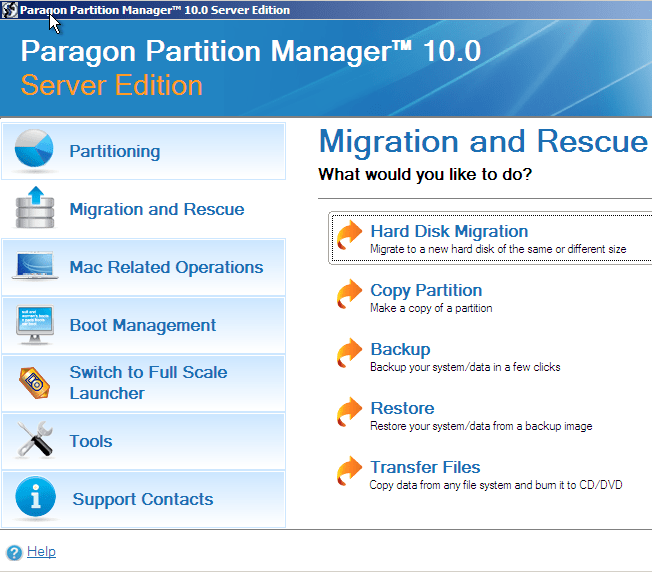
As for the partition management functions, Paragon Partition Manager allows you to create, delete, divide, copy, restore, merge, backup and transfer them to external media. You can even transfer the entire contents of the hard drive to another. In addition to the above, the application has network functions that make it possible to create a connection with other computers on the local network.

Despite the English-language interface, managing Partition Manager is quite easy. Most of the options launch a built-in wizard that guides the user through all the steps of the selected operation. It does not take much time to master the program, and the result of what is being done is always good.

Partition management, formatting and other operations through the disk manager
You can also redistribute disk space from under a running system through Disk Management, a native Windows 7 tool. The tool is in the Computer Management set.
- Launch the Control Panel and open the Administrative Tools application. From the list of administrative tools, select "Computer Management".

- Then select "Disk Management".

- You will see a “map” of hard drives and other drives installed on your computer - flash drives, memory cards and other things, if they are connected.
If the disks are divided into parts, the map will display each partition, otherwise called a volume, with its letter, size and type designation: primary or logical. Above is a table of properties for each volume. Here you can see which one your system boots from - the boot partition has the "Active" attribute.
Active in Windows 7 is a 100-megabyte partition at the very beginning of the hard drive (MBR standard). It doesn't have a letter and doesn't show up in File Explorer.
Right-clicking on one of the partitions on the disk map opens a list of available commands: what operations can be done on this volume.
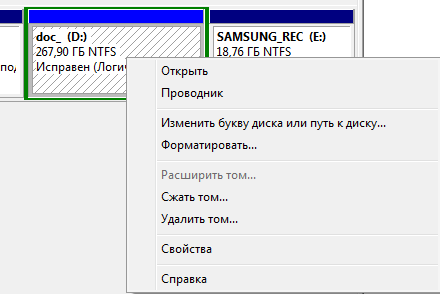
So, over the logical partition D of our only hard drive, you can do the following:
- open (via explorer);
- change letter;
- change the path to the disk;
- format;
- expand;
- compress;
- delete;
- view properties;
- read help.
If you remove the volume letter, it won't show up in Windows Explorer like other hidden partitions. Such as SYSTEM - where the Windows 7 bootloader is located, and the RECOVERY (recovery) partition. This protects the files stored there from accidental damage and deletion.
The “format” command will destroy all information, the “expand” and “compress” commands are designed to control the size of the partition. “Delete”, respectively, will turn the selected area of the hard disk into unallocated space.
In a word, working with the disk manager is not difficult, but it requires attention and caution from the user.
Want to install Windows 7 on your PC or laptop but don't know how? It's not as difficult as it seems. Although the first time, of course, it will be difficult. But, having figured it out once, you will become a real "IT master" and will be able to independently install Windows 7 on any computer or laptop.
Before installing Windows 7, print this page. This will make your task much easier. After all, during the installation of Windows 7, there will be no access to the Internet. The only exceptions are cases when you have a second PC, laptop or smartphone, from which you can, if necessary, re-enter the site and see what to do next.
- You bought a new laptop or computer. Everything is clear here. In most cases, laptops or PCs either do not have any operating system at all, or do not have the one you need (for example, the ancient MS-DOS).
- Did not like Windows 10 or 8, and you want to install the good old "seven".
- There was a malfunction, a virus or a ransomware banner was caught, the computer or laptop does not turn on, etc.
Let's stop a little on the last point. If there are problems with your computer or laptop, do not rush to reinstall Windows. Firstly, reinstalling the operating system is the last thing to do when other methods have not helped.
Secondly, remember that after installing Windows, all data is erased, at least on the local drive C. And these are all your programs: browsers, video players. And you have to reinstall everything.
Thirdly, there is no guarantee that reinstalling Windows will solve the problem. But the files on the local drive C will be permanently deleted anyway.
Therefore, first try to look for other solutions to restore the PC or laptop. For example, the following articles may help you:
You can also always search for other articles on this blog or through Google / Yandex.
Preparing to install Windows 7
The first thing to do before installing Windows 7 on a laptop is to copy all the important information. At least from the local drive C. After all, after formatting, all data on it will be erased.
If you bought a new computer or laptop, you can skip this step. In all other cases, this is a must!
Therefore, save all files, documents, pictures, audio tracks and videos from the desktop and from the My Documents folder. It is also recommended to look at the local C drive - important information is also often written to it. Where to save? On disk or flash drive. Another option is to upload files to online services (Yandex.Disk, Google Drive, etc.).
By the way, sometimes you can copy some programs along with the settings. For example, bookmarks and passwords from the browser you used.
The second point to be made is to determine what bit depth of Windows 7 you need - x86 or x64. Everything is very simple here. If you have 4 GB of RAM (or more) installed on your laptop or computer, then you need to install Windows 7 x64, and if less, then x86.
Why is that? The fact is that the x86 version does not see 4 GB of RAM. The maximum that it shows is 3.25 GB.
How to find out the amount of RAM? If you have a new computer - look in the documentation. And if a laptop - then the characteristics are indicated on its case (or on the box).
If you already have Windows installed, then the amount of RAM can be viewed as follows:
The third point that must be completed before installation is to burn a digital copy of Windows 7 to a disk or USB flash drive.
If you already have a boot disk (bought or given out in a store along with a PC), then skip this step.
Burning a DVD is easy. After all, you've probably already recorded movies, music, games, haven't you? You can do this through Nero, Alcohol 120% and other programs.
As for the USB flash drive, there are some difficulties. Therefore, in this case, I recommend reading -.
Where can I get a Windows 7 image or installation disc? You can buy in the store or online.
And the last thing to do before installing Windows 7 is to prepare drivers for a laptop or PC. Computers usually come with driver disks. If you have them, then you can skip this paragraph.
Notebook owners are not given disks, so you need to install drivers from the official website of the manufacturer (search by the name of your model).
If you skip this step, you may be left without the Internet. After all, you need to install a driver for it. The USB ports may also not work. That is, a mouse. And in the end, you have to go to a friend or acquaintances and download drivers from them.
This completes the preparatory process. Once again, check that you have saved all the important data, then connect the USB flash drive or insert the DVD with the Windows 7 installation image and restart the laptop / computer.
BIOS setup for installing Windows 7
Perhaps setting up the BIOS is the most difficult step for most users. Especially for beginners.
In addition, the difficulty here lies in the fact that BIOS versions may differ on different PCs and laptops. And the buttons to enter the BIOS too. As a result, some users cannot even enter BIOS. Therefore, so that there are no problems with this, we will consider in detail what and how to do.
So, when you have prepared everything, restart the computer, and immediately when the screen turns on, repeatedly press the Del button (for PCs) or F2 (for laptops). If everything is done correctly, you will see the BIOS screen. Roughly like this:

Or like this:


4 devices are displayed here - First Boot Device (first), Second (second), etc. By default, the first is the hard disk (Hard Disk or HDD). And you need to put a CD-ROM (disk) or USB-HDD (flash drive) on the first line - depending on which device the seven will be installed from.
How to do it? On a PC, you usually need to highlight the first item, press Enter and select the desired option from the drop-down list.

On laptops, the boot priority of devices is changed using the arrows or the F5-F6 buttons. The control keys are usually listed on the right or at the very bottom of the BIOS screen.

When you select the desired device (CD-ROM or USB-HDD) in the first item First Boot Device, be sure to save the settings, and then exit the BIOS. Which save button? This is also written at the bottom of the screen (most often F10).
If you have a UEFI BIOS (new version), then simply drag the desired icon (drive or flash drive) to the first place with the mouse and click "Exit" in the upper right corner.

After that, the laptop or computer will restart and the installation of Windows 7 will begin.
If all this is too complicated for you, there is another option to set up booting from a disk or flash drive without going into the BIOS. For this you can. But this method only works on new PCs and laptops.
Step-by-step instructions for installing Windows 7
Immediately after the reboot, you will see a black screen with a single line.

Here you need to press any button - for example, Space.
If this inscription does not appear, then you did not save the BIOS settings. Check them out again. If everything is fine there, then either you did not burn the bootable USB flash drive correctly, or the disk is damaged and the computer / laptop does not see it (perhaps the drive does not work).
After pressing the button, you will see a black screen with the inscription "Windows is loading files ...".

Wait for the system to copy everything. After that, a new window will appear on the screen. Choose the Russian language and click "Next".

In the new window, click the "Install" button.

If several versions of Windows 7 are recorded on a disk or flash drive, you need to choose the appropriate one. We have already figured out the x86 and x64 bit depths, so decide for yourself here. As for the version, it is better to choose "Maximum". Although there is almost no difference between it, “Home”, “Initial” and “Professional”, therefore it is not so important. Select the desired item and click "Next".

Agree with the terms of the license (check the box) and proceed further.

Choose full installation.

A window will open with a choice of a partition for installing Windows 7. But here it is worth stopping in more detail.
How to partition a disk on first install?
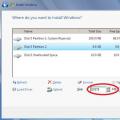
If the installation is performed on a new computer or laptop (that is, for the first time), then you will see only one line - “Unallocated disk space”.

And in this case, you need to split the hard disk into 2 partitions - local disk C and D (more is possible, but this is not necessary). To do this, select this line, click the "Create" button, specify the disk size (in megabytes) and click the "Apply" button.

Not sure how much 50 GB will be in megabytes? Write a number at random - for example, 50000. And then see how much the system will show for the created partition. If it doesn't work out well, select it, click the "Delete" button, and try again with a higher number.

For the normal operation of Windows 7, you need to create a special 100 MB partition where boot files will be stored. So when the next window pops up, just click OK.

When you specify the desired volume for the local drive C and create it, "Partition 2" will appear. This is what he is.

After that, select the "Unallocated space" line again, click "Create", and then the "Apply" button. After that, the local disk D (“Partition 3”) will appear.

If you forget to do this, then after installing Windows 7 there will be only one local drive C. And partition D will “evaporate” into the air. You will have to reinstall Windows again. Therefore, before moving on, make sure that the “Unallocated space” item is no longer there.
To install Windows on the local drive C, select "Partition 2" and click "Next".

If you are reinstalling Windows 7, then the following window will be displayed on the screen:

In this case, you need to select "Partition 2" and click the "Format" button. This will delete all data on it. When the formatting process is completed, select this section again and click "Next".
By the way, if you want to distribute the volume between the local disk C and D in a different way, you can delete them and recreate them, specifying a different size. How to do this is written in the previous paragraph. But remember: in this case, the information will be deleted on the local drive D too! As a result, the PC or laptop will be clean, as if you just bought it. Therefore, perform this procedure only if you have saved all the necessary files.
Continue installing Windows 7
So, you were able to partition the hard drive or format it before installing Windows 7 and clicked the "Next" button. After that, the operating system will begin to install. Wait for the files to finish copying.

After that, the computer / laptop will restart, and you will again see the familiar black window with a single line.

In no case do not press anything on the keyboard, otherwise everything will start all over again.


After that, the computer or laptop will restart a second time.
Well, the main thing is already behind, it remains only to fill in some fields:
- Specify the username and computer name (if you plan to play games, it is better to write in Latin).

- You can not set a password - in this case, just move on.

- If you have a digital copy, you can also leave out the activation key (usually Windows 7 is activated automatically when you connect to the Internet). To skip this step, click Next. And if you bought a disc, then enter here the code that is written on the sticker.

- Here it is recommended to select the option “Defer decision” (you can change these settings later).

- Choose your time zone, enter the time and click "Next".

- If Windows automatically finds drivers for the Internet, then in the new window select "Home Network".
- Wait for the desktop setup to complete.

- Congratulations - you have just been able to install Windows 7 on your laptop or computer.

What to do after installing Windows 7?
First of all, restart your laptop or computer, go into the BIOS and change the device boot priority back. That is, put the hard disk (Hard Disk or HDD) in first place, and lower the CD-ROM or USB-HDD to the second or lower.
Also, after installing Windows 7, the Internet and USB connectors may not work. This is because there are no drivers. So the next step is to install them.
It is for this that you need to prepare in advance all the necessary drivers before installing Windows 7. Especially on the Internet. After all, how do you download them if there is no access to the network?
And one more nuance - when you turn on your computer or laptop, you may see two Windows 7 (during boot).

The first one was installed by you, and the second one was saved in a hidden section (“reserved by the system”). However, the extra line can be removed. To do this, do the following:

Ready. After rebooting, the second Windows 7 will no longer exist, and you will not see the operating system selection menu.
If you have any questions, ask them in the comments.
 Preparing Your Computer Hard Drive for Windows XP Installation
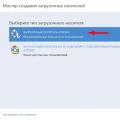 How to restore the system using the Acronis image?
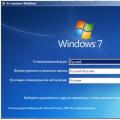 Windows 7 with uefi support