Disassembled hp pavilion laptop. How to disassemble and clean the HP Pavilion g6 laptop from dust. Tips, subtleties when disassembling a laptop yourself
Why does the HP Pavilion G6-2323sr get very hot and noisy? Everything is simple! The problem of any laptop, yes, by the way, of any portable equipment, is small heat dissipation channels, which eventually become dirty and clogged with dust. Due to the limited space and lack of heat output (dust build-up) from the laptop, the temperature inside the equipment rises. As a result, it starts to get very hot. To prevent the system from overheating, which can damage the laptop components, the cooling fan begins to work hard to remove heat. Because of this, the noise level increases.
To eliminate such defects, mechanical cleaning of the cooling system is required. And the usual vacuuming of the radiator holes on the laptop case in the vast majority of cases does not bring a positive effect. Therefore, further on a specific example, we will consider how the HP Pavilion G6-2323sr is disassembled and then cleaned from dust. At the same time, we will replace the thermal paste to improve the thermal conductivity of the “bottleneck” of the processor-heatsink.
How to disassembleHPPavilionG6-2323sr
The first step is de-energization. Turn off the power supply and remove the battery.
 Next, remove the keyboard. To do this, pry it off with a small flathead screwdriver. Next, we lead a screwdriver along the keyboard, unfastening the latches.
 When all the latches are unfastened, turn the keyboard over and disconnect its cable from the motherboard.
 We remove the keyboard to the side. We unscrew all the screws (there are 5 in total) that were hidden under the keyboard. And also turn off all the loops that we see.
 We close the screen of the HP Pavilion G6-2323sr and turn the laptop over. There is a screw in the center of the case. Unscrew it first.
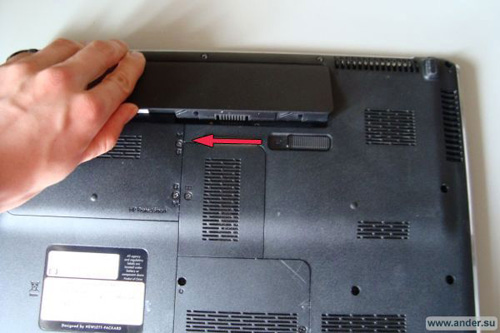
 Further from the side where the battery was. There is an inscription "Release door" and an arrow indicating the direction. Slide the cover in this direction. If it doesn't work with your hands, you can pry a little with a flat screwdriver.
 Under it are a hard drive, RAM and several cables. For convenience, everything should be disabled and removed.
 Do not forget about the Wi-Fi module. We disconnect the wires from it (white and black) and unscrew the screw fixing it.
 There is another screw under the hard drive that needs to be removed.
 And then unscrew all the screws on the laptop case in a circle. After that, we remove the drive for reading hard drives.
 Now we need to separate the body. To do this, slip a flat screwdriver or a plastic card from any convenient side and unfasten the first latch
 If all the screws are unscrewed and the cable is disconnected, then by unfastening all the latches in a circle, the case can be easily disassembled.
 We have the motherboard. But there is no access to the cooling system, since it is located below. To remove the board, you must disconnect all cables and unscrew one screw.
 After that, the board is very simply removed from the seats. Turning it over, you can see the cooling system in the form of a radiator and a fan.
 In fact, this completes the disassembly of the HP Pavilion g6-2323sr. But we need to clean the cooling system. So, remove the radiator with a fan.
 Next, disconnect the fan from the radiator by unscrewing the fixing screws.
 After that, it should be something like this (maybe worse, maybe better)...
 We remove the dirt and sweep away the dust with a brush.
If you need to replace the thermal paste on a laptop, then we clean the chips of the central processor and video processor.
 And the pads on the radiator...
 On the chips cleaned from the old thermal paste, we apply a layer of fresh.
 And we collect everything in the reverse order. This completes the cleaning and replacement of thermal paste on the HP Pavilion g6-2323sr. At each step, do not forget to check all contacts and cables so that you do not have to re-disassemble the laptop later.
Appearance HP Pavilion dv5

Attention! As experience has shown, self-disassembly can lead to serious damage, so if you have any doubts while reading the instructions, contact the specialists.
First of all, we remove the battery in order to de-energize the laptop and avoid the risk of possible short circuits during disassembly. The battery is easy to remove, the latch must be moved as shown in the figure and at the same time remove the battery.

Shown below:
- 1) Hard drive
2) RAM

Replacing, removing the hard drive
Removing or replacing a hard drive is quite simple, just remove it from the recess, take the hard drive with one hand, the connecting contact with the other and disconnect.

Replacement, removal of RAM
The RAM is also easy to remove, first you need to disconnect the fasteners on the sides and at the same time lift it slightly to remove the RAM. If you only needed to replace the RAM, then the steps below can be skipped.

Replacing, removing DVD drive
Replacing or removing a DVD drive on most laptops is done as follows: Unscrew one or more screws that secure the DVD, then carefully pull out the drive.

In order to clean the laptop from dust inside or further disassemble the HP Pavilion dv5 laptop, you need to unscrew the indicated screws. In this case, screws of different sizes and diameters will come across, so when unscrewing it, it is best to write down where the bolts come from and put them in a box signed earlier, otherwise an incorrectly screwed bolt can damage the laptop. After we disconnect the wi-fi sensor, for this we disconnect the wires from wi-fi, sign where the wire came from, disconnect the wi-fi sensor.

We turn the laptop over, hook the socket near the monitor with something flat and carefully unhook the plastic latches. This procedure requires some experience so as not to damage the plastic latches that secure the socket. The most important thing is not to make sudden movements, and because. the socket itself is still connected to the laptop with wires.

Lifting the panel, unscrew the 4 screws securing the keyboard. Under the keyboard there are contacts from the socket, so we do not remove it yet.

In order to disconnect the keyboard - turn the mount by prying it with a flat screwdriver (approximately as shown in the image). You can do it with your fingers.

We disconnect the socket in two places - in the middle part and similarly on the left. In some cases, before removing the contact, it is necessary to extend the 2 tips along the edges (shown by arrows) if they are present.


Having removed the socket, we proceed to disconnect the remaining contacts and unscrew the screws shown in the figure. When everything is done, take out the panel on which the speakers are located. Speaker holes usually get dust and debris onto the speakers, so cleaning the speakers from dust will not hurt, it is better to use a dry cloth.

The next step is to detach the display. Before removing the screen, you need to disconnect the 2 contacts on the left and remove the wires from the groove that fit on the right. Now we unscrew 2 screws on the right and left, note where the screws came from and we can remove the screen. Even if you only need to clean the laptop from dust inside and replace the thermal paste on the HP Pavilion dv5 processor, this will not work without removing the screen.

After removing the screen, we disassemble it further - we pass along the perimeter and disconnect all the latches, remove the cover under the keyboard, for these purposes it is convenient to use a small knife, it is not advisable to perform this procedure with a screwdriver. there is a risk of scratching the case.

We disconnect 2 pins on the board (shown in the picture), and unscrew a few screws (not shown in the picture) that secure the board to the bottom.

Cleaning an HP Pavilion dv5 laptop from dust inside
After removing the motherboard, turn it over and disconnect the laptop cooler power cable as shown in the image. You can use small pliers.

To replace the thermal paste and clean the laptop from dust inside, unscrew 6 bolts that secure the plate and the cooler. Sometimes it may be necessary to additionally unscrew a few more bolts near the cooler. Disconnect the HP Pavilion dv5 cooling system from the board. It happens that you need to make a little effort, because. thermal paste sticks the cooling plates to the processor.

We remove the old layer of thermal paste on the processor and another chip completely, even along the edges, using a cotton swab moistened with a solvent or alcohol (you can replace it with vodka). It is advisable to replace the thermal pad if a crack has appeared on it, if it has been preserved in good condition, you can leave it in place and do nothing with it. After that, you can clean the laptop board from dust with a dry cloth or moistened with alcohol, do not forget to clean the HP Pavilion dv5 case inside.

We perform a similar procedure before replacing the thermal paste and on the cooling system. Sometimes the thermal paste dries out a lot, in which case you can use a flathead screwdriver to remove the residue - all this only applies to the cooling system. On the processor or chip, you should not use an iron tip screwdriver or the like when removing the paste.

In order to be able to clean the dust inside the cooler, unscrew the screws. On some laptop models, the cooler may not be disassembled, in which case you can limit yourself to cleaning the places where possible with cotton swabs.

It is convenient to clean the cooler with a cotton swab moistened with alcohol. alcohol dries quickly and the cooler can be collected immediately after cleaning, and not wait until it dries. The piece of iron (cooling system) itself can be blown through, but it is better to rinse it under water. If you decide to rinse with water, then you need to prepare for the fact that you will need to wait a sufficient time until the water is completely dry or use a regular hair dryer.

Replacing thermal paste
The final touch is the replacement of thermal paste in the HP Pavilion dv5 laptop with a new one on the processor and chip. For these purposes, we apply a paste, smooth it with something flat - a SIM card from a phone, a plastic card or the like will do. The layer of thermal paste on the processor is about 0.5 mm, it is better to apply a larger layer on the chip, because there will likely be more clearance.

After application, be sure to make sure that the thickness of the layer will be sufficient. To test a layer, follow these steps:
- 1) Application of thermal paste (described above)
2) Assembly of the cooling system (we tighten all the screws that secure the iron plate to the board)
3) Remove the cooling system
4) We look - is there an imprint of the paste on the cooling system. If the imprint remains, then remove the thermal paste from the iron plate and repeat steps 1 and 2. If there is no imprint, or it is not completely imprinted, then you need to increase the layer. As a rule, a minimum layer is sufficient on a processor, and a larger layer is required on a video card or chip.
This article described how to disassemble an HP Pavilion dv5 laptop and replace the thermal paste on the processor. If you have any difficulties, you can always use the service cleaning laptops from dust inside .
Your questions and comments
05.07.2017 Sergei
- Question:
- HP dv6 2150er. From time to time the cooler junk, then it stops, then it starts spinning again, when tilted, you can hear how it touches the blades at low speeds. Today, when you turn on the cooling fan error 902, although you can hear that the cooler scrolls slightly, it stops and after 10 seconds it scrolls again and stops. Question: could you tell me what marking the cooler has and from which other laptops it is suitable to change or analogues or maybe an article to buy and change. Saasibo
- Hello, search by exact model name, for example "cooler for dv6 2150er". Be sure to specify the exact model, because. the dv6 line has many different modifications with different fans.
Is your HP Pavilion dv6 laptop getting hot and noisy even under light loads? Most likely, it's just time to clean the dust-clogged fan of the cooling system. So, how to disassemble an HP Pavilion dv6 laptop and return it to its previous working condition?
HP Pavilion dv6 laptops are powerful, stylish, multimedia devices that have become quite popular in their segment. HP managed to create a quality product, but, unfortunately, it has one drawback - a high level of heating and, as a result, noise. The laptop cooling system has two modes of operation - quiet and loud. At minimal loads, the dv6 works silently, but once the device is loaded, the cooling system is actively switched on, making some noise. Over time, the fan supplying air to the system becomes clogged with dust, its efficiency is seriously reduced, and indicators such as noise and heat increase. In this case, the laptop should be disassembled and cleaned. You can preload under load and compare it after cleaning.
How to disassemble an HP Pavilion dv6 laptop yourself?
Dismantling HP Pavilion DV6 does not involve complex actions that require special training. You can disassemble a laptop yourself at home, even if you have never disassembled computer equipment before. Following the detailed instructions from the next video, you can easily disassemble, clean and assemble yourself.
Briefly, the algorithm of actions can be described as follows:
- We remove the battery
- Unscrew the bottom cover (the screws are not removed from the cover)
- We take out the hard drive, RAM, DVD-ROM
- Remove the keyboard by first unscrewing the necessary screws
- Unscrew and remove the top cover
- Unscrew the display
- We disassemble the fan, remove all the dust from it
- Putting everything back in reverse order
Remarks: screws in a laptop of four types (the first - hold the bottom cover and hold on to it themselves, that is, they are not removed; the second - hold the keyboard and are marked with a special icon; the third - hold the top cover; the fourth - very small on the fan itself), so that not confuse them with each other, when disassembling, you need to prepare boxes for each type in advance. Before removing the keyboard or anything else, do not forget to disconnect the cables, and when assembling, be sure to connect them in place! The HP Pavilion dv6 fan becomes seriously clogged with dust in the first year of use, so it is highly recommended to clean it every six months.
We disassemble the laptop HP Pavilion dv6.
This guide is in two parts. In this, the first part, we will look at disassembling the main parts of the laptop. In the second part, we will look at disassembling the display module and replacing the LCD screen.
A warning
This article is not a guide to action! You are solely responsible for the collection and disassembly of your device.
Many manufacturers do not carry warranty obligations if the device has been disassembled by the user. If you do not want to lose the warranty for your device, check the terms of the warranty in the documentation or with the device manufacturer.
Tools Used
|
Before you begin disassembly, be sure to turn off the laptop and remove the battery.
Remove the 6 screws from the hard drive and memory module covers.
One of the screws (marked with a green circle in the picture) also secures the DVD drive.

Remove both covers and pull the DVD drive out of the laptop.

Lift the hard drive module and disconnect the hard drive cable from the connector on the motherboard.

Both memory modules are installed in a compartment at the bottom of the laptop case.
You can pull out both memory modules. But in our case, let's leave them on the motherboard.
The non-volatile memory (CMOS)/system clock battery is also located under the memory module cover and can be easily removed and replaced without dismantling the entire laptop.

Unscrew the 5 screws securing the panel above the keyboard (indicated by yellow circles in the picture below).
Unscrew the 4 screws securing the keyboard (marked with red circles).

Pry up the edge of the bezel above the keyboard and continue to remove it with your fingers.
Be careful! There are two cables running from the panel above the keyboard to the motherboard. They are shown in the next picture.

Slide the panel above the keyboard towards the display so that you can reach the three screws securing the keyboard.
Remove the three screws securing the keyboard.

Lift up the top of the keyboard as shown in the following picture.

Slide the keyboard toward the display so you can reach the flex cable connector under the keyboard.
Before removing the keyboard, you need to bend the cable lock and pull the keyboard cable out of the connector.

To open the connector, bend the brown tab up 90 degrees.

The following picture shows the keyboard cable connector in the open position.
Now you can pull the keyboard cable and pull it out of the connector.

Remove the keyboard.

Disconnect the two cables coming from the panel above the keyboard (mentioned in step 6) from the motherboard.
The connectors on these cables do not have latches. Simply pull on the cables and pull them out of the connectors.

Remove the panel above the keyboard.

If you plan to remove the display panel, you will need to disconnect both antenna cables from the wireless network card.
Loosen the screw securing the wireless network card and remove the card.

Disconnect the two cables (one of them is the video cable) from the motherboard.
Pull the antenna cables through the hole in the bottom panel.

To disconnect the video cable, simply pull up on the black tab.

Remove the 4 screws securing the monitor hinges.

Lift and remove the monitor module. How to replace the LCD screen, we will look at.

Remove any remaining screws from the bottom of the laptop.
One of the screws (circled in green in the picture) is located in the DVD drive bay.

Remove the 4 screws securing the speaker module.
Disconnect the speaker cable from the motherboard.

Lift and remove the speaker module.

Remove 5 screws securing the top panel.
Disconnect the touchpad cable from the motherboard.

Start separating the top of the case from the bottom.

Remove the top case.

Disconnect 3 cables from the motherboard.
In the HP Pavilion dv6 laptop, the power supply connector is not soldered to the motherboard. The power supply connector is attached to the wires and can be easily replaced without soldering.

Remove the screw securing the motherboard. It is located in the lower right corner of the motherboard.

Carefully lift up the motherboard on the right side.

Remove the motherboard from the case.

You will see that the cooling module is attached to the back of the motherboard.
Now you can clean the radiator and fan.
You can also replace the cooling module in case of a malfunction.

Disassembly completed. Reassemble in reverse order.

Notebook HP Pavilion g6 has excellent characteristics of the gaming model. But, despite the high quality of HP products, it also needs regular maintenance. One of the models in this series, 1232sr, has been repaired.
At startup, the laptop gave a system warning about the error of the fan (cooler) of the cooling system - System Fan (90B). Continuing work with such a failure, with a high probability, will result in overheating of the elements and breakdown of the laptop.
To eliminate the malfunction, it is necessary to inspect and, if necessary, clean the fan. But to get to it, the laptop needs to be disassembled.
Workplace preparation
Before you begin, prepare a lining of foam rubber, thick fabric or cardboard to fit the laptop so that you do not leave scratches on the top cover during disassembly. Remove excess from the desktop and wipe it. You can put a blank sheet of paper on which it will then be convenient to fold the screws, writing down their location in the laptop case.
Stock up on a small magnet that will help you get the screw that has fallen inside the case. Prepare a clean paint brush with medium bristles, screwdrivers of the required size and shape, and a vacuum cleaner. You will also need medical alcohol, cotton swabs and some thermal paste.
When separating the two halves of a laptop, metal tools leave scratches and nicks, so for this operation it is convenient to use a tool made of thick plastic, such as an unwanted plastic ATM card.
Be sure to take care of good lighting, the best option is daylight.
Disassembly order

Disassembling the HP-g6 laptop must begin with the obligatory disconnection of the battery. Then you need to unscrew the two screws of the cover that covers the hard drive and RAM slots.
Remove the cover, now you need to turn off and remove the hard drive. There is a “tail” on the cable connector for its safe disconnection, we pull it. We lift the disconnected disk and remove it from the seat.

Set it aside on a soft cloth. Handle the hard drive with care - shock or damage will result in data loss or failure, which is often impossible to repair.

Now let's remove the DVD drive. To do this, unscrew one screw, with a slight effort pull the drive housing until it comes out of the connector. Further, the drive freely leaves the seat.


Well, we got to the next step, in which you need to remove the keyboard. The keyboard is held in place by seven latches, five on the top and two on the sides. Press the latch with a screwdriver and lift up the keyboard. It is difficult to release only the first latch, so start from the corner.
Place the released keyboard in a vertical position to gain access to the cable. Lift the connector bar up, disconnect the cable and set the keyboard aside.

The removed keyboard opened up access to three more loops, which now need to be disabled. The design of the connectors is the same - to turn it off, you need to raise the bar up. Remove two more screws securing the top cover.

Now it's time to separate the body parts and remove the top cover. We do this from the corner, using a plastic tool, so as not to leave notches on the body.

A few simple steps will help remove the laptop screen.
Disconnect the matrix connector, it is located on the left. Disconnect the USB connector cable and the power connector located under it. We release the Wi-Fi antenna wires, unscrew the four screws on the screen hinges.
We put the removed screen aside, cover the surface of the matrix with a folded newspaper to protect it from accidental damage.

It remains only to disconnect the two connectors at the bottom left and unscrew one screw, insidiously covered with a cable.

The system board is no longer holding anything. We remove it by lifting it by the right edge and turn it over to inspect the cooling system.
To remove the heatsink with a fan, unscrew the seven screws and disconnect the connection connector.

Note!
The fan housing is fixed to the board with adhesive tape. When removing the cooling system, be careful not to break the edge of the system board.
After dismantling the cooling, you need to remove the remnants of thermal paste from the surfaces of the microcircuits and the heatsink and reapply fresh. It is convenient to remove hardened thermal paste with a swab dipped in medical alcohol.

Troubleshooting
Finally, we got to the fan that causes an error when the system boots. Let's figure it out. To do this, unscrew the two screws and unfasten the latches of the metal cover.

And here is the reason - a rolled up ball of dust jammed the fan. It is necessary to clean out all the dust using a brush and a vacuum cleaner.

Be careful with the fan blades, they can be broken if you force them too hard. Then the fan will lose balance, start to make noise and vibrate during operation. Here you can not avoid buying a new fan, and for HP-g6 it is not cheap.
When reassembling the laptop, pay attention to the length of the screws. On the body, next to the seat, the manufacturer made special notes.

Disassembling and cleaning the HP Pavilion g6 laptop:
Proper disassembly, cleaning and assembly of the HP Pavilion g6 laptop:
Disassembly and inspection of the HP Pavilion g6 laptop:
 iPhone disabled connect to iTunes - Solution
 If the tablet freezes, what should I do to bring it back to "life"?
 What is the CDR file extension?