Like using the ultraiso program. Mounting an ISO image through the UltraISO program in pictures. Preparing and writing an image to a USB drive via UltraISO
Opportunities
- creating an ISO image from any data stored on the hard drive;
- burning CD/DVD images;
- creating bootable distributions of Windows OS;
- optimization of the file structure of the image;
- extracting data from an image file;
- editing the content of the image;
- file conversion;
- adding / deleting / renaming files in the finished project.
Advantages and disadvantages
- Russian-language menu;
- support for multiple formats;
- creating boot disks;
- editing the created copy without the need to overwrite it.
- the program is shareware (it has a limit on the volume of recorded files - no more than 300 MB, it also has a limited validity period - 1 month);
- only one OS is supported - Windows;
- irregular release of updates.
Alternative programs
Alcohol 120%. A free program with which you can make virtual copies of optical discs. Allows you to burn images, play them in virtual drives, copy information from disk to disk, protect created files with a password. Works with almost all types of protected disks.
nLite. A free application that can create an assembly of necessary components for Windows OS. Integrates driver packages into the main distribution, configures services, changes accounts, creates an ISO image of a bootable disk with the possibility of its subsequent burning to CD / DVD, makes settings in the registry.
How to use
1. Create a boot disk
Launch the program and open the "Tools" tab. Select "Burn CD image" or press the "F7" key:
Instruments
In the next window, mark the desired file, set the optimal speed and recording method:

Recording speed and method
Click the "Record" button and wait for the process to complete.
2. Burning a disk image to a USB flash drive
Connect the USB stick to your computer. Run the program and open the required image by using the "File", "Open" commands:

Image opening
After that, go to the "Boot" tab and click the "Burn hard disk image" item:

Disc burning
Then select your USB drive and the specified burning method:

Media selection
Format the drive by clicking the "Format" button, select the file system:

Formatting
Click the "Record" button (in the previous window) and wait for the process to complete.
3. Create a virtual drive
Run the program, open the "Options" menu, the "Settings" item:

Settings
Go to the "Virtual drive" tab, mark the number of virtual drives. Pay attention to the drive letter. Under it, the created drive will be defined in the system.

Virtual drive
Then open the "Tools" menu, the item "Mount to virtual drive". In the next window, select the image file and apply the "Mount" button:

Mounting
UltraISO is a functional software product designed to perform numerous operations with disk images.
Most users know that the UltraISO program is an indispensable tool for working with images, burning discs, creating virtual drives or bootable flash drives. However, not every novice user clearly imagines the algorithms for working with this application. Read on to learn how to use Ultra ISO. A complete list of possibilities will not be considered. Let's dwell on the most important points.
How to Use Ultra ISO: Data Extraction
First of all, let's consider the simplest operations that are associated with extracting data from images. It's no secret that on many official websites of software developers or on the same torrent trackers, applications or games are posted either in the form of archives or in the form of images. The former are inconvenient because such distributions cannot be used in games, when the original disk is required in the drive.
It remains to download the images and extract data from them (the creation of virtual drives will be discussed separately). How to use "Ultra ISO" in such a situation? Everything is simple. By default, the application is configured to support almost all known image formats (there are about thirty of them). Thus, to extract information, you just need to use the file open in the application, then press the F4 key (or use the context menu) and specify the folder, drive or partition in which the data will be saved. In a way, this is similar to working with archivers.
How to use "Ultra ISO" for "Windows 7": creating images
Another thing is when you need to perform the opposite action and create an image with saving it on a hard drive or recording it on optical media. In the first case, the question of how to use Ultra ISO comes down to first adding the necessary files through the file menu, and then using the standard save command specifying the directory.

When you want to create an image of the original by saving it to the hard drive, the command to create a CD image is used, the final location of the file being created is indicated in the preparatory window, the drive with the inserted disc is selected and the "Make" button is pressed. Naturally, you can choose the format of the created image.
Burning discs
Now a few words about how to use "Ultra ISO" in terms of recording images on optical media. We assume that the image we have created and saved on the hard drive.

As before, we first add the necessary files and folders, after which we use the command to burn the CD image. In a new window, you will need to specify the burner (if there are several), select the recording method and speed, and then click the "Burn" button. Note: pay attention to the small window at the top right, which indicates the degree of filling of the media in percent and in megabytes. As already clear, the maximum volume cannot be exceeded, otherwise you will get an error.
Working with virtual drives
For some games, it is extremely important that the original disc is used to start, since a minimum set of components can be installed in the system, and the main files are located on optical media.
But what if you took the original disc to use for a couple of days, but you really want to play? And there shouldn't be any problems. Again, first a disk image is created, after which the virtual drive mount line is selected in the tool menu, the location of the image file is indicated, and the operation start button is pressed.

Sometimes, to simplify actions, you can use special integration commands through the options and settings sections, where the necessary image formats are simply checked. Now, after double-clicking in any file manager, the game or its installer will be launched. If there are no such files in the image, the contents of the image file will be opened.
Create bootable media
Finally, another look at how to use Ultra ISO. You can write information to a USB flash drive in such a way that the media becomes bootable. We are talking about distributions of operating systems and some disk utilities (sets of drivers, antiviruses, etc.) that can start even before the main OS is loaded.
To write an image, first select the command to open the image in the file menu and specify the path to it. After that, in the boot section, the hard disk image recording is selected and the desired media is selected (in our case, this is a USB flash drive). Next, the application will display a message about deleting all data from the device. We agree. After cleaning, recording starts automatically. The time depends on the amount of recorded information and the characteristics of the device itself (read and write speed).

This option using USB devices in many cases turns out to be more effective, since optical disks are quite often subject to mechanical damage, due to which the data on them may simply not be read.
Conclusion
As you can see, there is nothing particularly complicated in using the program. The main thing here is to clearly distinguish between the intended actions (depending on this, different commands and menus will be used). As for the default settings, in most cases you can not change them.
This popular software allows users to work with ISO images. With it, you can modify the downloaded images of programs and operating systems, as well as create your own. Particularly convenient is the ISO editing function without first unpacking. This allows you to significantly save time spent working with files. This article describes how to use the UltraIso utility, as well as install and activate it.
Download and install the application
Before using UltraIso, it must be installed. For this you need:

Activation
This utility is paid, so you need to activate it to use it. Along with the exe-file in the archive is a text document called "Activation". Open it and run UltraIso. Click on the "Enter registration code" button, then copy any pair of name and code into the text fields of the registration window. Click "Ok" to complete the process. 
Using UltraISO
The interface for is quite simple. Click "File", hover over the very first item - "New". Specify the type of image you need. After that, you will be prompted to select the files and folders you want to zip. 
Often, installing the Windows operating system from a USB flash drive is the only possible solution for device owners (netbooks, nettops, and others) where there is no drive, and external USB drives, although they are the most widespread in the consumer electronics market, are still not available to everyone. . In addition, this method is largely justified and has a number of advantages (compactness, data storage reliability, high reading speed) even in comparison with the traditional installation method with a CD\DVD drive.

So, in order to install Windows on a nettop or laptop (netbook) in the absence of a disk drive, or if you just want to have a distribution kit with one or another release of the operating system always at hand, you will need to burn a bootable USB flash drive. One of the simplest, and most importantly, working options is to burn a bootable USB flash drive using the UltraISO program.
Despite the fact that the program belongs to the category of shareware software, the free (trial) version of UltraISO (Russian version) is quite suitable for creating a bootable USB flash drive with the operating system, you can download the program.
Next, as an example, consider the process of creating a bootable USB flash drive for 64-bit Windows 8.1. Please note that the method described here is only suitable for Windows 7 and Windows 8 operating systems, for Windows XP this process is slightly different.
Download and run the program, such a window will appear, select "Trial period ..." here.

The main program window will open, in the menu select: File → Open,

after which we find the image file with the .iso extension (or it may be different: IMG, MDF, NRG, etc.) in Windows Explorer (it is assumed that we already have a virtual image of the operating system on the hard drive of the computer) and click " Open".

At the next stage, select the menu item "Boot" → "Burn image of the Hard disk ..."

This window will appear (if you have not inserted a USB flash drive, now is the time to do it).

Here you need to pay attention to the “Writing Method” item, UltraISO developers recommend choosing USB-HDD +. Here it is worth explaining that the recording method offered by the program at this step, namely: USB-HDD, USB-ZIP, USB-HDD+, USB-ZIP+, USB-HDD+ v2, USB-ZIP+ v 2 are emulation modes of the corresponding devices. For example, the main difference between the USB-HDD method and the USB-HDD+ method is that when using the advanced mode (USB-HDD+), the bootable flash drive will be more likely to be compatible with the BIOS of a particular computer (laptop), etc. than when using a basic USB-HDD. In turn, USB-HDD + v2 will ensure the compatibility of your bootable flash drive with almost any, even very specific BIOS, so we recommend using it right away.
We also note that when using UltraISO there is no need to format the USB flash drive in advance, the program will do everything by itself, the only thing before inserting a USB flash drive and starting recording, make sure that there is no important information for you on it. However, after you click "Record", the program will warn you about this with such a message.

We are waiting for the end of the recording process, upon completion we get a universal bootable USB flash drive with which we can easily install the Windows operating system (in our case, Windows 8.1) on any computer, laptop, nettop, etc.

The actual process of installing the operating system from a USB flash drive is no different from that via a disk, however, in order for everything to work, you must correctly set the device boot priority in the BIOS of your computer.
Disk images are now becoming more popular than physical drives due to their ease of use without the need for a disk drive. For virtual disks, you need an appropriate drive or drive to which it will be written in the future. UltraISO programs will help to understand all this, and we want to talk about its use further.
At the current time, most users use flash drives to install operating systems due to the lack of a drive or the ease of recording an image. The transfer of all files and preparation of the drive is carried out using special programs. UltraISO also includes a separate tool that allows you to perform a similar procedure. You will find detailed guides on this topic in our other materials, presented at the links below.

Create a disk image
As for the main functionality of the software in question, it is focused on creating a disk image. The finished image will fully match the structure of the CD, having the same content hierarchy and file system. The user only needs to enter the data he needs and set up the recording, all other actions will be carried out automatically by the software. The article below contains all the necessary information on this topic.

Burning an image to a disk or flash drive
In the previous paragraph, we talked about creating an image. If you have read these instructions, you should definitely be able to do the required procedure. Having a ready-made virtual image, you can burn it to a disk or USB flash drive in order to later read it from other devices. UltraISO will help with this too. As you can see, its convenience lies in the fact that all actions are performed in one place without the need to download additional software.

Create a virtual drive
Another of the important functions of the software in question is the creation of virtual drives. Through them, ready-made images are launched or other work is done. The user only needs to go to a special menu, specify the number of devices used, set the letter and save the changes. The finished drive will be displayed in the section "This computer" in the form of an empty slot for reading discs.

Mounting the image
Mounting an image is called connecting a virtual disk to the created virtual drive. This operation emulates the physical installation of the drive in the drive. It is necessary to carry out such actions when it is necessary to launch a disc, for example, with a series, program or application, while maintaining its structural integrity. If UltraISO is installed on the computer and selected by the default program, it should mount the image immediately after clicking on the corresponding file.

Installing games
Now many games are distributed in ISO format, and this type of file refers to disc images. To run it, you need to use certain software, for example, UltraISO. The image will be mounted, then the game can be installed on the computer. For a detailed description on this topic, look for our separate article by clicking on the following link.

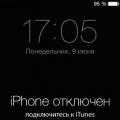 iPhone disabled connect to iTunes - Solution
 If the tablet freezes, what should I do to bring it back to "life"?
 What is the CDR file extension?