Why is the right button not working on the mouse? Mouse button does not work
During the day, an active computer user clicks on the left mouse button tens of thousands of times, if he is busy with the usual office work... The mechanisms in the manipulator are ready for this, and failure of the mouse due to a broken button is a rarity. In this case, situations are possible when pressing the left mouse button does not lead to the desired action. Sometimes a similar problem can be observed only with double or triple pressing, which are supposed to be used in operating system Windows. Below are some tips on what to do if it doesn't work. left button mice.
Diagnostics of a computer mouse
If the left mouse button does not work, the first step is to make sure that the problem is not related to mechanical or electronic damage to the manipulator. Even if the button “clicks” as before, the command may not work due to faults in the mouse board components. To be convinced of this assumption or to refute it, you need to check the operation of the mouse on another computer.
Important: When connecting a USB mouse to a new computer, you will need to wait a while while Windows detects the pointing device and installs required drivers for his work.
If the mouse works on a third-party computer, you can continue testing it on the PC where there were problems, looking for ways to fix them.
Connecting the mouse to a different USB port
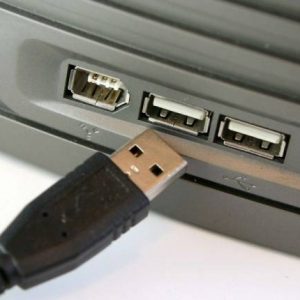 The most common mice on the market are USB mice, and it is quite rare now to find manipulators with a PS2 connector. If your computer uses a USB mouse, the first step is to try connecting it to a different connector on system unit... This is the most common cause of the mouse not working.
Please remember that after connecting the mouse to a new USB connector, you need to wait for a while until it is detected.
Disable power saving mode
In the operating room Windows system 10 present power saving mode, which automatically disconnects some connected devices, assuming that they are inactive. If the mouse is powered off or lowered, the left mouse button may not be pressed. To verify that the problem is not related to the power settings, you can do the following:
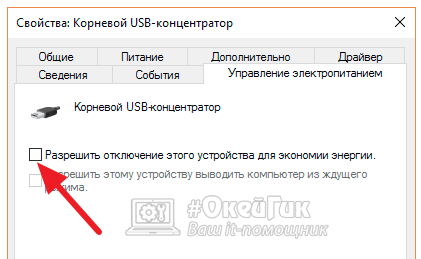
After making settings for all designated devices, restart your computer and check if the problems with the mouse are still there. If nothing has changed and the left button continues not to issue commands properly, you need to check the power settings in the control panel.
And so the first article was read "", the mouse malfunction was determined.
So we will deal with "", the repair is somewhat more complicated, and we need as a donor, either a non-working or the cheapest computer mouse, the switches for all are almost identical.
2. The MOUSE stopped responding to clicks or does it every other time, usually the left mouse button, as the most loaded one. Itself, in excitement, I press on it not childishly, although the result does not depend in any way on the strength of clicking the click. Here is the microswitch of the mouse and does not withstand, or has exhausted the prescribed number of clicks. Examination. We twist, twist, twist the wire, the cursor comes to life, so it's a wire after all. The computer mouse is in absolute rest, the wire is fixed (to eliminate the influence, if the wires are still frayed), we try to click gently, there are gaps, then the switch. Periodic skipping of computer mouse clicks may not respond to them at all. This means the button does not work.
This malfunction of the mouse, it is somewhat more difficult to repair, and for the repair of the mouse we need any (the price does not matter), and a faulty mouse is suitable, as a donor of spare parts, right button it probably works on it, well, or a side one.
Do not be surprised if the same computer mice, in appearance and in the series, there will be different filling, technologies do not stand still. So with interchangeability, problems. That is, one block cannot be transferred to another. If earlier the wires were inserted into the male-female connector, now soldering is everywhere. On the latter, in general, to solder the switch is a problem that is half a year or a year old, if you have such a thing about it "How to repair an optical or laser mouse... Sori is still writing "
At the end of the article " Mouse repair, mouse button not working". We'll have to draw a drawing, there is no photo, and maybe someone has a simple soldering method.
We disassemble the mouse for repair, as written in "".
Dismantled the mouse, we listen to the board, the screws are all unscrewed
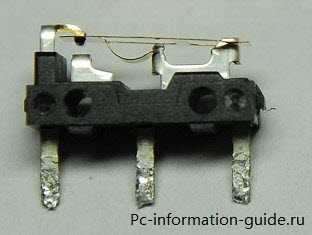
On our mouse, we will have to practice soldering without overheating, the switch on it is already broken. We heat the legs of the microswitch and, prying it with a knife (or pulling it with your fingers from the back side), we unsolder it ( we do everything at the same time and quickly).
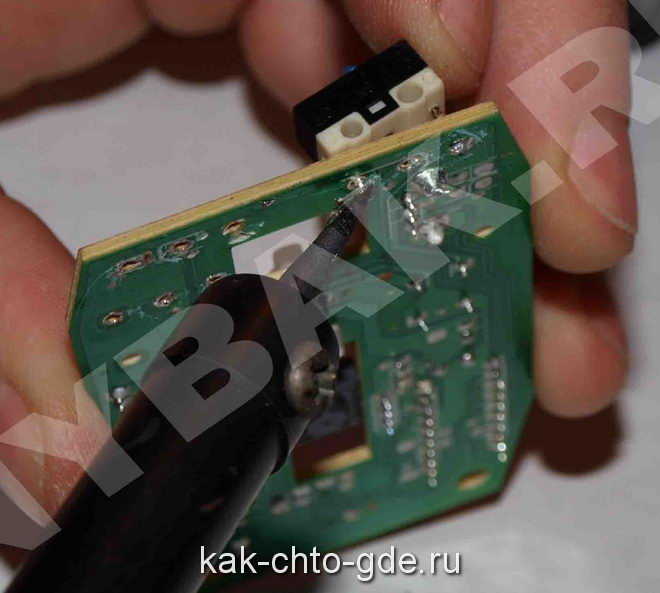
Pulling the switch while heating the legs
Without overheating the switch, you can still make mistakes, we work at the donor as miners without mistakes.
While heating the legs, we pull back, then one then the other side
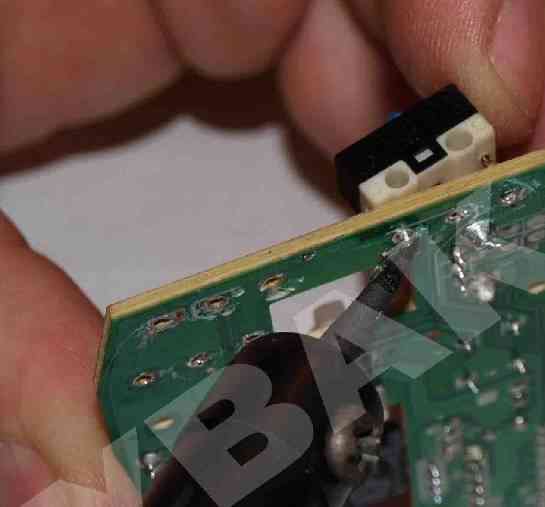
We take any old mouse, compare the switches in height: if they are the same, everything is simpler. If they differ, then the one above consists of two halves.
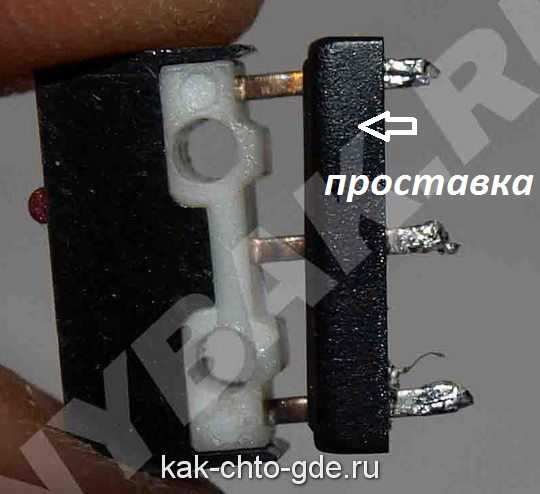
If the mouse button is high, remove the spacer
One of which is the spacer. By removing the spacer, the microswitch will fit in place of yours. On older computer mice, they are mostly tall. We bend the protruding legs on the back of the board (otherwise it will not sit in its place). I have seen only two types of switches, with and without a spacer, from a switch with a spacer you can make a switch of any height (changing the spacers like washers).
We unsolder the microswitch from the old mouse for a hundred rubles (be careful! Overheat - will not work(it is plastic). Then unsolder the second one from the old one - in the end, it will work out!). And we solder it to our "beloved" (no matter how much it costs, you know a habit). When we solder the microswitch, we don't drip a lot of tin, it can get in the way on the sole. But not enough, the solder also serves to fix the microswitch, we are not chasing beauty, it is still invisible (if the switch looses from clicks, you will have to disassemble the mouse again)! The switch only holds tin. Not overheated switch, emits a characteristic click, click. We look at the photo.
Not very pretty, but it works
It turned out not very nice, but everything works with a bang (this is the second trepanation of the mouse). Mouse repair, mouse button not working. Now your beloved, well, I hope, an expensive (don't bother with a cheap one) game rodent with you forever. As I wrote above, I did all the manipulations once with a simple screwdriver. Soldered oak oak. The soldered microswitch is enough for almost a year of active use, it has been tested by practice. Yesterday only the friend's computer mouse grunted, if it worked, there would be no article. Can someone help. Yes, and also, there is one more small malfunction, but about it to a heap in "How to repair an optical or laser mouse", and even so many dashed off.
Hope "Mouse repair, mouse button not working" and "as well as exotic malfunctions of a computer mouse, someone will help to revive computer mouse.
Write comments, I will answer. Until then, see you !!!
Hello dear readers of the blog site. I don’t know if you have faced a problem like double or triple action of the mouse button in one click, but definitely - such a problem exists and it is often encountered by users, as evidenced by numerous entries on the forums. But what can I say, I myself have repeatedly witnessed a situation when one click of the left button opened 2-4 windows at once, instead of one, it terribly annoyed and interfered with work. And then I wondered how to fix the mouse without having special tools.
And here's what I managed to find out, on different sites they write that it is necessary to rewire the micrik (the switch is a button on the board that emits a click) from some non-working mouse, or put paper / electrical tape under the key and then, they say, the problem will go away. However, there is a way in which the need for a soldering iron and placing something disappears, and the time to repair the mouse will take you no more than 10 minutes. The difficulty is that to implement this method, you will have to disassemble the mouse, but the same will need to be done with other methods.
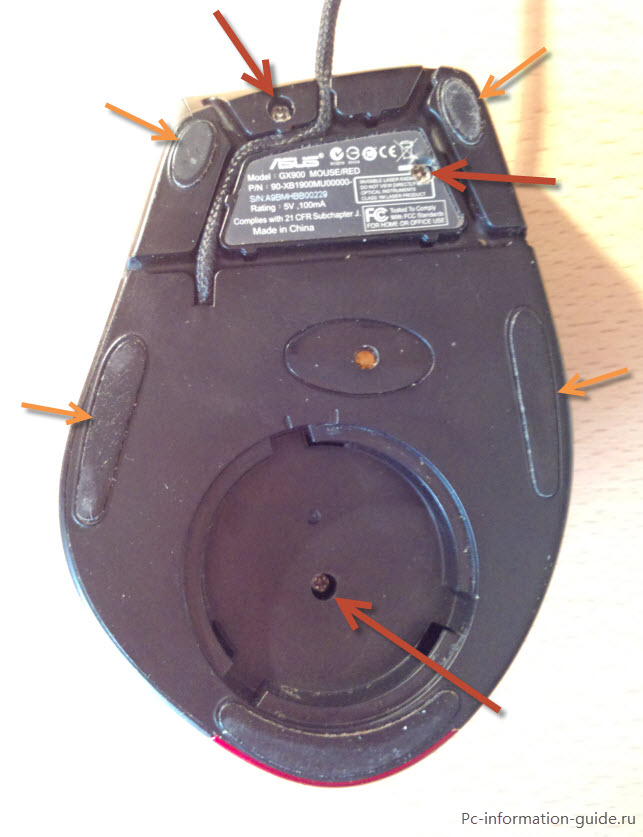
The case of any computer mouse is fastened with screws, some of them may be located in such places that, upon a cursory examination, they simply cannot be found. Usually, the screws are at the bottom, they hold the bottom of the mouse and the rest of it together. Gently twist everything visible to the eye screws, then jerk the case - if the bottom is still holding something, then you need to find hidden screws, I suggest looking for them, for example, under stickers or overlays. Be sure to disconnect the mouse from the port before disassembling it to avoid any trouble.
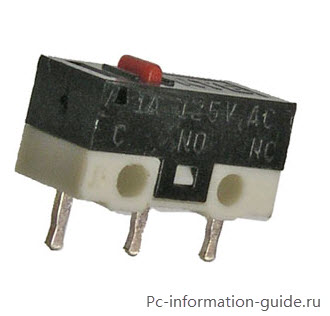
There are different types of computer mice - gaming, office (ordinary), wireless, and so on, but their internal structure is very similar. Regardless of how many buttons the mouse has, each button will have its own microphone. What is noteworthy, these mikriki are identical, which allows them to be replaced in the event of a breakdown. Even under the scroll wheel, there is its own switch.
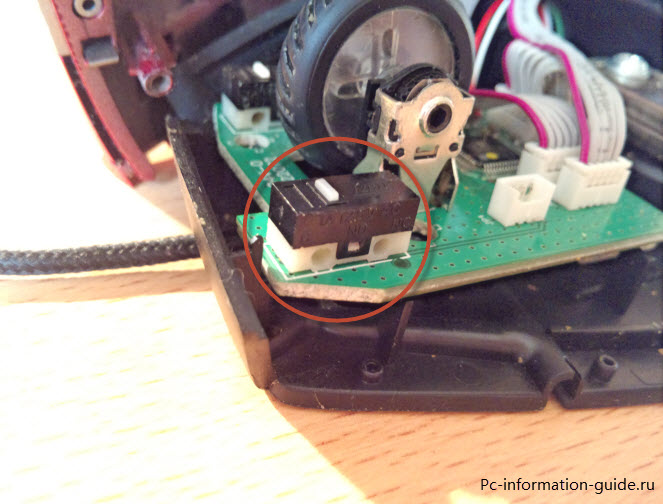
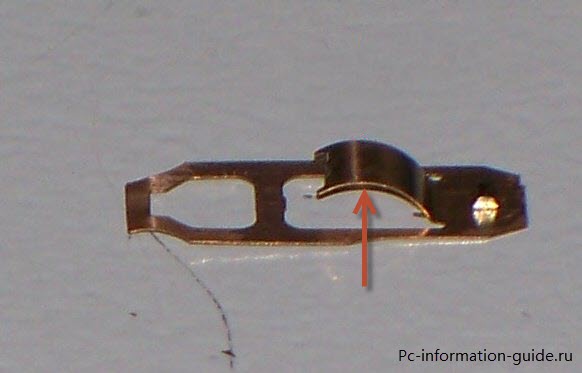
The switch itself consists of two parts, the lower part (base) is attached to the PCB with contact pins by soldering, the upper part is the switch body that covers the inside. Inside the switch is a thin copper plate of a peculiar shape, when it bends under the influence of force - you can hear a click, the same "click" that all mouse buttons usually make. The problem lies precisely in the plate, but to get to it you will need to remove the switch housing.
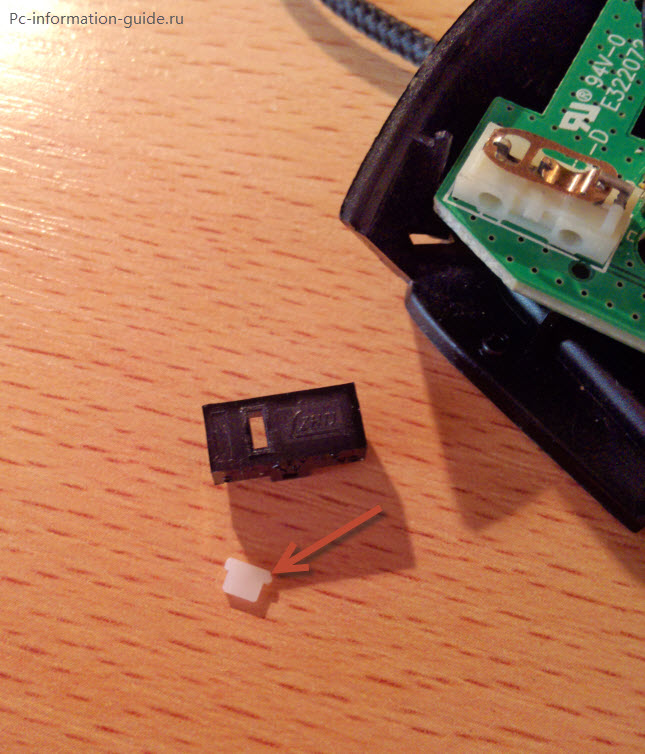
It is best to do this with a thin screwdriver or something else that will be convenient for you to work with. Gently pry the mikrik case from the end, then do it around the entire perimeter of the switch. Be careful, as a result of opening, a small plastic button (in the image it is red) may fall out, this is the part through which the force from your finger pressure is transmitted to the copper plate. The plate is supported by supports, which do not allow her to "walk" within the hull. However, one end of the plate is not rigidly fixed, so to release the plate, you will have to move it slightly to the side.
Great, now. The fact is that over time the metal subsides ("gets tired"), and in a certain position the plate drops so close to the bottom contact that in a split second it makes several closures, as a result of which we can observe multiple windows opening in Windows with one click. For example. It is necessary to turn the plate over, use a screwdriver or other object to slightly bend the "tail" upwards, it is important not to overdo it, otherwise the plate can be broken (copper is very thin).
Now you need to put the plate on the mounts, it is better to start installation with the movable side of the plate... I do not argue that this is not so easy to do, because the detail is very small, but with a certain skill, everything should work out. But installing the plate in place is only half the battle, it is also necessary to install the mikrik case back, since it is fastened to the latches. Before installing the switch body into place, insert the white (or any other color) button into it from the inside so that its narrow part looks up, after that you can snap the case back.
Well, that's all, now it remains only to assemble the mouse back by tightening the screws at the joints. If you did everything correctly, then you don't have to take the mouse for repair or run to the store for a new one. And if suddenly the problems with the mouse recur, now you know what to do. In such a simple way, even you can adjust the hardness of the click by simply bending the plate to the desired distance. Personally, I love it when the click on the mouse button is clear and hard and accompanied by a loud click.
This procedure can be repeated as many times as you like, until the lower part of the mikrik collapses, after all, plastic cannot be called a material resistant to mechanical damage. Also, as an option, you can completely solder the micrik, for example, from an old, but working mouse. But firstly, it will take more time, and secondly, not everyone may have a soldering iron at hand with solder. In addition, you can try to order such switches from the Internet, and if something happens, rearrange the copper plates from there, it will be much cheaper than buying even the simplest mouse. Thank you.
The right mouse button may not work for one of two reasons. Or the mouse is broken and needs to be replaced with a new one. Or the problem is software, drivers, in Windows itself.
Before buying a new mouse, you need to determine the cause of the problem. Even if the mouse is broken, you can fix it at home. Or you can right-click on a dedicated button on your laptop or computer keyboard. How to solve the problem with the not working right mouse button is described in detail here.
What to do if the right mouse button does not work?
The solution to the problem is very simple, you need:
a) solder the right "micrik" (microswitch), taking a spare one from the old mouse;
b) buy a new mouse, 150-200 rubles haven’t ruined anyone yet;
c) go to the boss (husband) and take away the working mouse from him.
It's very simple and it might work!
But seriously, for starters, let's try to call the context menu on the monitor screen not with the right mouse button, but with a key combination on the keyboard.
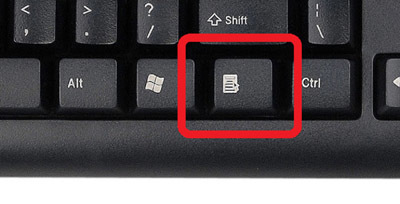
1. You can not click the right mouse button, but press a key from the Hot Keys list "hot Windows keys". To call the context menu, move the mouse cursor to the desired location on the screen and press the special button between the right" Alt "and" Ctrl ". A special symbol" context menu "should be drawn on this button.
Some laptops and keyboards don't have this icon, but there is an FN button. It is painted with a special color and on the top row of buttons F1, F2, F3, etc. special characters are drawn in the same special color. Among these special characters there is a call icon context menu", it must be pressed together with the FN button. If you press the FN button and hold it down, in my case it is Print Screen (you may have another button), then a context menu will appear, similar to pressing the right mouse button.
Show more
2.Right mouse button may not work due to software glitch after installation new program, driver updates, or computer virus... In this case, it is necessary to "roll back the system". Windows has a service that creates restore checkpoints. You need to restore the system to the last checkpoint.
To do this, go to the Control Panel, then along the path "System and Security" - "System" - "Advanced System Settings" - in the window that opens, the "System Protection" tab, here click the "Restore" button. If checkpoints were previously made, then the system can be restored, incl. and restore the functionality of the right mouse button.
3. Before buying a new computer mouse, you can try to fix the old one. To do this, it must be disassembled, cleaned cotton swab moistened with alcohol. You need to clean dust, dirt around the buttons, remove lint, dirt, hairs with tweezers. And then dunk, moisten the button itself on the board with a drop of alcohol or WD-40. If the mouse wheel does not work or does not work well enough, then it should also be lubricated with machine oil. Sometimes a plastic button just sticks mechanically, catches on the case, then you need to slightly tuck the lid, the button will snap into place and work.
Video: Logitech Mouse Right (Left) Button Repair.
4.There is still such Key program Remapper, which allows you to "hang" an action to invoke the context menu on any keyboard button. For example, you can attach a call to the right mouse button click to the "Print Screen" key. There are analogues of this program: MKey, Key Manager, Punto switcher and others like them. You can download Key Remapper for free on the official website. You can remap keys on the keyboard. independently through the Windows registry.
5.Attention, the following advice is only for experienced users... In order to determine that the mouse or computer is faulty, an experiment must be carried out. In the Panel Windows Control, on the path "Hardware and Sound" - "Devices" - "Mouse" you need to find the properties of the mouse. Namely, the ability to swap the functionality of the right and left mouse buttons. To do this, call the mouse properties, open the "Mouse Buttons" tab, put a tick in the "exchange button values" item and press the "Apply" button, not "OK", but "Apply". Now your buttons are swapped. If the right button still does not work, then the mouse is faulty. If the left button stops working, but the right button works, then there is a problem in the Windows software.
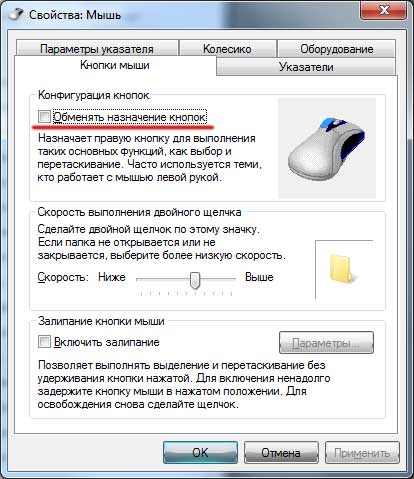
How to exchange mouse button values.
Returning everything back may not work the first time, the right button still does not work. How can you uncheck the "exchange button values" checkbox in this case? To do this, use the Windows "hot keys": "Tab", "Space" and "Inter". Using the "Tab" button, we select (get focus) on the item "exchange button values". Then remove the checkmark with "Space" and press "Inter".
If the "Mouse Properties" window is not active, then you can put it on the top of the screen by pressing the "Alt" + "Tab" keys.
Show more
6.And another tip for Windows XP and 7. If control points did not turn out or none of the above did not help, then it makes sense to look into windows registry along the way and see two branches:
"NoTrayContextMenu" = hex: 00,00,00,00
If instead of 00, you have 01, then this means you are executing the command:
Disable the right-click menu on the taskbar and
Disable the right-click menu on the Desktop.
You can enter the Windows registry through the Run program, in which you need to type "Regedit" and press "Inter".
 Why does the blue screen turn on on the iPhone Blue screen on the iPhone 5s what to do
 Everything you need to know about Apple Music
 How To Set Up An iPhone Like New From Zero - Detailed Instructions