Java Basic Syntax. The main operations of the language. Conditional if statement
Purpose, features and benefits of Eclipse
Eclipse is an extensible IDE (Integrated Development Environment). An IDE is a conveniently organized set of tools needed to work on a software project.
Eclipse is a universal platform that can be used to develop applications in any programming language (for example, you can use Python after installing the Pydev () connection, but Java is native to Eclipse (which, by the way, is written in Eclipse).
This is what conditions serve. To do this, we must define our example. In the end, that is, by closing the loop brace, the compiler takes us back to the beginning of the loop. If we hadn't done this, we would never have entered it. This is fine, since we check the condition before entering the loop! It's very simple: with a loop!
Attention, we will need to reset the response variable to. Here is our program as a whole. You can check this code: you will see that if you do not enter the correct letter, the program will ask you a question like in the following picture! Be careful to write your conditions correctly and check your variables during and in all of your loops in general. Try running the previous program without resetting the response variable and you should see the result! This is called an "endless loop". If you run this program, you will see an astronomical number of "cuckoo 1 time!".
The most important features of Eclipse are:
- Cross-platform. Eclipse runs on all common platforms: Windows, Linux, and MacOS X. More importantly, its functionality is the same on each of these platforms.
- Versatility and extensibility. Eclipse provides the ability to use a variety of third-party tools.
- Openness and gratuitousness. Eclipse is an OpenSource project (i.e. its source codes are available to anyone and anyone can join the development of this tool). Eclipse has an active community constantly working to improve the program and expand its capabilities.
Eclipse workspace
The first thing you see when you start Eclipse is a dialog box that lets you choose where the workspace will be located. Workspace is the directory where your work will be saved.
This will give us the following figure. You could use this syntax as well. It should be noted that there is one loop for loop: well, with this syntax, the increment operator takes precedence over the inequality operator, i.e. the loop increases the value of the variable a, and only after it has done this, it checks the condition!
Indeed, these two loops are not cousins but sisters. Their work is identical in two parts. That is, the test phase of the condition is executed at the end, because the condition occurs after the time. Do not forget, however, or the program will not compile. Apart from these two elements, these hinges work in exactly the same way.
After choosing a workspace, the start page will appear on the screen, with suggestions to see tutorials, examples, etc. Select Workbench and you will be taken to the window working environment (Workbench), in which your further work will take place.
The main components of a workspace are views, editors, and perspectives.
This cycle is a bit peculiar as it takes all of its attributes in its state and acts accordingly. By declaring a variable before the loop, initializing this variable, incrementing it in the loop. This gives the following figure. 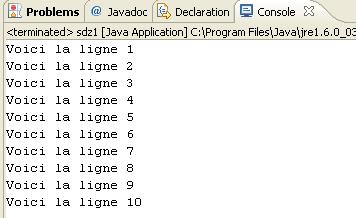
You've probably noticed the presence; In the condition of separating fields. Don't forget them, otherwise the program won't compile.
We can also change the value of the loop, that is, instead of starting from 0 to 10, we will start from 10 until we reach 0. The following figure is obtained. 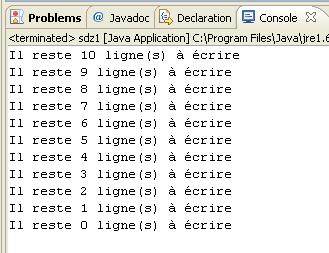
We have a starting number, a condition that must be met to execute the loop again, and an instruction. Note that nothing prevents us from accumulating declarations, conditions and instructions from the end of the loop. Loops allow you to perform repetitive tasks. ... Similar to conditions, if a loop contains more than one line of code to execute, you must surround it with curly braces to clearly define the start and end of the loop.
Representation Is a small section within the workspace that is used to navigate through a certain category of objects (such as resources or packages), open editors, and display properties of active editors. For example, the Navigator view displays projects and other resources, while the Bookmarks view displays all of the bookmarks in the Workbench, along with the names of the files with which those bookmarks are associated. The figure shows the upper right corner of the workspace with the Outline view active.
Error: you can measure the size of an object by serializing it to a stream of bytes and looking at the resulting length of the stream. The reason this doesn't work is because the serialization layout is only a remote reflection of the true layout in memory.
However, at the beginning of everything, we must ask ourselves the basic question, what was the purpose? This language mainly focuses on. Under this password, the permanent code is minimized. These are inherent class members that don't fetch too much code, but they are. After all, they can be used generically. An example of such a tool would be Lombok. The rest of the compiler will run during the bytecode generation phase. However, since nothing is perfect in practice, so is Lombok. Moving further in the concept of language, we come to the nightmare of the programmer, the so-called.
Any changes made to views are immediately saved.
Another type of Workbench visual components - editors, which are used to view and edit some resource (for example, program code). When you select a resource, a suitable editor appears. For example, open any text document (with the .txt extension) using the File -> Open File ... command and you will see a built-in plain text editor. If you type something in this editor, an asterisk will appear on its tab where the file name is written. It means that the editor contains unsaved changes. They will be saved if you press Ctrl + S or select the File -> Save command.
Here, in truth, Javan will say, "We have an optional." Not necessarily much friendlier than null checking every time, but the line length grows at a rapid rate, which unfortunately reduces the readability of the code. Durability and interoperability. ... So many with marketing pros, let's move on to the cons and how it works out in practice.
The new syntax evokes mixed feelings. Looking at the code for the first time in the pool made me a little uncomfortable. The syntax that was originally according to at least a strange reminder of a little return to the roots. In the case of declarations, methods can be read in a clear manner. The problem arises when we use the so-called. It cannot be hidden that the ability to handle checked exceptions is similarly uncontrollable, which greatly improves the readability of your code.
There are many useful views that you can add to the workspace window with the Window -> Show View command. However, instead of adding them one at a time, it is more convenient to switch perspective. Projection(or perspective) Is a collection of views and editors specially tailored to accomplish a task. After launching in Eclipse, the Java perspective opens, configured for the actual writing of the program. The Debug projection is often used to debug a program. You can switch the projection using the Window -> Open Perspective command. The name of the current projection is displayed in the upper right corner of the working environment (see figure).
Declared classes as well as default variables are public and final. The visibility issue can be overridden by the appropriate modifier while the last modifier is open with the modifier. A conditional statement is a project that lets you specify a condition for the execution of a specific piece of code — code that you want to run only if certain conditions are met. General form conditional operator as follows.
A conditional expression also allows you to specify alternate code, that is, code to be executed when the condition is not true. For example, for of this issue the following method is displayed, regardless of whether it is a positive number. Note that the same effect can be achieved by implementing the above method in a completely different way, for example.
The first Java program
Before you start programming, you need to create a project in which Eclipse will store all the resources related to your program.
To create a project, run the command File -> New -> Project. In the window that appears, select Java Project and click Next. Please provide a name for your project. Please note that a folder with the name of your project will be created in the directory you specified as a workspace (unless, of course, you change the settings in this window, which we will not do for the first time). Click the Finish button.
Naturally, the first form. Not only is it succinct in writing, it is also potentially faster as there are fewer comparisons on average. In this case, we can omit the curly braces that include the conditional code. From this lecture, we begin to study object programming using the example of a specific programming language. All these qualities justify the choice of the language as a tool for demonstrating object-oriented mechanisms. However, it should be emphasized that this is not the only option.
There are many possibilities, the creators of each lecture must make a choice. It is important for lecturers not to overlook a basic fact: the chosen programming language is simply a tool for showing examples of object-oriented programming. Language choice, while necessary, is secondary. This concerns the definition of the language as well as the description of the standard libraries. Of course, we will not discuss all of them in the context of our lecture, but we will study examples of a complex and complex class hierarchy.
Your project is now present in the PackageExplorer view on the left side of the workspace. You can delete it at any time by clicking on its name right click mouse and selecting Delete. After that, Eclipse will ask whether to destroy the folder with the project files at the same time (if necessary, you can also destroy it).
If you haven't deleted the project, you can add files and folders to it using the context menu commands New -> File and New -> Folder respectively. If the project is large, then it needs a nested folder structure. But in the case of a Java project, things are a little different. The point is that the fragments of a Java program are grouped into packages and a separate folder is created for each package. The package is created by the New -> Package command. For the package, you also need to come up with a name. As a result, a new folder with this name will be created in the project folder. You can check.
To create graphic user interfaces we'll take for example collections and streams and classes. After these explanations, it's time to start! Other design assumptions were about the portability of the programs. The effect will be the same. In object-oriented languages, functions defined in classes are called methods. A class definition begins with a class word, preceded by additional access modifiers. We will go about the packages. This method name is not random. Method parameters are very strong in most programming languages.
You may find it easier to browse project resources using the Navigator view. Open it with Window -> Show View command. You will see that in addition to the project and package directories, Eclipse has created two auxiliary files, .classpath and .project. They can be easily opened in the editor, but they are not of particular interest to us now.
A Java program always consists of one or more classes... You can create a class using the New -> Class command in context menu Navigator views (or Package Explorer, doesn't matter). When creating a class, you need to select the package to which it will belong (select the package you just created) and come up with a name for it. It is common practice to start class names with an uppercase letter. If you do not follow this rule of good form, Eclipse will issue a warning, but nothing bad will happen.
A sequence of individual parameter declarations is given, and the individual declarations are separated by a separator. Each declaration specifies the name and type of the parameter. Additional specifiers are provided in front of the method type. A static keyword means it is a class method, i.e. a call that does not need a copy of an object of this class. As mentioned earlier, the class corresponds to the type, and the values of the class - instances of that type are objects. We usually call methods on objects, but you can also call methods on a class.
This is especially important in our program, where we have not created any object. This class collected the basic operations and objects associated with standard input and output, and the operating system in which the program runs. Where component can be an attribute or a method. In the latter case, we provide a list of its parameters, enclosed in parentheses. Of course, we can additionally refer to the attributes of an attribute or the result of a method by writing, for example.
For our purposes, it is useful to check the box under "What methods do you want to create in your class?" opposite option public static void main (String args)... As a result, the main () method (function) will be generated in the class body. Java requires at least one of the program's classes to have a method with such a header. It is he who will be executed at the start of the program.
The same syntax is used when describing the attributes and methods of a class. One-line comments start with two forward slashes and end up to the end of the line. Of course, a multi-line comment can fit entirely on one line, and there can even be several such comments on a single line.
Multiline comments cannot be nested. We won't go into details here, sending more interested readers to the language report. Let's just summarize the most important lexical elements. The question of the legitimacy of using identifiers written with national symbols, i.e. not in English, causes a lot of controversy. The author of this text, evaluating other arguments regarding, for example, working in international teams, expresses joy in connection with the fact that, solving in Java, the problem of the wolf, goat and cabbage can be called a variable boat instead of a boat or a boat.
As a result of our actions, a file with the name of our class and the extension .java will be created in the package folder. Eclipse will open a code editor that displays the contents of this file. It will be something like the following (package and class names, of course, may differ):
package mainPack; public class MyClass (/ ** * @param args * / public static void main (String args) ())The commands that make up the body of the function can be written instead of the automatically generated comment // TODO Auto-generated method stub... We will only write one command that will print the classic "Hello, world!" Line to the screen:
This means that every variable, attribute, or parameter has a declared type. The compiler enumerates the types of all expressions in the program and verifies that all operators and methods are used in accordance with their declarations, that is, arguments of the appropriate types. Primary types, reference types. ... Primary types are a group of eight types that contain simple values.
Link types fall into the following categories. Types of classes, types of interfaces, types of arrays. ... Reference types are object references or null. Since it has no name, you cannot even declare a variable of this type. This value can be assigned to any reference type, so you can think of null values as values for each reference type and not worry about the type's existence. Variables are called containers for single values of the type with which they were declared.
System.out.println ("Hello, world!");
It remains to run the program. To do this, execute the Run -> Run command and get a dialog box with non-trivial launch settings. On the left side of this window, select Java Application ( Java application). After a little thought, Eclipse will find our class containing the main () method and offer to start the program from it (on the right side of the window, on the Main tab, the names of our project and our class should appear). In addition to this, a few more tabs are offered to the attention of the programmer. For example, on the second of them - Arguments - it is proposed to enter parameters command line(if the program is designed to be called from the command line with parameters). For our simple program, you do not need to specify anything else. Just click the Run button.
There are seven types of variables. Class variables, copy variables, local variables, array elements, method parameters, constructor parameters, exception handling parameters. Each variable must be declared. Each variable is associated with its type declared in the variable declaration. This type is used by the compiler to check operations on variables. If the compiler detects that the program is using a variable that does not match its type, the program will be rejected as invalid.
As a result, many many errors in programs have already been detected at the compilation stage. Of course, logical errors cannot be detected by the compiler. For the parameters, the preservation of this requirement is obvious. For the other four types of variables, this is more difficult.
As a result of the program's work, data is output to the so-called console. V operating system The MS DOS console was the entire monitor screen. Eclipse opens the Console view to us, in which (if everything is done correctly) the line "Hello, world!" is the output of our program.
Now, to restart the program (for example, if we decided to make some changes to it or need to show it to the teacher), you can go the easier way - execute the command Run -> Run Last Launched (run the previous application again) or just press Ctrl + F11.
Java syntax basics
Definitions
Operand is the value involved in the operation.
A method (function) is a part of a program that has its own name. This name can be used as a command in a program (such a command is called a method call). When a method is called, the commands that it consists of are executed. A method, similar to an operation, can return a result value.
An expression is a sequence of operations and method calls executed in a certain order (by priority of operations, taking into account parentheses), which gives a certain value during calculation.
Variable is a named area of computer memory in which a program can store data of a certain type (called variable value) and access this data using the variable name.
Program and algorithm concepts (repetition)
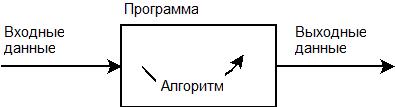
Appointment any computer program- transformation of input data into output data. The program algorithm determines how the input data is converted to output data.
Input data can come from a variety of sources. In educational projects, these data are most often entered while the program is running using the keyboard and mouse. In real programs, they can also be obtained from files, databases, networks, directly from various sensors, etc.
The output data (the result of the program's work) is most often displayed on the screen, but it can also be saved to a file or database, sent to the network. Embedded programs generate special escape sequences as output that cause the device to which the program is associated to perform some action.
Getting started writing a program MUST UNDERSTAND:
- What is this program for at all (what does it do, in general terms)?
- What input data does this program have (and where does it come from)?
- What is the output of this program (and where to send it)?
- How should the input be converted to output (algorithm)? This is the most difficult part of a programmer's thinking, but while there is no answer to the three previous questions, it makes no sense to start it.
When writing a simple program, you need to:
- Get input.
- Implement an algorithm for converting input data into outputs.
- Output the result of the program's work (output data): display it, send it over the network, etc.
When working with complex software projects, it is necessary to conduct a detailed analysis of the requirements for the program (for which you may need to communicate a lot with the customer), perform the design (determine which parts the program will consist of, how these parts will interact with each other, display various aspects of the structure and behavior of the program in the form of diagrams, etc.). But in any case, start programming without understanding the input and output data and without understanding in general terms the essence of the algorithm pointless... And think at least in general terms of the essence of the algorithm, without knowing the input and output data impossible.
Therefore, always start your exercises by defining the inputs and outputs. If you have any difficulties in this matter, contact your teacher.
Literature on the topic:
Basic Algorithm Constructions (Repetition)
Attention! At this stage of training, you should already have knowledge of this topic. If they are not there, and the materials for repetition are incomprehensible or insufficient, you will not cope with the tasks! It is urgent to consult the literature on this topic.
So, an algorithm is a sequence of actions to transform input data into output.
The algorithm can be written in three main ways:
The individual steps of the algorithm (regardless of how it is written) are linked to each other using three standard constructs that are implemented in absolutely all programming languages:
Sequential execution. The steps are performed one after the other.
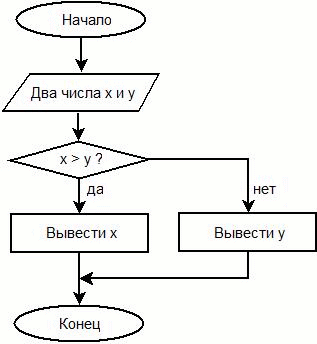
Branching. Depending on the fulfillment of a certain condition (in the considered example, is it x> y?), One or another branch of the program is executed.
Cycles. The sequence of steps of the program is performed several times. In fact, the loop is based on branching (the condition for exiting the loop is checked), but if this condition is not met, control is transferred to the beginning of the loop (back to the already completed step).
Consider a problem: display all even numbers less than 10. For this problem, you can use an algorithm based on sequential steps and an algorithm that uses a loop. Diagrams for both options are shown in the figure:
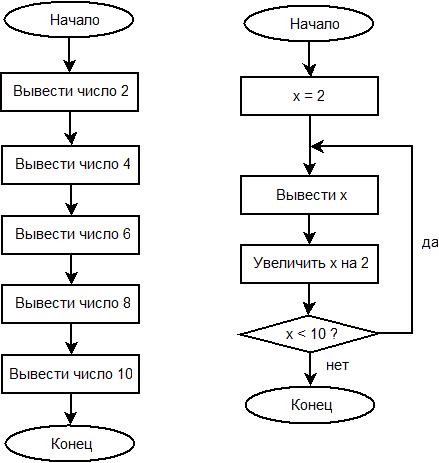
The first diagram looks clearer, but in the case when you need to display not 5 numbers, but 100, the diagram (and the program corresponding to this algorithm) will increase 20 times, and in the program corresponding to the second algorithm, only one place will change: 10 will change to 100 That is why repetitive actions are designed in the form of cycles, although in many cases they can be dispensed with.
Remember: the algorithm should be built from only three named constructions!
Literature on the topic:
1. School textbook of computer science.
The basics of Java syntax basics
- The Java language distinguishes between uppercase and lowercase letters. This means that the names of all functions and keywords should be written exactly as they appear in the examples and reference books.
- Every command (operator) in the Java language must end with a semicolon.
- A Java program consists of one or more classes... Absolutely the entire functional part of the program (i.e. what it does) should be placed in methods certain classes. (Class and method, as an object-oriented programming concept, will be covered in Lesson 3. Class syntax will also be covered. In the first exercises, use the classes that Eclipse generates by default.)
- Classes are grouped into packages.
- At least one of the classes must have a main () method, exactly the same as in the example we have considered. (At first, it is not necessary to understand or try to remember the correct spelling of this method - Eclipse will generate everything itself if you check the necessary box.) This method will be executed first.
In the simplest case, a program can consist of one (or even none) package, one class within a package, and a single main () method within a class. Program commands will be written between the lines
public static void main (String args) (and a closing curly brace) indicating the end of the method body. This approach should be followed when performing the simplest exercises.
Comments (1)
Comments are explanatory labels that programmers use to improve code comprehensibility. When compiling a program, comments are ignored, so anything can be written in them. The main thing is to show that this inscription is a commentary and should not be interpreted as program commands. In Java, this is done in one of the following ways:
- Two forward slashes // are inserted. From now on until the end of the line, you can write whatever you want - Java will treat it as a comment.
- At the beginning of a comment, characters / * are placed, and at the end - * /. In this case, the comment can span any number of lines.
- Highlight comments for documentation that are placed between markers / ** and * /. Their use will be discussed later.
Literal writing rules
about different forms of writing literals
Integers (integer literals) in Java can be written in the usual way in decimal form: 12345, +4, -11.
In addition, you can write integers in octal form, starting from zero (0777, -056) and in hexadecimal form, starting from zero and the Latin letter x (0xFFFF, 0x14, 0xA1BC).
Valid literals are written in decimal notation, with the integer part separated from the decimal point.
A real number can be written floating point, for example: 5.4e19, 17E-11, -123e + 4. The part of the number that comes before the letter e is called the mantissa, and the part that comes after the letter e is called the order. The notation means the following: you need to raise 10 to the power of the order and multiply by the mantissa. Sometimes it is actually more convenient to write 1e-9 than 0.000000001.
Single characters are written in apostrophes, for example, "a", "D", "@".
There are some special and control characters that are written using a special escape sequence. The most common ones are listed in the table:
Escape sequences are also enclosed in apostrophes.
The first line of the table says that any character can be specified using its code (with decimal encoding from 0 to 255) by writing this code in octal number system. For example, the letter "g" in the CP1251 encoding will be written with the escape sequence "\ 346"
If necessary, you can specify the code of any character in Unicode encoding- after the backslash and the Latin letter u - in four hexadecimal characters. For example, "\ u0055" is the letter U.
Character strings are enclosed in quotation marks. The opening and closing quotation marks must be on the same line of code.
For strings, the concatenation operation + is defined, which allows you to collect several strings into one ("attributing" them to each other).
If the string constant is too long and poorly readable in program code when writing it in one line, you can write it in several lines, concatenating them using the operation of concatenation of strings. For instance:
"This is a very long string constant written by" + "on two lines of source"Control characters and codes are written inside a string in exactly the same way as backslash(but no apostrophes).
Boolean literals are true and false.
Identifiers
about the rules of good style
When programming, there is a constant need to come up with identifiers for naming objects.
The identifier can consist of letters, numbers, underscore _ and dollar sign $ (the latter is not recommended, Java uses it for its own needs). The identifier cannot start with a digit. Java keywords (nor literals true, false and null).
As noted above, the Java language distinguishes between simple and lowercase letters... This means that myAge, myage and MyAge are names of completely different objects. Be careful: a register error is a very common case!
Class names begin with an uppercase letter; if the name consists of multiple words, then each word begins with an uppercase letter. For example: MyClass, Book.
Method and variable names begin with lowercase (small letters); if the name contains several words, then each next word begins with a capital letter. For example, myVar, x, y, newBigCounter.
Constant names are written in full capital letters; if the name contains several words, an underscore is placed between them. For example PI, COUNT_OF_MONTHS.
There are many benefits to using these guidelines. One of them is that you will know exactly how to place uppercase and lowercase letters when using standard Java libraries, the developers of which adhered to the recommendations.
Data types
about Java data types
The int type is most commonly used to store integers in Java.
In general, there are four integer types in the Java language: byte, short, int, long. They differ in the amount of memory that will be allocated for the variable and, accordingly, in the range of values that can be stored in this variable. The most commonly used int type occupies 4 bytes in memory and is suitable for storing numbers from -2147483648 to 2147483647. The byte type consumes the least memory and is suitable for working with small numbers (from -128 to 127). The short and long types are 2 and 8 bytes respectively.
The double type is suitable for real numbers.
Real (real) numbers (or floating point numbers) are represented by two types: float and double. The float type takes up 4 bytes of memory and does not provide a high degree of precision when dealing with very large or very small numbers. It is recommended to use it when the fractional part is needed, but high accuracy is not required (for example, for measuring distances in meters, but taking into account centimeters and millimeters, or measuring prices in rubles, taking into account kopecks). If more accurate calculations are required, it is recommended to operate with values of the double type (for example, such a variable can store the value of the sine of an angle).
Valid literals such as 5.3, 8.0, 2e-3 are considered by Java to be double. If they are to be used as floats in a program, they must end with the letter f: 5.3f, 8.0f, 2e-3f.
The char type is used to store single characters. Java considers it to be a kind of integer type (since each character is specified by its own Unicode code), so all integer operations apply to char.
Boolean values (either true or false) are represented by the boolean type.
Thus, Java defines eight simple types, the features of which are presented in table:
Declaring Variables
In Java (as in many other languages), you need to describe it before using it. To describe a variable is to give it a name and define its type.
When declaring a variable, the type is indicated first (which can be one of the simple types, the name of a class or interface), then the name of the variable. If a variable is needed initialize(assign initial value), the initial value is specified after the name through the equal sign. Several more can be declared separated by commas variables of of the same type.
Variable declaration examples:
int x; // Declare an integer variable x double a, b; // Declaration of two real variables a and b char letter = "Z"; // Declare a character variable letter, initialized with an initial value of "Z" boolean b1 = true, b2, b3 = false; // Declare three boolean variables, the first of them will be true, the last will be falseBasic operations of the language
Variables and can participate in (from which, in turn, complex ones can be built). Let's consider the simplest operations Java language.
Mathematical operations
Comparison operations, the result is a boolean value: true or false
Logical operations
about Java operations
&& and || differ in that the value of the second is not necessarily calculated. For example, && evaluates the value of the first operand and, if it is false, immediately returns false, while || returns true immediately if it sees that the first operand is true. Java has similar operations & and | , they evaluate the values of both operands before performing an operation on them.
Shift operations
(work with the bit representation of the first operand)
Bitwise operations
(work with bit representation of operands)
Operation?:
Operation ?: ternary, that is, it has three operands. The first operand is a condition, a boolean expression. The second and third operands are expressions of any other type. The operation works as follows: if the condition is true, it returns its second operand as a result, and if false, then the third.
For example, the expression (5> 3)? 7 + 1: 2 * 2 would be 8, but expression (5 == 3)? 7 + 1: 2 * 2 - value 4. This notation does not look very descriptive, but programmers often use it to shorten their code. So, instead of a sequence of commands:
if (x> 0) y = 45 + a * 2; // if statement is discussed below else y = 45 - b * 3;you can write:
Y = 45 + ((x> 0)? A * 2: -b * 3);
Assignment operator
After the variable is described, you can work with it in the program. In particular, it can be assigned a value of the appropriate type. Then, in the future, when using this variable in any expression, this current value will be automatically substituted for it.
The value is associated with a variable using an assignment. In Java, it is written with a simple equal sign:
Variable = expression;
To the left of the assignment operator is always a variable. on the right must match the variable by type. It can be as simple as (for example, a number or a symbol):
X = 7; // variable x is assigned the value 7 letter = "Q"; // letter is set to "Q"
In general, an expression is something that can be calculated (for example, the result of a mathematical operation or the result returned by some method):
A = 7.5 + 2.4; // variable a is assigned 9.9 as a result of calculations
In addition to literals, other variables can participate in an expression. Their current value is substituted for them. As a result of the command:
B = a + 1;
variable b will be set to 10.9.
So, the assignment operator works as follows. First, the value of the expression on the right side is evaluated, and then the result is assigned to the variable specified on the left side. Even the following situation is possible:
X = x + 4;
This command increments the current value of the integer variable x by 4.
And the following commands are not written correctly and will not work:
5 = x + 7; // there should be a variable on the left x + 3 = 14; // there should be just one variable on the left x = 4.5; // variable x can only take integer values
Eclipse will try to indicate the error in these lines before executing the program by placing warning signs in the margin of the code editor. You can see how he does it.
about type casting
When a variable of one type is assigned a value of another type, it is used casting (conversion) of types... For numeric types (byte, short, int, long, float, double, char) it happens automatically if the type of the variable being changed can "accommodate" a value of another type.
For example, if a variable of type int is assigned a value of type byte, the conversion from type byte to type int will automatically occur. Similarly, the float type can be cast to the double type, etc.
If you try to assign a variable of a less precise type (for example, byte) a value of a more precise type (for example, int), the compiler will generate an error message.
For type casting, you can use cast operator- before the expression for which we want to perform the type conversion, parentheses are placed with the type to which the conversion is performed, inside the parentheses. When casting a higher precision integer type to a lower precision integer type, modulo division can be performed by the allowable range of the type to which the casting is performed, and when casting a double expression to a float expression, the precision of the expression will be reduced.
long j = (long) 1.0; // use the casting operator to long, j = 1 char ch = (char) 1001; // use the casting operator to char, ch = "d" byte b2 = (byte) (100); // use the operator of type casting from int to byte, b2 = 100 byte b3 = (byte) (100 * 2); //Attention! modulo division occurs, b3 = -56The type mismatch error often occurs when applied to valid literals. For example, you cannot perform the assignment a = 7.5 + 2.4; if the variable a is of type float, since literals 7.5 and 2.4 are considered to be of type double. To avoid an error, you must use typecasting:
A = (float) (7.5 + 2.4);
or to indicate that literals are also float:
A = 7.5f + 2.4f; // this is also a valid command
Almost every binary operation has its own kind of assignment operator. For example, for the addition + operation, there is a unary assignment operator + =, which increases the value of the operand by a given amount:
X + = 8; // same as x = x + 8 (x increases by 8)
Similarly for other operations: operators * =, - =, / =,% =, & = ^ =, etc.:
X * = 3; // same as x = x * 3 (x increases by 3 times) b1 ^ = b2; // same as b1 = b1 ^ b2
Exercise 1
Declare two integer variables, assign any values to them. Print their sum and product.
Clue: you can use the project already created in Eclipse by pasting required commands after the command to output the line "Hello, world!" or instead of it.
Increment and decrement operators
about the increment and decrement operators
The increment and decrement operators ++ and –– increment and decrement the value of the operand by one. It is much more convenient to use the x ++ command; instead of the command x = x + 1;
The increment and decrement operators also return a value. This means that it is legal to execute the command
Y = 7 * x ++;
As a result, the variable x will increase by 1, and the variable y will take on a value seven times the old value of x. You can also run the following command:
Y = 7 * ++ x;
As a result, the variable x will increase by 1, and the variable y will take on a value seven times the new value of x.
Conditional if statement
The simplest form of writing a conditional operator is:
if (condition) commandThe parenthesized condition is a boolean expression, i.e. can be true or false. If the condition is true, the command will be executed, otherwise nothing will happen. For instance:
if (x // if the value of the variable x is less than 17, assign x to 17If it is necessary that in the case when the condition is false, some other command is executed, use the extended form of the if statement:
if (condition) command1 else command2about the else if construction
In the example above, we might want to assign the variable x to 5 if the condition x is not executed (why do we need it, another question).
if (x else x = 5;If it is necessary to use several mutually exclusive conditions, they can be written as follows:
if (condition1) command1 else if (condition2) command2 else if (condition3) command3 ... else commandNExercise 2
Declare two integer variables, assign any values to them. Use an if statement to find and output the maximum of them.
Clue: the algorithm for finding the maximum was considered while repeating the basic constructions of the algorithm.
Compound Commands
Multiple Java language commands can be combined into one compound command using curly braces (). For example, you can write:
(a = 12; letter = "D";)
Compound commands can be used wherever regular commands are. For example, in an if statement, if several actions need to be performed when a condition is met:
if (x "S";) else (x = 5;)The curly brace construction is also called block of commands and the curly braces are block boundaries.
Note that the notation used in the example (when the boundaries of the block are placed on separate lines, and the contents of the block are written indented from its boundaries) is optional. It's just a style rule to make programs easier to understand and not get confused by the curly braces that are common in Java programs.
about the switch selection statement
Switch selection statement
Often the choice of the command to be executed depends on the value of some variable (or expression). For example, the user is prompted to enter an operation sign and, depending on the entered character, it is required to display the result of addition, subtraction, etc. or, if an incorrect character is entered, an error message. In this case, it is convenient to use the switch selection statement, which has the following notation:
switch (expression) (case value1: command sequence 1 break; case value2: command sequence 2 break; ... default: default command sequence)Value1, value2, etc. are constants or expressions that involve only constants. Expression in brackets after keyword switch can contain variables. This expression is evaluated, and then the result is matched against one of the values after the case keyword. If such a match is found, then the entire sequence of commands located between the colon and the nearest break command is executed. If no match is found, the default sequence of commands following the default keyword is executed. For instance:
char oper; // Operation sign, it will be selected by the user ... // Let's assume that by this moment the user has selected the sign switch (oper) (case "+": System.out.println (a + b); break; case "-": System.out.println (a - b); break; case "*": System.out. println (a * b); break; default: System.out.println ( "Invalid transaction sign"); }You can omit the default section. In this case, if no match is found, no command will be executed.
While loop statement
The while loop has the following form:
while (condition) commandIf the parenthesized condition (representing a boolean expression) is true, the command will be executed - loop body(it can be a simple command or a sequence of commands in curly braces), after which the program will return to the execution of this statement again and will repeat this until the condition turns out to be false.
Therefore, so that the program does not enter an infinite loop and does not freeze, the loop body must provide for an exit option, that is, for example, commands in the loop body must somehow affect the variables included in the condition.
For example, the following code snippet prints even numbers from 2 to 10:
int x = 2; while (x<= 10){ System.out.println(x); x += 2; }about while loop with postcondition
There is another way to write a while loop:
do command while (condition)When using this option, the command is executed first, and then the condition is checked. Both options work the same way, but in the second case, the loop body (command) will be executed at least once, even if the condition is initially false.
Exercise # 3
Use a while loop to print all odd numbers from 1 to 10.
Clue: slightly change the algorithm for outputting even numbers.
For loop operator
The for loop is usually used when it is known in advance how many times the execution of a command (or a sequence of commands) should be repeated. It has the following form:
for (init command; condition; jump command) loop-bodyBefore the start of the cycle, the initialization command is executed. Then the jump condition (which is a boolean expression) is checked. If this condition is true, the command (or block of commands in curly braces) that makes up the body of the loop is executed. Then the jump command is executed and everything starts over. The jump instruction usually modifies the variable that affects the truth of the condition, and the initialization instruction is the description of this variable.
Typically a for loop is used like this:
for (int i = 1; i<= 10; i++) тело_цикла;In this example, loop_body will be executed exactly 10 times. In this case, at each iteration, the variable i will be available (it is called the loop variable), which sequentially runs through the values from 1 to 10. The next program fragment outputs even numbers from 2 to 10 (similar to the while loop example):
for (int i = 1; i<= 5; i++) System.out.println(i*2);Exercise 4
Use a for loop to print all odd numbers from 1 to 10.
Break and continue statements
When the body of the loop (for or while) consists of several commands, a situation may arise that there is no need to execute all of them at the next iteration. In this case, the break and continue statements are useful.
The break statement terminates the execution of the current loop, regardless of whether its termination condition is met.
The continue statement terminates the execution of the current loop iteration. That is, if this operator is encountered in the body of the loop, then the rest of the following commands are skipped and a new iteration (repetition) of the loop begins.
Conclusion
Despite the fact that the material of the first lesson is quite extensive, it should not cause difficulties for students who are already familiar with at least one programming language, since the constructions in all languages are the same and you just need to master the rules for writing them (syntax). If the acquaintance with other programming languages has been weak, you need more homework on the manual and the solution of additional tasks. The best option in this case would be to read the recommended chapters from the literature before the next lesson.
additional literature
1. Vyazovik N.A. Java programming. (chapters 1 - 4, 7, 10)
2. Khabibullin I.Sh. Java Self Tutorial 2. (Chapter 1)
Pay special attention to the Java datatypes and casting rules, which are not covered in detail in this tutorial. A professional programmer should always control in his programs the possibility of a variable value going beyond the range allowed for its type. Typecasting errors are one of the most common and difficult to detect. Chapters 4 and 7 of the first book are highly recommended reading for all students applying for an excellent grade.
JSP pages have a combined syntax: a combination of the standard syntax that conforms to the HTML specification and the JSP syntax that is defined by the Java Server Pages specification. JSP syntax defines the rules for writing JSP pages, which are composed of standard HTML tags and JSP tags. JSP pages, in addition to HTML tags, contain JSP tags of the following categories:
JSP directives
Directives provide global information regarding specific requests to the JSP and provide information needed during the translation phase.Directives are always placed at the beginning of the JSP page before all other tags, so that parser(parser) JSP, when parsing the text, at the very beginning, highlighted the global instructions. Thus, the JSP Engine (JSP runtime) parses the code and creates a servlet from the JSP. Directives are messages to a JSP container. Syntax directives The JSP looks like this:
<%@ директива имяАтрибута="значение" %>Task syntax directives in XML:
- page (page)
- taglib (tag library)
- include (include)
Page directive
Directive page defines the properties of the JSP page that affect the translator. Order of attributes in a directive page irrelevant. Violation of syntax or presence of unrecognized attributes results in a translation error. An example of a directive page the following code can serve:<%@ page buffer="none" isThreadSafe="yes" errorPage="/error.jsp" %>This directive declares that this JSP page does not use buffering, that it is possible for multiple users to access this JSP page at the same time, and that an error page named error.jsp.Directive page may contain information about the page:<%@ page info = "JSP Sample 1" %>List of possible directive attributes page presented in the table.
| Attribute name | Meaning | Description |
|---|---|---|
| language | Line | Determines the language used in JSP file scriptlets, expressions, or any include files, including the body of translated code. The default is "java" |
| extends | Line | Specifies the superclass for the generated servlet. This attribute should be used with great care as it is possible that the server is already using a superclass. |
| import | Line | Definition of packages to import, for example: & lt% @ page import = "java.util. *%> |
| Session | true or false | Meaning true(default) indicates that a predefined variable session(type HttpSession) must be bound to an existing session, if any, otherwise a new session is created and bound to. Meaning false determines that sessions will not be used, and attempts to access a variable session will result in an error when translating the JSP page to the servlet |
| Buffer | none or the size of the buffer in kB. | Sets the buffer size for the JspWriter out. The default value depends on the server settings and should not exceed 8 kB. If the value is none the output goes directly to the object |
| autoFlush | true or false | Determines whether the buffer should be emptied automatically when it overflows or an error occurs. The default is true |
| isThreadSafe | true or false | Meaning true(the default) specifies the normal execution mode of the servlet, where multiple requests are processed concurrently using a single servlet instance, assuming that the author has synchronized access to the variables of that instance. A false value signals that the servlet should inherit SingleThreadModel(single-threaded model) where sequential or concurrent requests are handled by separate instances of the servlet |
| info | Line | Defines a string of information about a JSP page that will be accessed by the method Servlet.getServletInfo () |
| errorPage | Line | The attribute value is the URL of the page that should be displayed in case of possible errors that cause exceptions |
| isErrorPage | true or false | Signals whether this page can be used to handle errors for other JSP pages. The default is false |
| contentType | Line | Specifies the encoding for the JSP page and response, and the MIME type of the JSP response. The default value of the content type is text / html, encodings - ISO-8859-1. For instance: contentType = "text / html; charset = ISO-8859-1" |
| pageEncoding | Line | Determines the character encoding of the JSP page. The default is charset from attribute contentType if it is defined there. If the value charset in attribute contentType undefined, value pageEncoding is set equal ISO-8859-1 |
Taglib directive
Directive taglib declares that the given JSP page uses a tag library, uniquely identifies it with a URI, and maps the tag prefix with which the library can be acted upon. If the container cannot find the tag library, a fatal translation error occurs. Directive taglib has the following syntax:<%@ taglib uri="URI of the included tag library"prefix =" prefix name"%> Prefix" prefix name"is used when referring to the library. An example of using the tag library mytags: <%@ taglib uri="http://www.taglib/mytags" prefix="customs" %> . . .Include directive
Directive include allows you to insert text or code while translating a JSP page into a servlet. Directive syntax include looks like this:<%@ include file="The relative URI of the page to include"%> Directive include has one attribute - file... It includes the text of the specified resource in the JSP file. This directive can be used to place a standard copyright header on every JSP page:<%@ include file="copyright.html" %>The JSP container accesses the include file. If the include file has changed, the container can recompile the JSP page. Directive include treats a resource, such as a JSP page, as a static object. The given URI is usually interpreted relative to the JSP of the page on which the link is located, but, as with any relative URIs, you can tell the system the position of the resource of interest relative to the home directory of the WEB server by prefixing the URI with a "/" character. The content of the include file is processed as plain JSP text and therefore can include elements such as static HTML, script elements, directives, and actions. Many sites use a small navigation bar on every page. Due to the problems of using HTML frames, this task is often solved by placing a small table on top or in the left half of the page, the HTML code of which is repeated many times for each page of the site. Directive include- this is the most natural way to solve this problem, saving the developer from the nightmare of the routine of copying HTML into each separate file. Since the directive include includes files during page translation, then after making changes to the navigation bar, re-translation of all JSP pages using it is required. If the attached files change quite often, you can use the action jsp: include that connects the file when accessing the JSP page.JSP declarations
Declarations (Declarations) are intended for defining variables and methods in the scripting language, which are later used on the JSP page. Syntax declarations looks like this:<%! код Java %> ads are located in the declaration block and are called in the expression block of the JSP page. The code in the declaration block is usually written in Java, but application servers can use the syntax of other scripts. ads are sometimes used to add additional functionality when working with dynamic data obtained from properties of JavaBeans components. Examples of ads are presented in the table. Announcement can contain multiple lines, such as in the below code for calculating the value of a function fact (int n), which should be equal to 1 when n is less than 2 and n! with a positive value of n;<%! public static int fact (int n) { if (n ads do not produce any output to standard output out... Variables and methods declared in announcements, are initialized and made available to scriptlets and other ads at the time the JSP page is initialized.JSP Scriptlets
Scriptlets include various pieces of code written in the scripting language defined in the directive language... Code snippets must comply with the syntactic constructs of the language scriptlets, i.e., usually the syntax of the Java language. Scriptlets have the following syntax:<% текст скриптлета %>Syntax equivalent scriptlet for XML is:If in the text scriptlet it is necessary to use the sequence of characters%> exactly as a combination of characters, and not as a tag - an end sign scriptlet, instead of the sequence%>, use the following combination of characters% \>.The JSP specification provides a simple and straightforward example scriptlet that dynamically changes the content of the JSP page throughout the day.<% if (Calendar.getInstance ().get (Calendar.AM_PM) == Calendar.AM) {%>Good morning<% } else { %>Good Afternoon<% } %>It should be noted that the code inside scriptlet inserted as written and all static HTML text (template text) before or after scriptlet converted using the operator print... This means that scriptlets do not have to contain completed Java chunks, and that chunks left open can affect static HTML outside of scriptlet. Scripts have access to the same auto-defined variables as expressions. Therefore, for example, if there is a need to display any information on the page, you must use the variable out. <% String queryData = request.getQueryString (); out.println ("Дополнительные данные запроса: " + queryData); %>
JSP expressions
Expression in a JSP page is an executable expression written in the scripting language specified in the declaration language(usually Java). Result expressions JSP of required type String, sent to standard output out using the current object JspWriter... If the result expressions cannot be cast String, either a translation error occurs if the problem was detected at the translation stage, or an exception is thrown ClassCastException if the inconsistency was detected during the execution of the request. Expression has the following syntax: & lt% = expression text%> alternative syntax for expressions JSP when using XML:- request, HttpServletRequest;
- response, HttpServletResponse;
- session, HttpSession - associated with the request, if any;
- out, PrintWriter - a buffered version of the JspWriter type for sending data to the client.
 How to download videos from Yandex Disk to iPhone: an easy way
 License Agreement for the terms of use of the Dr software
 Airyware Tuner - the best tuner in your smartphone Application for tuning guitar on Windows background