How to disable keyboard on asus laptop. Tips on how to disable the keyboard on a laptop
If there is a need to protect the laptop from animals and children, it will be useful to know how to disable the built-in keyboard on a laptop. Let us consider in detail the methods by which you can disable the keyboard on the most common versions of the OS.
We use specialized programs
The easiest method is to install on a laptop special utility. The most popular free programs:
- Toddler Keys;
- childlock;
- Blok.
They are suitable for any version of the OS, they are easy to use. For example, let's look at how you can disable the keyboard Windows laptop 7, 8, 10 using the first program in the list.
- We download the program.
- After the installation is completed, you need to click right click touchpad on the TK icon (in the tray);
- The menu will appear. We need to uncheck the Lock Drive Doors and Disable Power Button items.
- Next, you will need to click on the Lock Keyboard line.
It is worth noting that thanks to this program, you can block both the entire keyboard and individual keys. If desired, the user can also block the button, which is responsible for the power and function of the drive.
Windows 7: disable the keyboard
Important: the method presented below for Starter, Home Premium, Home Basic editions requires the local editor to be installed first. group policies.
In order to disable the keyboard without using third-party utilities, you can do the following:
- through the control panel go to the "Device Manager" section;
- click on the "Keyboard" item;
- choose the standard option;
- after that, you will need to open the "Properties" section and go to the "Details" section;
- then copy the value specified in the “Equipment ID” item;
- press Win + R and enter the following: gpedit.msc, then press the OK button;
- now we act sequentially: Politics " local computer»- Computer Configuration-Administrative Templates-System-Device Installation-Restrictions on device installation;
- now on the right we are looking for a line that has the name "Prohibit the installation of devices with the specified device codes", right-click on it on the touchpad, and select the value "change";
- then set the "enable" mode, then click "show";
- a window will open in which you will need to paste the previously copied information, after that we press the confirmation button;
- on the left you will see the line "Also apply to the corresponding devices that have already been installed" - you need to mark it and press the confirmation button;
- now you will need to go to the device manager again, delete the built-in keyboard there, then reboot the laptop.
Are you thinking about how to block the keyboard on a laptop if you have an operating Windows system 8? You can do this using the Group Policy Editor. The instruction is identical to the method that was described earlier.
What should I do to turn off the backlight and number printing mode?
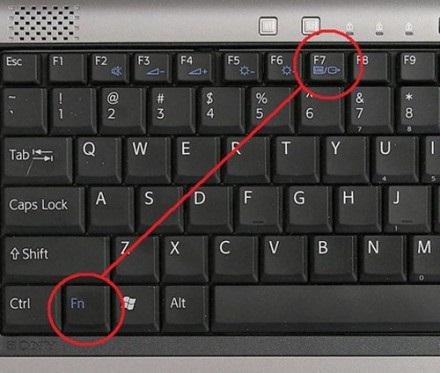
This function is tied to a set of specific buttons - they may vary depending on the laptop model. For example, if you have Lenovo, you should try the Fn + Spacebar combination. Read the instructions, or search Google for variations of turning off the backlight (do not forget to enter the brand of the laptop) - this is the fastest and most convenient option.
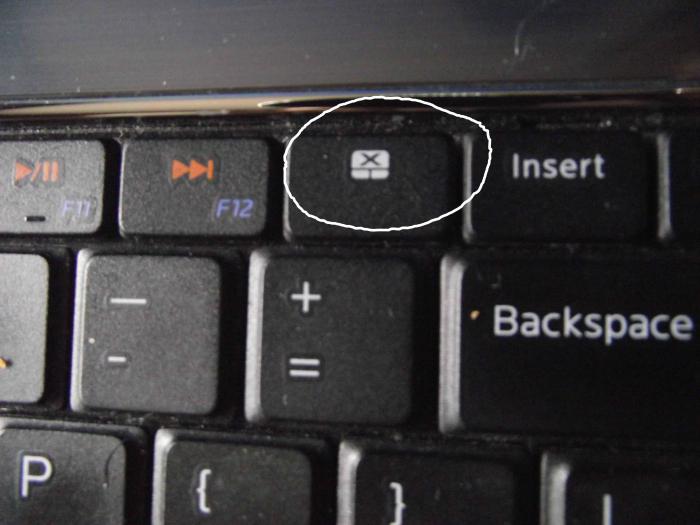
Another question that worries many users is how to turn off the mode in which numbers are printed instead of letters. This phenomenon indicates that you accidentally activated the mode Num Lock. You can turn it off by pressing Fn + F11, Fn + Num Lock, or just the Num Lock button on the keyboard.
AT-Service - perhaps the best service center in St. Petersburg. We change screens on laptops - . Lenovo branded laptop repair - with a guarantee.
Sometimes the owners laptop computers wondering how to disable the keyboard on a laptop. It can arise for various reasons. For example, when it is inconvenient for certain actions due to its small size. In order to disable the laptop keyboard, you can use one of several methods that we will now consider.
manual method
Let's start the review by physically disabling the keyboard. The keyboard is connected to motherboard using loops. If you need to know how to turn off the keyboard, then you should prepare in advance that you have to disassemble the laptop.
Each device has a specific architecture, and, accordingly, the cable from the keyboard to the motherboard can be installed in different places.
So, if you decide to remove the keyboard, then the first thing you need to do is open back cover laptop. After that, you need to carefully examine the device and then you may be able to determine where the cable is located. Of course, in some devices, even opening the back cover, it is impossible to see it, but in this case, you just need to download a diagram of your device model, which will show where the cable is located.
Be sure to remember that you have to work carefully and carefully, since even the slightest damage or just a scratch on the motherboard can completely disable the device. Let's say you have already learned how to disable the keyboard on a laptop and have done all the necessary steps. But do not forget that now you will need to install it back, and accordingly, it is better to remember all the steps.
For convenience, we recommend that you take a picture of the location of the cable before turning it off. After the keyboard is removed and you need to install it back, all steps must be performed in reverse order in strict sequence. Of course, this type of work is recommended to be trusted by specialists.
OS
 Now let's look at the option of how to disable the keys on the keyboard in the Windows operating system. Perhaps this method is the simplest, and now we will talk about how the shutdown is performed.
The the way is fine only for operating system"Windows 7", if you have another system installed, then you'd better use additional program or editor. You can disable the keyboard using this method both for a long time and before rebooting, only you should make a choice here.
In order to disable the keyboard at one time, you need to go to the "Start" menu and run there command line, and then enter the special command "rundll32 keyboard, disable".
If you need to disable the keyboard for a long time, then go to the "Control Panel", then to the "Device Manager" and there we find the "Keyboards" section. Choosing a keyboard this device, then right-click and open menu select the "Properties" tab. You should immediately take into account that there may be more than one keyboard for a laptop in the device manager, and accordingly you need to select the one that is currently being used.
Instruction
 When the properties dialog box opens in front of you, you need to click on the "Details" button and there, in the drop-down menu, find the "Hardware ID". When its number is copied, you need to re-launch the command line through the "Start" menu and write "gpedit.msc" in it and then click "Continue".
Next, a new dialog box should open in front of you, where you need to go to the "Policy" tab, then "Local Computer", "Computer Configuration", "Administrative Templates", "System", "Device Installation", "Device Installation Restrictions" . Next, you just need to find the item "Prohibit the installation of devices with the specified device codes." Now your task is to enter the copied code there. After all the points, you definitely need to save the new settings for them to take effect.
Special applications
If you are still looking for an answer to the question of how to disable the keyboard on a laptop, then let's now look at how to do this using specialized software. If you still decide to use a specialized program to solve this issue, then it’s worth noting right away - this process can be both simple and complex, everything will depend only on which program you choose to disable the keyboard on your device.
There are currently a large number of programs, for example, you can choose the "ToddlerKeys" application.
Conclusion
Now you know how to disable the keyboard on a laptop. As you can see for yourself, there is absolutely nothing complicated about this, the main thing is to choose the right option for yourself and follow the instructions.
A little about device management.
The built-in keyboard on my laptop is broken. And I decided to turn it off (well, or block it, whatever happens). After digging for some time on the Internet, I did not find a normal solution. I had to climb into the depths of Windows myself. Here is the result of my research.
How to disable the built-in keyboard on a laptop (Windows 7):
1) First, we need the ID of the device to be disabled. In my case, the built-in keyboard. Usually, for laptops, they are connected via an internal PS / 2 connector.
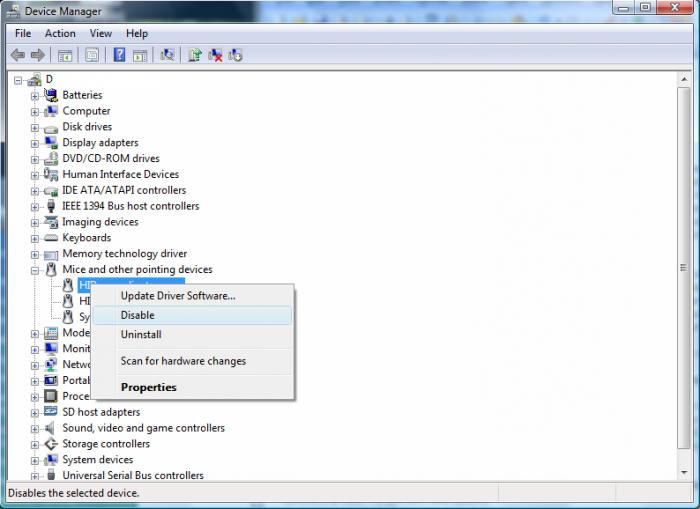
2) Open device Manager(Right click on Computer-> Management->DDevice Manager)
3) Find desired device, right click on it, " properties"
4) In the fold" Intelligence" in the drop down menu find " Hardware ID"
5) Copy it (I had it "ACPI\PNP0303")
6) Call ( win+r or "execute" in the start menu) gpedit.msc
7) There we open: Policy Local Computer -> Administrative Templates -> System -> Device Installation -> Device Installation Restrictions
8) There is an option: "Prohibit installation of devices with the specified device codes", right click on it, "change"
9) Put the radio batn in position " Turn on", in the parameters press button"Show..."
10) Paste copied into the window that appears IDequipment and press Ok.
11) Put a tick " Also apply for relevant devices that have already been installed"
12) Removing a device in device manager and reboot.
As a result, the built-in keyboard stops working, and "Unknown device" appears in the device manager.
How to turn on the built-in keyboard on a laptop back (Windows 7):
Or put the option " Switch off" in 8 paragraph. Or remove id devices in 9 and further paragraphs.
After that, in the task manager, do search for new devices.(or simply reboot)
P.S. Optional - key points for English version:
2)Computer->Manage->Device Manager
3) Properties
4) details, there - Hardware IDs
7) Local Computer Policy->Computer Configuration->Administrative Templates->System->Device Installation->Device Installation Restriction
8) Prevent installation of device that matches any of these device IDs
9) enabled, then the button show..."
11) Check mark " Also apply to matching devices that are already installed"
Some this method does not work, missing required policies. I have not found a normal way to solve this problem. So for them - this option:
1-2) see above
3) Find desired device, right click on it, " Update drivers"
4) Uncheck the box there Compatible devices" and choose something that doesn't fit. For example, "Standard" -> "HID Keyboard". Usually in laptops, the keyboard is hung on the PS / 2 port, so it should not work.
5) Reboot.
6) Now the keyboard does not work. We go to device Manager,
7) We find the keyboard there. It is now shown as problematic. Right click->Disable.
The built-in laptop keyboard is usually connected to the motherboard with cables. And if you decide to turn it off at this level, then be prepared to disassemble the "laptop". Each device has its own architecture and therefore the cable will be located in different places. First you need to remove the back cover. Carefully inspect and try to identify this plume. If you cannot find it, then download the scheme on the Internet or on the official website of the manufacturer. You should work carefully, because even a small damage or scratch on the motherboard can damage the performance of the laptop as a whole. Since in the future you will have to connect it back, the advice is to remember the location of the cable connector. For convenience, you can take a picture with your phone or digital camera. With a successful shutdown, do not forget to assemble the laptop in reverse order. It is advisable to entrust such work to a specialist service center.
- Disabling the keyboard in Windows.
More in a simple way is a software disable in Windows settings. This method is only suitable for the 7th maximum version of Windows. For other versions, you will need to install the group policy editor gpedit.msc. Finding it on the Internet is easy enough, so let's not get hung up on it. You can disable it for a long time and until the next reboot. For a one-time shutdown, you need to launch the command line in the "Start" and enter the command "rundll32 keyboard, disable" in it. To disable it permanently, go to Control Panel > Device Manager > Keyboards > Standard Keyboard. Right-click select Properties > Details > Hardware ID. Copy the first value. Next, in the "Start" menu, launch the command line and enter the command "gpedit.msc", press enter. In the window that opens, follow: Local Computer Policy > Computer Configuration > Administrative Templates > System > Device Installation > Device Installation Restrictions. In the "Prohibit the installation of devices with the specified device codes" right-click and select "Change". Switch to "Enable". Click the "Show" button and in the pop-up window paste the previously copied "ID of the built-in keyboard", then click OK. Check the box next to "Also apply to qualifying devices that have already been installed." and OK. In the device manager, delete the old and no longer needed keyboard. Reboot and enjoy the work done.
How to disable the built-in keyboard on a laptop (Windows 7):
1) First, we need the ID of the device to be disabled. In my case, the built-in keyboard. Usually, for laptops, they are connected via an internal PS / 2 connector.
2) Open Device Manager (Right click on Computer-> Management-> Device Manager)
3) Find the desired device, right click on it, "properties"
4) In the "Details" fold in the drop-down menu we find "Equipment ID"
5) Copy it (I had it "ACPI\PNP0303")
6) Call (win + r or "run" in the Start menu) gpedit.msc
7) There we open: Policy Local computer -> Administrative templates -> System -> Device installation -> Restrictions on device installation
8) There is an option: "Prohibit the installation of devices with the specified device codes", right click on it, "change"
9) Set the radiobatn to the “Enable” position, in the parameters press the “Show…” button
10) Paste the copied equipment ID into the window that appears and click Ok.
11) Check the box "Also apply to qualifying devices that have already been installed"
12) We delete the device in the device manager and reboot.
As a result, the built-in keyboard stops working, and "Unknown device" appears in the device manager
How to turn on the built-in keyboard on a laptop back (Windows 7):
Or put the option "Turn off" in paragraph 8. Or delete the device id in 9 and further paragraphs.
After that, in the task manager, search for new devices. (Or just reboot)
P.S. Additionally - key points for the English version:
2) Computer->Manage->Device Manager
3) Properties
4) Details, there - Hardware Ids
7) Local Computer Policy->Computer Configuration->Administrative Templates->System->Device Installation->Device Installation Restriction
8) Prevent installation of device that matches any of these device IDs
9) Enabled, then the button "Show ..."
11) Checkbox "Also apply to matching devices that are already installed"
For some, this method does not work, the necessary policies are missing. I have not found a normal way to solve this problem. So for them - this option:
1-2) see above
3) We find the desired device, right click on it, "Update drivers"
4) There we remove the checkmark "Compatible devices" and select something that is not suitable. For example "Standard" -> "Keyboard HID". Usually in laptops, the keyboard is hung on the PS / 2 port, so it should not work.
5) Reboot.
6) Now the keyboard does not work. We go to the device manager,
7) We find the keyboard there. It is now shown as problematic. Right click -> Disable.
- Using third party software.
Probably the easiest way is to install applications to disable the keyboard. Such an application is "Toddler Keys". This software works great for everyone. Windows versions and easy to handle. Enough minimal knowledge in English. The choice of the option to disable the keyboard depends on the degree of knowledge of the person. It’s easier for someone to spin up the laptop and turn it off manually, while for someone it’s easier programmatically. In any case, there are many versions and if something does not work out, you still have a plan "B".
Do not know how to turn off the keyboard on a laptop, for example, if it is damaged. This can be done on any model. See how to do it with Windows settings without disassembling the laptop.
Disabling the keyboard on a laptop with Windows 8, 10 may seem like a strange task to many. Indeed, then do it, does it interfere with something? After all, you can connect USB keyboard, and simply do not use the built-in laptop. But this is not always the case, there are times when it needs to be completely turned off.
One of them may be damage to the keys on the laptop. If any of the buttons "sinks" or is constantly pressed, it can cause problems, even if a separate USB keyboard is installed. In this case, you need to disable it. But what seems simple is actually more difficult to do.
Why is it not so easy to turn off the integrated keyboard?
Unfortunately, Microsoft did not foresee this situation. That is, in Windows you will not find simple solution or some kind of switch to be able to turn it off. Remove driver? A good line of thought, but this is all temporary - Windows will automatically restore it after restarting the computer. Or maybe just disable it in Device Manager. No, it won't work. The driver can only be removed or updated; function complete shutdown not available for this input device.
It makes no sense to look for some third party programs, which can block it, because they do not work so “smoothly”, and if they already block it, then this action can also affect the external one connected via USB. Dismantling the laptop case and disconnecting the cable from the keyboard is a good idea, but this solution is not for everyone. Therefore, let's look at another way with which you can effectively disable the built-in keyboard on a laptop.
It turns out that instead of removing or disabling the driver, it is enough to simply replace it with another one that is incompatible with the input device. Windows 7, 8.1, 10 does not recognize this as an error, and therefore allows you to install any, and the keyboard itself will eventually stop working? How to do it?
Incompatible but recognized device
So, how to disable the keyboard in a Windows 10 laptop. You can use this solution on any model. First check if it is disabled external keyboard from a laptop - now there is no need for it, in addition, exclude the possibility of accidentally replacing its driver. Therefore, disconnect it for now and leave only the integrated one. All operations are done with the mouse.
Right-click on Start in the lower left corner of the screen. Displayed context menu with a list of system services. Select "Device Manager" from the list.
A window will appear with a list of all components installed on the computer. Expand the "Keyboard" tab and find the built-in one here. Sometimes more items may be displayed here, such as "HID Device" or "Standard PS/2".
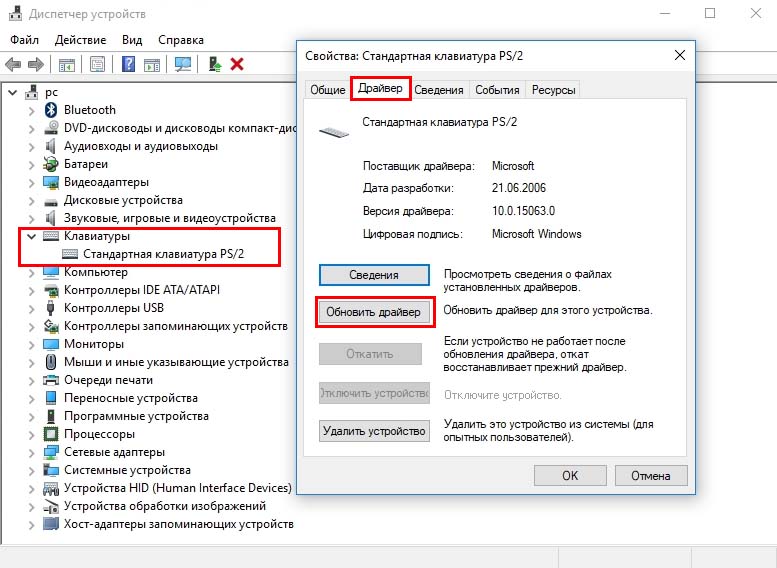
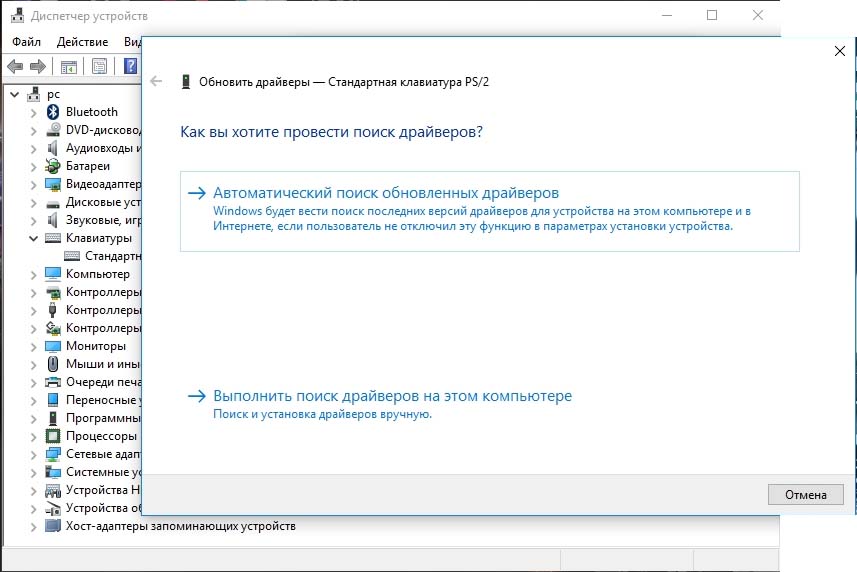
In this case, simply follow the steps below for each of the list. Double click on it to enter properties. Then go to the "Driver" tab and select "Update".
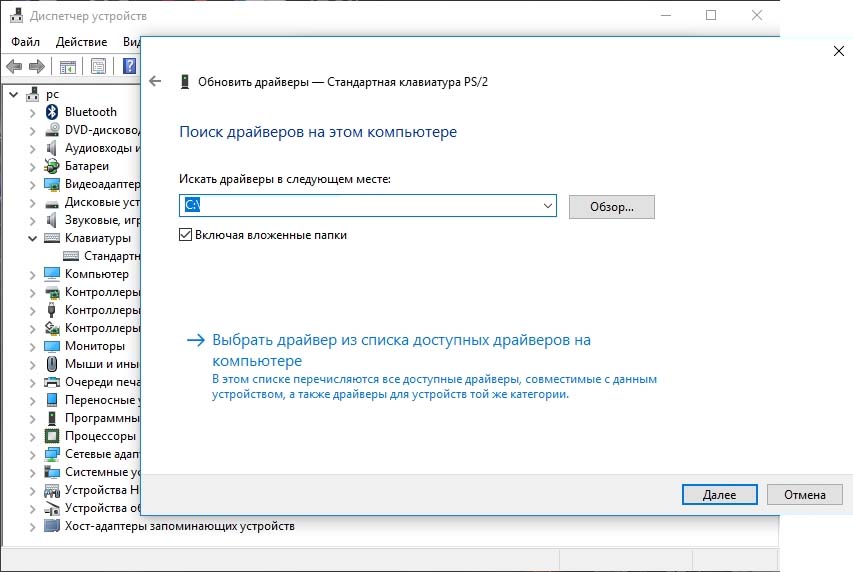
In the window that opens, click on "Search for drivers on this computer".
Then select "Select a driver from the list available on the computer."
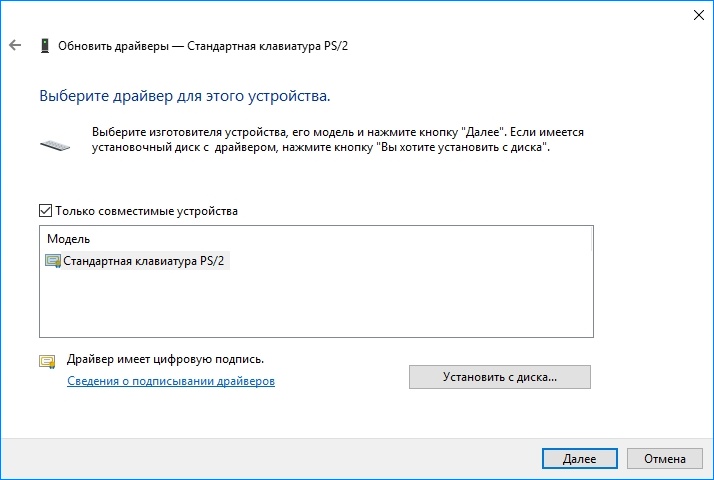
First of all, at the very top, uncheck the "Only compatible devices" box. We are just interested in installing an incompatible driver.
Choose any of them for different keyboard model. In our case, this is the Chicony device.
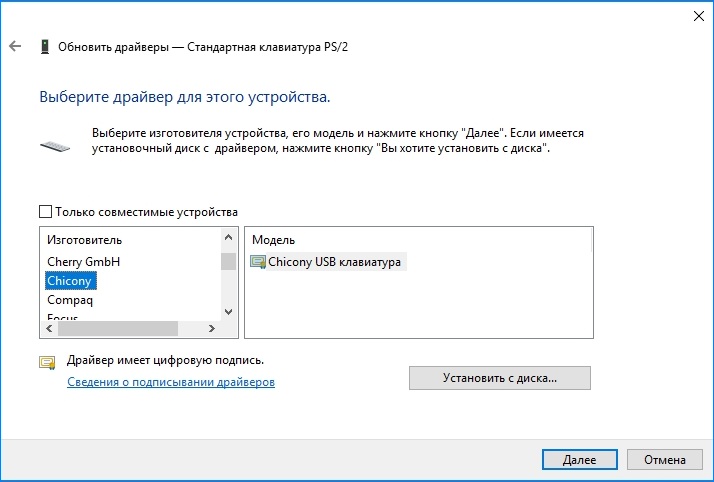
Then click Next. A message will appear asking if you really want to install it. Confirm this operation. After restarting the laptop, notice that the keyboard does not work. Now you can connect an external USB keyboard, which will connect and work without any problems.
When you open the Manager, yellow will be displayed opposite the built-in keyboard exclamation mark. This means that the driver is incompatible and as a result it cannot be recognized and will therefore be disabled.
If you ever want to restore its work, then go to the properties and select the "Roll Back" item, and then restart the laptop.
 Modules for digital television
 Tricolor TV - receiver software update
 Satellite receiver or satellite TV input ci common interface