How to disassemble Asus K series laptop
Quite often, laptop owners have a question about how to disassemble their device for cleaning. This procedure is simply necessary, since the dust inside the case prevents normal cooling, which will lead to its breakdown. There are situations when the device needs to be disassembled to replace parts or upgrade. Here the question immediately arises of how to disassemble?
The Asus laptop is a fairly common model, and it will serve as an example. Next, we will consider the order that should be followed in order to do everything easily and quickly.
How and how to disassemble a laptop?
Asus is a famous manufacturer, but its products, like all others, require revision, for which the device must be disassembled. Before proceeding with this procedure, you must prepare the instrument.
First of all, you will need a Phillips screwdriver (you can find its size by looking at the screws located in the back cover). Additionally, you will need tweezers, some paper, hands and eyes. The most important thing in this work is patience, since there are situations when they forget to unscrew the screw and cannot remove the cover or disk, and then an extra effort follows, which leads to disastrous consequences.
Safety regulations
When starting to disassemble the device, it should be remembered that this is an electrical device. For this reason, you can start disassembling the laptop only after it is disconnected from the network. Additionally, remove the battery from the device.
When it comes to assembly, the connection to the network can only be made when the laptop is fully assembled. When disconnecting the loops, you should be careful, as jerks can lead to their damage.
Asus K53S parsing procedure
Next, let's take a look at how to disassemble an Asus k53s laptop. First of all, it is necessary to de-energize the device by disconnecting it from the mains and removing the battery. Now you need to unscrew three screws from the cover, which is located on the opposite side of the battery. This procedure will allow you to remove it and gain access to random access memory and hard drive.
The next step is to remove the Wi-Fi board, which is secured with one screw. Here you need to be very careful, since two wires are connected to this module, to remove which you need to snap off the fastener.
It remains to take out the RAM and HDD fastened with four screws. Next, the procedure begins to unscrew a large number of screws. Remember that the screws located under the battery are shorter than the others.  After all of them are unscrewed, many novice craftsmen are faced with the question of how to disassemble a laptop? The Asus k53s has screws under the keyboard that secure the disc reader. To remove the keyboard, hook it up with a thin object around the edges. After that, six screws and two connectors are exposed, which must be carefully disconnected.
Now we take out the CD-ROM drive case. After removing it, access to three more screws will open, which should also be unscrewed.
That's it, now you can separate the top cover, for which it should simply be picked up by the edge. After completing all the procedures, access to the motherboard will open, to remove which you need to unscrew a few screws. If you follow the sequence of the listed operations, then the question of how to disassemble an asus laptop will disappear by itself. The user can easily do all this without spoiling or breaking anything.
Asus x54h - parsing order
When the question of how to disassemble an Asus x54h laptop is raised, you can refer to the instructions written above, since the models have a similar structure, but there are also small features.
The first thing to note is that Wi-Fi and RAM are swapped under the first cover, but the fastening technology has been preserved. Further, the parsing process goes in the same order as above, but only before removing the keyboard. 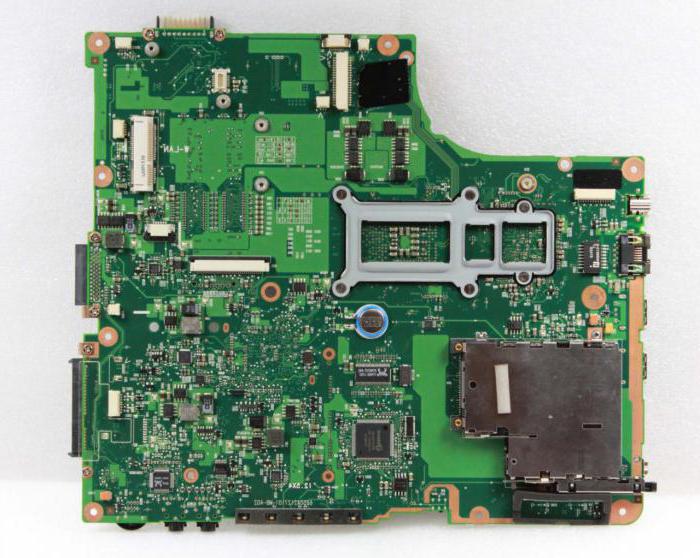 In this model, the keyboard has several fasteners, which must be dismantled at the top. Several ribbon cables will open under it, and you will need a thin screwdriver and tweezers to disconnect them. You can do without them, but only if you have thin fingers.
After removing the keyboard and unscrewing the last screws, you can proceed to removing the cover on which it was. This procedure should be done very carefully as there are many latches around the device. Anyone can help in this matter a plastic card... It remains to unscrew a few screws and pull out motherboard... This completes the disassembly of the device.
We disassemble the Asus n53s
When the question of how to disassemble an Asus n53s laptop comes up, you need to be quite careful. This is because the device has several hidden screws. Disassembly of the device begins with de-energizing it. Next, unscrew all the screws on the back cover and remove the cover, under which the RAM is installed. 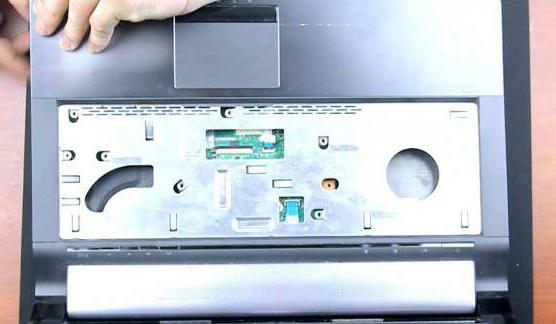 Here comes the turn to the hidden screws that are located under the legs of the laptop. They are attached to the device with an adhesive backing. Now you need to remove the keyboard and disconnect the ribbon cable. This procedure should be carried out very carefully, as the wire is very easy to damage.
There are difficulties when removing the motherboard, since some assembly options include a screw under the Wi-Fi module.
Dismantling Asus k53t
A very popular question is - how to disassemble an Asus k53t laptop correctly? To avoid complications, everything should be done in order. First of all, the battery is removed, then, on the back of the device, screws are unscrewed from two covers: under one there is a hard drive, and under the other - RAM and Wi-Fi. Next to the latter is the screw that holds the CD-ROM in place.
Now remove all screws from the back of the device and turn it over. The next step is to dismantle the keyboard, which is done by squeezing the antennae in its upper part, in the corners and in the center. Next, unscrew the three screws located under the keyboard and you can remove the cover. After that, access to the motherboard appears. By unscrewing all the screws from it, you will remove it along with the processor and cooling. This completes the disassembly.
Features parsing Asus x53s
The manufacturer Asus has released a huge number of models, but they all need periodic cleaning. Above, we have already described several options for how to disassemble a laptop. Asus X53s has a structure similar to other models, so the beginning of its disassembly is similar to them.
You should start work by removing the battery, then unscrew the screws on the back of the device. After that, you can remove the cover, gaining access to the hard drive and RAM. These modules should be removed, it is also necessary to disconnect the wires from the Wi-Fi module. 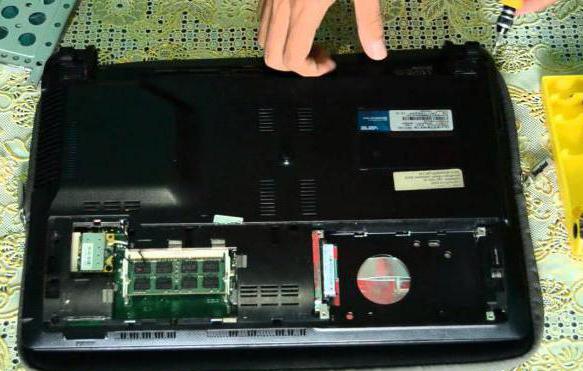 Now the laptop is turned over and the keyboard is removed. To do this, press the four clips at the top.
The next step is to disconnect the ribbon cable from the keyboard and other sensors. It remains to unscrew the three screws located under the keyboard, and you can remove the top cover. A plastic card or any thin object is suitable for this purpose. Now access to the motherboard has opened, which is quite easy to dismantle.
We disassemble the Asus x550c laptop
Many users wonder how to disassemble Asus x550c laptop. This is due to the fact that the keyboard of this model is removed together with the top panel. Now in more detail.
The beginning of the process, like all models of this manufacturer. Removing the cover hard disk and RAM, these parts should be dismantled. Further, the remaining screws are unscrewed with back cover. ![]()
Now you should put the device on its edge and use a thin screwdriver to separate the top cover. This procedure should be done very carefully, since the latches are very thin. Do not pull on the cover until the latches are removed in a circle.
After removing the top cover, disconnect the ribbon cable that connects the device to the keyboard. The further procedure for disassembling this model does not differ from those described earlier.
Parsing the screen of an Asus laptop
The question of how to disassemble an Asus laptop also rises in the situation when it is necessary to replace the matrix on the screen. Anything can be a reason for this. In most cases, such a need arises in the event of cracks on the screen. 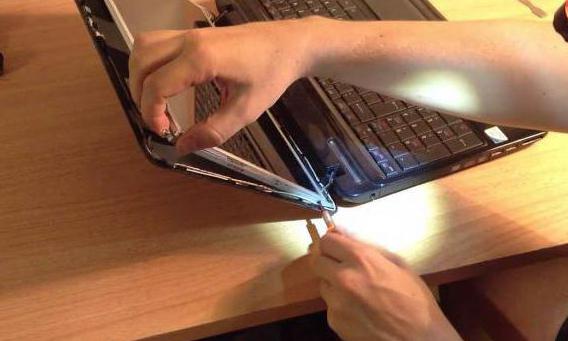 Here you should be glad standard rules, namely that it is necessary to de-energize the device. Extra care should be taken when removing a damaged matrix.
Now you should start parsing the device, according to the rules described above. It should be disassembled before removing the motherboard. Now you should go to the parsing of the screen. Quite often, the mounting screws are hidden under the rubber bumper. It is attached to a sticky base, which is removed with a knife.
After unscrewing all the screws, carefully insert a knife or a thin screwdriver into the gap between the two halves of the screen. By separating them, you will gain access to the matrix, which is bolted on. Having unscrewed them, the disassembly can be considered complete. Learn all the subtleties described in the article, and the question of how to disassemble an Asus laptop will become irrelevant.
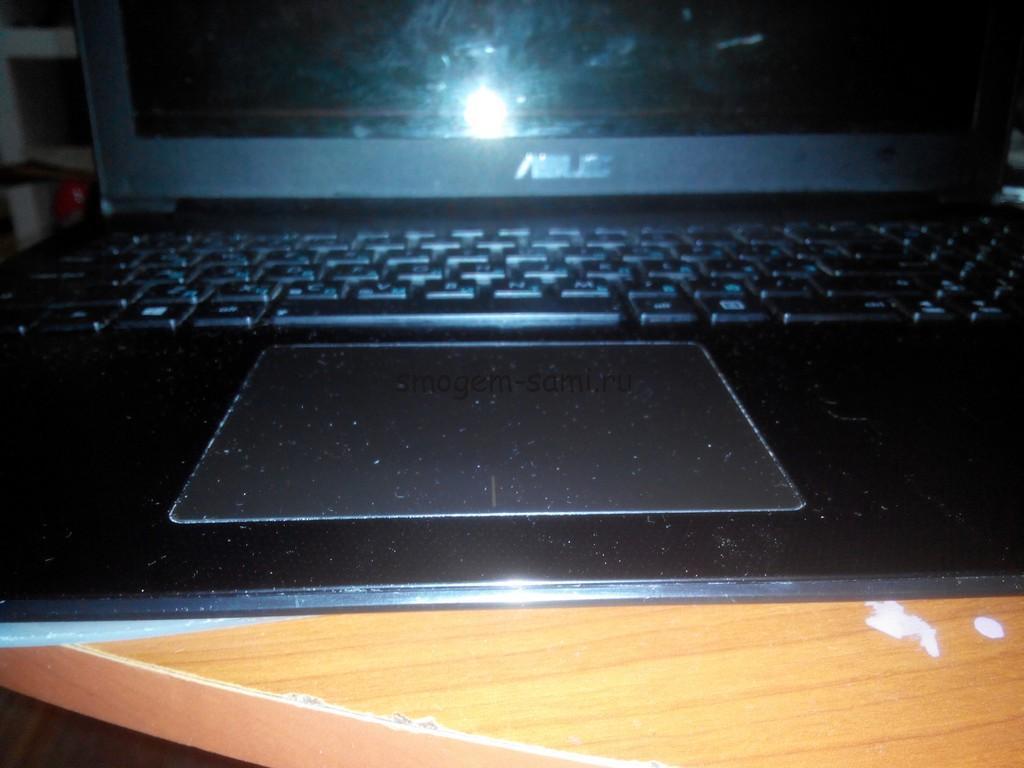
First, a little background. To me this laptop hit after soda was spilled on him. And after a preliminary inspection, it became clear that disassembly of the Asus X502C was inevitable. The reason for this is that the hard drive was not detected in the BIOS. Plus, it was necessary to clear all the internal space from the sticky slurry and at the same time solve the problem of loud operation, accompanied by a decent heating of the case. So let's move on directly to how to disassemble the Asus X502C laptop. This is not so difficult to do. First, turn off the laptop, disconnect the power supply, fold the lid and turn it upside down. The picture below shows all the bolts that need to be unscrewed. There will be 11 of them in total. 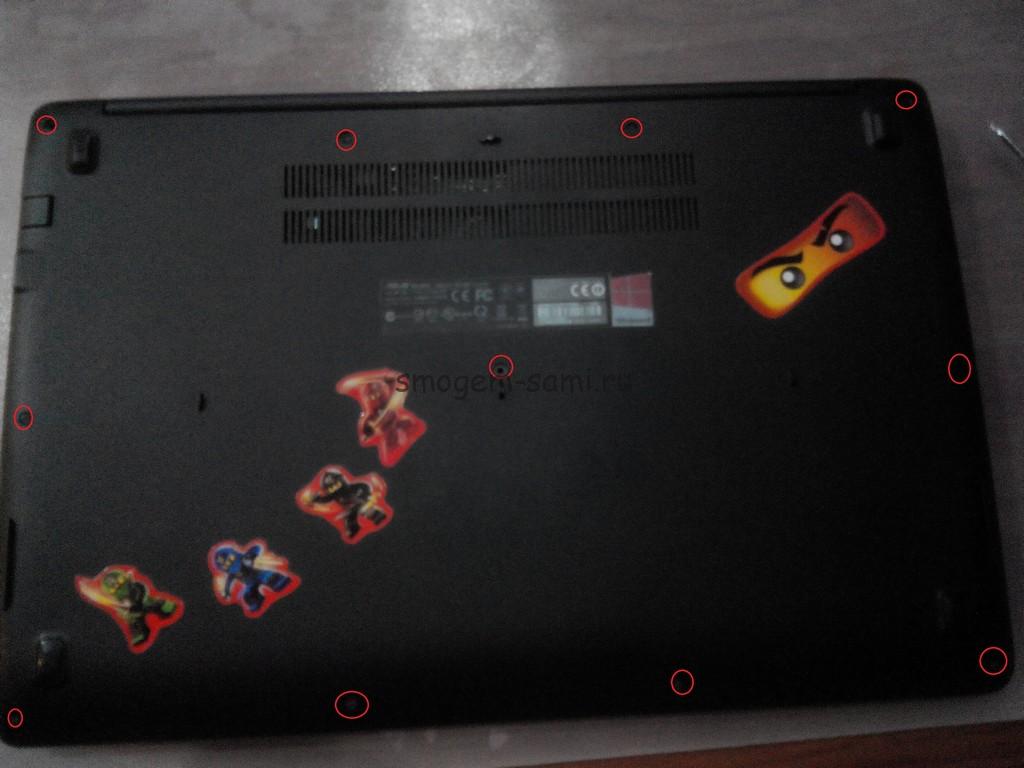
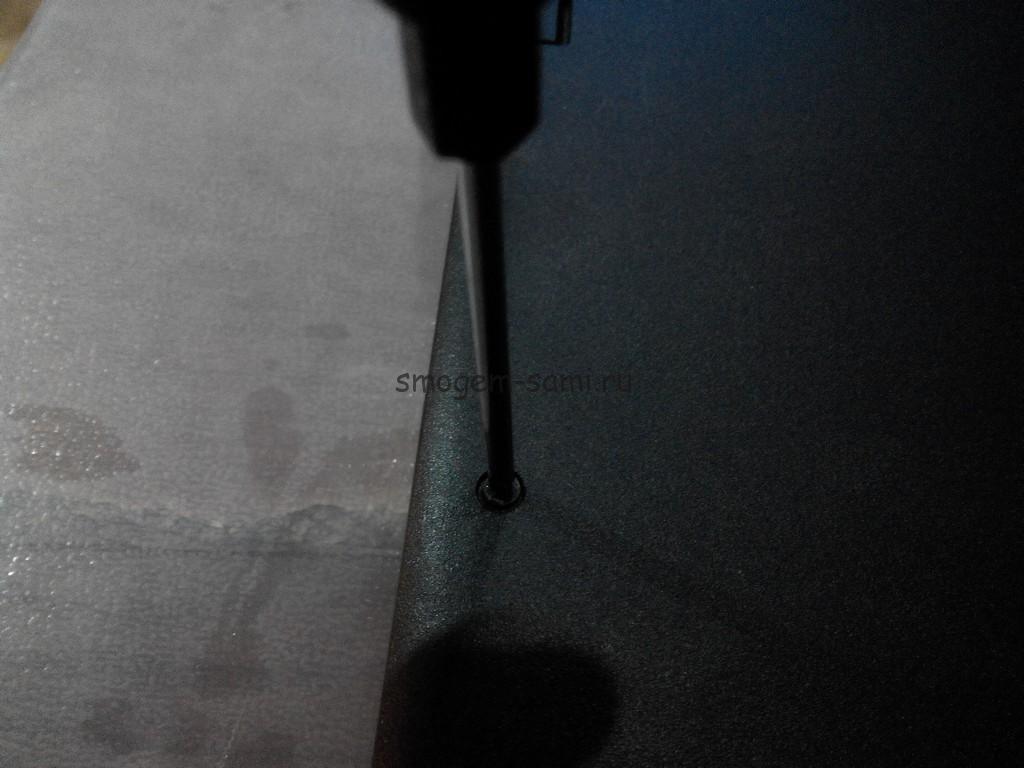 Put the unscrewed bolts in a separate pile so as not to confuse them with others, of which there will be plenty. Next, we put the laptop on the bottom and open the screen. Further disassembly of the Asus X502C will be performed in this position. Removal of the top panel is carried out together with the keyboard. This requires a flat screwdriver. With its help, we carefully pry the panel from any edge so that a small click is heard. It will indicate that the retainer has come off.
 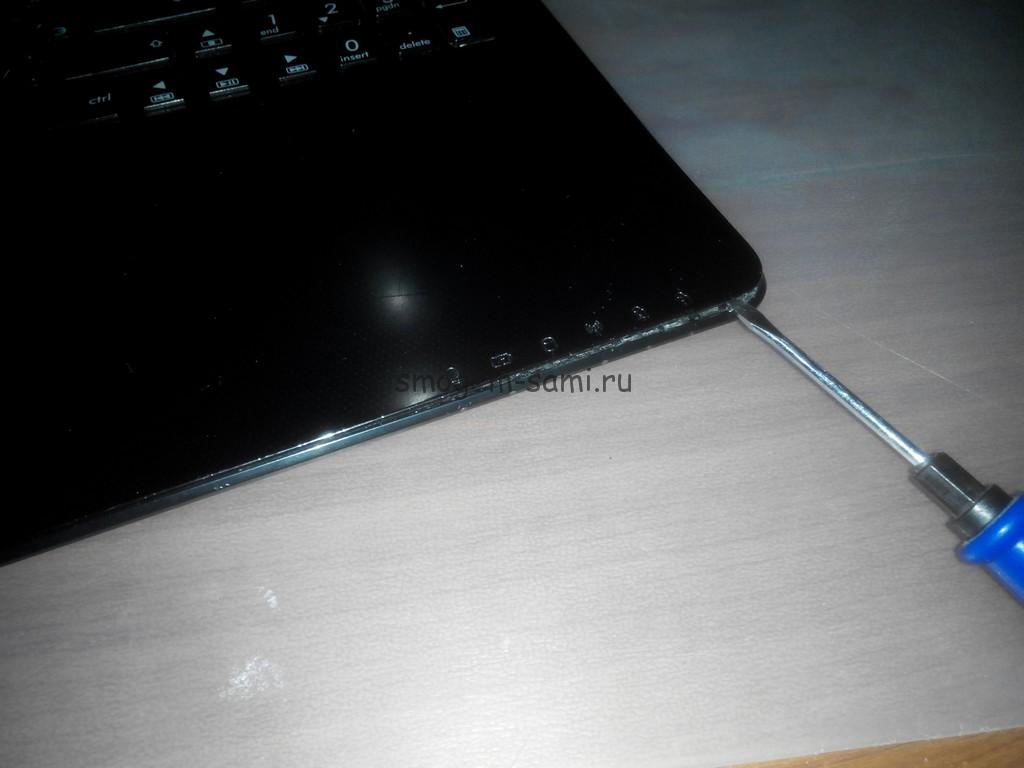 Then you can carefully remove the panel with your hands. But it's much easier to just run a flat screwdriver along the entire face. In this case, all the latches located on the front side will easily open and the panel will come off without any problems. And the side and rear latches will open by themselves when the panel is lifted further. It should be noted that this way of opening will in no way affect the appearance... The joints between the bottom and the panel with the keyboard are made using a rubberized layer, which is not so easy to deform.
 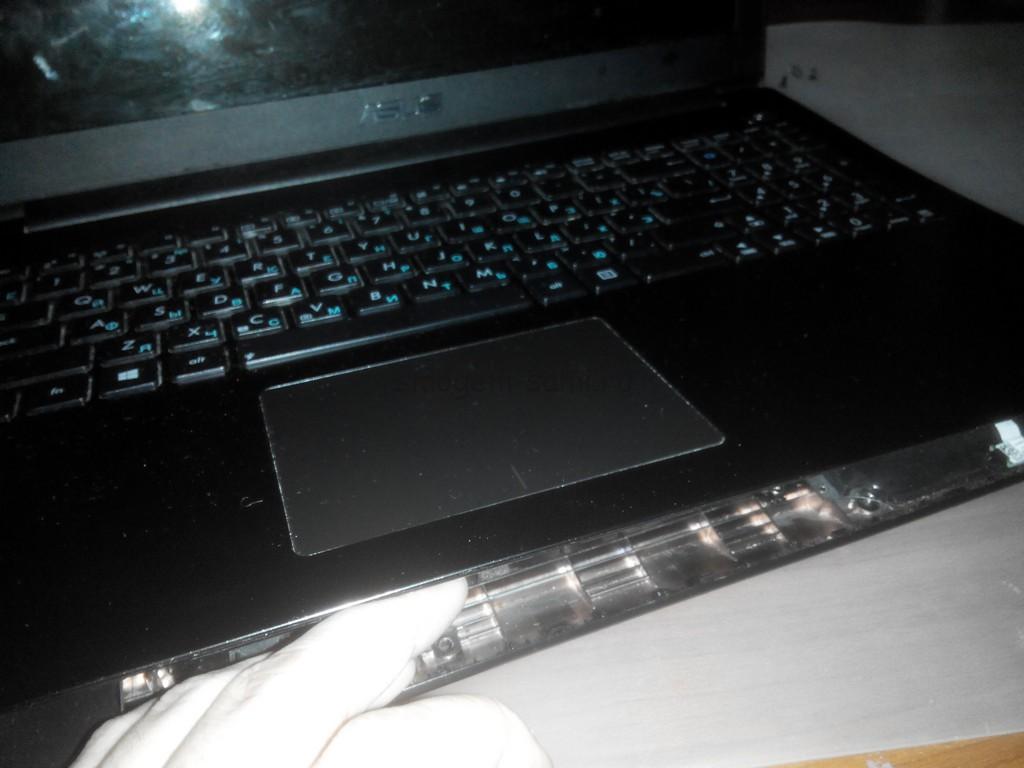 So the front side is open. But do not immediately try to remove it completely, since power cables from the keyboard and from the touchpad are suitable for this panel.
 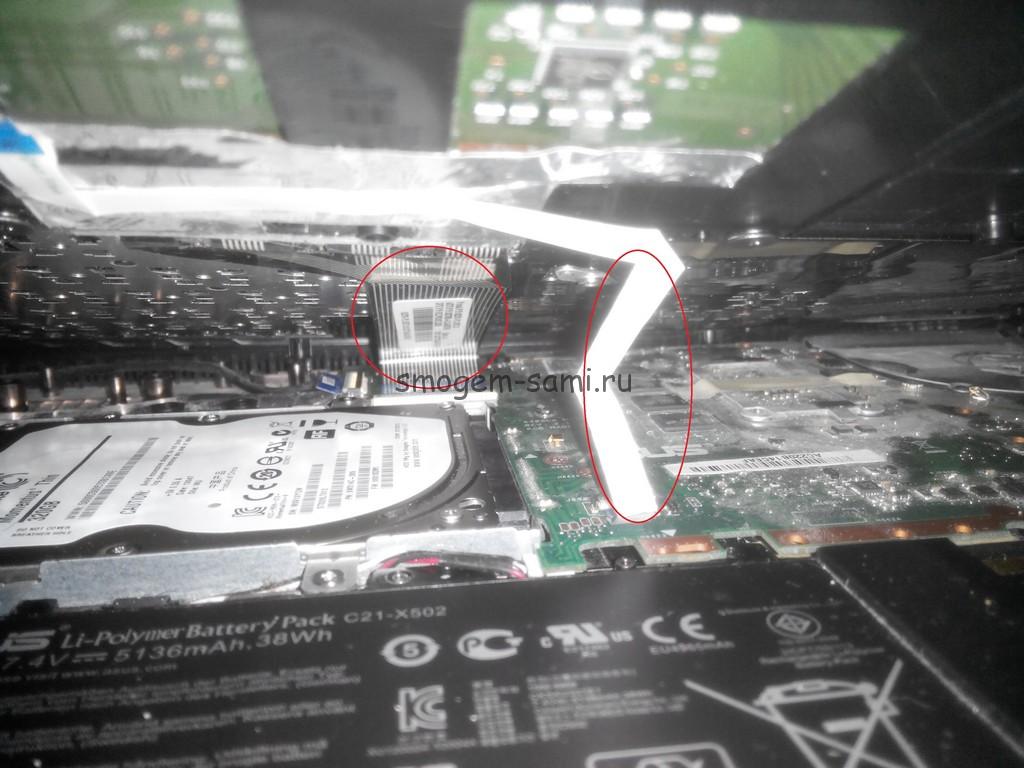 Therefore, before removing the panel, disconnect the loops. To do this, we put our hand in and unfasten the fixing latches.
 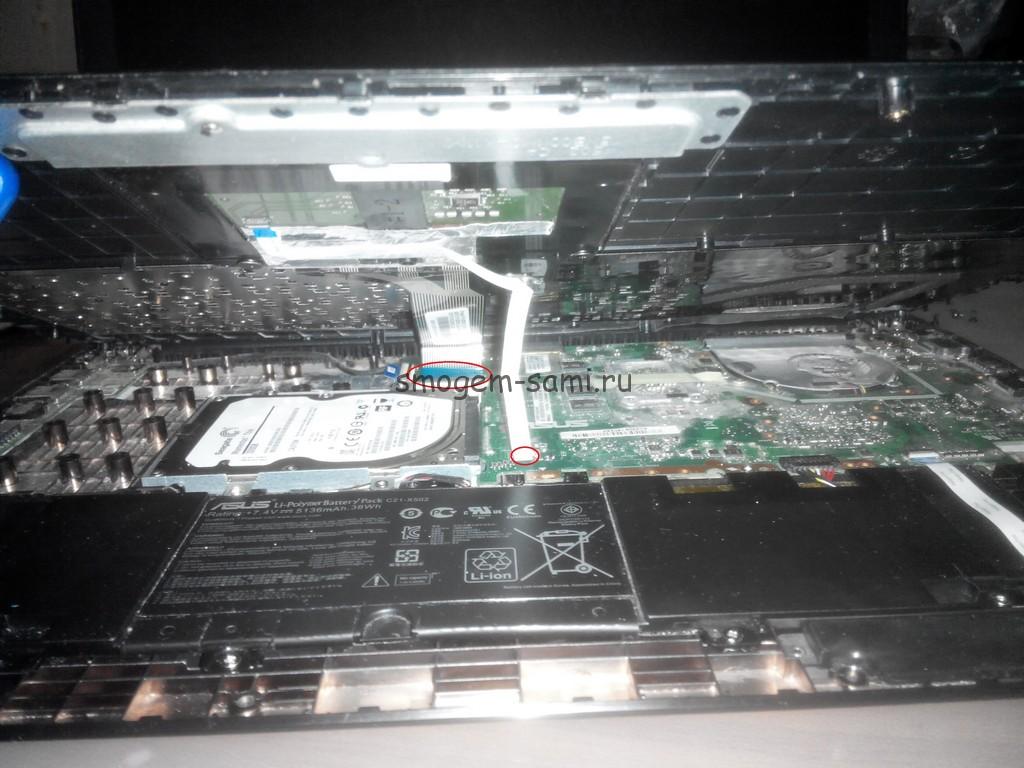 Everything. The panel can be completely removed. To perform such an operation, nothing else interferes. The disassembly of the Asus X502C, if you need to get only to this level, is complete. Further, you can perform other smaller operations.
 ![]() Battery replacementAsusX502C
Battery replacementAsusX502C
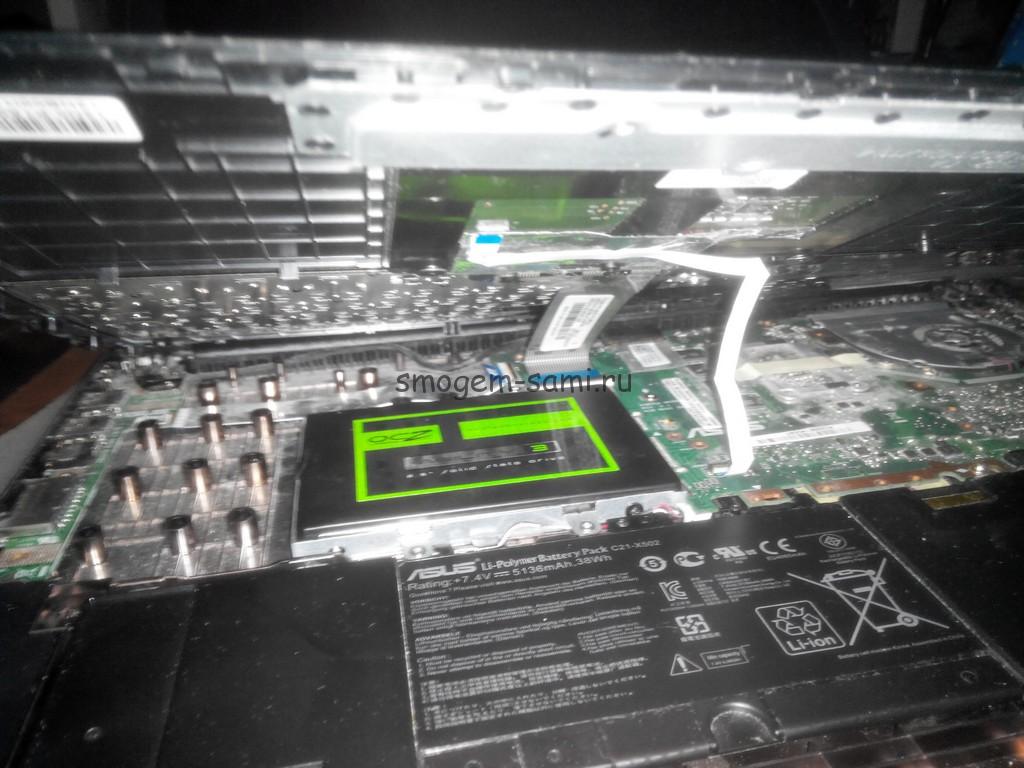
If you need to replace the Asus X502C laptop battery, you must first unscrew the screws that fix it. 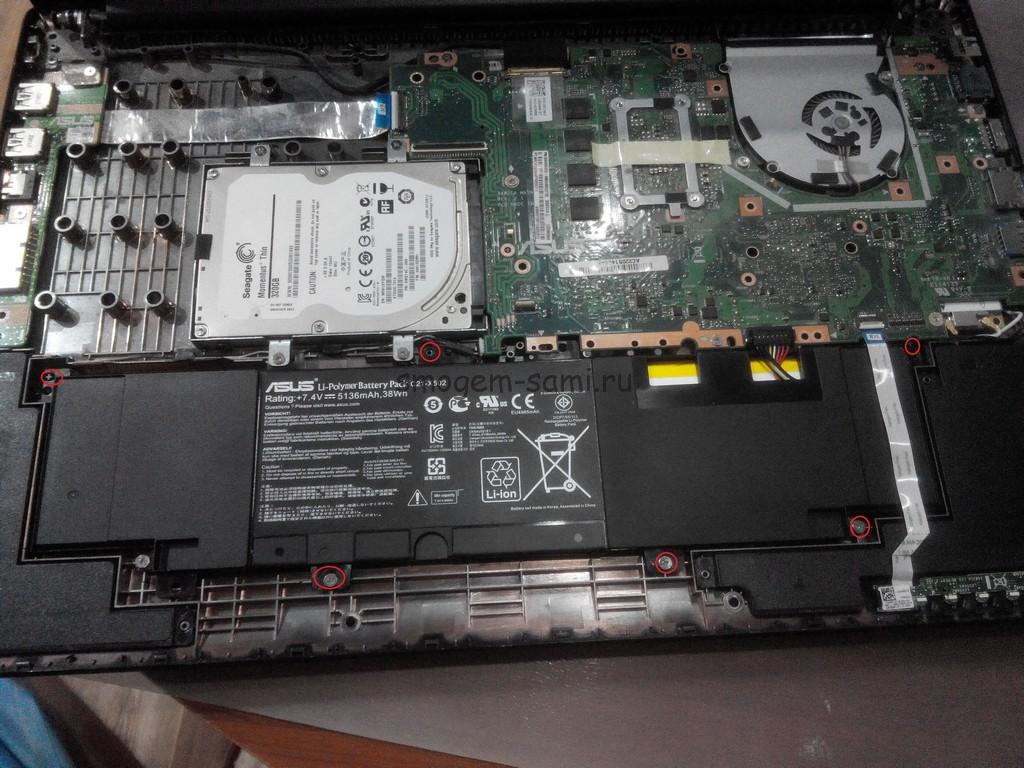 The illustration below shows the terminal for connecting the battery to the motherboard.
 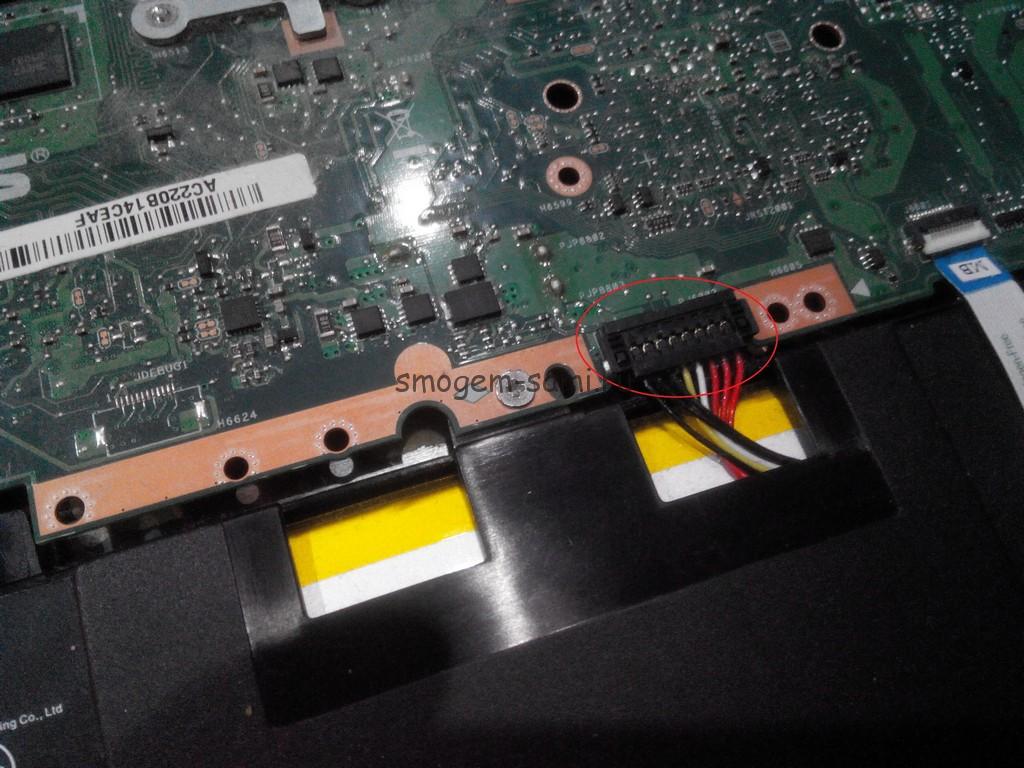 Disable it by slightly pulling it up.
 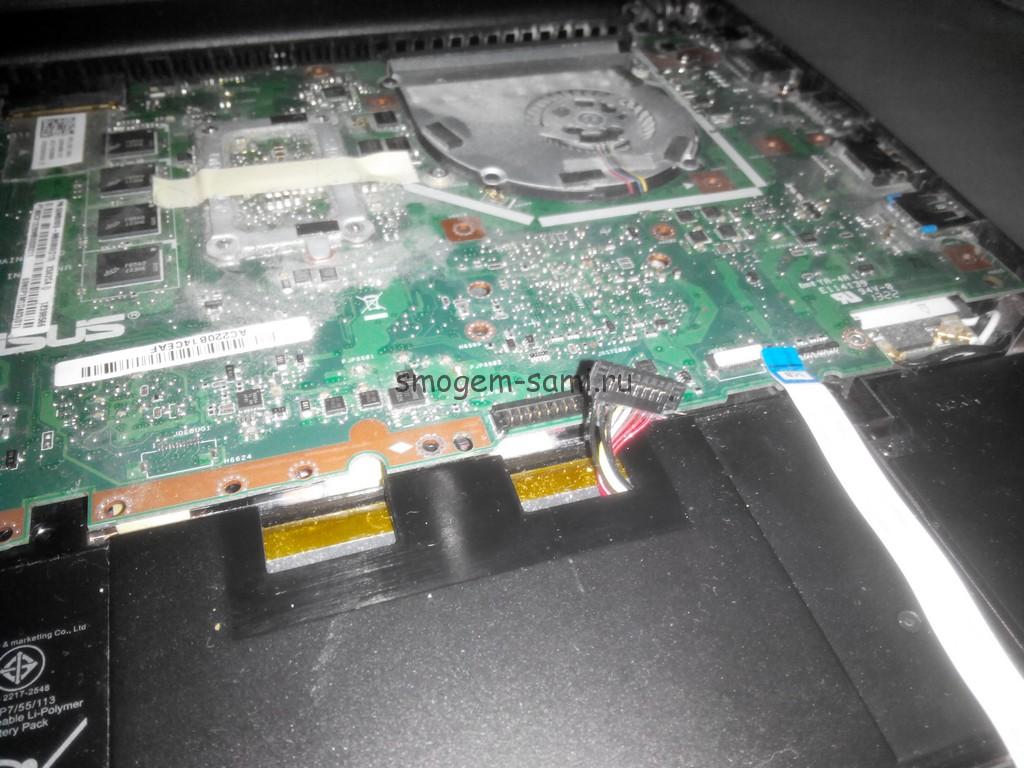 The battery can now be removed. To do this, we first pull it towards ourselves, and then at a slight angle upward.
 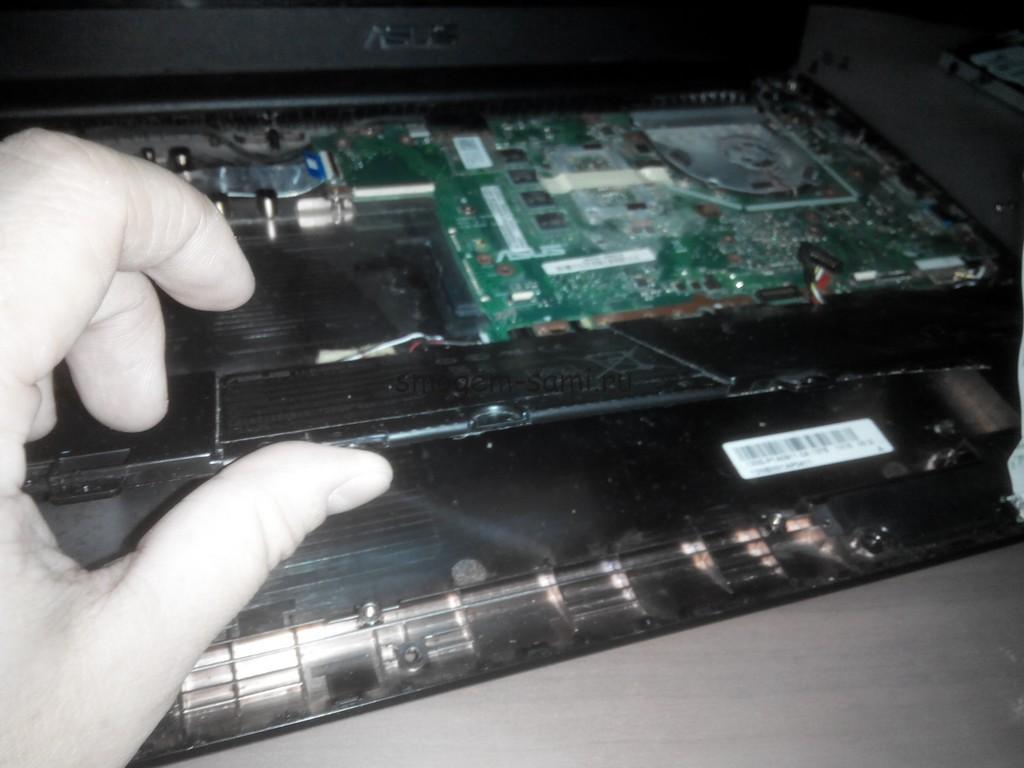 The battery has been removed.
 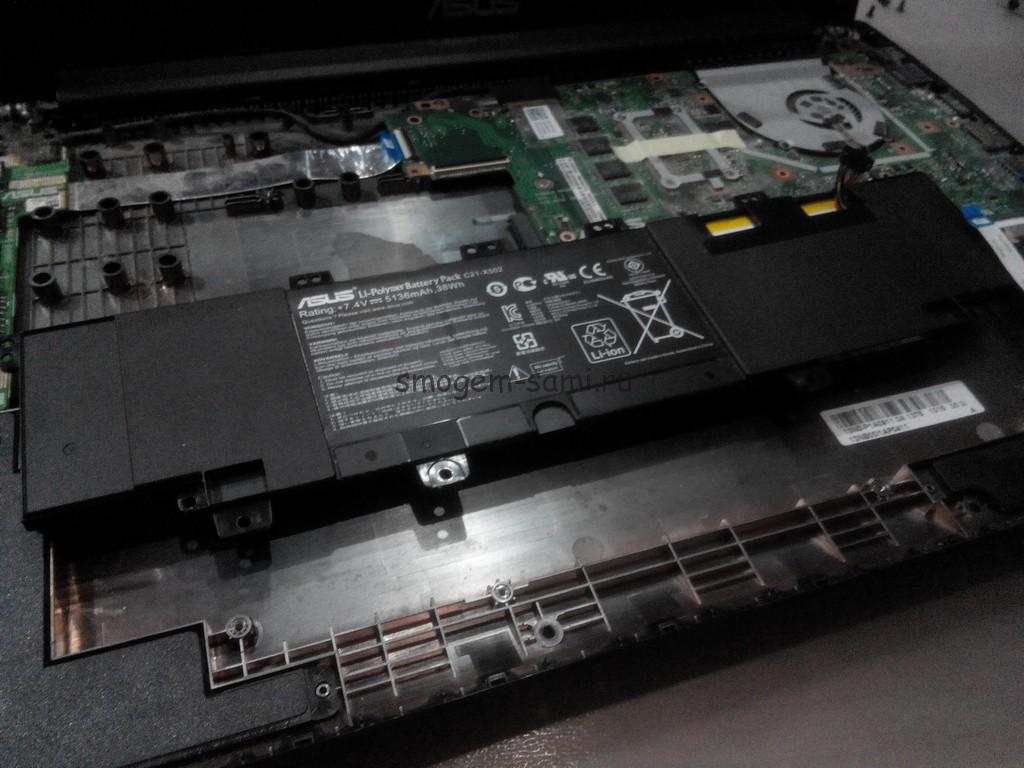 Replacing the hard driveAsusX502C
Everything is simple here. Unscrew the 4 screws securing the hard drive to the case and remove it. 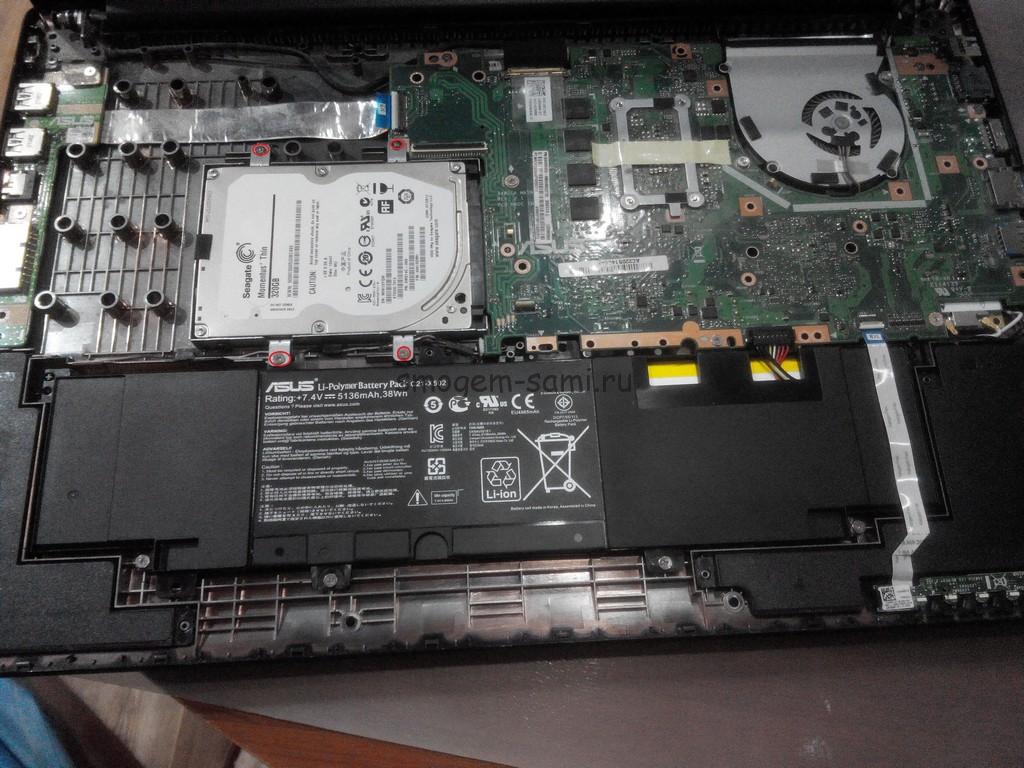 Dust cleaningAsusX502C
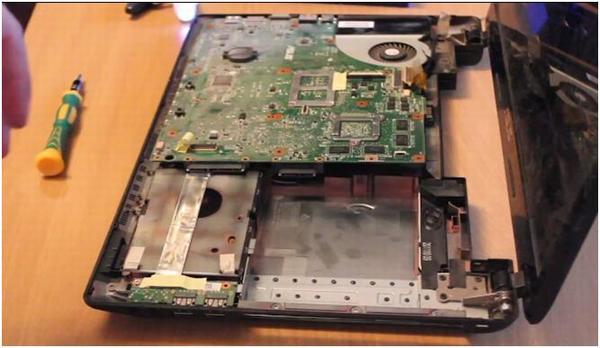
Cleaning the cooling system and / or replacing thermal paste is required if the laptop gets very hot or even overheats. In the case of the Asus X502C, to get to the cooling system, you need to completely remove the motherboard. Those. all the previous steps must be followed. 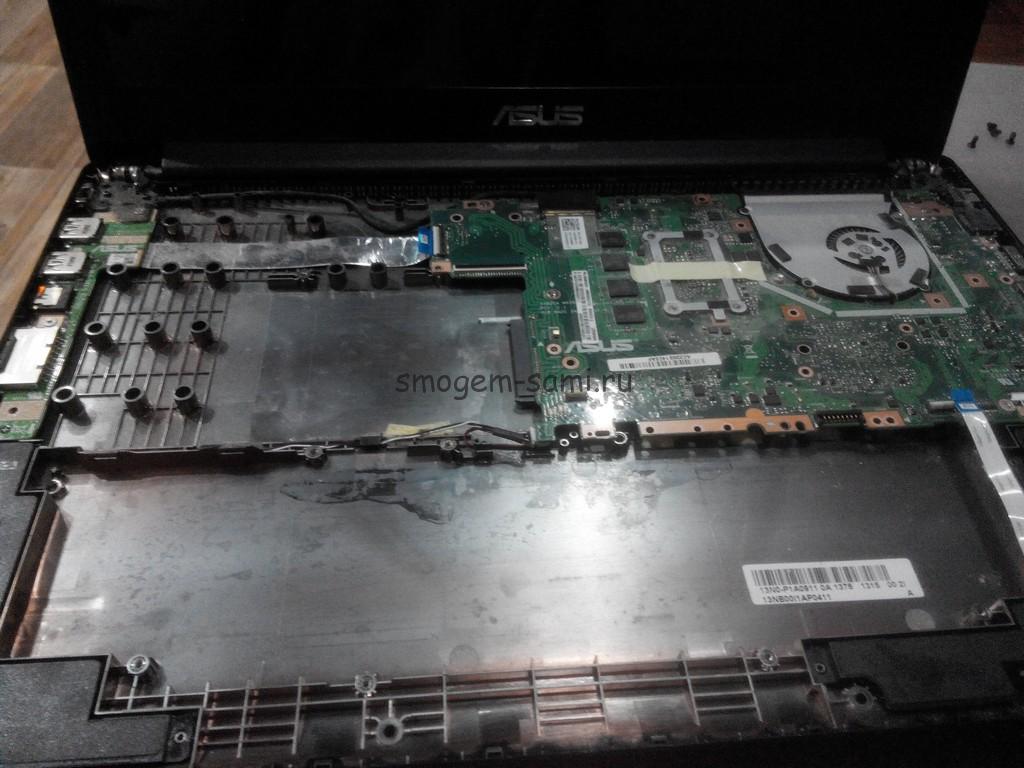 Next, you need to disconnect the cables connected to the motherboard.
 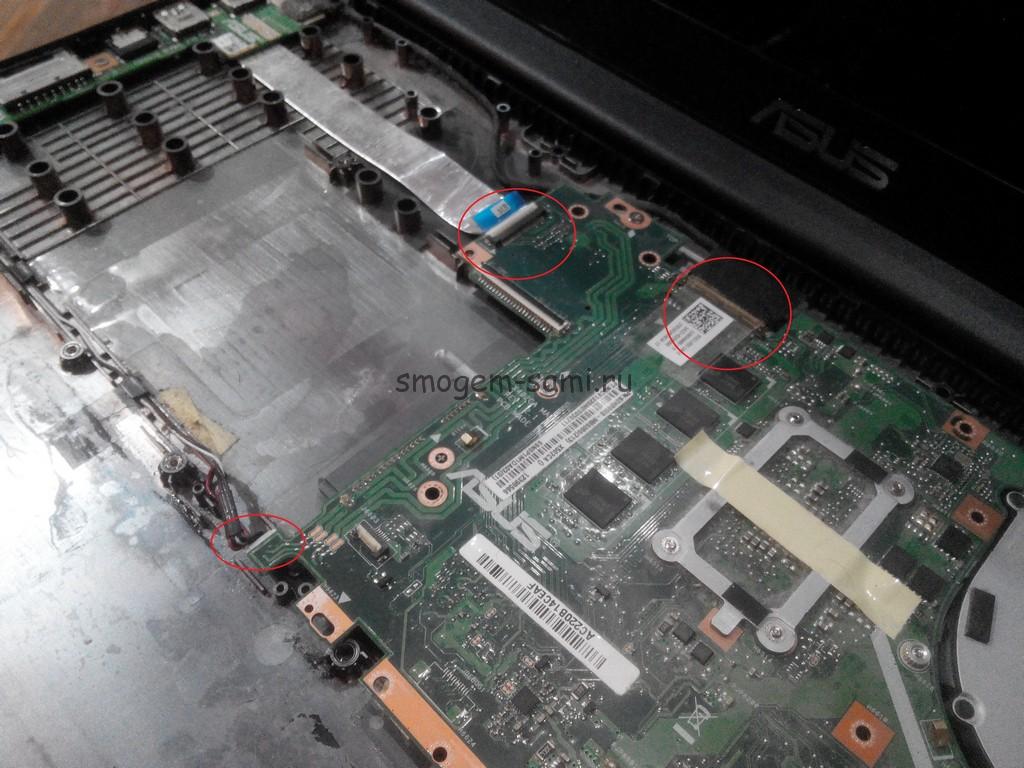 And we unscrew the feints of fastening the motherboard to the case of the Asus X502C
 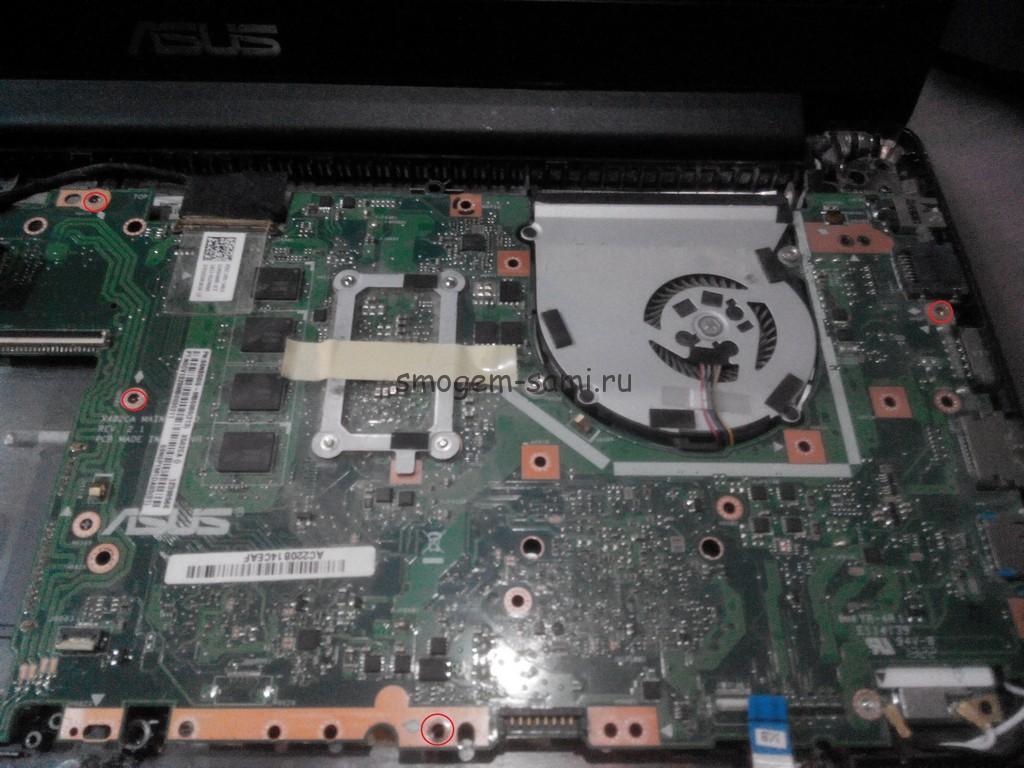 Removing the motherboard
 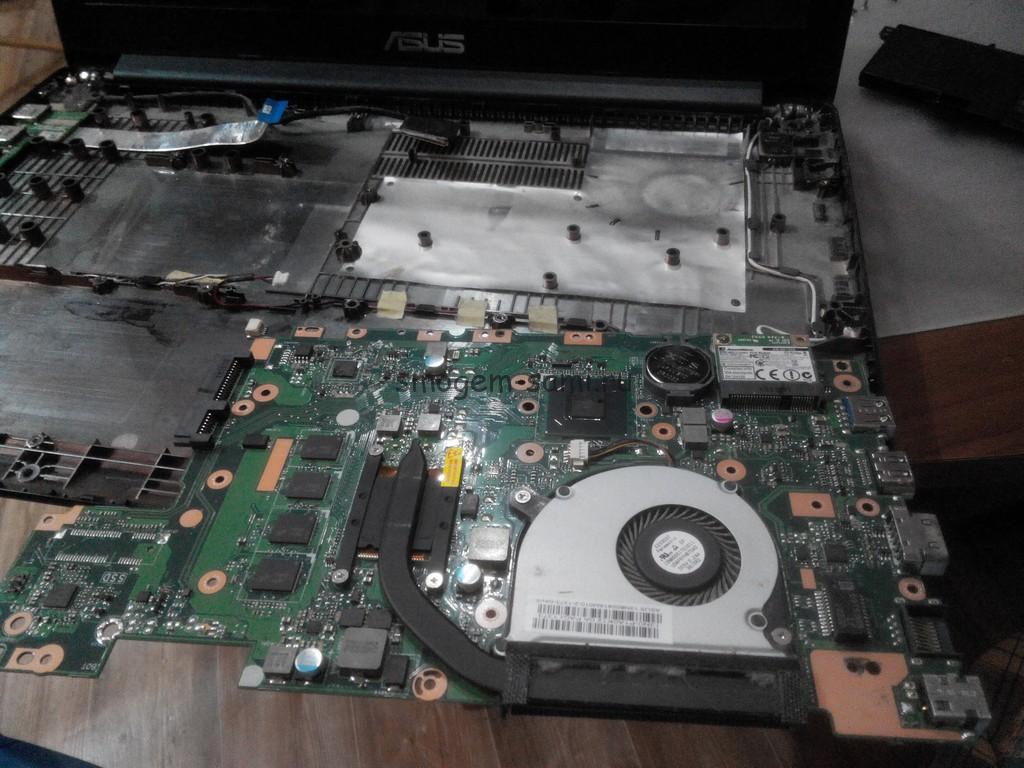 Turning it over, you can see the fixing screws, a cooler and a radiator for the cooling system.
  We unscrew them. Turn off the power supply to the cooler and remove the entire cooling system. Our disassembly of the Asus X502C has reached its climax, since there is, in fact, nothing to disassemble further.
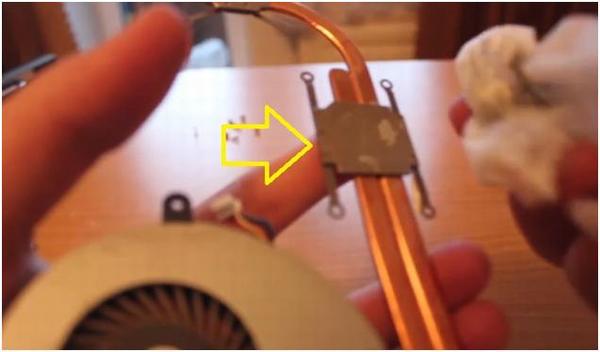
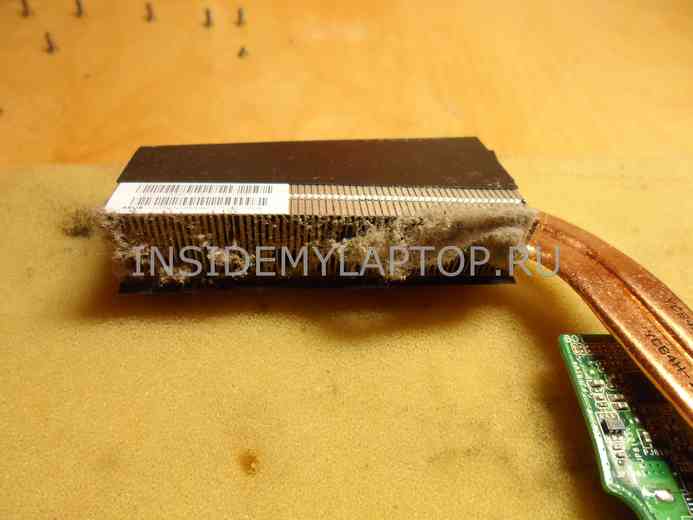
 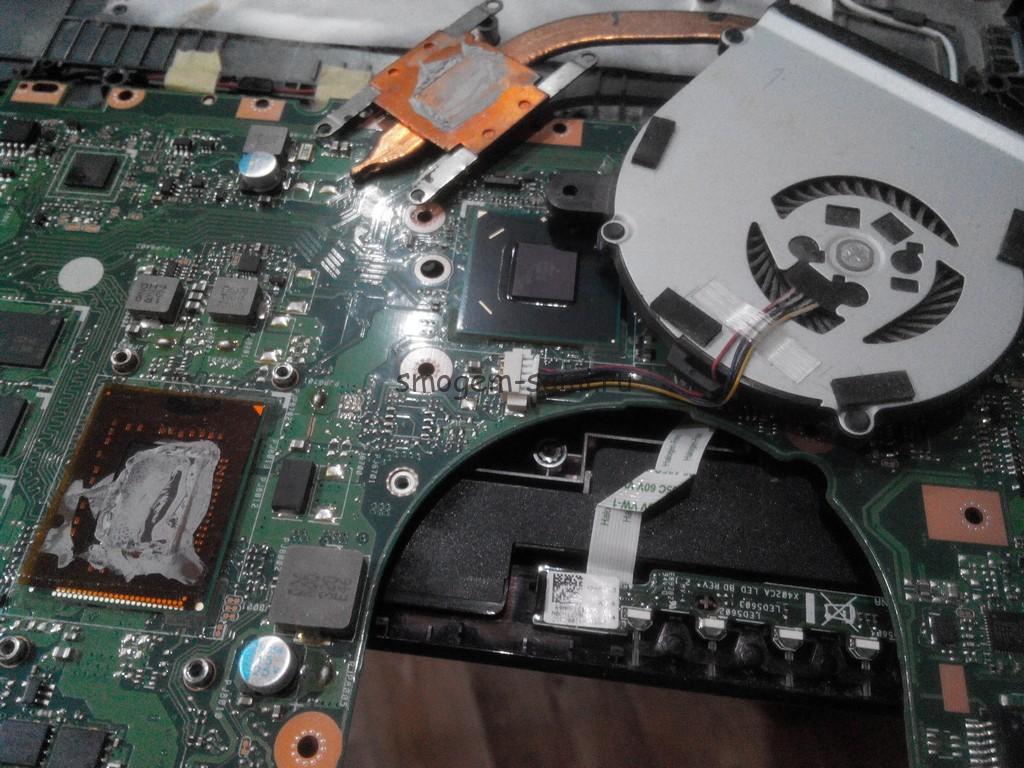 If there is thermal paste available, it is better to replace the old one with a new one in order to avoid re-parsing the equipment later. Now let's deal with another reason for the laptop overheating - it is the clogging of the heat sink channels. A radiator is attached to the cooler. It is attached with adhesive rubberized tape. It should be carefully taken to the side.
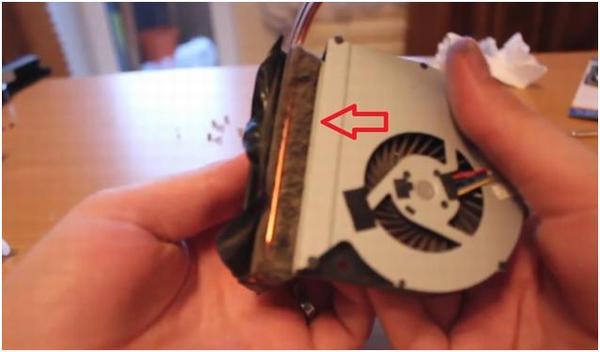
 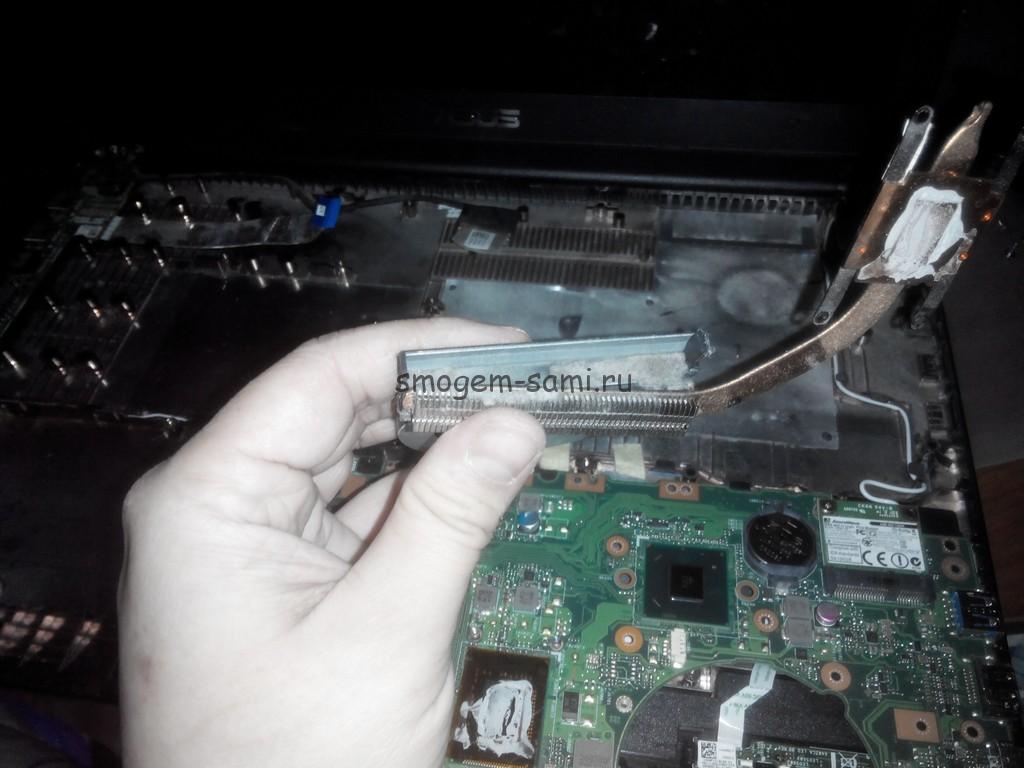 Next, the Asus X502C is cleaned from dust. To do this, it is enough to remove the accumulated "felt boots" with a brush and blow through the channels. You should also remove dust from the laptop processor cooling fan itself.
 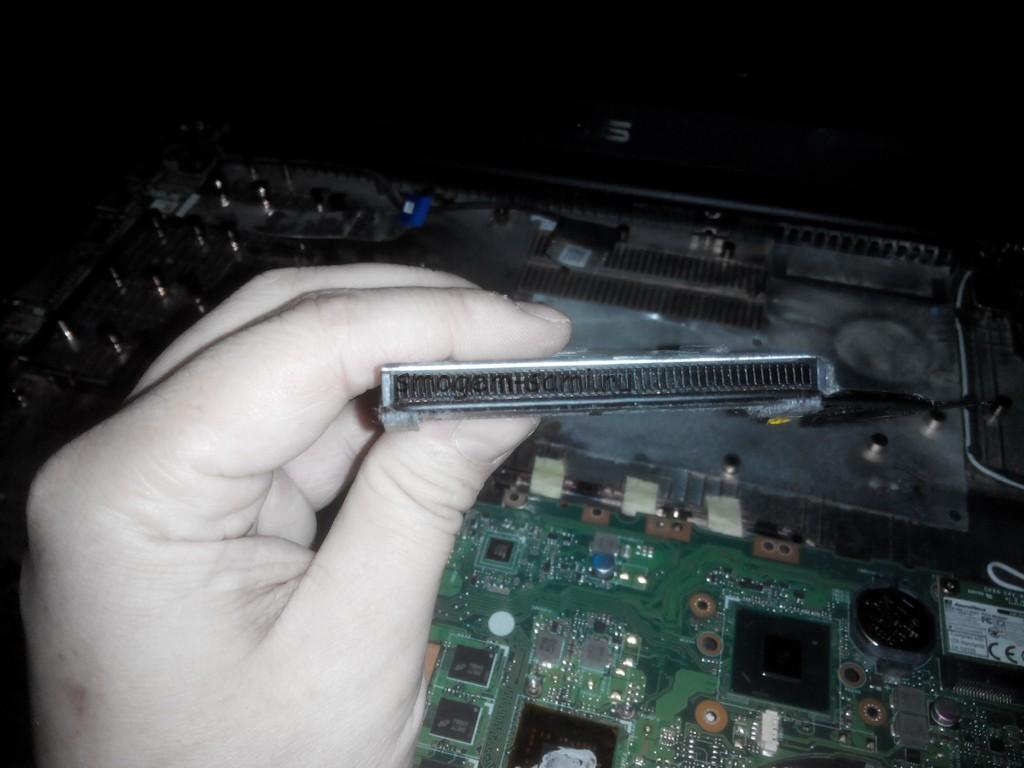 That's it, cleaning the Asus X502C is complete. And then you can start reassembling the laptop. Do not forget to connect all the cables and tighten all the screws. Otherwise, the Asus X502c may need to be disassembled again.
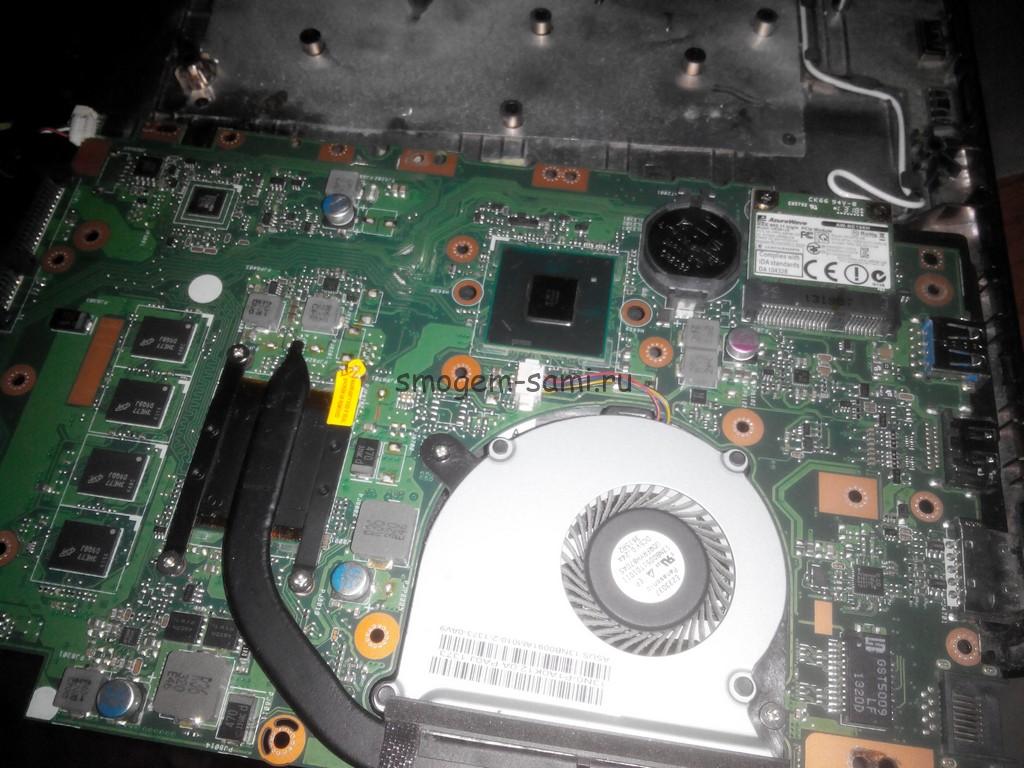

 That's all there is to know about how to disassemble the Asus X502C for cleaning or replacement parts.
This article is about cleaning your laptop from dust. As a patient, my laptop is ASUS X53S.
Cleaning your laptop from dust should not be neglected, as the computer will have poor performance and in the worst case, it may fail.
So, the first thing we do is disconnect the battery.
This is done very simply, turn the laptop over and move the latches at the edges that hold the battery.

Then we take a Phillips screwdriver and unscrew the screws. There are several of them here. One holds the DVD-ROM, the rest is the top cover and they also need to be unscrewed.
![]()
We take out the DVD-ROM, it can also be blown out of dust.
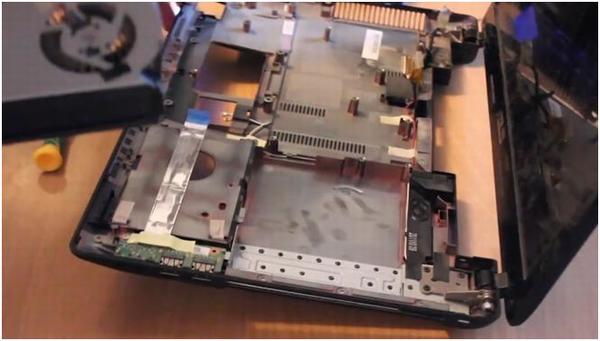
Then we close the laptop, carefully turn it over and begin disassembly.
In principle, here you need to unscrew all the bolts around the perimeter. The figure shows only one bolt, the rest are not visible, but they also need to be unscrewed.


After unscrewing the bolts holding the hard drive, you need to pull the handle and get it out.
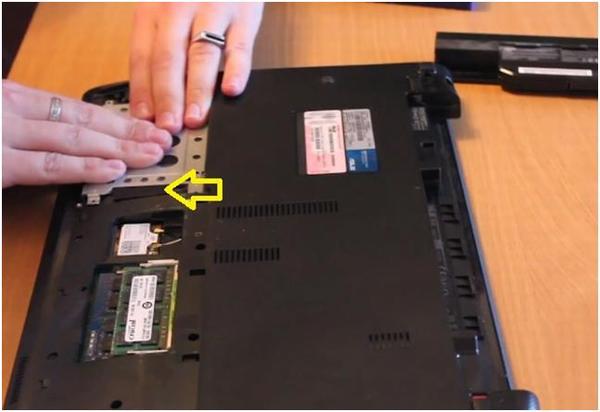
The figure shows the mounting locations for the bolts in orange, and they must be unscrewed.
Naturally, all dust on the lid must also be blown out.
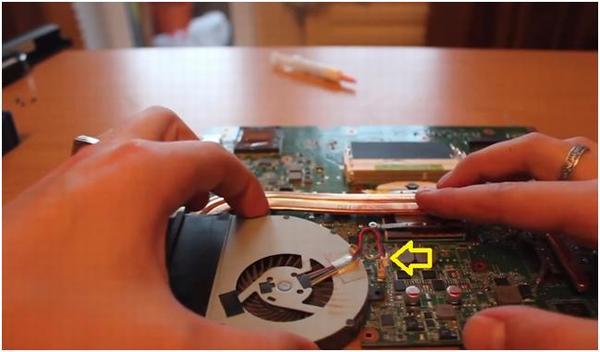
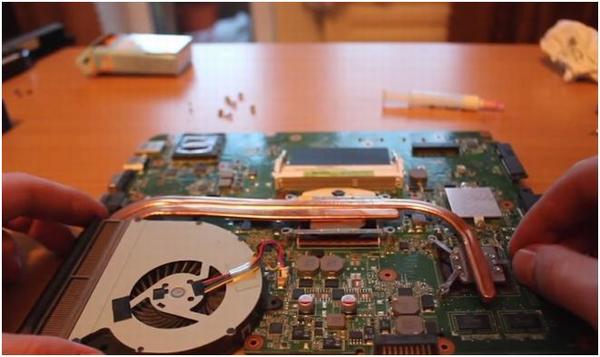
Now we need to unscrew the cooling system on the motherboard.
First you need to turn off the power on the motherboard. For you need to carefully disconnect this plug.
For this, there are numbers printed on the cooling system itself. We begin to unscrew along them, but not completely, so that the cooling system moves away. So we run by numbers.
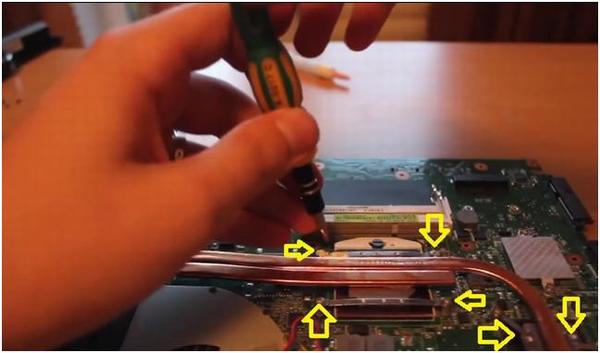
Then we unscrew the bolts completely, following the numbers. And very carefully disconnect the cooling system.

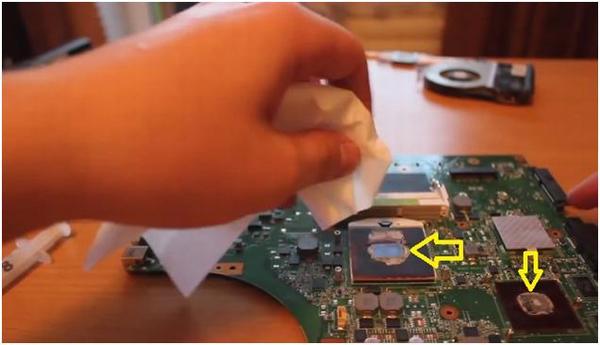
Now we clean the motherboard and cooling system from the old thermal paste. You can use a dry napkin.
And while we put the motherboard aside.
Then you need to clean the fan from dirt. To do this, turn the two parts a little to the side. We clean it from dirt.
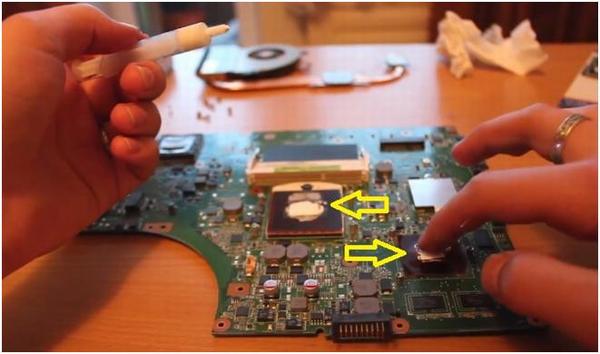
Now you need to apply thermal paste to the processor surface and to the surface graphics chip... It is very important not to overdo it with thermal paste. Distribute it evenly.
Then we collect everything in reverse order, also very carefully. We twist the cooling system according to the numbers on it. Do not twist too much.
We turn on the laptop, everything works and is fine. There is sound, the touchpad works, the buttons on the keyboard work.
If you still don't understand anything, watch the video below.
Secrets and subtleties of laptop disassembly methods
Asus is a Taiwanese corporation that manufactures laptops, PCs, mobile phones, tablets, DVD drives and a large number of other smart electronics lines. Asus is among the TOP5 of the largest PC makers, behind Lenovo, Hewlett-Packard, Dell and Acer.
Asus has a lot of laptop series, if we talk about the letter designations of the lines, then here they are: Asus A, B, F, G, K, M, N, NX, P, PL, R, S, T, U, UL, UX, V, VX, W, Z, EEE PC. The second letter in the name of the series means: L - thin and light, X - laptop case, the thinnest of the U series, minimum weight.
If we talk about our site, then here we talk about how to disassemble an Asus laptop, in particular, here you can find detailed instructions on the analysis of some Asus models such as Asus A7M, K40AD, K53E, Lamborghini VX7-SZ107V and others.
Consider how to replace a video card in laptop Asus Lamborghini VX7-SZ107V.
Step 1: First of all, we do all the points described in the articles Cleaning the cooling system in the Asus Lamborghini VX7-SZ107V laptop and Complete disassembly of the Asus Lamborghini VX7-SZ107V laptop.
Step 2: The graphics card is held in place by 3 screws. turn them out. After unscrewing the screws, the board rises to a small angle and is ready to be removed from the connector in the direction of the arrow:
We replace the card with a new one and collect everything in the reverse order.
On our website you can find other materials on how to disassemble an Asus laptop, at the specified link you will be able to access a list of all records related to the maintenance of laptops from this manufacturer.
The following links take you to the relevant records regarding repairs and cleaning Asus Lamborghini VX7-SZ107V:
I would be very interested to know with what question you came to the site and did you manage to find the answer to your question here?
I would be grateful if you share this article in social networks:
Let's take a look at how to disassemble an Asus Lamborghini VX7-SZ107V laptop.
We discussed how to disassemble a laptop to clean the cooling system from dust in the previous post. Now let's look at how to completely disassemble a laptop in order to replace the thermal paste.
Step 1: To get started, do all the points from the article Cleaning the cooling system in the laptop Asus Lamborghini VX7-SZ107V.
Step 2: Disconnect the connectors from the motherboard (7pcs) and unscrew the screws (3pcs) holding the board:
The continuation of the material on how to disassemble a laptop Asus Lamborghini VX7-SZ107V can be found by clicking on the link >>
Let's consider how to clean the Asus Lamborghini VX7-SZ107V laptop from dust by yourself.
To clean the cooling system, we need to completely disassemble our laptop. Before you start cleaning, make sure you can do it! In some way, only the fans and radiator fins can be safely cleaned! To replace the thermal paste, you will need a thermal pad kit! In this article, the option of cleaning will be considered, without replacing the thermal paste.
Attention, in this material we are talking only about how to clean a laptop, if you need a complete disassembly of the Asus Lamborghini VX7-SZ107V, then you can familiarize yourself with the sequence of actions at the link.
Step 1: Disconnect the power supply and remove the battery:
The continuation of the material on how to clean the cooling system in an Asus Lamborghini VX7-SZ107V laptop can be found by clicking on the link >>
 Bugs in Singularity?
 Just Cause 2 crashes
 Terraria won't start, what should I do?