Necessary desktop shortcuts. Labels. What is a label
Hello, friends! We are with you again on the pages of my blog " "
. The conversation that will go today is about small tricks when working in Windows, which will allow you to improve something, and change something for the better. The topic, first of all, will touch the desktop, and even more specifically, shortcuts. We will get acquainted with the concept of a label, what it looks like and why it is needed. If you are interested in this topic, then read on.
During the installation of programs, as a rule, its shortcut is also automatically created. By the way, what is a label? (In English - label, Label, File used for quick launch another file, folder or web page, that is, in fact, it is a link to another file or address.)
.
It is very easy to distinguish a shortcut from a program icon. There is an arrow on the shortcut icon, but it is not in the program. And what to do if the label is not provided in this setup file and, after installing the program, it did not appear on the desktop? And here it is elementary simple. We will create a new shortcut for this program. There are at least two ways to create shortcuts in the Windows operating system environment. For many, this procedure is no longer news, but for those who are new to this, I will tell.
Part 3 shows how you can use links. To access other sections, use the links at the end of the article. Below are the chapters on this topic. Part 1: Introduction Part 2: Setting up folder structures. Part 3: Using shortcuts. Part 4: Creating different workspaces. Part 7: Defragment your hard drive.
Among other things, you can easily launch your programs, open folders and files, browse interesting web pages, or access printers and disks directly. The possibilities are almost unlimited. Links are nothing but links. They store the location of objects and thus simplify access. This way you not only save a lot of time, but you don't have to constantly search through your folder structure for where the desired item is located.
1. The first method allows you to create a shortcut through . Click right click mouse on a free field of the desktop and in the menu that opens, select "Create" → "Shortcut".
![]()
A window will open where you click "Browse" and find the program for which you want to create a shortcut on the desktop, click "Next". You are invited to enter the name of the future shortcut, leave it as it is and click in the dialog box "Finish".
If you create a shortcut to this file, the shortcut to that directory will be remembered - like a notepad, which can then be placed anywhere. The reference is not a copy of the object. It will be more convenient to open you from different places. The same applies to other objects. They also exist only in the original. However, it's easier for you to get there.
Create shortcuts on the desktop. Typically, you will create shortcuts on your desktop. There you are in the city center and always easily accessible. You can also use the shortcut wizard. It defines you clearly with individual steps. Removing shortcuts from the desktop.
The window will close and a shortcut will appear on the desktop. Further already familiar actions. Clicking this shortcut will open the main file or program.
2. Another way to create a shortcut is to point (select it by clicking the left mouse button) on the file or program of interest and right-click to select "Create" → "Shortcut". The system will warn you that a shortcut for a particular object will be placed on the desktop. Click "Finish" and the operation will be completed.
If the link is no longer required, you can simply remove it. It does not affect the object. If it still exists, it remains intact. The link is removed, not the object itself. You can also customize the Start menu according to your wishes. It is divided into two main areas.
Here you can also influence and include links to other important objects in the Connected Programs area. Remove items from the start menu. 
Again, the object is only removed from the start menu, but is otherwise untouched. Complete the quick launch bar.
Some programs can be launched with . This is done very simply. Right-click on the selected program or application shortcut and select the "Properties" tab in the menu that opens, and in the window that appears - the "Shortcut" tab. Find the line "Quick Call". Here you are informed that there are no shortcut keys yet. Place the cursor in this window with the left mouse button.
Like the Start menu, the Quick Launch bar is the same. It's a small toolbar in the task list area. You can customize them to suit your needs. Removing shortcuts from the quick launch bar. You may be concerned about this because you have created your folder structure differently. You can then choose a different folder for the initial view.
What is a label
You can also create multiple File Explorer links for quick access to different folders. Edit every path and rename every link. Assign drive letters to individual folders. Instead of accessing complex folders using shortcuts, you can also assign drive letters to these folders. It generates logical drives, which, like other drives, can also be accessed directly through File Explorer, Workstation, or the Save or Open dialog.

Now press any letter on the keyboard (True, there are restrictions on the choice of keys. It is not recommended to assign keys from F1 to F10, as well as special keys Enter, Delete, Caps and so on.
That's it - the following key combination and a letter appeared in the shortcut window, for example: Ctrl+Alt+letter of your choice. Click OK. From now on, to launch an application or program, type the desired combination and, voila! In fact, the shortcut is no longer needed and can be removed from the desktop.
We have a label, but appearance we don't like him. There is a way out. We need to change its appearance. To do this, right-click on the desired shortcut and select from the drop-down menu "Setting properties change icon". A window will open with a large set of various icons. You just have to choose what you like and click OK. True, the choice is not so great. You can try to install your own icon or find it on the Internet, but in my opinion this is an unproductive process.
Disable the drive card. Permanently adjust disk assignment. If you have assigned a drive letter to a folder, this assignment only applies to one work session. If you restart your computer, the drive will disappear. If you want to permanently assign a task, you can do so conveniently with batch file, which automatically assigns a drive letter to each drive.
There's also an elegant way for the web to keep order: favorites. Here you can link to sites that are so interesting that you want to visit them more often. How often are there various ways creating a label. And hop on, your shortcut will appear on your desktop, nothing is easier. This is done by selecting the icon with the left mouse button. You can then copy, move, or create a shortcut using keyboard shortcuts. When you release the icon.
But such a situation - you do not like that the name of the program is written at the bottom of the label. You already know what kind of program this is and the inscription is not needed. Simply highlighting the text and deleting it does nothing. Click right key and select "Rename", and then erase - also to no avail, the name will appear again in its place. What to do? Try to do the following: click on the shortcut and press the F2 key. The text on it is highlighted, press the Backsace or Delete key. The text has disappeared, now instead of it, hold down the Alt key, write the number 255 and press Enter. Now everything, the inscription has disappeared forever.
Finally, you can create the shortcut manually, on the desktop or in a folder of your choice. To do this, right-click on the folder where you want to create a shortcut. Then you must specify the file that the shortcut points to. The Browse button allows you to navigate through the tree structure.
Click "Next" to proceed to the next step. Then click "Finish", the shortcut is ready. The Start Menu is actually a centralized hub. It has many more features than you would expect from such a small program, including. By default, the application saves files to the desktop.
These are the manipulations that can be done with labels. In conclusion, I would like to introduce you to small program which will help optimize the launch of several programs or applications. This program is called 7 stacks.
An easy-to-use, free utility designed to clean up your desktop by organizing shortcuts into groups. The program offers to create a group of related icons into a single icon on the taskbar or on the desktop, when clicked, a cascading menu opens with a list of included items. Here you can collect all the shortcuts to applications and programs that you use regularly. In settings 7stacks You can set the font color and appearance of the context menu.
Let's start with the download and installation. For download, I again suggest using cloud storage Yandex disk. You are already familiar with this repository and know how to download here. If you forgot, see
By going through this link , you will be taken to the download page. Downloaded - then install the utility. And here everything is standard. The only thing I recommend to you is to check the "Create a shortcut on the desktop" box. That's all. Now how to work? First of all, you need to create a folder and give it some kind of name, for example "Shortcuts". Further, in the created folder, add all the shortcuts, folders that you have chosen. Next, open the program.

Everything is clear here. Opposite the item "Specify the path ..." find your folder. In the line "Path to icon ...", click browse and select the shortcut icon and click "Create shortcut ...". Now when you click on the shortcut, a menu like this will open:
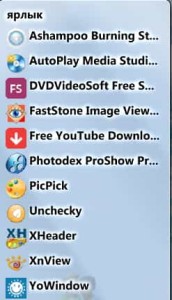
Of course, you will have a different list, but the essence is the same. By experimenting with the "Stack Type:" tab, you can change the list view. For more details, you can watch the video below. And I say goodbye to you. I look forward to your questions, discussions, comments. In our next meeting, we will get acquainted with another element of Windows, folders and their secrets. In order not to miss the topic, subscribe to new blog articles. See you!
As you know, in the store, labels are attached to clothes so that you can quickly determine the size, price, manufacturer, recommendations for washing and ironing, etc. for any model of clothing. If such a label is removed, then the clothes do not lose their properties and can be worn.
Similarly, you can handle shortcuts in Windows 7: use them for quick access to files, folders, programs on your computer.
What is a label
You should not worry or get upset if there is some problem with the shortcuts, for example, they are gone or, by clicking on them, you cannot open a file or program. In case of problems with shortcuts, files, folders and programs for which Win 7 shortcuts were created, as a rule, remain safe and sound.
How to distinguish a label from a regular icon?
The label has the same name as the object it points to. The object can be a program, folder, or file. It turns out that by name it is usually impossible to distinguish a program shortcut from the program itself.
How to understand when we have a label in front of us, and when the object itself? Moreover, the label can be safely removed. And it is worth deleting the object itself, only after thinking carefully.

Rice. 1 A shortcut icon differs from an object icon by having a navigation arrow.
You can distinguish a shortcut from an object by its icons.
The shortcut icon usually has a navigation arrow in the lower left corner (Figure 1). And the icon of the object does not have such an arrow. On fig. 1 shows examples of three icons:
- Shortcut icon for the Yandex.Disk program (there is a jump arrow, which means this is a shortcut for the Yandex.Disk program),
- Shortcut icon for Skype programs(there is a jump arrow, so this is a shortcut for the Skype program),
- Trash icon (no jump arrow, it's not a shortcut).
Windows 7 shortcut properties: shortcut type, size and location
If you right-click on any shortcut (right-click), the "Properties" window will open. We click on the "General" tab (number 01 in Fig. 2), and look at the general properties of the shortcut.
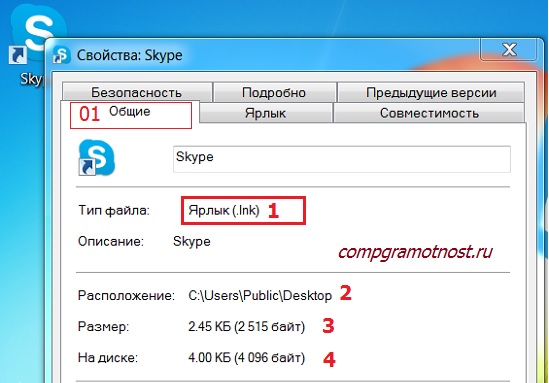
Rice. 2 File type, location and file size of the Skype shortcut
The shortcut file has (or type, format) .lnk (number 1 in Fig. 2).
Labels take up little space. On fig. 2 shows that the size of the shortcut file is 2-4 KB.
Also in fig. 2 you can see the label location. It can be seen that the shortcut for the Skype program is located on the Desktop, or rather, here - C:\Users\Public\Desktop (number 2 in Fig. 2).
How to create a shortcut: the first way
Shortcuts are useful because they can be located in a convenient place, for example, on the desktop. By clicking on the shortcut on the desktop, you can quickly open desired program, file or folder. Below we will consider two ways how you can create a shortcut for a program, or a file or folder.
1) You need to find on your computer an object (program, file or folder) for which you need to create a shortcut - number 1 in Fig. 3.

Rice. 3 How to create a shortcut in a folder and drag it to the desktop
2) Now you need to right-click (Right Mouse Button) on the object (on the program, on the file or on the folder) that needs a shortcut.
3) A menu will appear in which you should select the "Create Shortcut" command - number 2 in Fig. 3. That's all, a new shortcut will appear in the same place, in the same folder where our object is located.
4) It makes no sense to store the shortcut together with the object in the same folder. Therefore, you should drag the shortcut to the desired location, for example, on the Desktop.
To do this, use one of the three buttons in the upper right corner of the window (number 3 in Fig. 3) to reduce the window so that the desktop is visible.
Then you need to move the mouse cursor to the shortcut, click on the LMB ( Left Button Mouse) and, without releasing it, drag the shortcut to the desktop (number 4 in Fig. 3). After dragging the shortcut to the desired location, you can release the mouse button.
How to create a shortcut: the second way
Create a shortcut to Windows 7 directly from the desktop. For some it will be easier than the first method, but for others it will be more difficult.
1) Click on an empty spot on the desktop with RMB (right mouse button) (number 1 in Fig. 4).

Rice. 4 Create a shortcut on the desktop
2) Select the "Create" command in the menu that appears (number 2 in Fig. 4), and then "Shortcut" (number 3 in Fig. 4).
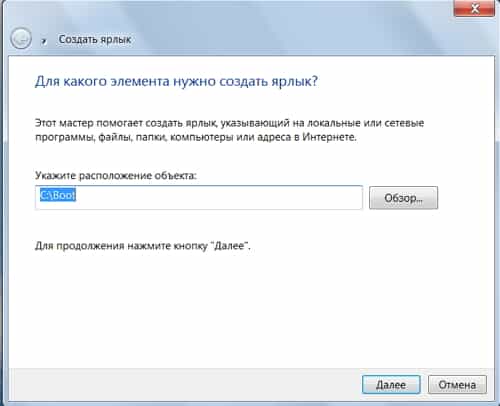
The Create Shortcut window will appear (Figure 5):
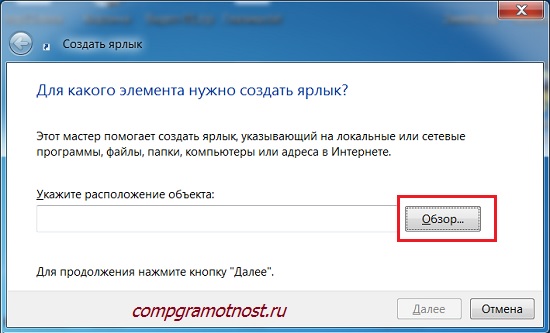
Rice. 5 We are looking for the folder where the object for which the shortcut is created is located
3) You need to fill in the field "Specify the location of the object." To do this, find the object (program or file, folder) for which the shortcut is being created. To do this, you can click on the "Browse" button (Fig. 5). The "Browse files and folders" window will appear, where you need to find necessary program or document and click on it. The field "Specify the location of the object" will be filled, after which click on "OK".
4) A new window will appear where you can enter a name for the shortcut or accept the proposed name, after which you should click on the "Finish" button.
5) Now you can look for a brand new shortcut with an arrow in the left corner on the desktop of your computer.
How to create a Mail.ru shortcut on the desktop?
Shortcuts can be created for more than just files or programs on your computer's hard drive. A shortcut can also be created for a site located on the Internet.
Consider once again the above creation of a shortcut on the Desktop using a specific example - the shortcut (icon) Mail.ru on the Desktop.
1) Right-click (right-click) on free space on the desktop.
2) In the appeared context menu select "Shortcut" - "Create" (Fig. 4).
3) The “Create Shortcut” window pops up (Fig. 5).
4) In this window, enter http://mail.ru/ (Fig. 5.1).

Rice. 5.1. How to create a Mail.ru shortcut?
6) The “Create Shortcut” window will appear, in which you need to enter a name for the shortcut. On fig. 5.2 I have entered the name “Mail.ru”, but you can enter any other name, including, in Russian, in Cyrillic.

Rice. 5.2. Enter a name for the desktop shortcut
7) Click on “Finish”, go to the Desktop to watch a new shortcut with the name that we just set.
How to give the shortcut a different name (rename)?
You can rename a shortcut an unlimited number of times. To rename a shortcut, you need to right-click on it (Right Mouse Button). A menu will appear in which we click on the “Rename” command (number 1 in Fig. 6).

Rice. 6 How to rename or delete a shortcut
After that, the field containing the label name will become editable. Using the keyboard, enter a new name for the shortcut or edit the old name.
How to remove a shortcut?
1st way. Select the shortcut and press the Delete key.
2nd way. Click on the shortcut RMB (Right Mouse Button). A menu will appear in which to click on the "Delete" command (number 2 in Fig. 6).
In the 1st and 2nd method, in order to avoid misunderstandings when deleting the shortcut, the operating Windows system will ask for confirmation of your decision regarding the removal of the shortcut: "Move this shortcut to the trash?" (Fig. 7)

Rice. 7 Confirm the removal of the shortcut to the Trash
If you click on the "Yes" button, the shortcut will be removed to the Trash.
If the Recycle Bin has not been cleared by the user, then the shortcut can be returned from the Recycle Bin back to its original location. To do this, you will need to go to the Recycle Bin, right-click on the previously deleted shortcut. A menu will appear in which you need to click on the "Restore" command. The shortcut will be restored to the folder and location from which it was deleted.
Windows 7 Shortcut Icons
Label icons can be changed to different ones. How to do it?

Rice. 8 How to change the shortcut icon
- To change the shortcut icon, right-click on it.
- In the menu that appears, click Properties,
- open the Label tab (number 1 in Fig. 8),
- click the "Change icon" button (number 2 in Fig. 8).
The "Change Icon" window will appear, allowing you to select an icon from the provided set of icons. Select an icon, select it with a mouse click and click OK. The icon will change to the selected, new icon.
Windows 7 shortcuts won't open
The appearance of the shortcut (color, size, presence or absence of an arrow in the left corner of the shortcut icon) does not affect its operation in any way. Moreover, the appearance of shortcuts can be customized to your liking.
And what affects the performance of shortcuts? Viruses, failed windows updates, imprudent user actions.
The rash actions of the user include, for example, moving the program to another folder. As an option: the user put things in order on the computer, moved the program and forgot. Then the shortcut to the program transferred to another folder will immediately stop working. The reason is simple - the old file location does not work, it is worth replacing it with a new one.
What can be done if the shortcut stops working?
- Check your computer for viruses.
- Can be rolled back operating system to the working version if points were made.
- Without thinking twice, you can try to remove the shortcut. Beforehand, you should make sure that the shortcut is actually being deleted, and not the program itself, for which the shortcut was created. Then create a new label. This is easier than checking the properties of the shortcut, looking for the cause there and fixing it.
- Check label properties. Let's consider this reason in more detail.
If the Properties of the shortcut specifies the location of the program that is different from its actual location on the computer, then, of course, the shortcut will not work.
Where to find it? RMB on the shortcut - Properties - Tab "Shortcut" - button "File Location" (number 5 in Fig. 8). If, after clicking on this button, the file is not found, then it is worth looking at in the “Object” window (number 6 in Fig. 8). Compare this path with the actual location of the file on the computer and, if necessary, correct it, especially since the field indicated by the number 6 in Fig. 8 is editable.
Computer literacy exercises:
- Find a photo (or program) on your computer and create a desktop shortcut for the photo. Click on the shortcut on the desktop, make sure it works.
P.P.S. To subscribe to receive new articles, which are not yet on the blog:
1) Enter your e-mail address in this form.
 Modules for digital television
 Tricolor TV - receiver software update
 Satellite receiver or satellite TV input ci common interface