How to create a folder in an email. How to create a new folder in Yandex mail. How to create a folder in Yandex mail in a few minutes
When the number of letters and the state of your e-mail starts to catch up with melancholy and depression. To clean up your online storage of correspondence and achieve the cherished "Inbox Zero", use the tips from our collection.
Find zen in a folder « inbox »
Gmail allows you to customize the style of your inbox: "Default", display "Important first", "Unread first, Starred first" and a "Priority" type that sorts emails based on their importance.
If you want to really control your email, the Default and Priority types are the most useful: one classifies, the other prioritizes. You can change the type of mailbox until you find the option that suits you. Open the Settings menu and click on the inbox tab, under which a menu will open to select the type of this folder.

Bypassing the Inbox
There is no need to manually sort messages for later archiving. If you want some emails (for example, those related to a work project, invoices, etc.) to be sorted automatically, create a filter that will bypass the Inbox folder.
To do this, open the Settings menu, click on Filters and blocked addresses, create a new filter and enter the necessary parameters, for example, all letters with the word "earnings" in the subject line. After that, you should specify that all future filtered messages are sent directly to the archive, bypassing the inbox. You can set it so that filtered messages are automatically marked as read.

Keywords
The Gmail archive system ensures that users never delete anything. Perhaps there is a rational grain in this, but because of this state of affairs, the search for a particular letter forces you to wade through piles of e-waste, even if they are perfectly organized and color-coded.
Gmail's automatic search option is fine, but it's much better to take your search settings into your own hands. If you have a letter and think it might be useful in the future, forward it to yourself with a few unique, catchy keywords or sentences. Now, instead of searching by date parameters, you can simply enter keywords / sentences and the letter you are looking for will appear in front of you.

Search like a pro
If you need to find any email that doesn't have useful keywords, you will have to turn to the Gmail search engine for help. In this section, you will find information on additional search operators that will help you find the right text in an ocean of 20k+ old emails.
- Exclude emails with certain labels via the function label: [label name]. This is especially useful when you want to disable chat logs. Just type label:chats in the search field. You can also search for messages with specific labels via +label: [label name]. The + and - operators also work with other search settings.
- Find emails sent and received within a certain period using operators before:[dd/mm/yyyy] And after:[dd/mm/yyyy].
- Search for an attached file by its name or type using the operator filename:[file type]. For example, if you need an email with attached PDF files, enter in the type filename:pdf.
- Basic search does not include messages from Trash or Spam - use in:trash or in:spam respectively. To search for absolutely all mail folders, use the command in:anywhere.

Highlighting
Labels are useful for sorting and classifying your emails in Gmail. But sometimes they are really difficult to read, especially if you have a colorless wall of letters in front of you. You can make emails visually organized, using colored labels.
Move your mouse to the left column and hover over the label you want to assign a color to. Click on the downward arrow and a menu of options will appear in front of you. Hover over Label color and select the option you like, thereby setting it for a specific shortcut. You can add your own color options.
Deleting old attachments
Google users get 15GB free space for Gmail, Google Drive and Google+. If you find that the limit has been reached - deleting old letters with large attachments will be the best solution.
You can find similar posts by going to the search field and clicking the down arrow to perform an advanced search. Mark the item There are attached files and click on Search. Or enter has:attachment in the search box. To find emails that are larger than a certain size, regardless of the attachment status, enter the following advanced search size options: next to the size, select "greater than" and enter a number in bytes, kilobytes, or megabytes, then search.
Smart Labels
You can also organize letters, by creating additional nested labels. Using them, you can classify letters even more accurately. For example, instead of tagging a post with a simple "Work", create a "Work>Important Projects" thread.
Select the letter and click on the "Label" button, create a new label and enter its name. Then check the box next to "Place label under" and select the parent element from the drop-down menu.
Adding a Viewport
Adding a preview option in the inbox will help you sort them much faster, without having to open each one separately.
Open the Settings menu and go to the "Lab" tab, which has been in beta for quite some time and offers a lot of still experimental features. Find Viewport and turn it on. After you save your new settings, a "Show multiple folders" button will appear next to the gear icon. Click on it when you want to enable or disable the Viewport, as well as change its settings.
Chat on the right side. Done
Chat on the right is another experimental Gmail feature and a great way to offload the left side of the screen. Go to the "Lab", find the "Chat on the right side" function, activate it and save the changes. After that, the chat will move to the right side of the screen, freeing up the left column.
Label display settings
To change the viewing options for individual shortcuts, go to the Shortcuts tab in Settings. There is a list: System Labels, Categories, Circles and others created by you. You can choose from the following options: show or not show labels, display only if there are unread messages. Select a setting for each individual shortcut and save the changes. If you choose to hide all shortcuts, a new setting will appear: "Yet" in the left column.
Use email aliases
You get the additional ability to sort emails using email aliases. Just add +any.alias to the address after username but before @gmail.com. You will still receive emails in your inbox because sending a message to " [email protected]" is the same as sending a message to " [email protected]" or " [email protected]».
Aliases are often used to filter out unwanted messages (for example, " [email protected]"), but you can also use them to filter important emails.
Automatic forwarding of important messages
First you need to add an address for automatic forwarding, for which it is better to get the consent of the recipient. Most likely, the forwarding addresses will belong to one of your relatives, colleagues, or yourself. Select tab Forwarding and POP/IMAP in settings, add the desired forwarding email address, and click Next. A confirmation email along with a verification code will be sent to this address. You or another recipient must follow the link in the confirmation email, after which automatic forwarding will begin to work.
After setting up forwarding, you can also create filters through the filters and blocked addresses tab in the settings. Create a filter according to new requests, on the next screen, set up forwarding to the address chosen for certain messages.
Master the art of "filtering"
Filters really work when you use them creatively. If you have already mastered the basic filters (filtering messages from a specific sender or domain name and then sending them to the correct folder), it's time to get acquainted with other interesting options.
- Use filename:[file type] to create filters for different media types. For example, filename:jpg | filename:png to send all messages with attached photos to the photo folder.
- Filter messages that contain your email address in the fields "From" And "To whom" and send them to the correct folder. Now you will immediately find your notes / reminders / to-do lists in one specific place.
- Create a hashtag (for example, #never delete) and a dedicated Gmail backup account for especially important emails that can't be missed or lost. Then set a filter that will automatically forward emails with the given hashtag to the backup account.
Add folder
- Click Add Folder.
- In the Name field, enter a name for the new folder.
- In the Folder Location field, select:
- Top Level Folder if you want the folder to appear in the list of other folders.
- Name of the parent folder if you want to create a subfolder.
You can also set a password for the folder. To do this, check the box next to "The folder is password protected" and fill in the fields:
Empty folder
If you want to clear a folder of emails, hover your mouse over the name of the required folder and click "Clear". Letters from the folder will be in the Trash folder.

Delete folder
You can delete any folder, except for the system folders: Inbox, Spam, Sent Items, Drafts, and Trash.
To delete a folder, hover over its name and click the icon.
The folder will be permanently deleted, and all messages will be in the "Trash".
You cannot delete a folder if it contains subfolders. You need to delete the subfolders first, and then the folder at the top level.

Rename folder
You can rename personal folders. To go to the folder editing page, hover over its name and click the icon.
Rename the folder and click Edit.
The Inbox, Spam, Trash, Sent Items folders cannot be renamed.

Make the folder unavailable for download by email programs using the POP3 protocol
To make a folder unavailable for POP3 downloading, hover over the required folder name and click the icon. In the window that appears, check the box next to "Not available for email programs (POP3)" and click "Change".
You cannot download emails using POP3 mail programs from the Sent Items, Drafts, and Trash folders.

Make folder archive
If you move old messages to the Trash, they may disappear: the letter is deleted from the Trash after 30 days. To keep old emails always available, create an archive folder.
To do this, check the "Make this folder an archive" checkbox. The folder will appear in the list after "Drafts" and will have its own icon - . Put old unclaimed letters in this folder so as not to clutter your Inbox.

Set a password for a folder
To set a password for a folder, move the mouse cursor over the name of the required folder and click the icon. In the window that appears, check the box next to "The folder is password protected" and fill in the fields:
A password for a folder will help further protect the messages it contains. However, if someone has access to your mailbox, he will not secure the letters completely. Turn on secure SMS login in your mail so that no one gets into your mailbox.
Folder order
Folders in Mail are arranged automatically in alphabetical order. The first folder is always Inbox, then folders with a name from 0 to ∞, then - from A to Z and finally - from A to Z. The service folders complete the list: "Sent", "Outbox", "Drafts", " Archive, Spam, Trash.
If you want to put the folders in their own order, add numbers at the beginning of their names: 0, 1, 2, 3, and so on until you designate the desired folders.

An example of manually ordering folders with numbers at the beginning of the names
If you have a problem logging into a folder, use our helper .
Note: This article has served its purpose and will soon be retired. To avoid "Page not found" errors, we remove links that we know about. If you have created links to this page, please remove them and together we will ensure data consistency across the web.
When you set up email in Mail for Windows 10, a set of default folders is created. You will see at least the Inbox, Drafts, and Sent folders that others can view, such as archived and junk. You cannot delete the default folders, but you can add new folders and remove all added folders.
Note. If you are unable to create the folder, see the section at the end of this article.
Create a folder
If you have multiple associated mailboxes, next to the All folders there will be no icon + . Each folder you create must be in the same account. Select Yet in the folder list and you will see sections for all accounts listed in alphabetical order. Click + next to the desired account name to add a folder. To create a subfolder, right-click a folder in one of your accounts, but not one of the five top-level folders (Outbox, Inbox, Drafts, Sent Items, and Archive).

Deleting a folder
To delete the folder you created, select your email account (if you have more than one) and click Yet.
Right-click the folder and select command Delete.
Note: Standard folders cannot be deleted. These folders are Inbox, Sent Items, and Drafts.
Troubleshooting
If you don't see the + sign next to All Folders, or if you receive an error message when you try to create or delete a folder, follow these steps:
In rare cases, especially if you've recently added an email account, you'll need to close Mail for Windows 10, wait about 30 seconds for it to finish completely, and then reopen it.
If that doesn't help, check for updates to Mail and Calendar for Windows 10.
additional information
For more information about Mail for Windows 10, see
Content:
This article shows you how to create a new label for emails in Gmail. Gmail labels are used to organize emails and make them easier to find.
Steps
Part 1 Create Shortcuts in Gmail
- 1
Open the Gmail website. Gmail labels are similar to folders, with the only difference being that you can assign multiple labels to a single email. Labels can only be managed on the Gmail website; You can't create new labels in the Gmail mobile app.
- If the Gmail Inbox service page opens, open the menu in the upper right corner of the screen and click "Mail".
- Unlike the Gmail app, the Inbox mobile app lets you manage labels and filters; read about it in the third section of this article.
- 2
Find the email you want to label. You can assign a label to any email. Open your inbox and find the email you need.
- To assign a label to several letters at once, check the boxes next to the corresponding letters.
- 3 At the top of the window (above the list of emails), click Labels. This button has an icon in the form of a label (tag). All available shortcuts will be displayed, including the pre-installed ones.
- 4 The name of the shortcut can be entered directly in the menu that opens in the appropriate line. After entering the name, click "Create" (displayed under the line with the name).
- You can also check the box next to an existing label to assign it to selected emails.
- 5 Consider whether you need to add a new label to an existing one. When you create a new shortcut, the system will prompt you to add it to an existing shortcut (this is the same as a folder and its subfolders).
- 6 Click "Create" to create a new label and assign it to the selected email. A message will appear on the screen stating that the label has been assigned to the letter(s).
- 7 View flagged emails. Emails with labels can be quickly found by clicking on the corresponding label in the left pane. To display a list of all available shortcuts, click More (below the shortcut names in the left pane). By clicking on the label, all letters to which it is assigned will be displayed; emails will be sorted by the date they were received.
Part 2 Filter emails by labels in Gmail
- 1 Create filters so that certain labels are automatically assigned to the appropriate emails. In this case, certain incoming letters will receive one or another label automatically. So you will greatly simplify the sorting of incoming messages and speed up the search for the right letters.
- 2 Open your Gmail settings. Click on the button marked with a gear icon and select "Settings" from the menu.
- 3 Click the "Filters and Blocked Addresses" tab. A list of active filters will be displayed.
- 4 Click "Create a new filter". This link is located below the list of active filters.
- 5 Enter a criterion according to which a certain label will be assigned to the letter. Emails can be filtered by sender address, recipient address, subject, keywords, attachment, and size. As you enter the criteria, the corresponding letters will be displayed in the main window. You can specify multiple criteria at once to create a highly specialized filter.
- 6
Click "Create a filter according to this query". In the window that opens, select what to do with the letter that matches the specified criteria. Check "Apply shortcut" and then select the desired shortcut. You can also choose to have the email skip the inbox or automatically mark as read.
- Check the "Apply filter to relevant conversations" checkbox to apply the filter to messages already received.
Part 3 Creating and working with labels in Inbox
- 1
Open the Inbox website or the corresponding mobile app. Shortcuts can be created and managed both on the Inbox website and on the mobile app, and the user experience is very similar (website design mimics that of the mobile app).
- Inbox is a new email service from Google. It works in conjunction with Gmail and is used to work with an electronic mailbox.
- 2 Open the menu and click Create. To open the menu in the mobile app, swipe from left to right on the screen. On the website, the menu is open by default. The Create button is located at the bottom of the menu.
- 3 Enter a name for the shortcut to create. Do it in the window that opens.
- 4
Click "Add" to specify the criteria according to which the label will be assigned to letters. Here you can choose almost the same filtering criteria for emails as in Gmail, including the sender address, email subject, and keywords. Open the "From" menu to select specific criteria.
- Use the "AND" menu options to add additional criteria. In this case, the letters must meet all the specified criteria.
- As you enter the criteria, the corresponding letters will be displayed.
- 5 Save the new label and rule. You will return to the shortcut settings window, and the new rule will be displayed at the top.
- 6 Decide whether emails will be grouped in the Inbox folder. In this case, all messages marked with the same label will be grouped. This will make it easier to find and work with multiple emails that have the same label. If you don't want to group emails, they will appear in your inbox as usual. If you've enabled email grouping, specify when to move the email group to the top of your inbox (every time you receive a new email, once a day, or once a week).
- 7 Find letters with labels. The list of shortcuts is displayed in the Inbox menu. Click on a label to see a list of related emails. Grouped emails also appear in your inbox if the group has unread messages.
- 8
Assign the existing label to the new email. If you receive a new message and want to quickly assign an existing label to it, do so directly from the email.
- Click the "⋮" button at the top of the open email.
- Select the desired shortcut. You can also create a new shortcut from the drop-down menu.
- Choose whether new emails sent from this address will be tagged with this label. This is optional, but automates the sorting process.
This section is for creating new folders in the e-mail mail, for distributing letters. Folders help organize mail by distributing emails by topic or other parameters. Folders also allow you to block access to certain letters by password-protecting the folder.
We go to the settings - the button in the upper right corner, next to the "Exit" button or click the "More" button and select "Settings".
Select the "Folders" section either in the list on the left or on the right with an icon in the form of a yellow folder with a lock drawn on it.

The page contains a list of existing folders. At the top of the list is the "Add folder" button, by clicking this button, you can accordingly create a new folder for letters. Let's create the "Personal" folder for example, click "Add Folder".

In the first field, write down the name of the new folder (any one is possible, but I will create “Personal”). In the second line, select the nesting level, that is, it is like in the operating system, either this folder will be visible and it will be equal to others, or it will be located inside another folder. To make it more clear, I will create a folder nested in the already existing Inbox folder. I open the "Folder at the first level" field and select the "Inbox" folder.

Now select the folder accessibility. "Not available for email programs (POP3)" - this means that if you check this box, you will not be able to open this folder from email programs such as Bat, Microsoft Outlook, and the like. In this case, letters from the folder can only be opened in Mail.
You can create a password if someone else has access to the mail. To create a password, check the "Password protected folder" box.

Additional lines appear to be filled in - we enter the password for the folder twice (how to create a password can be found in the "registration in the mail" section), after the password we enter a security question, the question is not selected, but invented independently. The answer to this question follows. The answer and the question do not have to be logically interconnected, the main thing is that you can then remember this answer. The answer is intended for password recovery, I do not advise you to write anything, because one day you will definitely forget your password.
In the bottom line, enter the password for the Mail mailbox, that is, from the mailbox in which you are currently located. If you do not remember your password, go to the "password recovery" section. After filling in all the data, click the "Add" button.

Now in the list of folders there is a new one called "Personal". If you hover over a new folder, then two buttons appear on the right, - settings, and - delete a folder. In the folder settings, you can rename the folder, make it inaccessible to mail programs and close it with a password. In general, this is all that we ask when creating a new folder.

If you hover over the main folders that already existed at the entrance, then two buttons also appear - "Clear" and - settings. You can only delete folders that you have created yourself. When you empty a folder, all messages stored in that folder are deleted.

Now we go to the main menu to look at the result of our actions, to go, click on the list on the left "go to inbox".

Among the folders, a new one appeared - the one that was created. The Personal folder is located below the Inbox and can be hidden or shown using the triangle in the Inbox.
 Installing and configuring Ghostery Video to help
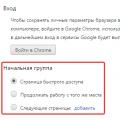 How to remove the start page in the Google Chrome browser
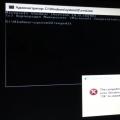 The computer restarted unexpectedly or encountered an unexpected error