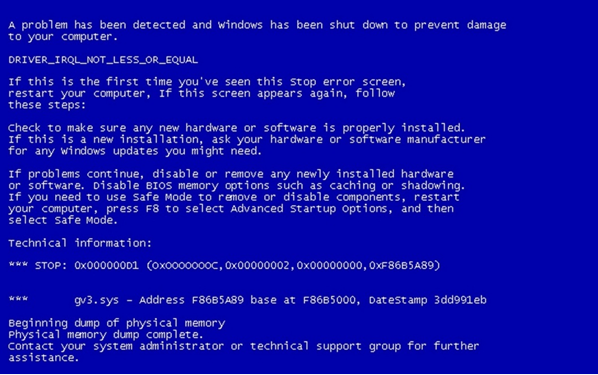
When turned on, the laptop gives an error. Award-style menu. Causes of message CPU fan error press F1
If you get this error when booting your computer or laptop, then you've come to the right place! Now let's quickly sort through the bones of the reasons and possible ways to eliminate the error "".
Literally this means the following: an error in the fan for the processor, press "F1". That is, to continue booting the computer, just press the "F1" button. But the problem itself, due to which this error appeared, will not go away.
In general, when the computer is turned on, its internal program polls all devices and checks their parameters. If errors are found, appropriate messages are displayed. Some mistakes are critical, and further work is impossible, and others are not critical, as in our case. Ie, you can press the button and work further, but you need to be confident in your actions, because if the CPU cooler is not actually spinning, then the computer may overheat.
Causes of message CPU fan error press F1
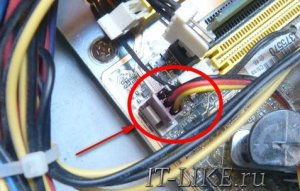
The processor fan is connected to a special connector motherboard called "CPU Fan". There are other connectors, for example "Chassis Fan" or "Power Fan", to which you can connect case or any other fans.
The computer BIOS determines the fan's performance by the number of its revolutions, i.e. if the speed is "zero", then the cooler is considered inoperative and an error message is displayed.
So, very often the processor fan is connected to the wrong connector, and the BIOS simply does not see it! To solve the problem, you just need to reconnect the wires to the desired connector and that's it!
It also happens that the cooler plug is three-pin, and the connector on the motherboard is four-pin. You can connect them and everything will spin, but the BIOS may not recognize the RPM sensor and there will be the same error. This is rare and usually fine. But if this is your case, then there are two options: either select compatible hardware, or ignore the error (more on that below).
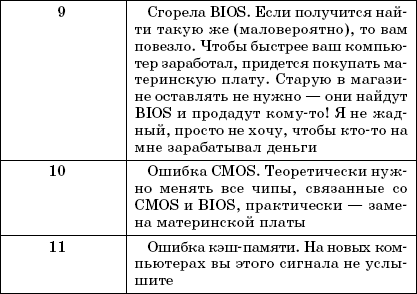
If everything is connected correctly and everything worked before, then it's time to open the lid of the system unit and check if the processor fan is spinning. Maybe the poor fellow is already clogged with dust and is no longer spinning Or wires have got into the blades and they do not allow them to budge.
You can try cleaning the fan and radiator, but then you still need to go and. As practice shows, cleaning helps for a very short time, and if it comes to the point that the cooler has stopped spinning altogether, then this is a completely disastrous business.
How to remove and install the processor cooling system, see this video
I had such a thing at home that everything was spinning and was connected correctly. The problem turned out to be in the "CPU Fan" connector itself. He didn’t read the rotation sensor, he simply didn’t see it, or he saw it only occasionally. I had no choice but to connect the fan to another connector on the motherboard.
I still got the CPU fan error press "F1" error, but I could have it on a different connector. For such and similar cases, it remains only to turn off the error message.
How to ignore an error while booting a computer
Fortunately, almost all BIOSes have a function to disable tracking the rotation speed of the CPU Fan. Depending on the BIOS version, the option may be located in different places, but the name will be approximately the same. , and look for the "Power" tab
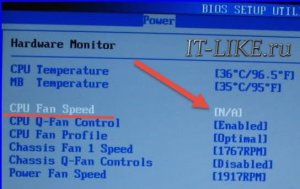
To disable tracking, set the "CPU Fan Speed" option to "N / A" or "Disabled".
But now you have to make sure that the cooler works on your own. That is, periodically check whether it is spinning, or observe the number of its revolutions on another connector. It will not be superfluous to monitor the temperature of the processor from time to time. conveniently using special program... In AIDA64, you can see the processor temperature and fan speed in the section " Computer -> Sensors»
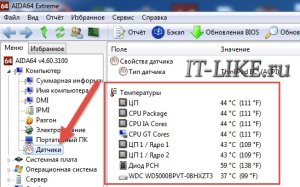
On my laptop, it does not show the rotational speed, but all temperatures are visible. In general, the average speed of coolers is about 1500-2500 revolutions per minute (RPM). It will not be superfluous to configure the thresholds for automatic shutdown. This is also done in the BIOS.
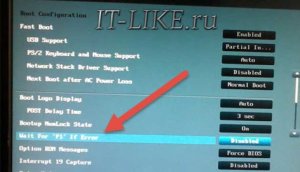
Also, it is possible to completely disable waiting for pressing the "F1" button for any non-critical errors. To do this, use the "Wait For F1 if Error" option, which is enabled by default.

Set to "Disabled" to disable.
In new "bios" UEFI this option is in the section "Boot"
What is the bottom line
We figured out why the error occurs when the computer boots up "CPU fan error press F1" and what to do so that it does not repeat itself every time you turn it on. According to statistics, the largest number of problems are due to a non-working or slow-working fan. When it barely spins, the rotation sensor shows zero. Also, sometimes it is connected incorrectly.
With a completely inoperative cooler, the processor most likely will not burn out, but it will work very slowly, and in Windows there may be various errors, if it boots at all)
Maybe you forgot to turn on the mains filter (popularly called "pilot", Fig. 1.1) or a source uninterruptible power supply? If the filter is on, then check the power connector itself - it so happens that you touched the computer, which violated the "fit" of the cable.
Rice. 1.1.
Network filter
If everything is ok with the power and cable, look at the back of the computer. There is often a small switch on the power supply. Make sure it is in position 1, not 0, that is, on.
In fig. 1.2 shows a computer power supply (usually it is mounted in system unit). There is an on / off button above the power connector (Fig. 1.3). It should be noted that not every power supply has such a button.

Rice. 1.2.
Power Supply

Rice. 1.3.
The connector to which the power button is connected (the plug is usually signed by POWER SW)
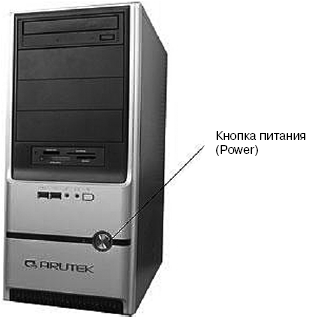
Rice. 1.4.
Computer case
So, everything is fine with food. This means that you need to open the case (Fig. 1.4) to find out the reason. If you have a computer under warranty and a warranty for the entire system unit, that is, it is sealed, then, of course, you do not need to open it, but you need to take the computer to service center- let them figure it out for themselves, otherwise you will lose the guarantee.
You can open the system unit if:
➲ the warranty has already expired;
➲ the warranty is given for the components, that is, the numbers of the components are written on the warranty sheet, and the system unit itself is not sealed.
The question is, what will we see if we open the case? We must measure the voltage of the motherboard battery (Fig. 1.5). It should be 3 V.

Rice. 1.5.
Battery on system board
If the battery runs out, you will not be able to turn on the computer. You can measure the voltage with a voltmeter. Don't you have it? You don't need to buy it - buy another battery, it costs much less than a voltmeter (one dollar versus four).
You can buy a battery at any computer store... You need a CR2032 (3V) battery. It's inexpensive, so replacing it won't ruin you. How long the battery will last is hard to say. She did not live on one of my computers even two years after buying a computer. And on my very first computer, bought in 1997, the battery is still alive. Believe it or not.
Replacing the battery is very simple: gently use a screwdriver to squeeze the retaining clip and remove the battery.
Was it the battery? Well, that's nice! But it so happened that she did not last long? Then the matter is either in the battery itself (the purchased battery turned out to be expired - next time, pay attention to the expiration date), or in the motherboard. If the next battery also quickly fizzles out, then the reason is most likely in the motherboard. Then decide for yourself which is better: either change the motherboard, or change the batteries every month.
It’s much worse if the computer still doesn’t turn on after replacing the battery. Take a look at the motherboard. Sometimes it has a power indicator (usually red). If the indicator is on, and the computer does not show any signs of life, then you will have to change either the processor or / and the motherboard.
If the indicator is off or not at all, you need to determine if the power supply is working. Pay attention to the fan: if the fan is not working, then you need to change the power supply.
If you cannot find a suitable power supply, you can prepare to replace the chassis. I do not recommend repairing the power supply - try to find a power supply that can be installed in your case, or buy a new case right away.
Text error messages
Each computer has a basic input / output system (BIOS, Basic Input / Output System). One of the BIOS functions is the Power On Self Test (POST) function.
POST is a computer self-test program. Runs immediately when you turn on the power of the computer and tests the video card, processor, memory, disk controller, keyboard and other important components of the computer.
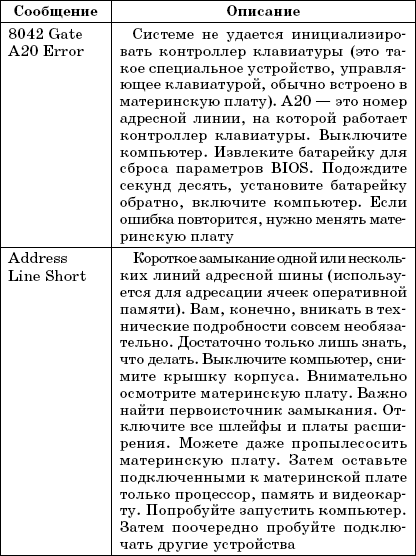
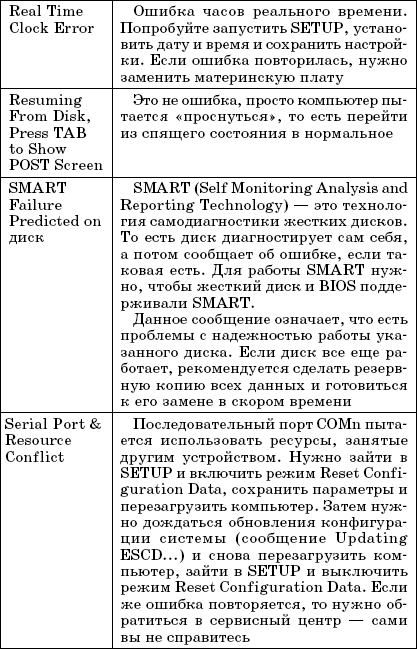
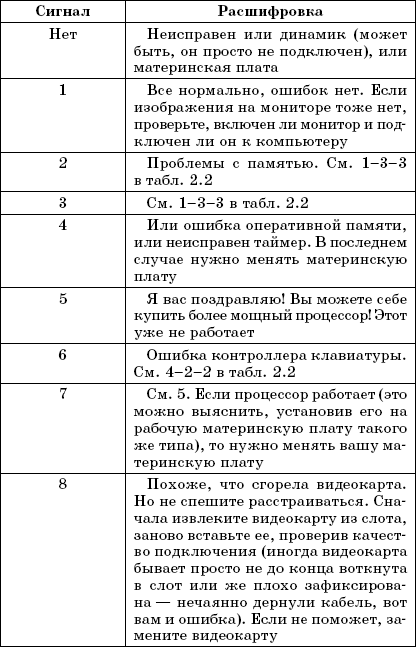
Table 1.1 lists the most common POST text messages. Since the BIOS can be from different manufacturers, the error messages may differ slightly, but still text message you can understand the essence of the error, but it will be the same regardless of the BIOS version and manufacturer.
Table 1.1.
POST text messages


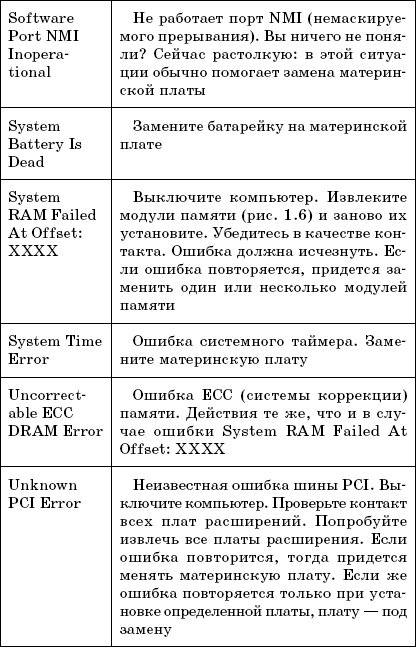
Rice. 1.6.
Memory modules
You don't see any diagnostic messages at all
In some cases, instead of diagnostic messages, the logo of the manufacturer of the motherboard (or computer) is displayed. To see the POST diagnostic messages, you need to enter the SETUP program (usually the Del key is used for this, which must be pressed one to two seconds after turning on the computer power), enter the Advanced BIOS Features menu and turn off the Full Screen Logo Display option (the name can be slightly different, but the essence should be the same: display a full-screen logo). Then you need to save the settings (F10 key) and restart the computer (usually this happens automatically after saving the settings).
Chapter 2
Computer audio messages
Especially critical situations
One short beep when starting the computer indicates that no critical malfunctions have been found. But if there are several signals, it means that the computer self-diagnostic program has detected critical error incompatible with the continuation of work. As a rule, if it comes to a squeak, then nothing is displayed on the monitor - it is simply turned off (it is in the standby state).
Just keep in mind that a squeak means a malfunction of the "hardware", that is, computer components. Maybe the connector just came off, but sometimes some computer components need to be replaced. We will talk about how to determine the culprit of the malfunction in this chapter.
We determine the malfunction by the number of sound signals
As noted, a beep on startup is a clear sign of a hardware error. The number of signals and their sequence depends on the basic input / output system (BIOS, Basic Input / Output System). Typically, the BIOS version and manufacturer is displayed on the screen when the computer boots.
But in some cases, nothing is displayed on the screen (for example, a problem with RAM or with a video card), and before this error appeared, you did not pay attention to the BIOS version or manufacturer. In this case, you can find out the BIOS manufacturer in the motherboard manual or by the inscription on the BIOS chip on the motherboard itself. Today you can find BIOS produced by the following companies: Award, Phoenix, AMI. The beep coding for the BIOS of these manufacturers is shown in Table. 2.1, 2.2, 2.3 respectively.
Table 2.1.Audio encoding BIOS signals from Award
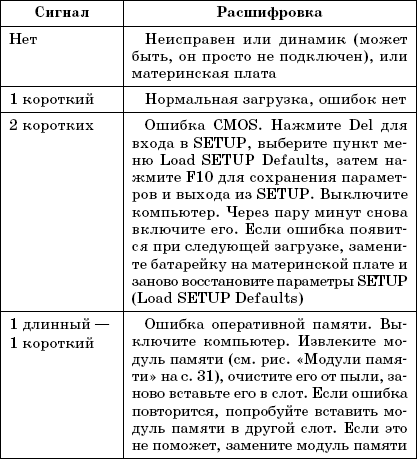

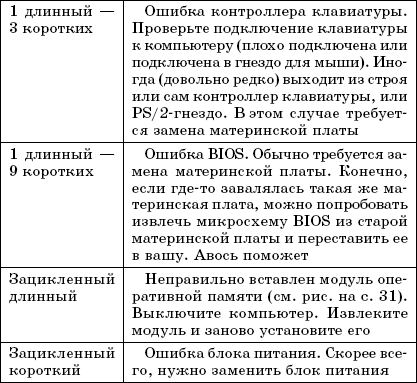
Table 2.2.BIOS beep encoding by Phoenix

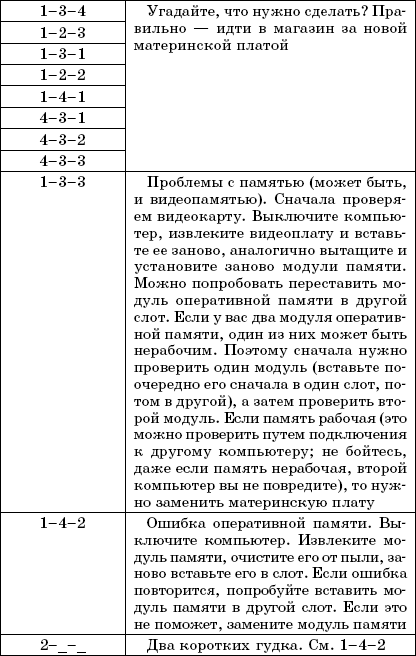
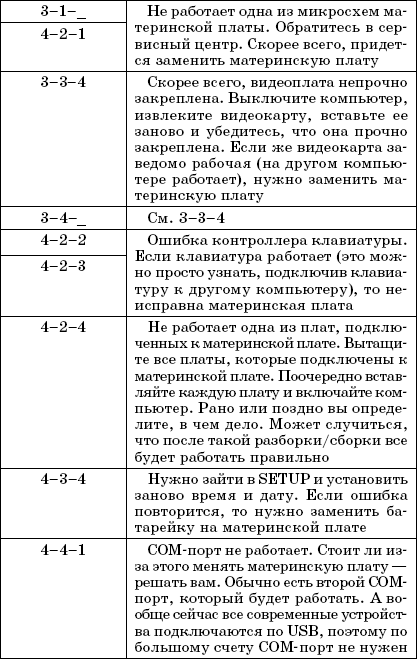
Table 2.3.BIOS beep encoding from AMI
Chapter 3
SETUP menu
Entering the SETUP program
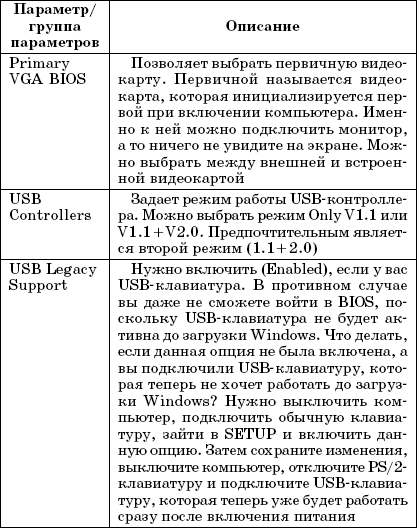
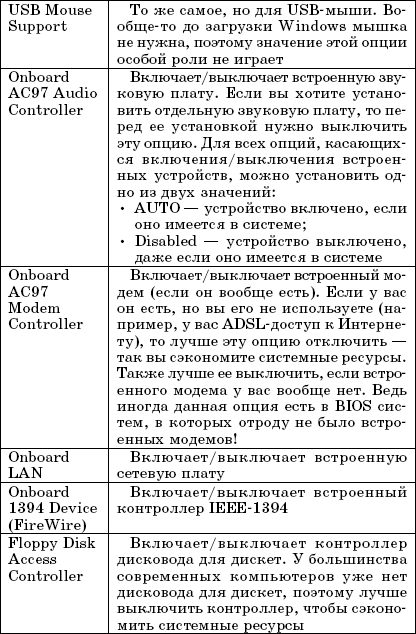
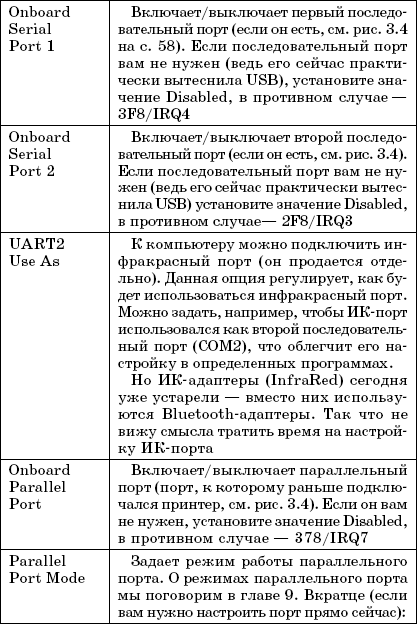
Integrated Peripherals Parameter Group
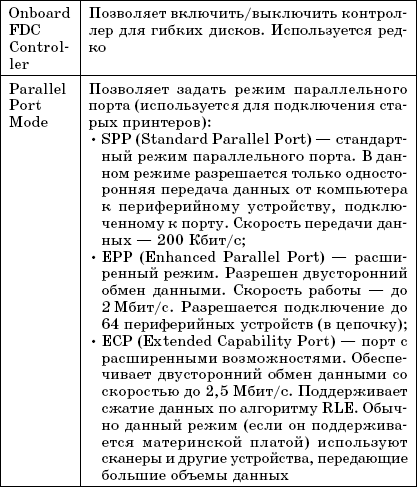
The Integrated Peripherals group contains parameters that affect the operation of onboard peripherals - an integrated sound card, network card etc. The options of this group are presented in table. 3.4.
Table 3.4.Integrated Peripherals Parameters

Rice. 3.4. Ports
In this case, there is one serial and one parallel port. Some older computers have two serial ports.
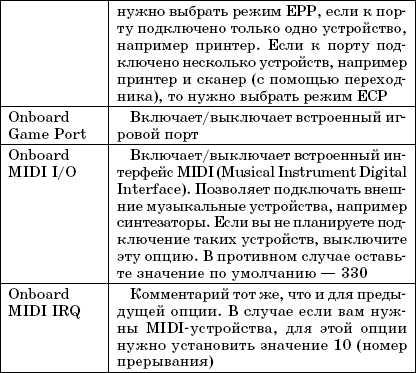
Security menu
V Security section(Figure 3.5) you can set user password and supervisor password. The administrator password gives you the right to enter SETUP and change the parameters of the computer. But the user password only allows you to boot the system.
The administrator password is requested only when entering SETUP. And the user password is when the computer is booted, if the parameter is enabled (Enabled) Password on boot.
Rice. 3.5. Security menu
Power menu
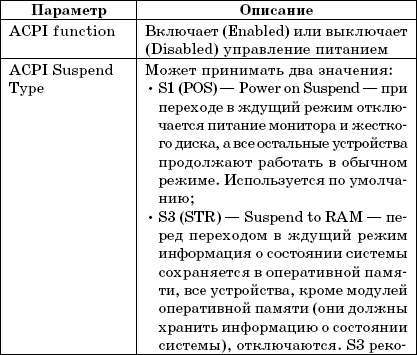
In the Power menu, you can adjust the power saving parameters, for example, set the maximum power saving. The options in this menu are relevant only for laptops - desktop computers have nothing to save, because they are powered by a 220 V network, and not from their own battery.
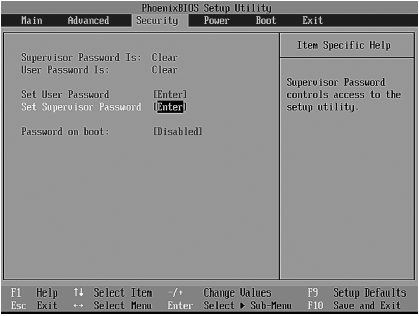
Boot menu
The Boot section is very important because it allows you to set the boot sequence for your computer. You guessed it right, this section configures the BIOS bootloader (Figure 3.6).
Rice. 3.6. Boot menu
Look at fig. 3.6. In this case, the boot sequence is as follows:
➲ HDD(Hard Drive);
➲ CD / DVD drive (CD-ROM Drive);
➲ removable devices, such as a floppy disk (Removable Devices);
➲ network devices(Network boot).
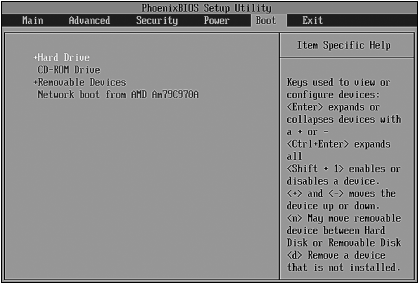
Exit menu
In the Exit menu (Figure 3.7), you will find the following commands:
➲ Exit Saving Changes - exit with saving changes;
➲ Exit Discarding Changes - exit without saving changes;
➲ Load Setup Defaults - load the default settings;
➲ Discard Changes - discard changes, but do not exit;
Rice. 3.7. Exit menu
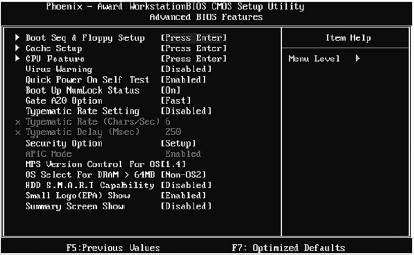
Award-style menu
The Award-style menu (Figure 3.8) is even more common than the Phoenix-style menu, so it can't be overlooked.
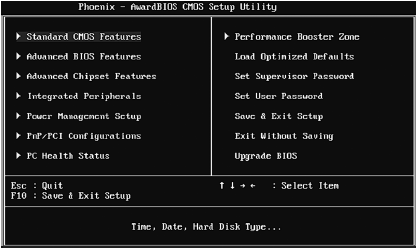
Rice. 3.8. Award-style menu
As seen from Fig. 3.8, the user has access to 8 submenus (indicated by the sign) and 6 commands of the SETUP program:
➲ Standard CMOS Features - standard functions like date, time, parameters hard drives;
➲ Advanced BIOS Features - advanced parameters, such as system boot order;
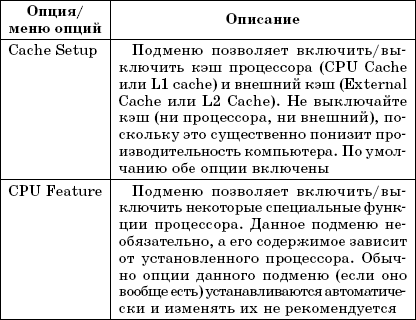
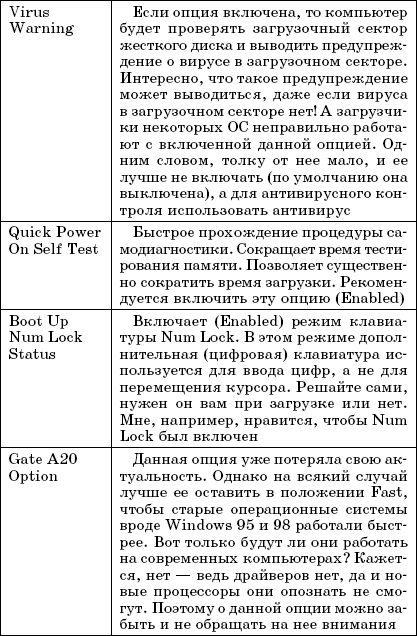
➲ Advanced Chipset Features - advanced parameters of the chipset (remember that this is the main microcircuit on the motherboard). Usually, these parameters are never changed, since everyone is always happy with the default parameters.
If you are interested, you can always read about these parameters in the motherboard documentation. This menu has only two useful options:
▹ System BIOS Cacheable - it is better to never enable it (it is disabled by default, see above);
▹ VGA Share Memory Size - sets the size of the RAM that will be used as video memory for the built-in video card, if any;
➲ Integrated Peripherals - parameters of devices built into the motherboard: sound card, network card, video card (if any);
➲ Power Management Setup - power management parameters;
➲ PnP / PCI Configurations - PnP / PCI parameters. Usually, the parameters in this menu do not need to be changed;
➲ PC Health Status - here you can view information about the "health" of the computer, for example, find out the temperature of the processor and the rotation speed of the fans. In some BIOS versions, this menu item is called H / W Monitor;
➲ Performance Booster Zone - here you can overclock your processor. Some BIOS versions do not have this menu at all, and the overclocking parameters are set in the PC Health Status menu. This menu can also be called Cell Menu. We will not consider overclocking in this book, because to overclock you need to have additional knowledge so as not to damage the processor or motherboard. This procedure is discussed in detail in my book about repairing and upgrading a computer at home;
➲ Load Optimized Defaults - load optimized default settings. This command is useful if you changed some option (and don’t remember which one) and now the computer does not work correctly. Keep in mind: this is not a rollback. This command will not do "everything as it was", but simply load optimal parameters default. Some of your settings (the ones you made yourself and they turned out to be correct) will be replaced by the default settings;
➲ Set Supervisor Password - set the administrator password (has the right to enter the SETUP program);
➲ Set User Password - set user password. The password is requested at boot. If the entered password is correct, the computer loads the operating system and the user can start using the computer. Using the user's password, you cannot enter SETUP;
➲ Exit Without Saving - exit without saving settings;
➲ Upgrade BIOS - this command is not available in all BIOSes, it is used to BIOS updates at home. Before performing it, you need to insert a floppy disk with the new BIOS version into the floppy drive. New version The BIOS can be downloaded from the motherboard manufacturer's website (namely the motherboard, not the BIOS!). If you do not know what it is, then either leave this option alone or carefully read the book that has already been mentioned several times above.
Standard CMOS Features Menu
In this menu, you can change the date and time, parameters of hard drives and some other parameters (Fig. 3.9). The parameters from this menu are presented in table. 3.5.
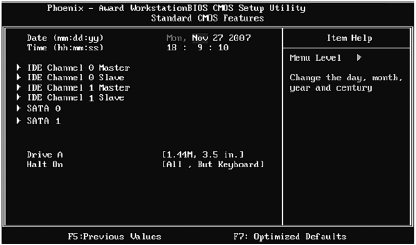
Rice. 3.9. Standard CMOS Features Settings Menu
Table 3.5.Standard CMOS Features Parameters
Advanced BIOS Features Menu
In the Advanced BIOS Features menu (Figure 3.10), you can change the advanced BIOS settings. Most often, users change the bootloader search order operating system... On new computers, this is usually the order: first, the computer looks for an OS on removable media(floppy disks, CD / DVD), and then on the hard disk. After installing the OS, you need to change the boot order - so that the computer immediately searches for the OS on the hard drive. In this case, you can gain one or two seconds when the computer boots - since the OS search will immediately start with hard disk, this will shorten the loading time.
Rice. 3.10. Advanced BIOS Features Menu
The boot order of devices is set either using the Boot Sequence submenu (in Fig. 3.9 this menu is called Boot Seq & Floppy Setup), or using the Boot Sequence option, or using the First options Boot Device(first boot device), Second Boot Device (second boot device), Third Boot Device (third boot device).
In our case, the options First Boot Device, Second Boot Device and Third Boot Device are hidden in the Boot Seq & Floppy Setup submenu (Fig. 3.11).
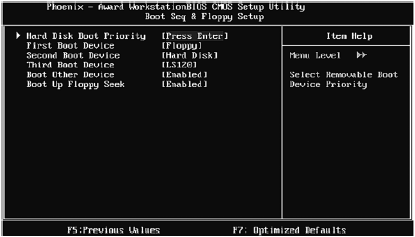
Rice. 3.11. Boot Seq & Floppy Setup Submenu
Pay attention to fig. 3.11. The first boot device is Floppy, that is, the drive for floppy disks the second is the Hard Disk and the third is the LS120 drive. We are not satisfied with this boot order, so select Hard Disk as the first boot device: use the arrows to select the First Boot Device option and press Enter, and then use the arrows to select Hard Disk.
And if there are multiple hard drives installed, how does the computer know which one to boot from? In some cases choose desired disk can be directly in the First Boot Device option: when you press Enter, you will see various boot options, and instead of the Hard Disk value, names will be given (usually manufacturers and / or serial numbers) hard drives. You will need to choose one of them.
But in some "especially difficult" cases (as, for example, in ours) there is a Hard menu Disk Boot Pri- ority, which allows you to set the boot priority of hard drives. In this menu, the names of the hard drives will be listed, or their type of connection to the computer will simply be indicated (see the next chapter):
➲ Pri Master - primary master - a hard disk connected to the first IDE controller as a master device (we will talk about ways of connecting hard disks in the next chapter);
➲ Pri Slave - primary slave - hard disk connected to the first IDE controller as a slave device;
➲ Sec Master - secondary master - a hard disk connected to the second IDE controller as a master device;
➲ Sec Slave - secondary slave - hard disk connected to the second IDE controller as a slave device;
➲ SATA 0 - the first SATA drive - the first hard drive connected to the SATA controller;
➲ SATA 1 - second SATA drive - second hard a drive connected to a SATA controller.
Pay attention again to fig. 3.11. The Boot Up Floppy Seek option is enabled by default. This means that the system will search for the floppy disk drive at boot time. And the side effects of this event are as follows:
➲ precious time is wasted determining whether the system has a floppy disk drive;
➲ if there is a disk drive, it emits an unpleasant buzz, constantly reminding of its presence.
Even if you have a floppy disk drive (I have not had it for three or four years already), disable this option (the value Disabled, which means “disabled”). There will be no problems with the drive, but save half a second at system startup, and the drive will not be annoying with its buzzing at startup. And if you do not have a floppy drive at all, then all the more you need to disable this option.
The rest of the Advanced BIOS Features menu options are presented in table. 3.6.
Table 3.6.Some of the Advanced BIOS Features menu options
Integrated Peripherals menu.
Installing a second video card
The Integrated Peripherals menu allows you to set the parameters of the devices built into the motherboard: video card (if integrated), sound card, network card, etc. (Fig. 3.12).
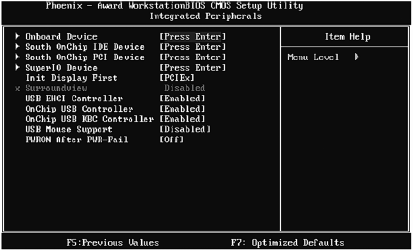
Rice. 3.12. Integrated Peripherals Menu
You will need to change the parameters of this menu only in one case: if you need to disable the built-in device. Why is this needed? For example, you have a motherboard with integrated video. You bought it to save money. There is nothing wrong with that. For example, there are good motherboards based on the Force 7100 chipset - except for the fact that the video card consumes RAM computer, and not your own, it is completely similar in all other respects to the nVidia 7100 video card. And motherboards based on the AMD 690G chipset often contain "on board" video cards from ATI, which work faster than external nVidia graphics cards 6100. So the integrated video card still makes sense. However, sooner or later, the capabilities of the built-in video card will not seem enough to you. Appetite, as they say, comes with eating, and you're going to want a high-performance graphics card.
To install the second video card (the first is built-in), you need to do the following:
➲ turn off the computer and install the second video card in the PCI-Ex slot or in the AGP slot (on older computers). Don't worry: it won't install in another slot;
➲ turn on the computer and go to the Integrated Peripherals menu of the SETUP program;
➲ set the value of the Init Display First parameter to PCIEx (or AGP - on older computers). Look at fig. 3.12. Init Display First is set to PCIEx. This means that an external video card installed in the PCIEx slot on the motherboard will be used (Fig. 3.13);
➲ press F10 to save the settings and turn off the computer;
➲ connect the monitor cable to the second video card and turn on the computer power.
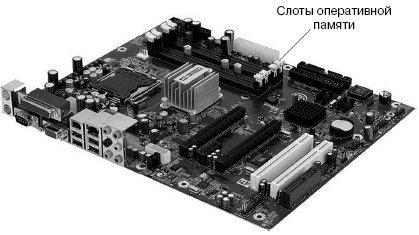
Rice. 3.13. Motherboard slots
In fig. 3.13 shows the various expansion slots suitable for installation different devices(expansion boards). It is clear that the type of expansion card must match the type of the slot, otherwise it will not be possible to install the card into the slot. On modern computers can be found PCI slots, PCI Express(PCIEx) 16x.
Similarly, you can install another sound card... To do this, go to the South OnChip PCI submenu and disable the Onboard Soundcard option (value Disabled) (it can be called a little differently, for example HD Audio or simply Onboard Audio - you can understand from the name what this or that option is used for).
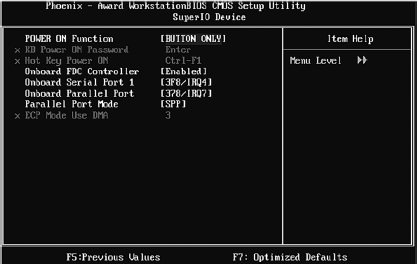
In the SuperIO Device submenu you can find some pretty useful options (Table 3.7).
Table 3.7.Some useful menu options Integrated Peripherals, SuperIO Device

In the Integrated Peripherals menu, I advise you to pay attention to the following options:
➲ USB Mouse Support - support for USB mouse;
➲ Onchip USB KBC Controller - support USB keyboards(this option must be enabled, and if you want to use a USB keyboard, you do not need to disable this option);
Rice. 3.14. Hot Key Pover On Option
➲ PWRON After PWR-Fail - if this option is enabled, the computer's power will be turned on automatically after power is restored. Turned off the light - it is clear that the computer will not be able to work. After the electricity turns on, the computer also turns on automatically. Quite handy in some cases.
Power Management Menu
Power management options are located in the Power Management menu (Figure 3.15). All of them are described in table. 3.8.
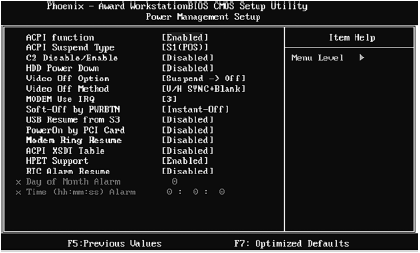
Rice. 3.15. Power Management Menu
Table 3.8.Power Management Menu Options
PC Health Menu
The PC Health menu is usually purely informational (Fig. 3. 16). In it, you can get information about the temperature of the processor, its voltage, and the speed of the fans. However, you can change three parameters:
➲ Shutdown Temperature: If the processor reaches the set temperature, the system will automatically shut down. If you are concerned about the health of your processor, it should not get hotter than 70 degrees (Celsius);
➲ Show H / W Monitor in POST - show information about processor health in POST messages. Enable / disable this option at your discretion;
➲ CPU FAN Control by - CPU fan control. Usually you need to select Always ON, which means that the fan will always be on. But if you select the Smart option (not recommended in summer), then the fan will turn on only when the processor temperature rises slightly. This option is not recommended (although it allows you to reduce the noise level from the fan), since in summer the fan may not cope with the task and the processor will overheat (or, if the Shutdown Temperature option is enabled, the computer will shutdown frequently).
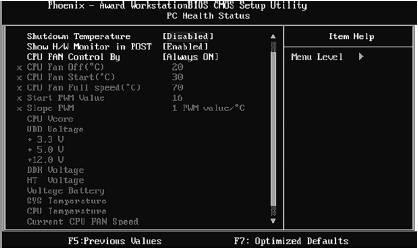
Rice. 3.16. PC Health Menu
That is where we bring the review of BIOS options to a conclusion and move on to the next chapter, in which we will learn how to deal with computer malfunctions on our own.
From time to time, each user encounters a problem when, after starting the computer, an error message appears on the monitor. No further loading of the operating system occurs after the error message is displayed. The user, naturally in frustration, tries to reboot the computer n times, but everything goes unsuccessfully. Only in some cases is it possible to start the operating system. Why does the computer give an error after starting?
Cause of the error after starting the computer
To understand the causes of errors on your computer that it issues at startup, you need to go back in time when the first PC was released. It was in those distant times that engineers and designers personal computers to increase the reliability of these devices, they were equipped with an important function, such as checking the main elements or self-testing.
The essence of self-testing speaks for itself, since after starting each PC, the health of all basic elements is checked: hard disk, RAM, processor, etc. If any of these devices fail, a message is displayed on the computer monitor that an error has occurred. Sometimes, after the monitor screen displays an error message, when the PC is turned on, further loading of the operating system may be observed.
In some cases, the computer does not display a visual error message when it is turned on. This occurs when an error is detected before the video system is initialized. In this case, the user of his PC can hear sound signal about the error. The sound is not emitted from the speakers connected to the PC, but from the built-in speaker on the motherboard.
So, the main reason that an error is displayed on the monitor screen is due to incorrect work any of the main constituent elements. To fix this problem, you will need to diagnose your computer. Diagnostics allows you to identify all malfunctions and eliminate them as soon as possible. To do this, you need to contact our service center, where computer equipment is serviced.
The work of our center is based not so much on earnings as on meeting the needs of customers. The center employs experienced and qualified PC masters who are familiar with different situations malfunctions. We have all the necessary equipment for carrying out diagnostic procedures of any computer equipment. Our center is also equipped with basic modern devices for repairing computers and their components. Therefore, after you contact our service center, you can be sure of complete elimination malfunction. We are so confident in the efficiency of our craftsmen that we give guarantees for the work performed.
If, when turning on, an error occurs on the PC monitor, then in order to eliminate it, it is necessary to detail its description. Depending on the manufacturer of the BIOS, the error on the monitor when turning on the PC may be distinguished by the inscription. We will consider the main ones that may help you fix them yourself, or at least try to figure out the problem.
Varieties mistakes
1) Hard disk initializing.Please wait a moment... Who owns English language, he can decrypt such a message, which means that the process of initializing the hard disk is in progress, so you need to wait a while. With this message format, the user can only wait for the system to load, and if this does not happen, then contact the service center for help.
2) Hard disk install failure... The system cannot find the hard disk, which may mean that there is no contact with the main unit. The system cannot find the drive when the BIOS settings fail, so you should check all the options. If the problem persists, then we will help to fix it directly in our service center after diagnostic procedures.
3) Bios Rom checksum error - system halted... An error occurred while testing the ROM. This error is eliminated by replacing the Bios firmware.
4) CH-2 Timer error... Peripheral error. To fix it, you need to Restart the computer.
5) CMOS battery failed... An error with this message or a similar meaning means that there is a problem with the CMOS battery. The battery has either failed or has been discharged. You can fix the problem by replacing or charging the computer battery.
6) CMOS Checksum error... Indicates a damaged CMOS checksum. May occur due to low battery.
This is only an approximate list of the main errors that occur when turning on the PC, in which you need to find out the main causes of the malfunctions that have occurred. In fact, the errors that occur when turning on the computer are more than enough, so an individual approach is required to solve the problems. Such errors can indicate both serious and expensive repairs and minor damage.
Why is it better to contact us
By contacting our service center, you get a full range of services to eliminate all types of malfunctions. Complete diagnostics The PC will display all available errors, failures, violations. After carrying out diagnostic procedures, our master will definitely contact you and consult about further action... Indeed, sometimes such malfunctions occur that it is much easier to acquire new computer than to suffer with the old.
Our masters perform the work in the shortest possible time, which also depends on the nature of the malfunction. The center employs a young team of IT specialists who are familiar not only with the external structure of a computer, but also with the internal components.
The cost of our services, as well as the quality of the equipment service will make it possible to recommend our center to your acquaintances, friends and relatives. You can always call and get a free consultation on further actions to solve a particular problem.
The advantage over our colleagues, which is the absence of returning the device in a faulty condition
Our advantages
- Urgent check-out
within an hour - Free of charge
diagnostics - Honest
prices - Qualified
specialists - Warranty for
all works up to 3 years old
 Architecture of a distributed control system based on a reconfigurable multi-pipeline computing environment L-Net "transparent" distributed file systems
 Email sending page Fill relay_recipients file with addresses from Active Directory
 Missing language bar in Windows - what to do?