How to enter BIOS without a keyboard: different approaches to different situations
Detailed material about BIOS, if you still do not know what it is, you can find it on our website, or simply by going to ... At the very beginning of this article, we talked about how to enter the BIOS, while you may notice that this procedure can only be carried out using the keyboard. Of course, all this is good if you have a keyboard and it works, but there are times when it is broken or USB keyboard support is disabled in the BIOS. In such cases, things will be a little ... more complicated. Let's see if it is possible to enter BIOS without a keyboard, and if so, how and in what cases?
Today we will look at:
USB problems
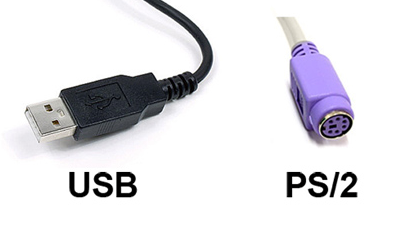
Let's start with the fact that in the BIOS settings it is possible to enable / disable support for keyboards with USB plugs. In this case, of course, you need to somehow go into BIOS and change the menu item responsible for initializing USB keyboards to the value opposite to the current one. This is where replacing your USB keyboard with a PS / 2 plug keyboard will help you. Looking at the screenshot, you will immediately understand what kind of connector it is.
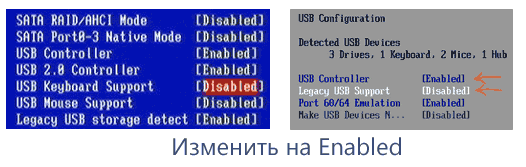
Entering the BIOS, look for the menu item called USB Keyboard Support (see screenshot below) and set the value of this parameter to Enabled.
Ready. We save the changes and restart the computer. Your USB keyboard will now work.
Alternative solution to the problem with USB ("surgical" intervention)
Of course, you may not have a keyboard with a PS / 2 plug, and you have nowhere to get it. In this case, you can use another method, namely, returning the BIOS settings to the factory defaults.
So, turn off the computer, open the side cover of the system unit and look inside. You need to find the trigger under which it is written CCMOS (see screenshot below).
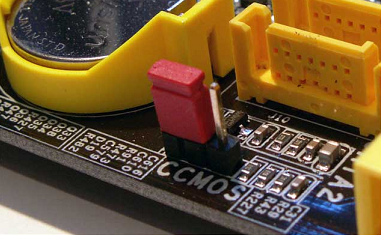
Switch it to another position for 10-20 seconds and then return it to its original position. After these steps, turn on your PC. The USB keyboard should work successfully.
For some laptop owners
In quite rare cases (why - it is not clear) laptops have special buttons for entering the BIOS. By pressing it, the system will enter BIOS mode without first rebooting the device.
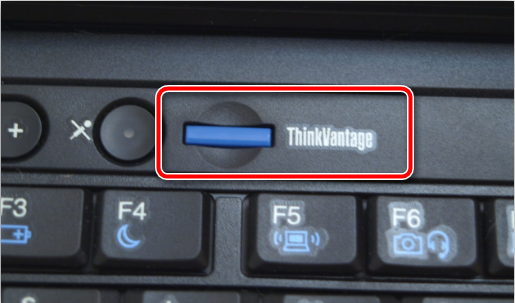
If you have such a button, feel free to use it.
Option for Windows 8.1 (for BIOS UEFI)
While everything is quite simple with relatively old computers, some problems may arise with new models. We are talking about updated version BIOS called UEFI. And if it so happened that your PC has this very UEFI, you are using operating system Windows 8.1, then for you there is a separate way how to enter BIOS.
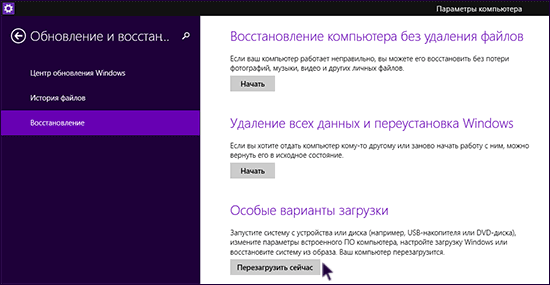
In such a simple way, you can enter the UEFI BIOS in Windows 8.1 without using the keyboard.
Outcome
Here are a few ways that will help you solve the problem with entering BIOS without a keyboard (or almost without). If none of the methods brought a result, then we recommend attributing system unit your pc in service center, which will tell you exactly what the problem with entering the BIOS is. That's all for us. Ask your questions in the comments if any of the methods was incomprehensible to you or if something does not work out for you. Good luck!
Configuring the keyboard operation basically consists in determining the degree of reaction of the keys to the user's actions. It is also possible to disable keyboard use for server systems.
"Boot Up Numlock Status"
The value of this parameter determines in which mode the additional numeric keypad should work after turning on the computer.
The operating mode can be changed at any time by pressing the key
Can take values:
Enabled - additional keyboard after loading the operating room
the system operates in digital mode. When this mode is enabled
the corresponding indicator on the right side of the keyboard (labeled NumLock) starts to light;
Disabled - additional keyboard generates keycodes
,etc.
Other names for this option may be found: System Boot Up Numlock
Status, Boot Up Num-Lock (in AMI BIOS) and Numlock.
"KVS Input Clock"
Control of the clock signal frequency of the keyboard controller. Simply put, this parameter sets the speed at which CPU communicates with the keyboard controller. In this way,
this option is used to change the speed characteristics of the keyboard and increase its stability.
Can take values:
8 MHz - reduced frequency. Installed if there are any problems with the keyboard;
12 MHz is the standard frequency. Installed by default;
16 MHz - increased frequency. Set to achieve faster keyboard performance, but may cause crashes.
The following option names may appear: KBC Input Clock Select,
Keyboard Controller Clock.
The option allows you to boot without problems in the absence of a keyboard,
which can be very useful when running a file server, print server,
including for security reasons.
Can take values:
Installed - when the computer is turned on, the keyboard will be interrogated, and if it is absent or malfunctioning, a corresponding message will be displayed on the monitor screen. Installed by default;
Not Installed - when the computer is turned on, the presence of the keyboard will not be detected. Recommended for servers.
In the AMI BIOS, the name System Keyboard can be found with the values Present - the keyboard is installed (by default) and Absent - there is no keyboard.
"Keyboard Reset Control"
The function of control over restarting the computer using a keyboard shortcut
.
Can take values:
Enabled - keyboard reboot is allowed. The value is set by default and is recommended in most cases;
Disabled - the ability to reboot using the keyboard is disabled.
"Typematic Rate Setting"
This parameter allows you to change the repetition rate of keystrokes on the keyboard.
Can take values:
Enabled - enables "manual" setting of parameters, giving access to the two options below;
Disabled - parameters are set automatically.
"Typematic Rate (Chars / Sec)"
This option allows you to adjust the speed of entering characters from the keyboard.
With its help, the time characteristic is set - the number of repetition signals of a pressed and not released key per cycle, which can vary from 6 to 30 characters per second, that is, the frequency of automatic repetition of keyboard characters is set. Setting a larger value allows, for example, to speed up cursor movement in MS-DOS. Windows operating systems have their own keyboard customization tools.
Can take values:
6, 8, 10, 12, 15, 20, 24, 30 - the numbers mean, respectively, the number of characters reproduced in one second after the autorepeat operation. The option may have a name Keyboard Auto-Repeat Rate.
"Typematic (Rate) Delay (Msec)"
The option is designed to adjust the second time characteristic - the delay before the autorepeat of the pressed key, which can vary from 0.25 to 1 s.
Can take values:
250, 500, 750 and 1000 - time delay before autorepeat start in milliseconds. The option may have a name Keyboard Auto-Repeat Delay.
"USB Keyboard Support Via"
Support for a keyboard connected to the USB bus can be implemented both at the BIOS level and at the operating system driver level.
Can take values:
OS - enables USB keyboard support using the operating system (for example, Windows 98);
BIOS - USB keyboard support is implemented at the BIOS level (for example, when working in MS-DOS or UNIX).
Phoenix BIOS offers the user two similar options for keyboard and mouse control. The USB BIOS Legacy Support option, through the Enabled and Disabled values, allows or prohibits the use of a USB keyboard (mouse) directly through the BIOS. The second USB Legacy Support option enables or disables (using the Enabled / Disabled values) the detection of devices by the operating system ...
"I x Port 64/60 Emulation"
This option allows you to choose the optimal variant of the USB keyboard operation.
Can take values:
Enabled - installed when working in the Windows NT operating system;
Disabled - set when working in Windows 9x operating systems.
Detailed material about BIOS, if you still do not know what it is, you can find it on our website, or simply by going to ... At the very beginning of this article, we talked about how to enter the BIOS, while you may notice that this procedure can only be carried out using the keyboard. Of course, all this is good if you have a keyboard and it works, but there are times when it is broken or USB keyboard support is disabled in the BIOS. In such cases, things will be a little ... more complicated. Let's see if it is possible to enter BIOS without a keyboard, and if so, how and in what cases?
Today we will look at:
USB problems
Let's start with the fact that in the BIOS settings it is possible to enable / disable support for keyboards with USB plugs. In this case, of course, you need to somehow go into BIOS and change the menu item responsible for initializing USB keyboards to the value opposite to the current one. This is where replacing your USB keyboard with a PS / 2 plug keyboard will help you. Looking at the screenshot, you will immediately understand what kind of connector it is.
Entering the BIOS, look for the menu item called USB Keyboard Support (see screenshot below) and set the value of this parameter to Enabled.
Ready. We save the changes and restart the computer. Your USB keyboard will now work.
Alternative solution to the problem with USB ("surgical" intervention)
Of course, you may not have a keyboard with a PS / 2 plug, and you have nowhere to get it. In this case, you can use another method, namely, returning the BIOS settings to the factory defaults.
So, turn off the computer, open the side cover of the system unit and look inside. You need to find the trigger under which it is written CCMOS (see screenshot below).
Switch it to another position for 10-20 seconds and then return it to its original position. After these steps, turn on your PC. The USB keyboard should work successfully.
For some laptop owners
In quite rare cases (why - it is not clear) laptops have special buttons for entering the BIOS. By pressing it, the system will enter BIOS mode without first rebooting the device.
If you have such a button, feel free to use it.
Option for Windows 8.1 (for BIOS UEFI)
While everything is quite simple with relatively old computers, some problems may arise with new models. This is an updated BIOS version called UEFI. And if it so happened that your PC has exactly this same UEFI, while you are using the operating Windows system 8.1, then there is a separate way for you how to enter BIOS.
In such a simple way, you can enter the UEFI BIOS in Windows 8.1 without using the keyboard.
Outcome
Here are a few ways that will help you solve the problem with entering BIOS without a keyboard (or almost without). If none of the methods worked, then we recommend that you take the system unit of your PC to a service center, where they will tell you exactly what the problem with entering the BIOS is. That's all for us. Ask your questions in the comments if any of the methods was incomprehensible to you or if something does not work out for you. Good luck!
 Why does the blue screen turn on on the iPhone Blue screen on the iPhone 5s what to do
 Everything you need to know about Apple Music
 How To Set Up An iPhone Like New From Zero - Detailed Instructions