Memorizing mouse actions. Mouse Recorder Record mouse movements. Simulate mouse and keyboard
Mouse Recorder is a universal service designed to free the user from any repetitive actions when performing tasks on a computer. To automate the process, you should record an action algorithm (macro) - mouse movements and keystrokes. Mouse and keyboard recording is done using the program. You do not need any special programming skills - the process is easy and simple. The program's capabilities allow you to individually customize any mouse movement or keystroke on the keyboard to quickly perform a specific task. Automating mouse and keyboard actions simplifies the work of the computer, which allows you to complete the same process in less time, increasing the speed of project execution. At the same time, the application has a unique opportunity to use your records in conjunction with a separate service"PhraseExpress" which adds additional opportunities Your work.
Automating repetitive tasks on computers Almost any repetitive task can be automated. Boost your personal productivity and efficiency. Improve reliability and accuracy, reduce human error. Research has shown that the human error rate during repetitive tasks can typically occur about 100 times.
The most common factor that contributes to carpal tunnel syndrome is repetitive movement of the fingers or hands. For example, the cursor should move down 100 pixels from the current position, but you do not know what the current position or the destination position is, this function can be used to indicate the cursor to move down 100 pixels. It then automatically configures itself for quick launch records, ensuring you keep your robots running smoothly.
Mouse Recorder - an affordable service for automating work on Windows
Mouse Recorder is a free program for recording macros, the playback of which makes it possible to significantly simplify and speed up some tasks: debugging computer software, detecting errors on web pages, imitating user actions and similar work on a PC using the automated operation of the service. The program for recording mouse and keyboard actions is easy to use and does not require special user training.
For example, today, when you recorded the robot, you have an application window of a certain size and is located in the center, tomorrow, when you start the robot, it may be of a different size and moved to the left when you worked on it. Because we also don't know when this offer will end.
Means autonomous work with macro recorders automates any activity in any software application, starting with the table with copying and ending with the actions of the system. You will now see the Keyboard and Mouse Recording dialog box as shown below.
Record mouse with keyboard and repeat
To simplify the monotonous work on repetitive tasks, it is enough to install Mouse Recorder, which even a novice programmer or web designer can use. Automation of the mouse and keyboard takes place in several stages: first, we record the required macro using the "Record" button, then, in order to repeat the recorded actions in the future, press the "Play" button at a configurable playback speed. So you can easily remember the actions of the mouse and keyboard and repeat them at the right time. A convenient editor allows you to customize any mouse movements, actions of buttons on the keyboard, as well as edit and add the necessary pauses, clicks and keystrokes. The accuracy of recording the movement of the mouse and the time intervals of clicks are observed by the program in automatic mode.
Click the "Start" button in "Keyboard and Mouse Activity Recording", the mouse and keyboard activity recording will begin. Just do the job and all your mouse and keyboard activity will be recorded, then hit the Stop button. The actions will be shown in the Add Robot dialog box.
Go through the steps and you can edit them if needed. After that you can save the macro by clicking the "Save" button. This way you don't have to leave the application to record the macro. You now have the macro shown in the macro list.
If you need to repeat an action in a game or need to automate a complex and repetitive task, the information presented here can be very handy and worth a try. Note that there are two different customizable keyboard shortcuts that give you complete control over the software. While recording, you can enable or disable mouse or keyboard actions.
Simulate mouse and keyboard
Everything is designed for comfortable use - recording and automation of user actions occurs under the direct supervision of a person and an automatic utility system. Mouse Recorder will provide you with the restoration of the position of the window of the recorded application, if the window for some reason has changed its position on the screen. For multi-user use of Mouse Recorder, you can sync with the Dropbox web service, allowing other users to access the recordings.
When performing write operations and pressing data keys, many of the recordings recorded in the recorder have been recorded. Editing such huge data can be cumbersome, and therefore alternative way Recording and Playback Mouse and Keys - This is to use the macro editor with functionality to insert a mouse and keyboard into it.
Yes, you need to schedule your recurring task in parts so that you can complete your fixed and recurring task in one macro shot and other changing parameters added as separate actions in the Macro script. When playing back macro photography, make sure the screen resolution is the same as when recording.
Screenshots of Mouse Recorder
|
|


Windows OC gained popularity primarily due to its user-friendly and intuitive interface. But if an ordinary user only benefited from this, then for the administrator, push-button control has many inconveniences. Of course, some tasks can be solved using console commands and scripts, but not all. And this is where special automation tools come to the rescue.
These tasks not only complicate and tire physically, but also mentally. It can replay recorded keystrokes and mouse events one or more times in a loop. The sequence of keystrokes and mouse events can be saved to a file to be played back later.
Screenshots of Mouse Recorder
The program also supports setting the playback speed. Of course, the recorded sequence can be saved in files that will be played back later. You can also change the hotkeys for recording and playback as you like. You just found a generic repeater! It is also capable of storing information about running in this moment applications to launch them during playback.
AutoIt
One of the most popular automation tools for admins is AutoIt (autoitscript.com/autoit3), which simulates keystrokes, mouse clicks, and other similar actions that a user usually performs when working in GUI applications.
Using AutoIt, all these movements can be programmed using a BASIC-like language. The program can manage processes, access Windows API and DLL, registry, clipboard, files (read, change, delete), create GUI, messages, data entry forms, work with databases (MySQL and SQLite), read HTML code, download files, send e-mail and much more. In general, it all depends solely on the desire to tinker with the settings. It is gratifying that AutoIt does not require programming skills from the admin. In scripts, you can easily access window controls with just a couple of lines of code. However, it should be remembered that AutoIt works without problems with standard windows windows... If the authors took care of the uniqueness of the interface, you will have to sweat a little with the AutoIt setting to find the necessary parameters.
It also includes visual preview events to help you navigate through your recordings. The repeater has some advanced scripting features such as. ★ Automatically start playback ★ Automatically start recording ★ Loop mode ★ Stealth mode ★ Lock playback interruption ★ Automatically stop after playback ★ Event decompiler and compiler event files.
It records mouse strokes just fine. Hope the quality will improve to improve the quality. Before you start, use your mouse and keyboard to perform actions so you can perform them smoothly while recording. You can take notes to help you with this.
Supports Windows from 95 to 2k8, including works in 64-bit versions of the system, "friends" with whist's UAC. Conveniently, the scripts can be compiled into an exe and then executed on another machine. No additional applications and no libraries are required.
AutoIt is distributed under a freeware license that allows its use without restrictions, including for commercial purposes. Installation is standard, there are no additional requirements. The current version is 3, which is syntax incompatible with the previous, second version. The program comes with the SciTE4AutoIt3 script editor, the AU3Check.exe syntax checker, ready-made examples, the Aut2Exe compiler (and the reverse Exe2Aut) and help. During installation, the * .au3 extension will be associated with the AutoIt interpreter.
If the command is application or window specific, make sure the correct application or window is open and active. Choose a phrase that is easy to remember but unlikely to be used in regular dictation. Follow the steps that you want to be part of the macro. Recorded macros depend on various settings on your computer such as screen resolution or operating system... These macros may give unexpected results when used on another computer or when changing settings on your current computer. If the recorded macro does not work as you expect during playback, try recording it again and add a short pause between each action. For example, sometimes it takes a few seconds or two to open the Start menu, and the macro must wait. Remember this and don't forget to include personal information into a recorded macro that can be used by unauthorized persons. Let's take a look at how to do this specifically so you can start using your product right away.
The scripting language used by AutoIt is one of its strengths. It is both powerful and simple. For example, to run a program, you just need to write:
That's it, no more action. AutoIt is a great way to automate the installation process for applications that don't support answer files. To catch windows, the WinWaitActive function is usually used to enter parameters, which interrupts the execution of the script until the window is activated. As parameters of the function, you should specify the window title and optional additional text. The latter allows you to distinguish different windows of one program from each other. For example, the windows of the installer of AutoIt itself contain the same title - AutoIt v3.3.6.1.5, that is, if you use:
Standard Windows Task Scheduler
The first is to record a macro, which is a sequence of keystrokes that you want the button to exit. Let's go over both to get started. All macros are executed through the first screen of the software. Then move on to using the keyboard to record the keystroke sequence.
In the previous example, you will notice that there are delays in the keystroke chain by default. However, it is actually possible to instantly display a word without a delay between keystrokes. Delays can have a big impact on how a macro is played out. As my colleague Mike Clements previously posted on a blog, everything can make a difference whether something in the game works or not at all.
WinWaitActive ("AutoIt v3.3.6.1.5")
This design will follow all the steps of the installer. Therefore, it is better to clarify by entering additional text that is displayed in the window, for example:
WinWaitActive ("AutoIt v3.3.6.1.5", "License Agreement")
This will unambiguously refer to the license agreement window. It remains only to send him a confirmation: Send ("! Y")
This allows you to bind hotkeys in-game so that you can map functionality to any of the buttons for easy access. Some games can interfere with the use of the software as it can lead to an unfair advantage. However, there is a way around this by using a profile directly from the hardware itself.
Keep in mind that if you need to make any changes, first uncheck this box, apply the changes, and then save the profile back to the hardware again. If you do not do this, the device will not be properly updated with the desired changes. However, macros and key bindings will continue to work, so you can use them for the games you like.
As you can see, everything is simple. Along with the programs, the AutoIt Window Info Tool (AU3Info.exe) utility is also installed, which will just help you get all the information on the window title, text (displayed and hidden), status bar, location, color, and so on. We just start and move the cross over the window, after which we read all the values in the Window Info Tool. With its help, it is much easier to collect the necessary information on the experimental program window. Help in AutoIt is very detailed, it has all the subtleties of using the language. In the documentation on the project website, you will find a link to the translated version of the help. Plus, on numerous specialized forums, there is usually a separate branch. There shouldn't be any problems in learning AutoIt, in one evening you can learn how to write simple scripts, difficult decisions will require, of course, a lot of time.
In a future blog, we will be using the steps above to show you how you can use them in new games, as macros can make things simpler and easier. Even if you're not playing, macros can also make it easy to create custom shortcuts for the apps you are using.
Installation of practical helpers
To keep your steps. In this chapter, you will find the instructions you need to create your own custom testing guide. Write down and organize a simple test. Create a test that tests the causality of functions in your application.
Xstarter
Another popular program for automating routine tasks of a system administrator. The developer is our compatriot, Alexey Gilev (xstarter.com/rus), respectively, xStarter has a localized interface, and most importantly, the program is distributed free of charge for Russian-speaking users.
Record mouse with keyboard and repeat
Please note that the "old" testing guide remains open in a separate tab. Make sure detailed view is active. On the left side of the two-part screen, you will see a tree that represents the test site. For the currently selected node, the attributes are displayed on the right side.
At the beginning of each test, the application under test must be run. We will use the Quick Start Wizard to create the appropriate startup sequence. Open the Quick Launch wizard from the More menu or alternatively using the Record button if it still shows a question mark.
Once installed, xStarter can be started manually, automatically when the user logs on to the system, or started as a Windows service. The latter option allows you to run the task at exactly specified time, regardless of the user's registration in the system and other factors, as long as the computer is turned on. It offers periodic execution of tasks, a compound schedule, setting skips and actions for missed tasks, triggering on an event. In general, there are more than enough options. Using xStarter, you can expand the list of hotkeys or override their values globally or locally. For example, you can easily make the task run when you press the key combination
Here you can select the type of application to test. 
Therefore, you can simply proceed to the next step of the wizard. 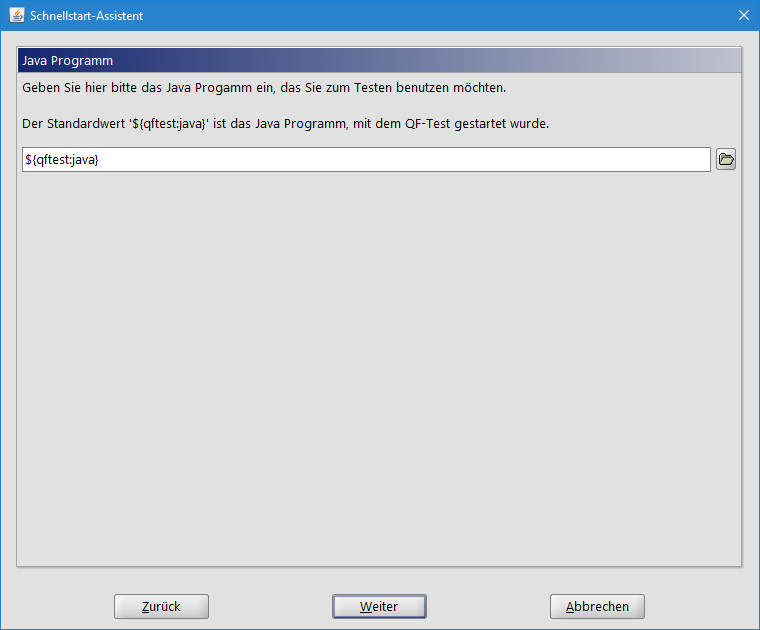
The next step allows you to specify the working directory for the application. Since our demo is not needed, you can move on. 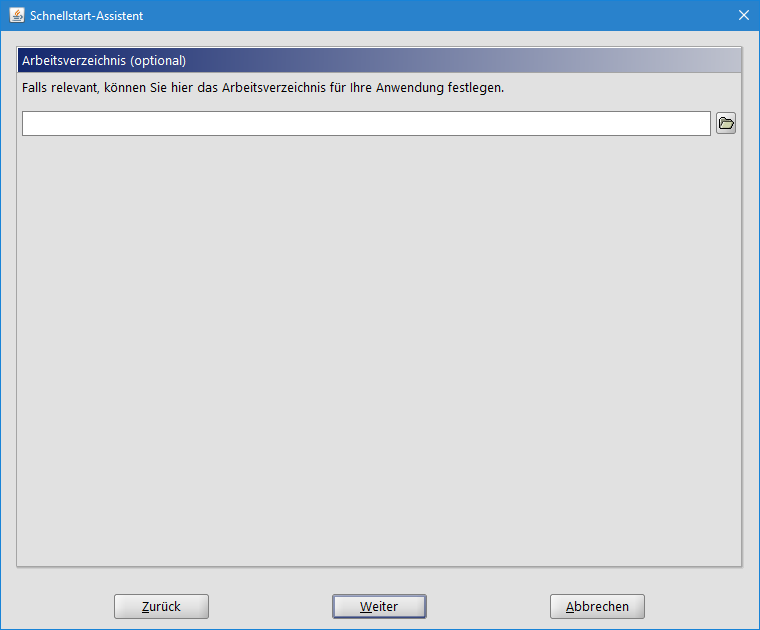
You can conveniently select a file from the "Select directory" button above the field or enter it directly as text in the field. 
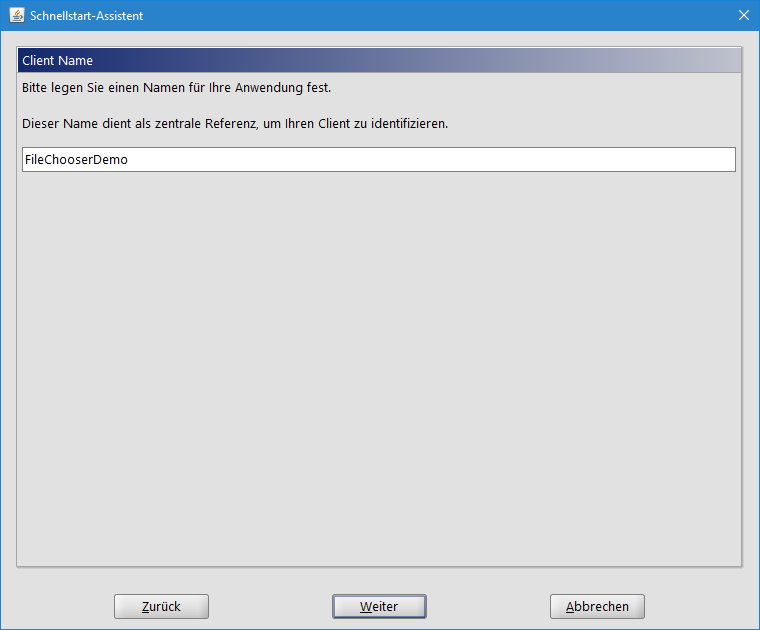
We still have a name to refer to our client.
The launched program is placed in the tray, by clicking on the icon, we call the task editor. In the Sections / Tasks window, we will find two dozen examples, as they say, for all cases. Included tasks are marked with a green icon.
We select the closest in meaning (or create a new task), copy using context menu and edit to fit your needs. Each task is configurable in four tabs. So, in the "Schedule and Information" tab, we indicate the name of the task, the time or event at which it will be launched, the key combination and the optionally active program window, when the task appears, the task should be completed. The "Actions" tab contains the actual macros. Press "New action" - a window for setting parameters appears. On the left side, we find the presets, divided into several groups, then clarify the parameters on the right side. The rest of the task tabs allow you to configure variables, set priority, run in a separate process, logging. Everything is very simple and straightforward.
Finally, there is some information on what to expect when the wizard completes its task of creating a startup sequence and where there is help in case of problems. Deactivate the "auto start" option as we want to take a look at the generated start sequence. Now click the Finish button.

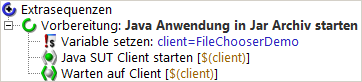
You can look at the details of the nodes and essentially find the values you entered in each step of the wizard. Now let's see the case in action. Make sure the Prepare node is selected, then press the or button and press the linefeed key.
To activate the blocked functions, you must additionally install the xStartHooks module. In this case, xStarter will behave like a typical Trojan or malicious software - it will start to intercept system calls, "press" keys and send messages, which may not like antivirus and firewalls. But with some antiviruses (for example, NOD32) this can be easily solved, just add xStarter to the exceptions.
For convenience, macros can be compiled into an exe file, and all the necessary libraries can be automatically added here under certain settings. Then we distribute such files to other systems and execute.
It remains to add that all Windows operating systems from NT4 to 2k8 / 7 are supported.
On the project forum, you can find examples of some popular tasks, including uploading files, sending SMS and e-mail, backing up and synchronizing data.
A special version of Starter Job Scheduler for Firebird / Interbase is also available on the site, it is designed to execute SQL scripts, backup and restore data in these DBMS. Another unique opportunity - remote control launching tasks, as well as viewing the log using the special xStarter Web Pilot application.
Automate
Probably the most famous commercial task automation software is AutoMate, developed by Network Automation, Inc (networkautomation.com). Its main feature is the creation of tasks using a user-friendly GUI, without the need to write code. The entire process is simplified through the use of wizards and a dedicated Task Builder. The program contains a large number of ready-made templates actions and reactions to them, which further simplifies the process of creating a chain of actions. The current version of AutoMate 7 at the time of this writing supports more than 230 preset actions that allow you to schedule tasks, work with files and databases, transfer data via FTP / SFTP, encrypt using PGP, monitor systems, access WMI, and much more.
AutoMate is available in four editions, all geared towards specific uses: AutoMate Professional and Premium, AutoMateBPAServer 7 Standard and Enterprise. The simplest one - AutoMate Professional - provides a convenient interface for creating tasks on the local system. The most advanced - Enterprise - provides opportunities for easy management accounts and roles, work in AD, provides centralized management of several machines, SNMP support, telnet and terminal emulator.
All Win OSs from XP SP2 to 2k8 / 7 are supported. To install, you need the Microsoft platform. NET Framework version 3.0.
The actual management is carried out using two consoles - Task Builder and Task Administrator. Tasks are created in the Task Builder. This process is quite simple: in the panel on the left of the 29 available groups, select the desired action and drag it to the middle field. A wizard appears to help you refine the settings. For example, let's create an action that allows you to get data by section of the hard disk. Go to the System -> Get Volume Information menu, a wizard of the same name appears, consisting of four tabs.
We need to sequentially go through and select the parameters in each of them. In General, we indicate the disk partition and the parameters that we want to receive: type, label, file system, a place. Alternatively, you can immediately specify the selection of all volumes (All volumes) and then, by clicking the icon next to the field, set the check condition. The program provides a number of built-in variables, functions, and triggers that you can use in this field. You can also create your own condition. In other tabs, a description of the task and an action on errors are set.
After creating a task, it appears in the list in the middle, where it can be edited, moved, disabled, and so on. Next, in the same way, select and add other Actions. For debugging, you can add breakpoints to the job (Breakpoint,
The Task Administrator is designed to manage all tasks, both on local and remote systems. Having selected any task in it, we can view its properties, activate or create a new task. In the properties of the task, triggers, priority, protection, Account, on behalf of which it will be executed. There are many settings, they are very diverse. Tasks are saved in files with the * .aml extension.
AutoHotkey
AutoHotkey (autohotkey.com) is a fork of AutoIt v2. Its author, Chris Mallett, suggested adding support for hotkeys to AutoIt, but the idea did not find a response, and as a result, the Initial release was released in November 2003. Unlike its parent product, AutoHotkey is available under the GNU GPL license.
The language syntax is based on AutoIt v2, some ideas are taken from v3. With its help, you can easily automate repetitive tasks: starting a program, sending mail, editing the registry. It supports working with files, simulating mouse clicks, it is possible to create a GUI. The program can monitor system events and take actions when they occur.
But the trick of AutoHotkey is the hotkey management. For example, to start the calculator with the combination
The hash mark "#" corresponds to the key
Scripts (extension * .ahk) can be compiled into an exe file and executed on any computer.
Install Firefox automatically with AutoIt
AutoItSetOption ("WinTitleMatchMode", 2)
AutoItSetOption ("WinDetectHiddenText", 1)
WinMinimizeAll ()
Sleep (1000)
Run ("FirefoxSetup3.6.6.exe")
WinWait ("Installation Mozilla Firefox")
Send ("(ENTER)")
WinWait ("Mozilla Firefox Installation", "Installation Type")
Send ("(ENTER)")
WinWait ("Install Mozilla Firefox", "Summary")
Send ("(ENTER)")
WinWait ("Install Mozilla Firefox", "Shutdown
installation wizard ")
Send ("(ENTER)")
Exit
AUTOMATION ANYWHERE
The development of the Californian company Tethys Solutions, LLC () has already earned the recognition of the admins and awarded by various media publications. With Automation Anywhere, you can easily automate any repetitive operation, both simple and complex, without the need for programming.
I must say right away that the product is very serious and has a huge number of possibilities. The program can work with files, send mail, run tasks according to a plan or when a trigger is triggered, use VBS and JavaScript scripts, and much more. The technology, called "SMART Automation Technology", eliminates the need for an administrator to be a programmer as well. Recording can be done in automatic mode, when the computer records all the user's actions. In the future, such a task, immediately or after editing, can be "scrolled" on other systems, observing how the mouse itself runs across the screen and presses buttons. The program offers two recorders: Object Recorder for desktop applications and Web Recorder for recording a sequence of actions in a web browser.
Moreover, Web Recorder latest version the program supports all major technologies used in the web: Java, JavaScript, AJAX, Flash, frames. The process is very simple: we launch Automation Anywhere, select a recorder, and the program starts recording all user actions. To stop, press the combination
The developers have already included in the program several task templates that can be used as examples. Editing a recorded assignment also does not require knowledge of the code. By clicking the Edit button, we will see the entire sequence of actions performed on the screen (mouse movements, keystrokes).
The left editor window shows predefined commands, divided by categories, that can be added to the task. There is everything here: working with files and directories, backup, Excel spreadsheets, connecting to the Internet, sending e-mail, capturing a desktop image, starting / stopping services. Select the desired task and simply drag it to the right window. The properties editing window immediately opens, in which we fill in the proposed parameters (they are specific for each item). The editor supports additional scripts, working with variables, debugging and much more.
The created task can be exported to executable file and extend to other systems.
The task can start by time or when a trigger is triggered, this behavior is configured in the Trigger Manager, here you can choose: starting a window with a specific text, the appearance of a file in the directory, resource load (CPU, memory, free place), start / stop a process or service, receive a specific e-mail. The developers have not forgotten about security - Automation Anywhere allows you to protect the script with a password and encrypt.
In general, everything you need is in the program, only localization is missing. Supports Automation Anywhere all Windows versions: from XP to 2k8 / 7.
Conclusion
In fact, there are much more programs for automating routine tasks. Paid versions are distinguished by great convenience and friendly interface, the ability to work in a networked environment. Although, depending on the preparation and desire to tinker with the settings, you can get by and free software like xStarter, AutoIt or AutoHotkey.
Standard Windows Task Scheduler
Microsoft finally understood the need for a normal scheduler, and, starting with Vista, the system has an improved Task Scheduler (Administration .. Task Scheduler, or taskschd.msc) - significantly redesigned compared to previous versions... Its interface allows you to connect to another computer for configuration, create (simple and advanced) or import a task. Thus, the main elements of the task are Triggers, Actions, Conditions and Settings. The trigger determines when and upon the occurrence of which event to start the task: by time, when the computer is turned on, when the system logs on, when an event appears in the log. In the latter case, you must specify the log where the event will be tracked, the source and the event code.
The conditions and parameters clarify the essence of the task, and the action determines what actually can be done (start the program, send a message). The possibility of delayed start of a task allows you to delay the start in situations when its immediate launch is unacceptable (for example, high system load). Conditions specify other options for the job, for example, when the computer is idle.
 Bugs in Singularity?
 Just Cause 2 crashes
 Terraria won't start, what should I do?