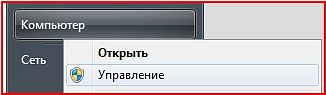
How to set up a router - router - to work as part of a home local network
Setup Instructions WiFi router Planet WRT-414.
So, let's begin. First, the router must be connected to one of the personal computers the patch cord that comes with it, as well as connect network adapter router to the network ~ 220 V. The instructions for the router must indicate its ip-address, administrator login and password to enter the settings panel. Usually, the ip-address of the router is 192.168.0.1 or 192.168.1.1, and the login and password of the administrator are admin admin, respectively. It should be borne in mind that for different manufacturers the ip-address, password and login may differ, but in any case, you will find it out from the manual for your router. In our example Planet WRT-414 router, we have an ip-address 192.168.0.1, login - admin, password - admin.
The cable from the computer to the router was connected, the power adapter was also connected. We go into network connections, we find a connection by local network, open its properties, and in the parameters of the TCP / IP protocol set the ip-address 192.168.0.2 and the network mask 255.255.255.0. We save the changes. a message like this should pop up in the tray: LAN connection 100Mbit / sec. We open any Internet browser, in our case - Internet Explorer, in the address bar, enter 192.168.0.1 and press Enter. If everything is done correctly, then the login and password entry window should pop up to access the router settings like this:
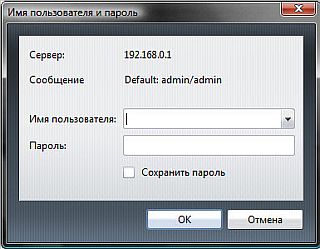
Introduce admin and admin in the username and password fields, respectively. Click OK. After that, the main window of our router's settings opens. What parameters need to be configured for the router to distribute the Internet to all computers on the local network? The basic settings are: ip-address, netmask, gateway, dns-servers of your internet provider. These settings are entered on the WAN tab, or external network. Then you need to adjust the parameters of your internal, home network or simply LAN. These settings are the same as in the previous case, ip-address, netmask, gateway, dns-servers. Only these parameters will be assigned a different value, the value of your internal network. Then it is configured wireless WiFi network, its name, channel number, degree and method of protection against unauthorized connection to this network by other persons. Let's explain with an example.
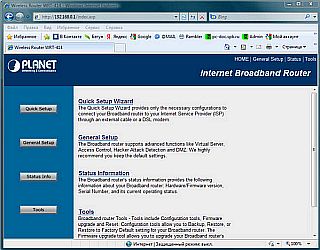
The main window of the router settings. We choose General Setup.
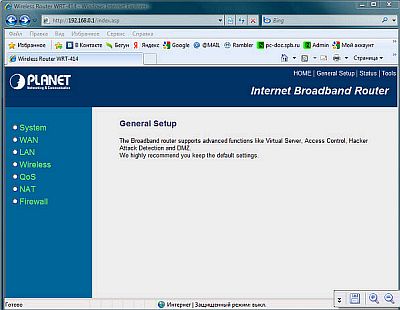
We go in order, first we choose System.
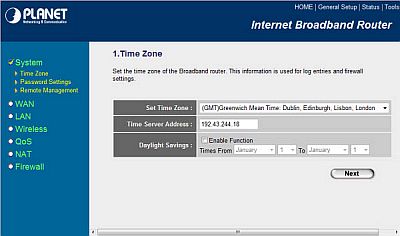
As seen on the tab Time zone you can adjust the time zone
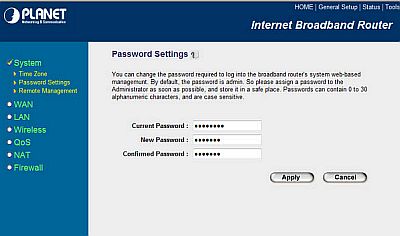
In the tab Password settings it is possible to change the default password (admin) to another. First introduced Old Password, then twice - a new one. On a bookmark Remote management the parameters of remote administration of the router (via the Internet) are set. Nothing should be changed here, let it remain by default. Going further - the settings of the external network of your Internet provider. WAN tab.
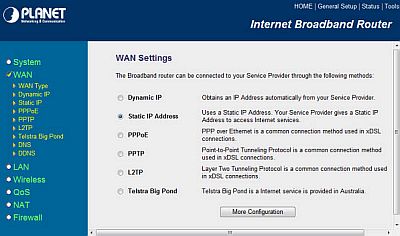
Here you need to select the type of connection that is applied by the provider to your Internet connection. Connection types are different. The main ones common today are: static ip-address, dynamic ip-address and connections via PPTP or VPN. In our case, it is used static ip address, and we will configure it.
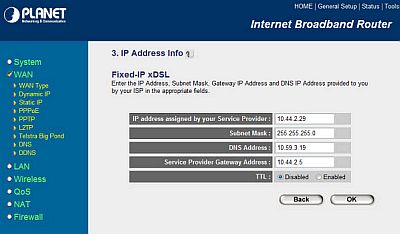
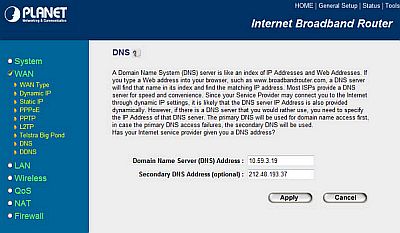
As you can see from this screenshot, we entered the ip-address 10.44.2.29 provided by our Internet provider, the network mask 255.255.255.0, the DNS server address 10.59.3.19 and the gateway 10.44.2.5. On the DNS tab, you can enter the address of an additional (alternative) DNS server. If the provider provided us with his ip, then enter it in the appropriate field.
Don't forget to press OK after making any changes to the router settings and move on. Now it's time to configure the parameters of our internal computer network. Well, let's get started - go to the LAN tab.
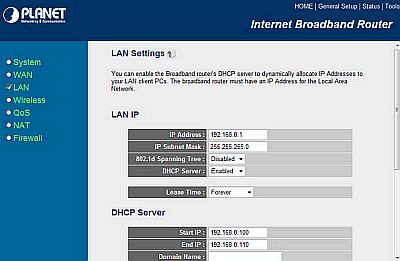
On this tab, our attention is presented to the settings of the internal local network, that is, the network where the router will distribute the Internet from the external channel of the provider. As you can see, we have the ip-address of the router - 192.168.0.1, the internal network mask - 255.255.255.0, and there is also the Enabled value in the DHCP Server line. What does this line mean? A DHCP server is a device that leases out IP addresses to computers on the internal network from a specified range. This saves users from manually assigning IP addresses, mask, gateway and DNS on computers on their home network. This process is fully automated through the DHCP service. Therefore, it is better to turn it on rather than turn it off. In almost all modern routers, DHCP is enabled by default, so in most cases, the initial configuration of the computer when connecting to the router does not have to be done. The Start IP and End IP lines define exactly the range from which ip-addresses will be leased to computers on the internal local network, and it does not matter how they are connected to the router - by wire or via a wireless WiFi network. Next, go to the settings tab of the same wifi.
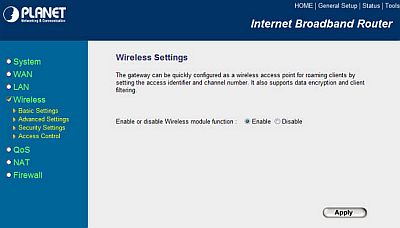
Bookmark Wireless Settings consists of several tabs on which you need to configure the router's wifi network on or off, preferably set a unique network name on English language, set security parameters - radio channel number, method and complexity of data encryption, as well as a password for accessing your wifi network.
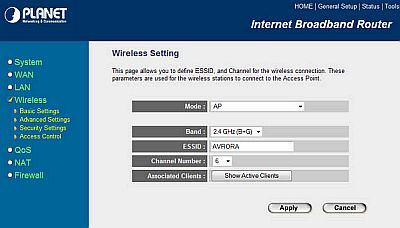
In our case ESSID is the name of the wifi network, Channel namber- radio channel number, MODE- wifi data transfer mode. We leave everything by default except for the network name and channel number. We set them manually. We save the changes and go to the next tab Advanced Settings(advanced settings for wifi router settings)
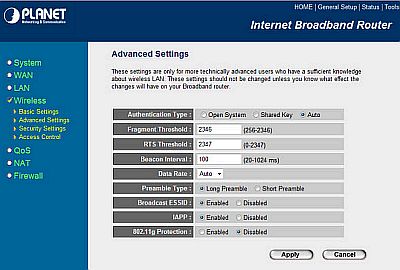
In this case, we leave everything as it is, nothing needs to be changed here. go to the tab Security Settings(Security Settings)
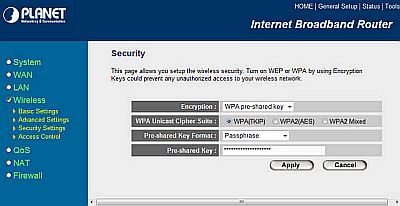
In this case: Encryption- encryption method, we chose WPA pre-shared key, its type is TKIP, and the password for accessing our local network is PRE-shared Key... We set it arbitrarily and remember or write it down well :-). More and more here we do not need to configure anything. Go to the NAT tab.
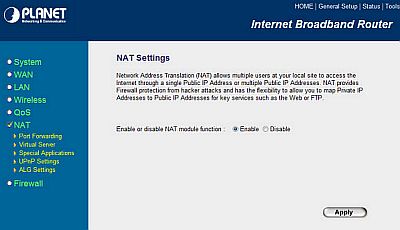
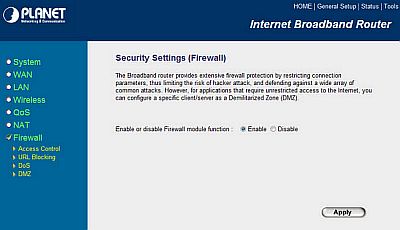
NAT must be enabled, otherwise you will not see the Internet as your own ears :-). Go to the bookmark Firewall(surge protector) or firewall.
Many modern router models now have a very useful feature: cloning a MAC address... What is it and what is it with? Cloning a MAC address is useful when you need to installed router was the same MAC address that was used when initially setting up the Internet on the computer when connected by the ISP. In other words, in local networks where there is a binding by the MAC address, when setting up the network, the MAC address of the computer on which the initial configuration was performed is entered into the base of the MAC addresses of the provider's server. Now let's imagine that at some point you have a second computer or laptop at home that you also want to connect to the Internet. Actually for this you purchase a router, which, as you know, has its own unique MAC address. So, in order not to ask the provider to change the existing MAC address to a new one, we came up with an option
In conclusion, I would like to hope that this article was useful to you and you, by analogy with our example with PLANET WRT-414 were able to independently configure their router for Internet sharing.
Instructions for WiFi setting router Asus WL-520GC
After connecting our cable entering your apartment to the access point, you need to make the initial settings on your network card. To do this, go to properties network card, then go to the properties of the Internet protocol TCP / IP and set the parameters in accordance with the picture:
We will configure the wireless network in the router through the device's web configurator. For the initial Wi-Fi settings connect to the router via an ethernet cable. Run Internet browser Explorer and type 192.168.1.1 in the address bar. Next, in the window that appears, click the Login button.

1) WAN Connection Type: PPTP
2) Take the IP address, mask and gateway address from the subscriber's registration card or check with technical support. (Example: IP Address - 10.0.x.x; Subnet Mask - 255.255.255.192; Default Gateway - 10.0.x.x)
3) Get DNS Server automatically? - #
DNS Server1: 195.98.64.65 DNS Server2: 195.98.64.66
4) User name - your login (account name)
5) Password - your password
6) Host Name: pptp.freedom
7) Host Server: pptp.freedom
Apply to routing table? - Yes
Then we introduce a permanent route. To do this, sequentially enter the IP - IP address in Network / Host (according to the figure), in the Netmask - the mask (according to the figure), in the Gateway - your gateway, Interface - MAN. After entering the first line, press Add (the line will be added to the Static Route List) and enter the second line in the same way, then the third. Then click Apply.
Then go to the bookmark Wireless - Interface.
To ensure a secure wireless connection on your router, specify the following settings:
Wireless Mode - 54G Only
Authentication Method - WPA-Personal
WPA Encryption - TKIP + AES
WPA Pre-Shared Key - Enter the encryption key between 8 and 63 characters. The key used will need to be specified when connecting clients to the access point.
WEP Encryption - None
Key Index - Key2
Network Key Rotation Interval - 0
Then click Apply.
Then go to the bookmark Wireless - Bridge
AP Mode - AP Only
Channel - 10
Connect to APs in Remote Bridge List? - #
Then click Apply.
Then go to the bookmark Wireless - Access Control
MAC Access Mode - Disable
Then click Apply
In the window that appears, click Save & Restart
To change your password you need to go to the bookmark System Setup - Change Password... V New Password to introduce New Password, v Retype New Password- confirm the password and click Save.

Now you need to configure the wireless network connection on your computer. To do this, go to the menu Start / Control Panel / Network Connections. Select the network card ("Wireless connection") with the right mouse button and in context menu select the item "Properties".
Use the scroll bar to select the item Internet Protocol (TCP / IP) and click the Properties button.
In the tab "General" fill in the items as shown in the figure. Click the "OK" button.
Let's configure the parameters wifi card for encryption. To do this, click on the shortcut of the network card in the lower right corner of the screen, next to the clock. We choose to install wireless network.
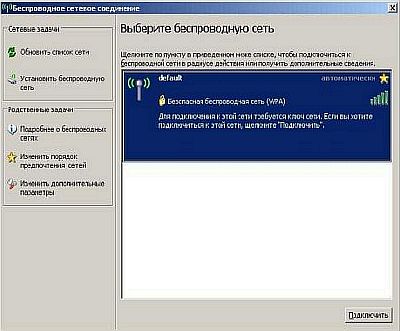
Enter the network name ( default) default. Mark the points as in the picture.
The network key is the password that you set when setting up the access point.
Set up the network manually.
The item "Finish" completes the configuration
Another article: Setting up a router + WiFi access point ASUS WL-520G.
After the purchase, it turned out that setting up a router is a slightly more difficult task than, for example, installing a RAM bar or even a printer, a video card, etc. After suffering two or three days and asking a bunch of stupid questions on this forum (interzet.ru), having received not a single intelligible answer (there were answers, but they assumed knowledge of the user's hardware, and at that moment I did not have it at all) I decided to write a small but detailed step by step instructions, which, perhaps, I myself will someday peep into.
1. Initial conditions: stationary computer(hereinafter referred to as Big Brother or BB) IS AVAILABLE (with Windows XP, a laptop is also suitable) and it is ALREADY connected to the Internet of the interzet network (Internet, mail, Strong DC ++, etc.).
2. We go: "Start" - "control panel" - "network connections"- right click mouse on "Local area connection" - "properties"- select from the list "Internet Protocol TCP / IP"- press the lit button "properties"... We rewrite the data (if they have not been rewritten yet, the provider, in theory, wrote them down to you on a piece of paper when you connect your computer to an Internet) in the fields: "ip-address", "Subnet mask", "Default gateway" and "Preferred DNS server". After that, put the circles in the fields "Obtain an IP address automatically" and "Obtain DNS servers automatically"... As a result, all unnecessary numbers will disappear.
4. We take out the BB from the network card network cable(RJ-45 connector), we plug the cable from the router (included in the kit) into the vacant socket, plug the other end of the cable into the Asus WL-520G router itself (must be connected to the socket) into the LAN1 socket. We are waiting for everything to finish (the process is visible in the lower right corner).
5. Click "Start" - "My Computer"- in the address bar we write: 192.168.1.1 ... In the dialog box, write the user - admin, password - admin... Click OK. If you saw something (like the beautiful ASUS page) - this is COOL, because you now have access to the access point settings through your computer's browser. If you haven't seen anything like this, try resetting the settings of your router (you probably have already cheated the couple), to do this, hold the button for three seconds “ Reset"On the bottom of your Asus.
6. Click in the left column on "Quick Setup" browser windows. Select the time zone "+03, Moscow", press " next". We put the circle in position "Cable Modem or other connection type that gets IP automatically" Press twice "Next"(we skip the field with IP addresses, we don't need them in this place) and "Finish" and wait for the Asus device to reboot (20 seconds). The result of this clause will be the assignment MAC addresses your real network card to your router. Without this, there will be no Internet.
7. Click again in the left column on "Quick Setup" browser windows. Select the time zone "+03, Moscow", click "next". We put the circle in position "ADSL or other connection type that uses static IP address"... Push "Next" and enter the settings that the operator gave you (ip, mask, gateway, dns). If you do not understand what is at stake, then these are the same settings that you copied on a piece of paper in paragraph 2 of this manual. Push "Next" give to the field SSID name "Voffka", Security Level: Low (None), click Finish and wait 20 seconds. We plug into the WAN socket (on the bottom of the router) a network cable (the same one that the provider gave you). We are waiting for 20 seconds. We go: "Start" - "control panel" - "network connections"- there, in theory, a new icon appeared: Internet gateway, connected. If everything is so, then congratulations, now there is Internet on your BB! You can verify this by typing "ya.ru" in the browser window. On your laptop or PDA (with WiFi), accordingly, it will also appear when connected (I will not paint, absolutely nothing complicated).
8. At the moment, your WiFi network not protected. To protect it, you need to go to the settings of your router (item 5) and click there "Wireless", choose the encryption method "Authentication Method", for example "Shared Key", for example 64 bit and in the "WEP Key 1 (10 or 26 hex digits)" field, enter the password, for example, "9215877081". "Finish" and overload. Everything, your network is encrypted, that is, only you can connect to it, and your neighbor will remain in flight, because he does not know the password.
9. You already have the Internet. But! If STRONG DC ++ stopped working for you (more precisely, it works, but "search", for example, does not work), then read on.
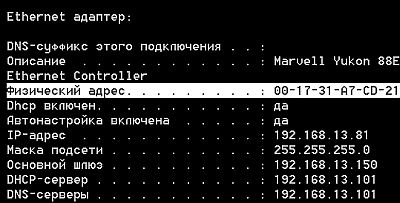
10. Open Strong DC ++, click "File" - "Settings" - "Network Settings"... In the "computer ip" field, write the real internal (local) address of your computer ON This moment(most likely 192.168.1.2). To find out for sure, press "Start" - "Run" - enter "CMD"... Will appear command line windows. We enter where the cursor is blinking: "Ipconfig / all" and look at the line "IP-adress". Most likely (if you do everything in the sequence as I wrote here), it will be 192.168.1.2.
11. Put the circle on "Firewall with manual port forwarding" and enter into the field "External WAN / IP"The same IP that the provider gave you (the one that you wrote out in the first line on your piece of paper in clause 2), and also put a checkmark" Don’t allow HUB / UPnP to override "
12. Write down TCP and UDP ports on a piece of paper.
13. Go to the settings of your router (p. 5) and click on "NAT Settings" - "Virtual Server"... We put a circle "Enable Virtual Server?" into position "Yes".
14. Now you need to fill in the "Virtual Server List". The Well-Known Applications field will be User Defined. Next, we need to make FOUR lines. To do this, in the fields, SEQUENTLY drive in one line at a time (Range port, IP locale, Local Port, Protocol, Description) line and press the "add" button. In the first two lines in the fields "Port Range" and "Local Port" you will have the first value from those written on the piece of paper (item 12), in the third and fourth lines - the second value.
15. As a result, we get something like this:
9392 192.168.1.2 9392 TCP strongdc
9392 192.168.1.2 9392 UDP strongdc
14466 192.168.1.2 14466 TCP strongdc
14466 192.168.1.2 14666 UDP strongdc
Where "9392" is the TCP port from DC ++ settings and "14466" is the UDP port. I copied it from a piece of paper. A 192.168.1.2 is the real ip address of your BB
Now you can restart DC ++ (turn it off and on), wait 10 seconds until everything is found and connected. Hooray!?
Do not forget to check your firewall settings, DC ++ should not be blocked by it, as you yourself understand.
http://forum.interzet.ru/index.php?showtopic=9988 (it is not displayed for me)
http://www.himki.net/faq/settings/dlink/ - setting up Dlink routers
ATTENTION! If the router is idle for a long time, it tends to freeze "due to power surges in the network. In this mode, the router works correctly through the wire, but it is not visible on the wireless interface (as if it does not exist at all, but everything worked yesterday). Just interrupt the power to the router for 1 second (I pull and plug in the power cord) or put the UPS in.
) for a network of home computers. The exact names of the configuration parameters of your router may vary depending on the model. and it can be both wired and wireless... This common router setup procedure guides you through the general home network setup process. After setting up the Internet, you can buy hosting and host your sites on it.
1. To get started configuring the router, choose a comfortable place such as an open space on the floor or desk. This will not be the permanent location of the device. In the beginning, it is better to choose a place where it is easiest to work with the router, and you can worry about its final placement later.
2. To set up a router, connect the power supply to the router, and then turn on by pressing the power button.
3. Connect the cable that your ISP provided to you to the router. This cable plugs into main entrance router, it is usually marked with the label - WAN.
Do not plug the main network cable into the LAN connector !!!
4. When configuring the router, even if wireless, you need to connect it to the host computer via a network cable. If desired and technically feasible, after connection, the connection method can be changed to wireless.
5. On a computer connected to the router, open any browser. Then enter the address of the router in address bar browser. Many routers have the address http://192.168.1.1 or http://192.168.0.1 Please refer to router setup documentation to determine the exact address for your model. Please note that you do not need an Internet connection for this step.
6. The page you will be taken to will ask you to enter your username and password. They are in the router documentation (by default, they are set: username - admin, password - admin). You must change the router password for security reasons, but you can do this after the installation is complete to avoid unnecessary complications during installation.
7. Choose router operating mode... The router has several modes of operation:
DHCP mode- allows the router to automatically distribute addresses to all computers connected to the network This mode is most convenient when a lot of computers are connected to the network, and it will be rather problematic to configure on each computer.
NAT mode- using this mode of operation, all computers connected to the network will be perceived by others as one computer, with one IP address. But within the network, each computer receives a separate address. This mode is good because many providers limit the number of computers that can enter the local network, so using NAT Mode you can mask the number of computers, since they will have one common IP.
Bridge Mode and Access Point Mode- in these modes, the router passes the entire stream of information through itself, and you will have to configure the connection on each computer.
8. After you have selected the mode of operation of the router, you need to configure the router WAN and LAN, and if your router has a wireless interface, you can still configure router across Wi-Fi connection... These settings are usually not complicated.
 Architecture of a distributed control system based on a reconfigurable multi-pipeline computing environment L-Net "transparent" distributed file systems
 Email sending page Fill relay_recipients file with addresses from Active Directory
 Missing language bar in Windows - what to do?