How to work with a new laptop. How to start a new laptop
Steps
on a new computer
You have purchased (or want to purchase) a new one stationary computer or a laptop with the Windows Operating System installed. I'll walk you through the first steps on a new computer.
How to connect new laptop
Connecting a laptop for the first time
To the laptop, initially, you need to connect the power supply.
Which consists of an AC adapter, a connection cable
adapter to the power supply (to the socket) and the connection cable
adapter to the laptop.

Of course, the laptop has a rechargeable battery and may be of some
time to work without connecting the power supply. But the battery charge
the new laptop has a small one. And you won't be able to work on it
long, without constant recharging.
In addition, the brightness of the screen when the laptop is working without a connected
power supply unit is much lower. Because automatically
the power saving mode is activated.
So, plug both cables into the AC adapter.
Laptop adapter cable - available separately
from the adapter or, as in the picture above, initially connected
to the adapter.
Plug, for connecting to a laptop - they also look different,
from different brands. Sometimes at right angles like the picture, sometimes
and straight. But no matter how the plug looks - connect it to a laptop.
Connector for connecting DC power on a laptop - has
such an icon. On those laptops on which I worked - the connector
located on the left side panel, the bottom of the laptop. Closer
to the back wall.
The second cable - connect to the power supply. That is, to the outlet. And you can turn on the laptop, by briefly pressing the power button. In a laptop - it is, most often, under the LCD screen. For a stationary computer - on the front panel of the system unit.
How to activate Windows on a new computer or laptop
Activation
Windows operating system
on a new computer or laptop
For the first time after turning on the computer and fully booting
Windows OS - the system will prompt you to activate Windows
on a new computer.
Label, with key Windows activation, pasted by the seller.
On a laptop - a sticker on the bottom of the laptop.
Simply put - turn the laptop upside down and you will see.
A stationary computer has a sticker on one
from the side walls of the system unit.
The label looks like this.
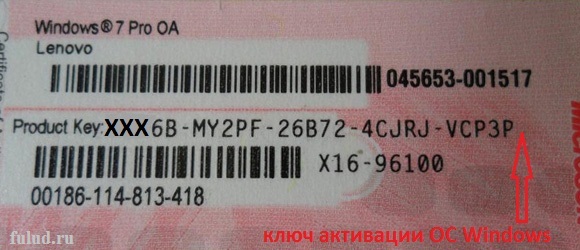
The quality of the photo, of course, is not important, but the activation key is visible quite clearly. And the fact that it consists of 5 blocks of 5 characters is evident. It is understood that there will be a different key on your computer. And the color of the label may differ.
So, your actions after
the system will prompt you to activate Windows.
Translate the language from RU to EN, at the bottom of the screen.
You can turn on the key if you like. Caps lock to print
capital letters. Or use with the Shift key... And enter the key
activation in a line with a blinking cursor. Then confirm it
action at the bottom of the tab. And that's it ... The activation took place.
Upon activation, you are the rightful owner
Windows OS on your computer.
And you are the one who has the rights
Administrator on your computer.
The operating system on your computer will be
updated regularly. And, if necessary,
you can contact the service technical support
Microsoft.
When buying a laptop, be sure to ask the seller if this laptop has been launched before. If it did not start, then the first turning on of the laptop should be done in a special way.
Sponsored by the placement of P & G Articles on "How to start a new laptop" How to set up wifi on a laptop How to turn on a webcam on a laptop How to take a picture with a laptop camera
Instructions
When buying a laptop, check with the retailer whether the preinstalled operating system comes with the laptop or not. This will help determine how you should start your new laptop. The general rule of thumb for starting a new laptop (regardless of whether the operating system is installed or not) is that the battery must be inserted into the laptop and the laptop itself must be connected to the mains. The connection to the electrical network is carried out so that the laptop does not turn off during installation operating system.
If your laptop comes with a preinstalled operating system, plug it in and press the power button. After turning on the power on a laptop that has never been turned on, the installation of the operating system should start, the distribution of which is located on a special hidden section hard disk... Carefully follow all stages of OS installation. If you need an activation key during installation, you can read it on the laptop's bottom cover. Do not turn off the power to the laptop until the operating system is finally installed.
If the laptop was sold without an operating system (or with a DOS or Linux operating system), the first time you turn it on, you will need to install the desired operating system. Purchase a distribution kit of the required operating system on an optical disk, connect the laptop to the electrical network, turn it on, wait for DOS or Linux to load, and then insert the Windows disk (instead of the disk, you can use a flash card if the laptop does not have an optical drive). Reboot the computer and enter the BIOS, setting the OS boot priority from the optical drive (or from a flash card), save the changes. Then install Windows, unplug your laptop and use it however you like.
How simpleOther related news:
Setting up an Acer laptop, like any computer, begins with the BIOS section. Before starting the installation of the operating system, it is necessary to set the boot parameters, check the time in memory, check the definition of the main system devices and enable additional ones if they are disabled in BIOS. Sponsor
The need to diagnose a laptop appears when a software or hardware malfunction occurs. Hardware includes breakdowns of the laptop's components - the central board, power supply, or loosely attached boards. Program errors cause malfunctioning
When you turn it on for the first time, a new laptop will not be ready for use right away. First you need to activate it. This is done different ways, depending on the presence or absence of a preinstalled operating system. Sponsored by placing P & G articles on "How to activate a laptop" How to turn on
First of all, a laptop is compact, and in terms of functionality it can replace a stationary computer. Secondly, you can take it with you and work wherever you want. But in order for a laptop, disconnected from the mains, to work for a long time, it must have a good battery. You will need a laptop with
From time to time, it becomes necessary to reinstall the operating system on a personal laptop. This can be done without the help of a professional programmer. You need to be careful and attentive when performing this operation. You will need - licensed Windows version; Placement Sponsor P&G
Any laptop will not work without an operating system. Loading process into Windows laptop not very troublesome, although it can take several hours. Many laptops are sold with already installed Windows... They are generally much more expensive. So it's better to buy a laptop without
When purchasing a laptop, many pay attention to whether the operating system comes with it. Laptops without an operating room Windows systems tend to be cheaper than with it. Installing Windows can be produced both from a hidden partition hard laptop disk, and from external media.
Introduction
This article will tell you what to do after buying a laptop. It is better, of course, to do all this immediately after buying a laptop, but if it did not work out right away, then you can do it after a while
Let's start
When you start the laptop for the first time, you need to enter your name, specify the name of the laptop, select the language ...
Then on the laptop it will take about 15-30 minutes to install proprietary utilities and drivers:
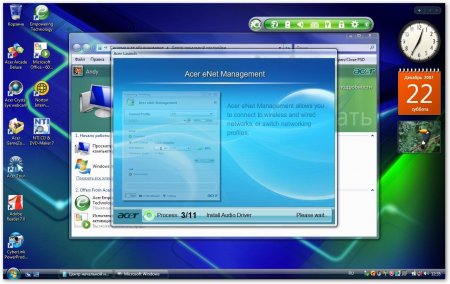
At the end of the installation process, there will be a reboot. When installing utilities and drivers, it is recommended that you do nothing on the laptop.
The first step is to fully charge the laptop, and then work in offline without recharging until the battery is completely discharged (charge level approximately 5-10%). These operations are used to calibrate the battery. They are recommended by many laptop manufacturers.
Create system recovery discs
Complete with laptops Acer recovery discs usually do not go. It is assumed that the user will create them himself. How to create them will be described below:
We launch the proprietary utility Acer eRecovery Management, press Setup -> Create a New Password and set a password that should not be forgotten as it must be entered during automatic system recovery using eRecovery and pressing ALT + F10(as an option, you can specify it in the field Hint- prompt)
Press the button Burn disc (Burn disc in the Russian version) at the bottom of the window and get into the disc burning menu:
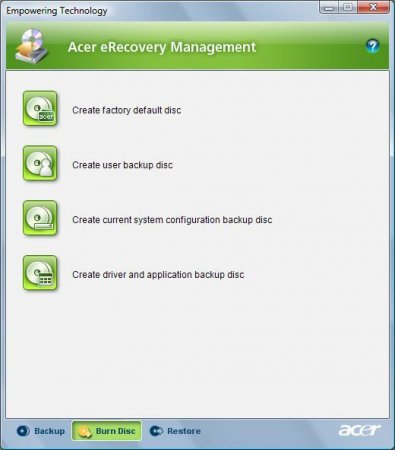
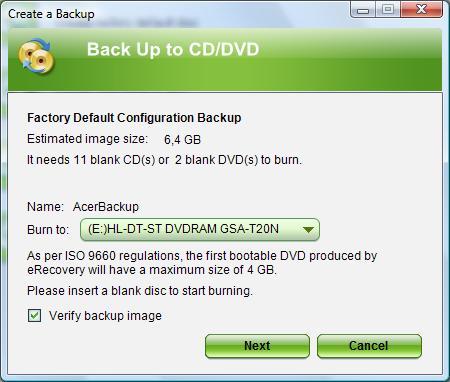
Here, first click on Factory Defeault Disc (Create a disc with factory default settings in the Russian version of the program), and then on ( Create a disk with an archive of drivers and applications in the Russian version of the program). For the first, you need two DVDs, for the second, one DVD:
It is better to put the burned discs in a safe place (in a laptop box, for example). Let me explain what those disks are for:
Two Factory Defeault Discs are used for Windows recovery Vista with all the programs and drivers that come with the laptop. To restore, you need to boot from the first disk, then the installation process will begin. To boot from the disk, you need to go into the BIOS (press F2 at boot), in the menu Boot and put the IDE CD in the first position (using the F5 and F6 keys), save the settings and exit the BIOS.
Looking ahead, I will say that for a successful recovery, the laptop hard disk should have only TWO partitions (not counting the hidden ones, although their presence is not required) - C: and D :. C: must be “primary” and D: must be “logical”. Disk size C: - at least 20GB. When recovering from these disks, the same as when recovering from hidden partitions (ALT + F10) ALL information from the C: drive is WASTE. Drive D: will remain intact.
Driver & Application Backup Disc is used when Vista is installed from disc. Naturally, whatever Acer utilities There is no bundled software or even drivers for a laptop in the standard Windows Vista package. On Driver & Application Backup Disc all this is there. There are distributions of Acer proprietary utilities, there are distributions of software that comes with the laptop and the driver for the laptop.
Note: if you have deleted hidden partitions and Acer eRecovery does not want to burn discs, then you should not despair. For example, if the laptop came with Windows Vista Home Premium, then on the bottom there should be a piece of paper with serial number Windows. If you want to have licensed Windows on your laptop, then you just need to get any disk with the Windows Vista distribution kit, start the installation and enter that code from the piece of paper on the bottom during installation. In that Windows case will be licensed, will be activated and receive updates. You can find the drivers on this site.
Everything about Acer eRecovery is discussed in this forum thread:
Create images of hidden sections
Having finished with the disks, you can start creating images of hidden partitions. There are one or two hidden partitions on a laptop hard drive. They serve to automatically restore the system with all drivers and programs. To recover, you need to press the ALT + F10 key combination when booting the laptop. V Acer aspire 5920 hidden partitions two, because in this laptop the manufacturer has implemented IOArcade technology - launching the media center without booting Vista. A hidden 3 GB partition serves for its work. The vast majority of Acer laptops have only one hidden partition - PQService volume of several gigabytes. The Acer Aspire 5920 has a capacity of 10 GB.
It is imperative to create images of hidden sections
To create images of hard drive partitions, we need a program Acronis True Image... The version used in this article can be downloaded from these links: /
The functionality of the demo version will be sufficient to create images. I recommend version 10, although later versions can be used.
During the installation process, you will need to fill out a small questionnaire, the laptop at this time must be connected to the Internet.
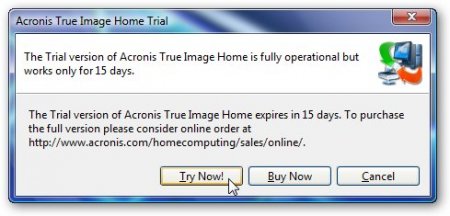
Run the program, click Try Now!(demo still)
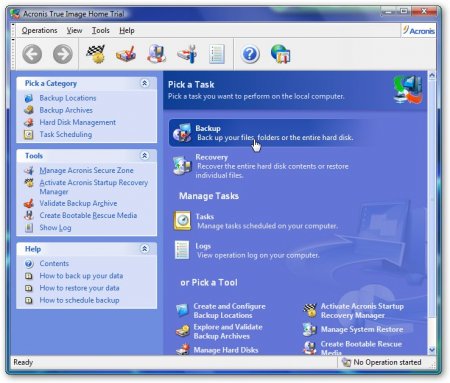
We choose Backup- that is, creating images of partitions:
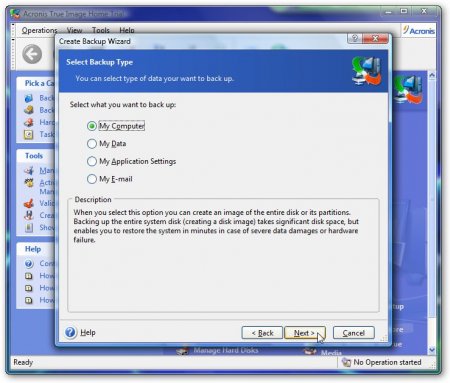
We indicate what we will do disk backup:
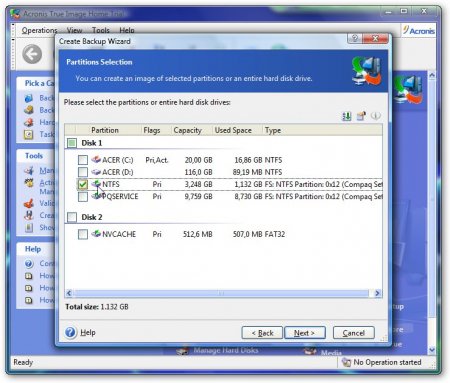
We choose only one hidden section. The hidden NTFS partition is responsible for the IOArcade technology - launching the media center without booting the OS. On some Acer laptops did not implement such an opportunity and NTFS partition will not, you can skip the steps below for this section. The sizes of your partitions may differ from the ones below:
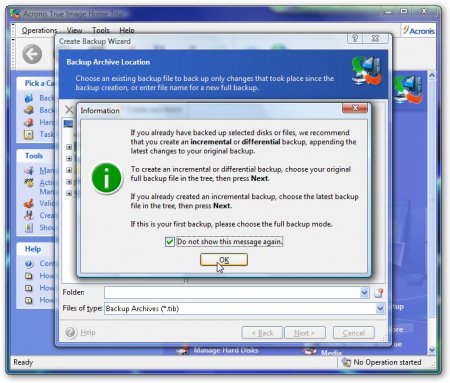
Push OK:
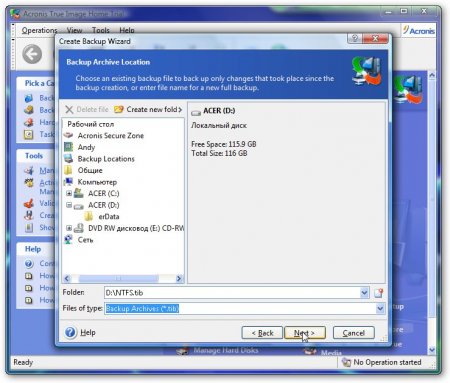
We indicate the name of the image of the hidden section and where to save it:
We choose to create an image of the entire section:

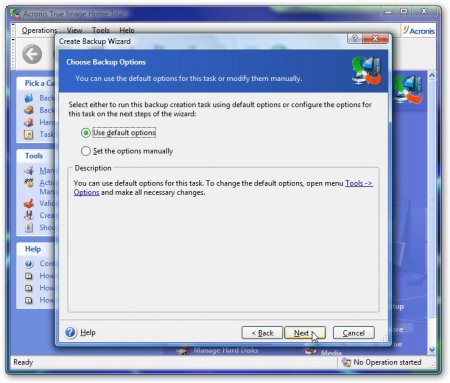
Choosing the default settings:
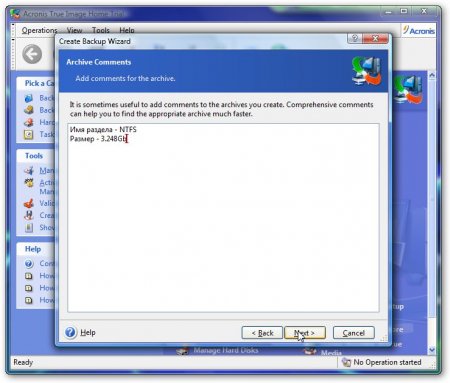
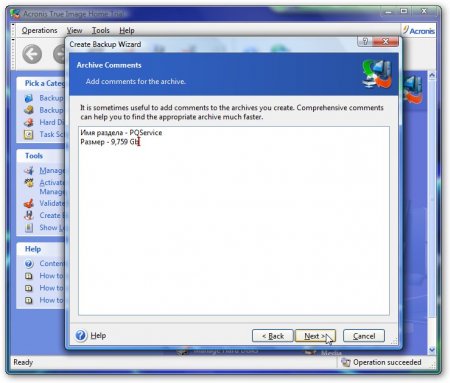
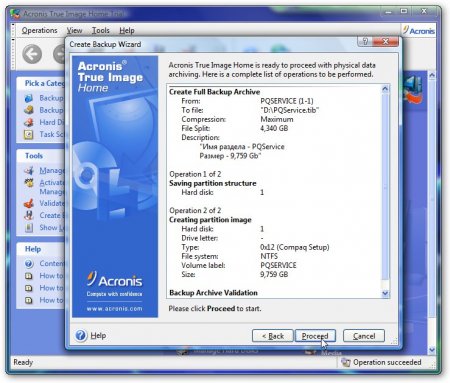
We indicate comments to the image. This is optional. You can specify the exact size of the section and its section name, for example. The exact size can be found on the last tab with a button Proceed in field Size:
We press Next and we get the following:
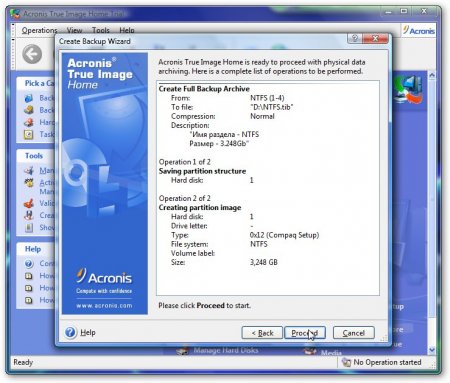
To start creating the image, click Proceed:
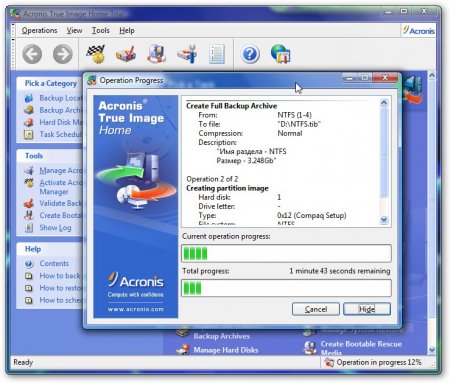
After the end, press OK:
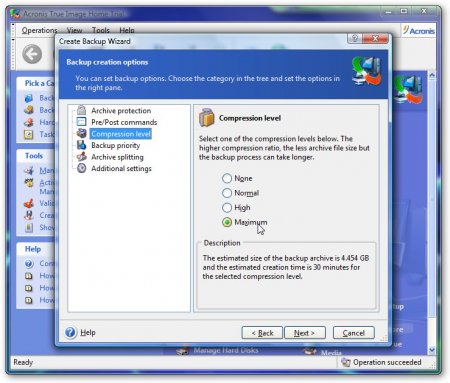
Now we repeat similar operations for another hidden section PQService. But this time we use maximum compression and splitting the image into parts for burning to DVDs. Do not rename parts of the image! The volume of this section for different Acer laptops may differ from the sizes in the screenshots.
Choose again Backup:
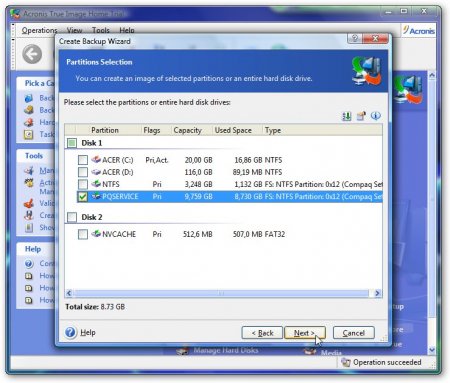
Select the PQService section. It is he who is responsible for automatic system recovery:
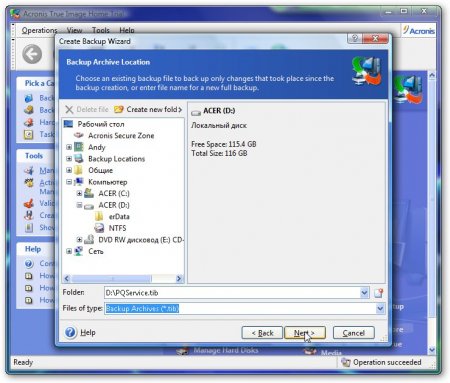
We indicate the name of the image and where to save it:
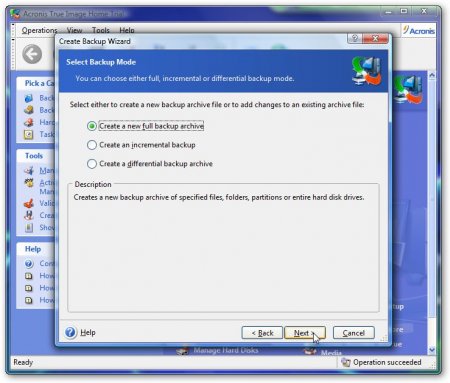
We choose to create a complete image of the partition:
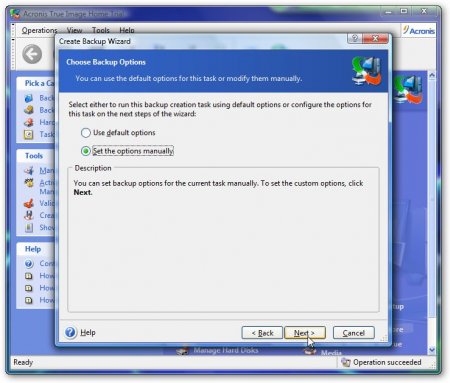
Selecting manual mode:
Set the maximum compression level on the tab Compression Level:
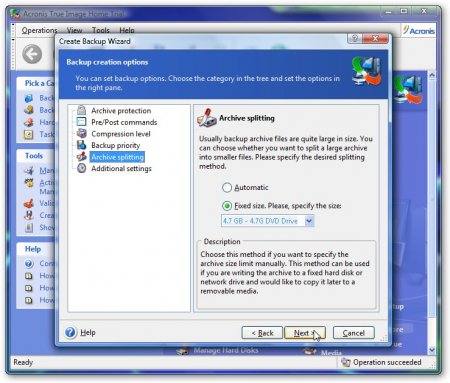
We indicate how to split the image of the section on the tab Archive Splitting:
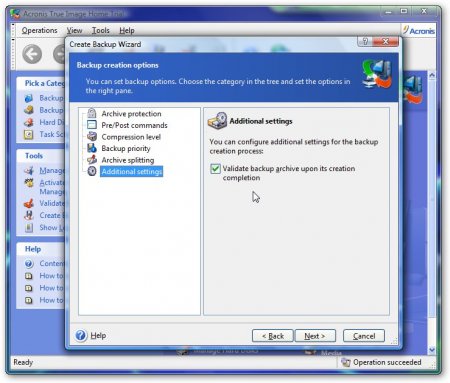
You can also enable checking the partition image for errors on the tab Additional Settings:
We indicate comments to the image. Although this is not necessary.
To start the process of creating an image, click Proceed:
After the end, we get something like this message and click OK:
As a result, there should be 2-3 files on the D: drive: one image file of one partition (on some models it may not exist) and two parts of the image of the second hidden partition - PQService. These images MUST be burned to another computer or DVD.
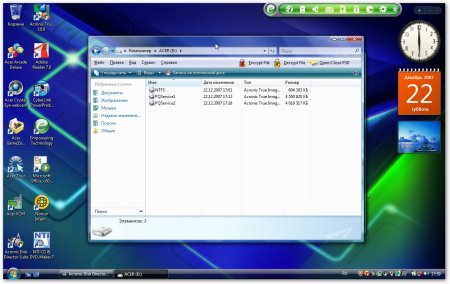
Do not rename image files!
Disks made by the eRecovery utility and disks with disk images must be placed in a safe place (for example, in a laptop box). Only when the images of the hidden partitions are made and they are burned to DVD or another computer, you can start manipulating the partitions, XP settings, etc. !!!
If you were in a hurry and accidentally erased hidden sections without making their images, then
BIOS update
First, download the BIOS archive from the Acer website. The archive has everything you need to BIOS updates, as well as an instruction (it is usually in the Readme.txt or install file). Also in the archive there may be text file with a description of the changes in this BIOS version.
There are two ways to update the BIOS:
1) from Windows. In this case, the program that updates the BIOS is launched from under Windows. This method is simple, but there is a small chance that the system will freeze during the update and, even worse, the firmware will be damaged. Then you will have to restore the BIOS using a Crysis flash drive. How to do it is described in this material:
2) from under DOS. This method is considered more reliable, but you must first create bootable USB drive from DOS, and then copy the firmware file and the flasher itself to it. The procedure for flashing from under DOS is usually well described in the flashing instructions. How to create such a USB flash drive is described in this article:
Let's take a look at an example of Windows firmware for an Acer Aspire 5920 laptop. The procedure for flashing your laptop model may vary significantly.
Questions about updating the BIOS are expressed in this forum thread:. Before that, it is worth reading the topic. It describes well the most typical mistakes when updating
So. Let's start. Download the Phoenix BIOS update program from here: /, it should also be in the BIOS archive.
Download the version for 64-bit OS from this link: /
Then we unpack the contents into a folder, unpack the file with the firmware xxxxxxxx.WPH into the same folder and run SwinFlash.exe from the folder where the BIOS was unpacked:
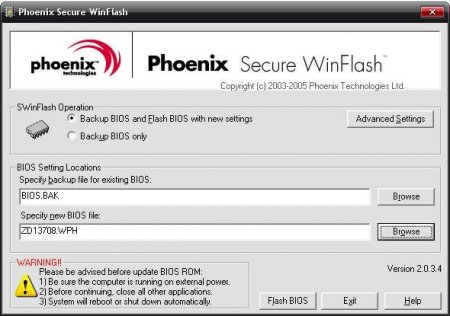
In the lower window, we indicate the path to the file with the firmware, and in the upper window, we indicate the name under which to save the current BIOS
Before flashing, all other programs must be closed, the laptop must be powered from the mains and the battery must be charged.
Click on the button Flash BIOS... After a couple of minutes, the BIOS will be flashed and the laptop must be rebooted.
If you still have questions after reading this material, then we express them on ours. I very rarely respond to comments.
Edited: FuzzyL- September 15, 2013
Reason: Material version 2.0
Execution of the first important steps with a new laptop will help you get the most out of your new mobile computer.
Before you start using your new laptop, you will need some time to complete a few auxiliary tasks.
This will ensure that you are not only well protected, but that you can also get the most out of your investment.
With a little ingenuity, you are able to complete all tasks without additional financial investment.
Download or activate antivirus software
The first thing you need to do after turning on your new laptop is to make sure you have anti-virus software and activate it (if not, download).
Threats exist most of all when your computer is connected to the internet, then your branded device can get infected with a virus.
You can download this program at no additional cost - there are many free antiviruses available today.
Many laptops come preloaded with antivirus program but this is almost always only during the trial period.
Check for Updates
On personal computer with windows, you can easily check for updates by clicking on the start menu and typing center Windows updates»In the search box that appears at the very bottom.
You should download all necessary updates for your device so that it is less vulnerable to various security threats.
Also connect additional devices to the laptop that you will be using in the future. This will update the drivers that will connect to it later.
Download files and programs
Take a moment to transfer or download all files, documents and programs on your new laptop that you may need for future use.
By doing this front, you will ensure your laptop is ready for use at any time and will receive warnings about any potential issues, such as licensing or incompatibility issues.
It's also a great time to remove any unwanted preloaded applications that are taking up extra space and slowing down your computer's performance.
It is advisable to find ways for Reserve copy files and programs on a new laptop.
Then you can quickly restore it if it breaks down or gets malfunctioning - a backup can help you restore your computer to an earlier period.
To do this, you can use the hard drive to create a restore point, external HDD to back up files.
also today there is already free (free) cloud-based software for storing data remotely. Good luck.
When you start the laptop for the first time, you need to enter your name, specify the name of the laptop, select the language ...
Then on the laptop it will take about 15-30 minutes to install proprietary utilities and drivers:
At the end of the installation process, there will be a reboot. When installing utilities and drivers, it is recommended that you do nothing on the laptop.
The first step is to update the BIOS. This must be done in order to get rid of various kinds of errors in the BIOS. More detailed information about fixes in the .txt file which is in the archive with BIOS.
A warning! This is a rather dangerous procedure and it is strongly recommended to follow all the recommendations below. If you are not confident in your abilities, it is better not to update the BIOS!
First, download the BIOS archive from www.acer.ru or from the official FTP server.
The flashing program can be downloaded from here: link, it should also be in the archive with the BIOS.
Download the version for 64-bit OS from this link: link (backup link)
Then we unpack the contents into a folder, unpack the file with the firmware xxxxxxxx.WPH into the same folder and run SwinFlash.exe from the folder where the BIOS was unpacked:
In the lower window, we indicate the path to the file with the firmware, and in the upper window, we indicate the name under which to save the current BIOS
Before flashing, all other programs must be closed, the laptop must be powered from the mains and the battery must be charged.
Click on the button Flash BIOS... After a couple of minutes, the BIOS will be flashed and the laptop must be rebooted.
Note: BIOS update procedure is individual for each laptop and may differ from model to model. If the flashing procedure fails, you can always revive the laptop using the Crysis disc. Read more about this on our FORUM
After flashing, you need to fully charge the laptop, and then work offline without recharging until the battery is completely discharged. So carry out several cycles of "full charge / full discharge". These operations are used to calibrate the battery. They are recommended by many laptop manufacturers.
Complete with laptops Acer recovery discs do not go. It is assumed that the user will create them himself. How to create them will be described below:
We launch the proprietary utility Acer eRecovery Management, press Setup-> Create a New Password and set a password that should not be forgotten as it must be entered during automatic system recovery using eRecovery and pressing ALT + F10(as an option, you can specify it in the field Hint- prompt)
Press the button Burn disc (Burn disc in the Russian version) at the bottom of the window and get into the disc burning menu:
Here, first click on Factory Defeault Disc (Create a disc with factory default settings in the Russian version of the program), and then on ( Create a disk with an archive of drivers and applications in the Russian version of the program). For the first, you need two DVDs, for the second, one DVD:
It is better to put the burned discs in a safe place (in a laptop box, for example). Let me explain what those disks are for:
Two Factory Defeault Discs are used to recover Windows Vista with all the software and drivers that came with the laptop. To restore, you need to boot from the first disk, then the installation process will begin. To boot from the disk, you need to go into the BIOS (press F2 at boot), in the menu Boot and put the IDE CD in the first position (using the F5 and F6 keys), save the settings and exit the BIOS.
Looking ahead, I will say that for a successful recovery, the laptop hard disk should have only TWO partitions (not counting the hidden ones, although their presence is not required) - C: \ and D: \. C: \ must be "primary" and D: \ must be "logical". The size of the C: \ drive must be at least 20GB. When recovering from these disks, the same as when recovering from hidden partitions (ALT + F10) ALL information from the C: drive is WASTE. The D: \ drive will remain intact.
Driver & Application Backup Disc is used when Vista is installed from disc. Naturally, there are no Acer utilities, no bundled software, or even drivers for a laptop in the standard Windows Vista package. On Driver & Application Backup Disc all this is there. There are distributions of Acer proprietary utilities, there are distributions of software that comes with the laptop and the driver for the laptop.
Having finished with the disks, you can start creating images of hidden partitions. There are one or two hidden partitions on a laptop hard drive. They serve to automatically restore the system with all drivers and programs. To recover, you need to press the ALT + F10 key combination when booting the laptop. Acer Aspire 5920 has two hidden partitions, because in this laptop the manufacturer has implemented IOArcade technology - launching the media center without booting Vista. A hidden 3 GB partition serves for its work. The vast majority of Acer laptops have only one hidden partition - PQService volume of several gigabytes. The Acer Aspire 5920 has a capacity of 10 GB.
It is imperative to create images of hidden sections !!!
To create images of hard drive partitions, we need a program Acronis True Image... The demo can be downloaded from here, from here or from here. The functionality of the demo version will be sufficient to create images. I recommend version 10, although later versions can be used.
During the installation process, you will need to fill out a small questionnaire, the laptop at this time must be connected to the Internet.
Run the program, click Try Now!(demo still :))
We choose Backup- that is, creating images of partitions:
We indicate what we will do disk backup:
We choose only one hidden section. The hidden NTFS partition is responsible for the IOArcade technology - launching the media center without booting the OS. On some Acer notebooks this feature is not implemented and there will be no NTFS partition, you can skip the steps below for this section. The sizes of your partitions may differ from the ones below:
Push OK:
We indicate the name of the image of the hidden section and where to save it:
We choose to create an image of the entire section:
Choosing the default settings:
We indicate comments to the image. This is optional. You can specify the exact size of the section and its section name, for example. The exact size can be found on the last tab with a button Proceed in field Size:
We press Next and we get the following:
To start creating the image, click Proceed:
After the end, press OK:
Now we repeat similar operations for another hidden section PQService. But this time we use maximum compression and splitting the image into parts for burning to DVDs. Do not rename parts of the image! The volume of this section for different Acer laptops may differ from the sizes in the screenshots.
Choose again Backup:
Select the PQService section. It is he who is responsible for automatic system recovery:
We indicate the name of the image and where to save it:
We choose to create a complete image of the partition:
Additional Settings
As a result, there should be 2-3 files on the D: \ drive: one image file of one partition (on some models it may not exist) and two parts of the image of the second hidden partition - PQService. These images MUST be burned to another computer or DVD.
Do not rename image files!
Disks made by the eRecovery utility and disks with disk images must be placed in a safe place (for example, in a laptop box). Only when the images of the hidden partitions are made and they are burned to DVD or another computer, you can start manipulating the partitions, XP settings, etc. !!!
If you were in a hurry and accidentally erased hidden sections without making their images, then
If after reading this material you still have questions - ask them in the FORUM.
Best regards, the author of the material is Andrey Tonievich aka FuzzyL. [b] Publication of this material permitted only with reference to the source and with the indication of the author.
If you have any questions, amendments, wishes, suggestions - write to my mail - [email protected]
I would be very grateful
 Bugs in Singularity?
 Just Cause 2 crashes
 Terraria won't start, what should I do?