Network software. Security Information Portal
This is the same for peer-to-peer LANs and domain-based networks.
1. To get the distribution kit, click the "Download" button above, enter your address Email and wait for a letter with a link to the program.
2. The program is installed only on the computer that will later be used as an observer.
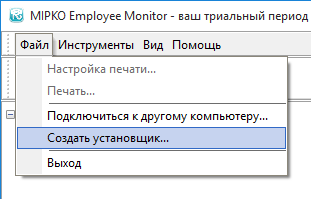
3. After installing the program, run it and generate the installer via the menu item " File → Create installer".
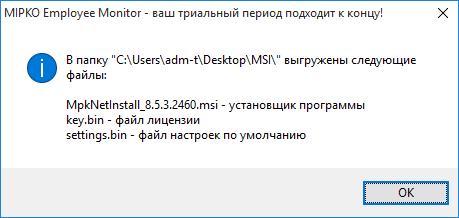
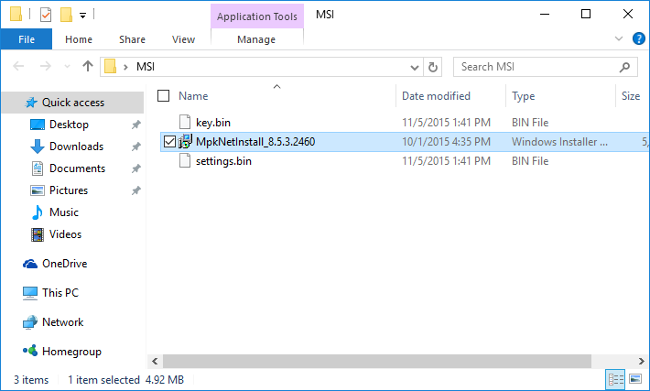
4. In the specified directory, the program will create setup files(MpkNetInstall.msi, key.bin and settings.bin). MSI file is an installer for monitored computers.
Installation on monitored computers in a peer-to-peer local area network
1. Copy the installation files (MpkNetInstall.msi, key.bin and settings.bin) to the monitored computer (via the network, via a flash drive, in any way) and run the MpkNetInstall.msi file. Administrator rights required.
2. Wait for the installation to complete. The program has no interface, the installation is quiet, you should not receive any messages upon successful installation.
3. Return to the watched computer, click the Add Computer button and enter the name (or IP address) of the watched computer.
Installation on monitored computers in the domain
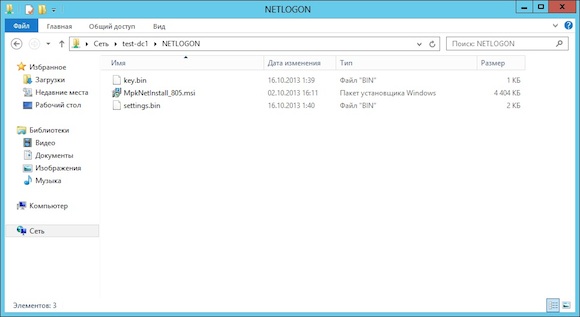
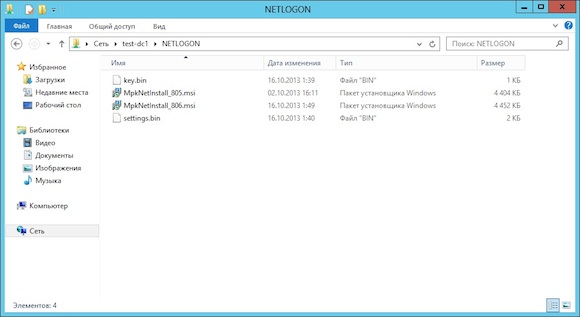
1. Create a network installation point on your server. You can use the NETLOGON folder.
2. Copy the installer files (MpkNetInstall.msi, key.bin and settings.bin) to it. It is advisable to combine the computers on which the program will be installed into one organizational unit and create a GPO for it.
3. Open the Group Policy Managment window, select right click mouse on a group of computers or the domain itself and click on Create a GPO in this domain, and Link it here.
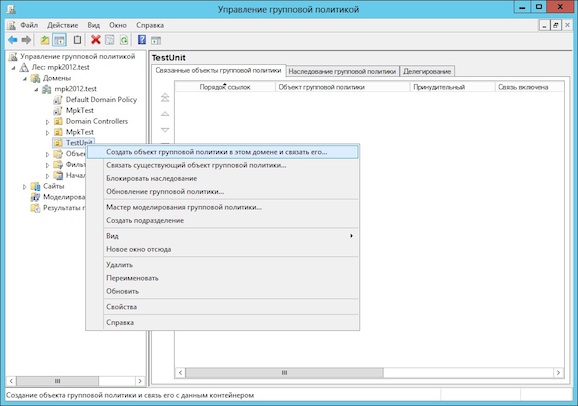
4. Enter a name for the policy and click OK.
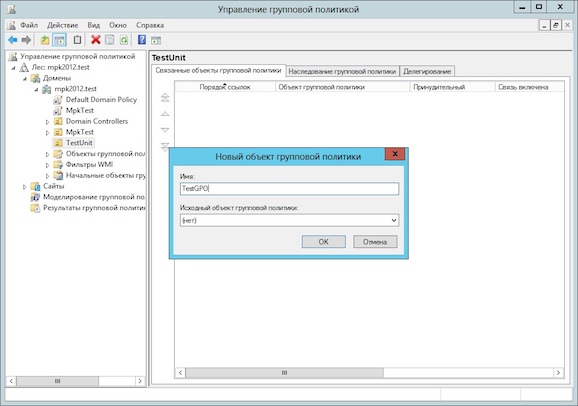
5. Right-click on the created policy and select Edit.
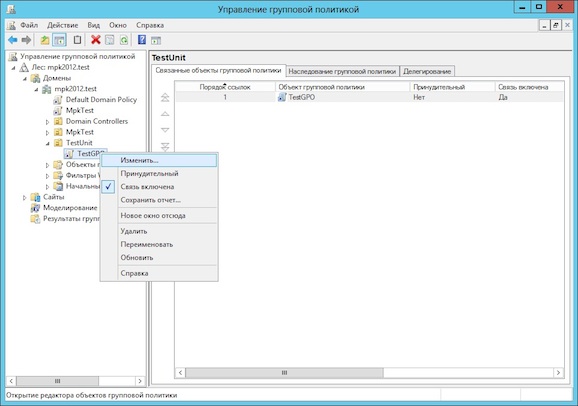
6. Expand the Software Instalation menu item, right-click it and select Properties.
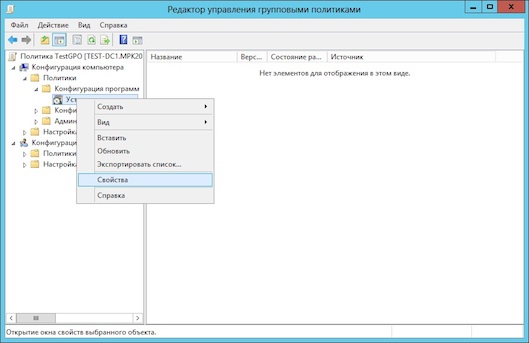
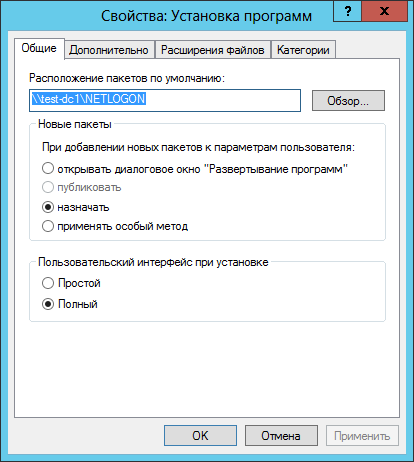
7. On the first tab, select the Default package location and set the Assign property for new network packages.
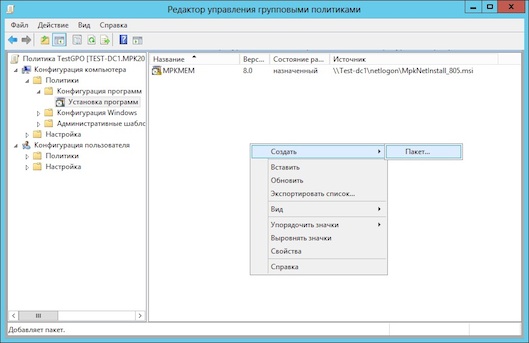
8. Right-click on an empty field and select the item to add a new installation package.
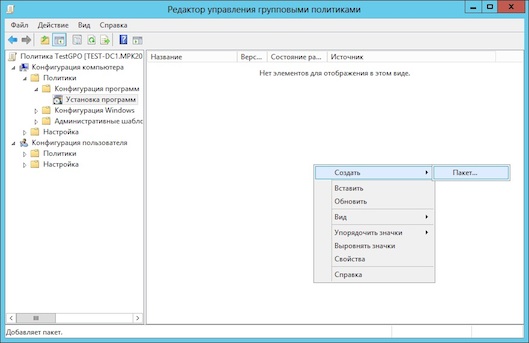
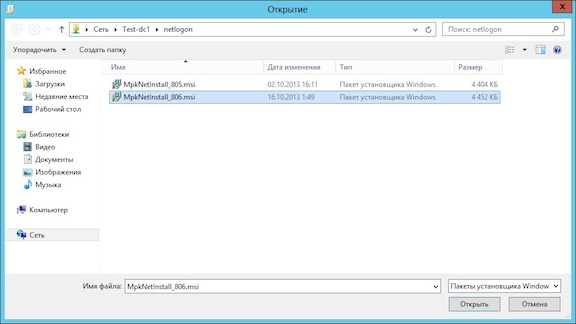
9. Select the MkNetInstall.msi package from the default package location folder and click Open.

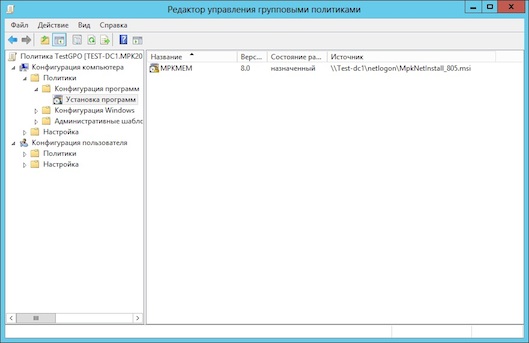
You can now close the policy management window.
10. Run the gpupdate / force command to update the policies.
![]()
Installation on monitored computers via PsTools
Create a network installer and copy its files to a shared network folder.
To install the application remotely, you need to run two commands:
Installing the agent:
PsExec \\ [Computer name or IP address] -s -u [Administrator login] -p [Password] msiexec / i "\\ server \ folder \ MpkNetInstall _ *. Msi" / quiet / norestart
Starting the module for collecting information on the current working user:
PsExec \\ [Computer name or IP address] -i -d -u [Administrator login] -p [Password] "C: \ ProgramData \ MPK \ mpk.exe"
For example:
PsExec \\ 192.168.0.1 -s -u admin -p pass msiexec / i "\\ 192.168.0.1 \ EM \ MpkNetInstall_8.9.0.3000.msi" / quiet / norestart
PsExec \\ 192.168.0.1 -i -d -u admin -p pass "C: \ ProgramData \ MPK \ mpk.exe"
For correct work PsExec requires network discovery and file sharing on your computer.
Connecting to monitored computers
The process of connecting monitored computers is described in the article on.
Updating the program in a peer-to-peer local network
It is carried out in the same way as for installation.
Updating the application in the domain
1. Copy the new network installer to the distribution folder.
2. Open the policy management window to install the network agent. Right-click on an empty field and select the item to add a new installation package.
3. Select the new version of the package and click Open.
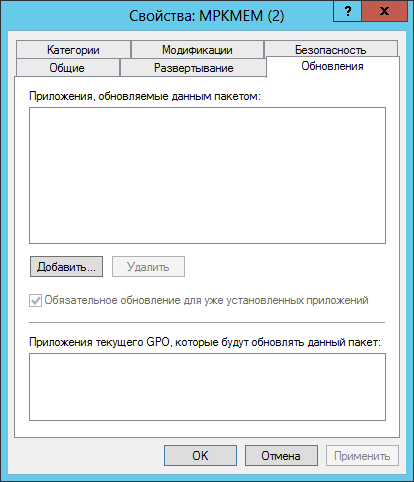
4. In the list of packages, select the new version, right-click and select Properties.
![]()
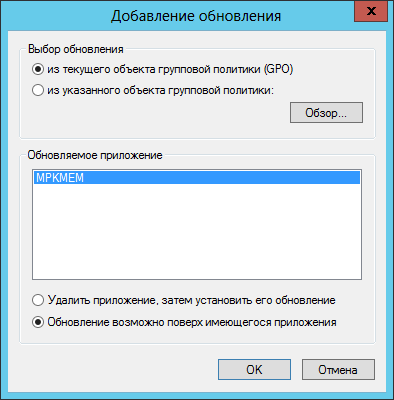
5. Select the Upgrades tab and click the Add… button.
6. In the update settings, select previous version package to upgrade and install the Package can upgrade over the existing package item and click OK.
8. Run the gpupdate / force command to update the policies.
![]()
Removing an application on a peer-to-peer local network
1. Make a network installer through the menu item "File → Create Installer" or use the one created earlier.
2. Copy the installation files (MpkNetInstall.msi, key.bin and settings.bin) to the monitored computer.
3. Right-click the MpkNetInstall.msi file and select Uninstall.
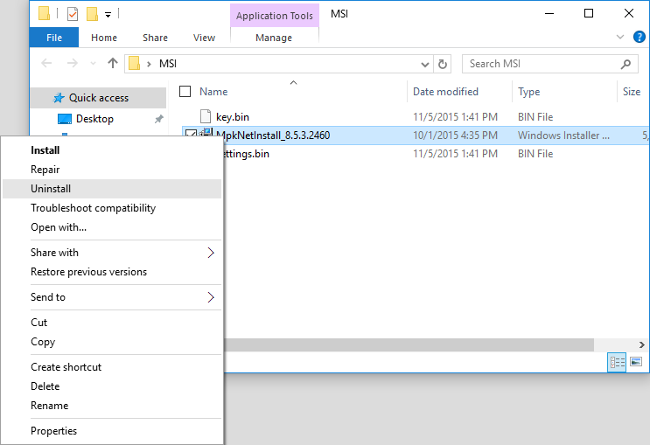
4. Wait for the uninstallation to complete.
Removing an application on a domain
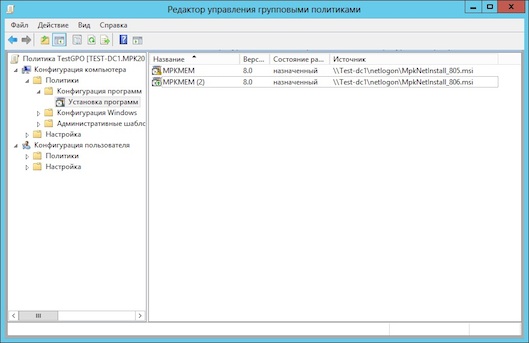
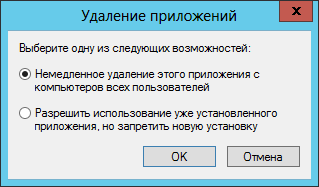
1. Open the Software Instalation menu item, select the application installation package and right-click on it.

Select the Remove… menu item. This operation must be performed for all packages.
2. Select Remove the program for all users and computers and click OK.
3. Run the gpupdate / force command to update the policies.
![]()
Removal via PsTools
It is enough to execute the command:
PsExec \\ [Computer name or IP address] -s -u [Administrator login] -p [Password] msiexec / x "\\ server \ folder \ MpkNetInstall _ *. Msi" / quiet / norestart
She solves the following tasks:
In fact, it is a convenient graphical shell for the utility psexec... The program window is divided into groups of fields and buttons corresponding to these three tasks:
The following fields respond to double mouse clicks:
- Red- computer not found (possibly firewall enabled).
- yellow- the computer was found, but the credentials are not correct.
- green- the computer is found and the credentials are correct.
1. Remote administration
2. Remote command execution
Commands are executed on a remote computer with the rights SYSTEM.
Applications ( Rel path) are placed on any network resource (Net path). Access to it is carried out according to the credentials ( Net User, Net Pass). To install the application on a remote computer, connect network drive (Net Disk).
Requirements for installed applications:
the application folder must contain a file install.bat, which the
installs the application. It is also desirable that this file should support
key -u(uninstall the application).
Mine meet all these requirements.
Getting Rinstall ready
Users = new Array ("Administrator", "Administrator", "");
Passs = new Array ("pass1", "pass2", "pass3", "");
Paths = new Array ("Far Manager", "Scripts", "TightVNC", "Firefox", "MSE");
NetPath.value = "(! LANG: IPresource"!}
NetUser.value = "(! LANG: DOMAINuser"!}
NetPass.value = "(! LANG: pass" !}
). She solves the following tasks:
- Remote administration.
- Remote command execution.
- Remote installation of applications.
- Host- IP address / name of the remote computer. The program constantly tries to connect to it and signals the result:
- Red- the computer was not found (perhaps a firewall is enabled on it);
- yellow- the computer was found, but the credentials are not correct / there are not enough rights / “simple file sharing” is enabled on the remote PC;
- green- the computer is found, the credentials are correct, the rights are there.
- User- the name of the account to connect to the remote computer.
- Pass- the password of the account for connecting to the remote computer.
By double clicking here, you can get the LAPS password - it will be copied to the clipboard.
Program settings are read when it is started from a file rinstall.ini which may be in directories "% PROGRAMFILES% \ Rinstall \" and "% USERPROFILE% \ Rinstall \"(the latter is more important).
1. Remote administration
- - get information about the system.
- - get a list of installed software.
- - start the computer management console.
- - start a remote shell.
- - connect via the Configuration Manager client.
- - connect via remote desktop.
- - connect via remote assistant.
- - connect via TightVNC.
- - connect via Radmin.
- - open a remote resource.
- - see what is occupied by the space on the disks of the remote computer.
2. Remote command execution
- - a command (executable file: * .exe, *. bat, * .cmd, * .vbs, * .hta, etc.) executed on a remote computer. By default, the command to start Device Manager is specified.
- - Arguments (parameters / options) of the command, if needed.
- [x] Copy- copy a command to a remote computer (in this case, you need to specify its full path on the local computer).
- [x] Hide- execute the command secretly.
- [x] Wait- wait for the command to complete.
- - run Far.
- - start the shell.
- - start startup manager.
- - run the uninstall manager.
- - update group policies (with the / FORCE key).
- - terminate all psexec processes.
- - update the IP address.
- - to restart a computer.
Commands are executed on a remote computer with the rights SYSTEM.
It is convenient to launch portable applications as commands (do not forget to check the box Copy). Here, however, there are incomprehensible problems with launching SFX archives on remote computers with a 64-bit OS ...
3. Remote installation of applications
Applications ( Rel path) are located on any network resource ( Net path). Access to it is carried out according to the credentials ( Net User, Net Pass). During the installation of the application on the remote computer, a network drive is connected ( Net Disk).
Requirements for installed applications:
- The application should be in a separate folder and installed automatically.
- The application folder must be written in the Latin alphabet.
- There must be a file inside the application folder install.bat, which the
installs the application. It is also desirable that this file should support
key -u(uninstall the application).
If WSUS is installed in the Windows domain, the administrator is happy and calm - they say, everything, updates are installed automatically, traffic has decreased, you do not need to run around computers, etc. In principle, everything else is the same, but after all, not everyone uses Microsoft Outlook in their work or Internet Explorer(although 8 is very good). There are many people who are used to working with The Bat !, Opera or Mozilla browser. If there is a question about updates, either it is a bummer for the administrator in the form of running to each computer to update everyone, say, Opera, or users must sit under the admins (albeit local, not domain ones).
Naturally, neither the first nor the second method is an option. So you need to be able to automatically install programs on workstations, and it is advisable to do this before the user is logged in - after all, if he is logged in, he will no longer want to reboot the machine, etc. We must confront the user with the fact that the program, his beloved Opera, has already been updated and the administrator does not bother that for some reason he likes version 10.10 less than the previous one. An update just came out and needs to be applied. No options.
The most common answer to the question is AS? - Of course, via Active Directory!- any specialist or just a system administrator will tell you. And how through AD?- you ask. And they will tell you - ?! Do you know how through AD? Yes, it's just there, through policy!- but they will probably not tell you anything more, because for most advisers this question is as vague as it is for you. And you will have no choice but to google until you lose your pulse, because finding a huge tome on the topic "how to deploy office 2007" on the corporate network is not a problem, but simply and in a nutshell - you will rarely find anything. Not without pride, I can say that this article is just one of the few short and "no bells and whistles" that came across to me.
Installing programs from MSI
Suppose we want to automatically install (and install updates as updates are released) the Firefox browser. The msi file for Firefox can be taken (in a new window).
I will skip configuring the .adm template, because This is not always necessary, and even more often you will find this fig template. As a result, the default settings (or, if we put on top of old version- the settings will be saved). We don't need the .adm template.
Distributing access rights
I guess everything Accounts computers (other than domain controllers) are located in the OU "OU Office Computers".
Note 1:
Why not use the original computer location (Computers - Domain Computers in the Active Directory Users and Computers snap-in)? It is more convenient for me to manage policies for groups of computers in the future. In addition, when I attended Microsoft courses, I saw that on domain controllers in test systems and in "production" systems configured by Microsoft specialists, almost only separately created OUs are used, and not basic ones. For myself, I decided to repeat the experience of specialists. So far, this only makes me more comfortable. Naturally, IMHO.
Note 2:
Not all users need Firefox (just like not everyone needs The Bat, Opera, etc.). Therefore, we will create a separate group of computers in "OU Office Computers" where Firefox will be installed. For clarity, let's call the group GFirefoxComputers... Note that this will be a group, not a nested OU!
We share a folder on the server (in the figure, this is SoftwareDistibution, not Mozilla Firefox as it might seem) and give group GFirefoxComputers read access, admin - full access(not to the administrator's computer, but to the user - after all, you should be able to upload files to the ball over the network;)).
In general, to check how everything works in general, you can do without the GFirefoxComputers group. Just in order not to immediately complicate your life, and not to blame group policies if something goes wrong;)
Politics rules the world!
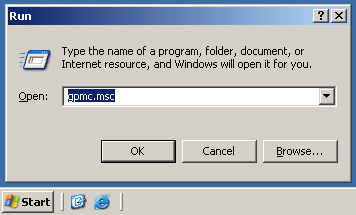
On the domain controller, launch the Group Policy Editor GPMC.MSC:
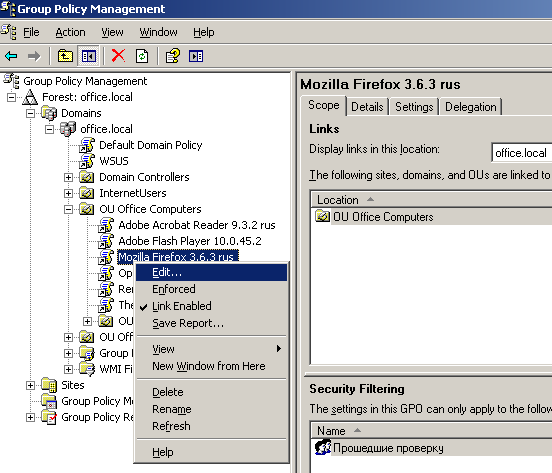
And we create connected only with our OU "OU Office Computers" group policy called "Firefox 3.6.3 rus":

Editing our policy "Firefox 3.6.3 rus":
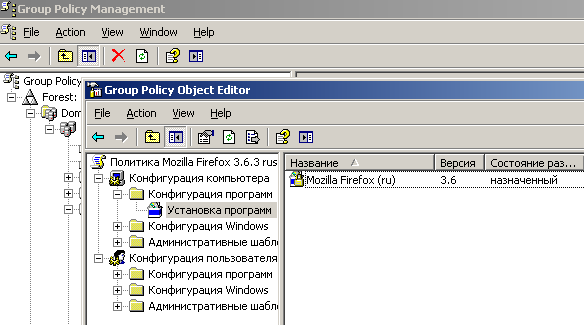
Preparing the Firefox distribution for network deployment
In the section "User Configuration" -> "Software settings" -> "Software Installation", click right mouse and create new object for installation - our future Firefox installer.
We select the MSI file, carefully placed by someone's hands in a shared folder. Important: you need to choose the network path to the file, not the local one, because the user will get access to your installation not locally on the server, but over the network.
Selecting "Assigned":

This completes the work with the "Software Installation" branch.
We close all open windows on the server (if it doesn't interfere with other tasks, of course), Start -> Run -> gpupdate / force
Installation on workstations
Further, it is enough to simply reboot the workstations to automatically install Firefox BEFORE the login / password window appears. In other words, the user will be unable not to install, forget, etc. That is why this method is so good. You remotely decide what will be installed / updated on the workstations.
Windows XP does not "accept" new policies from the first reboot, so you can approach the user, execute the command "gpupdate / force" (not necessarily under the administrator) and restart his computer.
Be sure to check the installation on your / test computer BEFORE users come in the next morning, turn on their computers ... what if there is a joint? Therefore, at least the first time, first try it on yourself.
Additionally
Now for any new computer introduced into the OU Office Computers division will be installed latest version Firefox browser. You don't even have to do anything. Simple and very helpful. In the same way, you can install almost any software, including Adobe Reader, Adobe flash Player (which normally require administrative rights to install), The Bat ... but you never know the software you have in local network, keeping it up to date is one of the responsibilities of the system administrator.
Nuance: if you have already installed any package, in our case Firefox 3.6.3 rus, and after a while you will need to update it (because sooner or later it will be released a new version browser), first remove the policy by installing Firefox 3.6.3 and then create a new one. Then "gpudate / force" and off you go!
TeamViewer - free program which allows you to carry out remote control computer via the Internet. This is one of the most popular utilities for this purpose. In just a matter of seconds, the program will provide you with a visual connection with your computer from anywhere in the world. You can download the program for free in Russian using a direct link from our website.

TeamSpeak is a program for devices under Windows control designed for organizing multi-user voice conferences over a local or global network using VoIP technology. TeamSpeak is primarily aimed at gamers who communicate with each other during online games, but can also be used by employees of various organizations for conferences and meetings.

Hamachi is one of the most famous VPN tools for creating virtual private VPNs. Using this program, you can easily establish an encrypted Internet connection between remote computers, simulating a local network connection. By launching the Hamachi service, users will be able to share equipment - printers, webcams, and more. You can download the program for free on our website and install it on your computer with Windows 7, 8 or XP.
Home media server (UPnP, DLNA, HTTP) is a modern free program for Windows for the convenience of viewing various media files of your computer on a TV, tablet, player, or other devices that have network connection or Wi-Fi. Based on the multifaceted experience of Internet development, the program is able to function independently of the operating system used in the device.

SHAREit is a popular cross-platform program from Lenovo, designed for convenient data exchange between different devices connected to one wireless network... Thanks to this program, you can easily transfer files between computers on Windows.

Wireshark is a free functional sniffer program for Windows designed to analyze network traffic of computer networks different types including PPP, Ethernet, FDDI, Token-Ring and many more. The program is a fairly easy-to-use utility with low system requirements, which has wide functionality and is easy to use.
 Bugs in Singularity?
 Just Cause 2 crashes
 Terraria won't start, what should I do?