Open the back cover of the laptop asus. Removing RAM, replacing
I love to take apart all sorts of electronic stuff! And when given such an opportunity, I do it with pleasure.
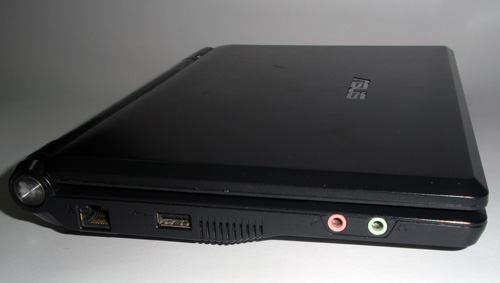
Today I have an Asus EEE 900 on my operating table.
So, before us is the Asus EEE PC 900 netbook:
Specification
| CPU | Intel® Celeron® M Ultra Low Voltage 353, 900Mhz (512kb, 533 MHz FSB) |
| Chipset | Mobile Intel® 910GML Express |
| RAM | 1024 MB, DDR2 667Mhz (Maximum 2048Mb) |
| Screen | 8.9 "WVGA |
| Screen resolution | 1024x600 |
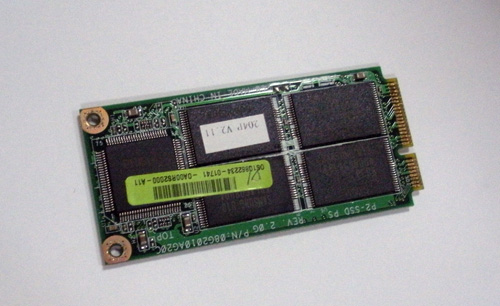
| HDD | 12Gb SSD (Solid State Disk) |
| Video card | Intel® GMA 900 |
| Sound card | Intel® High-Definition audio |
| Optical drive | No |
| Connection | 10 / 100Mbps network (RJ45) |
| Wireless connection | WiFi |
| Ports | 3xUSB 2.0, VGA, microphone and headphone jacks |
| Expansion slots | Card Reader SD / MMC (Plus) |
| Camera | 1.3Mp |
| Battery | Li-Ion up to 3 hours of operation, 5800mAh |
| Dimensions L x W x H | 225 x 170 x 21.5 / 35 mm |
| The weight | 0.99kg |
The problem is caused by hinges that damage the case and prevent the computer from being used. This causes stress in the area of the hinge, which is detached from the body. Very often, the hinge hinges also damage the plastic attached to it under the die, so that the laptop cap is only held onto the cable.
It's easy to accidentally damage at will, deprive yourself of a viable computer and the extra money to repair broken hardware. If you notice that the laptop door is hard open, the hinge or other plastic parts are cracked or otherwise damaged, please contact your computer service provider as soon as possible to avoid deepening the problem. Damaged hinges in the worst case can also damage the die or cables, and then the repair costs will be much higher.

It is quite small and very convenient. And in general - this is one of the most popular netbooks of all times and peoples.
He has an older brother EEE PC 901. The difference is not big - one number in the title, the processor is slightly more powerful and the presence of a bluetooth module. If it is difficult to do something with the processor, then it is quite possible to help with BT. In theory, after all these alterations, the happy owner will be able to listen to his favorite music in bluetooth headphones without any problems.
What is big, powerful, glowing red and specially designed for gamers? So, it's time to summarize this period and transfer the conclusions made to virtual paper. And when you're there, give your paw and subscribe, thanks in advance! Just look at the box, let alone an inactive laptop, to know we're dealing with gaming equipment.
In terms of workmanship, it is no different from competing gaming laptops. Everything is made of plastic, which is very pleasant to the touch, although its huge drawback is that it is terrible at catching dirt, dust and stains. It's nice that the laptop is properly balanced and you can open the lid with one hand, which many manufacturers completely ignore. The display case itself bends a little more than I'd like, but it feels solid enough. The work table is also rigid and does not bend under pressure.

But, to the point! We begin to disassemble.
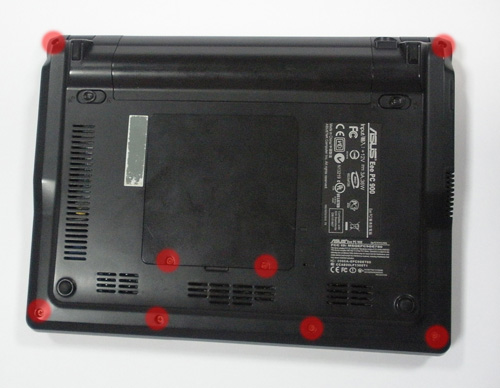
First you need to unscrew all the bolts marked in the picture above. You can immediately remove the ssd module by unscrewing the 2 bolts that hold it.
The only pity is that the placement of the last two is an ergonomic disaster and a serious sin, which is practically practiced by every manufacturer. However, it is not supported by the built-in display. And as the display speaks, this is one of the Predator's strengths. The surface of the display is dull, so it is also refreshing to have reflections, and using such a matrix does not tire the eyes.
Even more beautiful under the mask
It's a shame that this pretty pretty screen is hardly the "same" front camera. This configuration is more than enough to enjoy smooth gameplay in absolutely every new game... For those who think that this is poor performance, and a desktop computer for a similar amount would be much better - and what to do about it? Buttons 5 and can be programmed in three groups. To cool this monster, there are two fans hidden inside the case, which exhale air through two powerful outlets on the back of the case.
You don't have to worry about sorting the bolts - there are only 2 varieties.
The short ones are for wi-fi and ssd, and all the others (16 pieces) are the same.

Next, you need to remove the keyboard. This is done much more conveniently than on the Acer one. No need to bother with credit cards. Everything is just pushing aside the 3 latches at the top of the keyboard,
When you browse the Internet or do less complex tasks, the laptop is still cool and the gentle fan noise is constantly present but barely audible. All you have to do is charge the Predator with a game or an advanced program to make the fans very obsessive.
The keyboard is a completely different story
The desktop is constantly cooling down and all the heat is drained away. I must say that I didn't like the beginning of my adventure with the Azeri game animal. Although the fact that this program is useless to me does not mean that someone else will not be useful to him. It just doesn't stand out. Well, perhaps other than the fact that the button next to it allows you to turn it off so it doesn't interfere with the game. I am very sorry that a very tall desktop is a comfortable, ergonomic work with this keyboard, it will require a dedicated wrist pad because the keys and the way they work are wonderful.
![]()
After that we lift the keyboard and disconnect the cable.

There will be a few more bolts under the keyboard (5 in my opinion) that secure the aluminum plate.
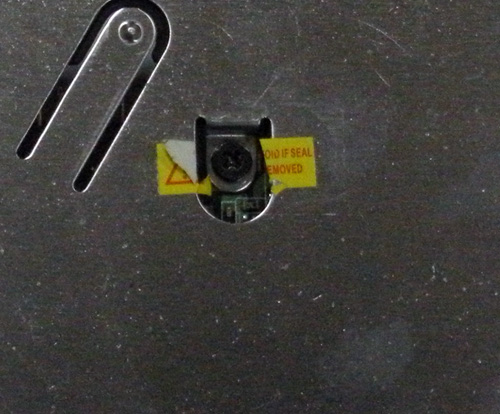
At this step, you will have to overcome the fear of removing the device from the warranty :)
The jump is perfect, not too high, not too low. The sound they make is quiet and pleasing to the ear. The spacing between the keys is exactly the same, and there is no problem finding the key in the usual place - everything is where it should be. It was a little disappointing, however, the backlight is not graduated, we can turn it on and off, and its color is always the same, red on the main keyboard and blue on numeric keypad... With the equipment of about 7 thousand. zlotys.
The sound of two grandmothers broke out
However, in order to work comfortably for several hours, it is necessary to adapt to the unusual dimensions of the laptop itself. This set is above average, albeit of average quality. The speakers can be heard "in action" by watching the video overview. A bit of a waste of untapped potential, although a lot depends on the application. While listening to music on the built-in speakers is not a good idea, playing games is not bad.

It has already come to professionalism for me:
In addition to the bolts, there will also be latches to hold the plate, which are located on the sides of the lid and the touchpad cable, which detaches in the same way as the cable Asus keyboards EEE PC.
They may have been specifically customized for this particular application. The same is true for external output with built-in sound card... For gaming, when paired with a good headset, the sound effects are properly emphasized and background music well cut off from the foreground. Likewise, in films, where, despite such details, the separation between background sounds and foregrounds and actors' voices is very good.
And in any case, keeping such a monster in front of you is rather strange. The predator is surprisingly good for working away from the nest. This is probably the biggest surprise in these tests - battery life. It is also worth remembering that if you want to travel with such large equipment, you need to buy a special backpack or bag, because, by standard, 17-inch laptops, the predator, unfortunately, does not want to match.
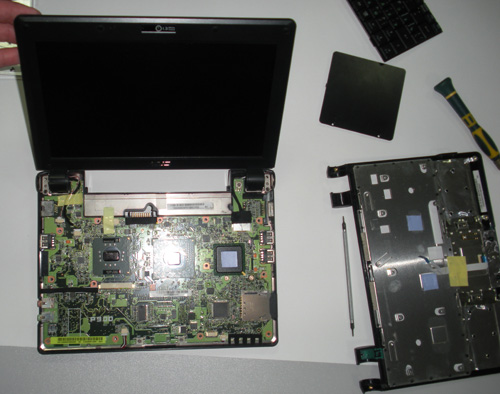
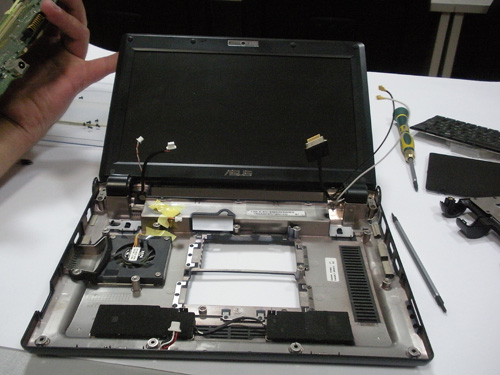
Well, here we have a fee. Note the blue spots on the chip and the back of the lid. This is a thermal pad through which the processor and bridges are cooled. The cover itself serves as a radiator (it's not just aluminum).
In order to make it convenient to solder the eeepc board, it must be completely pulled out of the netbook case. But before that, you must disconnect all the cables that go to it. This is a vga, microphone, speakers and camera cable. Finding them is not difficult - there are no more wires, except for these ones. That is, you need to disconnect everything :)
Here is the VGA connected to the board
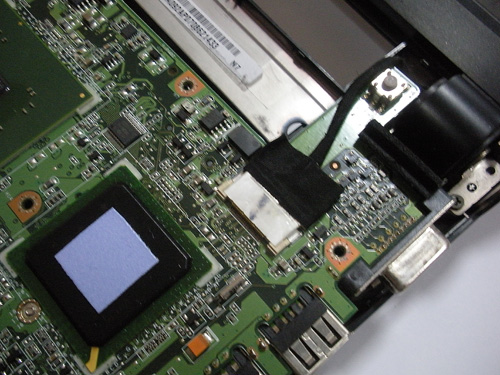
But from already and not in the connector:

After everything has been disconnected, it is necessary to uncheck the board. The latches that hold it are located in the area of the touchpad.
Asus eeepc 900 netbook motherboard top view:
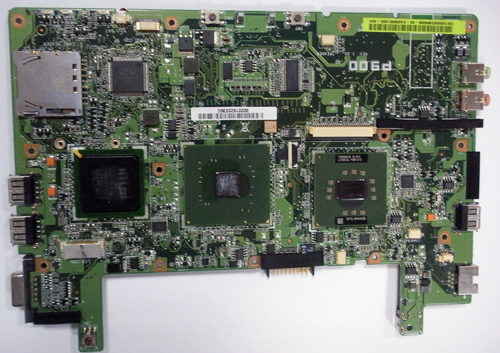
Asus eeepc 900 netbook motherboard bottom view:
blue round - bios battery
in the middle - ddr2 connector
![]()
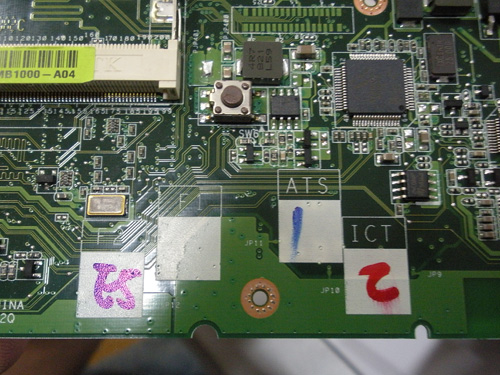
On the board itself, mysterious signs left to us by Chinese collectors were found. The meaning of these signs has not yet been deciphered. :)
Interestingly, the cooler is located under the board and takes heat not from the top of the processor (as usual), but from the bottom of the board. I wonder if it doesn't overheat?
There are speakers in the front of the case. In principle, this is perhaps the standard arrangement for them in most netbooks.
That's all. As soon as the bluetooth is soldered, I will take more photos and continue the story about upgrading or tuning the Asus EEE PC 900.
This article is about cleaning your laptop from dust. As a patient, my laptop is ASUS X53S.
Cleaning your laptop from dust should not be neglected, as the computer will have poor performance and in the worst case, it may fail.
So, the first thing we do is disconnect the battery.
This is done very simply, turn the laptop over and move the latches at the edges that hold the battery.

Then we take a Phillips screwdriver and unscrew the screws. There are several of them here. One holds the DVD-ROM, the rest is the top cover and they also need to be unscrewed.
![]()
We take out the DVD-ROM, it can also be blown out of dust.
Then we close the laptop, carefully turn it over and begin disassembly.
In principle, here you need to unscrew all the bolts around the perimeter. The figure shows only one bolt, the rest are not visible, but they also need to be unscrewed.


After unscrewing the bolts holding HDD, you need to pull the handle and get it out.
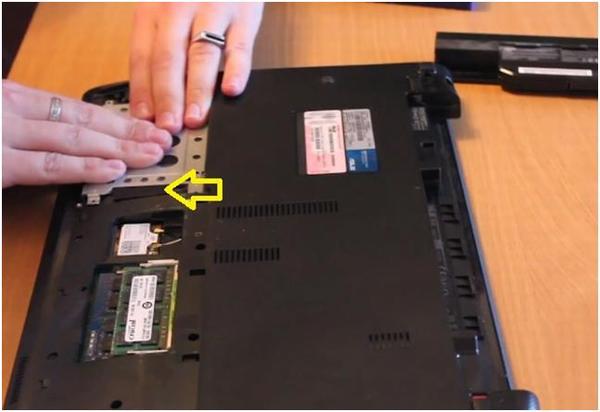
The figure shows the mounting locations for the bolts in orange, and they must be unscrewed.
Naturally, all dust on the lid must also be blown out.
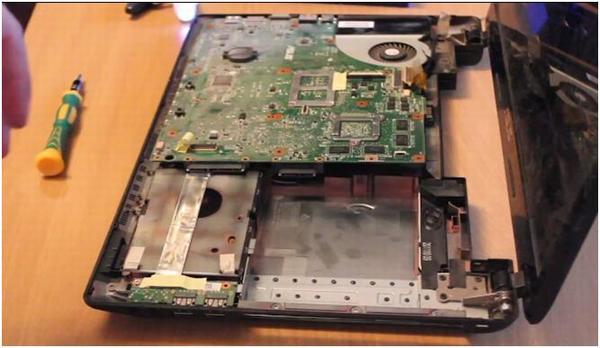
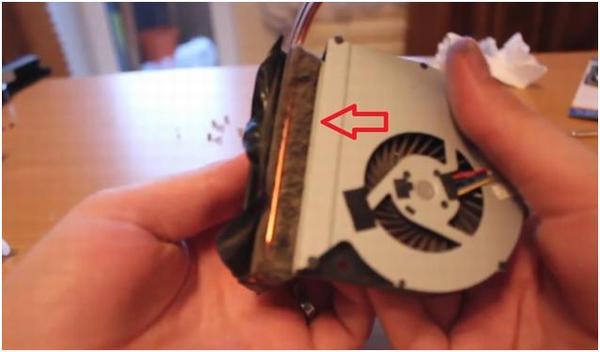
Now we need to unscrew the cooling system on the motherboard.
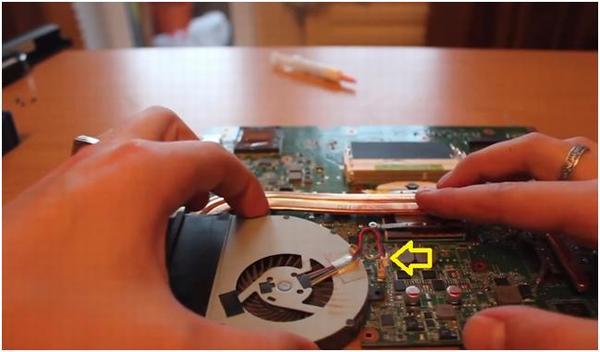
First you need to turn off the power on the motherboard. For you need to carefully disconnect this plug.
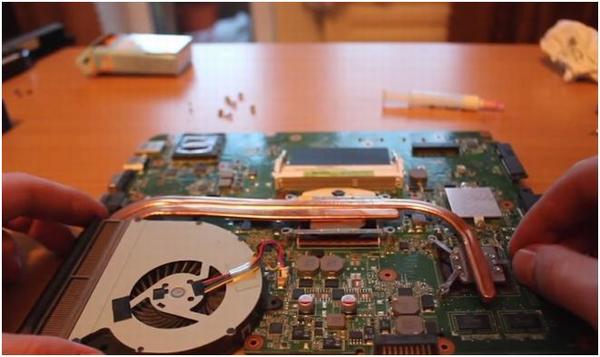
For this, there are numbers printed on the cooling system itself. We begin to unscrew along them, but not completely, so that the cooling system moves away. So we run by numbers.
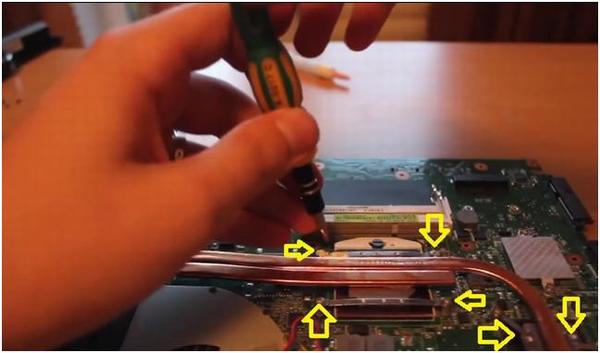
Then we unscrew the bolts completely, following the numbers. And very carefully disconnect the cooling system.

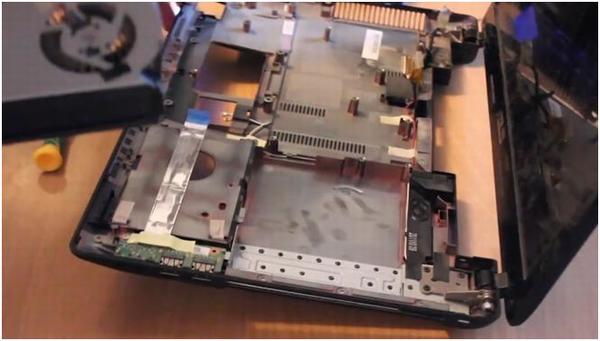
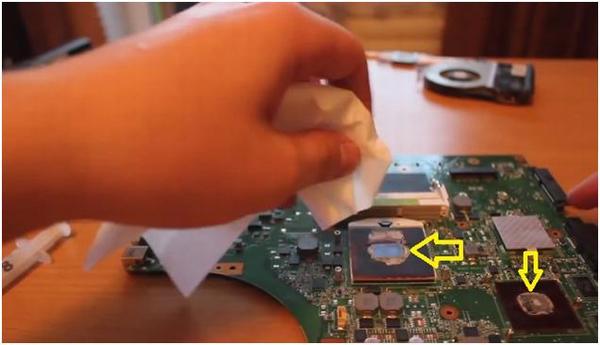
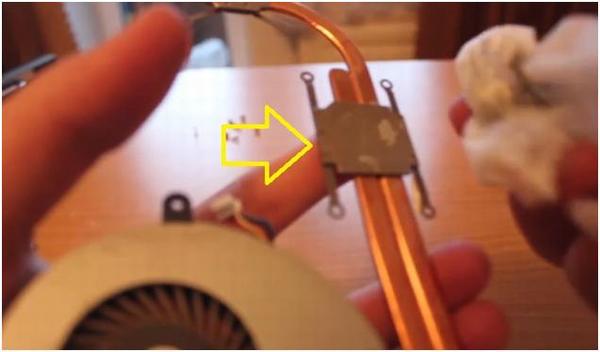
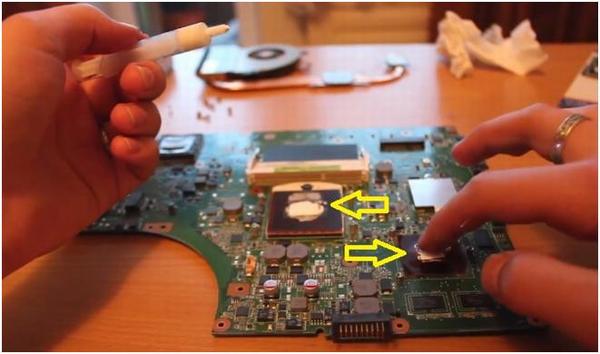
Now we clear motherboard and a cooling system from the old thermal paste. You can use a dry napkin.
And while we put the motherboard aside.
Then you need to clean the fan from dirt. To do this, turn the two parts a little to the side. We clean it from dirt.
Now you need to apply thermal paste to the processor surface and to the surface graphics chip... It is very important not to overdo it with thermal grease. Distribute it evenly.
Then we collect everything in reverse order, also very carefully. We twist the cooling system according to the numbers on it. Do not twist too much.
We turn on the laptop, everything works and is fine. There is sound, the touchpad works, the buttons on the keyboard work.
If you still don't understand anything, watch the video below.
 Backlash of the volume and power buttons on the iPhone - a marriage or not?
 The network card does not see the cable: instructions for solving the problem What to do if the Internet cable does not work
 StoCard and Wallet: discount cards from the application