How to start Windows recovery. How does system restore work? Choosing a control point
Often, users have situations when, due to the installation of a certain driver, utility or virus infection, the OS starts to slow down terribly or does not function at all. Thanks to the program's restore option, system files can be reanimated to a normal state. In this way, you will be able to avoid the lengthy process of repairing breakdowns. In some cases, the issue can be solved only by digging into the BIOS system, in others, simpler tools, for example, a boot disk, will help. To understand how to restore Windows 7, spending a minimum of time, study this material to the end!
The easiest recovery option is to roll back the system.
Experts identify a number of methods by which the OS can be returned to the correct state. The list looks like this:
- system backup (backup);
- last good system configuration applied;
- disk with system installation files or using safe mode (non-standard mechanism);
- standard "System Restore" mechanism.
Last Known Good Configuration
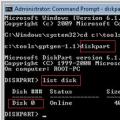
This is the most elementary way to restore Windows 7. To do this, you need to boot through safe mode (the computer is rebooted, and at the stage of turning on the OS, press F8). The window that appears in front of you will list the different download options. The Last Known Good Configuration section will help you by selecting it and pressing Enter.

The section is needed so that the user can boot the PC using the latest, adequately working parameters. Often, with the help of such simple manipulations, it is possible to restore the driver settings and data system registry... The function helps when it is impossible to boot the OS in standard mode due to incorrect changes.
Recovering from Safe Mode
First you need to go to Windows safe mode (F8 key). After waiting for the machine to boot completely, go to "Start" - "Search" and look for the "System Restore" program. It remains to choose a point and confirm the decision. We'll talk about what a restore point is later.

If the method helped, then at the last stage the computer will reboot on its own, and then restore its work in the usual mode for you.
Boot disk
The method is perfect for those who have at hand the original Windows 7 disk. It will help to restore the system when even safe mode does not help. Let's consider the order of actions:
- by pressing F8 switch to safe mode;
- select "Troubleshoot computer problems", and then "System recovery options";
- insert the disc, boot from it (read below how to do this);
- select a language, go to the "System Restore" section in the "Install Windows" window.

After these simple manipulations, you will be taken to the section with the recovery options for Windows 7, where you can return everything to its place by selecting the correct point.
BIOS boot priority
The boot order makes it possible for the computer to understand from which device to boot the OS. Having chosen the order, the user can boot from different media: from a flash drive, disk, over the network.
So, in order to change the order, you first need to enter the BIOS system. Most often, this requires pressing F2 or Del. It is necessary to press it when the message like "Press Del (F2) to access the BIOS" appears on the screen.
Some machines use other shortcuts: Ctrl + Alt + Esc, F1, or just Esc.
Once in BIOS, you need to go to the Boot tab. Navigation between menu items is performed using the "left" and "right" keys. The decision is confirmed by pressing the Enter key.
Next, it is important to find the item Boot Device Priority. Now it remains to select the order of devices, changing them by pressing the "-" and "+" buttons. Having set the necessary parameters, it is important to save the changes and leave BIOS (Save & Exit tab).

Restore using backup
If you've created an image of the system before, then the method will be truly life-saving. Find a backup and do the following:
- connect a USB flash drive that has a backup;
- select "Recovery" from the "Control Panel" menu (opens via "Start" in safe mode);
- perform Windows 7 renewal.
If it is impossible to boot the system, then you will be able to use the backup only when booting through safe mode (F8) and selecting the "System Image Restore" item.

When installing an image through safe mode, it is important to select the "Advanced recovery methods" options, and then find the point to use the system image. The computer will offer to back up, you can skip this moment and just reboot. If you leave the default recovery settings, Windows will recover after reboot.
System Recovery Options window
It doesn't matter which method you used to restore the OS, you will go to this window. There are a number of functions here that are important to know about:
memory diagnostics Windows - by selecting this item, the computer will check the system memory for errors;
System Restore- the return of Windows to a period when there were no defects;
startup recovery- analyzes defects through which the usual system boot cannot take place;
command line- the ability to delete files that prevent the system from booting;
system image recovery- allows you to resume normal operation of the OS from a previously prepared copy.
After going to "System Restore", a new window will appear, where there will be a message stating that "System Rollback" will help to fix all the current problems. Click Next and select a point.

Recovery point
A properly working OS creates such points without your help, it happens every 7 days. They are also created when updating drivers, installing software components. Such points, if desired, can be set manually. Necessary:
- save and close all files;
- go to "Start" - "Find programs and files", where enter "Create";
- go to "Create a restore point";
- click "Create" in the "System Protection" window;
- describe the name of the point so that you can find it in the future.
After selecting a description for identifying a point, the creation process will begin, after its completion, the system will issue a corresponding notification.
Return to factory settings
If it was not possible to achieve an obvious result, then you need to "zero" to initial settings... The variant is used on laptops. It is very controversial, because all data on the machine will be lost. In addition, the method can be implemented if there is a hidden volume on the hard drive (provided from the factory). You can find out if such a volume exists by clicking on the "Computer" shortcut and selecting "Manage" - "Disk Management".
To return Windows to factory settings, you must hold down a certain key (the algorithm is different for each device model).
Here is a list of keys:
- for MSI notebooks - hold down the F3 button at startup;
- Samsung - F4;
- ASUS - F9;
- Acer - Alt + F10 (hold down);
- Toshiba - F8;
- HP, LG - F11;
- Dell - Ctrl + F11.

Outcomes
It is not difficult to restore Windows 7 to work. One of the methods presented here will certainly help to restore the system to work and achieve its correct state. This is using the last known good configuration, restore via safe mode, boot disk and backup. Extreme measures - reinstall Windows again or roll back to the initial settings, but you will lose data on the disk where the OS used to be.
Write in the comments which of the methods turned out to be the most effective!
How to start recovery Windows systems 7. All possible methods
Let's take a look at how to start Windows 7 System Restore.
In the second half of 2017, Microsoft officially ended support for the seventh version of Windows.
In this regard, many users are trying to find options for solving many errors and problems on their own.
According to the latest data from the company, OS updates are released much less frequently, and user support is provided only in really important cases.
The corporation focuses on improving Windows 10. Insufficient system support leads to bugs and freezes.
Often, user actions are also the cause too slow work OS.
Installing "heavy" games, programs, rebooting random access memory and hard drive are the main factors in system failure.
If you experience a sharp deterioration in the performance of your computer, you should perform a recovery. After this procedure, all PC functions will be corrected.
There are three basic recovery methods:
- Using the built-in assistant;
- Using system tools (BIOS, command line, and others);
- Through third-party programs.
Standard utility "Recovery"
By default, every copy of Windows 7 periodically creates restore points - this is an archived version of the last successful PC configuration that the user can use to restore.
Each such restore point is stored on your computer's hard drive. To select one of them, you need to use the standard Windows utility.
This option is the simplest and will only work if operating system boots normally and the function of creating archived copies of the OS is not disabled on the computer.
Follow the instructions:
1. Go to the PC control panel and enter "System Restore" in the search text box;
2. In the results tab, select the window of the same name and wait for it to open;
Rice. 2 - standard utility window
3. By clicking the "Next" button, you consent to the processing of your data by the system. During the restore process, only those files and folders will be saved that were created before the date of adding the access point you selected. The configuration settings of the RAM and hard disk are also changed. Also, drivers and other software will be updated, which supports the stable operation of the system. Make sure your computer is connected to the Internet;
4. When choosing a restore point, pay attention to the date of its creation. The save date should correspond to the period when Windows 7 was working normally, without crashes;
5. Click on the "Show other points" checkbox to see all the objects in the window. To see what applications the rollback process will work with, select the required point and click on the "Affected programs" button;
6. After you have decided on the choice of the created backup, click "Next";
Rice. 3 - choosing a restore point
7. In the new window, confirm your choice. Do not forget to check the properties of the point and the name of the disk with which it will work (to restore the OS, the system drive C must be indicated in the corresponding column);
Using Safe Mode
After a serious error occurs in Windows 7, the system may not boot normally.
To troubleshoot this problem, you can start in safe mode. It can be used to boot Windows specifically for troubleshooting purposes.
This boot option is missing some standard services and options. Only the basic drivers and components that are required for the system to function are launched.
This option is suitable if you cannot work due to a constantly occurring error that shuts down the computer or causes it to freeze.
In safe mode, such errors will not appear, and you can remove malware or perform a system rollback, as described in previous paragraph articles.
Follow the instructions to start Safe Mode:
- Turn on your PC. Then press the power key again;
- Open the startup menu by holding down the F8, F12 or Escape key, depending on your PC model;
- After a few seconds, the Windows 7 boot options window will appear;
Rice. 4 - system boot parameters window
- Select " Safe mode»By pressing the keys up and down, as indicated in the picture above;
- Press Enter to complete the action.
After restarting the PC, you are taken to the working Windows table 7 where you can perform an access point restore.
Remember! In this mode, there is no way to use a WAN connection. If you need Internet access to configure the normal operation of the system, select "Safe Mode with Networking Components" in the advanced settings window.
Automatic troubleshooting
Boot options can also enable the troubleshooting option. It allows you to reset all errors in automatic mode.
Also, users have the option to enable the last normal Windows 7 configuration.
After selecting this function, the OS desktop will boot as the last good copy of the settings.
Follow the instructions:
- At the stage of turning on the computer, launch the system menu of the power-on options by holding F8;
- Select "Last Known Good Boot" and try to start Windows 7;
- In case of an unsuccessful attempt to turn on, go back to the system menu and select the "Troubleshooting" item;
- The operating system will launch a utility to automatically fix all errors. After that, Windows 7 should start in a restored form.
Rice. 5 - troubleshoot and start a good Windows 7 configuration
Command line recovery
This option is suitable if you do not have any saved restore points on your computer, but you are able to start Windows 7.
Turn on your PC in safe mode with command line support. This will allow you to open a CMD window and work with basic commands.
Rice. 6 - select the OS launch option
After turning on windows 7, open the Run window and enter the command below in the field. It will run the line.
Rice. 7 - Run window in Windows 7
In the window that opens, type the command shown in the figure and press Enter. After a few minutes, a message will appear stating that the PC has been restored successfully.
Reboot it to exit safe mode.
Rice. 8 - fix the system using Command Line
Recovery using a flash drive or disk
Due to the occurrence of fatal errors in Windows 7, users are unable to start the system using Safe Mode.
In this case, you can restore Windows using a boot disk or USB flash drive.
Bootable media is a removable device (usually a CD or flash drive) onto which an installation copy of the Windows operating system is downloaded.
You can create such a media on another PC using ISO programs Maker, Live CD, Daemon tools and other utilities.
If you still have a disc with an official copy of Windows, you can also use it to roll back the system.
Note! The versions of Windows 7 on the boot disk and on the computer must be the same. Otherwise, the recovery will fail.
Before starting to fix the work using removable media, you should configure the boot queue of components in the BIOS - the computer should not boot installed version Windows 7, and the one on the drive:
- Open the BIOS by pressing the F8 or F12 keys immediately after turning on the PC;
- Go to the Boot tab;
- In the window that opens, find the items "Boot Priority" - each of them means a certain order of loading PC components. Put the type of your bootable media in the first place. In our case, the recovery will be carried out from a flash drive, so in the first column "Boot Priority" select "USB Storage". If you are working with a disk, put the “Hard Drive” component first;
Rice. 9 - choosing the order of loading removable media in BIOS
- Now, as a result of starting the computer, you will see a window Windows installations Find the item "System Restore" and click on it;
Rice. 10 - recover from bootable media
- Confirm the action again, as shown in the figure below:
Rice. 11 - select recovery option
- Click on the "Next" button and select an access point, as described in the first section of the article.
Rice. 12 - launching the standard utility
Using the AVZ utility
AVZ is an anti-virus software which performs a quick scan of your computer for malware, incorrect settings and Windows errors.
The application is distributed free of charge and does not require installation. Suitable for use in a system of any bit depth.
To execute Windows recovery in this program, just open the "File" tab in the main window. Then click on "System Restore".
Fig. 13 - main menu in AVZ
In the window that opens, check all the system options with which the program will work. Click on the "Run" button.
Doing them will increase the likelihood of uninterrupted operation of Windows 7 after the application terminates.
Correcting network, hard drive, search, and startup settings at the same time is the best recovery option for the operating system.
Fig. 14 - selection of system settings in AVZ
Occurrence of error 0 * 000000
Sometimes, during recovery or immediately after the completion of the operation, an error with the code 0 * 000000 may occur.
Its various variations can be supplemented by other identifiers, for example, 0 * c0000034 or 0 * 0000007b.
Fig. 15 - an example of an error
The occurrence of a problem informs the user that the system was unable to access the bootable media read procedure.
Since the error appeared in an already installed system immediately after its recovery, we can say that its cause is a problem with the drivers.
Most likely, after the recovery procedure, the operating mode of the system disk was changed from IDE to AHCI, so the existing drivers did not fit to boot the OS.
You can solve the problem by disabling AHCI through the BIOS:
- Turn off your computer and open the BIOS menu;
- Go to the CMOS settings tab and select the SATA serial interface configuration item, as shown in the figure below;
- Press Enter and select the IDE option in the pop-up window;
- Save the settings, exit BIOS and restart your computer.
Fig. 16 - switching SATA modes in BIOS
When turned on again, the system will complete recovery and operate without interruption.
Thematic videos:
System Restore Windows 7 and XP
In this video tutorial, you will learn how to perform a Windows 7 and XP system recovery, and in what cases you need to roll back the system.
In this video I will show you how the system restore function starts.
There are often cases when after installing a program, driver, unintentional deletion of a system file or a virus attack, the Windows 7 operating system starts to "slow down" or stops functioning altogether. If there is no important information on the computer, then you can simply reinstall it. Otherwise, System Restore will help you. This tool returns the OS with all data on the hard disk to a usable state.
Windows 7 System Recovery Methods
The developers of Windows OS provide a number of standard recovery methods, but all of them do not give one hundred percent guarantee. Therefore, be prepared that you may need to use several resuscitation methods in turn.
You can restore the Windows 7 operating system to work using:
- applying the last good configuration;
- safe mode;
- restore points.
Using Last Known Good Configuration
This Windows resuscitation tool is the easiest to use, so you should use it first. The sequence of work will be as follows:
After completing the above steps, data is automatically restored from the OS registry and the operable parameters of the available drivers. If this method fails to start the system, go to the second method.
Safe Mode is an effective Windows resuscitation tool
Safe mode is a special version of the operating system that does not perform automatic start installed programs as usual loading Windows... In this case, only those drivers are activated, without which the operation of the OS is impossible.
This tool is launched in the same way as the last working configuration, that is, using the F8 key. When you enter the system in this way, the screen resolution will change to 800x600. This is normal, so don't worry.
The following recovery procedure is presented below:
- The Windows 7 boot disk is inserted into DVD drive and starts up. The build of the system you are using should be the same as on your computer. Therefore, if possible, take the same disk that you used when installing the operating system.
- When the message about autostart pops up, click "Cancel".
- We open the command window "Run", which is located in the "Start" menu.

- We enter the command for checking the functionality of the system files "sfc / scannow".

- Some time after activating the search process executable files all damaged or deleted system data will be copied from DVD disc and restored.
- If you want to follow the progress of the recovery, you need to enter the command line by entering the command "cmd" in the "Run" window. After that, "sfc /?" Is written in the line. You must log in to the command line as an administrator, otherwise you will not receive the required information.

- If in command line the data will be displayed in the form of hieroglyphs, then you will additionally need to enter the properties and select the required language there.

Using a restore point
Another effective tool for reanimating the Windows system is the use of restore points. The principle of this function is based on the fact that after a certain period of time the existing OS configuration is written to the hard disk. If you encounter any software problems, you can use the saved points and restore your computer to work.
Even advanced user, representing, and where to look at the parameters of the operating system, at some point will encounter a new problem: the stubborn unwillingness of Windows to boot. It's not about activation; and, fortunately, reinstallation is not always necessary - most often recovery saves. How to return Windows 7 to its original state and get rid of accumulated errors - let's try to figure it out.
System utility
Contrary to popular belief, to restore Windows 7, one of the most flexible operating systems from Microsoft, you do not have to restart your computer or laptop, insert the installation disc and go to Recovery mode... Most often, a few clicks are all it takes to resolve startup issues, reverse changes, or disable poorly selected options.
All actions described in this section are provided by the manufacturer and do not affect the validity of the license or the health of the computer in any way. Recovering Windows 7 with their help is no more difficult than just sticking to the algorithm carefully.
Important: if the operating system does not start and the user cannot get to the "Desktop", you should skip this method and go straight to the next one.
Start Windows recovery using system utility as follows:
- Turn on your computer or laptop and wait until it is fully loaded. If for some reason it is impossible to log into the system as usual, you should try "Safe Mode" by selecting the appropriate item on the start screen by pressing the Enter key. If there are no problems, "Normal Windows Boot" will be enough to restore the system.
- Left-click on the Windows checkbox in the lower left corner of the screen, then go to the "Computer" section, the link to which is located in the right pane of the "Start" menu. If desired, the user can create a shortcut on the desktop - then use "System Restore", like many others Windows functions 7 will become much easier.

- In the list that opens, select "System Properties" by clicking the mouse; using one of the adjacent buttons, you can either delete unnecessary programs - one of them could lead to crashes in Windows 7.

- Go to the "Additional system parameters" section located in the left side menu of the new window.

- Switch to the "System Protection" tab, the second one in the opened list of settings.

- This is where the system recovery management tools are located. By clicking on the button of the same name, the user will be able to start the operation.

- Windows 7 will offer to restore the most successful, in the opinion of the OS, previous settings. If you have no objections, you should click on the "Next" button and follow the prompts of the utility.

- If the user wants to return Windows to a different point, it is necessary to set a circle opposite the bottom line "Select another restore point".

- The list that opens in the next window will show Windows 7 restore points, created both by the system automatically and by the user himself in manual mode. Having selected the desired one by pressing the left mouse button, you should again click on the "Next" button. The owner of a computer or laptop can see which applications are affected by the change by clicking on the Search Affected Programs button. This must be done for each point separately.

- Read the parameters of the operation and click on the "Finish" button. If the need for restoration has disappeared or you need to select another point, you should use the "Cancel" and "Back" buttons, respectively.

- Confirm your intentions by clicking on the "Yes" button in the dialog box. As the OS honestly warns, the operation is irreversible: with Windows 7 you can at any time and in any direction, but you will not be able to return to the moment "before recovery".

- Wait while Windows prepares the data to start the process.

- During the recovery, the user will be switched to the welcome screen - information about the progress of the process will be displayed on it.

- As a result, Windows 7 will inform about the completion of the operation and reboot.

- After turning on the computer or laptop in normal mode, the user will see a successful recovery message on the screen. Now most of the OS errors should be eliminated; if it is not, you should go to one of the following methods.

- Before you start your daily activities and rejoice at the return of Windows to work, it makes sense to create a "fresh" restore point. This can be done on the already well-known "System Protection" tab by clicking on the "Create" button.

- Now you need to provide a name for the new "original" version; the more informative it is, the better - it is worth spending a little time on the name instead of using a few random numbers or letters.

- In a minute or two, the system will notify you of the successful completion of the operation. Now the user will be able to restore Windows 7 to its current state at any time or later prepare several more successful options.

Important: quite often problems with the system are associated with an unsatisfactory state hard disk... To check its performance, you should call in context menu the "Properties" option, go to the "Service" tab and select the "Run check" item.

By checking the boxes in both checkboxes, clicking on the "Start" button and waiting from several minutes to an hour, the user will receive comprehensive information about the health of the disk; in some cases, this will require restarting Windows 7.

Before loading Windows
The operating system from Microsoft can behave in different ways: from time to time, issue minor errors, randomly close running applications, abandon the user's usual actions, or even “crash” and stop starting normally.
In the latter case, before reinstalling Windows 7, the user can try to restore the system from the boot menu. This can be done by entering "Safe Mode" (or using installation disk: nothing needs to be reinstalled, it will be enough to insert it into the floppy drive, restart the computer or laptop and press any key before the OS boots from the hard drive).
After waiting for the black start screen to appear, the user must:
- Go to the Windows Memory Diagnostic section by pressing the Tab key or another - in accordance with the instructions of the system.

- Select the launch of the utility using the Enter key.

- Wait until the end of the memory check - depending on the parameters of the computer or laptop and the severity of the problem, it can take up to one and a half to two hours.

- By clicking on F1, the user can choose one of the verification methods: basic, standard or advanced. It is easy to guess that the time spent on the operation increases in proportion to the increase in the enabled options; nevertheless, it is recommended to select the "full" scan once - if the problem with the performance of Windows 7 is not related to the software, but to the hardware, the user will be able to find out about this before the machine is completely out of order and take appropriate action.

- If everything is fine with the memory, the owner of the computer can reboot the device and wait for Windows to start from the hard disk; As a rule, as a result of all the manipulations, the operating system will offer to choose one of the start options: the "Safe Mode" already known to the user, as well as the launch of the last successful configuration and the standard startup. If until the last moment there were no problems with the operating system, it is worth trying the second method in a row.

- And if the screen appears after fixing failures, for example, as a result of an unplanned disconnection of the computer from the network, - "Normal boot".

- After selecting "Safe Mode", the user must wait a little while the system loads the required configuration; she will do this for two to five minutes - depending on the parameters of the device.

- In this mode, there is no Internet connection, most services are blocked, so uninstall unnecessary program or calling "System Restore" is much easier.

- Upon completion of the work, the user can simply restart the computer or laptop from the "Start" menu - after turning on, he will see standard screen greetings.

From backup
You can restore Windows 7 from a backup or archive: this way the user can return back not only the successful system settings, but also get back important files. The latter is especially pleasant, considering that in some cases, Windows can fly off with all the data.
Important: if the owner of the computer or laptop did not make any changes, the backup will not be created automatically, so before describing the recovery, it will be useful to talk about creating a copy and archiving settings.
You can make a backup copy of Windows 7 as follows:
- Turn on your computer or laptop, open the "Start" menu and go to the "Control Panel" located in the right section of the window.

- Open the "System and Security" section.

- Enter the subsection "Backup and Restore".

- Select where the backup will be saved using the "Change settings" link.

- In a new window, the user will be able to choose where the backups will be placed. Depending on the needs and availability of the appropriate storage equipment, a removable HDD, an intranet folder, or a DVD-R / RW optical disc.

- The most ergonomic option is to save files online. Having indicated a specific folder, entering the name of the current user and having come up with (if not specified) a password, the owner of a computer or laptop can safely click on "OK".

- Having finished with the saving settings, you should, without closing the window, click on the "Next" button and proceed to the selection of the data to be saved.

- In the next window, the user will have to choose from two options: creating a backup copy of the system's choice or based on his own preferences.

- After checking the boxes in the required checkboxes, you can continue creating a copy for recovery by using the "Next" button again.

- Here, the user can request a simultaneous recording of the system image by checking the box in the lowest checkbox.

- It remains to click on the "Save parameters and start archiving" button.

- The process will take from several minutes to several hours; the progress of the operation can be monitored by referring to the gradually filled scale at the top of the window.

- The button "View information" will help the user to get a little more information about what is happening - in particular, to find out what exactly the OS is doing right now.

- To prevent the waiting from being wasted, it is recommended to use the "Enable Schedule" link located in the same window.

- You can turn off automatic backups in the left sidebar "Backups and Restores".

- By clicking on the links located in the same place, the user initiates the procedure for creating an image of the system or writing it to disk; the procedure in these cases is fundamentally the same, and it makes no sense to talk about it separately.

- When the backup is ready, the user will see in the window the date and time of its creation, as well as the size of the image.

To restore Windows 7 from a previously made copy, you should:
- In the "Taskbar" click on the link "Restore files from the archive" in the subsection "Archiving and restoring".

- By clicking on the "Space Management" link, the owner of a computer or laptop will be able to view the current archives (useful if several backups have been created) and delete unnecessary ones.

- Now you can start restoring by using one of the links in the field of the same name.

- In a new window, the user needs to select, by clicking on the "Browse files" button, what data he wants to return.

- Windows 7 will open a window with a folder containing the last saved copies; navigation in it is carried out as usual.

- After completing the selection, you need to click on the "Next" button.

- Indicate whether to replace the current files with the saved ones and click on "Restore".

Important: the action, like the restoration of Windows described in the first section, cannot be undone - if during the work with failures new important documents were created, they should first be copied to another folder.
From the installation disc
If the user has an installation disk or flash card with the recorded image and it is impossible to restore Windows 7 from a backup, insert the media into the drive or USB connector and restart the computer, then:
- Enable booting from a disk or flash drive by pressing any key before starting from a disk, wait for the start screen and use the F8 button.

- Select one of the recovery start modes; in most cases, the usual is sufficient.

- On the launch screen, select your language.

- And other language settings of the system.

- Instead of the "Install" button located in the center of the screen, select the less noticeable "System Restore" - in the lower left corner.

- Wait until the computer or laptop downloads the data necessary for work.

- Select a recovery method (standard or from a previously created image) and click on the "Next" button.

- Specify the preferred startup option - most often the user wants the first or second option - and click on it.

- At the end Windows works 7 prompts you to restart it.

Advice: If the device starts up, you can restore the system without rebooting by simply inserting the installation disc into the drive and launching it directly in the running environment.

Acronis True Image Utility
This program allows you to restore the settings and Windows files 7 back to its original state based on a previous backup and is probably the best replacement for standard archiving. The application is paid, but a demo version is available to the user with some restrictions.
To create a backup using Acronis True Image, you need:
- Download, install and run the program, and then create an account by filling out a short form.

- In the next window, select the "Run trial version" option.

- Select which folder the copies will be saved to by clicking on the empty field on the right.

- If necessary, set a password for accessing the data using the link at the bottom of the same field.

- Choose whether the application should archive the entire computer or individual files.

- By clicking on the "Options" button at the bottom of the window, the user can set a schedule for automatic backups and determine the algorithm for saving data.

- Calling the drop-down list next to the "Create a copy" button, the owner of the computer or laptop will determine after what time the operation should start. If you plan to start creating an archive right now, just click on the indicated button.

- The process will take some time; it can be stopped by clicking on the button of the same name, and you can also request to turn off the device after copying is complete.

- The program will notify the user about the successful creation of the archive. Now you can close the application and start working - until you need to restore Windows 7.

To recover data usingAcronisTrueImage follows:
- Go to the "Recovery" tab, select the required data and click on the "Next" button.

- Determine the process parameters - or immediately click on the "Restore" button. Upon completion, a window similar to the one described above will appear in front of the user.

Important: in the section "Tools" there are other useful options Acronis True Image: full disk cloning, remote recovery, system cleanup and many others.

Disaster recovery with antivirus
The system can also crash due to viruses, for example, the Windows blocker. To combat them, boot disks with antivirus software are used; one of the most famous products - Anti WinLocker Live CD, which allows you to boot Windows even in the most difficult cases.
To restore the performance of Windows 7 with its help, you must:
- Insert the disc into the drive, restart the computer, wait for the data to load and select the "Start disinfection" item.

- Wait until the program finishes dealing with the virus; the process usually takes no more than ten minutes.

- On the "Selective recovery" tab, the user can choose which startup parameters need to be fixed.

- At the end of the process, a corresponding notification will appear on the screen.

- You can log in to the system simply by rebooting the machine and waiting for it to start from the hard drive - or by using the Exit item in the shell's pop-up menu.

Summing up
You can restore Windows 7 using the system utility, from a previously created backup, or from an installation disc. You can create an archive using both built-in tools and Acronis True Image. The user can get rid of the virus blocking the OS boot by running the Live CD with the antivirus.
Or a built-in utility that says that. I will give the most common causes of the problem and for each of them a probable solution. As you try the tips, you will be able to draw conclusions for yourself about what causes the circular restart and the inability of Windows to recover itself.
Just a small remark: the option with the registry is ideal for Windows 7, because in Windows 10 the saving folder with the registry backup is sometimes filled with zero files. Why dont know. But this means that the registry files we will be accessing are simply empty in Windows 10. Warm greetings to Microsoft!
Hello. I think there are many of those who have at least once encountered a problem Windows startup and tried to fix it with a boot disk or the system itself:
stumbled upon a repeated message stating that the startup repair tool is powerless. Almost no resource familiar to me offered any intelligible solution to this problem. And besides sending the user to reinstalling Windows, do not advise anything.
Reasons for a circular reboot
- Windows shut down incorrectly due to power problems
- incorrect start of antivirus software
- device drivers or system files are beaten on the computer
- hard drive is "very tired"
- damaged registry
- Windows incorrectly detects the size of the system volume
- To USB port connected "extra" device (remove all flash drives)
In general, the problem can lie anywhere ...
Based on the first two errors, the key may be the magic wand F8 which will bring up a menu with. From there it is worth trying The usual boot Windows ... Sometimes this simple method helps out in a situation.
For further work we need from Windows. Read the article very carefully, you will need programs for checking the status of the disk and file system which you will be using. And immediately advice to users:
Did you know that Microsoft support specialists officially recommend running System Restore AT LEAST 3 TIMES(!)? Even in case of failure! That is, the remedy can work on both the fifth and the eighth, since it does not know how to solve problems(if there are several) en masse... Only step by step, starting at the command of the user. So, everything that the startup recovery tool is designed to do, we will repeat it manually.
Where do we start?
If in Windows after turning on or restarting nothing but the recovery tool does not start, we will try the error a little differently. To do this, let's try to turn off the circular reboot itself:
- Opening the repair console cmd

- we enter the command
- reboot and check if the behavior of the system has changed
Let's try to determine the reason by name.
- In the repair console, we go to a file that is created specially when the system has problems with loading. We write:
where NS- the letter of the system volume where the non-boot Windows is located. Notepad will open, in which you should find an entry like
... Boot critical file c: windowssystem32 something_where is corrupt ...
This file (or files) is the cause of the problem. The path pointing to the broken file / driver can be anything. Just take a close look. You just have to find this file and delete it. For example, the log stated that ...
Boot critical file c: windowssystem32driversvbfsoc.sys is corrupt
In the console, we type by type:
Cd X: \ Windows \ System32 \ drivers \ del vbfsoc.sys
Do not close the console and enter the launch commands one by one.
I / O system lost boot device
It happens. After updates or system crash. In general, the computer looks for a boot device in general on all connected to it - cards, flash drives, external drives etc. Perhaps not on the keyboard or mouse. But we agreed that there is nothing "superfluous" on the ports? And if so, ...
- tuck into the port bootable USB drive or insert a boot disk into the drive
- boot via BIOS or menu quick launch from this boot device
- exit to console cmd

after the window with the choice of language, press Shift + F10 - the console will appear
- we enter the command to help "remember" disks:
If there is no reaction, we will repeat the procedure, but we will “kick” the computer harder:
Bootsect / nt60 all
We replace the registry completely
I offer you one more option for solving the problem with correcting entries. windows registry, which often cause circular failure of the recovery tool. In general, the principle is simple - we will substitute in a non-working copy of Windows files from the registry backup... In fact, we will do what Windows itself is trying to do - only we will do it manually and for sure. Works on any of Windows versions... Or it doesn't work ... The approach is cardinal, but sometimes it helps.
Some of the recently installed programs will have to be donated.
BEFORE YOU BEGIN.
- I hope that you have already used all the funds; some are very helpful with loading Last configuration with workable parameters
- try to follow the advice carefully, otherwise, after rash actions, other means will be completely useless - the system will really be beaten irrevocably
- I do not give guarantees, but it's worth checking
- if everything is done correctly, but the problem is not solved ...
ERROR CAUSE NOT IN REGISTER
Launch the startup repair tool.
Apparently, since you are reading this article, again. Once again we come across a message that
Startup Repair Tool cannot automatically repair this PC
Windows cannot automatically troubleshoot this computer
and go for additional tools to work in Show additional features system recovery... We need a command console:
The console will open from X. Let me remind you that this is the letter of the media on which the Windows boot (installation) files are located. Let's go to the section with installed system... This is usually section C. If there are several partitions, and even more so systems, you will have to navigate by the space occupied, directories, accounts... But even in this case, Windows' fancy during installation is usually enough for the letters C and D.
- we enter the required disk with a command in the manner of:

my system disk turned out to be D
- check its contents. Most quick way to do this - enter the command:
if folders appeared in the manner Program Files, Desktop and others, you are in the right place. Another way to find the drive on which Windows is installed is to quickly enter the command to search the bootloader editor for suitable files:
Bcdedit | find "osdevice"
the console will immediately return a response with a section letter in the following manner:
Osdevice partition: D
- so, we have decided on the location of Windows; go to the system directory:
where again we will display its contents for the best navigation with the already known dir command and with Let's create a folder that will contain the files we are going to work with now (in case something goes wrong). I named the new folder backup- arbitrary name:
Md backup

- and copy all the contents of the directory to this folder:
 If the first attempt fails and you have to overwrite the content, press A in response to the console's question.
 Differences Between GPT and MBR Partition Structures
 Wipe Internet explorer clean
 Windows updates are downloaded but not installed