How to install 1 s enterprise 8.3. Correct installation of "1C: Enterprise. Installation and configuration
Often, 1C users have a question - where to get the 1C platform and install it on the computer, for example, after replacing the computer or when the platform needs to be reinstalled at the request of the 1C configuration? The answer is obvious - you can download the 1C Enterprise 8 platform from the official website. I propose in this publication to disassemble this issue and update the 1C platform yourself.
Very often it happens that seemingly elementary things are unknown how to perform. In my opinion, the installation of the 1C Enterprise platform is a question from this very area. For all its elementary nature, this operation very often baffles users: there is a box, licenses with pin codes, disks, books, but where is the new platform here? On disk, usually a distribution outdated version platforms 1C, and where to get a new one, it is not known ... there is only one way out - to call 1C partners, they will decide everything, but, however, not for free.
This is exactly what an ordinary 1C user will think and do, but what to hide - I would have done so myself. Knowingly they say that knowledge is power. In our case, knowledge will help to save a little on the services of 1C franchisee firms and independently install the 1C platform.
We will divide the consideration of this issue into two stages:
How to download the 1C Enterprise 8 platform from the official website
1C updates can be downloaded through the 1C Portal, at https://portal.1c.ru/. We find the service "1C: Software Update" and click on the link "Learn more".

On the page that opens, you can find out a description of the service, conditions for obtaining and other useful information... We find in the menu on the left the item "Download software updates".

 If you have not been authorized in the service up to this point, a login / password entry form will appear. This data should be given to you by 1C partners when installing 1C configurations. I know that this requirement is often ignored by both 1C partners (to avoid unnecessary questions and explanations) and by the users themselves (who do not understand where to use this data and why? - everything works, if it stops, then 1C partners will decide it).
After entering the registration data, a list of configurations available for updating 1c will open, from where you can download the 1C Enterprise 8.3 platform. Find current version platforms 1C Enterprise.
At the time of this writing, the current platform has release 8.3.8.1964, platform 8.4 exists only in test mode. Accordingly, in the list of platforms we find "Technology platform 8.3" and click on the latest available platform version "8.3.8.1964".

In the opened list different types platforms, choose the one we need for work. The most popular installation option is to install the 1C platform in Windows system... If this is your option, then choose from the list "Technological platform 1C: Enterprise for Windows".

By this action you will download the archive of the 1C Enterprise 8.3 installation distribution kit - windows.rar.  We extract the archive.
Installation of 1C Enterprise 8 platform
After extracting the application archive, enter the created directory with program files and find and click on the installation file in the list setup.exe(file named setup and type "application").

The 1C: Enterprise 8 installation wizard will greet you and warn you that the program is copyrighted. Click "Next".
At the next step, the Wizard will offer you to select the components for installation:
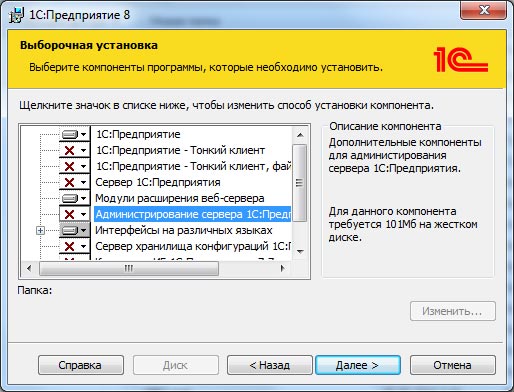
I'll tell you about the components offered for installation another time, but now we are only interested in the 1C: Enterprise platform. Check that it is not marked with a cross and click "Next".
At the next step, select the installation language and click "Install platform", after which the Wizard will start the installation procedure.
After installation, a form will be displayed informing you that the installation program has completed. Click "Finish".

Platform 1C Enterprise 8.3 is installed.
After installation, a shortcut to launch 1C Enterprise 8.3 will appear on your desktop.
As you can see, there is nothing difficult to independently Download the 1C Enterprise 8 platform from the official website and install it on your computer. Don't forget after installing the platform.
Enjoy your work with 1c Enterprise!
If you have any questions, you can ask them in the comments to the publication or at.
Download the 1C Enterprise 8 platform from the official website and install
One of the most popular accounting programs "1C: Accounting 8" requires constant updating due to the development of new platform capabilities. We offer detailed instructions for updating the 1C platform, which will help you easily upgrade to a newer version.
To work, you will need the Internet with access to the site 1 C and 20 minutes of free time. So let's get started.
Make sure the release is correct
Before upgrading the platform, you should make sure that the configuration you are using supports operation in new version platforms.
How to find out the release number of the 1C platform and configuration? To do this, open the "Help" section in the main menu and select the "About" item.
A window will appear on the screen where the platform release number will be indicated in the first (upper) block, and the configuration release number in the "Configurations" section (in the main block).

You can also find out the release number by clicking on the yellow icon with the letter "i" inscribed in it - it is located in the upper right corner of the main program window.

Download the update from the official website
We will not consider updating the 1C platform in user mode, but will perform the installation manually. You must download the update on the official website at the following link: https://releases.1c.ru/total (authorization required!)

Updating the version of the program is available only for registered users, so enter in the proposed form the login and password that were issued at the registration stage. If you are not registered, please do so now.


Attention! If, after downloading and checking the platform version, as described in the first paragraph, is displayed old version most likely, an incorrect installer option has been selected (for example, "thin client").
Find and run the installer
The developers packed the updates into a RAR archive, so you need an archiving program that supports this format. Find the downloaded platform update, unzip it into a separate folder and run the setup.exe file.


Wait for the installation preparation to complete. Then, in the welcome screen of the installer, click Next to proceed to the selection of options.

Select the required components and interface language
Before upgrading the platform, you need to select the components to work with. If you are not a system administrator, leave the ones that the system offers by default and click the "Next" button.

In the previous paragraph, the system will offer a folder for installation - by default, this is Program Files. If the main files of the program are located in another directory, install it via the "Change" button. This is important for correct work programs.
On the next window select suitable language interface ("Russian" is offered by default) and go to the "Next" button.

Start the update installation process
In the new window, click on the "Install" button - after that, the installation of the update files into the system will begin.

The procedure takes several minutes and directly depends on the performance of the computer and the work of other applications running at that moment.
If the User Account Control window appears during the installation process, agree that you really want to install this software to the computer - click the "Yes" button.

After completing copying and making settings in the system, the program will offer to install the protection driver.

If you are using a USB dongle in your work that provides protection at the hardware level, uncheck the box - required driver is already on your system. Do the same if you tied the 1C application to a specific computer at the software level - in this case, there is no need for a driver either. Go to the next window by clicking the "Next" button.
Attention! If you skipped the checkbox and the driver will be installed again, this will not affect your further work in any way.
Finish installing the update
At the end of the installation, a window will appear on the screen in which there will be a "Finish" button - click it.

We have described in detail how to update the platform through the configurator - if the process was successful, the program will work stably on your computer. To verify this, use its capabilities for several days.
After that delete previous versions"1C: Enterprise 8.3" so that they do not take up space on your hard drive. To do this, go to the "Control Panel", select the appropriate item in the list and click "Delete".

If you continue to work with configurations created for the 8.2 platform, do not delete it.
Leave two platforms on the computer different versions(in our case 8.2 and 8.3) - they will start automatically when the appropriate configuration is selected.
"1C: Enterprise" is today one of the best platforms for doing business, accounting, and in general for automating the work of various organizations. The programs are applied in areas for which they were not previously intended. If you want to improve the efficiency of your individual entrepreneur or to practice before accounting practice, you should know how to independently install 1C: Enterprise on a PC.
The installation of 1C itself and the simplest setup is not difficult. The user's questions begin to arise after it: "What to do with this?" In order not to pull out your hair, trying to master tons of information with your mind, check out some of the features of "One ES".
- "Enterprise" is a platform. That is, in order to use the software, you need to select some configuration. There are many of them, the most popular are: Accounting, Trade Management, Salary and Personnel Management. From the name it is easy to guess what they are for.
- 1C must be able to use. For some, it was difficult at one time to master Excel or even Word. But all these are flowers in comparison with domestic software. No, the program is really super and gives a bunch of possibilities. However, you will have to spend a lot of time on training or even money on video tutorials.
- "You look in a book - you see a fig." A Russian proverb perfectly describes the state of a person who opens the Enterprise for the first time. There is no base, and it is not clear what to do. At the end of the article, the basics of software management will be given.
Version
Which version is better for installing on a computer? The most recent, of course. Today it is 8.3 or 8.2. The previous ones, even 8.0, are a rather old product that will be inconvenient to use. Try to install the newest, especially if you buy software for money.

And if it's free? There are demo versions of databases that can be used for several days - about 30. If you are a novice accountant and want to practice at home, then this option is fine for you. Moreover, the price for a whole product is by no means small.
Another option is the pirated version. Despite the diligent work of Roskomnadzor, it is quite easy to find an unlicensed version of 1C. Most organizations have just such. And, most likely, if you are reading this article, you have also already found a source with a "pirate". It is worth warning in advance. The installed software will work with almost no flaws. However, if you plan as a programmer to provide services for the operation of illegal "1C: Enterprise", then you run the risk of incurring criminal liability for this. And if you are a simple client, then, again, no good programmer will undertake to serve you when he discovers a pirated version.
Installation and configuration
Installing the 1C platform, as mentioned above, is nothing difficult.
- We go into the folder with the program and select the "setup" file there or click on the disk icon, after which the installation window will open.

Select the file "setup"
- Click "Next", skipping all the standard steps, stop only at the window where you need to select the components of the program. We mark the first three without fail. They must be installed on the hard drive.
- In the final window, you will be prompted to install the protection key driver. We also need him, so we agree.
We have successfully delivered the platform. Now in a similar way, but without additional settings the required configuration must be installed. We launch the setup file and do everything in the same way, it will take several minutes to install the software.
Configuring to get started
So, we figured out how to install 1C. Now you need to create a database. This, in fact, is initial setup... The creation of the database will be considered on the example of "1C: Accounting" - the most popular configuration.
- We launch the program.
- As a rule, we will immediately see a message in which the system offers to create a new infobase.
- Select "Create a new ...", click "Next".

- In the list, you need to make a choice of configuration. We do it. Then we come up with a name and move on.
- Choosing a location on your hard drive.
- We press ready.
We now have a database to start working with.
Practice shows that 1C: Enterprise installation is not a problem for anyone. But all the following actions are already causing difficulties. See information on the sections you are interested in, gain new knowledge on this topic and soon you will be able to proudly tell your friends that you understand the software from "One ES".
Almost all users sooner or later ask themselves the question of self-installation of 1C software. Using the configuration example "1C: Accounting 8", we suggest looking at how to install 1C on a computer or laptop. It is not only easy, but also cost-effective: Doing it yourself with a setup or reinstallation saves both time and money.
Where to begin?
Installation software product 1C firm, regardless of its accounting focus, consists of three key stages:
- Installation of a platform - an engine or foundation, which is the basis for the operation of any 1C program.
- Installation of the configuration part - direct installation of a custom accounting program (1C: Accounting, 1C: ZUP, 1C: Trade Management, etc.).
- The final step will be to create a new or connect an existing information database, which will be displayed in the program launch window when the shortcut is pressed. There can be several bases and even quite a lot, their display in the form of a tree allows you to somewhat order the list.
Let's consider in detail each of the stages.
Installation of 1C platform
Boxed 1C software products are delivered in cardboard packaging, which includes:
- installation disk with distributions for installing the platform and the supplied configuration;
- ITS disk;
- printed documentation in several books: usually a user guide and an administration guide.
Installation of 1C begins with the computer delivered to the DVD drive installation disk, this starts the installation wizard, in the window of which you should select the item "Install the technological platform". If CD and DVD autorun is disabled (no movement on the screen occurs when installing discs), go to the "My Computer" shortcut to desired disk and run either the autostart.exe file (to start the disk) or setup.exe (to start the installation). In the welcome window that opens, click "Next".
In the next window "Custom installation", without delving into the technological details, you can leave the methods for installing the components by default and click on the "Next" button to go to the next screen:

In the next window, select the interface language:


1C provides two options for protecting the licensing of the product used:
- physical USB dongle, which is becoming less popular;
- software protection using a PIN-code.
Installing the protection driver in the next window is only necessary for the USB version.

This completes the platform installation. A recognizable 1C icon will appear on the desktop, when launched, an empty window of the list of user databases will open.
Setting the 1C configuration
This step boils down to deploying configuration templates from which you can create any number of bases for accounting. In the initial window of the installation wizard, select the item "Configuring", move to the next screen by clicking the "Next" button:

In the next step, the user can leave the default directory or create his own path where the configuration template files will be stored. For 1C: Accounting 8, the Accounting folder will be created along this path:

The template is installed in the specified directory, and the installation of the configuration is considered complete at this point:

Creation of a new 1C database
When you start the 1C shortcut that appears on the desktop, a window with a list of installed infobases opens, while it is empty:

By clicking the Add button, select the first of the options, moving to each next step is performed by clicking the Next button:

Selecting the first of the options in the next window will display a list of available second stage templates from which the base can be expanded. Here you just need to select the appropriate one:

You should enter a name for the database - as a rule, this is the name of the organization for which the records will be kept:

The next screen allows you to select the path of physical storage of the database on the computer disk:

The next window will be the last one. It offers several settings that you can leave as default. By pressing the "Finish" button information base will be created:

Its creation will be recorded by a new line in the list of infobases:

In case of delivery from software protection when starting the database for the first time, you will be prompted to enter the registration number of the kit and the PIN-code from the sealed envelope included in the box.
If you have an Internet connection, you should click "Get a license" and in a couple of minutes you can start working.
The presented detailed instruction "How to install 1C" shows that there is nothing tricky in this process: for attentive users who perform competent actions, everything will take no more than 20 minutes. Good luck!
schastliviy
Installing and updating the 1C 8.2 / 8.3 platform for the file version of the work.
In order to install / update the 1C 8.2 platform for the operating system Microsoft Windows we need its distribution kit. Let's consider the most common 1C Enterprise installation option. For example, let's take the platform of the 1C Enterprise software product 8.2.19.106. Other platform versions are installed by analogy.
Installation / update of the platform distribution kit version 1C 8.3 is similar to version 8.2, therefore this instruction suitable for her too.
Before starting, you need to download setup files distribution kit of the 1C Enterprise platform. If you have a subscription to ITS (Information Technology Support), everything is simple, go to the site users.v8.1c.ru and download the necessary. For basic versions of configurations, ITS subscription is not required. detailed instructions to download the distribution from the users site.
It is also possible to install the distribution kit from the "ITS Supplement" disk. If you choose this installation option, you should pay attention to the date of its release, since the platform must be up-to-date, otherwise the configuration of a newer release will simply not start, giving an error. Detailed instructions for installing the distribution from disk.
So, the distribution is downloaded, open the folder with the distribution and see the following picture:
Run the installer file named "setup.exe" highlighted in the picture above.
After starting the installation program, a welcome window opens, click the "Next" button

A window for selecting components opens, and the path to the platform files is also written. It is advisable to select the first three items. Also, if, on a computer, you plan to use remote access to databases, through a thin client or a web browser, you must add a "web server extension module" (Works only with managed applications).

Next, a window for selecting the interface language opens. If you have a Russian-speaking operating system we leave by default “ System settings", Or we choose at your discretion: 
Then the installer informs about readiness. Click "Install": 
The program installs the components we have selected. We are waiting for the end of the process. 
Next, the installer asks if we need a hardware key protection driver? If the "Hardware protection key" is used (USB device in blue), then the checkbox must be left. If the licenses are software (Envelope with PIN codes), you can uncheck the box. In any case, you can install / uninstall the driver later, you can read about it. Click "Next":

Further, if everything went well, we see the corresponding window. Click "Finish" and install the configurations: 
 How do I enable line-in?
 Recovering deleted files from a USB flash drive
 Installing windows 8 64 bit