Open the server console 1c. Administration of servers1C enterprise. Registration of a new infobase
In this article I will talk about how to add new or existing databases to the 1C: Enterprise server 8.3 (for other platform versions - 8.1 and 8.2 the steps are the same). Options for adding information base both from and through the 1C: Enterprise server administration program (in Windows OS). And also touched upon some issues of administering infobases in the 1C: Enterprise server cluster.
1. Adding an infobase from the 1C: Enterprise launch window
Let's create a new database on the 1C: Enterprise server from a typical configuration. To do this, launch "1C: Enterprise" and in the launch window, click " Add…»To add an infobase.

The wizard for adding an infobase will start, select the item “ Creation of a new infobase"By setting the appropriate switch and press" Further».

In the list of installed configuration templates, select the template we need and click again " Further».

We will enter the name of the database, how it will be displayed in the list of infobases, we will indicate the type of location “ On the 1C: Enterprise server"And click" Further».

On the next page, you must specify the parameters of the infobase being created, namely:
(V this example the parameters are selected in accordance with the 1C: Enterprise server installation parameters adopted in the article)
- Name of the 1C: Enterprise server cluster- as a rule, coincides with the network name of the computer where the 1C: Enterprise server is installed (central server cluster);
- Name of the database being created in the cluster- the name that will be used to refer to the infobase. Must be unique within a given cluster;
- Secure connection- disable by default;
- The type of DBMS on which the database will be stored- in this example MS SQL Server;
- Database server name- as a rule, it consists of the network name of the computer where the database server is installed and the name of the server instance (if any), separated by "\";
- Name of the database on the database server- for convenience, we will adhere to the rule that the name of the database must match the name of the infobase in the cluster. In addition, in the case of using MS SQL Server, the first character in the name of the database can only be a letter of the Latin alphabet or the character "_", the subsequent characters can only be the alphabetical alphabet, a number or characters "_" and "&", the name must be unique within a given database server instance and must not exceed 63 characters. If the database already exists on the server, the current database will be used, if not and the flag “ Create a database if it is missing", A new database will be added to the database server.
- Database user- a DBMS user who will become the owner of the database on the server in the event of a new database being created or who has rights to work with an existing one;
- User password- user password on whose behalf the database will be accessed;
- Date offset- 0 or 2000. This parameter determines the number of years that will be added to the dates when they are saved in the database Microsoft data SQL Server and subtracted when retrieved. The point is that the DATATIME type used Microsoft SQL Server, allows you to store dates in the range January 1, 1753 through December 31, 9999. If, when working with an infobase, it may be necessary to store dates preceding the lower limit of this range, the date offset should be set to 2000. In addition, if the applied solution uses accumulation registers or accounting registers (and most likely it will be) also in the "field offset "dates must be set to 2000.
- Set blocking of scheduled jobs- setting the flag allows you to prohibit the execution of scheduled tasks on the server for this infobase. It should be installed in the case of creating test infobases, where the execution of routine tasks does not bear any practical load.
After setting all the parameters of the infobase, click " Further».

And finally, we specify the launch parameters for the database being created and click " Ready»To start the process of creating a new infobase. In this case, a new information base will be created on the 1C: Enterprise server, if necessary, a new database will be created on the database server, and data will be loaded from the configuration template.

If all of the above steps are completed successfully, the wizard will complete its work, and we will see the newly created database in the list of infobases in the 1C: Enterprise launch window.

2. Adding an infobase from the administration console of 1C: Enterprise servers
Now let's add one more infobase to the server cluster, but through the snap-in “ Administration of 1C: Enterprise servers"(Preliminary). You can find it:

Well, in any case, the snap-in can be launched by executing the file " 1CV8 Servers.msc"Located in the 1C: Enterprise installation directory in the" common».

If the snap " "Is launched on the same computer where the 1C: Enterprise server is installed, then in the tree on the left, in the branch with the network name of the current computer, we should see this server cluster called" Local cluster". Expanding the tab " Information bases"We will see all infobases in this server cluster (for example, the database created through the" 1C: Enterprise "launch window in the previous step). To add a new infobase, click right click mouse on this tab, in the context menu select " Create» — « Information base».

The parameters window for the infobase being created will open. The list of parameters is the same as described above in paragraph 1 of this manual. Having filled in all the parameters, press " OK»To start the process of creating a new infobase. This will create a new information base on the 1C: Enterprise server and, if necessary, create a new database on the database server.

If all of the above actions are completed successfully, the parameters window will close, and we will see the newly created database in the list of infobases of the current cluster.
And if you go to the program "Wednesday SQL Server Management Studio"And connect to the current instance of MS SQL Server, you can see the databases created in the previous steps.

3. Properties of the infobase
To view or change the parameters of a specific infobase, you need to use the snap-in “ Administration of 1C Enterprise servers", In the list of infobases, right-click on it and select" Properties". To authenticate in the administration console, you must use administrators in the corresponding infobases. In other words, this check is similar to authentication when connecting to an infobase through a 1C: Enterprise client.

As you can see, the following parameters have been added to the list of parameters already familiar to us:
- Session start blocking enabled- a flag that allows you to enable blocking of the beginning of sessions with an infobase, if the flag is set, then:
- Existing sessions can continue running, establish new connections, and run background jobs;
- The establishment of new sessions and connections to the infobase is prohibited.
- Start and End- the duration of the session blocking;
- Message- text that will be part of the error message when trying to establish a connection with a blocked infobase;
- Authorization code- the string to be added to the parameter / Uc when starting 1C: Enterprise to connect to the infobase despite being blocked;
- Blocking options- arbitrary text that can be used in configurations for various purposes;
- External session management- a string describing the parameters of the Web service for external session management;
- Mandatory use of external control- if the flag is set, then if the external session management Web service is unavailable, an error occurs and the connection to the infobase cannot be established;
- Security Profile- if the profile name is specified, the applied solution starts working subject to the restrictions imposed by the specified security profile;
- Security Profile safe mode - the same as the security profile, but restrictions will be imposed on fragments of the application solution operating in safe mode.

After changing the necessary parameters, click " Apply"To save changes or" OK»To save and close the infobase properties window.
4. Adding an existing infobase to the list of infobases in the 1C: Enterprise launch window
And finally, all we have to do is add the " Administration of 1C Enterprise servers»Infobase to the list of infobases in the 1C: Enterprise launch window. Why, in this window, click " Add…"And in the launched wizard for adding an infobase / group, select the appropriate item and click" Further».

Enter the name of the infobase, as it will be displayed in the list, select the type of infobase location “ On the 1C: Enterprise server"And press again" Further».

Enter the address of the 1C: Enterprise server cluster and the name of the infobase as specified in this cluster. Click " Further».

Finally, we set the parameters for launching the infobase and click “ Ready»To complete the wizard.

Our base has appeared in the list of infobases. You need to understand that this is an empty (clean) database, and then you should load data into it from a template, or from a file of previously unloaded data.

Did this article help you?
As many probably know, the 1C Enterprise system supports two options for work. It:
- client-server;
- file version of work.
For client-server mode, you must install the 1C: Enterprise Server.
In this article, we will consider how to administer this server using the 1C 8.3 (8.2) Servers Administration Console utility.
Immediately service retreat - if at startup the console displays the message "The client and server versions are different (8.3.x.x-8.3.x.x), client application: Cluster Console", you need to register using the appropriate shortcut from the Start menu :
It does not have its own management interface. Administration is carried out using the 1C server console. The console is included in the delivery of 1C Platform and is installed locally on the user's computer. The Infobases themselves can be located both locally and on remote computers or servers.

Get 267 1C video tutorials for free:
Creating, editing and deleting databases on 1C Server
To create an infobase on a 1C Server, you must first create a Central Server and a Cluster to which the database will belong. On line 1C: Enterprise 8.3 Central Servers, right-click and select Create from the context menu. In the window that opens, enter the server name and port number.

Now let's create a Cluster. We will also use the context menu and select the "Create" item. Let's fill in the cluster parameters.

In the branch "Information bases" using context menu add a new base. After filling in its parameters, click "OK". The information base is ready to go.
Using the context menu, the base can be deleted or the properties can be edited.

Console Actions
How can the administration console be useful to us? It often happens that the user's computer “freezes”, and the 1C program for a particular user does not start. A message appears that someone is already working under this user. The thing is that “non-working” sessions remain on the 1C server. These users even remain in the "Active Users" section. And when you need to perform operations in the program that require exclusive mode (for example, deleting objects marked for deletion), then if you ask all users to exit, the operation still does not always work.
Putting the next update of the Accounting department, I got the error "I only work on 8.3.4", well ... it's time to put 8.3.4. so:
I will not describe the process of downloading and installing the new platform, everything is simple there.
1C Server Agent Service
By default, it is put on port 1540, and there I have 8.2 running, so we change it in the registry branch
HKEY_LOCAL_MACHINE \ SYSTEM \ CurrentControlSet \ Services \ 1C: Enterprise 8.3 Server Agent ImagePath parameter
change port numbers by adding offset: "C: \ Program Files \ 1cv8 \ 8.3.4.365 \ bin \ ragent.exe" -srvc -agent -regport 1741 -port 1740 -range 1660: 1691 -d "C: \ Program Files \ 1cv8 \ srvinfo "
We start the Agent and Open the Administration console of 1C servers and create a cluster 8.3
Specified the server name and configured it on port 1740 (8.2 works on 1540)
We create a cluster + optimized a bit (I only have a small ONE server, so I specify the interval for restarting worker processes and the amount of memory, because I have one server - the fault tolerance level is 0) 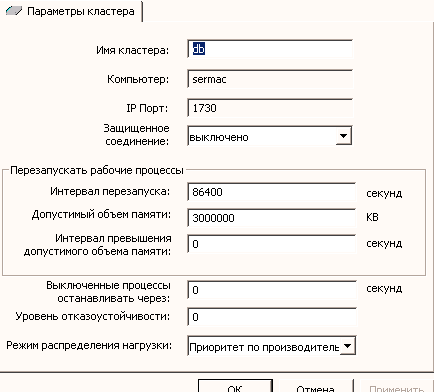
Now in more detail:
1. Restart interval: 86400 sec (24 hours). The moment of restart is not regulated, apparently from the moment of setting the parameters, or starting the application server.
2. You can also specify the allowable memory size: 3,000,000 KB (3 GB) - For a server with 4 GB of RAM, If it is less, then do not fill this parameter!.
3. Out-of-memory interval is a continuous interval of time out of memory, after which the server will restart the process. If 0 sec is specified, it will wait forever.
4. The number of Workflows is calculated automatically based on your settings
5. Failover level You can set the cluster failover level as the number of working servers that can fail at the same time, and this will not lead to an abnormal termination of users. Redundant services are started automatically in the amount required to provide the specified fault tolerance; in real time, the active service is replicated to the standby ones.
6. Load balancing mode, which can be used either to increase the performance of the system as a whole, or to use new regime"Saving memory", which allows you to work "with limited memory" in cases where the configuration used "likes to eat away memory".
Working server
My server is simple, 2 Gb of RAM in total and it will have only 2 bases, so I will configure it like this: 
I set the parameter Number of IBs per process equal to 1, i.e. I want to start its own process for each information security - this will reduce the mutual influence both in terms of reliability and performance. You customize to the characteristics of your server!
Information base
I add IB: 
In the starter writing base: 
Requirements for assigning functionality
I don't set it up for myself, but I think I need to say about it:
Cluster management consists in the fact that the administrator determines the composition of computers (working servers) on which the cluster is located. In addition (if necessary), he can determine the "requirements" for them: what services and connections to infobases should work on each of the working servers. Cluster managers and workflows are automatically started based on the assigned "requirements". "Requirements" for production servers can be set interactively from the cluster administration console, or programmatically from the built-in language.
So on a laptop with a security key, in order not to launch users on the cluster server, you need to add “requirements” for the “Client connection to information security” requirement object - “Do not assign”, i.e. prevent the worker processes of this server from processing client connections. Of even greater interest is the ability to run "background jobs only" on the production server in the cluster without user sessions. Thus, high-loaded tasks (code) can be transferred to a separate machine. Moreover, it is possible to run one background task of "closing the month" through the "Value of the additional parameter" on one computer, and the background task "Refresh the full-text index" on another. Refinement occurs through the indication "The value of the additional parameter". For example, if you specify BackgroundJob.CommonModule as a value, you can restrict the working server in the cluster to only background jobs with any content. The BackgroundJob.CommonModule ..- value will indicate the specific code.
Security Profiles
Security profiles are used to prohibit an application solution from performing actions that could potentially be dangerous for the functioning of the server cluster.
The cluster administrator can assign one of the security profiles existing in the cluster to any infobase. And then the potentially dangerous functionality of the applied solution will be limited within the limits described in this profile.
By default, after creation, the security profile prohibits the execution of all potentially dangerous actions:
-appeal to file system server;
-starting COM objects;
-use of external components of 1C: Enterprise;
-start external treatments and reports;
-starting applications installed on the server;
- access to Internet resources.
Thus, it is very simple to protect against unwanted actions of an unfamiliar application solution: you need to create an empty security profile and assign it to the infobase. Further, if necessary, you can expand this profile, describing in it the actions that are allowed to be performed by the applied solution.
Location of the service files of the cluster manager in 1C Enterprise 8.3
If during the installation of the system! "1C: Enterprise" option was chosen to launch the "1C: Enterprise" server as a service, then the first launch of the server agent will be performed during the installation of the system. In this case, the service will be launched on behalf of the user selected in the system installation dialog, but the service files of the server cluster will be located in the directory<каталог установки системы 1С:Предприятие>\ srvinfo (the -d startup switch will be explicitly specified in the service parameters).
If during the installation of the 1C: Enterprise system the option of launching the server as an application was selected, then the server is not launched during the installation of the system; the server agent must be started independently after the system installation is complete. At the same time, if the -d launch switch is not specified, the server cluster service files will be located in the default directory:% USERPROFILE% \ LocalSettings \ ApplicationData \ lC \ lCv8 (% LOCALAPPDATA% \ lC \ lCv8 for WindowsVista and later).
ATTENTION! If a cluster has already been created on this central server once, then when changing the server agent launch option (service, application) or when changing the user on whose behalf the server agent runs, you should always take care of specifying the correct path to the directory of the server cluster service files. If during startup the server agent does not find the list of clusters, it will create a new cluster on this server.
V operating system Linux service files of the server cluster will be located in the /home/usrlcv8/.lcv8/lC/lcv8 folder (or shorthand ~ / .1cv8 / 1C / 1cv8).
21/03/2016
Features of using the administration console of 1C: Enterprise servers of different versions
Introduction
In continuation of the previously published one describing the possibility of running several 1C services on one server, we would like to talk about the peculiarities of using the administration console of 1C: Enterprise servers. different versions... The fact is that with a standard installation of this console, you will only be able to administer the 1C server of one version. If several versions of the platform are installed on one server and several 1C services are running, the question arises of how to administer 1C servers of different versions within one server?
Registration of the 1C console
To register the administration console of 1C: Enterprise servers, 1C offers to use executable file RegMSC .cmd, located in the bin folder of the 1C server directory. This file can be started from the Start menu in Windows: "1C Enterprise 8 -> Additional -> [the required version of the 1C platform] -> Registration of the 1C Enterprise server administration utility".
The RegMSC .cmd file contains the following script:
regsvr32 / n / i: user radmin.dll
The purpose of this script is only to register the radmin .dll component. In practice, it is inconvenient to use this script, since every time before starting the administration console of 1C: Enterprise servers of the required version, you have to run the corresponding RegMSC .cmd file. Plus, this script is inoperable and needs to be improved (most likely, when it is executed, you will receive a message about the successful registration of the component, but the console will not work).
So, we want to get a workable script that will allow us to automate and perform the following actions in one click:
- Component registration radmin. dll of the required version;
- Launching the 1C cluster console.
We propose to change the above script and create a basic universal script for registering a component and launching a snap-in (console), as well as create "starter scripts" for consoles of the required versions. Here's what we got:
rem% 1 - full version number of 1C: Enterprise
@echo off
This script should be saved to an executable file of the .bat format (for example, "start_console .bat"). Let's take a closer look at this script. The following line is responsible for the correct registration of the radmin .dll component:
start / wait regsvr32 / s "C: \ Program Files (x86) \ 1cv8 \% 1 \ bin \ radmin.dll"
As a parameter (% 1), the version number of the 1C platform is passed to it. The next line is responsible for starting the MMC console with the snap-in for administering 1C: Enterprise servers:
start "C: \ Windows \ System32 \ mmc.exe" "C: \ Program Files (x86) \ 1cv8 \ common \ 1CV8 Servers.msc"
start _console 8.3.7.1873
Since the registration of the radmin .dll component does not affect the operation of the already running administration consoles of 1C: Enterprise servers, using this approach and the proposed scripts, we can simultaneously launch administration consoles for 1C: Enterprise servers of different versions and work successfully in them, with our cluster versions in each. Done, now you can administer several versions of 1C server on one server.
Please note that the proposed scripts use 32-bit versions of the components. If you try to register a 64-bit component in the same way, you will receive a message stating that it has been successfully registered, but then when you start the 1C: Enterprise server administration console, you will most likely see an error like this:
MMC could not create the snap in, Name: 1C: Enterprise (x86-64) Servers, CLSID: ...
Bye this problem not resolved, the use of several 64-bit administration consoles for 1C: Enterprise servers within a single server is not possible. If you have other information and you know how to solve this problem, we will be happy to update the article.
Conclusion
In the article, we described a method that allows you to use several administration consoles for 1C: Enterprise servers of different versions. This is necessary if you are working on a server with several working or test bases, for which the versions of the 1C server used differ.
We hope you can easily complete the task you need and continue to enjoy using 1C products. Well, if something doesn't work out for you, or you run into some difficulties, we will definitely help!
In this article, we will get acquainted with the administration server of the server cluster, and specifically with the utilities rac.exe and ras.exe as well as programs deployka with the help of which it becomes possible to administer a cluster of 1C: Enterprise servers from the command line.
By tradition, all who are too lazy to read, I suggest watching a webinar on this topic.
Well, the rest are welcome under the cat:
1. General information
Manage a cluster of servers 1C: Enterprise version 8.3 possible both using the 1C server administration console and from the command line. For these purposes, serves Server cluster administration server, which consists of two utilities: directly the server itself - the program rac.exe and command line utilities rac.exe, which, referring to the previously launched ras server, allows you to perform various operations with a cluster of 1C: Enterprise servers.
Details about this mechanism can be found in the book “Administrator's Guide. Client-server version "(or, respectively, on the ITS website).
And the general scheme of work of this bundle is as follows:

The administration server must be same version, as the version of the 1C: Enterprise server cluster, and at the same time, one server cluster can be connected several administration servers, but a specific administration server can communicate with only one server agent.
Both the administration server and the command line utility can work in any supported 1C: Enterprise OS platform. But in this article we will limit ourselves only to the OS of the Windows family.
2. Installing the administration server components
Both the server itself and the administration utility are part of the 1C: Enterprise server component. Accordingly, on the computer running the 1C: Enterprise server agent service, they should already be installed default.
To make sure of this, just go to the directory with the 1C: Enterprise server files and find the appropriate utilities in it (for convenience, files can be grouped by type).

I wrote in detail about the 1C: Enterprise server installation.
To install the Administration Server on a computer where previously was not the 1C: Enterprise server is installed, you need to run the distribution kit for installing the 1C server and, as part of the component, select the item "Server 1C: Enterprise 8".

Moreover, with this component selected, at the next step, the installation wizard will offer to install the 1C: Enterprise server as a Windows service. From this point of course should be abandoned by unchecking the corresponding flag.

After installation, you need to make sure that you have all the necessary components as described above.
3. Starting the administration server
To receive detailed information using the ras.exe utility, you can call the help by running the command

From the help you can see that the administration server can work as in application mode and how windows service(parameter service ). Also with we can set the network port on which the administration server will run (parameter port , the default is the port 1545 ), and for the cluster administration mode, the claster ... You can call help for this mode with the command:
rac help cluster
Then we will see that this regime the address of the agent of the 1C: Enterprise server cluster is specified as an argument. By default it is localhost: 1540.

Thus, if the administration server is started on the same machine where the 1C: Enterprise server agent is running, it is enough to execute the command
Well, if you need to connect to a server agent running, for example, on a computer with a network name Server1C, and the agent is running on a non-standard port 2540 , then the command will be as follows:
rac cluster server1c: 2540
4. Starting the Administration Server as a Windows Service
Of course, in order not to start the administration server every time by hand, it is convenient to start it once as windows services... But, unfortunately, the platform developers did not implement the ability to automatically register the corresponding service in the system, as, for example, it was done. To add a service, it is proposed to use system utility sc... Let's take a closer look at this process.
Let it be a local user named USR1CV8_RAS and password Pass123
Register-ras.bat file:
@ echo off rem% 1 - full version number of 1C: Enterprise set SrvUserName =. \ USR1CV8_RAS set SrvUserPwd = "Pass123" set CtrlPort = 1540 set AgentName = localhost set RASPort = 1545 set SrvcName = "1C: Enterprise 8.3 Remote Server" set BinPath = "\" C: \ Program Files \ 1cv8 \% 1 \ bin \ ras.exe \ "cluster --service --port =% RASPort%% AgentName%:% CtrlPort%" set Desctiption = "1C: Enterprise 8.3 Remote Server" sc stop% SrvcName% sc delete% SrvcName% sc create% SrvcName% binPath =% BinPath% start = auto obj =% SrvUserName% password =% SrvUserPwd% displayname =% Desctiption%In the file, we indicate:
- username and password from which the service will be started - variables SrvUserName and SrvUserPwd
- the address and port of the server agent that we are going to administer - variables AgentName and CtrlPort
- As well as the name of the service and the network port on which the administration server will run - variables RASPort and SrvcName ... It makes sense to change these parameters only if you want to run several administration servers in parallel, for example, to service different 1C servers.
The current version of the 1C: Enterprise platform is used as the only parameter in the bat-file. Thus, to create a service, run command line with administrator rights and run the file created earlier register-ras.bat, not forgetting to indicate the required version of the platform.


We check that a service with the specified name has appeared on the system. And immediately launch it by selecting the appropriate item in the context menu.

This completes the installation of the Administration Server as a service.
5. Administration of the server cluster using the rac.exe utility
So, we have installed the administration server. Interaction with the server is carried out using a special console utility rac.exe. Let's execute the command
to get help for this program.
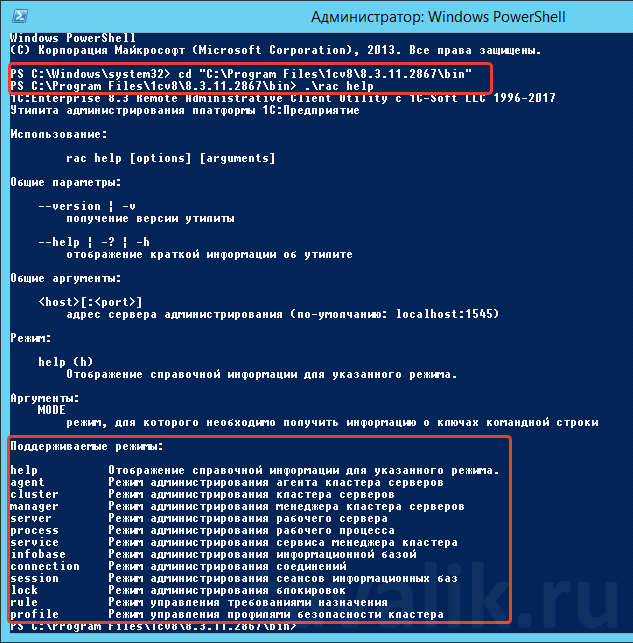
As you can see from the help, the utility has one general argument that specifies the address of the administration server (by default localhost: 1545) and a variety of operating modes: for administering the server cluster agent, the cluster itself, the cluster manager, worker processes, etc. Help for each mode can be invoked by the corresponding command.

There is obviously no point in describing all modes of operation. Here are just a few examples of how it works.
Getting a list of information about clusters:

Obtaining a list of infobases on a given server cluster:
Getting the list of connections with the specified infobase:

The administration utility allows you to perform all the work required to administer a server cluster, with the exception of OS authentication for administrators of a server cluster, a working server, and an infobase.
6. Software wrappers for working with the administration server
As you can see from the examples, working from the command line with the rac utility is still a pleasure. But this mechanism was not created for manual control. For example, the ITS website has Java archives that allows you to interact with the administration server from a program on Java language, without the help of a console administration utility. Download Current Package can .
The main thing is that we are able to execute various instructions on a cluster of 1C servers from the command line. This means that you can add the necessary functions for interacting with a cluster of 1C: Enterprise servers in various programs, processing or scripts.
For example, among other things, it can work with the administration server written in the language OneScript program deployka.
I have already talked about the OneScript engine.
Learn more about deployka.
Well, as much as possible full overview all available libraries and applications written in OneScript are given in this article.
7. Installation and configuration with the deployka program
The algorithm for installing OneScript and deployka is discussed in some detail in the articles on the links indicated in the previous paragraph. Well, in short, it consists of the following points:
1. Download the OneScript distribution from the official website.
2. Install following the instructions of the wizard.
3. We log in to the system so that the new environment variables are applied.
4. We start the command line with administrator rights, check that previous items executed correctly by the command
5. Installing the deployka program using the package manager opm by running the command
opm install deployka

6. We check that everything works by calling the "deployment" help with the command

7. In general, that's all. All modes of the program are visible on the screen. Next, we read the help on the site or in the console, calling up a hint for each mode with the corresponding command:

This is how, for example, you can end all sessions in a specified infobase and then block the start of sessions.
deployka session kill -db Accounting_Demo -rac "C: \ Program Files \ 1cv8 \ 8.3.11.2867 \ bin \ rac.exe" -db-user "AbramovGS (director)"
8. Now you can use the "deployment" in your scripts. For example, a script for updating an infobase from the repository, disconnecting users and updating the database may look like this:
@ echo on rem Set variable values set ServerName = "1CAPP: 2541" set RacPath = "C: \ Program Files \ 1cv8 \ 8.3.11.2954 \ bin \ rac.exe" set uccode = "123" set BaseName = "ERP_Test" set UserName = "Admin" set UserPass = "Pass123" set ConStr = "/ 1CAPP: 2541 \ ERP_Test" set RepoPath = "tcp: // 1CAPP / ERP_DEV" set RepoUserName = "test" set RepoUserPass = "123" rem Shutting down users call deployka session kill -db% BaseName% -db-user% UserName% -db-pwd% UserPass% -rac% RacPath% -lockuccode% uccode% rem Updating the database configuration from the repository call deployka loadrepo% ConStr%% RepoPath% -db-user% UserName% -db-pwd% UserPass% -storage-user% RepoUserName% -storage-pwd% RepoUserPass% -uccode% uccode% rem Update database configuration call deployka dbupdate% ConStr% -db-user% UserName% -db-pwd% UserPass% -uccode% uccode% rem Unlock sessions call deployka session unlock -db% BaseName% -db-user% UserName% -db-pwd% UserPass% -rac% RacPath% -lockuccode% uccode%Thank you all who have read to the end. Write if you have any questions.
Did this article help you?
 Architecture of a distributed control system based on a reconfigurable multi-pipeline computing environment L-Net "transparent" distributed file systems
 Email sending page Fill relay_recipients file with addresses from Active Directory
 Missing language bar in Windows - what to do?