How to start reinstalling Windows from disk. How to reinstall Windows. We work independently.
It is important for every user to know what reinstalling windows 7 on a laptop is. Since at some point in time, any of us have to deal with the "uneven" operation of the system. That is, failures periodically begin to occur. At the same time, the usual configuration of the system does not help anymore.
The main reason for this is debris operating system laptop various unnecessary files or "leftovers" is wrong remote programs... In addition, do not forget about viruses and their "tribesmen" in the form of spyware, worms, and so on.
The problem can be solved using special program to clean the registry, however, if it did not help, still the best solution the question will be to reinstall the system. In our article, we will tell you what a step-by-step reinstallation of windows 7 on a laptop or computer is, and briefly describe its main steps.
Do not be surprised if you have to search and install all the necessary drivers after you decide to reinstall Windows 7 on your laptop. After all, they most likely will not be on the installation disc. Therefore, in order for your ACER laptop or Asus, or any other fully functioning, will have to manually install the missing drivers (to sound card, graphic editor, motherboard, etc.).
And if you decide to install the "seven" on your laptop for the first time, be prepared for the fact that this Windows version consumes much more resources than, for example, XP. That is, if the laptop previously worked under xp, then before installing the seven, you should compare system requirements this version of the operating system and the resources that your laptop possesses.
We start reinstalling windows 7 from under the laptop operating system
Now let's talk specifically about the reinstallation process itself.
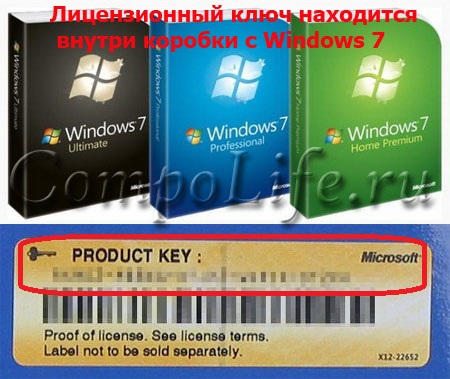
How to reinstall windows 7 on laptop step by step? So, if you are a happy owner of a licensed "seven", then all you need to do is insert the disc into the CD-DVD drive and run the installer from it. When the process requires license key, we find it on the box from the CD or DVD with the operating system and enter it. And now we have a licensed version of the OS.
But what are we going to do if we don't have an installation disc? To use the old Windows, cluttered with various "garbage", unnecessary files and viruses further? Of course not!
There is a way out of this situation. you just need to find and download the required version of the operating system from the Internet. It should be a bootable disk image. It, in turn, should be launched using a CD / DVD drive emulator program. It is not difficult to find it on the Internet.
After that we insert blank disc into the optical drive. Using the emulator program, we write the image obtained on the Internet to disk. When the recording is complete, you will have your own installation disc for reinstalling windows 7 not only on a laptop, but also on a computer.
All this can be done only if your laptop is in good working order and it has not yet been completely "killed" by virus attacks. If you cannot download the disk image or Windows does not boot at all, then there is another option for solving the problem - reinstalling through the BIOS.
How to reinstall windows 7 on a laptop using BIOS
How is windows 7 reinstalled on a laptop in this case? Here it is already necessary to perform some BIOS settings to boot from the installation disk. Further - everything is according to the instructions.
Press the laptop power button, insert the disc into the drive. In this case, press the DELETE or F2 button several times in a row. If you do everything correctly, a blue Bios window should appear in front of you.
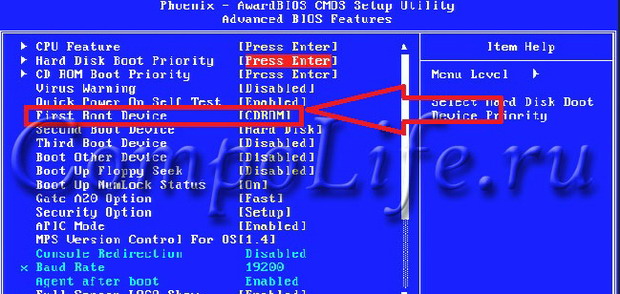
There we find the inscription Advanced Bios Features, go to this menu. Next opposite First Boot Device put the CD-ROM. Thus, we select the device in the system, which will be loaded first when the computer is turned on.
That is, now instead of the hard disk of the computer, the CD-ROM will be loaded first of all, or rather our boot disk located in it. We save the settings and press the exit button. Then, after pressing any key, the system will boot from the CD-DVD drive. This will be the beginning of reinstalling windows 7 on a laptop.
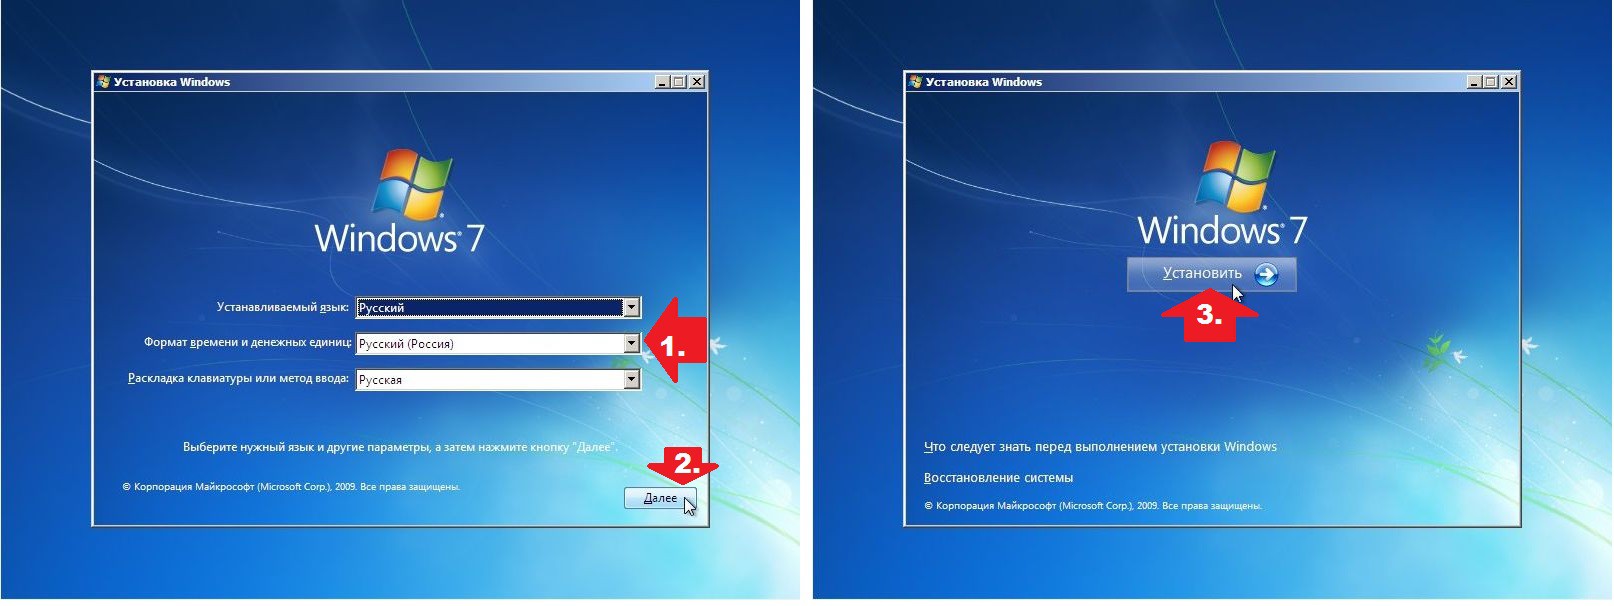
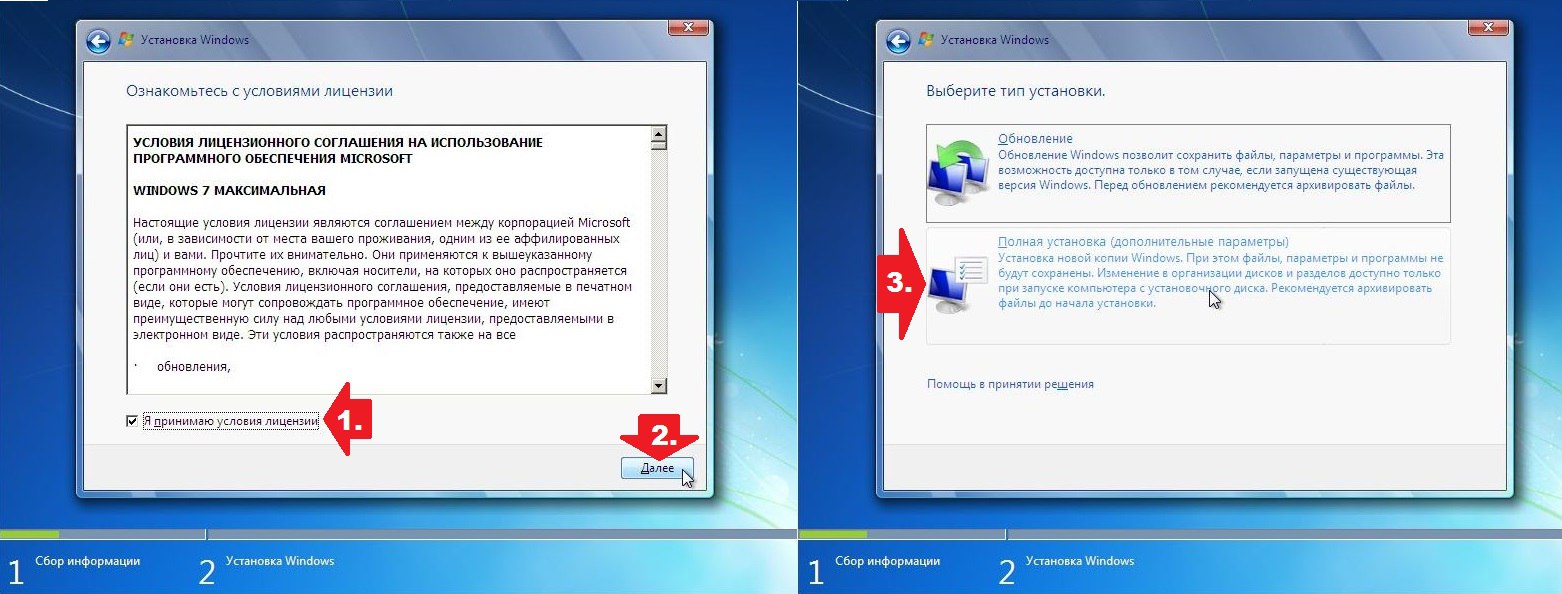
After a while, the program will prompt you to select a language. Select, click "Next" and "Install". In the window that appears, we agree with the terms of the license, and also select the type of installation.
You should be extremely careful here. If you need to do a complete reinstallation of windows 7 on a laptop, then select the appropriate item in the installation menu. However, it is important to remember that in this case the local disk where Windows will be installed will be formatted. Those. all information on it will be deleted.
After the end of the reinstallation process, do not forget about the necessary drivers and software to keep the laptop working properly.
Restoring a laptop system from under windows 7 without reinstalling
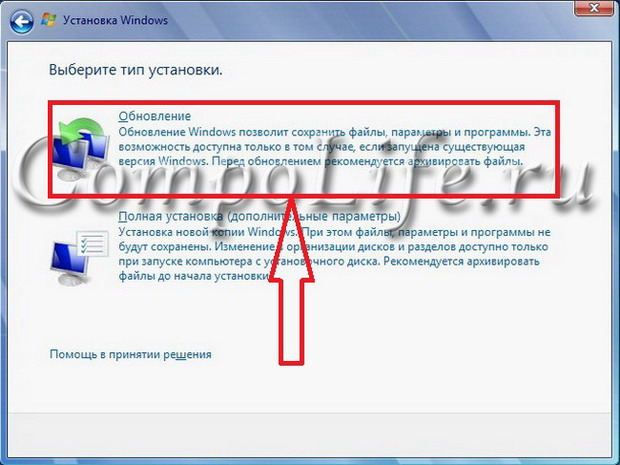
If you do not want to lose data, that is alternative way- without losing the information stored on the disk. Here you should select the "Update" item. This will clear and update the registry and windows data. personal information and installed programs will remain intact. Thus, recovery will take place windows systems 7 on laptop, not reinstalling.
Updating Windows 7 on a laptop without reinstalling
After choosing any of the installation types, the process itself will take place on its own. During this time, the laptop will reboot several times, and the process itself will take about 45 minutes. Downloading the desktop will indicate that the reinstallation is complete.
All you need to get started is a disk or flash drive with installation windows files... How to create bootable USB drive read the article "Installing windows from a USB flash drive". This time we will be looking at installing from CD / DVD.
Briefly about the size of the partitions for installation. Minimum for Windows 7 I recommend 20 GB, for XP 10 GB. When installing Windows 7, it is possible to expand the partition using the standard installer tools; when installing XP, this is not possible. Therefore, if your C partition is less than 10 GB, increase the free space.
If you have everything ready (you can of course not prepare, but simply reinstall windows, for the first time it's like flying in a spaceship)), insert the disk into the drive and restart your computer.
BIOS
The most difficult thing for beginners to enter the BIOS (the basic I / O system, the intermediary between the hardware and the operating system, ensuring its launch). The fact is that manufacturers computer equipment cannot conspire and assign one key to enter the BIOS. You need to click on it immediately after turning on the power, preferably several times. Below is a list of hardware and the corresponding buttons to enter the BIOS. If you do not know which motherboard or laptop model you have, try pressing these most common keys: DEL, F2, F1, ESC.
- Acer (Aspire, Power, Veriton, Extensa, Ferrari, TravelMate, Altos) - or
- Acer (Altos 600 Server) - ++ or
- Acer (Older PC) - or ++
- AMI (American Megatrends AMIBIOS, AMI BIOS) -
- AMI (American Megatrends AMIBIOS, AMI BIOS) - Old Version - or
- Award BIOS (AwardBIOS) -
- Award BIOS (AwardBIOS) - Old Version - ++
- ALR - ++ or ++
- ARI - ++ or ++
- AST Advantage - ++
- Compaq (Presario, Prolinea, Deskpro, Systempro, Portable) - - when the cursor is in the upper right corner
- Compaq (Presario, Prolinea, Deskpro, Systempro, Portable) - - at the time of displaying the logo
- Compaq (Older Computers) -,,, or
- Cybermax -
- Dell (XPS, Dimension, Inspiron, Latitude. OptiPlex, Precision, Vostro) -
- Dell (Older 486 Models) - ++
- Dell (Some Models) - Reset - Press the button twice
- Dell Dimension L566cx System -
- Dell (Older Laptop Models) - + or +
- DTK (Datatech Enterprises) -
- eMachines (eMonster, eTower, eOne, S-Series, T-Series) - or
- eMachine (Some Older Computers) -
- Fujitsu (LifeBook, Esprimo, Amilo, Tablet, DeskPower) - - when the logo appears
- Gateway Using Phoenix BIOS (DX, FX, One, GM, GT, GX, Profile, Astro)
- Gateway (Some Older PCs) -
- Hewlett-Parkard (HP Pavilion, TouchSmart, Vectra, OmniBook, Tablet) -
- Hewlett-Parkard (HP Alternative) - or
- Hewlett-Parkard (HP) Tablet PC - or
- IBM ThinkPad using IBM BIOS (Early Models) - ++ - when the cursor is in the upper right corner
- IBM ThinkPad using IBM BIOS (Later Models) - - Press and hold
- IBM ThinkPad using Phoenix BIOS - ++ - from command line DOS
- IBM PS / 1 (Late Models), PS / ValuePoint and 330s - ++ [?]
- IBM PS / 2 with Reference Partition -
- IBM PS / 2 - + - when the cursor is in the upper right corner
- IBM PS / 2 - 75 and 90 ++ [?]
- IBM (PC, XT, AT) -
- IBM (Older Computers or Notebooks) -
- Lenovo (ThinkPad, IdeaPad, 3000 Series, ThinkCentre, ThinkStation) - or
- Lenovo (Older Products) - ++, ++ or +
- Microid Research MR BIOS -
- Micron (MPC Computers ClientPro, TransPort) -, or
- NEC (PowerMate, Versa, W-Series) -
- NEC Versa Notebook - - press and hold
- Olivetti PC Pro - +++ - on numeric keypad
- Packard Bell (8900 Series, 9000 Series, Pulsar, Platinum, EasyNote, imedia, iextreme) -, or
- Packard Bell (Early 386 and 486 Dodels) - ++ [S] - sequentially
- Phoenix BIOS (Phoenix-Award BIOS) -
- Phoenix BIOS (Phoenix-Award BIOS) - Old Version - ++ [S], ++, ++ or + [S]
- Sharp (Notebook Laptops, Actius UltraLite) -
- Sharp (Old PCs) - Diagnostic disc required to enter BIOS
- Shuttle (Glamor G-Series, D'vo, Prima P2-Series, Workstation, X Mini XPC, Surveillance) - or
- Sony (VAIO, PCG-Series, VGN-Series) -, or
- Sony Vaio 320 Series -
- Tandon 386 - ++
- Tandon - ++
- Toshiba (Portege, Satellite, Tecra) -
- Toshiba (Portege, Satellite, Tecra with Phoenix BIOS) -
- Zenith, Phoenix - ++
If you can get into BIOS, congratulations! Half the battle is done. You should see something like this.
In BIOS, we need to change one parameter that is responsible for the boot priority, that is, from which device the system will start in the first place. This can be a hard drive (default), floppy drive, flash drive, or network.
Again, a small problem. There are many manufacturers - different BIOSes. And the menus in them are naturally not the same either.
I'll show you a general case. In all the rest, if you know English, there will be no problems. If not, take a second computer and translate.
Typically, the sequence of polling disk devices in search of a bootable disk is set in the Advanced or Advanced BIOS Features menu, less often in the Boot menu. The menu command can be called Boot Device Priority, Boot Sequence, or something similar. Sometimes there are three or four items labeled 1st Boot Device, 2nd Boot Device, etc.
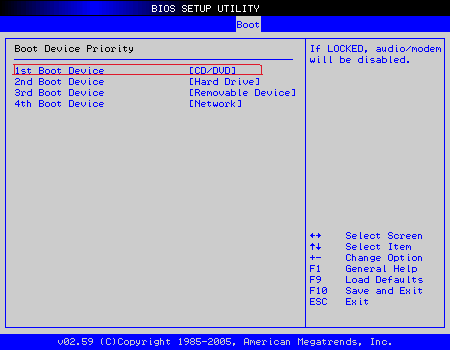
Choice of boot sequence.
To boot from a hard disk (HDD, Hard Disk), specify it as the first in the list or the first boot device. This is a setting for normal operation: without polling other drives, the computer will immediately start booting from the hard drive. Usually you can change the value by pressing the "F5" - "F6" or "+" "-" keys.
To boot from CD (which is what we need in this case) specify DVD drive(in the menu it can be referred to as CD-ROM) the first in the list or the first boot device. In this case, the hard disk will automatically become the second or third in the boot order. In principle, such a setting is permissible during normal operation: if there is no boot disk in the drive, the computer will continue booting from the next device, that is, from the hard disk.
After changing the settings, save them and exit the BIOS. Most often, the settings are saved with the "F10" key and then ENTER. During the installation of the operating system (relevant for windows xp), on the first reboot, go to the BIOS settings again and specify the hard disk as the first boot device.
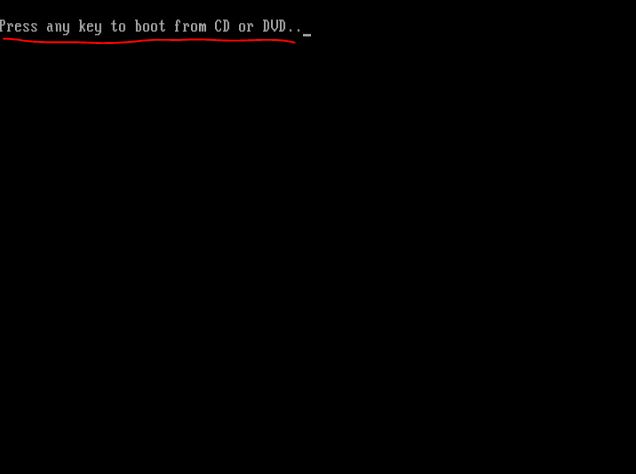
So, you were able to boot from the CD (DVD). This can be determined by the cheerful buzzing of the drive and the absence of the inscription "Hello, I'm Windows!". Don't count the crows here. If you see a similar message: Press any key to boot from CD (DVD) (Press any key to boot from CD (DVD)), do it.
This is where the installation actually begins.
I have prepared presentations for you, separately for XP and Seven, to help you walk through the entire installation process with ease.
And how to install two systems at the same time on one hard drive, read this article.
Wish you successful installations and long Windows glitch-free work!
Sometimes, for various reasons, we need to reinstall Windows 7 on a computer (laptop). Of course, the most common situation is that it is impossible to use a computer normally because of brakes or viruses. During the installation process, users may experience various difficulties, so in this article we will try to tell you as much as possible, how to reinstall Windows 7 yourself .
In fact, pe Windows installation a very simple procedure, but many service centers charge fabulous sums for this procedure, taking advantage of the ignorance of their customers.
Reinstalling Windows on a laptop with built-in tools.
Almost all laptop manufacturers endow their device with special utility, which allows you to automatically reinstall Windows and install the correct drivers.
This feature is a real lifesaver for inexperienced users who want to return the laptop to factory condition.
This method should be used only if you have not previously asked for help from the masters, and the laptop contains exactly that Windows version with which it was purchased.
Typically, this feature is called differently on laptops, but it can always be found in the search through the Start menu. Most often, such programs have in their name the word Recovery .
Opening the desired program, you will be prompted to perform several ways Windows recovery, among which there will be a point to return the operating system to the factory state.
Next, the laptop will reboot, and along with the manufacturer's logo, a message will appear that a certain button must be pressed to start the recovery. Such a record might look like this: Press F2 for recovery» (press F2 to restore).
Routine reinstallation of Windows.
We will now look at the process reinstall Windows using a flash drive or disk with an operating system.
We will reinstall Windows in several stages.
Stage 1: preparation.
What do we need first? Of course, a bootable USB flash drive or a disk with an operating system distribution kit.
Ideally, if you have a Windows boot disk. If you do not have one, you can write the image yourself by creating. Microsoft has developed a convenient utility for creating a bootable USB flash drive, which can be downloaded from this link.
Now a few words about files and data. If your hard drive already has two partitions (drive C and drive D), then all important files can be transferred to D, and then during the reinstallation of Windows they will not go anywhere.
If the laptop has only one disk, then the files can be saved to a USB flash drive, external hard disk or cloud services.
Stage 2: BIOS setup.
So you have completed the preparation step and inserted removable media with the Windows distribution kit to the computer. Please note that it is recommended to connect a USB flash drive not through hubs and splitters, but directly to a computer. It is better if the device is inserted from the back of the system unit.
In the BIOS settings, we need to set a USB flash drive or disk, which will be in priority when installing Windows. To do this, follow these steps:
1. Restart your computer.
2. At the very beginning of the computer boot, when the name of the computer manufacturer is displayed on the black screen, press the button to enter the BIOS. Which button exactly depends on the manufacturer. Typically, when a black screen appears, this information is indicated at the bottom of the screen in the form of a message similar to the following: Press Del to enter Setup» or Press F2 for BIOS Settings ... Such messages are translated as follows: "Press the Del button to go to the settings" and "Press F2 to go to BIOS settings».
Most often the Del button needs to be pressed for stationary PCs, F2 - for laptops.
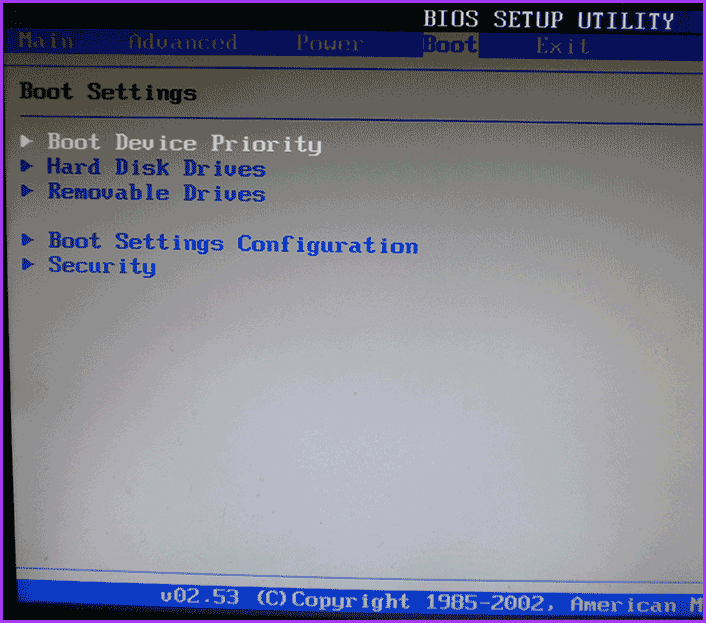
3. If you did everything correctly, then the BIOS settings menu will open in front of you, in which you need to find the item that has the word in the name "Boot" (loading). This item can be named, for example, "Boot Settings" or "First Boot Device" ... As a rule, the choice of one or another menu item is carried out using the "Right" key.
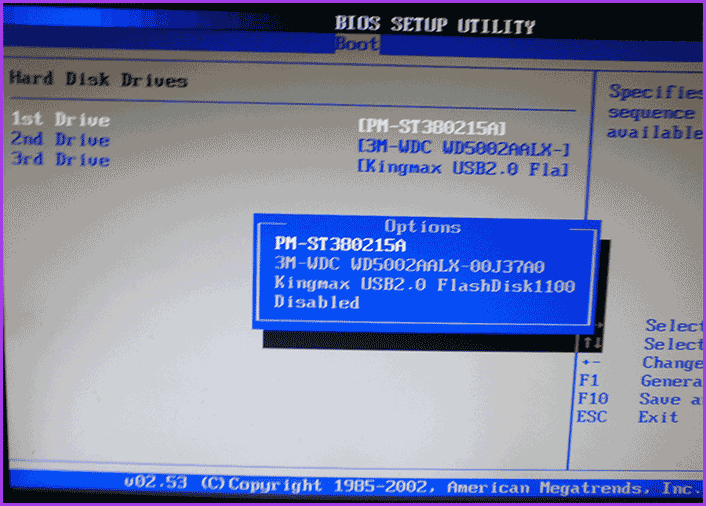
4. Now you need to specify the boot device as the first item. If you are installing Windows from a disk, then put the first item CD / DVD, if you are using a bootable USB flash drive, respectively, select the item with the name of the flash drive.
Save the changes by clicking the Save button, and then exit the BIOS by clicking the Exit button.
Stage 3: installing Windows 7.
If the installation disk or flash drive is written correctly, and the BIOS settings are correct, you will see a black window with the inscription "Press any key to boot from CD or DVD" ... Press any key on the keyboard.
If such an inscription does not appear, you have made a mistake somewhere. First of all, check the BIOS settings, and then recheck the media with the recorded Windows.
Immediately a small disclaimer: depending on the version Windows assemblies, further actions may differ. Do not be alarmed, but carefully read the instructions of the installer, especially since they are translated into Russian.
A window will start "Install Windows" , in which you need to specify the language, and then press the button "Further" .
In the next window, to start installing Windows, click the button "Install" .
Now you need to select the version of Windows for which you have an activation key. If you are a laptop user, the key number can be written on the bottom of the device. Click the button "Further" .

Next, you need to accept the terms of the license agreement by checking the box. Go to the next menu item.
In this window, select Full installation
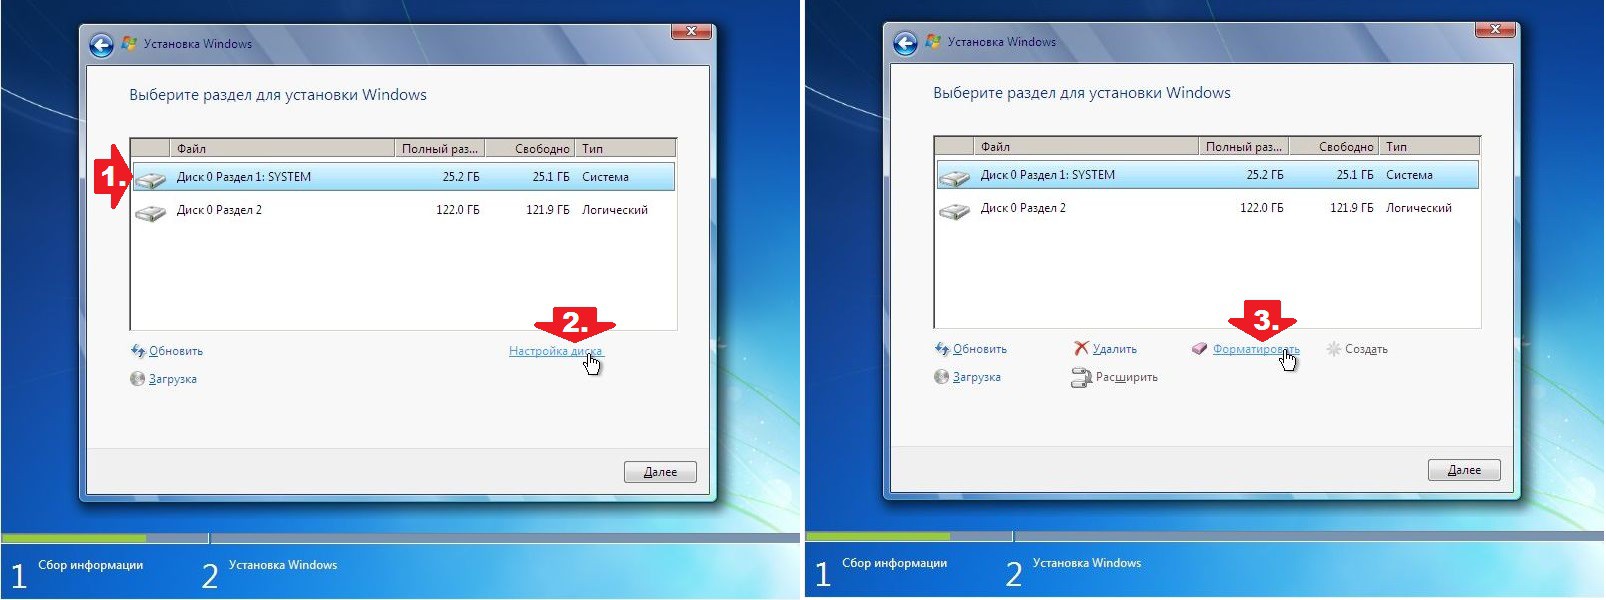
Select the partition from which the operating system will be installed and select "Disk setup" .
Click the button "Format" .
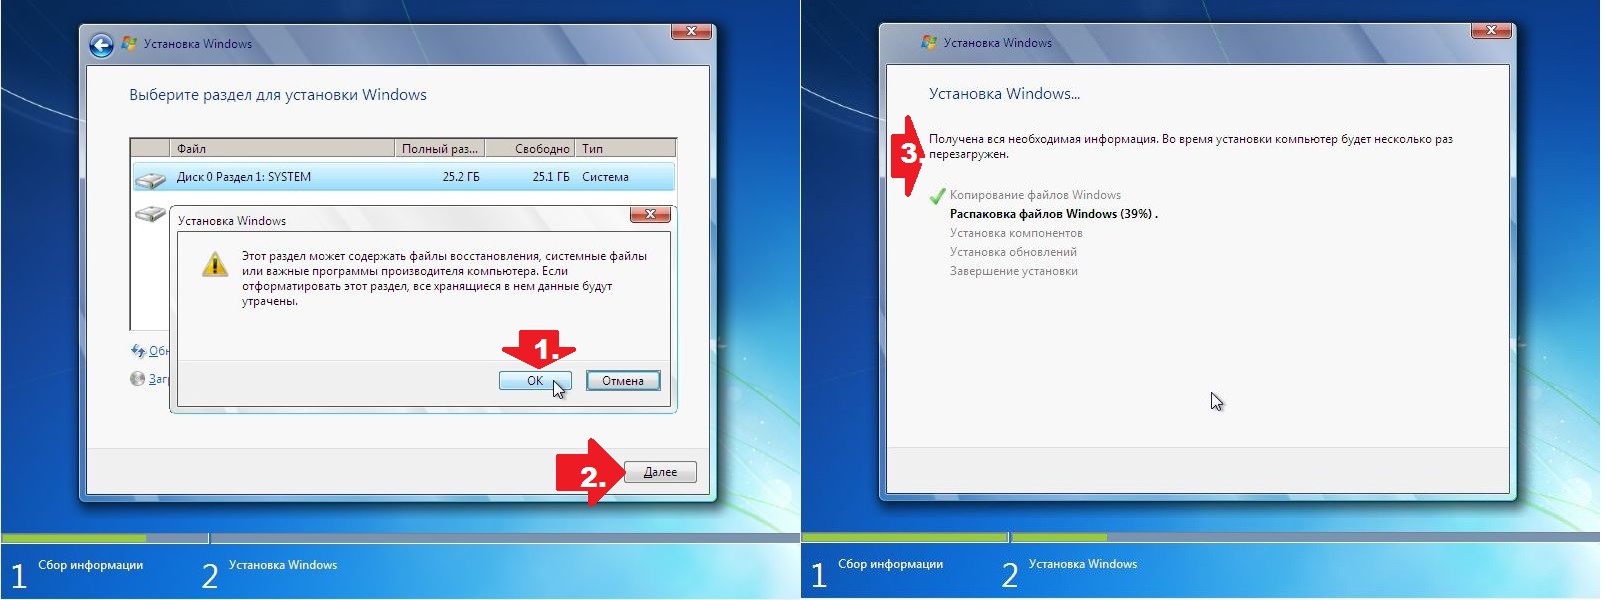
A window will appear in which the system will warn that all the information contained on the disk will be permanently deleted. But, if you managed to prepare for this stage (see the item "Preparation"), then press the button "OK" .
Formatting will take some time, after which press the "OK" and then press "Further" .
You will need to wait a while for Windows to install.
You will then be prompted for a username and then a password.

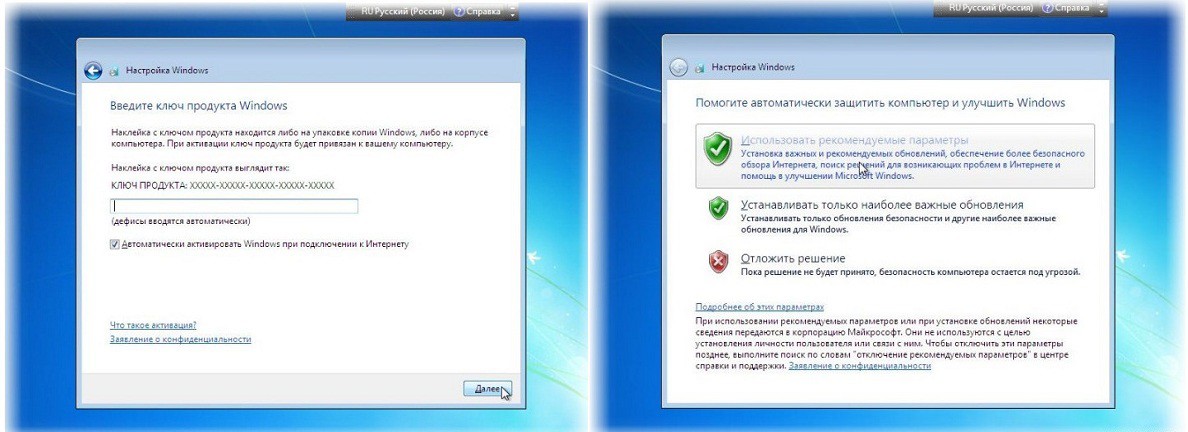
But now you need to specify the activation windows key... After entering the key, press "Further" .
The next item suggests activating automatic Windows update... It is desirable, of course, to choose "Use Recommended Settings" but you focus on your needs.
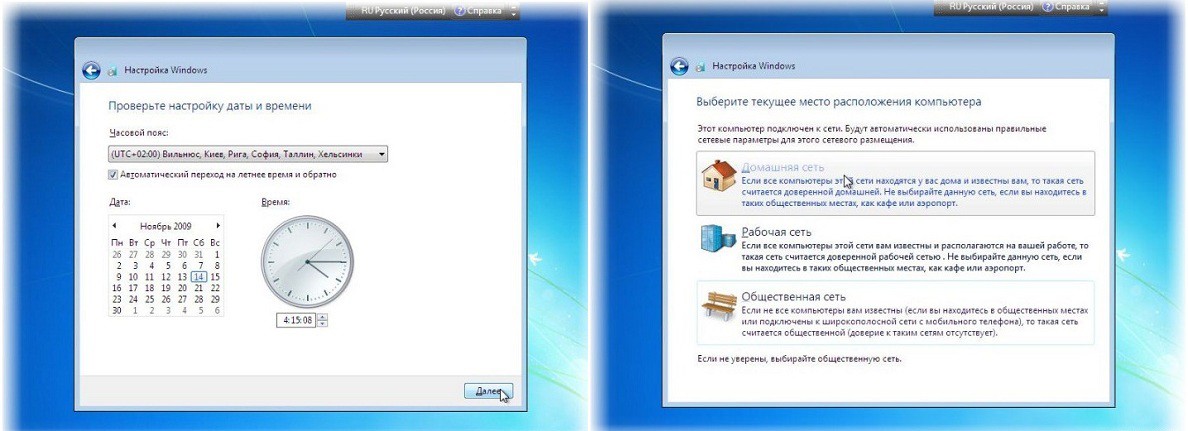
Set your time zone, date and time.
Select your connection type.
Congratulations, Windows setup is complete! You just have to download required drivers and start installing programs.
In the case of a computer, find out the model of the motherboard and download the drivers on the manufacturer's website. Things are even easier for the case: just go to the manufacturer's website this device and download drivers specifically for your laptop model. After installing the drivers, the computer can be used.
Is it worth "bothering" with the problem of how to reinstall Windows when you live two steps away from service center, and next door is a familiar specialist who is always ready to come to your aid? In this case, it is everyone's choice to know and be able to use a few simple rules for installing the OS. On average, the cost of this procedure is low, and this is despite the fact that 99 percent of it is performed automatically. In all honesty, it is better to spend this money on this is where a real specialist sometimes has to work hard, although this procedure can be mastered and carried out independently.
But often, mastering science, we just save time. Despite the appearance of the seventh version of the Windows OS from Microsoft, many users are in no hurry to part with the proven Windows XP, which was initially considered experimental. To reinstall Windows of any of the above versions, you will need to perform similar operations.
Immediately before starting the OS installation procedure, it is necessary to carry out several preparatory measures. Since preparing space on the disk, the system will format it, you must save all required files on a removable device or move them to a nearby local drive.
Sometimes computers are initially configured so that the user has at his disposal one large disk corresponding to the size of the hard drive. In such situations, it makes sense to split it into several sections. A convenient tool for performing this operation is Acronis Disk Director.
Run the program, select auto mode, in the appropriate paragraph, select the disk on which we will allocate "territory" for the new partition, and set its size. We notify the utility that we intend to create a logical partition. As file system give preference to NTFS, choose any letter for its name. Any entry can be made to the "specify disk label" request, but it is usually left blank. In a new window, having admired the expected result of the work, we press the "finish" button.
It is possible that Disk Director will reboot the system several times, but it will constantly inform you about the progress of work. When everything is over and after the next reboot the familiar Windows window pops up, you can continue to work.
Before reinstalling Windows, we will revise our files and folders, save only the essentials, and just get rid of the rest of the garbage.
When all the preparatory operations are completed, we proceed directly to reinstallation. For example, we will describe how to reinstall Windows XP. The seventh version almost completely repeats these steps.
We insert the disk with the distribution kit into and the message "Press any key to boot from CD ..." will appear, we will fulfill this requirement and press any button.
Sometimes in the BIOS settings the "boot" item is set not from the drive, with hard disk... Then you have to change them. To do this, press Delete before starting the system. So far, the most common are two BIOS options.
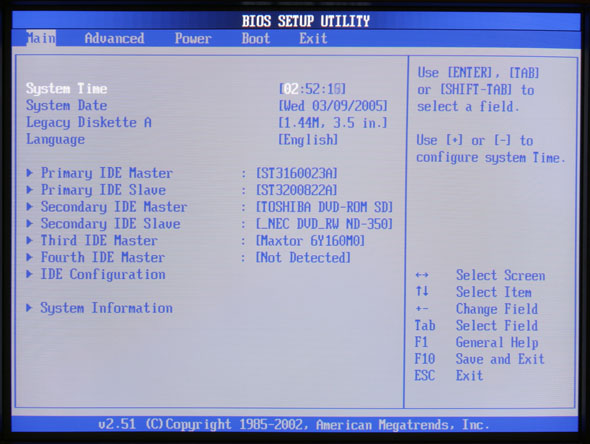
In the AMI BIOS with a dark blue design on a gray background, select the Boot tab at the top, set our drive there as the first boot device. For the hard drive, we put the second place. We control either the "plus", "minus" buttons or PageUp and PageDown.
For Award BIOS with a yellow-red design on a bright blue background, go to Advanced BIOS Features and configure the First Boot Device line. Exit the BIOS by pressing the Save & Exit item or the standard F10 key.
Some modern motherboards use the Qiuck Boot Menu, which identifies the boot device. It is usually assigned to F8 or F12.
After starting the installation, we ignore all the suggestions of the system up to the choice of a partition on the hard disk. Traditionally, this is the C drive. We agree to fast formatting in NTFS.
At the final stage, when it is successfully placed on your computer, we will go into the BIOS again and return HDD in place of the first device.
On this, the instructions on how to reinstall Windows can be completed, since then the usual user settings follow, which are no longer difficult to cope with.
Today, almost all laptop manufacturers provide the ability to reinstall Windows. To do this, it is proposed to use either special integrated recovery tools, or the ability to install over an existing operating system with overwriting all saved data. The first, very convenient, option allows you to save the licensed software and restore initial settings... The second is to install the system in a format "freed" from unnecessary software applications imposed by the manufacturer. But with this option, the paid licensing support is lost.
Recovery of licensed Windows OS
Restoring the operating system on a laptop is possible using an image saved on the hard disk. The recovery image is created by the manufacturer and contains the initial settings of the computer that were made before it was sold. Thus, restoring the system is almost the same as reinstalling it.
To restore, you need to press again the key or key combination displayed on the screen during the system boot process. Usually at the bottom of the screen appears an inscription similar to "Press F2 for Recovery". At the same time, different manufacturers have different key combinations. For example, with Acer it is usually "Alt + F10". After entering the command, the interface is displayed Acer eRecovery Management.
To start the recovery procedure, select the "Full recovery" option. Note that all data stored on the C drive will be erased. The installation wizard works in interactive mode, and at each next step, a window will appear prompting you to select the desired action. Activating the "File Restore" command starts a 10-15 minute preparation for recovery and requires a final reboot of the system.
After restarting the program, you will be prompted to select a keyboard input language, enter a username and agree to the terms of the license agreement. When choosing a method automatic update it is better to choose the option to use the recommended parameters. After entering the time zone, exact time and date information, the display will show the user's desktop and the driver download status window.
The download process is quite lengthy and takes approximately 20-25 minutes to complete. The system will ask for a reboot and further activation of the built-in antivirus. You can either approve the offer or reject it, since the built-in antiviruses are usually inferior in efficiency to the widely available Eset Nod32 SS or Kaspersky IS. You can install them later. The recovery process is now complete.
It is important to note that a recovery image takes up several gigabytes of hard disk space and is often corrupted by viruses. Therefore, it is advisable to use special function Acer eRecovery Management and pre-create and save the image on DVD discs.
 Solving the problem with the missing brush outline in Photoshop
 Technical details of PSD files
 Free download various watercolor textures with stains