How to restore previous settings on Windows 7
Fortunately, Windows 10 still has support for Windows 10 System Restore, and you can use it to help protect everything on your computer, not just user files and settings, if needed. To return your computer to the point where it was stable and with better performance than after the crash, follow the instructions below.
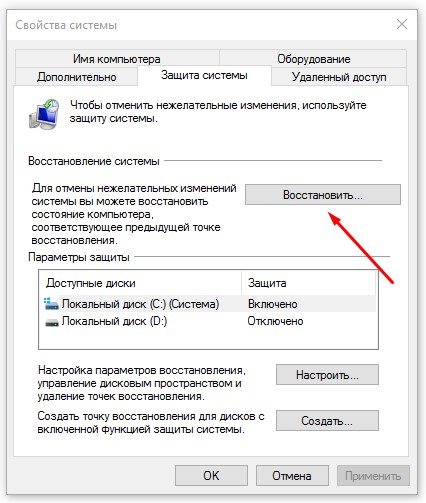
1. Click right click mouse on the Start button and select in context menu the System command. In the window that appears on the screen, go to the System Protection section (on the left pane). Finally, in the System Properties dialog box, click the Restore button. The System Restore dialog box will appear on the screen.
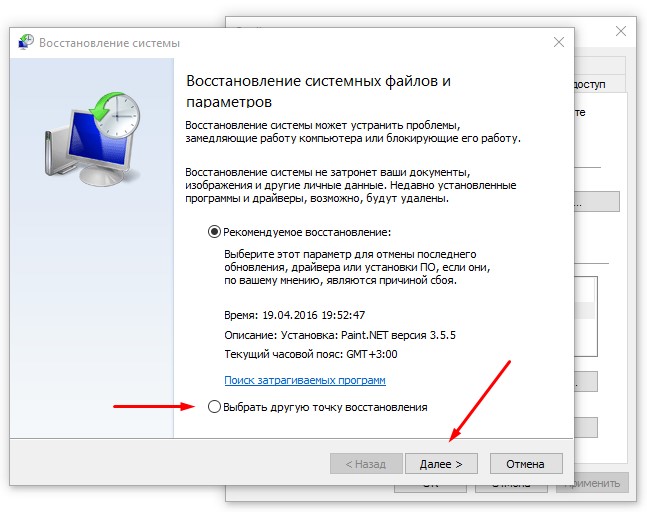
2. Click the Next button in the System Restore window. On the next page of the window, a list of available restore points will be presented.
3. Click on one of the provided restore points. To display more restore points, select the Show other restore points check box at the bottom of the window.
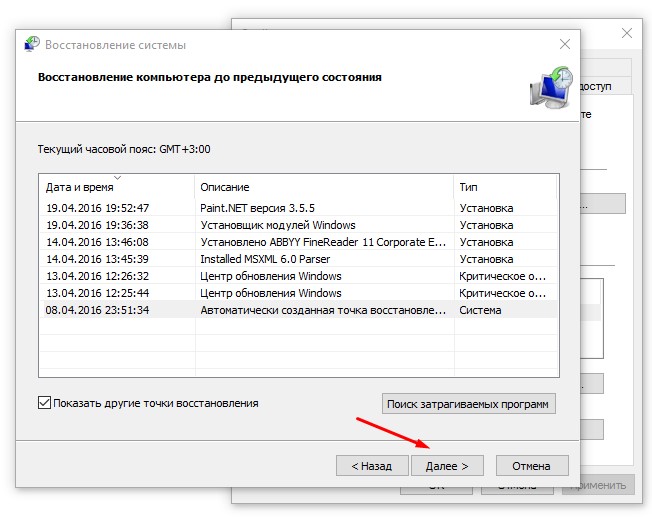
4. Click the Scan for Affected Programs button to see how restoring your system to a specified point will affect installed programs. By carefully reviewing the information in the window, you will identify the programs that you need to reinstall after a system restore.
5. Click Next to confirm the restore point. In the next window, click the Finish button.
After a short thought, the computer will return to the previous state in which it (I would like to believe) kept its normal working capacity. If your computer is already working fine, you can manually create an additional restore point, as described earlier. Give the restore point a name that describes the state of the computer in it as accurately as possible, for example, Before a neighbor arrives. Naming recovery points is a good practice to keep the data stored on your computer safe from any kind of trouble.
Sometimes it happens that the Windows system starts to malfunction and is unstable. In fact, there can be many reasons for this. A sign that not everything is in order anymore is when all sorts of errors are issued or when the launch becomes completely impossible. As a rule, this happens as a result of changing some settings, installing new programs and virus infection. And here the question of reinstallation arises sharply, however, before proceeding with this radical measure, you can still try to restore the system's performance.
Restoring Windows using standard system tools
If the case is not too neglected, then you can try to reanimate the operating system using the standard utility Windows recovery. This utility makes it possible to ensure the working state of the operating system. The action takes place due to the fact that important system files and other no less important parameters are restored from a previously created archive. This is called a recovery checkpoint.
In this case, documents, video and audio files, mail and Internet bookmarks will not be affected and will remain intact. At the same time, the settings of some programs may return to the date the restore point was created, from which the system will be reanimated.
For a more precise understanding, you can consider an example. So, if the current date is January 25, and the restore point was created on the 5th, then the anti-virus database updates downloaded after January 5 may disappear. By the same date, the settings of the operating system and programs, their updates, as well as registry settings will be rolled back.
Typically, Windows automatically creates control points recovery. This happens when the user installs or uninstalls the program, configures new devices and drivers for them, and also changes important settings... In addition, a system restore point can be created manually, at the most convenient time for the user. So, based on the foregoing, a restore point is a display of settings and parameters of the system and programs for a specific date. At the root of the disk there is hidden folder System Volume Information, in which a "snapshot" of the system is stored under a certain number. It is impossible to view the content and change it, because only Windows has access to this folder.
How to create such a restore point and use it to save the system
First, you need to make sure that the ability to create restore points for the system drive is enabled. This is a prerequisite in order to be able to use the standard utility. If you doubt whether this option is active, on the Desktop you need to right-click on the My Computer icon and select "Properties" from the context menu.
Next, you need to go to the "System Restore" tab and make sure that there is no check mark in the utility setting against the "Disable system restore on all disks" item. The Available Disks label provides information on which disks you can create recovery points for. The "Monitoring" state is interpreted as the fact that the system is monitoring the selected disk and, if necessary, will automatically create a restore point for it.
In order to save recovery points, a specific amount of disk space is allocated on the disk. By clicking on the "Options" button, you can get information about how much space is allocated for storing checkpoints. In order to reduce or increase the amount of disk space that is allocated for storage, you need to move the slider to the left or right, respectively. Naturally, the more space you have, the more recovery checkpoints you can store on your computer. But since there is no expediency in getting a half-year-old system after recovery, then storing the last five checkpoints will be more than enough. Depending on what operating system is on the computer, this may require from 1 to 5 gigabytes.
How to create a system restore point manually
Windows XP
In order to manually create a system restore point for Windows XP, you need to go through the following path: "Start" - "Programs" - "Accessories" - "System Tools" - "System Restore". After that, you will need to check the "Create a restore point" item and click "Next". The user will then be prompted to enter a description for the restore point and click Create. As a result of this procedure, you will see a message about the creation of a restore point, its date and description. Then click on the "Close" button.
Windows Vista
In order to provide system recovery for Windows Vista, you need to select "Start" - "Control Panel" - "System". On the left in the menu, click on the item "System protection". After the window opens, make sure that there is a check mark next to the system disk, which means that the selected disk is under the control of the system recovery program, which, if significant Windows settings will automatically create a restore point. To create manually, you need to click on the "Create" button and enter the characteristics of the control point.
So, if the System Restore program is active, then Windows has a chance to regain a working state. In order to restore the system, you need to open the program window and select the "Restore an earlier state of the computer" item, and then click "Next". It is recommended that you select a date when the computer was functioning well. During the period of such stable operation, more than one checkpoint could be created. You must select the desired one and continue the procedure.
After that, Windows will prompt you to confirm your choice and will give you all the information about system recovery from the checkpoint that was selected by the user. In order to start the process - click "Next". After, the computer will automatically restart. In the subsequent booting Windows the system status for the specified date will be obtained. After a successful recovery is completed, Windows will warn you of the result.
In most cases, recovery will return the operating system to its proper state. But there are cases when at the end of this procedure there are even more errors and freezes, then the last restoration must be canceled. It is important to have time to do this before the computer restarts. In order to cancel the restoration, you need to check the box "Undo the last restoration" and click "Next". After that, you will need to confirm the selected solution by pressing the "Next" button again. After that, the computer will restart again and a message about system recovery will be displayed.
Safe mode
There are times when Windows won't even boot. For this option, you can try to restore the system through Safe Mode. To do this, when loading personal computer you need to hold and hold the "F8" button.
When a menu appears with the proposed boot options, select "Safe Mode" or "Safe Mode with Boot network drivers"Press" Enter ". Then Windows will be able to boot into safe mode... Further, it will already be possible to try to restore the system from a checkpoint when the system was functioning stably. This is done in the same way as with a simple boot of the operating system.
There are severe situations when Windows cannot boot either in Normal or Safe mode. In this case, when booting the computer, you must also hold down the "F8" key, but at the same time select "Load the last successful configuration (with working parameters)", press Enter.
Next, you need to select the operating system to start. It should be borne in mind that it will be possible to restore the last good configuration only if the checkpoint creation option is enabled. If you are the owner of a laptop, then you can use the Recovery Disc. As a rule, such a disc is given out when the computer itself is purchased. Further it is necessary in Laptop BIOS put the boot from CD, insert the Recovery Disk into the drive and press the restart button. The next time you start it, it will be loaded from this disk, and you just need to use the system recovery functions available on it.
In cases where the standard system recovery program did not solve the problems, and there is no special recovery disc, it is worth trying to update the system. To do this, you will need installation disk with Windows system. You need to boot the operating system in Safe or Normal mode, insert the disc into the drive and follow the instructions.
But this does not always work, and therefore sometimes it will be possible to solve the problem only by completely reinstalling Windows. In this regard, it is strongly recommended to back up the most important information at regular intervals. Acronis True Image can help you with this.
System recovery using Acronis True Image
Acronis True Image is an excellent program for creating backup copies of data, as well as an image of the system partition. In the difficult case when the system does not want to start, it can be easily and quickly restored using this image. Such a program must be installed on a well-functioning operating system. The most ideal option is to install it immediately after installation and Windows settings, other important programs, devices and drivers. Thus, even in the event of a complete system crash and the inability to boot, it can still be returned to its original state without viruses and freezes. The described program will allow you to create both separate archives and backup copies of audio and video files, photos and documents. In addition, they can be periodically supplemented with the necessary information.
It is best to save an image made with Acronis True Image in a separate section hard disk in the Acronis Safe Zone, which is inaccessible and invisible to users, as well as to windows and other programs, including dangerous and malicious ones.
In order to be able to reanimate the system when the operating system is completely inoperative, you need to make sure that the "Startup Recovery" option is activated in the program settings.
To create Acronis Secure Zone, select the required item in the Acronis True Image window that opens or in the program's Tools menu. In the next window, click "Next".
On the hard disk, you must select a partition that will be used for the Acronis Secure Zone. It should be ticked and clicked "Next". After that, you will be prompted to specify the size of the Acronis Safe Zone.
It is imperative to take into account that the allotted space should be enough for the operating system image, as well as all previously installed programs computer. Based on this, the minimum volume should be at least 3.5 gigabytes. Of course, ideally, about 40 gigabytes should be allocated for the Security Zone. This amount of memory is due to the fact that here you can save not only the system image itself, but also archives with documents, other important files created with Acronis True Image. In this case, when Windows crash nothing will be lost. It should be noted that Acronis Secure Zone is a hidden partition, and therefore Windows Explorer it will not be visible. After the size is determined, click the "Next" button.
Be sure to check the "Activate Startup Recovery" item. With this option, in the case when it is impossible to boot the system, you will still be able to restore Windows. Click Next to continue.
After that, Acronis True Image will offer the user a list with the planned operations. To continue, click "Proceed". Within a few minutes you will be watching the operation of the program. After that, we can assume that the Security Zone for storing the system image has been created, the "Startup Recovery" option is activated, and it remains only to work on creating the system partition. To do this, in the Acronis True Image window, click on the "Create archive" task.
Since you will need to create an image of the system for copying, check “ HDD whole or separate sections on it "and click" Next ". In the proposed list of partitions, select the system partition on which Windows is located, to continue, click "Next". Then you need to select the location for storing the backup image - Acronis Secure Zone, mark it in the list and continue by clicking Next.
For the first Reserve copy section, you need to select "Create a complete archive". In subsequent cases, it will be possible to add changed folders and files to it, creating incremental archives. But at the same time, it must be remembered that errors, failures, and viruses inevitably appear on the computer in the process of work. In this regard, it makes no sense to restore a system containing viruses and errors. But there is still a way out in this situation: it is recommended to create an archive immediately after Windows installations and setting all the necessary parameters. Then, the state of the operating system will be almost perfect.
Working at the computer, you can create other images and periodically replenish them with incremental archives. As a result, the user will always have two types of system partition - a state close to ideal and an actual state. When you have decided on the archiving mode, click "Next" again. Next, select "Use default settings." If necessary, you can enter a comment. This is not a mandatory procedure, but thanks to this, in the future, the user will be able to distinguish one image from another without any problems. After, click "Next".
This completes the preparatory procedures for creating an archive. To start the backup process, you need to click the "Proceed" button.
If a system image is previously created in Acronis Secure Zone, then it will not be difficult to restore an incorrectly working Windows. Let's say the operating system has stopped loading. Then, when you try to boot, the message "Press F11 for Acronis Startup Recovery Manager ..." will be displayed. When you see it, you can press F11 without hesitation. This button will launch Acronis True Image Downloader and start recovery. When prompted for download options, you will need to select “Acronis True Image ( full version) ", And then wait a couple of seconds for the program to load. In the window that appears, select "Recover data". After starting the Data Recovery Wizard, click "Next".
After that, select the archive to restore. You will need an image of the system partition that was previously saved in the Acronis Secure Zone, click "Next". After that, you need to note what exactly you want to restore: and again "Next". After that, select the partition to be restored and "Next". Then select the partition to which the system image will be restored. You will need to replace the C: partition with a non-working Windows system with the C: partition with a working system taken from the Acronis archive. To do this, mark "NTFS (C :)" and click "Next". After that, select the type of partition and select "Active" for the system partition. Then you will need to set the size for the restored partition. At this point, you can do without making changes and click "Next". After, assign a letter to the section. For system, choose "From:". You can also configure Acronis True Image to scan recovered files and archives. If you are currently restoring one section, then when the program asks about restoring others, select the answer "No, I don't want" and finally click "Next". Then it is recommended to carefully check the recovery options and click on "Proceed". Over the next few minutes, you will observe the progress of this operation.
After the process of restoring the system partition is completed, a message will appear stating that the data has been successfully recovered. Then, by clicking the cross in the upper right corner, you need to close the Acronis True Image window. As you could understand, this program is quite simple to work with, while its advantages are quite significant. Indeed, in the presence of archival Windows image there will be no need to reinstall the system.
In order to avoid data loss, it is enough to adhere to a few simple rules:
- Make backup copies of important information at regular intervals, or create images of system partitions.
- Use reliable protection against viruses and hacker attacks. Regularly update antivirus and a correctly configured firewall. It is also highly recommended to do a full scan of your computer for viruses.
- Install updates that can fix critical software bugs.
- Even Windows work stable, you still need to create restore checkpoints.
- To experiment with different programs it is recommended to use virtual computer... It can be created in programs such as Virtual Box or VMware Workstation.
A rollback point, or restore point, is the saved state of the system as of a specific date. Rollback points can be manually created by the user and the system automatically on a weekly basis or before a configuration change, such as installing a driver or program. In this case, only the state of the system files is recorded. User-created documents ( text files, photos, videos, music) are not saved.
How to create a rollback point
This feature must be enabled for restore points to be created. Right-click on the "My Computer" icon, select "Properties" and go to the "System Restore" tab. Uncheck the box next to Disable System Restore.
If your computer is running Windows XP, to manually create a restore point, press the Win key and in the "Programs" group go to the "Accessories" section, then "System Tools" and select the "System Restore" program. Check "Create a restore point" and follow the instructions.
V Windows system 7 press Win, right-click on "Computer" and check "Properties." On the left side of the window, click System Protection, go to the System Protection tab and click Create. Then follow the instructions.
How to restore the system
To restore the system in any Windows versions you need administrator rights. On a computer under Windows control XP, click Win, in the "Programs" section, select "Accessories", then "System Tools" and "System Restore". Check "System Restore", click "Next" and mark the desired date in the calendar that the recovery program will offer you. Choose the date closest to the fatal event after which recovery was required.
In critical cases, when the system does not boot, restart the computer and press F8 after the initial polling of the hardware. In the boot options menu, check "Load last good configuration", then in the proposed calendar, specify the date when the computer worked correctly.
To start System Restore in Windows 7, go to the Control Panel and follow the link "Security System". In the new window, select "Back up and restore", then "Restore system settings or computer." Click "Start System Restore" and follow the instructions of the restore wizard. Alternatively, you can use System Restore under Programs or Last Known Good Configuration as described for Windows XP.
You can cancel System Restore if you are not satisfied with the result. Click Start, under Programs, select Accessories, then System Tools and then System Restore. Click "Cancel System Restore" and follow the instructions of the wizard.
Most often the function recovery working condition computer required if a program was installed and after that the system began to slow down. You should also restore the system to an earlier state in the event that the computer has been affected viral attack... In most cases, the computer is infected or littered programs so much so that the restore operation can only be performed from safe mode. How to boot a computer into safe mode- when you turn on the computer, press F8 and select "safe mode" in the menu that appears.
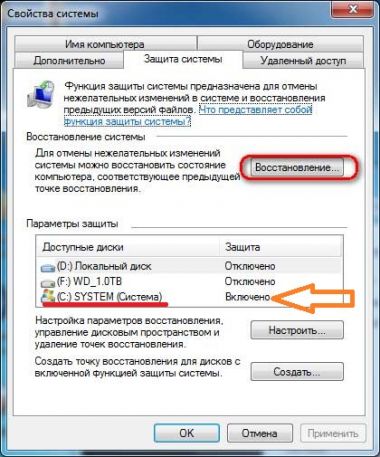
So, I will briefly describe the recovery procedure in operating system Windows 7... Right-click on the "computer" icon (desktop) and go to the last item "properties".In the window that appears, select.
At this stage, we need to make sure that your computer is enabled data recovery on disk C. If the function is enabled, proceed further by clicking on the "Restore" button.
The System Restore window will appear. Here I recommend selecting the "Choose another restore point" option.
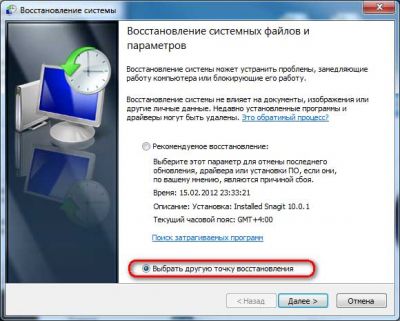
And then you already estimate the approximate date when the computer started to slow down. Here, opposite the dates, it will be indicated which programs were installed, which will also help you a lot when choosing system health... Be sure to check the box “show others restore points”To display all recorded restore points.
Restoring the system to a working state
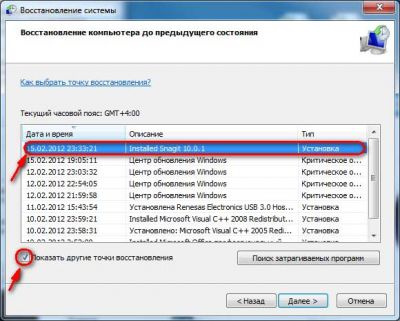
The next window is informative, check the selected date and click on the "Finish" button. Next, we confirm the start of the recovery operation.


We smoke for a few minutes, drink coffee, do not touch anything. After rebooting the system, you will see a success message. system recovery... If the state of the computer still does not suit you, try rolling the system back to an earlier date. Let me remind you that this action does not affect your files, such as photos, videos, etc. Recovery only affects system files, programs, and the Windows registry.
For advanced users, there is a more reliable and interesting option for creating a Windows backup and restoring the system, which requires the ability to work from under the BIOS.
 Entering forced mode
 If the drivers have already been installed on the PC
 Installing and configuring the Canon i-SENSYS MF4410 printer Installing the canon mf 4410 drivers