CANON PIXMA IP3000 cartridges - inkjet printer. CANON PIXMA IP3000 cartridges - inkjet printer Canon ip3000 print head
Advertising covered us with surprise and inevitability, like an avalanche, not giving us the slightest chance to dodge this powerful, all-consuming flow. We see it on our TV screens, hear it on the radio, find it in newspapers and magazines, and billboards have become an indispensable attribute of city roads and freeways. Good or bad is a question that is very difficult to answer, but the fact that it helps us navigate the infinite variety of goods (with some caveat) is beyond doubt.
Choosing the next contender for our test, I decided to follow the path of an ordinary user, who was attracted by the beautiful "wrapper" and brand fame. I don’t even remember where and under what conditions I saw or heard about the Canon iP3000 printer, but this is the first thing that popped up in my memory.
Acquaintance

So, the "patient" is on the table, it's time to start the examination.
The appearance of the printer is very impressive: a modern shape with smooth edges and a silver finish gives the device an extra charm. The case, made of dark gray plastic with a glossy front panel, draws attention to itself. Speaking of color and shape, it is difficult to imagine other shades, the designers spent their time knowingly and gave the device the look of an expensive "toy". And the size leaves mixed feelings - it is somewhat larger than I expected. The printer is massive, at least it looks like that, and the shape of the rectangular "brick" only enhances this feeling.
The case itself has a large number of folding and transforming panels. There is only one button on it, surrounded by a transparent matte teardrop-shaped plastic. The backlight of the button changes depending on the operating mode and can be green or orange. When opening the folding front panel, which in turn serves as the receiving tray, we have access to a connector for direct printing from digital cameras and two buttons:

- reset and continue printing (two-position button - a completely non-obvious function);
- paper feed selection (top/bottom).
Here, above the receiving tray, there is another folding element. It serves as a tray and covers the hole for stacking the module for printing on discs. Under the front panel is a cassette (essentially the same tray) for feeding paper. In the assembled state, the cassette is almost invisible, but with paper it is extended ten centimeters. The design of the tray can not be called comfortable, but you quickly get used to it.

Top paper feed is also possible, for this you need to lift the cover and use the slider to set the paper size. On the back are the power connector, USB, and a built-in duplexer. When opening the module, we get access to jammed sheets, if any.

Printer Specifications |
|
| Print Resolution | Up to 4800x1200 dpi |
| Print method | 4-colour system, FINE print head with micro nozzles, drop volume 2 pl |
| Color matching | ICM, ColorSync, Exif Print |
| Mono print speed | Up to 22 ppm (Max.) |
| Color print speed | Text and graphics - up to 15 ppm. (max.), 11 ppm (standard mode) Full-size printing on A4 sheet - up to 2.3 ppm. (standard mode) |
| Photo print speed | A4 format - up to 0.86 ppm (Max.) Edge-to-edge (borderless) photo 4”x6” (10x15 cm) - approx. 36 s (max.) |
| Media type | Plain Paper, Envelope, Professional Photo Paper, Photo Glossy Paper, Duplex Photo Paper, Semi Matte Photo Paper, Photo Glossy Paper, Photo Matte Paper, High Resolution Printing Paper, OHP Transparencies, Fabric Thermal Transfer Media, Photo Stickers |
| Media Weight | Feeder: 64 - 105 g/m2 and Canon recommended specialty media up to 273 g/m2 |
| Feeding media | Automatic feeder: 150 sheets Cassette: 150 sheets CD-R/DVD Tray: 1 CD-R or DVD |
| Printing on CD-R discs | Standard |
| Media Size | Feeder: A4, B5, A5, Letter, Legal, Envelopes (DL or Commercial 10), 10x15cm, 13x18cm, Credit Card Size (54x86mm) Cassette: A4, B5, A5, Letter, envelopes (DL or Commercial 10 size), 10x15cm, 13x18cm |
| Edge-to-Edge Printing (Borderless) | On professional photo paper, photo glossy paper, duplex photo paper, photo semi-matte paper, photo glossy paper, or matte photo paper in A4, 10x15cm, 13x18cm and credit card sizes |
| Two-sided printing | Available with duplex photo paper or A4, B5, A5, Letter, and 13x18 cm size plain paper |
| Ink cartridge configuration | Single Ink technology - 4 separate ink tanks (BCI-3eBK, BCI-6C, BCI-6M, BCI-6Y) |
| Black ink resource | 330 pages at 5% coverage |
| Color ink tank resource | 460 pages at 5% coverage per ink tank |
| Interface and PC connection | USB |
| Interface and connection to the camera | Direct Print Port: Direct printing from PictBridge compliant digital cameras and camcorders that support the Bubble Jet Direct print function |
| Camera direct printing | Compatibility: Exif 2.21 or earlier, DPOF |
| Operating system requirements | Windows: PC with Windows XP, Windows 2000, Windows Me or Windows 98, USB interface, CD-ROM drive; free hard disk space: 50 MB for Windows XP/2000, 15 MB for Windows Me/98 Mac: Macintosh computer with Mac OS 9.x or Mac OS × v10.2.1 or later, USB interface; free hard disk space: 30 MB for Mac OS 9.x, 100 MB for Mac OS × v10.2.1 or later |
| Driver Features | Windows: Photo Optimizer PRO technology, Image Optimizer function, Photo Noise Reduction technology, Vivid Photo function Mac: Photo Optimizer PRO technology, Photo Noise Reduction technology, Vivid Photo function |
| Software included with the printer | Windows: Easy-WebPrint, Easy-PhotoPrint, PhotoRecord, CD-LabelPrint Mac: Easy-PhotoPrint, CD-LabelPrint |
| Source of power | 220-240V, 50-60Hz |
| Power consumption | Approx. 15W printing, approx. 0.5W standby |
| Temperature | 5–35°C |
| Relative Humidity | 10-90% (non-condensing) |
| Acoustic noise level | Approx. 35 dB(A) (in best quality mode) |
| Dimensions (WxDxH) | 418x286x170mm |
| Weight | 6.5 kg |
Set

I think it's not worth talking about connecting a printer, everything is very simple and trite. The system identifies it as USB Printing Support.

The kit (in our case) includes a disk with drivers, programs (Easy-PhotoPrint, Easy-WebPrint, PhotoRecord, CD Label Print) and instructions, as well as a module for printing on disks. Few? I do not think. Considering that the duplex printing module and the additional paper feed tray are built-in, the bundle is quite decent. Of course, paper instructions and bonus paper for printing would not be superfluous, but the printer came to me without packaging, which leaves hope for a more complete set.
Work
1. Print speed
The speed characteristics given in the table are somewhat overestimated; in our case, the printer spent 1 minute 30 seconds on 22 pages.
2. Control fonts
Printing fonts at maximum quality can be called satisfactory. The letters have a dense filling, the edges are even, but leave much to be desired, the general hairiness is noticeable. Letters of the second size are quite distinguishable.
In average quality, the situation repeats itself, but is aggravated by uneven edges and even greater hairiness. The letters of the second size are also well read.
Draft mode is a little weird. If you look at two documents printed in this mode (the first without duplex printing, the second with duplex), the difference will be obvious. In the first case, the text looks very good. A general lightening is noticeable due to a decrease in density. But the letters of the second size are quite distinguishable. The second option has a noticeable raster, chopped edges and complete unreadability of the text below the sixth size. Most likely, this is a driver flaw, and if my assumption is correct, then not everything is so bad and we can expect this flaw to be fixed soon. But in any case, I would not print important documents (documents for signature) on this printer.
Regular printing

Regular printing

Printing with 2-Sided Printing
3. Test strip
If the first two points seemed to be a clear burden for the subject, then here he showed professional skill and issued a print of very high quality.
Smooth gradient filling, no noticeable screening, good reproduction of color densities and high lineature (on Canon PP-101 paper - 175 lpi) pleased us very much. Printing decorative type in reverse (a stumbling block for many inkjet printers) is clear and correct. Evaluating the test strip, you can put a "solid five" without stretch, but only when printing on photo paper.

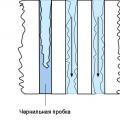
On plain paper, the picture changes noticeably. It seems that the printer mercilessly fills the strip with black ink. His "dislike" for this type of paper is clearly traced, the lineature does not exceed 70lpi.
This is noticeable on the “scans” above, the first illustration is from photographic paper, the other two are from plain paper.


4. Photo printing
Photo printing is an indisputable "horse" of our test subject. A close look at the prints does not reveal halftone dots even in complex color transitions. Sufficiently accurate color reproduction, not suffering from excessive saturation and contrast, good elaboration of small details and good printing in grayscale.


You can also note the good transfer of commemorative and metallic colors. Test prints were made on several types of photo papers: Canon GP-401 (190g/m2), Canon PP-101 (270g/m2), Canon MP-101 (170g/m2) and Lomond Premium Photo Paper (260g/m2) ).
If you want to get rich, vibrant colors with good detail, then it is better to use GP paper, and to get more accurate color reproduction without excessive saturation and contrast, it is better to use PP and MP papers, Lomond shows similar results, these types of papers have greater whiteness.

Printing a borderless A4 photo at maximum quality lasts only three minutes, and 10x15 - a little more than one.
Printing on discs
Recently, printing on discs has ceased to be an outstanding achievement for home printers, but for this price category, the fact is remarkable.
As I mentioned above, the kit comes with a CD Label Print program. It is quite simple and moderately convenient, it allows you to design not only the disc itself, but also its packaging. The program has the necessary settings to change the print area, but these options are limited and do not allow you to print the entire surface of the disc. Here you should pay attention to the program Easy-PhotoPrint, also included in the kit. It is equally suitable for both photo printing and disc printing, and unlike its predecessor, it allows full use of the entire printable area.
It takes 1 minute 32 seconds to print a disc (full printing with High quality), taking into account positioning, and 56 seconds are spent directly on printing, with Standard quality - 1 minute 16 seconds, printing 40 seconds, on Draft - 64 seconds, printing 28 seconds! It is worth noting that if you look at the discs, it is almost impossible to distinguish them, the quality is equally high.


high quality


standard quality


Draft quality
On this, you can complete the test part of the article and summarize.
Price
At the time of this writing, the cost of this model in Moscow retail was in the region of $ 140 - 150.
Conclusion
Specialists from Canon have tried to provide this model with all sorts of bonuses. The built-in duplex printing module and an additional bottom feed cassette, designed mainly for simple and text documents, are, of course, good, but if these modules were removable, the printer would noticeably lose “weight”, which would obviously go to him benefit. Massiveness to the printer, partly, is given by these additions.
The disadvantages of this model include mediocre printing of text documents, otherwise the printer leaves only positive emotions.
It can be positioned as a home device for printing photos and applying images to discs. You can, of course, print abstracts, pages from the Internet, letters, etc., but you should not count on high quality. It wasn't made for that, it just happened.
When printing on plain paper, the printer makes a fair amount of noise, but it's worth checking the "silent mode" options, as everything changes noticeably. The speed, of course, drops a little, but the noise disappears almost completely. I think "silent mode" should be set immediately after installation, and forget about it.
I will not talk about printing photos, there is simply nothing to add to what was written above. Speed, quality, almost complete absence of noise… everything is on top.
If you have a digital camera and you are not going to organize exhibitions, if you want to get high-quality photographs without leaving your home, this is your choice. The ability to print without borders and wide driver settings, plus the programs included in the kit, will help you create and design your home photo album, which will become a real pride.
Canon PIXMA iP3000 is designed primarily for printing photos and printing on discs. With PIXMA iP3000 you can also print web pages, abstracts, letters and other text documents.
Appearance and design features
The design of the printer, made in light gray tones with rounded shapes, makes the Canon PIXMA iP3000 quite attractive.
On the top panel is a cover that easily transforms into a vertical photo media feed tray. For printing on plain paper, the machine has a pull-out feed tray located directly below the front panel.
The only button is surrounded by a drop-shaped transparent matte plastic with a backlight that changes depending on the selected mode of operation. It can be either green or orange.
The flip-down front panel serves as the output tray. In addition, it also provides access to the connector for direct printing from compatible digital cameras and two keys. The top key is used to reset/resume printing. Lower - to select the paper path.
Here, above the output tray, there is another folding element that serves as a tray and closes the hole for installing a module for printing on discs with a special coating. The CD Label Print program that comes with the printer allows you to design both the disc itself and its packaging.
Easy-PhotoPrint lets you create stunning photo albums by making full use of the entire printable area.
The rear panel has a power connector, USB and built-in duplex printing module.
Consumer properties
The Canon PIXMA iP3000 printer delivers speed, quality and convenience. One 10x15 cm photo card is printed in 36 seconds. The print speed of A4 documents is 22 monochrome or 15 color pages per minute.
High detail of prints of photographs and clarity of text is ensured thanks to the technology of photolithographic production of ink nozzles (Canon FINE) implemented in the printer. This technology uses print heads with a large number of nozzles that produce microscopic ink droplets as small as 2 pl. The maximum print resolution is 4800x1200 dpi.
Consumables
The Canon PIXMA iP3000 uses four separate ink tanks when printing. Detailed information about cartridges for Canon PIXMA iP3000 can be found on our website.
Printer does not pick up paper
Quite often it happens that various small objects get into the paper tray (accidentally) and the printer stops taking paper, or takes it, but every other time. Our wizard will help you remove the objects that have fallen into the printer or repair the damage by replacing the paper feed roller of the printer. It is also possible that the roller is dirty if your room is dusty or pets live.
Possible reasons for this problem:
Interference inside the device. Remove foreign objects.
Paper is not loaded correctly. Remove paper from the tray and load it correctly.
There is too much paper in the tray. Remove excess paper from the tray.
The paper is too thick. Use only paper that meets the requirements of this machine
The printer picks up multiple sheets at a time
Such a misfortune mainly occurs when the printer is already old and the mechanism, which has exhausted its resource, begins to slow down the movement of the paper (braking pad or rollers that slow down the paper). It can also occur due to clogging of parts.
![]() The computer does not recognize the printer
The computer does not recognize the printer
First of all, you need to check the cable that connects the printer to the computer, usually it changes to another one. If the problem remains, then we look at the socket of the printer and the computer, if the connector is loose. If not, then check the driver to see if it is installed on the computer. If not, then install, if yes, but still does not work, try to remove the old driver and install a new one. Usually they are on the manufacturer's website (download from there). If all these manipulations did not help, then there is a high probability that the problem is in the printer board (formatter / control board). In this case, you need to take the printer to the service for diagnostics.
![]() Printer is jamming (paper)
Printer is jamming (paper)
Most of the time it is actually paper jams, but there are exceptions such as small objects getting into the printer and catching the paper. Paper can jam for various reasons: uneven paper, the printer did not pick it up correctly, the paper is crooked relative to the gripping element. You, trying to remove the jammed paper, can damage the sensors, and even worse, break them, because. they are very fragile. IMPORTANT: If paper is jammed, it must be removed in the direction of its movement and in no case against the movement. But, if something is still broken, then you should come to us, our master will fix the breakdown at the lowest cost for you.
![]() The printer makes noise, screeching, creaking
The printer makes noise, screeching, creaking
In fact, this problem is not critical except for some factors. Over time, regular and paper dust builds up and some torques start to squeak. For a more accurate definition, printer diagnostics are needed to understand if this creak, hum, or noise harms the printer. Our master will be able to cope with such a problem both in our service and on the road.
Printer prints with dark and dirty streaks
In principle, the printer itself cannot stain paper, but the cartridge (head) does. This may be like improper refilling of the cartridge, i.e. they filled in incompatible or low-quality (cheap) ink, or just wear of the cartridge (head). In this case, we recommend not to print further, but to change the cartridge or head, since it pours out of it both on paper and into the printer, which can end very badly, up to replacing the printer units. If you have such a problem, you need to bring a test sheet, how your printer prints and show it to the master in the service for a complete understanding.
The printer prints with light stripes (does not print)
Most often, the ink is the culprit, that is, they simply run out or do not enter the print head. When the printer streaks, it is necessary to do a head cleaning programmatically at least once and also try to print something. If the result is disappointing, in this case you should not clean the head further, as you will simply merge the ink and you will not achieve the result. But, if the printer started printing normally, but after a while everything repeats, then in this case you should not take any action except for contacting us to fix the problem.
Internal cleaning of the printer
During printing, paper dust, ink particles, and airborne dust particles may accumulate inside the machine. Gradually, this may lead to a decrease in print quality, such as smudges and smearing. Cleaning the inside of the machine will help resolve or reduce the problem. Remove the cartridge and use a dry, lint-free cloth to wipe the cartridge installation area to remove dust particles.
Cleaning the outside of the device.
Use a soft, lint-free cloth to clean the body of the device. You can dampen the cloth slightly with water, while avoiding dripping on or inside the device.
Moving the Printer
When moving the printer, do not tilt or turn it upside down. Otherwise, the toner may contaminate the inside of the printer, causing damage to the printer or poor print quality.
![]() IMPORTANT!
IMPORTANT!
Our company strongly recommends self-repair enthusiasts not to clean the print head of the Canon PIXMA iP3000 printer with improvised means. For this purpose, there are special liquids that do not damage the internal structure of the Canon PIXMA iP3000 print head. If you still decide to clean the head yourself, then remember - 80% that the printer will "die". But the cost of the print head is 70% of the cost of the printer itself. So draw your own conclusions.
![]() Canon PIXMA iP3000 printer head cleaning or new printer?
Canon PIXMA iP3000 printer head cleaning or new printer?
Quite often at the present time it happens that you need to print something, and you remember that somewhere you have a Canon PIXMA iP3000 printer lying around. And you are considering whether to use it or buy a new one. So, the Rapid company offers such a service as restoring an old printer, if it is so dear to you. Our masters repaired printers that lay for 2-3 years, or even more. After competent diagnostics and repair, the Canon PIXMA iP3000 printer gained a second wind. From our experience, we can say that cleaning the head of the Canon PIXMA iP3000 printer is practically a "jewelry job", but we know where the secret lies. In 80% of Canon PIXMA iP3000 printers, the head is cleaned and the printer works like new. We also want to note that payment is made after the fact. That is, if you managed to wash the head, the cost will be the one that was originally announced to you, but if for some reason it is impossible to eliminate the blockage in the print head, then you pay only for diagnostics. A guarantee is also given for the work performed.
Canon PIXMA iP3000 Printer Error Codes.
The indicator blinks yellow/green, with a continuous green glow separating the series of blinks
Flashes 2 (two) times yellow/green with a dividing green glow. Then the cycle repeats. If the driver is installed on the computer, the notification will display error 5100. Error value: Carriage error. In this case, you need to contact us for repair. The cost is set only after the diagnosis.
Flashes 3 (three) times yellow/green with a dividing green glow. Then the cycle repeats. If the driver is installed on the computer, the notification will display error 6000. Error value: LF error (paper feed error). Most likely, the paper is not loaded correctly or the paper feed roller is dusty. Try to wipe it (degrease). If the problem persists, then you need to contact us for repair. The cost is set only after the diagnosis.
Flashes 4 (four) times yellow/green with a dividing green glow. Then the cycle repeats. If the driver is installed on the computer, the notification will display error 5C00. Error value: Purge unit error. After a long period of inactivity in the cleaning system (in the parking lot), the lubricant thickens and dries, respectively, the mechanism works with a load and with violations. Quite often, various holders break or springs fly off, and as a result, an error appears. In this case, you need to contact us for repair. The cost is set only after the diagnosis.
Flashes 6 (six) times yellow/green with a separating green glow. Then the cycle repeats. If the driver is installed on the computer, the notification will display error 5400. Error value: Internal temperature abnormal error (printer overheating). In this case, you need to contact us for repair. The cost is set only after the diagnosis.
Flashes 7 (seven) times yellow/green with a separating green glow. Then the cycle repeats. If the driver is installed on the computer, the notification will display error 5B00. Error value: Waste ink full (absorber overflow - "diaper"). In the process of printing on a Canon inkjet printer, not all ink is used for its intended purpose, i. onto paper to form an image. Quite a lot of ink is pumped by the printer during head cleaning, and when printing borderless photos, the printer fills not only the photo itself, but also 2-3 mm around it. All these unclaimed inks fall into a special sump of the printer, the so-called "diaper" (absorber). The diaper of an inkjet printer is located in its lower part and consists of several strips of porous “felt” material. Canon printers do not have built-in diaper filling level sensors and determine its critical value using a software method, counting the print volume in non-volatile memory. When this value is reached, the printer refuses to work, signaling error 5B00. If you have knowledge in repairing office equipment, you can try to reset it yourself. If not, please contact our service. In the Add. services have information about the cost of the reset service. For a complete understanding, it is possible to call the master.
Flashes 8 (eight) times yellow/green with a separating green glow. Then the cycle repeats. If the driver is installed on the computer, the notification will display error 5200. Error meaning: Abnormal temperature rise (print head overheating). Most often, overheating means that the print head has failed. In this case, the most common is replacement with a new one, since the electrical circuit is out of order and it does not work. Repair of the print head, in this case, is useless. Thinking about replacing with a new head, you run the risk of burning it again, since the reason for the failure of the previous one has not been determined. Diagnosis in this case is dangerous and impractical. In most cases, we refuse diagnostics with an error such as 5200.
Flashes 9 (nine) times yellow/green with a separating green glow. Then the cycle repeats. If the driver is installed on the computer, the notification will display error 6800. Error value: EEPROM error. In most cases, this is a faulty control board. In this case, you need to contact us for repair. The cost is set only after the diagnosis.
Canon PIXMA iP3000 Printer Error Codes.
The indicator blinks yellow, with a continuous green glow separating the series of blinks
Flashes 2 (two) times yellow and 1 (one) time green. Error value: No paper. Action: Insert paper into the selected tray and press Resume/Cancel. Notes: If there is paper in the tray, there may be a problem with the paper feed unit or a foreign object in the tray is preventing the paper from picking up. In this case, you need to contact us for repair. The cost is set only after the diagnosis.
Flashes 3 (three) times yellow and 1 (one) time green. Error value: Jam. Action: Remove the jammed paper, close the printer cover and press Resume/Cancel. Notes: If there is no jammed paper, check the paper registration sensor box and the sensor itself. In this case, you need to contact us for repair. The cost is set only after the diagnosis.
Flashes 4 (four) times yellow and 1 (one) time green. Error value: Out of ink. Action: Replace the empty ink tank. If it does not work, then you need to contact us for repair. The cost is set only after the diagnosis.
Flashes 5 (five) times yellow and 1 (one) time green. Error Meaning: The printhead is not installed. Action: Install correct printhead, close the cover and press "Resume/Cancel". Notes: If the printer has a print head, reinstall it; did not help - clean the contacts of the head (and the response contacts in the carriage); did not help - check the carriage cable for a break; the cable is intact - replace the head with a working one . Repair of the print head in this case is useless. Thinking about replacing with a new head, you run the risk of burning it again, since the reason for the failure of the previous one has not been determined. Diagnosis in this case is dangerous and impractical. In most cases, we refuse diagnostics with such an error.
Flashes 7 (seven) times yellow and 1 (one) time green. Error Meaning: An unsuitable print head for this printer model is installed (communication error between printer and print head EEPROM). Action: Install a working printhead, close the cover, and then click Resume/Cancel. Notes: If the printer has 100 and t printhead - reinstall it; did not help - clean the head contacts (and the return contacts in the carriage); did not help - check the carriage cable for a break; the cable is intact - replace the head with a working one. Repair of the print head in this case is useless. Thinking about replacing with a new head, you run the risk of burning it again, since the reason for the failure of the previous one has not been determined. Diagnosis in this case is dangerous and impractical. In most cases, we refuse diagnostics with such an error.
Flashes 8 (eight) times yellow and 1 (one) time green. Error Meaning: Warning - Waste Ink Absorber Fill Count has reached 95%. Action: Click Resume/Cancel to continue. Notes: When the counter reaches 100% - the printer will be blocked and will not work until the counter is reset. If you have knowledge in repairing office equipment, you can try to reset it yourself. If not, please contact our service. In the Add. services have information about the cost of the reset service. For a complete understanding, it is possible to call the master.
 Instructions for using flushing fluid
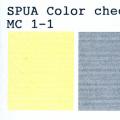 Why do printheads burn out on Epson printers?
 Installing and configuring the Canon i-SENSYS MF3010 printer Download driver for canon 3010 for scanning