MP3Gain is a utility for leveling the volume of audio files. Normalization of volume and the maximum allowable level of the audio signal What does it mean to raise the volume in peaks
So it is with sound files, only they do not hear, but store. Some files store sound at volume level conforming to the norm... Others store sound at a volume level, deviant... However, the volume level of the original sound signal does not change from this. Everything is determined only recording level sound signal. And the recording level, in order to prevent distortion, is set in such a way that the audio signal supplied to the input of the analog-to-digital converter (ADC) is slightly lower than its maximum possible level at maximum loudness values (peaks). Otherwise distortions cannot be avoided and the sound acquires an unnatural distorted character .. In addition, the recording level can be lower also for a variety of technical reasons.
For man norm hearing sensitivity is determined range or two positions corresponding to the lower and upper level sound is the so-called dynamic range or the area of audibility. One position corresponds to the weakest sound volume level (sensitivity threshold) still distinguishable by a person. The other position corresponds to the strongest sound volume level (pain threshold) still perceived by a person.
There is also a norm for sound files, but this loudness recording level norm... It is determined range or two positions corresponding to the lower and upper levels of the sound volume recording and this is also the so-called dynamic range... Since the computer understands and processes sound in digital form, it stores it in files also in digital form. And therefore the range is determined by two numbers corresponding to the upper and lower boundaries. dynamic range... Depending on the stored sound quality the range will have different widths.
Speaking further about sound files, we mean files with the extension .WAV, that is wav files... Since these are exactly the files that are used for recording audio cd.
On audio CDs sound files are stored with the extension .RAW... When recording to a hard disk, they are converted into wav files... When burning to an audio CD, audio files with the extension .WAV converted to files with the extension .RAW.
Quite often, the recording level of the sound volume at audio CDs for different musical compositions turns out to be unequal or lower norms, which creates an unpleasant feeling when moving from one piece of music to another. It also often turns out unequal and the values for the recording level of the sound volume for two stereo channels of one musical composition. To eliminate these shortcomings, it is necessary to perform normalization... Which was invented for this.
If not execute normalization, then the low volume level of the recording of the sound of a musical composition when playing an audio CD will require compensation in the form greater gain from the side of sound reproducing equipment. Which is quite inconvenient and leads to the emergence of completely unnecessary distortions from the side of sound-reproducing equipment. Which could have been avoided by using non-distorting processing sound in the form of normalization.
As a possible tool for normalizing wav files, I would like to recommend you a shareware program. This program allows you to process wav files with the usual 8 and 16-bit digital format and one or two stereo channels. By opening and processing sound wav files, Sound Normalizer 2.2 creates copy original sound file with which she works. Thus allowing in critical situations to avoid irreversible change original file. Also one of the advantages of the program is the ability independent adjusting the level of sound normalization for each channel. Unlike other similar programs, Sound Normalizer 2.2 has simple and intuitive interface.
Normalization is carried out by peak or maximum sound levels. This means that each sound level value will be subject to proportional change and thus will remain natural sounding the entire musical composition.
However, it also happens that the sound for two stereo channels after normalization to the maximum level will be perceived as having different volume levels... This is due to the fact that the perception of loudness has more dynamic and frequency components that can be so different in the two channels that they cause a large skew in the average volume level for each channel. In this case, we can recommend doing it by trial and error. manual adjustment normalization level for each channel.
Sound normalization in Sound Forge Pro 10
Raise the audio signal level without the risk of losing quality, the function allows "Normalize"... The algorithm of its operation is as follows: the program subtracts the level of the highest signal from the level of the maximum possible signal, raising the overall volume level of the file by the resulting difference. To take advantage of function "Normalize" Let's open the dialog box of the same name, located in the menu item "Process". The main parameter is "Normalize to", indicating the maximum possible signal level that will be taken into account when sound normalization in Sound Forge.
It is possible to normalize the signals of multiple files, which is useful when burning a CD. To do this, by pressing the button "Scan levels", we will scan the audio file, the volume of which will be equalized to the rest. Then open the next audio file and in the "Normalize" dialog box check the box next to the radio button "Use current scan level (do not scan selection)"... Click the "OK" button in the dialog box "Normalize to"... The program will produce loudness normalization in the audio file.
Function "Normalize" can also do more complex processing by calculating the average "Perceived loudness"... Sometimes a situation arises when any sound in an audio file, being at the same volume level with the rest, sounds louder. The reason for this is the properties of human hearing. Sound Forge has the ability to measure file data in terms of human perception. To do this, in the "Normalize to" dialog box, you need to activate the switch ... In this case, several more parameters will be available: "Ignore below"- the value of this parameter determines the threshold of the acceptable sound level. All values below the specified threshold will be ignored when scanning "average perceived loudness". In most cases, the value of this parameter is approximately "-45 Db".
Parameter "Attack time" tells the program how quickly the digital signal gateway should open to take into account the acceptable sound levels when scanning data. Therefore, if the audio file contains sounds that often replace each other, for example, drum sticks, you should set this value as low as possible, otherwise frequent sounds will not be taken into account. In most cases, a value of 200 milliseconds will do the job well.
Parameter Release time tells the program how quickly to close the digital gateway. If you want to take into account as much material as possible when scanning data, you should set this parameter higher.
Due to some limited human hearing, very high and very low frequencies are more difficult to hear than medium frequencies. This situation can be corrected by checking the box Use equal loudness contour. This function enhances inaudible spectra in frequencies, so in most cases it is advisable to install it.
After setting all the characteristics, press the button "Scan levels" to start the scanning process "Perceived loudness".
When working with the function "Average RMS level (loudness)", be careful when adjusting the Normalize to parameter, as choosing a very high value may result in sound warping or clipping of data. If you do not exceed the value "-6 Db", distortions are excluded.
For better protection from data clipping, you can select the item "Apply dynamic compression" bookmarked "If clipping occurs".
Click the "OK" button. The program normalizes the audio data volume, taking into account the values of the current parameters.
(0)| Introducing Sound Forge Pro 10 | |||||
|---|---|---|---|---|---|
| 1. | Interface | 3:13 | 4 | 25906 | |
| 2. | Navigating the Sound Forge Pro 10 | 2:00 | 0 | 8937 | |
| 3. | Markers | 1:50 | 0 | 6369 | |
| 4. | Areas | 4:23 | 0 | 5093 | |
| 5. | Search | 4:01 | 0 | 4476 | |
| Sound Forge Pro 10 Editing Basics | |||||
| 6. | Magnify tool | 1:21 | 0 | 7006 | |
| 7. | Highlighting | 1:41 | 0 | 4729 | |
| 8. | Copy and paste functions. Part 1. | 3:20 | 0 | 7352 | |
| 9. | Copy and paste functions. Part 2. | 3:20 | 2 | 44121 | |
| 10. | Undoing Actions | 2:45 | 0 | 2863 | |
| 11. | Pencil tool | 3:16 | 0 | 5686 | |
| Processing functions | |||||
| 12. | Amplitude axis offset | 2:16 | 0 | 5631 | |
| 13. | Change bit depth | 2:17 | 0 | 4908 | |
| 14. | Changing the sampling frequency | 9:33 | 0 | 5605 | |
| 15. | Removing fragments of silence | 4:41 | 0 | 4850 | |
| 16. | Inserting silence | 1:05 | 0 | 3643 | |
| 17. | Change the sound volume. Part 1. | 1:09 | 0 | 8053 | |
| 18. | Change the sound volume. Part 2. | 1:09 | 0 | 9455 | |
| 19. | Sound normalization | 2:37 | 0 | 27550 | |
| 20. | Changing channels | 4:31 | 0 | 4636 | |
| 21. | Pan | 3:26 | 0 | 3538 | |
| 22. | Equalization part 1. | 2:12 | 0 | 5807 | |
| 23. | Equalization part 2. | 2:12 | 0 | 5087 | |
| 24. | Equalization part 3. | 2:12 | 3 | 3056 | |
| 25. | Reverse playback | 3:20 | 0 | 4656 | |
| 26. | Speed change | 1:57 | 0 | 18614 | |
| Effects in Sound Forge Pro 10 | |||||
| 27. | Echo effects | 2:21 | 0 | 5897 | |
| 28. | Multi-Tap Delay | 3:51 | 0 | 3021 | |
| 29. | Chorus | 2:09 | 0 | 3275 | |
| 30. | Flange | 2:25 | 0 | 2491 | |
| 31. | Pitch bend | 2:42 | 0 | 3149 | |
| 32. | Pitch Shift | 3:08 | 0 | 12197 | |
| 33. | Vibrato | 2:47 | 0 | 2171 | |
More recently, I came across a wonderful resource from the independent sound engineer Des McKinney. This is a treasure trove of useful articles on modern recording and mixing! And here is one of them (free translation by):
The normalization process often confuses newcomers to digital audio recording. Quite frankly, “normalization” has different meanings, which is naturally confusing. However, newcomers and professionals can be confused by the myths and misinformation that are plentiful on this topic.
Here are 10 common misconceptions and what really happens.
Peak Normalization
First, some clarification: Since “normalization” can mean several things (see below), the myths below primarily relate to peak normalization.
Peak normalization is an automated process that changes the level of each sample in a digital audio signal by an equal amount so that the loudest sample reaches the specified level. Typically, a process is used to get the signal to a maximum of 0dB, the loudest level allowed in digital audio.
The normalization process is similar to moving a volume knob or fader: the entire signal is altered by the same “fixed” amount, up or down. During normalization, the system finds the loudest peak and builds a general level based on it.
Some of the myths below reflect nothing more than a misunderstanding of this process, as is the case with common misconceptions, but nevertheless, some of the myths stem from more fundamental misunderstandings - in this case in sound, mixing and digital recording.
Myths and misinformation.
Myth # 1: After normalizing multiple tracks, they sound at the same volume.
Normalizing multiple tracks to a common level is only guaranteed if the tracks are identical. However, our perception of loudness depends on many factors, including sound intensity, duration, and frequency. Peak signal level is important, but it is not directly related to the overall volume of a track.
Myth # 2: Normalizing makes a track as loud as possible.
Listen to these two mp3 files, each normalized to -3dB:
When the track level is so low that you can no longer use the Gain and Volume controls to make the track loud enough. This indicates a problem with the recording, ideally you can rewrite the track at the required level ... But when this is not possible, normalization can save the bad take.
When you want to set the peak level of a track without changing its perceived loudness. For example, working with test tone, white noise, and other non-musical content. You can of course set the peak level manually - by listening to the track and noting the peaks ... but the normalization function can do the job for you.
Myth # 9: Normalization ensures that the track is not clipped.
A single track normalized to 0dB will not overload. However, if the track is processed or filtered with an increase in volume (for example, during equalization), distortion will appear. And if the track is part of a mix that includes other tracks normalized to 0dB, there is a guarantee that the sum of all tracks will exceed the loudest peak of any single one. In other words, normalization only protects you from overload in the simplest case.
Myth # 10: Normalization requires an additional dither operation.
This latter myth is slightly esoteric, but it appears occasionally in online discussions of the recording. Usually, in the form of a statement, “it's okay to normalize in 24 bits, but not in 16 bits, because ...”, followed by an explanation that conveys a misunderstanding of digital audio.
I'll just say: dithering is applied when the bit width is changed. (for example, converting from 24 bit to 16 bit). Normalization, on the other hand, works independently of the bit depth, changing only the level of each sample. Since no bit change occurs, no dithering is required.
Other Definitions.
Normalization can mean several other things. In the context of album mastering, engineers often normalize album tracks to the same level. This is related to the perceived loudness and is not related to the peak level of each track.
Some systems (such as SoundForge) offer RMS Normalization, which is based on the calculation of the rms loudness level. This corresponds approximately to the perceived loudness and is also independent of the peak level. However, as with peak normalization, its application also requires a thoughtful approach.
5 / 5 ( 1 voice )
For those who constantly listen to music in an mp3 player, the problem with normalization sound different songs after adding the compiled playlist. Either the sound becomes too loud, or vice versa, so quiet that even an increase in volume does not allow you to enjoy the melody.
For a long time, this problem also prevented me from listening to music comfortably.
And I started looking for a way to solve the problem of loudness normalization. Using a search on the Internet, I was able to find a simple solution in the form of the mp3gain program. It is also worth noting that the program can be used for free.
In addition to ease of use, the program is also good in that it does not make any changes to the audio data. It just changes the value of the ID3 tags. Most programs (such as iTunes) and mp3 players understand this meaning and play the track with the specified parameters. So, the essence of the problem is clear, the tool has been found. Let's get started.
First, download the mp3gain program (you can download it from here http://mp3gain.sourceforge.net/download.php) and install it on your computer. The program supports different languages, including Russian, to change the language, click the Language menu and select Russian.
First you need to select a folder with files for processing, for this we select the button Add folder.

After the files are uploaded, click the button Track analysis

Depending on the size of the tracks being loaded, this procedure may take time.
The program will determine the volume of the files and calculate how much it is necessary to adjust the volume of the sound in the tracks. After the analysis is completed, you can bring the volume to one value simply by specifying it in the field Volume rate

After processing is complete, all tracks will sound at the same volume. If you didn’t like the effect of normalization, and there was a desire to bring everything back to its original value, then it’s not difficult to do this. You just need to select in the menu, the item - Change level and press - Undo level change .


That's all. It is hoped that the method I described in this article will help you too.
solve the problem with volume normalization in different music tracks and enjoy music without having to constantly adjust the volume level in the player.
Here I just showed an example of how to work with the program. This does not mean that you need to do just that. For simplicity of demonstration, the maximum values have been set. This can lead to significant distortion. Therefore, select the values that are acceptable to you.
Especially for better assimilation of the material on working with the program, I made a video - how to make the volume of the tracks the same:
32044
We believe that music lovers have had to deal with a situation more than once when some compositions of one collection sound too loud, while others, on the contrary, are too quiet. This happens when users download music from different sources, and compositions with different sound volumes are often found in mixes, where songs by different artists are collected. Well, this is understandable, but how to act in such cases, not to adjust the volume every time, as soon as the song sounds louder or quieter?
No, of course not, because the volume can be leveled, and it's very simple. To do this, you need a little free utility. This program allows you to process audio files of popular formats in batch mode in accordance with the specified volume parameter.

So, go to the developer's page and download the last complete (!) version ... By default, the program is installed on English language and, if this does not bother you, install it as usual, in order to immediately get the interface in Russian, at the second step of the installation, you must check the box "Russian" on the menu "Language files".

In the menu, press the button "Add files" and load into the utility window audio files whose volume needs to be worked on. Next, click "Analysis track" and wait until the program completes the analysis of files in order to identify their volume. This procedure may take several minutes, it all depends on the total size of the analyzed files. It takes about 10 minutes to process a 1GB assembly.

Then you need to set the desired volume (default is 89 Db) and press the button "Track type"... As a result of processing, the volume of all audio files will be reduced to a single specified value. Changing the volume level takes less time than analysis. It is also worth noting that all files will be overwritten during processing and saving.
And finally, a few words about what the parameters mean in front of each file.
- Level- current volume.
- Clipping- the bird installed opposite Y indicates that there is noise in the background of the track at the current volume (whether you hear them or not depends on the acuity of your hearing).
- Track- shows the difference in decibels between the current and set by the user volume parameter.
- The presence of a mark in the column "Clip (T)" indicates that background noise will remain after processing.
To keep this noise as low as possible, it is not recommended to set the volume too high or too low. The optimal value for the parameter "Loudness rate" is about 85-95 decibel.
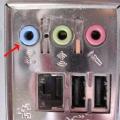 How do I enable line-in?
 Recovering deleted files from a USB flash drive
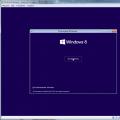 Installing windows 8 64 bit