The sd rum on the laptop does not open. Possible Causes of Drive Failure
Hello everyone. Came across a little problem recently. It all started with the fact that when opening the drive wedged and opened only after several attempts. This went on for a couple of months - there was no time to understand the reason, and, to be honest, I was reluctant. As a result, it all ended with the fact that the DVD drive stopped opening completely and then completely disappeared from the system (although it was detected in BIOS).
At first, I did not connect these two phenomena in any way (well, the drive does not open, but it should be determined) and decided that the recent update of the program was to blame. Daemon tools... To check, I booted under the second system (well, I have two of them - one on, the second on the traditional one), but the disk was not detected in it either. Everything is clear - the point is in the drive itself.
What to do if the DVD drive won't open?
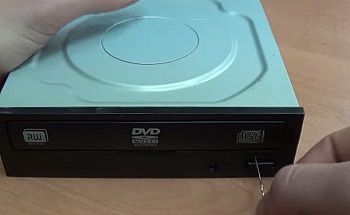
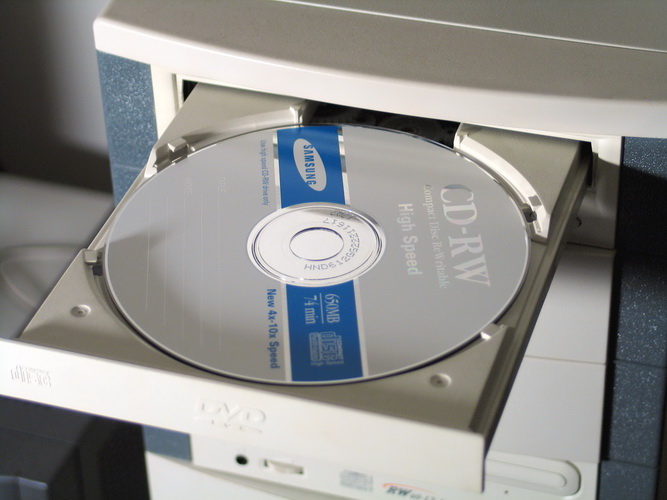
The first thing you can do is to use the mechanism for manually opening the drive. To do this, take a 1mm diameter needle (needle, pin) and insert it into the hole on the front panel of the drive until it stops and press a little, the drive should open slightly, after which you can safely push it out with your hands. In my case, it looks like this:
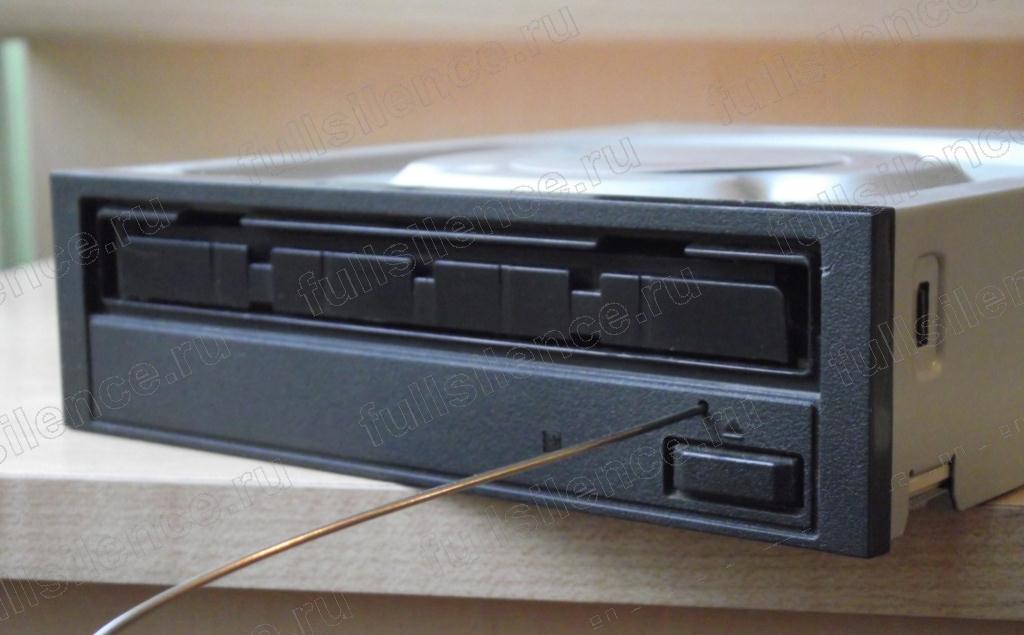
But using this method is rather inconvenient, and in some cases this requires partial disassembly of the case, so let's move on to finding out the reason why the drive does not open.
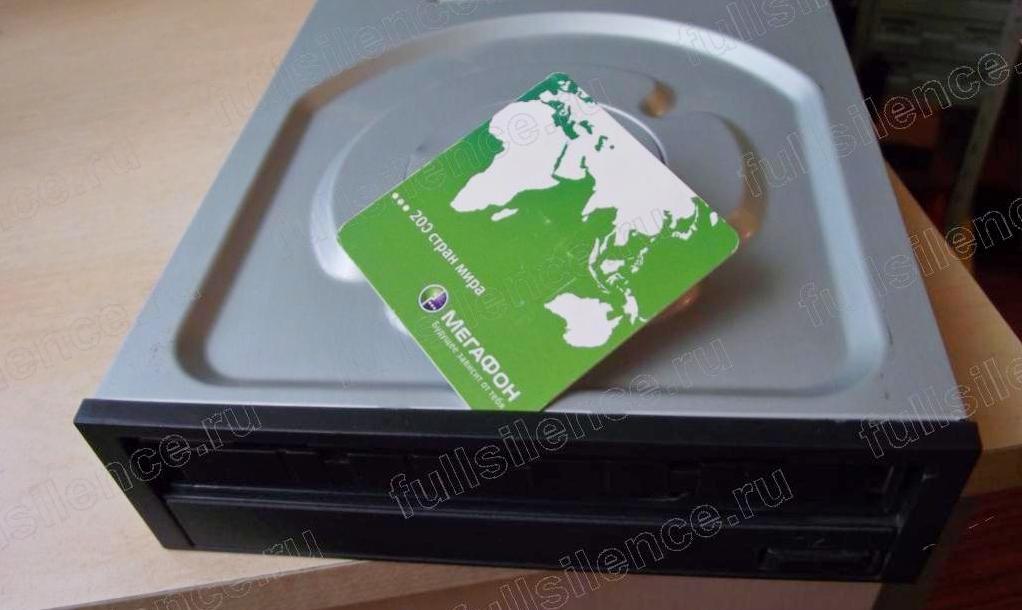
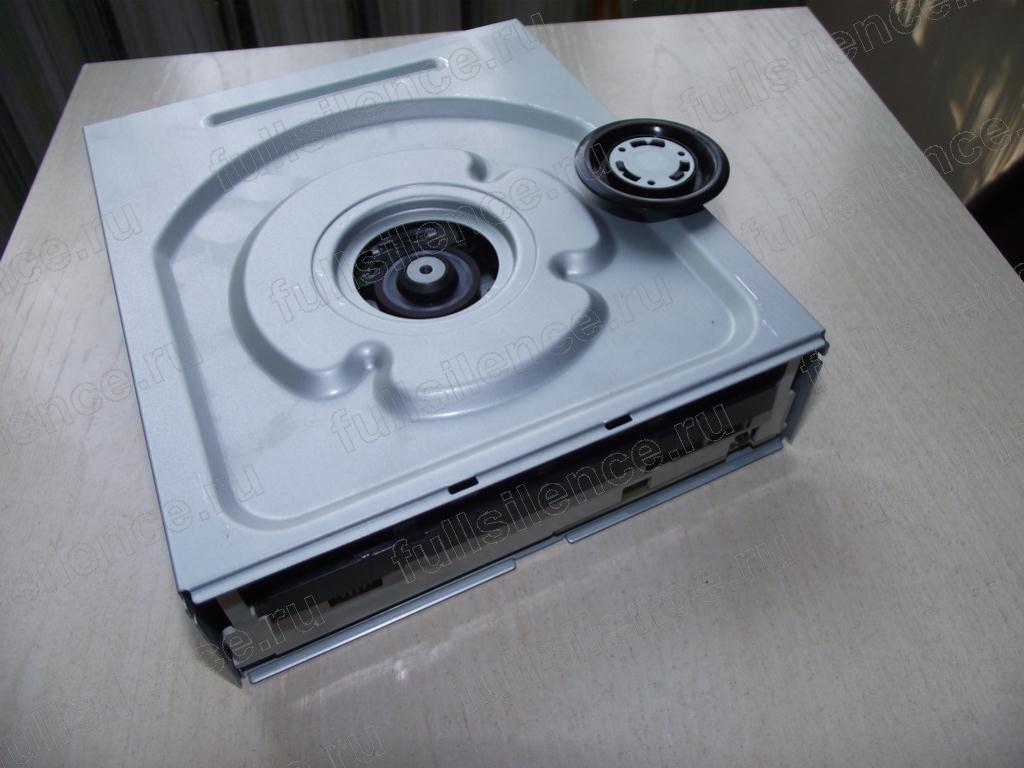
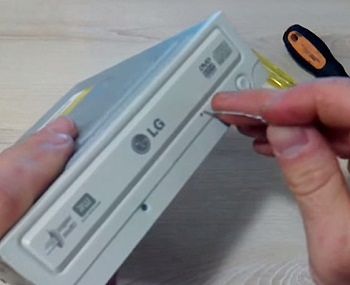
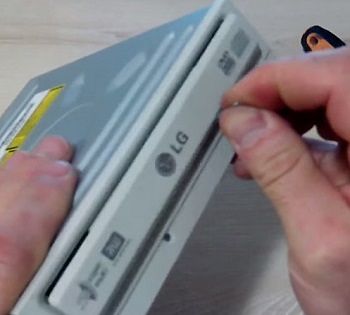
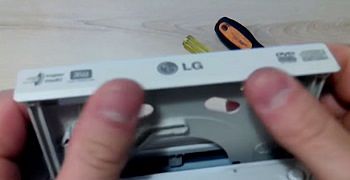
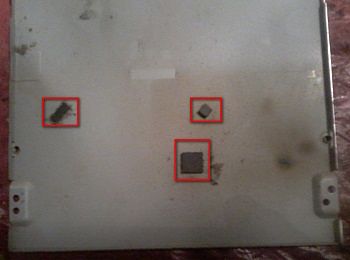
The warranty for the drive has already expired for six months, so you can disassemble it for inspection and cleaning (maybe some gear wedges). Disassembling the case is reduced to unscrewing four screws and removing the front panel. To remove the panel (release the latches), an unnecessary plastic card is useful:
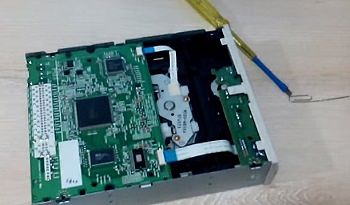
But the inspection did not reveal any jambs - everything was in perfect condition. I decided to see everything in operation and connected the disassembled drive, tried to open and close - everything works. If you have the opposite situation (the drive does not open), then first check the condition of the electric motor and drive belt:
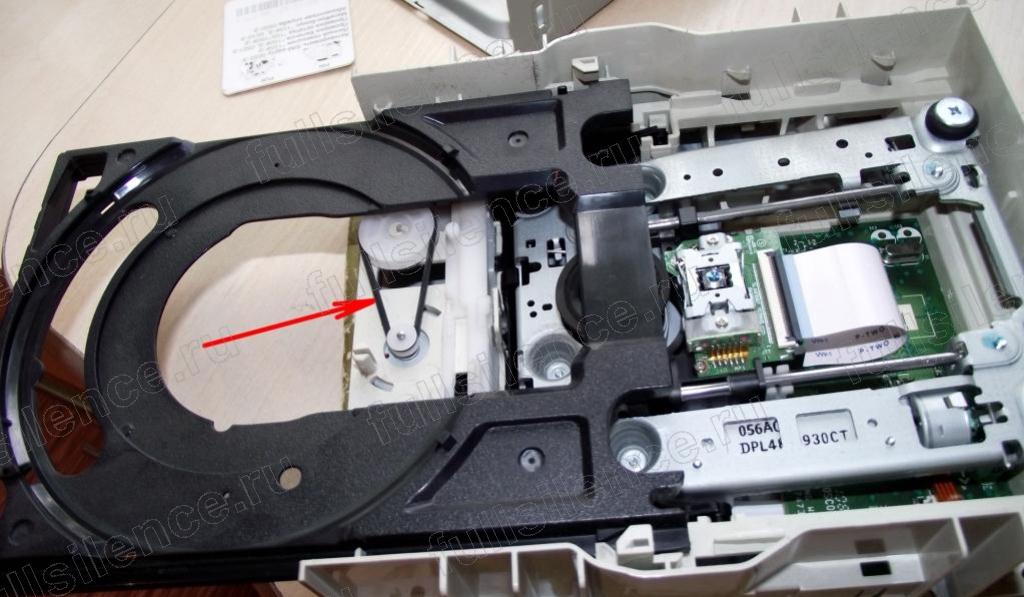
If it stretches and slips, replace it or rub it with rosin (temporary measure). If the electric motor does not work, then you have a direct road to a service or store. Where exactly you decide for yourself - sometimes it is cheaper to buy a new one than to repair an old one. This node turned out to be working for me and I continued searching. I will not bore you with a listing of all the manipulations that I performed, let's move on to the bottom line. The reason turned out to be that the mechanism for opening the DVD drive could not open the halves of the spindle that rotates the disc, between these halves the disc is fixed due to the attraction of the neodymium magnet of the upper part of the spindle to the lower one. The top half can be removed practically without disassembling the drive; to do this, remove the protective metal plate at the top of the drive:
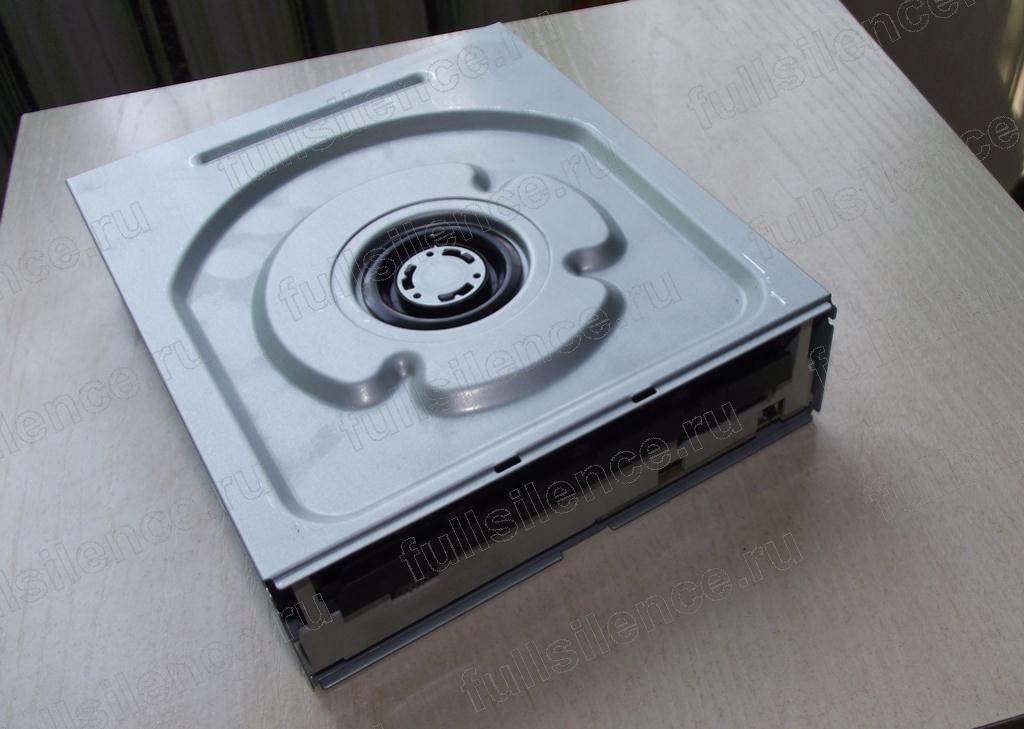
Then pick up the plastic disk and remove it:
If after that the DVD drive opens and closes normally, then the easiest way to fix the problem is to leave the disc in the drive with the working side up (this way the drive will not see it and will not start every time the system starts). This method did not suit me, tk. a growing up son-hacker often uses a DVD-ROM and can easily close it empty, but every time you don't really want to disassemble your computer because of this. Therefore, I went in a similar, but slightly different way, to increase the air gap (decrease the adhesive force of the magnets) between the halves of the spindle, I used ordinary electrical tape:
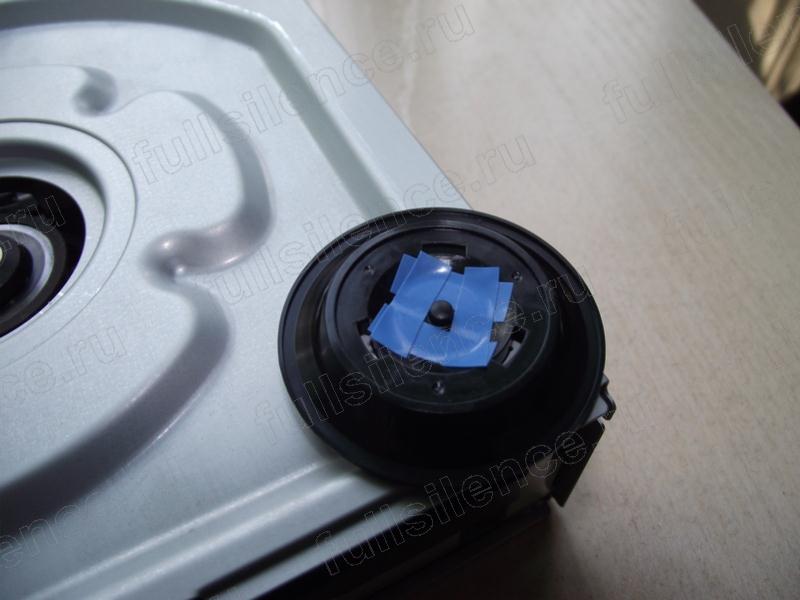
The amount is determined empirically. In my case, two layers were enough.
I hope this note helped you if the floppy drive does not open.
In addition, there is one utility that will allow you to open and close the drive without touching it (you can draw in front of your friends). For me, the drive buttons are not visible at all and it sometimes helps me. These are two files, double-clicking on which will lead the DVD drive to the desired action. You can download them by clicking on the link.
And finally, the video
Tray exit problems most often appear due to hardware malfunctions in the drive. By the phrase "the drive does not open" we mean that in the operating environment the drive is perfectly visible and it does not have any problems with reading / writing discs, but there are problems with leaving its tray. In this case, it must be remembered that the drive tray feed is carried out by a separate mechanism with a motor and a control microcircuit.
Rubber belt problem
Many drives use a small rubber belt in the disc tray feeders. It is its wear that most often causes problems with the exit of the tray. During the operation of the drive, it very quickly loses its elasticity and stretches. This belt is used between the tray drive motor and the tray transport itself.
Failure of this belt immediately affects the operation of the transport system, which does not receive the required rotational motion. The tray may either not move out at all, but may only move forward slightly. To solve this problem, it is enough to replace the rubber belt itself.

Gear problem
In drives, gears can be used to feed rotary motion from the engine to the transport system of the tray, instead of a belt. And although such a mechanism is more durable, it also deteriorates over time. Due to the nature of the mechanism, the teeth of the gears may shear.
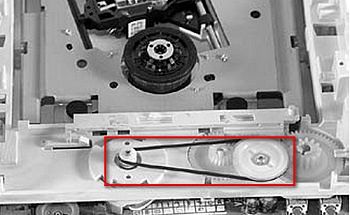
In the same figure, gears are visible, the teeth of which can easily wear out and lead to the problem of tray exit failure.
Damage to the plastic teeth will also cause tray feed problems. The tray can either not run out at all, or start only halfway. Replacement of damaged gears is usually required to solve the problem.
Dust accumulation and some other reasons
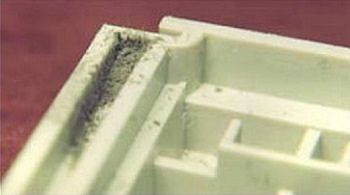
It must be said that the most common reason for the drive failure to extend the tray is the accumulation of dust and various contaminants on the moving parts of the tray transport system. Accumulated dust can cause the tray to completely jam. It can also cause the drive to fail to read data from disks normally.
Therefore, the drives always need proper maintenance. To do this, they are disassembled and cleaned of contamination, they wipe not only the moving parts, but also the optical system.
![]()
The picture above also shows the belt and engine.
Also, the reason for the failure of the drive tray may be problems with the power supplied to the "Eject" button, with the control microcircuit and with the mechanism motor. Sometimes the problem may be in the magnet, which is hidden inside the clamping cap of the drive motor. Over time, its properties can change dramatically and it can become an overwhelming burden for the drive mechanics.
The operating bar and the limit switch often fail, which makes it possible to set the drive traverse in one of two positions: in the position of the servo motor ready to spin up the disk, or in the position ready to feed the disk to the exit.
Safely ejecting a disc
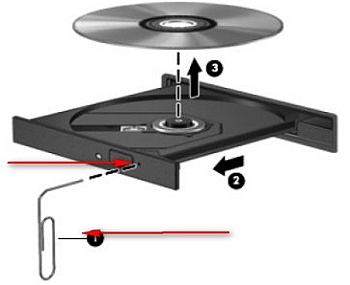
If the tray is jammed, and there is a disc in it, then it will be very easy to remove it with an ordinary paper clip. Each drive, both for desktop and laptop, is equipped with an emergency eject system.
Drive manufacturers leave a small hole on the case of their devices, into which you need to insert a paper clip and press a little on the device that blocks the tray. A number of slotted optical discs can be equipped with an external emergency release button. Such drives are used in laptops.
The arrows schematically show a regular paper clip and the hole into which the paper clip must penetrate.
The figure below shows a slot-loading optical disc and an emergency eject button.
Laptop drive
The laptop drive is a little more complicated. Most often, notebook drives lack a tray feeding system, which has been replaced by a semi-automatic disk locking system. In this case, special springs are used, which are designed to block the disc. Pressing the eject button allows you to unlock the disc, and therefore it simply falls out of the drive along with the tray, and then the tray must be removed manually. If the tray does not slide out, then the problem may be precisely in the work of the locking springs.
In the event that the drive does not open and even a paper clip inserted into the emergency eject hole does not help, then you will have to disassemble the drive itself to remove the disc. In this case, the solution to the problem is often a complete replacement of the drive.
Replacing the rubber belt
Rubber belts can be purchased or found on the O-rings on the fitting connectors.
As an example of dealing with the problem of the tray's failure to be removed from the drive, we will give the replacement of a rubber belt. To do this, we need two screwdrivers (one flat, and the second curly), with which we need to disassemble it; an ordinary paper clip that will allow us to remove the tray from the unpowered drive; and the actual rubber belt itself.
Our first step is to remove the front of the tray.
To do this, remove the tray from the drive using a paper clip and carefully push off the front part of the tray, lifting its central part to release it from the latches. In addition, the front of the drive itself must be removed using a flat screwdriver.
We remove the front part of the tray by slightly lifting its middle part, freeing it from the latches so that they are located approximately in the area of the fingers

We unfasten the front part of the drive itself. To do this, lightly press down the latches highlighted in red squares.
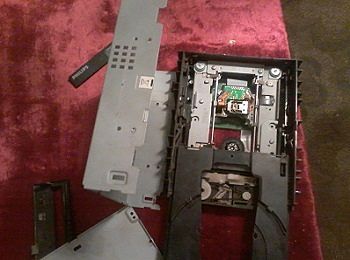
The next step is to remove the drive cover using a curly screwdriver to pick up the Phillips screws. There are four of them on the lid. It is very important not to lose the protective pads that are located between the main chips of the drive and its cover. They often just remain on the surface of the lid.
Rubber gaskets that remain directly on the surface of the lid - do not move them
After removing the cover, we need to remove the drive itself from the protective metal casing. To do this, you just need to turn the drive over to "shake" it out of the protective casing.
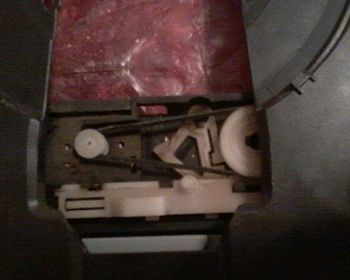
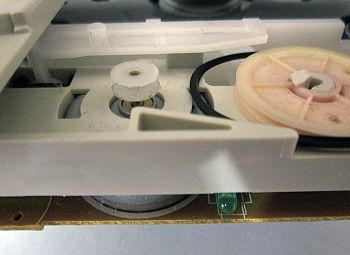
After removing the cover, we get to the tray feed mechanism, where we will see the rubber belt that we want to replace. Having removed the old belt, we will replace it with a new one.
The assembly is carried out in the reverse order, and therefore does not present any particular difficulties. True, before assembly, you can still clean the laser optical system from dust and, at the same time, the transport system of the tray.
Instead of a conclusion
The reasons why the drive does not open can be very different, but most of them are associated with mechanical breakdowns drive. However, it must be remembered that desktop and laptop drives are very different from each other in the tray feeding mechanism. If traditional drives use automatic system, then notebook computers work in semi-automatic mode. If the drive does not open, then a stretched belt or gear with damaged teeth is most often to blame.
Also, a significant accumulation of dust and debris on the moving parts of the tray feeder can lead to this behavior of the drive. Sometimes such a malfunction is caused by a breakdown of the mode bar and the limit switch, and sometimes the properties of the hold-down magnet change so that they do not allow the drive mechanics to "free" the disc from the drive.
Optical discs are losing their popularity every year. But, they are still used, not only on desktops, but also on laptops.
Here you can learn how to open the drive on a laptop, where to look for a button to open, and also how to open the drive without buttons at all.
Opening the drive with a button
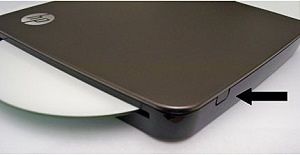
If your laptop has an optical drive, it should also have a button to open that drive. In most cases, the button is located on the drive itself. Press this button and the drive will slide slightly out of the laptop case. After which it will be possible to open it completely manually.
If your drive does not have a button for opening, then this button is probably located somewhere on the laptop case. This solution is found on some compact models. The button on the case works in the same way as the button on the drive. After pressing it, the drive will slide slightly out of the case, after which it can be opened completely by hand.
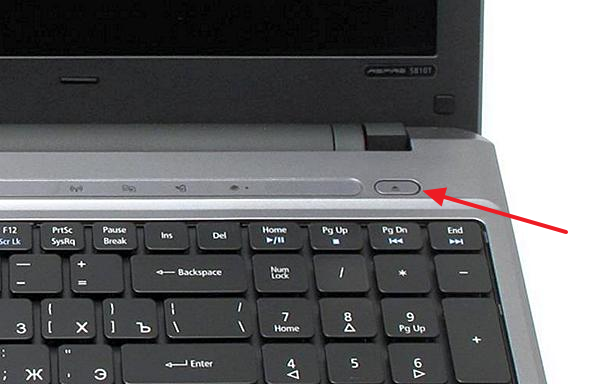
In some cases, in addition to the button itself for opening the drive itself, a special key combination may be provided on the laptop, with which you can also open the drive.
Opening the drive programmatically
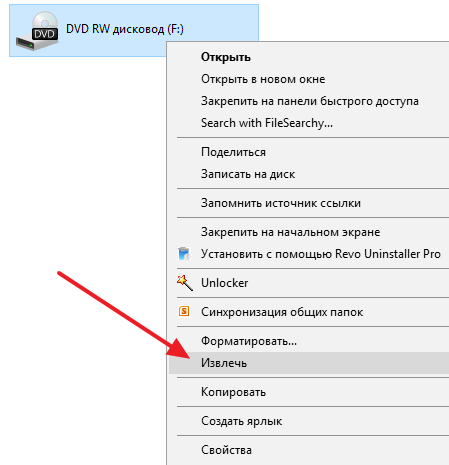
In addition, it is always possible to open the drive programmatically. To do this, open the "my computer" window, click right click mouse over the drive and select the "Eject" item in the menu that opens.
Also, programs for recording discs are able to remove the drive.
Emergency opening of the drive
Sometimes users are faced with the fact that the drive refuses to open, no matter what opening method they use. The drive simply doesn't respond to a button press or an Eject command. If you find yourself in such a situation, then you have several ways to solve the problem:
- Close all programs that could block the opening of the drive. Then try again, perhaps the drive will give in.
- Reboot your computer... Then try to open the floppy drive again, maybe after a reboot everything will work fine.
- Open the drive with a paperclip... As a last resort, you can always open the drive with a paper clip. This can only be done if the drive is not spinning the disc. That is, if you do not write or read, otherwise you can damage the drive. The best option is to turn off the laptop and then open it. To open with a paper clip, you need to find a hole in the drive, insert a paper clip there and press lightly. As a result, the drive cage should slide out of the case, after which it can be opened completely by hand.
How to open the floppy drive on a laptop without a button
Sometimes there are laptops on which there are no buttons at all to open the drive. There are no buttons either on the drive itself or on the case. This situation is especially common with Lenovo laptops, a little less often with ASUS laptops and ACER. When faced with such a laptop, users usually ask how to open the laptop's floppy drive without a button.
In fact, if the buttons are not on the case or on the drive itself, then this means that the laptop is simply not equipped with a drive. And what looks like a floppy drive is a cover that covers the place for installing a floppy drive. To make sure that the laptop does not have a floppy drive, just open the "My Computer" window and see what drives are available there. If there is a drive, then it should be displayed there.
Such laptops can be independently equipped with a floppy drive by purchasing it separately. You can also buy a dongle that will allow you to install an additional 2.5-inch drive in your laptop instead of a disk drive.
Instructions
Make sure the jammed disc is not being used for this moment, i.e. no programs or data on this drive are open. Otherwise, quit all programs on the disk.
Try pressing the Media Eject key on your computer keyboard (the button with the underlined up arrow in the upper right corner, or F12).
If you cannot eject the disc, try pressing the Media Eject key while holding down the Fn button (for laptop computers).
If all of the above doesn't work, try simply dragging and dropping the disk icon to the Trash.
If that doesn't work, restart your computer. For Mac computers, simultaneously press the mouse or trackpad button and use Restart from the Apple menu in the upper left corner of the desktop.
The next attempt to eject the disc will require a restart of the computer by simultaneously pressing four keys at once: Command + Option + O + F. After the Welcome to Open Firmware window opens, release the keys and enter the eject cd command and press Return. It is assumed that after that the disk will become available for ejection, and the system ok message will appear on the computer screen under the command entered. Type mac boot and press Return (for Mac computers.
With absence desired result, locate a small round hole with a diameter of 1.0-1.5 mm on the front of the actuator. Insert a needle into it at a right angle and push. When placed on the lever, the CD-ROM will open and the disc will become available.
The hard drive is one of the most vulnerable elements personal computer... Extreme care must be taken when replacing this device. In addition, it is important to choose the right new hard drive.
You will need
- screwdriwer set.
Instructions
Disconnect the power supply cable from the mobile computer. Turn off your laptop. Turn the device over and remove the battery. Study in advance the type of attachment of this battery.
Unscrew the necessary screws holding the battery. Modern laptops use special latches. Move all available controls to the Open position. Most often, latches are marked with special signs in the form of an open lock.
Remove the battery from the mobile computer chassis. Locate the bay that is designed to store the placement of the drive. Remove the screws and open the cover of this compartment.
Now remove the screws holding the carriage hard disk... Carefully slide the hard drive away from the connectors. Pull out HDD from the case. Examine the device interfaces.
If you see a lot of individual pins, then this hard drive has an IDE interface. SATA hard drives have two flat connectors. Purchase equipment of the correct format.
Remember that for mobile computers you need to use hard drives with a 2.5-inch form factor. After purchasing a new hard drive, secure the device to the carriage using the remaining screws.
Install the hard drive into the bay of the mobile computer. Connect the equipment to the connectors by sliding it in the desired direction. Screw in the control screws to prevent shutdown hard disk while using the laptop.
Close the compartment cover. Secure it with screws. Turn on mobile computer and open the BIOS menu. Make sure the new hard drive is identified and available for use. Proceed with the installation operating system to a new drive. Be sure to format the new hard drive before use.
In the vast majority of operating room applications Windows systems graphic images used in toolbars and menus are stored in the resource section of the module in icon format. Windows icons are sets of image-mask raster pairs, thus allowing you to store several icons of different resolutions with transparency support in one file. There are many free icon collections available today. But sometimes for research and experimentation, you need to pull icon from an existing module.

You will need
- Resource Hacker program.
Instructions
Open the PE module in Resource Hacker. In the main menu, click on the "File" item. Then select the "Open" item. A file open dialog will be displayed. Change it to the directory where the file you want to extract is located icon... Select the file from the list showing the directory contents. Click the "Open" button.
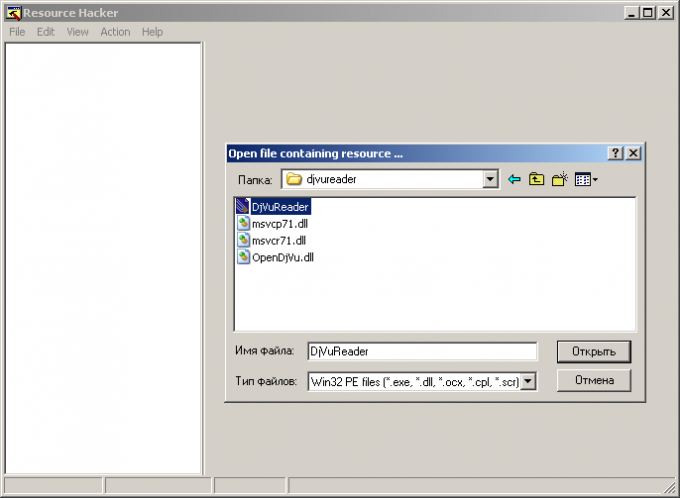
Search for the icon you want to extract. After the PE module is loaded, a panel representing a tree control will appear on the left side of the application window. It will contain information about all the resources of the module in the form of a hierarchical representation with the grouping of resources by type. Expand the "Icon" section. Next, expand the subsections of this section one by one. They will display elements whose names will correspond to the numeric identifiers of the icons. Select items in sequence. View icon images in the far right pane. Do the same for the "Icon Group" section.
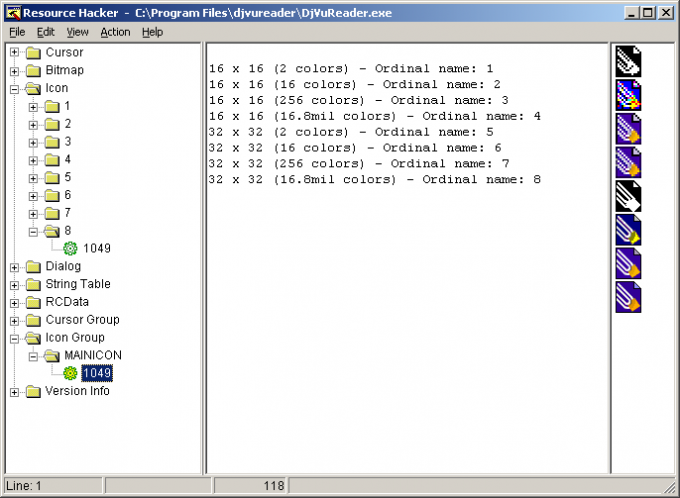
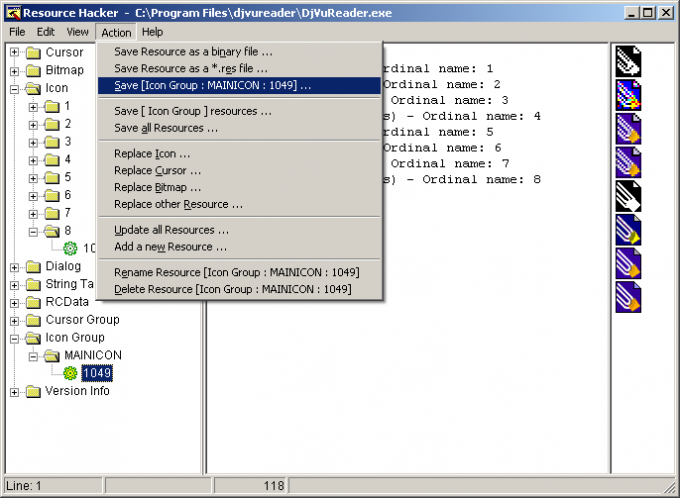
Start saving the found icons. Allocate the required resource. Click on the "Action" menu item. In the displayed submenu, select the item corresponding to the operation of saving the selected icon. The name of the item looks like: "Save [section: subsection: identifier]".
Related Videos
note
It may be illegal to extract, modify, and distribute copyrighted icons. Always check the license for software and the graphic elements used in it.
Use specialized software to view and edit the extracted icons, such as Icon PRO, Microangelo, aWicons PRo.
Various unpleasant incidents happen in life. And it is not always possible to immediately consult a doctor in order to receive qualified medical care. If suddenly a situation happened when you drove a splinter in the form of a needle into a certain part of the body, then you need to act immediately.

You will need
- - tweezers;
- - glue, tar or resin.
Instructions
First of all, keep in mind that unskilled picking in the body in order to pull out such a splinter can provoke further complications and the development of a secondary infection. However, in case of penetration of a needle into the body, action must be taken immediately. True, immediately note all the horror stories that the needle, having got into the pulp of the body, immediately begins to travel through the veins and comes to the heart, which can provoke death. Experts call these stories an ordinary bird, but they do not deny that a needle must be pulled out of soft tissue immediately. However, there were cases of needle migration along the soft tissues of the body.
If the needle or part of it has not entered the body completely and is close enough to the surface of the skin, then you can use different methods with which you can get it. For example, you can use regular tweezers to grab the tip of a needle, stretching the skin. If you get a needle succeeded - the problem was eliminated. Disinfect the area where the splinter just happened, and don't worry.
Another method is to lubricate the place where the tip of the needle sticks out with strong glue, tar or resin. When the layer dries up, along with it, an unpleasant splinter can be removed from the body. If you pull out such a splinter to a child, then try, first of all, to calm him down, so that the baby can relax as much as possible. Then the splinter will come out much easier and faster.
All of the above methods are suitable only when the tip of a whole or broken off needle is visible from the body with the naked eye. If the needle has entered the body completely, then it is immediately necessary to go to an appointment with a specialist. Let the surgeon examine you thoroughly, even if there is a slight doubt about the possibility of the needle getting into the body. Before your doctor carefully examines you, try not to move again: a needle is a serious matter.
The doctor will first take an X-ray, and later, he will carry out a surgical procedure with which the needle will be removed from the body. If necessary, the doctor will provide pain relief, and the operation will be quick and easy enough.
Inserted disk into the drive, they wanted to work with him, but he turned out to be "vicious". The disk drive refuses to release it, and you cannot restart the computer for some reason. Familiar situation? This problem is solvable.
You will need
- Unlocker program, needle or paper clip.
Instructions
If you cannot eject the disc by simply pressing the "open / close" button on the drive, then there is a very small chance that the problem is in this button itself. In order to exclude or confirm this option, use programmatically extraction - open the window "My Computer" double click on it on the desktop. In the window on the icon floppy drive right-click and select the "Extract" command in the appeared context menu.
If no reactions have occurred, it is quite possible that this or that file on the disk is occupied by some system process, maybe even a virus. To check this, use the Unlocker program. If it is not there, then be sure to install it, it will be very useful to you for solving many problems.
After installing the program, the Unlocker item will appear in the context menu of the drive, click on it. The program window will open, in which there will be information about which process is using this or that file on the disk. If the program shows a list of files and paths to processes, then the files are locked and this is probably why the disk is not ejected.
To unlock the files, at the bottom of the program's dialog box, click the Unlock All button and try to eject the disc. If all else fails, then proceed to the next method.
Take a paperclip and straighten it (you can also use the back of a thick needle). There is a small hole on the front of the drive (it serves for emergency opening of the tray), insert the end of a paper clip there and push inward. The tray lock will loosen and you can pull it towards you to remove the disc.
Helpful advice
If none of this helps, or a similar problem recurs regularly, then remove your drive and take it to a repair service.
Sources:
- how to pull out a cd
People who work a lot at the computer sooner or later face breakdowns. keyboards... Some keys may start to stick, poorly move in their cell. Patterns may be erased on some keys. Don't rush to throw out your keyboard! She can be given a second life.
You will need
- Operation manual, a sheet of paper, a set of screwdrivers.
Instructions
Read the instruction manual of your keyboards... If you cannot find the printed manual, please visit the manufacturer's website for your keyboards... On it you can find the instruction manual for your keyboards v in electronic format... In it you can find a diagram of the structure of your keyboards... With it, you can figure out how best to disassemble your keyboard and find all the invisible mounts and bolts.
Turn the keyboard over with the keys down. Unscrew all bolts. You also need to unscrew the bolts that may be on the front. After that, carefully open all latches and gently pull towards you back panel... She needs to be filmed. After that, you need to remove two layers. Find a small socket with diodes. It is usually secured with one small bolt. Unscrew it and dismantle it.
Now you need to proceed directly to extracting the keys themselves. If all the keys are in separate slots, then you need to gently press your finger on the back of the key. The latches will be compressed and the key will be released from the mount. This procedure must be done very smoothly and carefully so as not to damage the latches by accidental movement. If the key sheet is solid, then you need to find the latches or bolts with which it is attached to the body keyboards... Unscrew the bolts or open the latches and carefully remove the canvas from the grooves. Assembly keyboards must be done upside-down.
Surely you have already faced such an unpleasant situation when a different letter was assigned to one or another partition of one hard disk or dvd drive. It turns out that the letter priority in the name of the sections can be changed using standard Windows tools.
Instructions
Why is this happening and how are drive letters separated? If you installed the operating system on a clean, not broken into partitions hard disk, the newly created partitions acquire the already remaining letters. As a rule, drive "C" is the system drive, and the letter "D" is assigned to the drive (drive). Also, such a case with unequal assignment of letters to disks can occur when installing other storage media, for example, flash drives or card readers (some can reserve up to 4 disks).
To change the drive letters initially assigned by the system, you need to open the "Computer Management" applet (for Windows XP). Click the "Start" menu, in the list that opens, select "Control Panel". Then go to the "Administrative Tools" section and select "Computer Management".
You will see the "Computer Management" applet. Select "Disk Management" and right-click on the dvd drive (floppy drive). In the context menu of the drive, select the item "Change letter drive or path to drive ".
In the window that opens, click the "Change" button, then click the drop-down list "Assign letter disk (A-Z) "and select any free letter... If the desired letter is occupied by one of partitions hard disk, select for the first time any letter, so that later the desired one can be obtained when changing the letters of the hard disk partitions.
After changing the letters of the hard disk partitions, go back to the settings of your drive - now you can change the old one letter floppy drive to the desired one.
In the Windows 7 operating system, this operation is performed in a similar way. For quick launch Disk Management applet, click the Start menu, type diskmgmt.msc in the search bar. In the search results, click on the found file. If you cannot perform this action, you can do this: click the "Start" menu, select "Control Panel", in the window that opens, go to the Administrative Tools section and start "Computer Management".
All steps for changing drive letters or drive letters are similar to the case described for the example of the Windows XP operating system.
Sources:
- how to change drive letter
Imagine a situation that you inserted a disc into your drive, and it is not only unreadable, but also slows down the entire computer. In the usual ways it cannot be removed from the drive. We'll have to use other methods.
![]()
Instructions
Check the actuator button to remove disk from computer... The probability of a button malfunction is very small, but still there. In this case, only the button does not work in the drive, the rest of its systems should be in perfect order. To verify this or discard this version, double-click on the "My Computer" icon on your desktop.
Right click on the drive icon. In the context menu that appears, select the "Extract" item. If the tray slips out, you can remove disk and start dealing with the faulty button. If the miracle doesn't happen, keep looking for options.
Install the Unlocker program on your computer. You will need it in order to check if any of the files are busy on disk e system process or virus program. Perhaps this is why the drive does not open. After the program is installed, go to "My Computer".
Call again context menu drive icons. Now it has an item called Unlocker. Click on it with the left mouse button. The program will start. Its window will display information about which file with disk and which application or process is busy. If the path is specified, then this file blocked.
To get hold of disk from the drive, click on the "Unlock All" button. The list will be cleared. If even after that it is not possible to get disk, try another option.
Take a thin needle or paperclip (bend and straighten the paperclip). Locate the small round hole on the front of the drive. It should be under the tray, next to the button. Insert the needle in there and apply slight pressure. Without releasing, pull the tray towards you.
Pull carefully so as not to break a loosened latch. If this method did not bring the desired result, then you need to contact service center for help from specialists or simply purchase a new drive for your personal computer.
Related Videos
One of the main characteristics of an optical drive is speed reading disks. The higher it is, the faster will be the recording of information from the media to the hard disk of the computer. But there is a small drawback: the higher speed drive, the noisier it runs. But if this drawback is insignificant for you and it is much more important for you that the recording is carried out faster, then you can increase speed floppy drive.
You will need
- - CDSpeed v2.0 program;
- - Speedlock beta-2 program.
Instructions
Minimum and maximum speed limits floppy drive depend on the specific model. You cannot set a higher speed than the one listed on the data sheet for your optical drive.
To increase the speed of the drive, you need to use special software. One of the simplest and convenient programs called CDSpeed v2.0. Download this utility from the Internet - it is free. Unpack the archive with the program, there will be only one file. The utility does not require installation - just double-click on this file.
A small window will open. There is an arrow at the top of the window. If you click on this arrow, a list of connected drives will appear. In this list, select the drive speed which you want to increase. Of course, you only need to do this if you have multiple drives installed on your computer.
The maximum is written in the lower left corner of the window. speed optical drive, for example, Max 48. Nearby there are two arrows, one of which points up, the other - down. The current speed drive. Click on the arrow pointing upwards with the left mouse button. Speed floppy drive will be increased by 1. Thus, you can increase it as much as you need. Then click Exit. The program window will close.
Another small utility for adjusting the speed is called Speedlock beta-2. It's also free. To start it, you just need to unzip and click on executable file by double-clicking the left mouse button. A window will open. In this window, find the line Preferred. There is an arrow next to the line. Click on this arrow and increase speed drive, then click Apply. After that speed the optical drive will be enlarged.
When repairing or upgrading a computer, the user may need to remove floppy drive from system unit... This procedure is quite simple and can be done independently.
Instructions
Be sure to unplug your computer by unplugging the power cord before starting work. Then remove both side panels of the system unit, usually this requires unscrewing the retaining screws located at the back of the case. On some computers, you will need to remove the bezel to remove the side panels.
Disconnect from floppy drive loops, remembering their location. Power connector on IDE floppy drive x may be quite tight, gently wiggle it from side to side to remove it. After disconnecting the cables, unscrew on both sides floppy drive screws holding it in place. Now carefully remove the device from the system unit.
Installation floppy drive is performed in reverse order. If you are changing the IDE floppy drive, and you have another device on the same cable with it, check the position of the jumper. On the device that is at the end of the loop, the jumper must be set to the master position. Set the jumper to the slave position on the one connected to the middle connector. If you put a drive and a hard disk on one ribbon cable, the latter must be connected to the end of the ribbon.
When installing devices with a SATA interface, you do not need to set jumpers, since it is impossible to connect more than one device to a SATA cable. When connecting the loops, do not use force: if the connector does not fit into the connector, it means that you have inaccurately aligned them or are trying to insert them the other way around.
Most loops have special keys that prevent the connector from being plugged in incorrectly. If there is no key, the first core should be found on the IDE cables; it is highlighted in red or blue. Then look at the pin numbering on the connector of the connected device. The first core of the loop must be connected to the first contact.
Hello my dear readers. Today I want to talk with you about a specific problem. There are cases when the drive does not open on the computer, that is, you cannot remove the disc from the CD / DVD drive. This can happen for various reasons. For example, you have a power outage at your home, and some important disk is left in the drive, which is immediately required to be returned.
The drive may also stop working due to a sudden power surge. It happens that the button for ejecting the disc from the drive is simply jammed, and it is not pressed.
On my old drive, I had cases when the tray moved out quite a bit, buzzed for a while and moved back. I just helped him move out with my hands, pulling him out with two fingers.
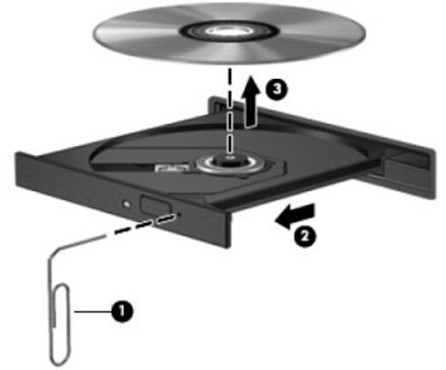
All these problems are, in fact, very simple to solve. To eject the disc in emergency mode, you need some solid wire. If you don’t find the wire, do not despair, use a needle, pin or paper clip - they will surely be at your fingertips.
There is a small hole on the front panel of any drive, you can clearly see it in the figure below. It is also intended for emergency ejection of disks from the drive.
So, we figured out why the drive does not open, now let me show you what to do when the drive does not open.
How to open the floppy drive
Carefully insert the needle into the hole until we feel that we have rested against the lever. You must hold the needle straight to get on the lever inside the drive.
After about 1.5-2 cm, this very lever will be felt. You need to gently press down on it with a needle. As you press down on the lever, the drive will slowly slide out. Continue pressing until you can grasp the tray with your fingers.
Now, by hand, we pull the tray out to the end, calmly remove the disc from it and carefully push it back, or you can press the button to close the tray. The most important thing with this emergency retrieval drive out of the drive - be careful not to damage the drive mechanism inside.
I hope you will not need an article on how to remove a disc from a CD / DVD drive in emergency mode, but just in case, I told you about it.
If you: recently repaired your computer, dropped your computer or hit it, then the ribbon cable from the floppy drive may be disconnected. You can read more about this in the article: "" (information is almost at the very end of the article).
See you soon!
P.S. : By the way, here's a good example of how to get a disc out of the drive:
 Architecture of a distributed control system based on a reconfigurable multi-pipeline computing environment L-Net "transparent" distributed file systems
 Email sending page Fill relay_recipients file with addresses from Active Directory
 Missing language bar in Windows - what to do?