Let's remember forever: what is the difference between margin and padding. Padding, Margin and Border - we set inner and outer paddings in CSS, as well as frames for all sides (top, bottom, left, right) CSS syntax padding
This property can have one to four values.
In the image, the light gray color indicates the area for which the padding property is responsible:
- When you specify four values(5px 10px 15px 20px ) - the order of padding will be as follows: Top(5px ) - Right(10px ) - bottom(15px ) - Left(20px ). To remember the order of indentation in one declaration, you can use the English word TR ou BL e(where T-top, R-right, B- bottom, L- left).
- When you specify three meanings(5px 10px 15px ) - the order of padding will be as follows: Top(5px ) - Right&Left(10px ) - bottom(15px ).
- When you specify two values(5px 10px ) - the first value (5px ) will set the size of the padding from the top and bottom of the element's content, the second (10px ) value will set the padding to the left and right of the element's content.
- When you specify one value(5px ) - the padding on all sides will be the same size - 5px .
Browser Support
| Property | Opera | IExplorer | edge |
|||
|---|---|---|---|---|---|---|
| padding | 1.0 | 1.0 | 3.5 | 1.0 | 4.0 | 12.0 |
CSS syntax:
padding: "length | initial | inherit" ;JavaScript syntax:
object.style.padding = "5px"
Property values
CSS version
CSS1Inherited
No.Animated
Yes.Usage example
Source: margin or padding?
Philip Sporrer.
Translation: vl49.
When is it better to use margins for formatting purposes, and when to use padding, and does it matter?
I struggled for a very long time in search of suitable answers. And only after writing a lot of terrible, illegible CSS code, accompanied by various side effects, I could confidently say that I had found the fundamental ironclad rules regarding the issues listed above.
For clarity, let's turn to a typical situation that is likely to be familiar to every user interface developer in 2017. We have the simplest card template.
In this example, two types of intervals can be distinguished:
It is very important to understand here that we are dealing with two different concepts, which should not be interconnected when linking. That is, if I need to change the distance between the cards and their container, for example, up to 24 pixels, then this should not in any way affect the spacing between the cards themselves.
Implementing an example with CSS?
There are literally thousands of ways to create such a template using margins and padding, but I would like to present to you one of them that demonstrates the correct use of the margin and padding properties. Moreover, this method allows you to add other cards later.
Container(
padding: 16px
}
.card + .card(
margin: 0 0 0 8px;
}
Just 2 selectors and 2 rules.
What is the function of the plus sign?
Symbol + represents adjacent selector. It only points to the element immediately following the element specified before this selector.
As you can see from the image above, in our case, this selector will select every card preceded by every other card. So with the adjacent selector, we can set the left margin for every card except the first one.
This means that we have the ability to add any number of cards we need, the distance between which will always be eight pixels.
Everything works fine until we need to place something other than a card next to the cards. Well, let's say a button "Add card" ("Add card"):
Based on the CSS snippet we already have, we probably wouldn't give the new element that represents the button a .card class, since it's not a card. How to be? Is it worth it to create an additional class name .add-card , which contains the same rule with a margin property as the .card class? No, there is a better solution.
Lobotomized owl *+* .
And what does it look like. Despite the funny association, this method works great, and I've been using it all the time since I found out about it. So, what is all this for? Here's a look at the relevant CSS code:
Container(
padding: 16px
}
/* Well, did you recognize the lobotomized owl? */
.container > * + * (
margin: 0 0 0 8px;
}
As you probably remember, the previous selector applied to any card that was preceded by another card. Now with its help we can format every element immediately preceded by any other element, including the button, of course.
Eventually.
I sincerely hope that the material presented here has helped you figure out when to use padding to separate the content contained within the container, and when to use margins.
As a conclusion, I would like to present for your consideration a pen project that demonstrates the examples above, as well as two rules that have been verified by my own experience. So, we use:
padding- for spaces between the container and its content.
margin- for gaps between elements inside the container.
Post Views: 427
This guide will help you better understand CSS properties like border, padding, and margin. These properties are very helpful for developers to position elements on the page according to the layout.
Let's create a div and give it the margin, padding and border properties.
Padding Property
The padding CSS property defines the distance between an element's border and its content. You can define it like this:
- padding-top: 10px;
- padding-right: 10px;
- padding-bottom: 10px
- padding-left: 10px
This entry can be shortened:
- padding:25px 50px 75px 100px;
- top 25px
- right 50px
- bottom 75px
- left 100px
- padding:25px 50px 75px;
- top 25px
- right and left 50px
- bottom 75px
- padding:25px 50px;
- top and bottom 25px
- right and left 50px
- padding:25px;
- all 25px
Note: The padding value is added to the element's width and depends on the element's background.
In other words, we have a div element with a class of div-1:
Div.div-1( width:150px; padding: 25px;)
The browser will add left and right padding to the width of the element. As a result, we will get an element with a width of 200px.
Border property
The CSS border property allows you to define the style and color of an element's border.
border-width
The border-width property is used to determine the width of the border. The width is specified in pixels or using one of the predefined values: thin (thin), medium (medium) or thick (thick).
border color
The border-color property is used to define the color of the border. The color can be set in the following ways:
- name - the name of the color, for example, "red"
- RGB - defines an RGB value, for example "rgb(255,0,0)"
- Hex - defines a hex value, for example, "#ff0000"
border style
- dotted: Defines a precise border
- dashed: Defines a dotted border
- solid: Defines a thick border
- double: Defines two borders. The distance between them depends on the value of border-width
- groove: Defines a three-dimensional indented border
- ridge: Defines a 3D raised border
- inset: Defines the border so that the block wobbles indented
- outset: Defines the border so that the block wobbles convex
You can write the border properties of an element in a shorthand way:
Div.div-2( border:1px solid #ccc; )
Margin Property
The CSS margin property defines the spacing around an element. Margin frees up some space around the element (outside of the border). Margin has no background color and always remains transparent.
You can define margin values for an element like this:
- margin-top:100px;
- margin-bottom:100px;
- margin-right:50px;
- margin-left:50px;
This entry can be shortened:
- margin:25px 50px 75px 100px;
- top margin 25px
- right margin 50px
- bottom margin 75px
- left margin 100px
- margin:25px 50px 75px;
- top margin 25px
- right and left margin 50px
- bottom margin 75px
- margin:25px 50px;
- top and bottom margin 25px
- right and left margin 50px
- margin:25px;
- all four margin 25px
By using the default margin values you can center the box horizontally.
In the previous chapter, we mentioned CSS properties such as margin (field) and padding (indent). Now we will dwell on them in more detail and consider how they differ from each other and what features they have.
You can create gaps between elements in both ways, but if padding is the indent from the content to the edge of the block, then margin is the distance from one block to another, the inter-block space. The screenshot shows a good example:
Padding separates the content from the block border, and margin creates gaps between blocks
As you can see, CSS margins and padding are different, although sometimes without looking at the code it is impossible to determine which property is used to set the distance. This happens when there is no frame or background for the content block.
To set margin or padding in CSS from each side of an element, there are the following properties:
Indents:
- padding top: meaning;
- padding-right: meaning;
- padding-bottom: meaning;
- padding-left: meaning;
Fields:
- margin-top: meaning;
- margin-right: meaning;
- margin-bottom: meaning;
- margin-left: meaning;
Values can be specified in any CSS unit - px, em, %, etc. Example: margin-top: 15px .
There is also a very handy thing like CSS shorthand for margin and padding. If you need to set margins or padding for all four sides of an element, it is not necessary to write a property for each side separately. Everything is made simpler: for margin and padding, you can specify 1, 2, 3 or 4 values at once. How the settings are distributed depends on the number of values:
- 4 values: padding is set for all sides of the element in the following order: top, right, bottom, left: padding: 2px 4px 5px 10px;
- 3 values: padding is set first for the top side, then both for the left and right, and then for the bottom: padding: 3px 6px 9px;
- 2 values: padding is set first simultaneously from the top and bottom sides, and then - simultaneously for the left and right sides: padding: 6px 12px;
- 1 value: set the same padding for all sides of the element: padding: 3px;
The same rules apply to the CSS margin property. Note that you can also use negative values for margin (for example, -3px), which can sometimes be quite useful.
collapsing margin
Imagine the situation: two block elements are on top of each other and they are given margins. The top block is set to margin: 60px and the bottom block is set to margin: 30px . It would be logical to assume that the two bordering margins of two elements would simply touch, and as a result, the gap between the blocks would be 90 pixels.
However, things are different. In fact, in such a situation, an effect is manifested, which is called collapse, when the largest in size is selected from two adjacent element fields. In our example, the resulting gap between elements will be 60 pixels.
 The distance between blocks is equal to the larger of the values
 Collapsed margins only work for the top and bottom margins of elements, and do not apply to margins on the right and left sides. The final value of the gap is calculated in different situations in different ways:
- When both margin values are positive, the final margin size will be the larger value.
- If one of the values is negative, then the sum of the values must be obtained to calculate the field size. For example, with values of 20px and -18px, the field size will be:
20 + (-18) = 20 - 18 = 2 pixels. - If both values are negative, the modulus of these numbers is compared and the number with the greater modulo is selected (hence the smaller of the negative numbers). Example: you want to compare the values of fields -6px and -8px . The modules of the compared numbers are 6 and 8, respectively. It follows that 6 -8 . The final field size is -8 pixels.
- In the case when the values are specified in different CSS units, they are reduced to one, after which they are compared and the larger value is selected.
- The size of the margin for child elements is even more interesting: if the child has a larger margin than the parent, then priority is given to it. In this case, the sizes of the top and bottom margins of the parent will become the same as set for the child. In this case, there will be no distance between the parent and the child.
 How to disable paid subscriptions on Megafon
 How to make hashtags on Instagram: step by step instructions and recommendations
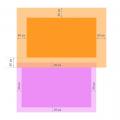 Padding, Margin and Border - we set the inner and outer margins in CSS, as well as the borders for all sides (top, bottom, left, right) CSS syntax padding